
Steam Capsule CAP1700D 011 - Steam cleaner HOOVER - Free user manual and instructions
Find the device manual for free Steam Capsule CAP1700D 011 HOOVER in PDF.
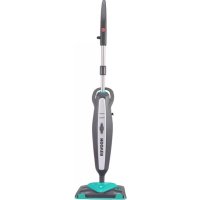


| Product type | Steam cleaner |
| Brand | Hoover |
| Model | Steam Capsule CAP1700D 011 |
| Power supply | Mains, power cord (13 A plug for UK/Ireland) |
| Grounding | Yes, mandatory |
| Main function | Steam cleaning for hard floors |
| Steam trigger | Yes, manual control |
| Steam variator | Minimum, Medium, Maximum (on certain models) |
| Steam booster | Yes, additional 10-second press (on certain models) |
| Indicator light | Red (power on), Green (steam ready) |
| Water tank | Removable, fill with cold tap water, capacity approx. 20 minutes of use |
| Hard water filter | Yes, replacement recommended every 6 months depending on water hardness |
| Included accessories | Triangular brush, textile wipes (x2), carpet and rug support |
| Wipes | Machine washable at max 40°C, no bleach or fabric softener |
| Usage | On hard floors (marble, ceramic, stone, linoleum, sealed wood, parquet) |
| Usage restrictions | Do not use on people, animals, plants, or electrical components |
| Safety | Do not immerse, do not use with chemicals, always unplug before maintenance |
| Spare parts | Microfiber pads (AC36 35601693), filter cassette (U75 35601691) |
| Warranty | 12 months, conditions according to retailer |
Frequently Asked Questions - Steam Capsule CAP1700D 011 HOOVER
User questions about Steam Capsule CAP1700D 011 HOOVER
0 question about this device. Answer the ones you know or ask your own.
Ask a new question about this device
Download the instructions for your Steam cleaner in PDF format for free! Find your manual Steam Capsule CAP1700D 011 - HOOVER and take your electronic device back in hand. On this page are published all the documents necessary for the use of your device. Steam Capsule CAP1700D 011 by HOOVER.
USER MANUAL Steam Capsule CAP1700D 011 HOOVER
INSTRUCTIONS FOR SAFE USE
This appliance should only be used for domestic cleaning, as described in this user guide. Please ensure that this guide is fully understood before operating the appliance.
Do not leave the appliance plugged in. Always switch off and remove the plug from the socket after use, or before cleaning the appliance or any maintenance task.
This appliance can be used by persons with reduced physical, sensory or mental capabilities or lack of experience and knowledge if they have been given supervision or instruction concerning use of the appliance in a safe way and understand the hazards involved. Children shall not play with the appliance.
Keep the appliance out of reach of children when it is energized or cooling down.
The appliance is not to be used if it has been dropped, if there are visible signs of damage or if it is leaking.
If the power cord is damaged stop using the appliance immediately. To avoid a safety hazard, an authorised Hoover service engineer must replace the power cord.
This appliance must be earthed.
The appliance shall not be left unattended while it is connected to the supply mains.
Do not use your appliance out of doors.
Use only attachments, consumables or spares recommended or supplied by Hoover.
Do not use the appliance to clean or direct steam towards animals, people or plants.
Liquid or steam must not be directed towards equipment containing electrical components, such as the interior of ovens.
The filling aperture must not be opened during use.
Unplug the cleaner and switch off before filling the water container. Do not over-fill the container. Replace the filling cap.

Danger of Scalding.
Surfaces are liable to get very hot during use. Avoid contact with steam.
Do not stand on or wrap the cord around arms or legs when using your appliance.
Do not position the appliance above you when cleaning the stairs.
When using the cleaning tools ensure to always steady the appliance with your other hand. This will ensure that the appliance does not fall while in use.
Do not handle the plug or appliance with wet hands.
Do not run over the power cord when using your appliance or remove the plug by pulling on the power cord.
Do not continue to use your appliance if it appears faulty.
Hoover service: To ensure the continued safe and efficient operation of this appliance we recommend that any servicing or repairs are only carried out by an authorised Hoover service engineer.
Do not immerse the appliance in water or other liquids.
Do not use detergents or liquids other than water inside the appliance.
For UK and Ireland only: This appliance has a 13 amp mains plug. If you need to change the fuse in the mains plug, use a 13amp ASTA (BS1362) fuse.
The Environment
The symbol on this appliance indicates that this appliance may not be treated as household waste. Instead it must be handed over to the applicable collection point for the recycling of electrical and electronic equipment. Disposal must be carried out in accordance with local environmental regulations for waste disposal. For more detailed information about treatment, recovery and recycling of this appliance, please contact your local city office, your household and waste disposal service or the shop where you purchased the appliance.

CE This appliance complies with the European Directives 2014/35/EU, 2014/30/EU and 2011/65/EU.
CANDY HOOVER GROUP Srl Via Privata Eden Fumagalli, 20861 Brugherio (MB) Italy
GETTING TO KNOW YOUR CLEANER
A. Steam Release Trigger B. Handle Assembly B1a. Steam Boost Button B1b. Variable Steam Release Control Slider Maximum, Medium & Low C. Upper & Lower Cord Storage Hooks D. Power Cord E. Metal Tube F. Cleaner Main Body G. Handle Release Button H. Cleaner Carry Handle I. Clean Water Tank Release Latch J. Clean Water Tank K. Hard Water Filter L. Power On/Off Button M. Power On Indicator Light (Metallic Red) N. Steam Ready Light (Green) O. Handle Storage Location P. Floor Head P1a. Triangular Brush P1b. Triangular Brush Release Pedal Q. Textile Pads R. Carpet Glider S. Glider Release Pedal
ASSEMBLING YOUR CLEANER
Remove all components from the packaging.
- Insert the Handle Assembly pole into the Cleaner Main Body until it locks into position. [1]
- Assemble the main body of the cleaner to the Triangular Brush. [2]
- Assemble the main body of the cleaner to the Floor Head and assemble the Triangular Brush into the Floor Head.* [3]
USING YOUR CLEANER
- Release the clean water tank by sliding the water release button upwards and remove tank from cleaner main body. [5]
- Twist the cap anti-clockwise and remove. [6]
- Fill the clean water tank with cold tap water. Replace cap. [7] Do not add any chemicals, detergents or perfumes to the clean water tank.
Certain Models Only *Nozzle design may vary according to models
- Re-fit the clean water tank to the cleaner ensuring the hard water filter is in place.
- Attach a textile pad to the base of the Floor Head. [8] IMPORTANT: Always unplug the cleaner when adding water or changing a textile pad. NOTE: Wash the textile pad prior to use to remove any lint.
STEAM CLEANING HARD FLOORS
NOTE: Always sweep or vacuum the floor prior to use to remove any loose dirt or debris.
IMPORTANT: Do not use the cleaner without a textile pad attached to the floor head.
NOTE: Do not use the carpet glider when cleaning hard floors. 1. Plug the steam cleaner into the main power. The red ON light will illuminate. 2. After a few seconds the green Steam Ready light will illuminate indicating the cleaner is ready for use. 3. Recline the cleaner by placing a foot on the floor head and lowering the main body towards the floor. [9] 4. To produce steam press the Steam Trigger Button. [10] 5. Move the cleaner slowly backwards and forwards paying particular attention to high traffic areas. [12] 6. For certain models to produce steam, just select your cleaning setting on the Slider control located on the handle. Minimum, Medium or Maximum depending on your specific cleaning requirement and recline the cleaner. 7. On certain models the cleaner is equipped with a steam boost button located on the Handle. This allows the user to apply extra cleaning power for 10 seconds to help remove stubborn marks. [11]
Steam cleaning hard floor - intensive clean
Use the triangular floor brush for hard floors that require deep cleaning. Please note that there is no mop and the area will have to be dried separately. NOTE: Always sweep or vacuum the floor prior to use to remove any loose dirt or debris. 1. Remove the triangular floor brush from the floor head by pressing the release pedal at the rear of the floor head. [13] 2. Plug the steam cleaner into the main power. The red ON light will illuminate. After a few seconds the green Steam Ready light will illuminate indicating the cleaner is ready for use. 3. Recline the cleaner by placing a foot on the floor brush and lowering the main body towards the floor. [14] 4. To produce steam press the trigger release button. [10] 5. For certain models to produce steam, just select your cleaning setting on the Slider control located on the handle. Minimum, Medium or Maximum depending on your specific cleaning requirement and recline the cleaner. [11] 6. On certain models the cleaner is equipped with a steam boost button located on the Handle. This allows the user to apply extra cleaning power for 10 seconds to help remove stubborn marks. [11]*
CLEANER MAINTENANCE
IMPORTANT: ALWAYS ENSURE THE CLEANER HAS FULLY COOLED DOWN BEFORE PERFORMING ANY MAINTENANCE TASKS.
Emptying the water tank
- Unplug the cleaner from the main power and ensure the unit has cooled.
- Remove the clean water tank from the main body of the cleaner. [5]
- Twist the cap anti-clockwise and remove. [6]
- Empty any excess water from the tank. [17] Replace the cap and return to the cleaner.
Removing and cleaning the textile pad
- Unplug the cleaner from the main power and ensure the unit has cooled.
- If necessary, remove the carpet glider, then peel the textile pad from the floor base. [19]
- Wash the textile pad in a washing machine with a mild detergent at a maximum temperature of 40°C.
IMPORTANT: Do not use bleach or fabric softener when washing the textile pad.
Replacing the hard water filter
The cleaner is fitted with a hard water filter. If you live in an area of hard water, the filter will discolor over time. Depending on the water hardness and frequency of use, the filter should be changed every 6 months.
- Unplug the cleaner from the main power and ensure the unit has cooled.
- Remove the clean water tank from the main body of the cleaner. [16]
- Lift the hard water filter out of the cleaner. [18] Replace with a new filter.
- Reassemble the clean water tank to your cleaner.
Note: The condition of the filter will affect the cleaner's performance.
Handle storage
- Unplug the cleaner from the main power and ensure the unit has cooled. [20]
- Remove the handle. [21]
- Engage the handle storage locking hook into the storage slot on the side of the cleaner main body and locate the end of the handle into the location hole on the floor head. [22]
TROUBLESHOOTING
Should you have a problem with the product, complete this simple user checklist before calling your local Hoover service.
The steam stick will not switch on. - Check the unit is plugged in. - Check the power cord.
The steam stick is not producing steam.
- There may be no water in the clean water tank. The tank may not be fitted correctly. The textile pad won't pick up dirt.
- The cleaning pad may already be saturated with dirt and needs to be washed.
Refer to the Maintenance section.
CLEANING FAQs
When Is Capsule ready? In approximately 30 seconds.
Can I use Capsule on all floor surfaces? On all hard floors like marble ceramic, stone, linoleum and sealed hardwood & Parquet floors. Care should be taken when using Triangular brush on certain floor coverings.
Does Capsule emit steam automatically? Yes on certain models, you can recline the cleaner and the steam will emit automatically. On other models you should press the steam/sweep trigger button.
Can I use it vertically? No, Capsule can be used only on horizontal floor surfaces.
Can I put detergents or other chemicals inside the tank? No, you would damage the product.
What if in the city where I live the water is very hard? Filtered water can used or you must replace your filter on a more regular basis.
When is it time to change the filter cassette? How do you notice it? It depends on the water hardness. Normally 6 months. You will notice that the colour of resin inside the filter cassette becoming more darker.
How long will one tank of water last before needing to be refilled? Approximately 20 minutes if you continuously press the trigger.
Is the mop washable? Yes, it can be washed by hand or in the washing machine with a mild detergent at max temperature 40°C. Do not use bleach or fabric softener.
How often should I replace the mop? It depends on different factors, above all how hard the floor is. The best way to understand when to change the mop is when the mop is still dirty after having washed it or if you notice that it doesn't perform like before.
IMPORTANT INFORMATION
Hoover spares and Consumables
Always replace parts with genuine Hoover spares. These are available from your local Hoover dealer or direct from Hoover. When ordering parts always quote your model number.
Consumables
Microfiber Pads (x2): AC36 35601693
Filter Cassette: U75 35601691
Hoover Customer Helpline Service
Should any faults occur with your cleaner during the first 12 months, contact the Hoover Customer Helpline on the number below.
Quality
Hoover's factories have been independently assessed for quality. Our products are made using a quality system which meets the requirements of ISO 9001.
Your Guarantee
The guarantee conditions for this appliance are as defined by our representative in the country in which it is sold. Details regarding these conditions can be obtained from the dealer from whom the appliance was purchased. The bill of sale or receipt must be produced when making any claim under the terms of this guarantee. Subject to change without notice.
SAFETY INSTRUCTIONS FOR USE
This appliance must be earthed.
MAINTENANCE OF THE VACUUM CLEANER
IMPORTANT: ALWAYS ENSURE THAT NO FORM OF MAINTENANCE IS PERFORMED UNTIL THE CLEANER HAS COMPLETELY COOLED DOWN.
Empty the water tank
USING THE STEAM CLEANER
BEFORE YOU START CLEANING
Do not spray liquid or steam onto equipment containing electrical components, for example the interior of an oven.
Do not open the filling opening during use.
If the water container overflows, unplug the vacuum cleaner from the outlet. Do not overfill the container. Replace the filling cap.

Danger detected.

During use, surfaces become very hot. Do not touch them with steam.
Do not step on the cord or wrap it around your arm or leg during use of the appliance.
Do not place the appliance on yourself during stair cleaning.
When using the appliance for cleaning, always hold the appliance with both hands. This helps prevent the appliance from falling during operation.
Do not plug in/unplug the plug and do not operate the appliance with wet hands.
Do not carry the appliance by the power cord and do not pull the cord to remove the plug from the socket.
In case of malfunction, do not continue to use the appliance.
Hoover Service: To ensure continued safe and efficient operation, we recommend that the appliance be serviced by an authorized Hoover Service Centre.
Do not immerse the appliance in water or other liquids.
Do not use cleaning agents and do not pour other liquids, except water, into the appliance.
Only for UK and Ireland: This appliance is fitted with a 13 A plug. If it is necessary to replace the fuse in the plug, use a 13 A fuse of type ASTA (BS1362).
Environment:
The symbol on the product indicates that it must not be disposed of with household waste. It must be handed over to an appropriate collection point for recycling of electrical and electronic equipment. Disposal must be carried out in accordance with local environmental regulations for waste disposal. For detailed information about the disposal and recycling of this product, please contact your local council, your waste disposal service, or the shop where you purchased the product.

For more information, contact your local waste disposal service or the shop where you purchased this appliance.

MAINTENANCE
BEFORE YOU START CLEANING
- Remove the reservoir for used water by pulling the water release valve upwards, then lift the reservoir from the main body of the vacuum cleaner. [5]
- Turn the cap counterclockwise until the click, then remove it. [6]
- Fill the reservoir with clean lukewarm water. Replace the cap and turn it clockwise until it clicks. [7] Do not add any cleaning agents.
TECHNICAL SERVICE FOR THE VACUUM CLEANER
WARNING! BEFORE SERVICING THE VACUUM CLEANER, MAKE SURE THAT THE APPLIANCE IS DISCONNECTED FROM THE POWER SUPPLY.
Empty the dirt container
- Disconnect the vacuum cleaner from the power supply and make sure that the unit has cooled down.
- Remove the dirt container from the vacuum cleaner body for cleaning.[5]
- Turn the lid counterclockwise and remove it.[6]
- Remove any dirt from the container.[17] Place the lid back on.
Remove and clean the textile filter.
- Disconnect the vacuum cleaner from the power supply and make sure that the unit has cooled down.
- If necessary, remove the brush or the carpet nozzle, then remove the textile nozzle from the brush.[9]
- Wash the textile nozzle in a washing machine with a mild detergent at a temperature of 40°C.
WARNING! Do not use bleach or fabric softener when washing the textile nozzle.
Replacing the hard water filter
The vacuum cleaner is equipped with a hard water filter. Hard water contains minerals that can cause scale buildup. The filter reduces the hardness of the water and prevents scale formation in the steam function.
- Disconnect the vacuum cleaner from the power supply and make sure that the unit has cooled down.
- Remove the dirt container from the vacuum cleaner body for cleaning.[16]
- Replace the filter. [18] Replace the new filter.
- Reinstall the reservoir for the steam generator.
Application: The type of water used can affect the characteristics of the steam.
Storing the handle
- Disconnect the steam generator and make sure that the block has cooled down. [20]
- Remove the handle. [21]
- Attach the handle storage clips to the back of the main steam generator housing and insert the end of the handle into the opening and press it down. [22].
TROUBLESHOOTING
If you have any difficulties during the operation of the steam generator, try to identify the possible causes using the table below or contact the nearest service center.
The steam generator does not turn on. - Check that the unit is plugged in. - Check the power cord.
The steam generator does not produce steam. Possibly, the reservoir is empty or there is no water. - The reservoir may be incorrectly inserted.
The textile nozzle does not want to pick up dirt.
The textile nozzle may be too dirty and needs to be washed. Refer to the "Maintenance" section.
FREQUENTLY ASKED QUESTIONS ABOUT IRONING:
When is the steam iron ready to use? Approximately within 30 seconds.
Can I use the vacuum cleaner on all types of flooring? For the Hoover brand vacuum cleaners, such as the MPamOp, KeapMAmu, KamehB, NmHoneym, parket, and other types of flooring, on some types of flooring, it may be necessary to use special care.
Is the cord retraction automatic? Yes, on some models. You can tilt the vacuum cleaner, and the cord will retract automatically. On other models, you need to press a special button to retract the cord.
Can I use the vacuum cleaner on uneven surfaces? No, the vacuum cleaner is designed to be used only on flat, horizontal surfaces.
Can I use the vacuum cleaner to pick up liquids or chemical substances? No, you will damage it.
What if the vacuum cleaner gets wet? In that case, you can use a dry cloth to wipe it down.
When should I change the filter? It depends on the frequency of use. Once every 6 months. Remember that the filter inside the vacuum cleaner gets dirty.
How often should I empty the dust container? It is recommended to empty it when it is about 20% full, or when you notice a decrease in suction power.
Can I wash the fabric filter? Yes, you can wash it by hand or in a washing machine with a mild detergent at a maximum temperature of 40°C. Do not use bleach or fabric softener.
How often should I change the fabric filter? It depends on various factors, but mainly on the hardness of the floor covering. The best way to know is to check the filter; if it is damaged or not working properly after cleaning, replace it.
RU
IMPORTANT INFORMATION
Spare parts and consumables
When replacing parts, use only original spare parts and consumables from the Hoover company. You can order them from your local Hoover dealer or directly from Hoover. When ordering spare parts, be sure to provide the model number of your vacuum cleaner.
Consumables
Fabric filters (x2): AC36 35601693
Kaptpnckfwhbtpa: U75 35601691
Cnyk6a noepKKK KHeHToB
B Cnyaee NOIOMKII BAOJI NIIOCOBA T OTOHIEN PEBXb 12 MECJIeB PA60Tb, NIO3BOHHTE HORPOJIYI INHIO DN KIIMIEHOB HOover NO YKAZAHOHMY HIXE HOMEy.
Tpe6oBaHmKKauecTeBy npOdykun
3abDn KOMaHINHooverPPOUHNHeaBcNMyOJeHKHa npMeTcoBIOeHnA Tpe6oAHnK KKeAETbByNpyCaEMnoPpOyKn. HaaNo pOpykInIbTOrABtnBaTeC n PpIMeHEmm CNTeMbKaCTBe, YOdbonTeBOpHoumien TeP6oBAHmN CTaHdPa1 ISO 9001.
Bawa rapaHTn
YcNOBnIgaparHnI DnA HHOBTBOIeNtPNUeCKoRPOpDBeIOTCAHauIM pnpctabntbCTBOM B ToT CToPAH, B KToPOJOT 3TOE NkETPONPp60 BsnKynNE. Bonee npdo6hky INHfOpMaHIO 63TNX YCLOBMAx BMOKeTe NOyHTB OT HaIEero DNepa. Pnp nppeBdREM npeTENHNO yCNOBAM DAHNHb RapaHTMHbX O63AtetbCTB Heo6xOIMo nppeBdREM Tck YIN KBrTAHUM No PAODAHb TOBAP
N3MeHeHMA MOrY T 6bITb BHeceHb 6e3 npEaBapntbHoro yBeaOMneHnA.
PL
INSTRUKCJE BEZPIECZNEGOGUZYTKOWANIA
NAVODILA ZA VARNO UPORABO
a a a a a a a a a a a a a a a a a a a a a a a a a a a a
6 6 6 6 6 6 6 6 6 6 6 6 6 6 6 6 6 6 6 6 6 6 6 6 6 6 6 6 6
a 20
y 40 j 40 j 40 j 40 j 40 j 40 j 40 j 40 j 40 j 40 j 40 j 40 j 40 j 40 j 40 j 40 j 40 j 40 j
HOOVER 2000
AC36 35601693
U75 35601691
24
x2
Hoover
AR
1
[20]
[21]
3
[22]
xL
Hoover JaaJy
jldl
y
1
Ae 150
y
A 1
i#
1
aaii aai iiaai iai iai iai iai iai iai iai iai iai iai iai iai iai iai iai iai iai iai iai iai iai iai iai iai iai iai iai iai iai iai iai iai iai iai iai
[10]
[12] 5
a 1
[11]
7
[11]
i
y
1
[13]
a aaaee
[14]
[10]
5
a
[11]
6
[11]
AR
i 1
A.
Therefore m = 3/11
G
Therefore the area of triangle AOB equals the area of triangle COD plus the area of triangle BOC.
- Stability fluctuation
1. Important notes
J 1
jll()
J 1
January 16, 2017
[1]
[2]
3
[3]
[5]
[6]
[7], and 10
1
A
[8]
y
A
ailllll lalil 100 g jieell plisuliee oeyll cllg j
Jaaai 12
HOOVER
sji jilggi jlljgl 1
jgl j1s gla jg jgs jcbia p
13 24 5 6 7 8 9 10 11 12
.ASTA(BS1362 13(j)
Lg 100000000000000000000000000000000000000000000000000000000000000000000000000

EU/2011/65 EU/2014/30 EU/2014/35

CANDY HOOVER GROUP Sri Via Privata Eden Fumagalli, 20861 Brugherio (MB) Italy


- INSTRUCTIONS FOR SAFE USE
- THE ENVIRONMENT
- GETTING TO KNOW YOUR CLEANER
- ASSEMBLING YOUR CLEANER
- USING YOUR CLEANER
- STEAM CLEANING HARD FLOORS
- STEAM CLEANING HARD FLOOR - INTENSIVE CLEAN
- CLEANER MAINTENANCE
- IMPORTANT: ALWAYS ENSURE THE CLEANER HAS FULLY COOLED DOWN BEFORE PERFORMING ANY MAINTENANCE TASKS
- EMPTYING THE WATER TANK
- REMOVING AND CLEANING THE TEXTILE PAD
- REPLACING THE HARD WATER FILTER
- HANDLE STORAGE
- TROUBLESHOOTING
- CLEANING FAQS
- IMPORTANT INFORMATION
- HOOVER SPARES AND CONSUMABLES
- CONSUMABLES
- HOOVER CUSTOMER HELPLINE SERVICE
- QUALITY
- YOUR GUARANTEE
- SAFETY INSTRUCTIONS FOR USE
- MAINTENANCE OF THE VACUUM CLEANER
- IMPORTANT: ALWAYS ENSURE THAT NO FORM OF MAINTENANCE IS PERFORMED UNTIL THE CLEANER HAS COMPLETELY COOLED DOWN
- EMPTY THE WATER TANK
- USING THE STEAM CLEANER
- BEFORE YOU START CLEANING
- ENVIRONMENT
- MAINTENANCE
- TECHNICAL SERVICE FOR THE VACUUM CLEANER
- WARNING! BEFORE SERVICING THE VACUUM CLEANER, MAKE SURE THAT THE APPLIANCE IS DISCONNECTED FROM THE POWER SUPPLY
- EMPTY THE DIRT CONTAINER
- REMOVE AND CLEAN THE TEXTILE FILTER
- STORING THE HANDLE
- FREQUENTLY ASKED QUESTIONS ABOUT IRONING
- SPARE PARTS AND CONSUMABLES
- CNYK6A NOEPKKK KHEHTOB
- TPE6OBAHMKKAUECTEBY NPODYKUN
- BAWA RAPAHTN
- INSTRUKCJE BEZPIECZNEGOGUZYTKOWANIA
- NAVODILA ZA VARNO UPORABO
- AR
- XL
- I
Brand : HOOVER
Model : Steam Capsule CAP1700D 011
Category : Steam cleaner