MSB11002 - Drill Meister Craft - Free user manual and instructions
Find the device manual for free MSB11002 Meister Craft in PDF.
| Product type | Impact drill |
| Brand | Meister Craft |
| Model | MSB11002 |
| Power supply | 230-240 V ~ 50 Hz |
| Rated power | 1100 W |
| No-load speed (1st gear) | 0-1100 min⁻¹ |
| No-load speed (2nd gear) | 0-3000 min⁻¹ |
| Impact rate (1st gear) | 0-16500 min⁻¹ |
| Impact rate (2nd gear) | 0-45000 min⁻¹ |
| Max drilling diameter (concrete) | 13 mm |
| Max drilling diameter (metal) | 18 mm |
| Max drilling diameter (wood) | 40 mm |
| Chuck capacity | Up to 13 mm |
| Chuck type | Keyless quick-tighten |
| Weight | 3.45 kg |
| Cable length | 300 cm |
| Functions | Drilling, impact drilling, forward/reverse, 2 gears, variable speed, continuous operation |
| Safety | Double insulation, insulated auxiliary handle, restart protection |
| Maintenance | Clean with a damp cloth, do not use solvents |
| Repairability | Repair by authorized after-sales service, original parts required |
| Warranty | Keep the warranty certificate and receipt |
| Included accessories | Auxiliary handle, depth stop, plastic case, instruction manual, warranty certificate |
Frequently Asked Questions - MSB11002 Meister Craft
User questions about MSB11002 Meister Craft
0 question about this device. Answer the ones you know or ask your own.
Ask a new question about this device
Download the instructions for your Drill in PDF format for free! Find your manual MSB11002 - Meister Craft and take your electronic device back in hand. On this page are published all the documents necessary for the use of your device. MSB11002 by Meister Craft.
USER MANUAL MSB11002 Meister Craft
F- Perceuse a percussion 25
GB- Impact drill 37
Originalbetriebsanleitung
Cz Ppreklad originaiho nadvodu na obsluhu
Traduction du manuel d'utilisation original
Translation of the Original Instructions
Vertaling van de originele gebruiksaanwijzing
PL Tlumaczenie oryginalej instrukcji obslugi
IR Original isletme talimatinin tercumesi
meisterM
NL-Slagboormachine 47
PL -Wiertarka udarowa 59
TR - Darbeli Matkap 71

Operating instructions & safety hints

To prevent injury, always read the operating instructions before use and pass them on to any future owners of the tool. Keep with the tool.
Contents
| Page | |
| 1 - Scope of delivery | 37 |
| 2 - Technical information | 37 |
| 3 - Components | 38 |
| 4 - Correct use | 38 |
| 5 - General safety instructions | 40 |
| 6 - Safety instructions relating specifically to the equipment | 42 |
1 - Scope of delivery
1 impact drill
1 additional handle
- 1 depth stop
- 1 plastic carry-case
- Operating Instructions
Guarantee
2 - Technical information
Technical data
| Power supply 230-240 V~/50Hz | |
| Nominal consumption 1100 W | |
| Revolutions n0 | 1) 0-1100 min-1 |
| 2) 0-3000 min-1 | |
| Impact rate 1) 0-16500 min | -1 |
| 2) 0-45000 min-1 | |
| Spindle collar diameter 43 mm | |
| Connection thread | ½" x 20 UNF |
| Drill adapter max. 13 mm | |
| Maximum drill diameter | |
| - in cement 13 mm | |
| - in metal 18 mm | |
| - in wood 40 mm | |
| Feed cable 300 cm | |
| Weight 3.45 kg | |
| Page |
| 43 |
| 44 |
| 45 |
| 45 |
| 45 |
| 46 |
Technical changes reserved.
Noise emission/vibration
Noise emission
Measured values determined in accordance with EN 60745-1; EN 60745-2-1.
WARNING! The specified vibration emission value was measured in accordance with a normed test
procedure and can be used to compare one power tool with another.
The specified vibration emission value can also be used for an introductory estimation of exposure.
The actual vibration emission value at disposal during operation of the power tool may deviate from the specification in the operating instructions or by the manufacturer. This may be caused by the following influencing factors that should be taken into account prior to and during each use:
- Is the power tool used correctly?
Is the correct type of material processed?
Is the power tool in proper working order? - Are the handles or optional vibration handles mounted and fixed securely against the body of the power tool?
If you sense an unpleasant feeling or your skin changes colour when you are using the power tool, stop working immediately and take a break. Take sufficient breaks. If you do not take sufficient breaks, this may cause a hand-arm vibration syndrome.
Try to keep the vibration loads as low as possible. Examples of measures that may be taken to reduce the vibration load include wearing gloves when using the tool and limiting the length of the working period. All parts of the operating cycle must be taken into account for this purpose (for example, also including times in which the power tool is switched off and times in which it is switched on, but is running without load).
Service this power tool in accordance with the information in the operating instructions.
If the power tool is to be used frequently, contact your dealer and procure anti-vibration equipment (handles) if necessary.
Avoid using the power tool at ambient temperatures of t = 10^ or lower. Draw up a work schedule that can be used to minimise vibration load.
Information about minimising noise
A certain amount of noise is unavoidable when using this power tool. Ensure you carry out noise-intensive work during permitted times. Maintain the quiet periods and limit your work to the absolute minimum. For the sake of your personal protection and that of the persons around, suitable ear protection should be worn.
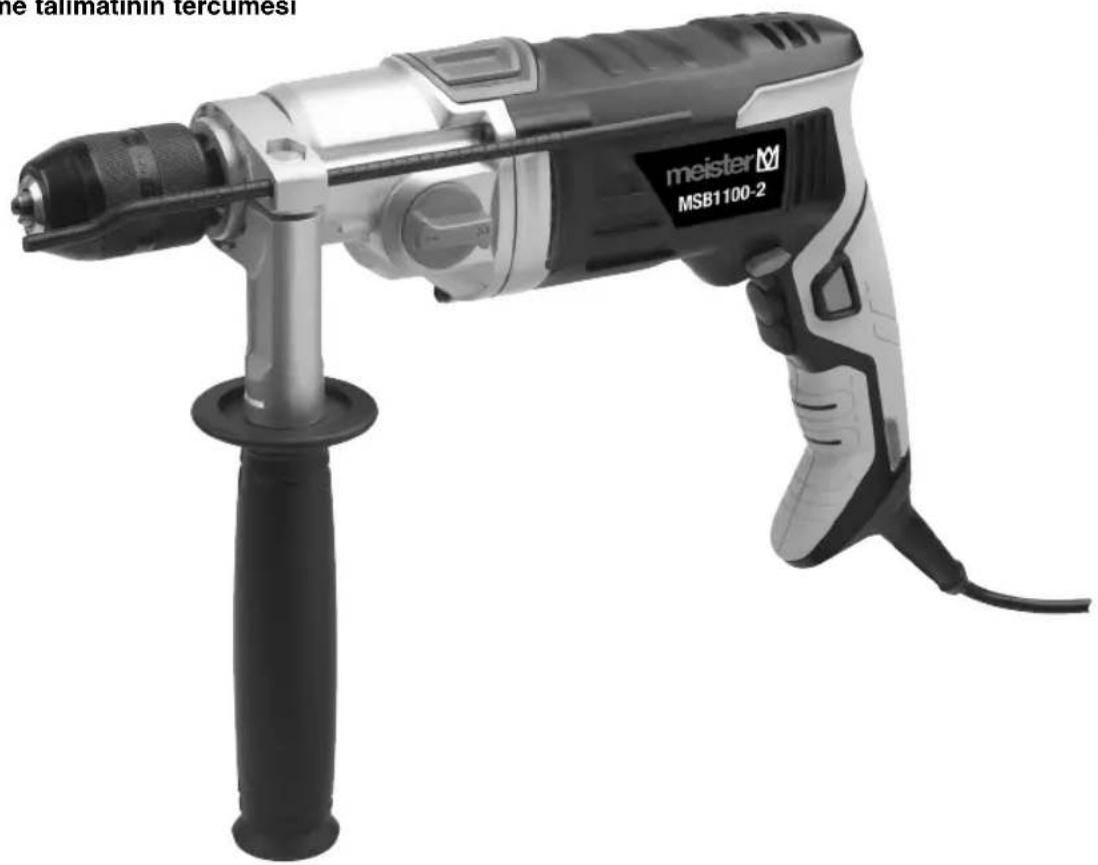
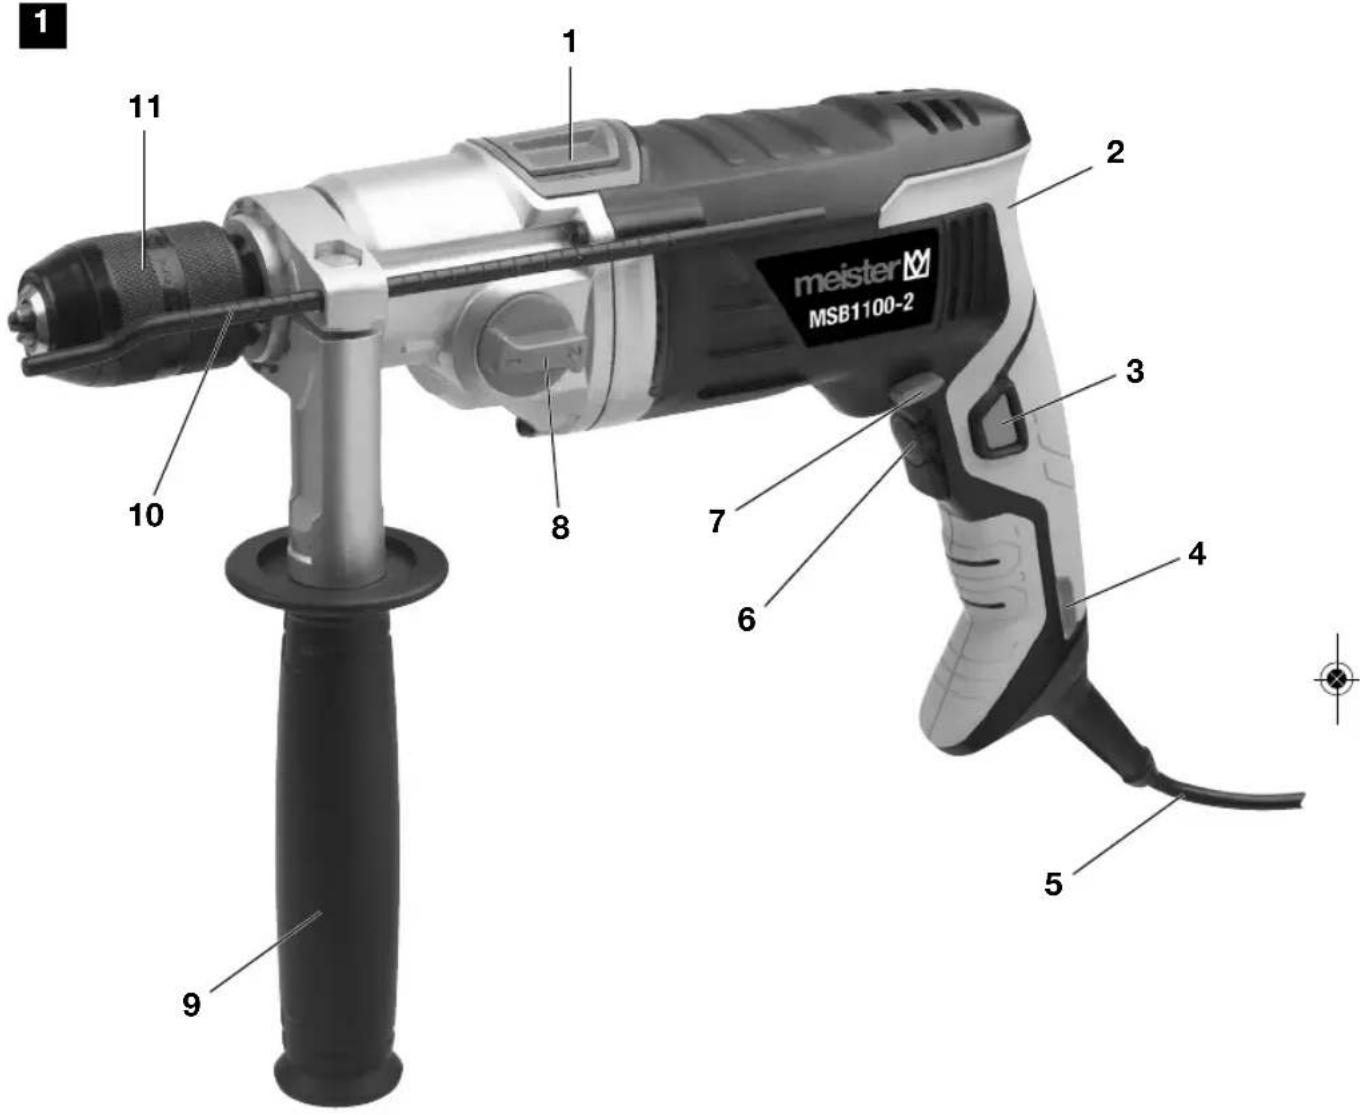
3 - Components
1 Switch for drilling/hammer drilling
2 Hand I e
3 Locking button for continuous operation
4 LED operating light
5 C a b l e
6 On/Off switch with revolution regulation
7 Right/Left rotational switch
8 Switch for 1st and 2 gear
9 Additional handle
10 Depth stop
11 Quick-release chuck with securing mechanism
4 - Correct use
MSB1100-2 designates a hammer drill with 1100 Watt power output. The
proper use of this power tool comprises drilling of wood and metal as well as hammer drilling of concrete and masonry. Only use the power tool, tools and accessories for additional tasks (observe the manufacturer specifications) when they are within the scope of proper use. All other uses are expressly forbidden.
This power tool is intended for use in domestic household only.
CAUTION! Intervention on the power tool outside the scope of proper use will invalidate the warranty claim.
Improper use of the product
This power tool may not be used as a screwdriver.
All applications carried out with the device that are not listed in the "Proper use" chapter will be considered improper use.
Uses for which the tool is not designed may cause risks and injury. Do not use accessories that are not intended specifically for this electrical tool.
Just because you can affix an accessory to your electrical tool, there is no guarantee it is safe to use.
The permitted revolutions of the tool insert must be at least as high as the highest value specified on the electrical tool. Accessories that turn faster than is permitted may break and fly away.
The external diameter and thickness of the tool insert must match the dimensions of your electrical tool. Incorrectly measured tool inserts cannot be properly protected or checked.
Drill bits or other accessories must fit precisely into the tool holder of your power tool. Tools that do not fit precisely into the tool holder of the power tool will rotate unevenly, vibrate heavily and may cause loss of control over the device.
There is a risk of injury.
The user of the device is liable for all property and personal damages occurring as the result of incorrect use.
If other components or non-original components are used with the machine, the manufacturer guarantee is voided.
Remaining risks:
The operating instructions for this electrical tool contain comprehensive tips for the safe handling of electrical tools. However, every electrical tool has a certain level of remaining risks which cannot be excluded by the protective mechanisms on the device. Always operate electrical tools with the necessary care.
Remaining risks may be, for example:
- Touching rotating parts or tools.
- Injury caused by flying tools or tool parts.
- Risk of fire with insufficient ventilation of the motor.
- Adverse effects on the hearing caused by working without ear defenders.
The ability to work safely is dependant on the familiarity of the operator when it comes to handling the given electrical tool. Appropriate knowledge of the
machinery and careful behaviour when working help to minimise the remaining risks.
Warning! During operation, this power tool generates an electromagnetic field. This field may, under certain circumstances, influence active or passive medical implants. In order to reduce the risk of serious or deadly injuries, we recommend persons with such a medical implant to consult their doctor and the manufacturer of the medical implant before using the electrical tool.
5 - General safety instructions for handling power tools
WARNING! Read all safety warnings and all instructions.
Failure to follow the warnings and instructions may result in electric shock, fire and/or serious injury.
Save all warnings and instructions for future reference.
The term "power tool" in the warnings refers to your mains operated (corded) power tool or battery-operated (cordless) power tool.
1 Work area
a Keep work area clean and well lit. Cluttered and dark areas invite accidents.
b Do not operate power tools in explosive atmospheres, such as in the presence of flammable liquids, gases or dust. Power tools create sparks which may ignite the dust or fumes.
c Keep children and bystanders away while operating a power tool. Distractions can cause you to lose control.
2 Electrical Safety
a Power tool plugs must match the outlet. Never modify the plug in any way. Do not use any adapter plugs with earthed (grounded) power tools. Unmodified plugs and matching outlets will reduce risk of electric shock.
b Avoid body contact with earthed or grounded surfaces, such as pipes, radiators, ranges and refrigerators. There is an increased risk of electric shock if your body is earthed or grounded.
c Do not expose power tools to rain or wet conditions. Water entering a power tool will increase the risk of electric shock.
d Do not abuse the cord. Never use the cord for carrying, pulling or unplugging the power tool. Keep cord away from heat, oil, sharp edges or moving parts. Damaged or entangled cords increase the risk of electric shock.
e When operating a power tool outdoors, use an extension cord suitable for outdoor use. Use of a cord suitable for outdoor use reduces the risk of electric shock.
If it is not possible to avoid using the electrical tool in a damp environment, use a residual current circuit-breaker. The use of a residual current circuit-breaker reduces the risk of an electrical shock.
3 Personal safety
a Stay alert, watch what you are doing and use common sense when operating a power tool. Do not use a power tool while you are tired or under the influence of drugs, alcohol or medication. A moment of inattention while operating power tools may result in serious personal injury.
b Use personal protective equipment. Always wear eye protection. Protective equipment such as dust masks, non-skid safety shoes, hard hat, or hearing protection used for appropriate conditions will reduce personal injuries.
c Prevent unintentional starting. Ensure the switch is in the off-position before connecting to power source and/or battery pack, picking up or carrying the tool. Carrying power tools with your finger on the switch or energising power tools that have the switch on invites accidents.
d Remove any adjusting key or wrench before turning the power tool on. A wrench or a key left attached to a rotating part of the power tool may result in personal injury.
e Do not overreach. Keep proper footing and balance at all times. This enables better control of the power tool in unexpected situations.
f Dress properly. Do not wear loose clothing or jewellery. Keep your hair, clothing and gloves away from moving parts. Loose clothes, jewellery or long hair can be caught in moving parts.
g If devices are provided for the connection of dust extraction and
collection facilities, ensure these are connected and properly used. Use of these devices can reduce dust related hazards.
4 Power tool use and care
a Do not force the power tool. Use the correct power tool for your application. The correct power tool will do the job better and safer at the rate for which it was designed.
b Do not use the power tool if the switch does not turn it on and off. Any power tool that cannot be controlled with the switch is dangerous and must be repaired.
c Disconnect the plug from the power source before making any adjustments, changing accessories, or storing power tools. Such preventive safety measures reduce the risk of starting the power tool accidentally.
d Store idle power tools out of the reach of children and do not allow persons unfamiliar with the power tool or these instructions to operate the power tool. Power tools are dangerous in the hands of untrained users.
e Maintain power tools. Check for misalignment or binding of moving parts, breakage of parts and any other condition that may affect the power tool's operation. If damaged, have the power tool repaired before use. Many accidents are caused by poorly maintained power tools.
f Keep cutting tools sharp and clean. Properly maintained cutting tools with sharp cutting edges are less likely to bind and are easier to control.
g Use the power tool, accessories and tool bits etc. in accordance with these instructions, taking into account the working conditions and the work to be performed. Use of the power tool for operations different from those intended could result in a hazardous situation.
5 Service
a Have your power tool serviced by a qualified repair person using only identical replacement parts. This will ensure that the safety of the power tool is maintained.
6 Safety notes for power drills
a Wear ear protection when hammer drilling. The effects of noise may lead to loss of hearing.
b Use auxiliary handles supplied with the power tool. Loss of control may lead to injuries.
c Hold the power tool by the insulated handle when doing work in which it is possible that the tool may get in contact with concealed mains lines or its own cable. Contact of a power tool with a mains cable may also put its metal parts under power and cause an electric shock.
6 - Safety instructions relating specifically to the equipment


Always use goggles and hearing protectors.

Wear a dust protection mask
- Before drilling holes in a wall, check, if necessary using a cable detector, whether you are at risk of contacting concealed power, gas or water lines.
- Only change a drill/chuck when the power tool is disconnected from power supply (unplugged)!
- In order to prevent injuries, ensure that the work piece to be drilled is secured (e.g. by clamping in a vice).
- Prevent motor standstill during operation.
Safety symbols
The symbols on the housing have the following meanings:
Model number and year of construction

Model name

When using the hammer drill, wear goggles.

Wear ear defenders when using the hammer drill.

Wear a dust protection mask when using the hammer drill.
230-240V\~50Hz/1100W
Power supply, frequency and power consumption
no:
Idle revolutions

Impact rate

Maximum drill diameter

Do not dispose of with household waste!

Read this instruction manual thoroughly before using the hammer drill.

"GS" voluntary quality mark

Housing is double insulated

CE marked (conforms to European safety standards)

Manufacturer address
7 - Installation and setting
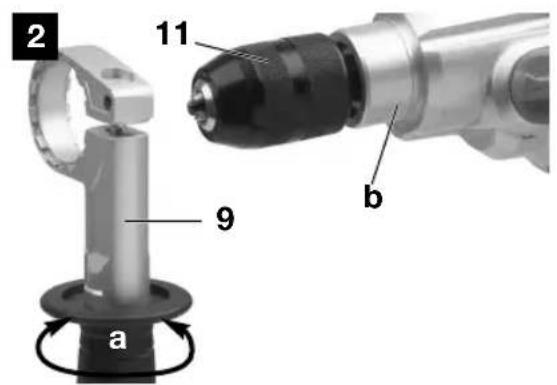
Mounting the additional handle (9) (Figure 2)
The additional handle (9) can be mounted on the right or the left of the chuck, as required.
Loosen the handle piece (a) on the additional handle (9) by turning it to the left until it can be pushed over the chuck (11) and onto the tensioning neck (b).
Tighten the handle piece by turning to the right until the additional handle is connected to the power tool.
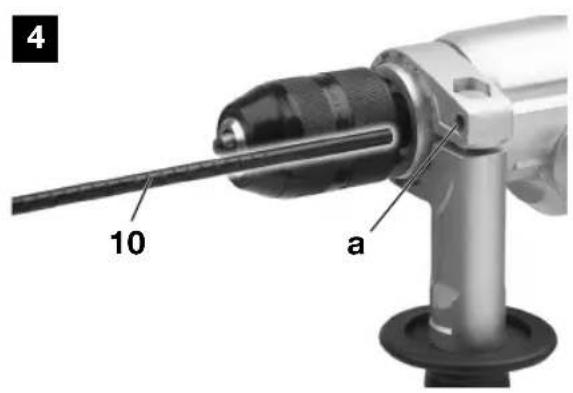
Mounting and setting the depth stop (Figure 4)
Loosen the handle piece (a/Figure 2) on the additional handle (9) by turning it to the left so that the hexagonal screw exposes the opening for the depth stop (10).
Push the depth stop into the opening to the length of the inserted drill. Do this by pushing the drill against an even wall.
Read the relevant value on the depth stop's scale and deduct the desired drilling depth from this value.
Set the new valve by sliding the depth stop and read on point (a/Figure 4).
Tighten the handle piece (a/Figure 2) on the additional handle (9) by turning to the right.
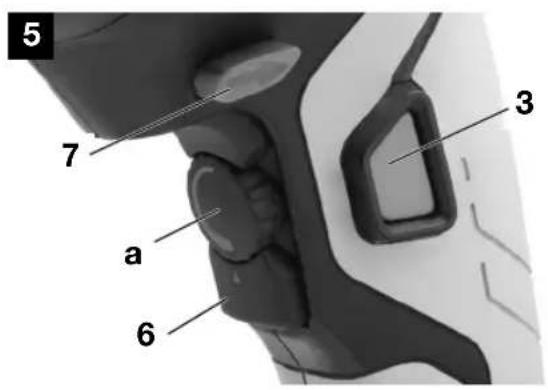
Revolution pre-selection

CAUTION! Unplug from the power source!

The rotation speed pre-selection function enables the motor rotation speed to be adapted to
the respective insert tool and material (Fig. 5).
- Rotate the rotation speed regulator (a) on the On/Off switch (6) in the (-) direction: The maximum rotation speed of the power tool is reduced.
- Rotate the rotation speed regulator in the (+) direction: The motor rotation speed is increased.
The On/Off switch can be used to infinitely vary the rotation speed of the power tool within the selected maximum rotation speed.
Depending on the pressure on the On/Off switch, the rotation speed is increased (more pressure) or decreased (less pressure).
Right or left (clockwise or anticlockwise) rotation

Setting according to the figure, with the machine at standstill (Fig. 5).
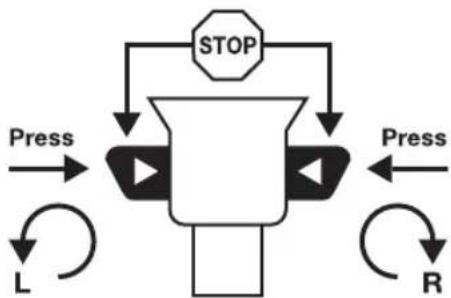
IMPORTANT! During operation of the power tool, the clockwise/ anti-clockwise direction switch may not be pressed (7), therefore await a complete standstill.
Use clockwise rotation to drill holes.
Use anti-clockwise rotation to release jammed drills.
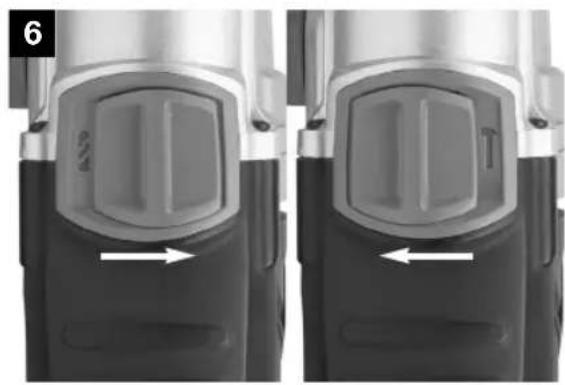
Selector switch for drilling/hammer drilling
The respective mode is selected by sliding the switch (1) at standstill of power tool (Fig. 6).
- Drill symbol visible: Mode for "drilling" wood and metal
- Hammer symbol visible: Mode for "hammer drilling" concrete and masonry.
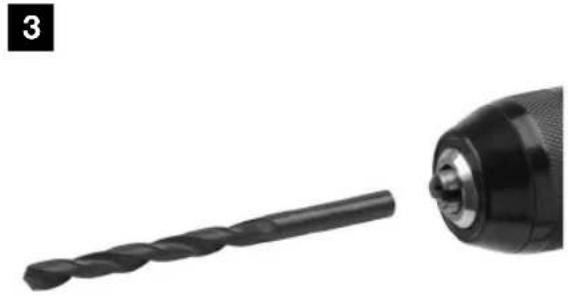
All common screwdriver bits, bit holders and drills up to a diameter of 13mm (not included in the scope of delivery) may be tensioned in the chuck (11) (Figure 3)
The machine has a quick-release chuck. This enables changing accessories in manual operation quickly without needing a chuck key.
Changing tools (Figure 3)/Quick-release chuck
Hold the rear sleeve of the quick-release chuck (11) firmly and turn the front sleeve until the tool can be inserted.
Insert the tool.
Hold the rear sleeve of the quick-release chuck (11) firmly and turn the front sleeve by hand to close firmly.
Changing tools (Figure 3)/Screwdriver tools
When using screwdriver bits, always use a universal bit holder. Only use screw - driver bits that match the screw head.
8 - Operation
Switching on and off
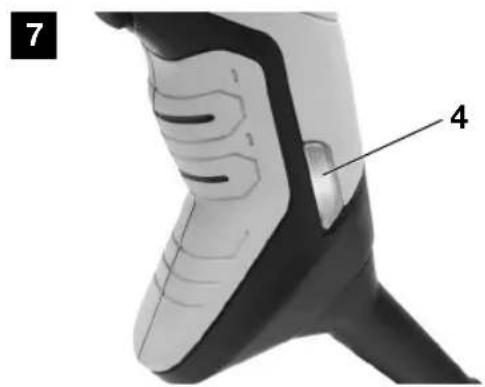
Insert the power plug into a suitable socket.
The LED operating light (4) lights up (Fig. 7) and indicates contact with the power supply. It goes off when the plug is detached.
CAUTION! Always switch the machine on before making contact with material.
Switching on
Press the On/Off switch (6) carefully, the machine starts, the rotation speed varies according to the pressure exerted on the switch.
Switching off
Release the On/Off switch and wait for the machine to come to a stop.
Switching on continuous operation
Press the On/Off switch (6) and hold. Press the locking button (3) (Figure 5). Release the On/Off switch - the machine will operate at the revolutions set.
Switching off continuous operation
Press the On/Off switch, the locking button is disengaged. Release the On/Off switch and wait for the machine to come to a stop.
9 - Mode of operation
Drilling into wood and metal
To drill into wood and metal, the hammer action must be switched off. Set the switch (1) to the "Drill" mode. Set the Right/Left rotational switch (7) to "Right rotation." Regulate the electronic revolution by operating the On/Off switch. Preset the revolution with the setting wheel on the On/Off switch (6).
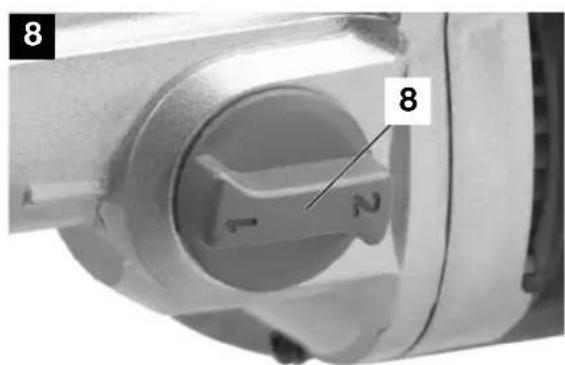
Start with low revolutions. Depending on material properties and the diameter of drill, switch on 1st and 2nd gear (8) when at a standstill (Figure 8). This changes the revolutions.
Hammer drilling in cement and masonry
Set the switch (1) to the "Hammer drill" mode. Set the Right/Left rotational switch (7) to "Right rotation". Start with low revolutions. Depending on material properties and the diameter of drill, switch on 1st and 2nd gear (8) when at a standstill (Figure 8). This changes the number of impacts and revolutions.

To remove a stuck drill, wait until the machine has come to a standstill, and switch to anti
clockwise rotation. With the drill running anti-clockwise, carefully pull it out of the drilled hole.
10 - Storage and transportation
- Keep the power tool, operating instructions and accessories together, if possible, in the original packaging. This ensures you have all information and parts on hand at all times.
- Store the power tool in a dry and well ventilated place out of reach by children.
- Always carry the power tool by the handle surfaces.
- To prevent the power tool from being damaged in transit, pack it well or use the original packaging.
- Secure the power tool to prevent it from slipping off or tipping over.
- Protect the power tool from vibrations and shaking, in particular during transport in vehicles.
11 - Maintenance and environmental protection
- Meister power tools are mostly maintenance free. Use a damp cloth to clean the housing.
- Only clean the housing with a damp cloth - do not use solvents! Then dry well. Never submerge the power tool in water.
Always ensure that the venting slots in the power tool are kept clean.
- Your power tool should be serviced only by a qualified repair person using only original replacement parts. This ensures that the safety of your electrical tool remains intact.
- If this device's mains connection cable is damaged, it must be replaced with a special connection cable that is obtained from the manufacturer or its customer service.
CAUTION! Electrical and battery operated units that no longer work should not be disposed of in the household waste! They are to be collected separately, in accordance with the 2012/19/EU directive
for the disposal of electrical and electronic waste, and sent for proper and environ mentally-friendly recycling.

Please discard power tools no longer usable at a local collection point. Collection and disposal of packaging materials separately by types complying with local rules and regulations. For details, please contact your municipal authority concerned.
12 - Service instructions
- Meister devices are subject to stringent quality control. If however
a functional fault shoult occur, send the device to our servicing address.
The repairs will be carried out in a short time.
- A brief description of the defect speeds up the faulttracing and repair time. If within the guarantee period, please enclose the guarantee document and the proof of purchase.
- In so far as a repair under guarantee is not concerned, we will charge the repair costs to your account.
PLEASE NOTE! Opening of the device invalidates the guarantee claim.
IMPORTANT! We point out expressly that in accordance with the Product Liability Act we do not take responsibility for any damage caused by our appliances, in so much that said damage is caused by improper repair, or original parts or parts released by us not being used when parts are changed, or repairs not being conducted by Meister Werkzeuge GmbH, Customer Service or an authorised specialist! The same applies analogously to the accessories used.
Even after the expiry of the guarantee period, we would like to help you and carry out any repairs at a favourable price.

Monteer de extra handgreep (9) (afb. 2)
Makoto Watanabe &kiyoshi Ohashi 37-59 D-6258 Watanabe Germany
Adres producenta
7 - Montañ i czynnosci regulacyjne
EC-Declaration of Conformity
EG-Verklaring van overeenstemming
The following product ...
... is herewith declared to conform with the following guidelines: