CNS 3635 Battery - Saw Kärcher - Free user manual and instructions
Find the device manual for free CNS 3635 Battery Kärcher in PDF.

User questions about CNS 3635 Battery Kärcher
0 question about this device. Answer the ones you know or ask your own.
Ask a new question about this device
Download the instructions for your Saw in PDF format for free! Find your manual CNS 3635 Battery - Kärcher and take your electronic device back in hand. On this page are published all the documents necessary for the use of your device. CNS 3635 Battery by Kärcher.
USER MANUAL CNS 3635 Battery Kärcher
natural_image
Illustration of a Karcher chain drive with visible blade and jaw (no text or symbols beyond brand name)Deutsch 7
English 26
Français 42
Italiano 61
Nederlands 81
Español 99
Português 118
Dansk 136
Norsk 153
Svenska 169
Suomi 186
Ελληνικά 202
Türkçe 223
Русский 240
Magyar 262
Čeština 280
Slovenščina 297
Polski 314
Românește 333
Slovenčina 351
Hrvatski 369
Srpski 385
Български 403
Eesti 424
Latviešu 440
Lietuviškai 457
Українська 474
日本語 495
Қазақша 512
العربيه 533
A
text_image
KARCHER 12 13 11 10 9 8 7 6 14 15 5 4 3 2 1 KARCHER 19 18 17 16 KARCHER CHAIN OIL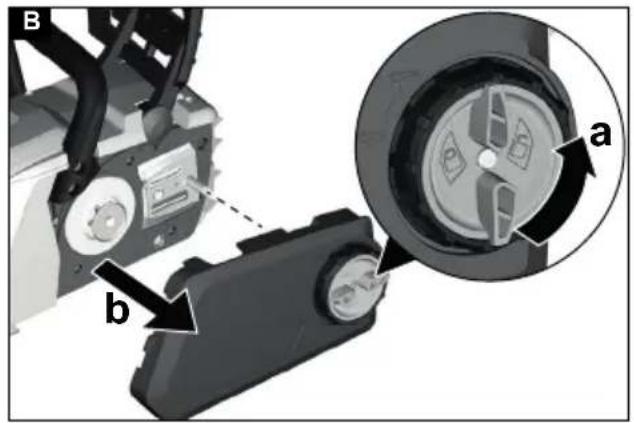
text_image
B a b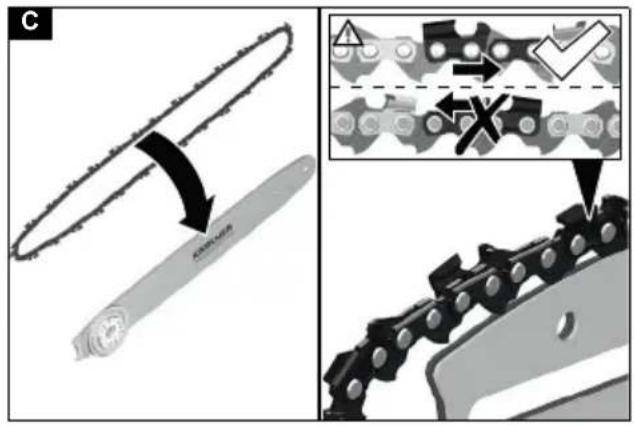
text_image
Diagram illustrating mechanical assembly steps with labeled components and process indicators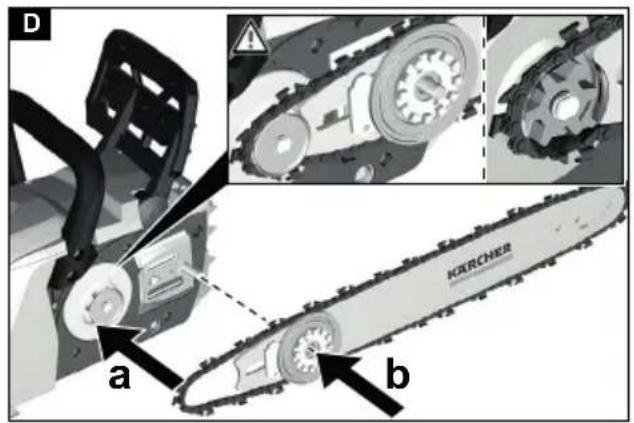
text_image
D a b KONORCHNEUR
text_image
E a b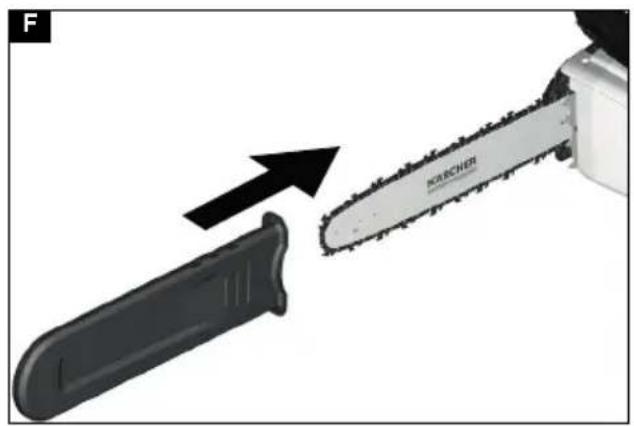
natural_image
Close-up of a chainsaw with a black handle and arrow indicating direction (no text or symbols on the diagram itself)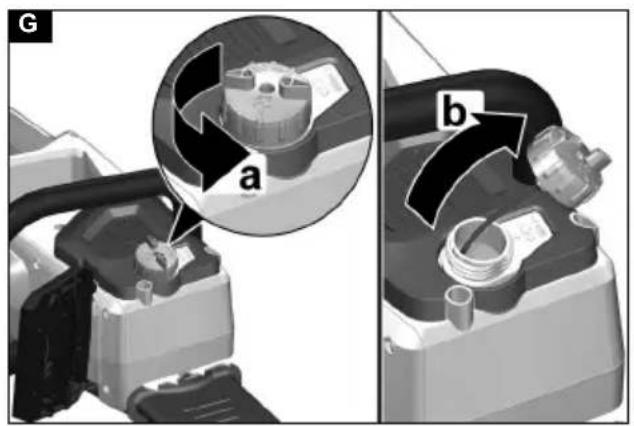
text_image
G a b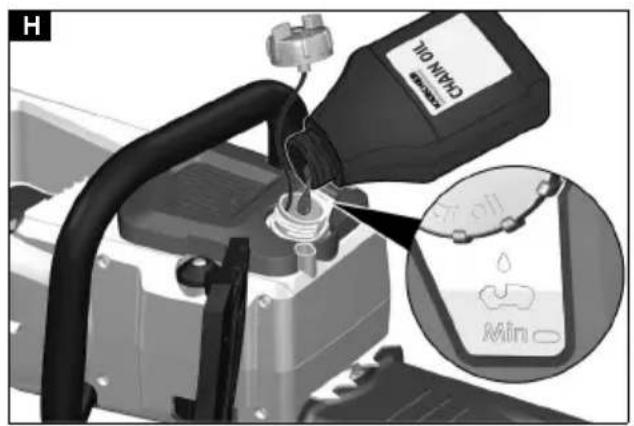
text_image
H CHAM OIL Min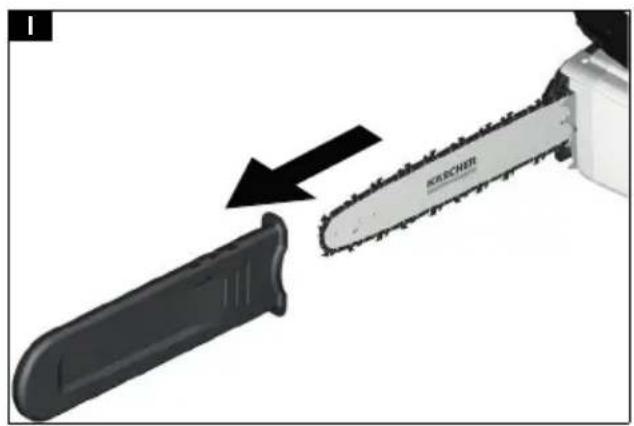
natural_image
Close-up of a chainsaw with a black handle and arrow indicating process (no text or symbols)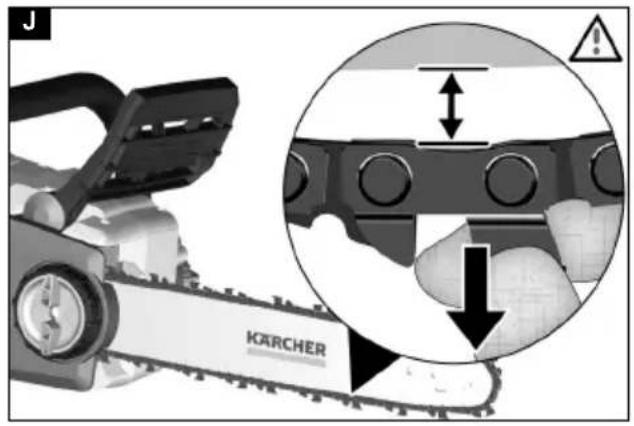
text_image
KARCHER
text_image
K "click"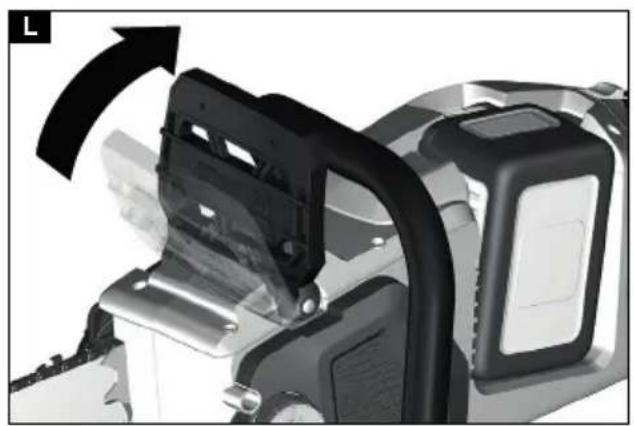
natural_image
Close-up of a mechanical device with a black bracket and arrow indicating rotation (no visible text or symbols)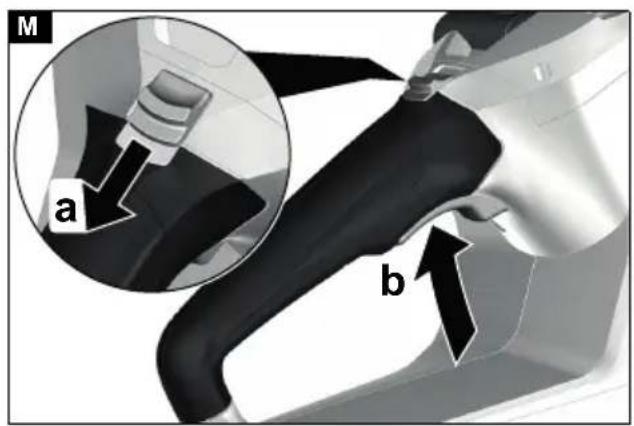
text_image
M a b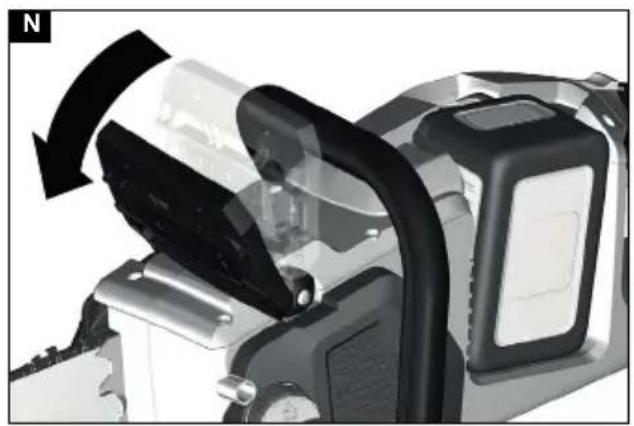
natural_image
Close-up of a digital camera module with black arrows indicating rotation or adjustment (no text or symbols visible)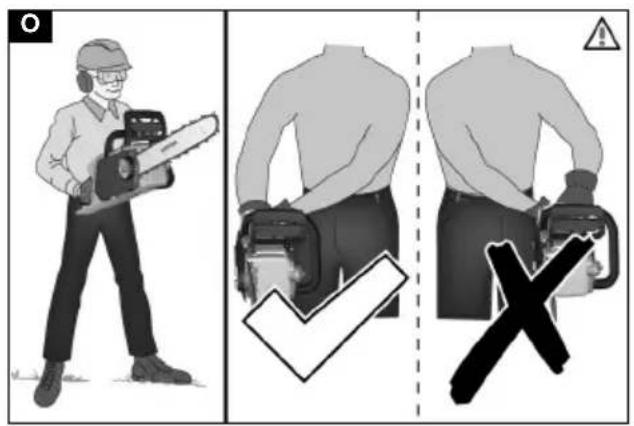
text_image
Illustration showing a worker using a chainsaw to adjust equipment, with check and cross symbols indicating inspection or validation.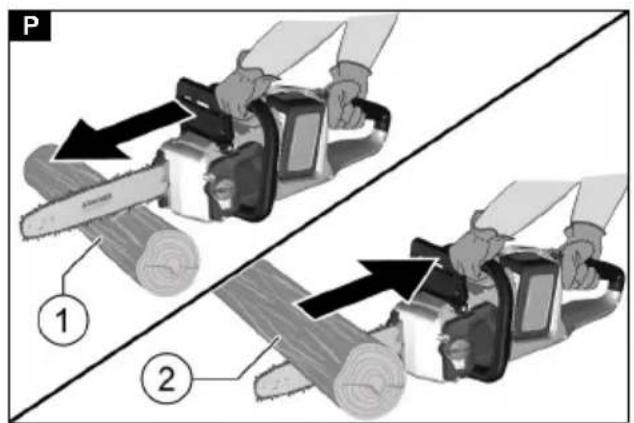
text_image
P ① ②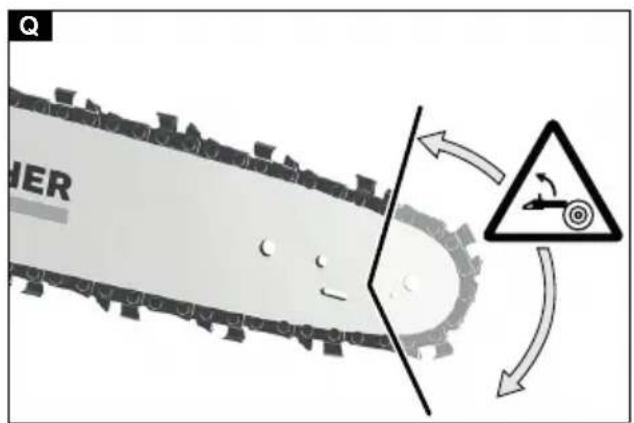
text_image
CHER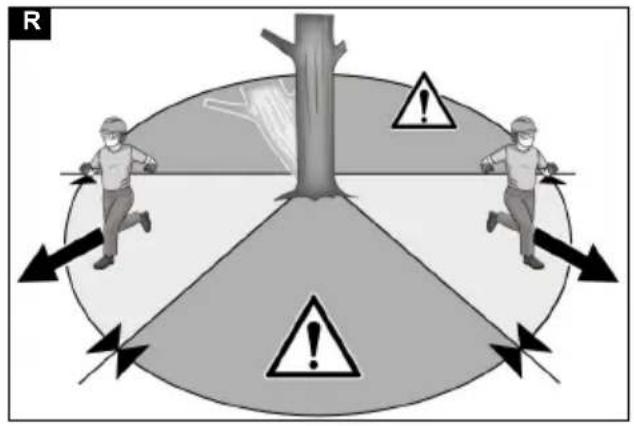
text_image
R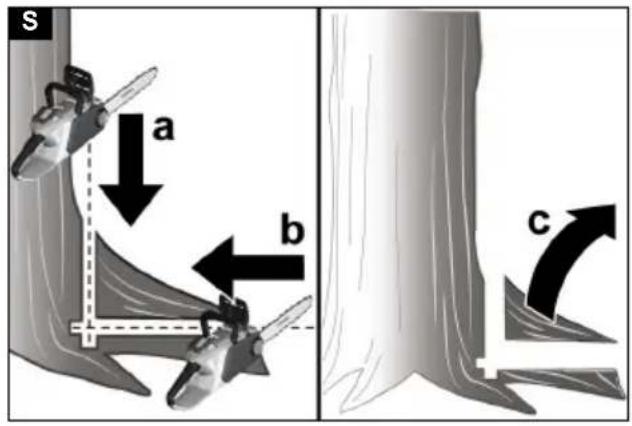
text_image
S a b c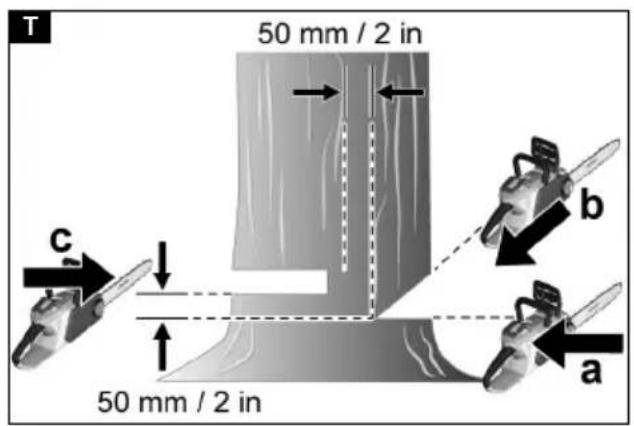
text_image
T 50 mm / 2 in b c 50 mm / 2 in a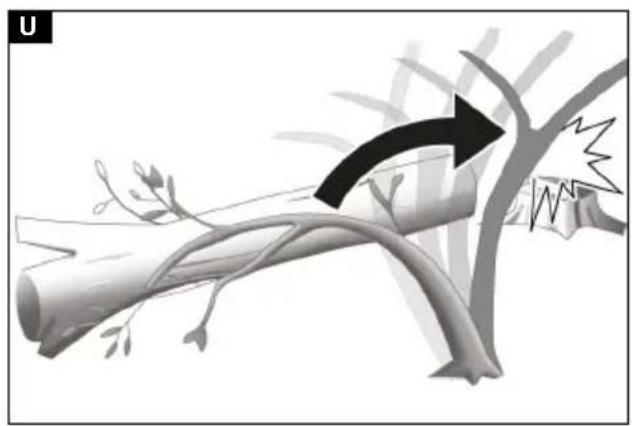
natural_image
Illustration of a tree branch with leaves and a black arrow indicating movement or change (no text or symbols)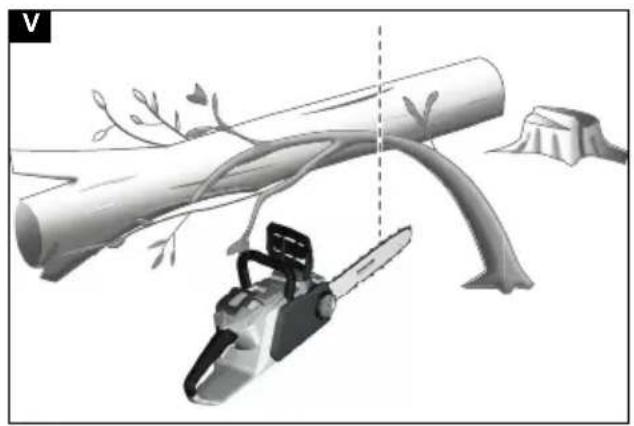
natural_image
Illustration of a chain-linking device with tree branches and a vertical dashed line, no text or symbols present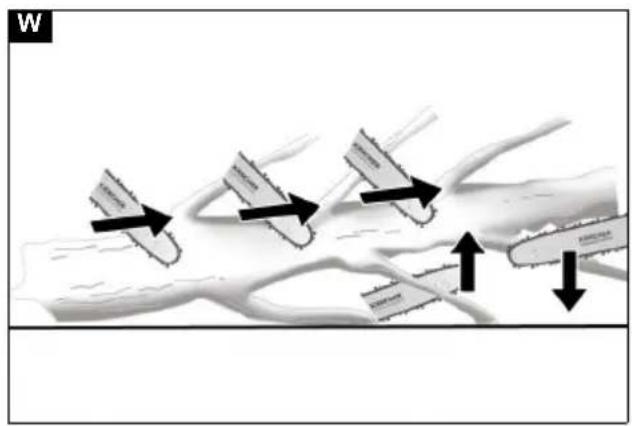
text_image
W
text_image
X a 1/3 b 2/3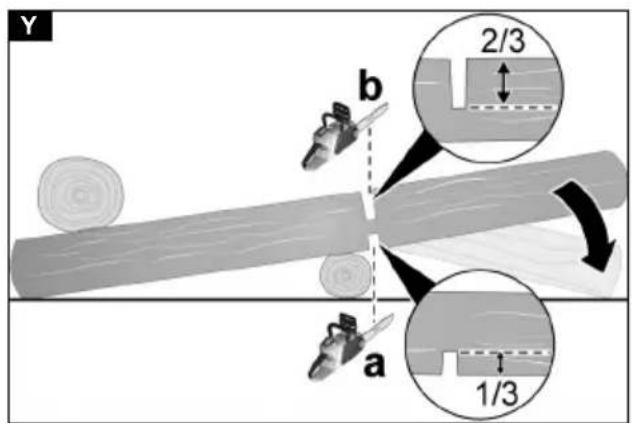
text_image
Y b 2/3 a 1/3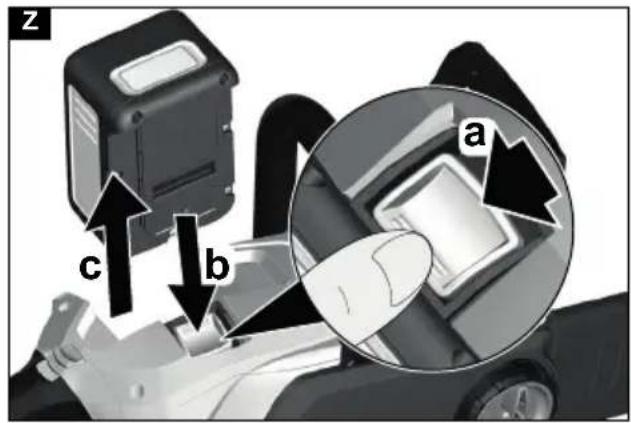
text_image
z c b a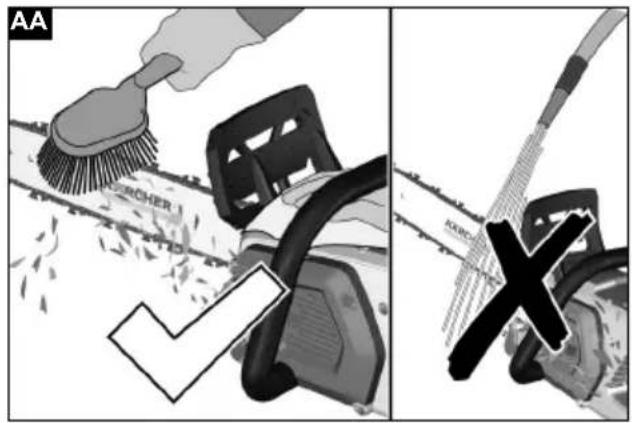
text_image
AA RCHER X
natural_image
Close-up of a Karcher chain saw with visible blade and gear (no text or symbols)
natural_image
Close-up of a Kürcher chain saw with a close-up inset showing the blade and gear mechanism (no text or symbols)
text_image
AD E KASF a b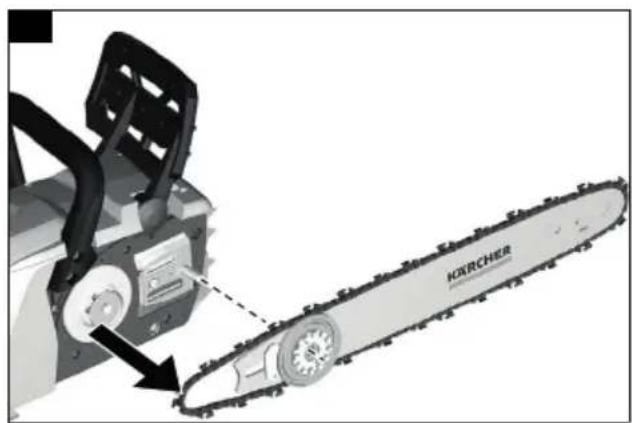
natural_image
Close-up of a chainsaw with a gear mechanism, showing blade and jaw components (no text or symbols visible)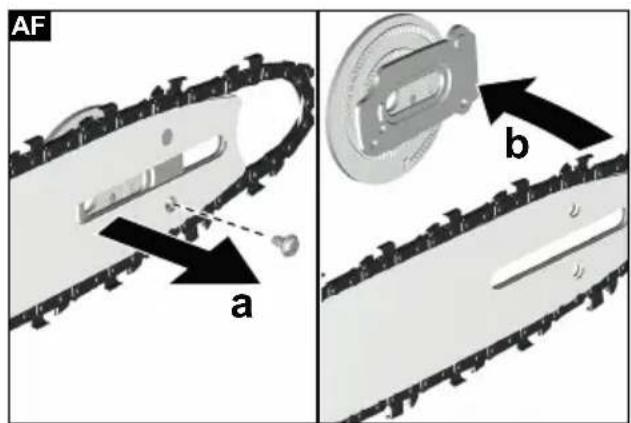
text_image
AF a b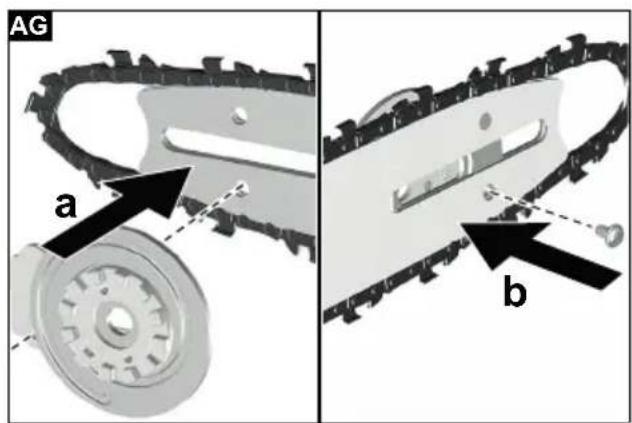
text_image
AG a bInhalt
Chairman of the Board of Management

S. Reiser
Director Regulatory Affairs & Certification
71364 Winnenden (Germany)
Tel.: +49 7195 14-0
Fax: +49 7195 14-2212
Winnenden, 2018/09/01
Contents
| General notes | 26 |
| Safety instructions | 26 |
| Intended use | 35 |
| Environmental protection | 35 |
| Accessories and spare parts | 35 |
| Scope of delivery | 35 |
| Safety devices | 35 |
| Symbols on the device | 36 |
| Protective clothing | 36 |
| Description of the device | 37 |
| Installation | 37 |
| Initial startup | 37 |
| Operation | 38 |
| Transport | 40 |
| Storage | 40 |
| Care and service | 40 |
| Troubleshooting guide | 41 |
| Warranty | 41 |
| Technical data | 41 |
| Vibration value | 42 |
| EU Declaration of Conformity | 42 |
General notes
Read these safety instructions, these original instructions, the safety instructions provided with the battery pack and the original instructions supplied with battery pack/standard charger before using the device for the first time. Act in accordance with them. Keep the booklets for future reference or for future owners.
In addition to the notes in the operating instructions, you also need to take into consideration the general safety regulations
and accident prevention guidelines applicable by law.
Safety instructions
Working with chain saws poses a very high risk of injury, since you will be working with high chain speeds and very sharp saw teeth. It is vital you observe the safety measures and code of behaviour for working with chain saws.
In addition to the safety warnings stated, the country-specific safety and training regulations (e.g. from authorities, trade associations or social insurance funds) also need to be observed. The use of chain saws may be restricted to certain times by local ordinances (time of day or time of the year). Observe the local regulations.
Hazard levels
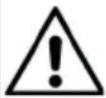
⚠️DANGER
- Indication of an imminent threat of danger that will lead to severe injuries or even death.
⚠ WARNING
- Indication of a potentially dangerous situation that may lead to severe injuries or even death.
△CAUTION
- Indication of a potentially dangerous situation that may lead to minor injuries.
ATTENTION
- Indication of a potentially dangerous situation that may lead to damage to property.
General Power Tool Safety Instructions
⚠ WARNING
- Read all safety warnings and all instructions.
Failure to follow the warnings and instructions may result in electric shock, fire and/or serious injury. Save all warnings and instructions for future reference.
The term "power tool" in the warnings refers to your mains-operated (corded) power tool or battery-operated (cordless) power tool.
1 Work area safety
a Keep work area clean and well lit. Cluttered or dark work areas invite accidents.
b Do not operate power tools in explosive atmospheres, such as in the presence of flammable liquids, gases or dust. Power tools create sparks which may ignite the dust or fumes.
c Keep children and by-standers away while operating a power tool.
Distractions can cause you to lose control.
2 Electrical safety
a Power tool plugs must match the outlet. Never modify the plug in any way. Do not use any adapter plugs with earthed (grounded) power tools.
Unmodified plugs and matching outlets will reduce the risk of electric shock.
b Avoid body contact with earthed or grounded surfaces such as pipes, radiators, ranges and refrigerators. There is an increased risk of electric shock if your body is earthed or grounded.
c Do not expose power tools to rain or wet conditions. Water entering a power tool will increase the risk of electric shock.
d Do not abuse the cord. Never use the cord for carrying, pulling or unplugging the power tool. Keep cord away from heat, oil, sharp edges or moving parts. Damaged or entangled cords increase the risk of electric shock.
e When operating a power tool outdoors, use an extension cord suitable for outdoor use. Use of a cord suitable for outdoor use reduces the risk of electric shock.
f If operating a power tool in a damp location is unavoidable, use a residual current device (RCD) protected supply. Use of an RCD reduces the risk of electric shock.
3 Personal safety
a Stay alert, watch what you are doing and use common sense when operating a power tool. Do not use a power tool while you are tired or under the influence of drugs, alcohol or medication. A moment of inattention while operating power tools may result in serious personal injury.
b Use personal protective equipment. Always wear eye protection. Protective equipment such as dust mask, non-skid safety shoes, hard hat, or hearing protection used for appropriate conditions will reduce personal injuries.
c Prevent unintentional starting. Ensure the switch is in the off-position before connecting to power source and/or battery pack, picking up or carrying the tool. Carrying power tools with your finger on the switch or energising power tools that have the switch on invites accidents.
d Remove any adjusting key or wrench before turning the power tool on. A wrench or a key left attached to a rotating part of the power tool may result in personal injury.
e Do not overreach. Keep proper footing and balance at all times. This enables better control of the power tool in unexpected situations.
f Dress properly. Do not wear loose clothing or jewellery. Keep your hair, clothing and gloves away from moving parts. Loose clothes, jewellery or long hair can be caught in moving parts.
g If devices are provided for the connection of dust extraction and collection facilities, ensure these are connected and properly used. Use of dust collection can reduce dust-related hazards.
4 Power tool use and care
a Do not force the power tool. Use the correct power tool for your application. The correct power tool will do the job better and safer at the rate for which it was designed.
b Do not use the power tool if the switch does not turn
it on and off. Any power tool that cannot be controlled with the switch is dangerous and must be repaired.
c Disconnect the plug from the power source and/or the battery pack from the power tool before making any adjustments, changing accessories, or storing power tools. Such preventive safety measures reduce the risk of starting the power tool accidentally.
d Store idle power tools out of the reach of children and do not allow persons unfamiliar with the power tool or these instructions to operate the power tool.
Power tools are dangerous in the hands of untrained users.
e Maintain power tools. Check for misalignment or binding of moving parts, breakage of parts and any other condition that may affect the power tool's operation. If damaged, have the power tool repaired before use. Many accidents are caused by poorly maintained power tools.
f Keep cutting tools sharp and clean. Properly maintained cutting tools with sharp cutting edges are less
likely to bind and are easier to control.
g Use the power tool, accessories and tool bits etc. in accordance with these instructions, taking into account the working conditions and the work to be performed. Use of the power tool for operations different from those intended could result in a hazardous situation.
5 Battery tool use and care
a Recharge only with the chargers specified by the manufacturer. A charger that is suitable for one type of battery pack may create a risk of fire when used with another battery pack.
b Use power tools only with specifically designated battery packs. Use of any other battery packs may create a risk of injury and fire.
c When the battery pack is not in use, keep it away from other metallic objects, like paperclips, coins, keys, nails, screws or other small metallic objects that can make a connection from one terminal to another. Shorting the battery terminals together may cause burns or a fire.
d Under abusive conditions, liquid may be ejected from
the battery; avoid contact. If contact accidentally occurs, flush with water. If liquid contacts eyes, additionally seek medical help.
Liquid ejected from the battery may cause irritation or burns.
6 Service
a Have your power tool serviced by a qualified repair person using only identical replacement parts. This will ensure that the safety of the power tool is maintained.
Additional General Safety Instructions
Note • Regulations may restrict the use of this device in some regions. Seek advice from your local authorities.
⚠️ DANGER ● Risk of fatal injury from cuts as a result of uncontrolled device movements. Keep body parts away from moving parts. ● Risk of injury from hurled or falling objects. Never use the device if there are persons, in particular children or animals, within a radius of 15 m.
- No changes may be made to the device.
⚠ WARNING • Children and persons unfamiliar with these instructions are not allowed to operate the device. The age of the operator may be limited by local restrictions. • You need an un-
obstructed view of the work area in order to be able to recognise any potential dangers. Use the device only under good lighting conditions. ● Before operation, make sure that the device, all control elements including the chain brake and safety devices are working properly. Check for loose locks, ensure that all protective devices and handles are correctly fitted and securely fastened. Only use the device when it is in a correct condition. ● Never use the device if the trigger on the handle does not switch on and off correctly. ● Replace any worn or damaged parts before operating the device. ● Risk of kickback due to loss of balance. Avoid an abnormal posture, keep a stable, safe footing and maintain your balance. ● Immediately stop the device and check for damage or identify the cause of the vibration if the device has been dropped, hit or vibrates abnormally. Have damage repaired by the authorised Customer Service or replace the device.
⚠CAUTION • Wear full eye protection and hearing protection, strong and sturdy gloves and head protection when operating the device. Wear a face mask when the work is dusty.
- Wear long, heavy trousers, sturdy shoes and well-fitting
gloves when working with the device. Do not work barefoot. Do not wear any jewellery, sandals or short trousers. ● Risk of injury when loose fitting clothing, hair or jewellery is caught by moving parts of the device. Keep clothing and jewellery away from moving parts of the device. Tie long hair back.
- Hearing protection can impair your ability to hear warning sounds, so pay attention to hazards in your vicinity and in the work area. • Only use accessories and spare parts which are approved by the manufacturer. Only original accessories and original spare parts ensure that the appliance will run fault-free and safely.
Chain saw safety warnings
- Keep all parts of the body away from the saw chain when the chain saw is operating. Before you start the chain saw, make sure the saw chain is not contacting anything. A moment of inattention while operating chain saws may cause entanglement of your clothing or body with the saw chain.
● Always hold the chain saw with your right hand on the rear handle and your left hand on the front handle. Holding the chain saw with a
reversed hand configuration increases the risk of personal injury and should never be done.
- Hold the power tool by insulated gripping surfaces only, because the saw chain may contact hidden wiring or its own cord. Saw chains contacting a "live" wire may make exposed metal parts of the power tool "live" and could give the operator an electric shock.
- Wear safety glasses and hearing protection. Further protective equipment for head, hands, legs and feet is recommended. Adequate protective clothing will reduce personal injury by flying debris or accidental contact with the saw chain.
- Do not operate a chain saw in a tree. Operation of a chain saw while up in a tree may result in personal injury.
● Always keep proper footing and operate the chain saw only when standing on fixed, secure and level surface. Slippery or unstable surfaces such as ladders may cause a loss of balance or control of the chain saw.
- When cutting a limb that is under tension be alert for spring back. When the tension in the wood fibres is re-
leased, the spring loaded limb may strike the operator and/or throw the chain saw out of control.
- Use extreme caution when cutting brush and saplings.
The slender material may catch the saw chain and be whipped toward you or pull you off balance.
- Carry the chain saw by the front handle with the chain saw switched off and away from your body. When transporting or storing the chain saw always fit the guide bar cover. Proper handling of the chain saw will reduce the likelihood of accidental contact with the moving saw chain.
- Follow instructions for lubricating, chain tensioning and changing accessories. Improperly tensioned or lubricated chain may either break or increase the chance for kickback.
- Keep handles dry, clean, and free from oil and grease. Greasy, oily handles are slippery causing loss of control.
- Cut wood only. Do not use chain saw for purposes not intended. For example: do not use chain saw for cutting plastic, masonry or non-wood building materi-
als. Use of the chain saw for operations different than intended could result in a hazardous situation.
Causes and operator prevention of kickback
Kickback may occur when the nose or tip of the guide rail touches an object, or when the wood closes in and pinches the saw chain in the cut.
Tip contact in some cases may cause a sudden reverse reaction, kicking the guide rail up and back towards the operator.
Pinching the saw chain along the top of the guide rail may push the guide rail rapidly back towards the operator.
Either of these reactions may cause you to lose control of the saw, which could result in serious personal injury. Do not rely exclusively upon the safety devices built into your saw. As a chain saw user, you should take several steps to keep your cutting jobs free from accident or injury.
Kickback is the result of tool misuse and/or incorrect operating procedures or conditions and can be avoided by taking proper precautions as given below:
- Maintain a firm grip, with thumbs and fingers encircling the chain saw handles, with both hands on the saw
and position your body and arm to allow you to resist kickback forces. Kickback forces can be controlled by the operator, if proper precautions are taken. Do not let go of the chain saw.
- Do not overreach and do not cut above shoulder height. This helps prevent unintended tip contact and enables better control of the chain saw in unexpected situations.
- Only use replacement bars and chains specified by the manufacturer. Incorrect replacement bars and chains may cause chain breakage and/or kickback.
- Follow the manufacturer's sharpening and maintenance instructions for the saw chain. Decreasing the depth gauge height can lead to increased kickback.
Additional safety instructions for chainsaws
Note • Kärcher recommends sawing tree trunks on a saw-horse during first use. • When using the chainsaw, keep a first aid kit for large wounds and a means of calling for help. A larger and more extensive first aid kit should be nearby.
⚠ WARNING ● Ensure a firm footing, a clean workplace and plan a retreat path from falling
branches before using the device. ● Beware of exhaust fumes, oil vapour and sawdust. If necessary, wear a mask or breathing apparatus. ● Always hold the chainsaw tightly with both hands. Hold the handles with your thumb on one side and your fingers on the other side. Hold the rear handle with your right hand and the front handle with your left hand. ● Risk of injury. Do not make any modifications to the device. Do not use the device to drive attachments or devices not recommended by the manufacturer of the device.
- Before switching on the device, make sure that the saw chain does not touch any objects. • Serious injuries or death if a wrongly tensioned saw chain jumps out of the guide rail.
Check the chain tension before each use. The length of the chain depends on the temperature. ● Ensure that all protective devices, handles and bucking spikes are correctly fitted, securely fastened and in good condition. ● Serious injuries due to incorrect working methods:
- You need to be alert at all times and be in control of your workplace when working with the chainsaw. The size of the workspace depends on the task to be performed and the size of the tree or work piece.
Felling a tree requires a larger workspace than e.g. trimming.
- Never saw with your body in line with the guide rail and chain. This reduce the danger of being hit by the chain on the head or body during a kick-back.
- Do not move the chainsaw back and forth but rather let the chain do the work, keep the chain sharp and do not try to push the chain through the cut.
- Do not apply pressure to the saw at the end of the cut. Be prepared to relax the load on the saw when it has cut through the wood.
- Do not stop the chainsaw while sawing. Let the saw run until it has finished the saw cut.
- Familiarize yourself with your new chainsaw by making simple cuts in safely supported wood. Repeat this exercise if you have not used your chainsaw for a long time. • Do not saw vines and/or bushes with a diameter of less than 75 mm. • Switch the device off, lock the chain brake, remove the battery pack and make sure that all moving parts have stopped moving:
● Before cleaning the device or removing a blockage.
- When leaving the device unattended.
● Before mounting or removing attachments.
● Before checking, maintaining or working on the device.
⚠️ CAUTION ● The chainsaw is a heavy device. People who use the chainsaw should be physically fit and in good health. You should have good eyesight, agility, balance and manual skills. In case of doubt, they should not use the chainsaw. ● When working with the device, always wear a safety helmet with a grille visor to reduce the danger of injury from a kickback into the face and head.
Residual risks
⚠ WARNING
- Certain residual risks remain present, even when the device is operated in the prescribed manner. The following dangers can be present when using the device:
- Vibration can cause injuries. Use the correct tools for the job, use the handles provided and restrict the working time and hazard exposure time.
- Noise can cause hearing injuries. Wear hearing protection and limit the duration of exposure.
-
Incision injuries on contact with exposed saw teeth of the saw chain.
-
Incision injuries due to unforeseen, abrupt movements or kickback of the g bar scab-bard.
- Incision injuries / risk of injection by parts flying away from the saw chain.
- Injuries caused by hurled objects (wood shavings, splinters).
● Inhalation of dust and particles.
● Skin contact with the lubricant / oil.
Risk reduction
△CAUTION
- Using the device for longer periods can cause poor circulation in the hands due to vibrations. A general period of use cannot be set, because this depends on several influencing factors:
● Personal tendency to suffer from poor circulation (fre- quently cold fingers, tingling sensation in the fingers) - Low ambient temperature. Wear warm gloves to protect your hands.
● Holding the device too tightly hindering blood circulation.
● Continuous operation is more harmful than operation interrupted by work breaks.
You should see a doctor if using the device regularly and for lengthy periods of time, and in the event of repeated occurrences of symptoms such as tingling in the fingers or cold fingers.
Intended use
DANGER
Improper use
Danger of death from incision injuries
Only use the device for its proper use.
● The chainsaw is only intended for private use.
● The chainsaw is intended for outdoor use.
- For safety reasons, always hold the chainsaw firmly with both hands.
- The chainsaw was developed for sawing small branches, large branches, trunks and beams. The cutting length of the guide rail determines the maximum possible diameter of the sawed material.
● The chainsaw may only be used for cutting wood.
- Do not use the chainsaw in a wet environment or in the rain.
- Use the chainsaw only in a well lit environment.
- Modifications and changes to the device that are not authorised by the manufacturer are prohibited for safety reasons.
Any other use is prohibited. The user shall be liable for hazards arising as a result of improper use.
Environmental protection

The packing materials can be recycled. Please dispose of packaging in accordance with the environmental regulations.

Electrical and electronic appliances contain valuable, recyclable materials and often components such as batteries, rechargeable batteries or oil, which - if handled or disposed of incorrectly - can pose a potential threat to human health and the environment. However, these components are required for the correct operation of the appliance. Appliances marked by this symbol are not allowed to be disposed of together with the household rubbish.
Notes on the content materials (REACH)
Current information on content materials can be found at: www.kaercher.com/REACH
Accessories and spare parts
Only use original accessories and original spare parts. They ensure that the appliance will run fault-free and safely.
Information on accessories and spare parts can be found at www.kaercher.com.
Scope of delivery
The scope of delivery for the appliance is shown on the packaging. Check the contents for completeness when unpacking. If any accessories are missing or in the event of any shipping damage, please notify your dealer.
Safety devices
△CAUTION
Missing or modified safety devices
Safety devices are provided for your own protection. Never modify or bypass safety devices.
Chain with a low risk of kickback
A chain with a low risk of kickback reduces the likelihood of kickback.
The raked teeth (engagement blades) in front of each saw tooth prevent the saw teeth from engaging too deeply in the kickback zone, thus reducing the amount of kickback.
When grinding the chain, there is a danger that this safety function will be overridden. If the saw performance deteriorates, the chain should be replaced for safety reasons. For spare parts, use only the combination of guide rail and chain recommended by the manufacturer.
Guide rails
Guide rails whose tips have a small radius usually carry a lower risk of kickback.
Therefore use a guide rail with matching chain for the task, which is just long enough. Longer guide rails increase the likelihood of loss of control during sawing. Check the chain tension before each use (see chapter Checking the chain tension). If the chain tension is not set correctly, sawing smaller branches (thinner than the full length of the guide rail) increases the danger of the chain being thrown off.
Chain catcher
If the chain loosens or tears, the chain catcher prevents the chain from being thrown in the direction of the user.
Bucking spikes
The integrated bucking spikes can be used as a fulcrum to give the chain saw stability during a cut.
When sawing, press the device forward until the metal spikes penetrate the edge of the wood. Subsequently moving the rear handle up or down in the direction of the cut reduces the physical strain when working with the chainsaw.
Chain brake
Chain brakes are used in case of danger to bring the chain quickly to a standstill.
The chain must come to a standstill immediately when the hand guard/chain brake lever is pressed in the direction of the guide rail.
The chain brake cannot prevent kickback, but reduces the risk of injury if the guide rail hits the user in the event of a kickback.
The proper function of the chain brake must be checked before each use of the device (see chapter Checking the functionality of the chain brake).
Symbols on the device
 | General warning symbol |
 | Read the operating instructions and all safety instructions before operating the device for the first time. |
 | Always wear suitable head protection, eye protection and hearing protection when working with the device. |
 | Wear non-slip safety shoes when working with the device. |
 | Wear non-slip, sturdy gloves when working with the device. |
 | Danger of death from kickback of the chainsaw. Never touch the objects to be sawn with the tip of the guide rail. |
 | Danger of death due to uncontrolled movements of the chainsaw. Always hold the chainsaw tightly with both hands. |
 | Danger of death due to uncontrolled movements of the chain saw. Never hold the device with just one hand. |
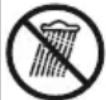 | Do not subject the device to rain or moist conditions. |
 | The guaranteed sound level specified on the label is 104 dB. |
 | The chain brake is released. |
 | The chain brake is locked and the saw chain is blocked. |
 | Turn to adjust the chain tension: = Tension the chain = Loosen chain = Loosen chain |
 direction of the chain (marking the bar cover) direction of the chain (marking the bar cover) | |
| [k3A3] chain tensioner | |
 the chain tensioner the chain tensioner | |
 on of the guide rail and the chain on of the guide rail and the chain | |
 filling level of chain oil filling level of chain oil |
Protective clothing
△DANGER
Risk of fatal injury from cut injuries. Wear suitable protective clothing when working with the device. Observe the local regulations for accident prevention.
Head protection
When working with the device, wear a suitable safety helmet that complies with EN 397 and is CE marked.
When working with the device, wear hearing protection that complies with EN 352-1 and is CE marked.
For protection against flying splinters, wear suitable safety goggles that comply with EN 166 or are CE marked. Or wear a helmet visor that complies with EN 1731 and is CE marked.
Protective helmets with hearing protection and a safety visor are available in specialist shops.
Chainsawing jacket
Wear a chainsawing jacket satisfying the requirements of EN 381-11 and labelled with the CE marking when working with the device.
Protective gloves
Wear suitable protective gloves with cut protection equipment that comply with EN 381-7 and are CE marked when working with the device.
Leg protection
Wear suitable leg protectors with all-around protection that comply with EN 381-5 and are CE marked when working with the device.
Safety shoes
Wear non-slip safety shoes that comply with EN 20345 and are marked with a chainsaw symbol working with the device. This ensures that the safety shoes comply with EN 381-3.
If you only use the chainsaw occasionally, the ground is level and there is little danger of tripping or snagging in bushes, you can use safety shoes with steel front caps and protective leggings that comply with EN 381-9.
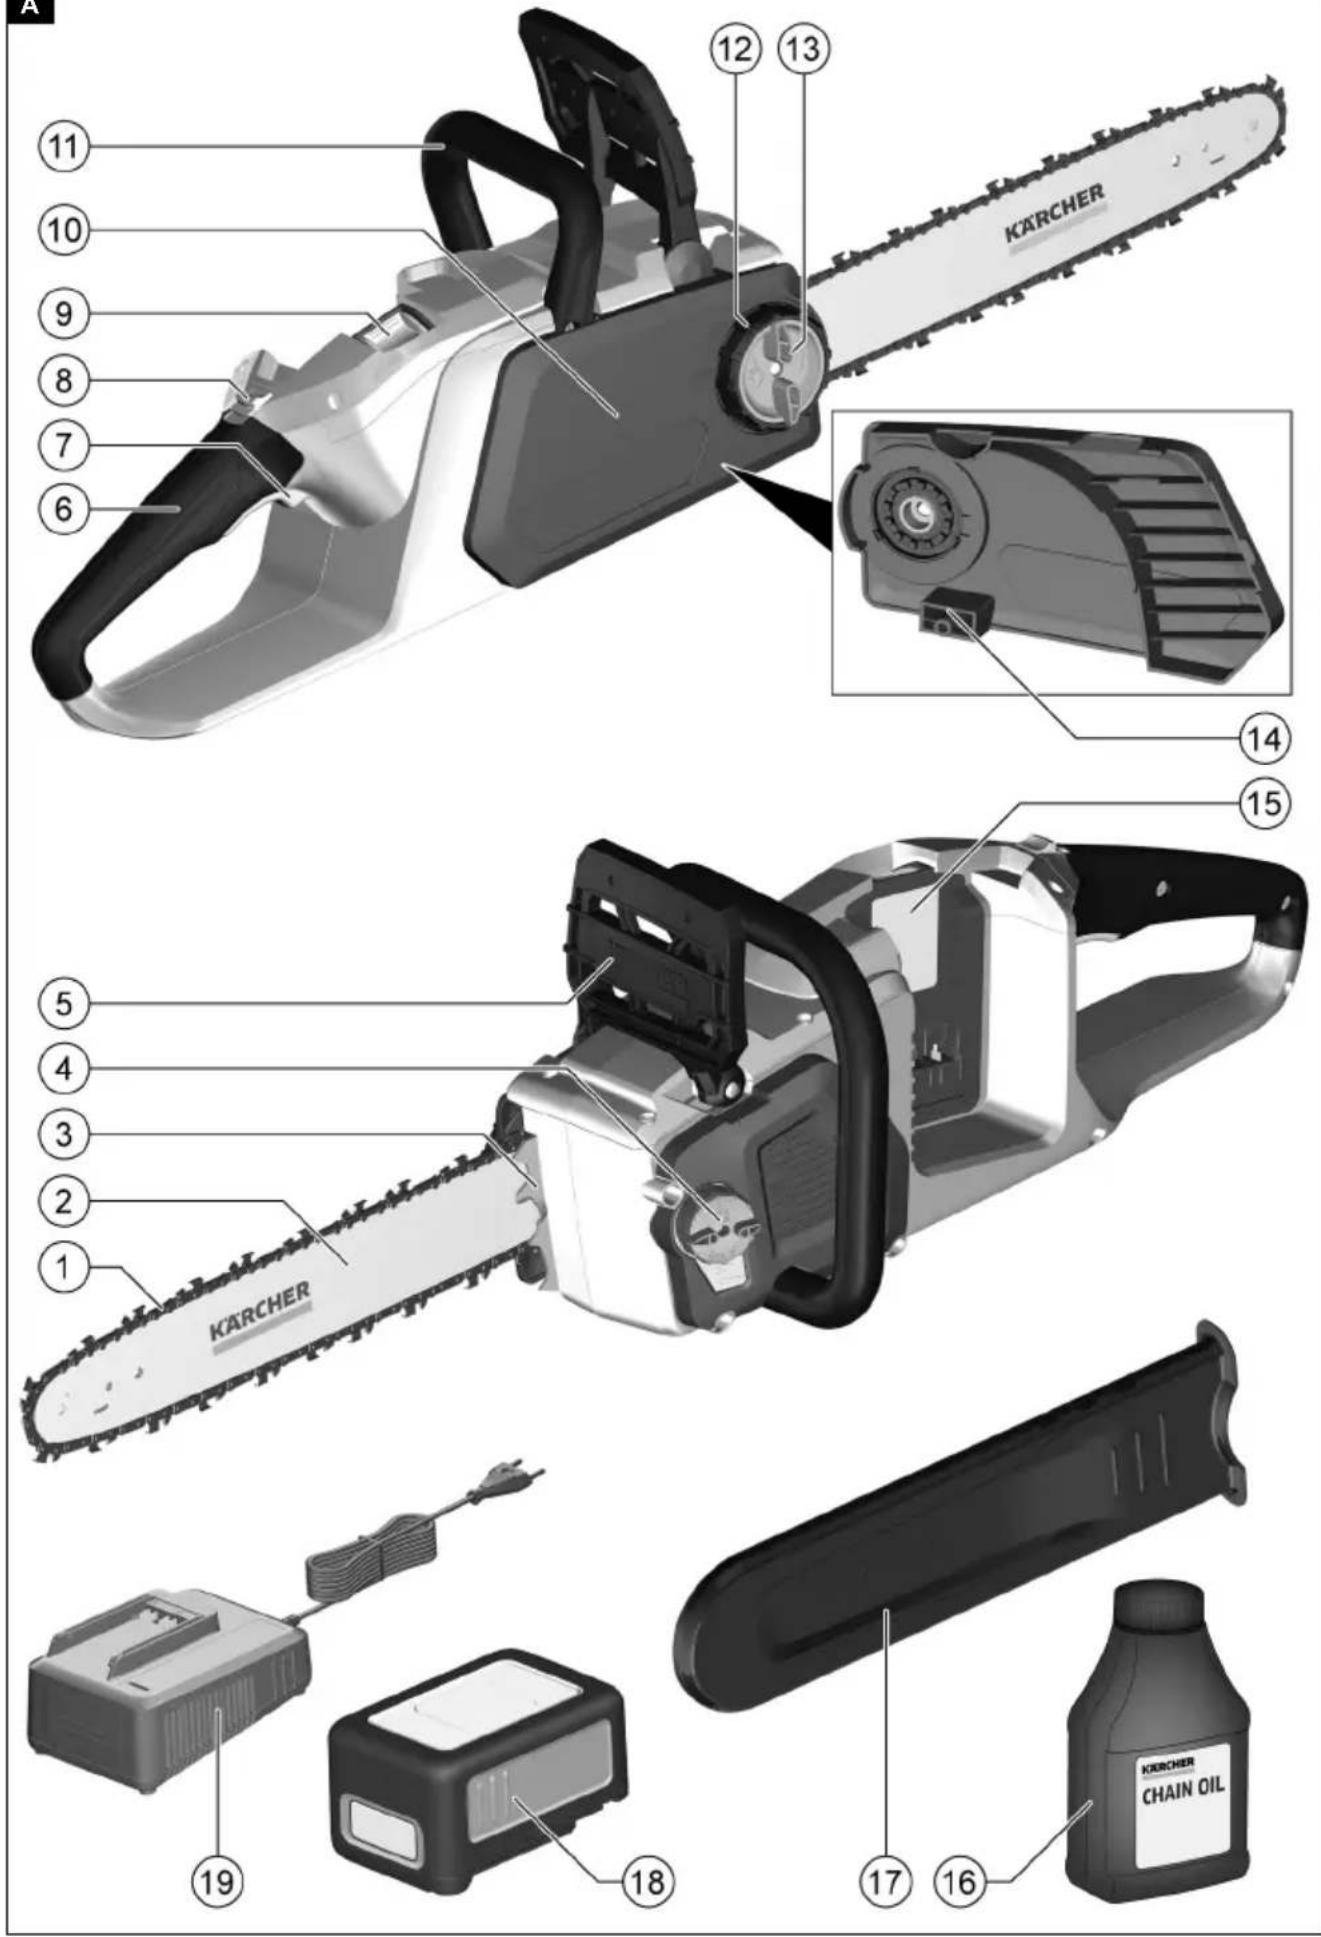
Description of the device
The maximum amount of equipment is described in these operating instructions. Depending on the model used, there are differences in the scope of delivery (see packaging).
See graphics page for illustrations Illustration A
① Chain
② Guide rail
③Bucking spikes
④ Chain oil tank cap
⑤ Hand guard/chain brake lever
⑥ Handle, rear
⑦Trigger
⑧ Trigger lockout button
⑨ Battery pack unlocking button
⑩ Bar cover
⑪ Handle, front
⑫ Ring for adjusting the chain tension
⑬ Chain tensioner knob
⑭ Chain catcher
⑮ Type plate
⑯ Chain oil
⑰Bar scabbard
18*Battery Pack Battery Power 36V
⑲*Quick Charger Battery Power 36V
* optional
Rechargeable battery pack
The device can be operated with a 36 V Kärcher Battery Power battery pack.
Installation
Mounting the chain and guide rail
△CAUTION
Sharp chain
Incision injuries
Wear protective gloves when working on the chain.
- Release the chain tensioner knob and remove the bar cover.
Illustration B
- Fit the chain on the guide rail. Observe the direction of rotation of the chain.
Illustration C
- Place the chain around the sprocket and insert the guide rail.
Illustration D
- Fit the bar cover and tighten the chain tensioner knob.
Illustration E
-
Adjust the chain tension (see Chapter Adjusting the chain tension).
-
Install the bar scabbard.
Illustration F
Initial startup
Filling the chain oil tank
-
If necessary, clean the area around the filling hole of sawdust and dirt.
-
Remove the chain oil tank cap.
Illustration G
- Slowly fill the chain oil into the tank.
Illustration H
-
Wipe up any spilled chain oil with a cloth.
-
Close the chain oil tank cap.
Checking the chain tension
△CAUTION
Sharp chain
Incision injuries
Wear protective gloves when working on the chain.
- Remove the bar scabbard.
Illustration I
- Carefully pull on the chain.
Illustration J
The distance between the guide rail and the chain must be ca. 5,5 mm.
- If necessary, adjust the chain tension (see Chapter Adjusting the chain tension).
Installing the battery pack
- Push the battery pack into the mounting in the device until it audibly latches into place.
Illustration K
Operation
Basic operation
- Examine the tree and branches for damage such as rot. In the case of damaged or rotten branches, seek the advice of a professional arborist.
- Remove the bar scrubber.
- Hold the device firmly with both hands.
Switch on the device
- Pull the hand guard/chain brake lever in the direction of the handle.
Illustration L
The chain brake is released.
- Press the trigger lockout button.
Illustration M
- Press the trigger.
The device starts up.
Interrupting operation
- Release the trigger.
The device stops.
- Push the hand guard/chain brake lever towards the guide rail.
Illustration N
The chain brake is locked and the saw chain is blocked.
- Remove the battery pack from the device (see Chapter Removing the battery pack).
Working techniques
Working position
⚠️DANGER
Uncontrolled movements of the chainsaw
Danger of death from incision injuries
Plan the cut before cutting and identify any potential dangers.
Always hold the chain saw firmly with both hands.
- Do not guide the chainsaw in the body axis. Illustration O
- Carry the chainsaw at your side so that parts of your body do not get in the range of movement of the chainsaw.
- Keep as far away as possible from the sawed material.
● Never work on a ladder or standing in a tree.
● Never work in unstable locations.
Pull in/recoil
⚠️DANGER
Uncontrolled movements of the chainsaw
Danger of death from incision injuries
Plan the cut before cutting and identify any potential dangers.
Always hold the chain saw firmly with both hands.
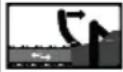
Pull in/recoil is an effect that occurs in principle in the opposite direction to the chain running direction on the sawed material.
Illustration P
① Pull in
②Recoil
When sawing with the underside of the guide rail - forehand cut - the chainsaw can be pulled suddenly towards the sawn object if the saw chain jams or hits a solid object in the wood.
- To avoid pulling in, always set the bucking spikes securely onto the wood.
When sawing with the top side of the guide rail - back-hand cut -the chainsaw can be propelled back towards the user if the saw chain jams or hits a solid object in the wood.
● To avoid a recoil:
- Do not pinch the top of the guide rail.
- Do not twist the guide rail in the cut.
Kickback
⚠️DANGER
Uncontrolled movements of the chainsaw
Danger of death from incision injuries
Plan the cut before cutting and identify any potential dangers.
Always hold the chain saw firmly with both hands.
When kickback occurs, the chainsaw is suddenly and uncontrollably flung in the direction of the user.
A kickback occurs when e.g. the saw chain in the upper region of the blade guide tip unintentionally encounters an obstacle or is trapped.
Illustration Q
● Always hold the chainsaw so that the kickback forces can be withstood. Do not let go of the chainsaw.
- Do not bend too far forward when sawing.
- Do not use the chainsaw above shoulder level.
● Always wait until the chain has reached full speed and saw at full throttle.
- Do not saw with the saw rail tip.
- Insert the guide rail into a started cut only with extreme care.
● Pay attention to the position of the trunk and to forces that can close the cut and jam the saw chain.
- Never saw off several branches at the same time when pruning.
- Only work with a sharp and properly tensioned chain.
- Use a chain with a low kickback risk and a guide rail with a small rail head.
Plan the fall direction and retreat path
⚠️DANGER
Falling tree
Danger of death
Tree felling work may only be carried out by trained persons.
When planning the fall direction, note the following:
- The distance to the next workplace must be at least 2.5 tree lengths.
- Do not perform felling in strong wind. The tree can fall unchecked.
- Determine the direction of fall based on tree growth, terrain (slope) and weather conditions.
● Always drop the tree into a growth gap, never onto other trees.
A retreat path must be planned for every worker. Where:
- The retreat path us to be positioned approx. 45° diagonally opposite the direction of fall.
Illustration R
● Free the retreat path from obstacles.
- Do not place any tools and equipment on the retreat path.
- When working on a steep slope, plan the retreat path parallel to the slope.
- When using the retreat path, watch for falling branches and observe the crown space.
Preparing the work area at the trunk
-
Clean the work area at the trunk of interfering branches, scrub and obstacles. Safe stance ensured.
-
Thoroughly clean the root, e.g. with an axe. Sand, stones and other foreign matter make the chain blunt.
-
Remove large roots. a Cut the root vertically.
Illustration S
b Cut the root horizontally. c Remove the loose root piece from the work area.
Setting the felling cut
⚠️DANGER
Falling tree
Danger of death
Tree felling work may only be carried out by trained persons.
-
Make sure nobody will be endangered by the falling tree. Calls can be overhead due to engine noise. Only persons occupied with felling may be present in the felling area.
-
Set the felling notch at right angles to the direction of fall.
a As close as possible to the ground, make a horizontal cut (sole cut) over approx. 1/3 of the trunk diameter.
Illustration T
b Make an oblique cut (roof cut) at an angle of approx. 45-60°.
- Set the felling cut.
a Make the felling cut parallel to the sole cut and at least 50mm higher.
b Only make the felling cut so far that a break-off strip at least 50mm wide remains. The break-off strip prevents the tree from twisting and falling in the wrong direction. As the fell line approaches the break-off strip, the tree should begin to fall.
-
Stop the felling cut if there is a danger that the tree will not fall in the desired direction or sway back and jam the saw chain. Use wedges to extend the cut and fell the tree in the desired direction.
-
pull the chainsaw out of the cut when the tree starts to fall.
-
Switch off the device.
-
Lock the chain brake.
-
Lower the chainsaw.
-
Follow the planned retreat route.
Cutting tensioned wood
⚠️DANGER
Uncontrolled movements of chainsaw and sawing material
Life-threatening incision injuries, injuries caused by sawed material
Plan the cut before cutting and identify any potential dangers.
Always hold the chainsaw firmly with both hands
Tensioned wood is created when a trunk, branch, rooted stump or sapling is tensioned by other wood.
-
Watch out for tensioned wood, as there is a danger that it will snap back to its original position. Illustration U
-
Carefully saw the tensioned wood from the pressure side (see also Chapter Trimming a tensioned trunk). Illustration V
Pruning
DANGER
Kickback
Life-threatening incision injuries
When pruning, make sure that the guide rail/chain does not become jammed.
⚠ WARNING
Changing weight distribution when pruning
Risk of injury due to uncontrolled movement of the trunk Select the work area so that no danger arises.
● Prune in the direction of growth. Illustration W
● Prune from top to bottom.
- Leave larger branches below as supports to keep the tree above the ground.
● Support the chainsaw as much as possible.
- Do not prune while standing on the trunk.
- Do not saw with the tip of the guide rail.
- Watch out for branches that are under tension. Cut branches that are under tension from bottom to top.
● Never saw several branches at once.
- Regularly clear the work area from pruned branches.
Cutting a trunk to length
△DANGER
Uncontrolled movements of the chainsaw
Danger of death from incision injuries
Plan the cut before cutting and identify any potential dangers.
Always hold the chain saw firmly with both hands.
ATTENTION
Damage to the chain due to ground contact
Make sure that the chain does not touch the ground.
-
Set the chainsaw onto the trunk with the bucking spikes.
-
Evenly saw through the trunk.
Trimming a tensioned trunk
⚠️DANGER
Uncontrolled movement of the chainsaw
Life-threatening incision injuries
When trimming tensioned trunks, be sure to follow the sequence of a relief cut at the pressure side and then a separating cut at the tension side.
● Trunk is supported on 2 sides:
a For the relief cut on the pressure side, saw in about 1/3 of the trunk diameter from above. Illustration X
b Set the cut on the tension side from the bottom.
- Trunk is supported on 1 side:
a For the relief cut on the pressure side, saw in about 1/3 of the trunk diameter from below. Illustration Y
b Set the cut on the tension side from the top.
Removing the battery pack
Note
During longer work breaks, remove the battery pack from the device and secure it against unauthorised use.
-
Pull the battery pack unlocking button in the direction of the battery pack. Illustration Z
-
Press the battery pack unlocking button to unlock the battery pack.
-
Remove the battery pack from the device.
Finishing operation
- Remove the battery pack from the device (see Chapter Removing the battery pack).
- Clean the device (see Chapter Cleaning the device).
Transport
△CAUTION
Failure to observe the weight
Risk of injury and damage
Be aware of the weight of the device during transportation.
△CAUTION
Uncontrolled startup
Incision injuries
Remove the battery pack from the device before transport.
Transport the device only with the blade guard fitted.
-
Remove the battery pack (see chapter Removing the battery pack).
-
Push the hand guard/chain brake lever towards the guide rail.
Illustration N
The chain brake is locked.
- Install the bar scabbard.
Illustration F
-
Only carry the device by the handle and with the guide rail facing to the rear.
-
Empty the chain oil tank when transporting over longer distances.
a Remove the chain oil tank cap.
Illustration G
b Fill the chain lubricating oil into a suitable container.
c Tighten the chain oil tank cap.
- Secure the device against slipping and tipping over when transporting in vehicles.
Storage
△CAUTION
Failure to observe the weight
Risk of injury and damage
Be aware of the weight of the device during storage.
△CAUTION
Uncontrolled startup
Incision injuries
Remove the battery pack from the device before storage.
Store the device only with the blade guard fitted.
-
Remove the battery pack (see chapter Removing the battery pack).
-
Push the hand guard/chain brake lever towards the guide rail.
Illustration N
The chain brake is locked.
- Install the bar scabbard.
Illustration F
- Empty the chain oil tank.
a Remove the chain oil tank cap. Illustration G
b Fill the chain lubricating oil into a suitable container.
c Tighten the chain oil tank cap.
-
If the device is to be stored for more than one month, oil the chain to prevent rust.
-
Store the device in a dry, well ventilated location. Keep away from corrosive substances such as gar-
den chemicals and defrosting salt. Do not store the device outdoors.
Care and service
△CAUTION
Uncontrolled startup
Incision injuries
Remove the battery from the device before all work on the device.
△CAUTION
Sharp chain
Incision injuries
Wear protective gloves when working on the chain.
Cleaning the device
-
Remove the battery pack (see Chapter Removing the battery pack).
-
Use a brush to clean the chain of cutting residue and dirt.
Illustration AA
-
Clean the housing and handles with a soft, dry cloth.
-
Check the function of the chain brake after every cleaning (see Chapter Checking the functionality of the chain brake).
Maintenance intervals
Before every use
The following activities must be carried out before every use:
- Check the filling level of the chain oil, top up the chain oil if necessary (see Chapter Filling the chain oil tank).
- Check the chain tension (see Chapter Checking the chain tension).
- Check the chain for sufficient sharpness, if necessary replace the chain (see Chapter Replacing the chain and guide rail).
- Check the device for damage.
- Check all pins, nuts and screws for tightness.
- Check the function of the chain brake (see Chapter Checking the functionality of the chain brake).
Every 5 operating hours
- Check the function of the chain brake every 5 operating hours (see Chapter Checking the functionality of the chain brake).
Maintenance work
Checking the functionality of the chain brake
-
Switch the device on.
-
While the device is running, turn your hand on the front handle so that the hand guard/chain brake lever is pressed towards the guide rail with the back of your hand.
The chain brake is locked. The chain must come to a standstill.
- Pull the hand guard/chain brake lever in the direction of the handle. The chain must release.
Adjusting the chain tension
-
Remove the battery pack (see chapter Removing the battery pack).
-
Loosen the chain tensioner knob.
Illustration AB
- Adjust the chain tension with the ring.
Illustration AC
- Check the chain tension.
Illustration J
The distance between the guide rail and the chain must be ca. 5,5 mm.
- Tighten the chain tensioner knob.
Replacing the chain and guide rail
△CAUTION
Sharp chain
Incision injuries
Wear protective gloves when working on the chain.
-
Remove the battery pack (see chapter Removing the battery pack).
-
Release the chain tensioner knob and remove the bar cover.
Illustration AD
- Remove the guide rail with the chain tensioner.
Illustration AE
- Remove the chain tensioner if the guide rail is to be replaced.
Illustration AF
-
Dispose of the old chain and, if necessary, the guide rail properly.
-
If necessary, mount the chain tensioner on the new guide rail.
Illustration AG
- Fit the new chain on the guide rail. Observe the direction of rotation of the chain.
Illustration C
- Place the chain around the sprocket and insert the guide rail.
Illustration D
- Fit the bar cover and tighten the chain tensioner knob.
Illustration E
- Adjust the chain tension (see Chapter Adjusting the chain tension).
Troubleshooting guide
Malfunctions often have simple causes that you can remedy yourself using the following overview. When in doubt, or in the case of malfunctions not mentioned here, please contact your authorised Customer Service.
As the battery pack ages, even if it is looked after, its capacity reduces such that the full run time will no longer be reached when fully charged. This does not indicate a defect.
| Fault Cause Rectification | ||
| The device does not start up | Battery pack is empty ● Charge the battery pack. | |
| Battery pack is defective. ● Replace the battery pack. | ||
| Battery pack is not inserted correctly. | ● Push the battery pack into the mounting until it latches into place. | |
| The device stops during operation | The battery has overheated | ● Stop working and allow the battery to cool down to normal battery temperature. |
| Motor has overheated ● Stop working and allow the motor to cool down. | ||
Warranty
The warranty conditions issued by our relevant sales company apply in all countries. We shall remedy possible malfunctions on your appliance within the warranty period free of cost, provided that a material or manufacturing defect is the cause. In a warranty case, please contact your dealer (with the purchase receipt) or the next authorised customer service site.
(See overleaf for the address)
Technical data
Device performance data
| Working voltage of the battery V | 36 | |
| No-load chain speed | m/s | 21 |
| Chain oil tank volume | ml | 190 |
Determined values in acc. with EN 60745-1, EN 60745-2-13
| Sound pressure level L_pA | dB(A) | 91,2 |
| Uncertainty K_pA | dB(A) | 3,0 |
| Sound power level L_wA | dB(A) | 102,2 |
| Uncertainty K_WA | dB(A) | 1,8 |
| Front handle hand-arm vibration value | m/s ^2 | 3,6 |
| Rear handle hand-arm vibration value | m/s ^2 | 4,9 |
| Uncertainty K | m/s ^2 | 1,5 |
Dimensions and weights
| Length x width x height | mm | 834 x 222 x 235 |
| Guide rail length | mm | 356 |
| Cutting length | mm | 300 |
| Chain pitch | in (mm) | 0,375 (9,525) |
| Weight (without battery pack) | kg | 4,3 |
Subject to technical modifications.
Vibration value
△WARNING
The specified vibration value was measured using a standard test procedure and may be used to compare devices.
The specified vibration value may be used in a provisional assessment of the load.
Depending on the way the device is used, the vibration emission can deviate from the specified overall value during the current use of the device.
Device with a hand-arm vibration value > 2.5 m/s ^2 (see chapter Technical Data in the operating instructions)
⚠️CAUTION • Uninterrupted use of the device for several hours can lead to numbness.
- Wear warm gloves to protect your hands.
- Take regular breaks from work.
EU Declaration of Conformity
We hereby declare that the machine described below complies with the relevant basic safety and health requirements in the EU Directives, both in its basic design and construction as well as in the version placed in circulation by us. This declaration is invalidated by any changes made to the machine that are not approved by us.
Product: Cordless chainsaw
Type: 1.444-05x.x
Currently applicable EU Directives
2014/30/EU
2006/42/EC (+2009/127/EC)
2011/65/EU
2000/14/EC (+2005/88/EC)
Harmonised standards used
EN 50581: 2012
EN 55014-1: 2017
EN 55014-2: 2015
EN 60745-1:2009+A11:2010
EN 60745-2-13:2009+A1:2010
Conformity evaluation procedure used
2000/14/EC and amended by 2005/88/EC: Appendix V
Sound power level dB(A)
Measured:102,2
Guaranteed:104
Notified body, 0197 TÜV Rheinland LGA Products
GmbH; Tillystraße 2 D - 90431 Nürnberg, Germany has carried out EC type approval, certificate number: BM XXXXXXXX 0001
The signatories act on behalf of and with the authority of the company management.

H. Jenner
Chairman of the Board of Management

S. Reiser
Director Regulatory Affairs & Certification
Documentation supervisor: S. Reiser
Alfred Kärcher SE & Co. KG
Alfred-Kärcher-Str. 28 - 40
71364 Winnenden (Germany)
Ph.: +49 7195 14-0
Fax: +49 7195 14-2212
Winnenden, 2018/09/01
Contenu
2006/42/CE (+2009/127/CE)
2011/65/EU
2000/14/CE (+2005/88/CE)
H. Jenner
Chairman of the Board of Management

S. Reiser
Director Regulatory Affairs & Certification
Responsable de la documentation : S. Reiser
Alfred Kärcher SE & Co. KG
Alfred-Kärcher-Str. 28 - 40
71364 Winnenden (Germany)
H. Jenner
Chairman of the Board of Management

S. Reiser
Director Regulatory Affairs & Certification
71364 Winnenden (Germany)
Tel.: +49 7195 14-0
Fax: +49 7195 14-2212
Winnenden, 01/09/2019
Inhoud
Reduceren van risico's
⚠️ VOORZICHTIG
Chairman of the Board of Management

S. Reiser
Director Regulatory Affairs & Certification
71364 Winnenden (Germany)
Tel.: +49 7195 14-0
Fax: +49 7195 14-2212
Winnenden, 2018/09/01
Chairman of the Board of Management
S. Reiser
Director Regulatory Affairs & Certification
71364 Winnenden (Germany)
Tel.: +49 7195 14-0
Fax: +49 7195 14-2212
Winnenden, 01/09/2018
Índice
2006/42/CE (+2009/127/CE)
2011/65/UE
2000/14/CE (+2005/88/CE)

H. Jenner
Chairman of the Board of Management
S. Reiser
Director Regulatory Affairs & Certification
Winnenden, 2018/09/01
Indhold
www.kaercher.com/REACH
2006/42/EF (+2009/127/EF)
2011/65/EU
2000/14/EF (+2005/88/EF)

H. Jenner
Chairman of the Board of Management
S. Reiser
Director Regulatory Affairs & Certification
71364 Winnenden (Germany)
Tlf.: +49 7195 14-0
Fax: +49 7195 14-2212
Winnenden, 2018/09/01
Indhold
Generelle merknader 153
2006/42/EF (+2009/127/EF)
2011/65/EU
2000/14/EG (+2005/88/EG)
Anvendte harmoniserte standarder
EN 50581: 2012
EN 55014-1: 2017
EN 55014-2: 2015
EN 60745-1:2009+A11:2010
EN 60745-2-13:2009+A1:2010
Chairman of the Board of Management
S. Reiser
Director Regulatory Affairs & Certification
71364 Winnenden (Germany)
Tlf.: +49 7195 14-0
H. Jenner
Chairman of the Board of Management

S. Reiser
Director Regulatory Affairs & Certification
D-71364 Winnenden (Germany)
Tfn: +49 7195 14-0
Fax: +49 7195 14-2212
Winnenden, 2018-09-01
Sisältö
Chairman of the Board of Management

S. Reiser
Director Regulatory Affairs & Certification
Dokumentointivastaava: S. Reiser
Alfred Kärcher SE & Co. KG
Alfred-Kärcher-Str. 28 - 40
71364 Winnenden (Germany)
Puh.: +49 7195 14-0
H. Jenner
Chairman of the Board of Management
S. Reiser
Director Regulatory Affairs & Certification
71364 Winnenden (Germany)
Tηλ.: +49 7195 14-0
Φαξ: +49 7195 14-2212
Winnenden, 2018/09/01
İçindekiler
2006/42/AT (+2009/127/AT)
2011/65/AT
2000/14/AT (+2005/88/AT)
Chairman of the Board of Management

S. Reiser
Director Regulatory Affairs & Certification
Winnenden, 01/09/2018
Содержание
Chairman of the Board of Management
S. Reiser
Director Regulatory Affairs & Certification
71364 Winnenden (Germany)
Тел.: +49 7195 14-0
Факс: +49 7195 14-2212
H. Jenner
Chairman of the Board of Management

S. Reiser
Director Regulatory Affairs & Certification
Winnenden, 2018/09/01
Obsah
Obecné pokyny 280
2006/42/ES (+2009/127/ES)
2011/65/EU
2000/14/ES (+2005/88/ES)
Chairman of the Board of Management
S. Reiser
Director Regulatory Affairs & Certification
Zmocněnec pro dokumentaci: S. Reiser
Alfred Kärcher SE & Co. KG
Alfred-Kärcher-Str. 28 - 40
Winnenden, 2018/09/01
Kazalo
Splošni napotki.... 297
Varnostna navodila.... 298
Namenska uporaba.... 307
Varovanje okolja.... 307
Pribor in nadomestni deli.... 307
Obseg dobave.... 307
Varnostne naprave 307
Simboli na napravi.... 308
2006/42/ES (+2009/127/ES)
2011/65/EU
2000/14/ES (+2005/88/ES)
Chairman of the Board of Management
S. Reiser
Director Regulatory Affairs & Certification
Winnenden, 9. 1. 2018
Spis treści
2006/42/WE (+2009/127/WE)
2011/65/UE
2000/14/WE (+2005/88/WE)
Chairman of the Board of Management

S. Reiser
Director Regulatory Affairs & Certification
71364 Winnenden (Germany)
Tel.: +49 7195 14-0
Directive UE relevante
2014/30/UE
2006/42/UE (+2009/127/UE)
2011/65/UE
2000/14/CE (+2005/88/CE)
Norme armonizate aplicate
EN 50581: 2012
EN 55014-1: 2017
EN 55014-2: 2015
EN 60745-1:2009+A11:2010
EN 60745-2-13:2009+A1:2010
Chairman of the Board of Management
S. Reiser
Director Regulatory Affairs & Certification
71364 Winnenden (Germania)
Tel.: +49 7195 14-0
Fax: +49 7195 14-2212
Winnenden, 2018/09/01
Obsah
Všeobecné upozornenia .... 351
2006/42/ES (+2009/127/ES)
2011/65/EÚ
2000/14/ES (+2005/88/ES)
Chairman of the Board of Management

S. Reiser
Director Regulatory Affairs & Certification
71364 Winnenden (Germany)
Tel.: +49 7195 14-0
Fax: +49 7195 14-2212
Winnenden, 01.09.2018
Sadržaj
| Opće napomene | 369 |
| Sigurnosni napuci | 369 |
| Namjenska uporaba | 378 |
| Zaštita okoliša | 378 |
| Pribor i zamjenski dijelovi | 378 |
| Sadržaj isporuke | 378 |
| Sigurnosni uređaji | 378 |
| Simboli na uređaju | 379 |
| Zaštitna odjeća | 379 |
| Opis uređaja | 380 |
| Montaža | 380 |
| Puštanje u pogon | 380 |
| Rad | 380 |
| Transport | 382 |
| Skladištenje | 383 |
| Njega i održavanje | 383 |
| Pomoć u slučaju smetnji | 384 |
| Jamstvo | 384 |
| Tehnički podaci | 384 |
| Vrijednost vibracije | 384 |
| EU izjava o sukladnosti | 384 |
Opće napomene
Prije prve uporabe uređaja pročitajte ove sigurnosne naputke, ove originalne upute za rad i priložene sigurnosne na-putke za komplet baterija, kao i priložene originalne upute za rad za komplet baterija / standardni punjač. Postupajte u skladu s njima. Čuvajte knjižice za kasniju uporabu ili za sljedećeg vlasnika.
2006/42/EZ (+2009/127/EZ)
2011/65/EU
2000/14/EZ (+2005/88/EZ)
Primijenjene uskladene norme
EN 50581: 2012
EN 55014-1: 2017
EN 55014-2: 2015
EN 60745-1:2009+A11:2010
EN 60745-2-13:2009+A1:2010
H. Jenner
Chairman of the Board of Management
S. Reiser
Director Regulatory Affairs & Certification
Opunomoćenik za dokumentaciju: S. Reiser
Alfred Kärcher SE & Co. KG
Alfred-Kärcher-Str. 28 - 40
71364 Winnenden (Njemačka)
Tel.: +49 7195 14-0
Telefaks: +49 7195 14-2212
Winnenden, 1. 9. 2018.
Sadržaj
Opšte napomene.... 385
Sigurnosne napomene 385
Namenska upotreba 395
2006/42/EZ (+2009/127/EZ)
2011/65/EU
2000/14/EZ (+2005/88/EZ)
Primenjene harmonizovane norme
EN 50581: 2012
EN 55014-1: 2017
EN 55014-2: 2015
EN 60745-1:2009+A11:2010
EN 60745-2-13:2009+A1:2010
Chairman of the Board of Management

S. Reiser
Director Regulatory Affairs & Certification
Lice ovlašćeno za dokumentaciju: S. Reiser
Alfred Kärcher SE & Co. KG
Alfred-Kärcher-Str. 28 - 40
71364 Winnenden (Germany)
Tel.: +49 7195 14-0
Winnenden, 2018/09/01
Съдържание
Общи указания.... 403
Указания за безопасност.... 403
Употреба по предназначение.... 416
Chairman of the Board of Management
S. Reiser
Director Regulatory Affairs & Certification
71364 Winnenden (Germany)
Тел.: +49 7195 14-0
Факс: +49 7195 14-2212
Виненден, 2018/09/01
Sisukord
2006/42/EÜ (+2009/127/EÜ)
2011/65/EL
2000/14/EÜ (+2005/88/EÜ)
Chairman of the Board of Management

S. Reiser
Director Regulatory Affairs & Certification
71364 Winnenden (Germany)
Tel: +49 7195 14-0
Winnenden, 2018/09/01
Saturs
Chairman of the Board of Management
S. Reiser
Director Regulatory Affairs & Certification
Pilnvarotais sagatavot dokumentāciju: S. Reizers (S. Reiser)
Alfred Kärcher SE & Co. KG
Alfred-Kärcher-Str. 28 - 40
H. Jenner
Chairman of the Board of Management

S. Reiser
Director Regulatory Affairs & Certification
H. Jenner
Chairman of the Board of Management
S. Reiser
Director Regulatory Affairs & Certification
71364 Winnenden (Germany)
Тел.: +49 7195 14-0
Факс: +49 7195 14-2212
H. Jenner
Chairman of the Board of Management
S. Reiser
Director Regulatory Affairs & Certification
Chairman of the Board of Management

S. Reiser
Director Regulatory Affairs & Certification
www.kaercher.com/REACH
natural_image
Black silhouette of a hand giving a thumbs-up gesture (no text or symbols)THANK YOU!
MERCI! DANKE! iGRACIAS!

Register your product and benefit from many advantages.
www.kaercher.com/welcome


Rate your product and tell us your opinion.
natural_image
Icon showing a gear and wrench, no text or symbols presentwww.kaercher.com/dealersearch
Alfred Kärcher SE & Co. KG
Alfred-Kärcher-Str. 28-40
71364 Winnenden (Germany)
Tel.: +49 7195 14-0
Fax: +49 7195 14-2212