
Foodi max Pro AG651EU - Grill plate NINJA - Free user manual and instructions
Find the device manual for free Foodi max Pro AG651EU NINJA in PDF.
| Product type | Ninja Foodi Max Pro AG651EU Indoor Grill & Griddle Plate |
| Power supply | 220-240 V~, 50-60 Hz, 2460 W |
| Cooking functions | Grill, Griddle, Roast, Air Fry, Bake, Dehydrate, Reheat |
| Temperature ranges | Grill: 200-250 °C; Griddle: adjustable; other modes: up to 250 °C |
| Capacity | Suitable for multiple servings (details not specified) |
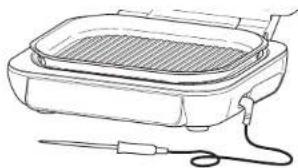
| Included accessories | Grill plate, griddle plate, cooking basket, splatter guard, digital meat thermometer with magnetic housing |
| Plate material | Non-stick coating |
| Safety | Auto shut-off, cool-touch handles, splatter guard, plate detection |
| Care and cleaning | Plates, basket, and guard are dishwasher safe; thermometer and main unit hand wash only; clean lid with a damp cloth |
| Dimensions (approx.) | Approximately 40 x 40 x 20 cm (estimated) |
| Weight (approx.) | Approximately 7 kg (estimated) |
| Warranty | 2 years (legal and Ninja commercial warranty) |
| Repairability | Genuine spare parts available on ninjakitchen.eu |
Frequently Asked Questions - Foodi max Pro AG651EU NINJA
User questions about Foodi max Pro AG651EU NINJA
0 question about this device. Answer the ones you know or ask your own.
Ask a new question about this device
Download the instructions for your Grill plate in PDF format for free! Find your manual Foodi max Pro AG651EU - NINJA and take your electronic device back in hand. On this page are published all the documents necessary for the use of your device. Foodi max Pro AG651EU by NINJA.
USER MANUAL Foodi max Pro AG651EU NINJA
MED WELL
MED
MED BARE
RARE
BEMARK: Nár du bruger Grill, flad plade, steg erler lufsteg bipper apparatelet, og VEND visps pa displayct. Vi anbefalar at vende, men det er valgfrit
Dehydrate (Dehydrating)

1For a moniere glripiaden sku du placere den foran pa cason, sa den sactes fast, og dereftertrykke ned pa cagdisen at pladen indl den klikker pa plaeds. Serg for at staenkpider cr merteret.
2 Placer grillkurven pa gritplaten og biftj ingriscorderi ul kurver. Luk liget, ca apparatior: like kravor forvarming ul derme function.
3 Serg for, at apparae, er tilsluttet, og tryk o8 @ for taene cct.
4 Droj drejskiven ti Funktionen DEHYDRER Standardtemperatureen visets. For at justere temperatur, his vsnset, sa tryk pa knappen Temperatur og drej pa drejskiven.
5 Tryk pä knappen TID og drei drejesikven for at vaelge den anskeke tio.
Tryk pä cirejeknappen for at starte. Apperatet forvarmer ilke dychydriningslstand.)
7 Nár dehyceroitrsteden er feed,g bilper apparatus, og displayet visor FERIDG.
8 Fjern ingrodonserrno og kurven fra grillplaoen.
9 Fjern grilpladen ved at trykke pa den orange ulasekrnap pa venstre side af enheden Pladen gar op pa bagsiden og kan saa ftes op.
TILBEREDNINGSFUNKTIONER - FORTSAT
Reheat (Genopvamnling)
1 For at montre grilplader skal du placere den foran p basen, sed n cactos fast. og deretter trykke ned p bsagcien at pladen, inclen den klikker pa plaids. Serg for at staekneper or moncrat.
2 Placer grillkurven pa alden, og anbring den saedes, at den sicderangs bagsicen af grillplacen, sa kurvfeoderne sicderi glialadens melemrum. Tilj ingredientso, og suk salaget.
Serg for, at apparatuset er tiliSLutter, og nyk pa@ dr at lacende dcI.
1 Drei dreie knappen ti GENVARM Standardtemperatur indstellungen dukker op pa displayel. Ior al juste temperaturen, Hvis ensket, sa tryk pe knappen Temperatur og drej pe drejeskiven.
BEMERK: Hvis du germe vll bruge sonden til at alle din maps temperatur, skal du trykke pa MANUEL I to sekunder, nyretter madans indvionigo temperatur vises pa skaeren im sekember.
RENGØRING OG VEDLIGEHOLDELS FEJLFINDING
Apparatet skai alidr rengares grundigt after brug. Lad altid apparatet kole af, for du renger det.

injakitchen.eu
ninjakitchen.eu
GARFUNKTIONEN
GHI (Grillen)
for purchasing the Ninja* Foodi' Max Pro Grill, Plancha & Air Fryer

REGISTER YOUR PURCHASE

ninjakitchen.eu/registrationguarantee

Scan QR code using mobile device
RECORD THIS INFORMATION
Model Number:
Serial Number:
Date of Purchase:
(Keep receipt)
Store of Purchase:
TECHNICAL SPECIFICATIONS
Voltage: 220-240V-50-60Hz
Watts: 2460W
TIP: You can find the model and serial numbers on the QR code label on the back of the unit by the power cord.
CONTENTS
Important Safeguards 44
Parts 46
Getting to Know Your Grill. 47
Function Buttons 47
Operating Buttons 47
Before First Use 47
Using the Ninja Foodi Max Pro 48
Splatter Guard 48
Grill Control 18
BatchGrilling 48
Using the Digital Cooking Probe. 49
Using the Probe in Different Cooking Scenarios 50
How to Insert the Probe. 51
Cooking Functions 52
Grill 52
Plancha 52
5
56
Buke 56
57
Cleaning & Maintenance. 58
Troubleshooting 59
Product Registration. 60
IMPORTANT SAFEGUARDS
HOUSEHOLD USE ONLY · READ ALL INSTRUCTIONS BEFORE USE
When using electrical appliances, basic safety precautions should always be followed, including the following:
AWARNING
To eliminate a choking hazard for young children, discard all packaging materials immediately upon unpacking.
2 This apolpliance can be used by persons with reduced physical, sensory or mental capabilities or lack of experience and knowledge if they have been given supervision or instruction concerning use of the appliance in a safe way and understand the hazards involved.
3 Keep the appliance and its cord out of reach of children. DO NOT allow the appliance to be used by children. Close supervision is necessary when used near children.
4 This appliance is for household use only. DO NOT use this appliance for anything other than its intended use. DO NOT use in moving vehicles or boats. DO NOT use outdoors. Misuse may cause injury.
5 Ensure the surface is level, clean and dry. DO NOT place the apollance near the edge of a worktop during operation.
6ALWAYS ensure the appliance is properly assembled before use.
7 When using this apolatance, provide at least 15cm of space above and on all sides for air circulation.
8DONOTuse an extension cord. A short power-supply cord is used to reduce the risk of children grabbing the cord or becoming entangled and to reduce the risk of people tripping over a longer cord.
9 To protect against electrical shock DO NOT immerse cord, plugs, or main unit housing in water or other liquid.
10DONOT use the appliance if there is damage to the power cord or plug. Regularly inspect the appliance and power cord. If the appliance malfunctions or has been damaged in any way, immediately stop use and call Customer Service.
11 NEVER use socket below worktop surface.
12 DO NOT place appliance on hot surfaces including on or near a gas or electric burner or in a heated oven.
13 DO NOT let cord hang over edges of tables or workups.
14 Only use recommended accessories included with this appliance or authorised by SharkNinja. The use of accessories or attachments not recommended by SharkNinja may cause a risk of fire or injury.
15 Before placing any accessory into the cooker, ensure it is clean and dry.
16 DO NOT use the appliance without the grill plate and splatter guard installed.
17 ALWAYS ensure lic is fully closed before operating.
18 DO NOT move the appliance when in use.
19 DO NOT cover the air intake vent or air socket vent while unit is operating. Doing so will prevent even cooking and may damage the unit or cause it to overheat.
20 DO NOT touch hot surfaces. Appliance surfaces are hot during and after operation. To prevent burns or personal injury, ALWAYS use protective hot pads or insulated oven gloves and use available hinges and knobs.
21 DO NOT touch accessories during or immediately after cooking. The grill plate and basket becomes extremely hot during the cooking process. Avoid physical contact while removing the accessory from the appliance. To prevent burns or personal injury ALWAYS use care when using product. Recommend use of long handed utensil and protective hot pads or insulated oven gloves.
22 DO NOT use this appliance for deep-frying.
23 DO NOT place hands near the Digital Cooking Probe cord when in use to prevent burning or scalding.
24 We recommend that you confirm the internal temperature of food using an external food probe.
25 Please refer to the Cleaning & Maintenance section for regular maintenance of the appliance.
26 To disconnect turn any control to "off", then unplug from socket when not in use and before cleaning.
27 Allow to cool before cleaning, disassembly, putting in or taking off parts and for storage.
28 DO NOT clean with metal scouring pads. Pieces can break off the pad and touch electrical parts, creating a risk of electric shock.
29 Cleaning and user maintenance should not be performed by children.
30 Extreme caution must be used when moving an appliance containing hot oil or other hot liquids.
31 DO NOT place anything on top of the product when the lid is closed during use and stored.
32 Ensure the grill plate is correctly inserted and securely locked into position.
33 Always ensure the grill is completely cool before releasing and removing the cooking plates.
Indicates to read and review instructions to understand operation and use of product. Indicates the presence of a hazard that can cause personal injury, death or substantial property damage if the warning included with this symbol is ignored. Take care to avoid contact with hot surface. Always use hand protection to avoid burns. For indoor and household use only.
SAVE THESE INSTRUCTIONS
PARTS
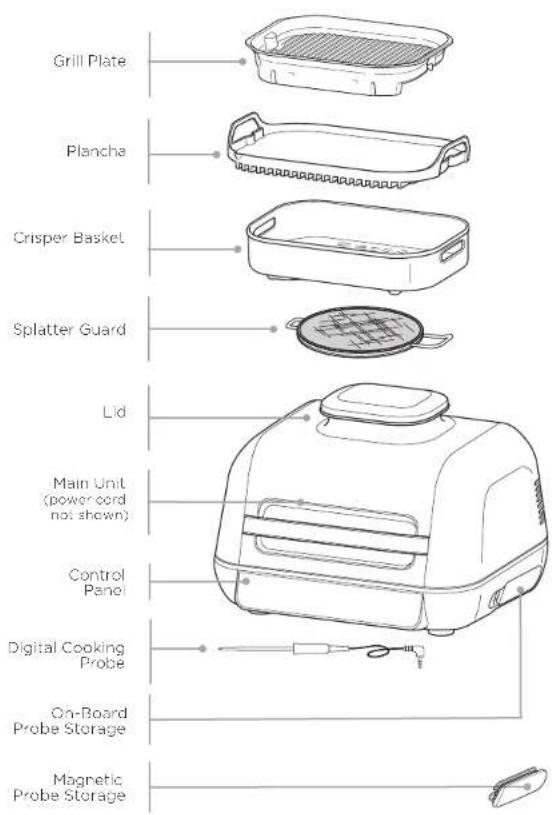
GETTING TO KNOW YOUR GRILL

NOTE: Not all functions included with every model.
FUNCTION BUTTONS
GRILL Closed-lid cooking: Top and bottom heat which is best for grilling large or thick cuts of meat, frozen food or for an all-around sear.
Open lid cooking. Ideal for grilling delicate foods or lean proteins to develop char-grilled textures without over-cooking.
ROAST Tenderlo mocts, roest vegetabies and more.
AIR RFY For crispiness and crunch with little to no oil.
BAKE Make cakes, treats, desserts and more.
PLANCHA Perfect for delicate foods like onions, eggs, fish or fajitas.
REHEAT Revive leftovers by gently warming them, leaving you with crispy results.
DEHYDRATE Denydrate meats, fruits and vegetables for healthy snacks.
MANUAL Switches the display so you can manually set the internal outcome with the dial.
PRESET When probe is inserted, the display will allow you to select your food type. Turn the dial to select your protein.
COOK LEVEL Cook to your preference, choose from Rare to Well Done.
BEFORE FIRST USE
OPERATING BUTTONS
POWER Make sure unit is plugged in. To turn on the unit, press the button.
DIAL To select a cooking function or other setting, turn the dial.
START/STOP Press the centre of the dial to start or stop the selected cooking function. When most cooking functions are started, the unit enters preheat mode, then cooking begins when the temperature setting is reached.
TEMP To select temperature, press the TEMP button and use the dial to adjust
TIME To select cook time. press TIME button and use the dial to adjust.
FUNCTION Press to clear all settings or when probe is in "Rost" state (if preheating and cooking have not begun).
PREHEAT After you set function, time and Temperature then cross the dial, the unit will automatically begin preheating. If PREHEAT button is selected after pressing dial, the unit will skip preheating (not recommended).
PREHEAT FOR BETTER RESULTS For best grilling results, let the unit fully preheat before adding food. Adding food before preheating is complete may lead to overcooking, smoke and longer preheat time.
USING THE NINJA® FOODI® MAX PRO
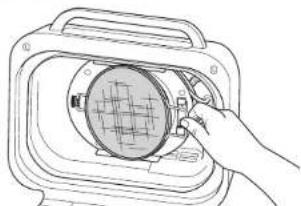
SPLATTER GUARD
Located on the underside of the lid, the splatter guard keeps the heating element clean. ALWAYS ensure the splatter guard is installed when cooking. Failure to use the splatter guard will result in oil build-up on the heating element, which can cause smoking.
Installing the splatter guard
To install, hook the left side of the soldier guard into place and then snap the right side into place until you hear it click and it feels secure.
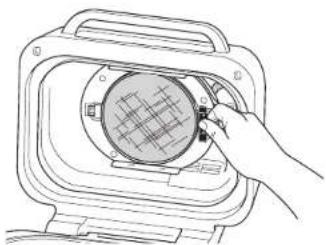
Removing the splatter guard
Remove the solater guard for clearing after each use. Allow the shield to cool completely, then unlock the shield from the back of the lid by pressing the top tab back, then pull handle forward.
GRILL CONTROL
Closed lid cooking for top and bottom heat. Best, when grilling large or thick cuts of meat or frozen food or for an all-around sear.
When using the Grill function, you will need to select the temperature for the grill plate. Below are recommended temperature levels for common ingredients. The unit may produce smoke when cooking Ingredients on a setting hotter than recommended.
| LOW (200°C) | MED (330°C) | HI (250°C) | MAX (200°C) |
| - Bacterium | - Frozen meats | - Sticks | - Veggables |
| - Seusages | - Marinated/ sauced meats | - Chicken | - Fruit |
| - Worm using live RBD source | - Hot dogs | - Meat lice/bread | - Fishes/ frozen seafood |
| - Burgers | - Veggies/Kobats |
Switching to Grill after using another function
If the unit is already warm from using a different function, "ADD FOOD" may appear on the screen immediately. We recommend allowing the grill plate to heat up for at least 6 minutes before placing ingredients on it.
Batch grilling
When grilling more than two consecutive batches of food, it is recommended that you empty the fat/oil from the removable cooking pot. It is also HIGHLY recommended to clean the splatter guard in between uses. This will help prevent grease from burning and causing smoke.
USING THE NINJA* FOODI* MAX PRO - CONT.
USING THE DIGITAL COOKING PROBE
IMPORTANT: DO NOT place hands near Digital Cooking Probe cord when in use to prevent burning or scalding.
Before First Use
Make sure the probe jack is free of any residue and the cord is free of knots before plugging it into the socket. Handle cord with care.
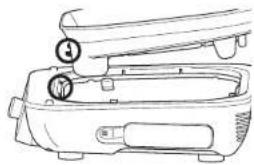
Pull the magnetic probe storage compartment on the right side of the unit outward. Then unwind the wire from the compartment to remove the probe.
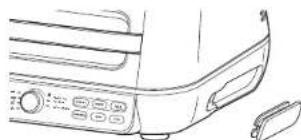
2 Pug the probe into the input jack on the right hand side of the unit. Push firmly on the plug until it cannot go into the jack any further and you feel or hear it click into place. Place the storage compartment back onto the side of the unit.
3 Once the probe is plugged into the jack, it will enable and illuminate the PRESET and MANUAL probe buttons. Turn the dial to select the desired cook function (e.g., Grill) and cook temperature.
NOTE: There is no need to set a cook time, as the unit will automatically turn off the heating element and alert you when your food has completed cooking.
4 If using PRESET, then press the PRESET button and turn the centre dial to select your desired food type. Upon selection, press the COOK LEVEL button and turn the dial to choose your preferred internal outcome of your food (rare to well done).
NOTE: Cooking different meals or to different preferences? Refer to page 50 for details on programming.
WELL
MED WELL
MED
MED RARE
RARE
If using MANUAL, then press the MANUAL button and use the below recommended internal cook temperatures.
FOOD TYPE: SET LEVEL TO:
| Fish Medium Rare (50°C) | |
| Medium (55°C) | |
| Medium Well (60°C) | |
| Well Done (65°C) | |
| Chicken/Turkey | Well Done (75°C) |
| Pork Medium Rare (50°C) | |
| Medium (55°C) | |
| Medium Well (65°C) | |
| Well Done (70°C) | |
| Beef/Lamb Rare (50°C) | |
| Medium Rare (55°C) | |
| Medium (60°C) | |
| Medium Well (65°C) | |
| Well Done (70°C) | |
NOTE: Refer to the local food standards authority for recommended food safe temperatures.
NOTE: Preset cooking levels for BEEF/LAMB are lower than normal recommendations as unit will carry-over cook 5 - 10^
USING THE NINJA* FOODI* MAX PRO - CONT.USING
HOW TO INSERT THE PROBE
NOTE: DO NOT use the probe with frozen foods or for cuts of meat thinner than 1.5cm
5 Place the accessory required for your selected cook function in the unit and close the lid. Press the dial to begin preheating.
6 While the unit is preheating, insert the probe horizontally into the centre of the thickest part of the piece of protein.
Refer to the chart on the adjacent page of a further probe placement instructions.
7 When the unit has preheated and "ADD FOOD" appears on the screen, open the lid, place food with inserted probe in the unit and close the lid over the probe cord if the function requires the lid to be closed.
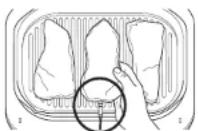
Correct probe placement. Progo grip is fully inside unit
The progress bar at the top of the display will track the stages of cook. Flashing indications progression to that stage.
WELL
MED WELL
MED

RARE
NOTE: When using Grill, Plancha, Roast and Ar Fry, the unit will beep and display FLIP. Flipping is optional but recommended
9 The unit will automatically stop when your selection is almost reached, as it accounts for carry-over cooking and GET FOOD will display on the screen.
10 When REST displays on the screen, transfer the protein to a plate. Probe can be removed before transferring. The protein will continue to carry-over cook to your set outcome, which takes about 3-5 minutes. This is an important step, as not resting could lead to results looking less cooked. Carry-over cook times can vary based on size of protein, cut of protein and type of protein.
NOTE: The probe will be IOT. Use either oven gloves or tongs to take the probe out of the food.
NOTE: To check the internal temperature of other pieces of protein, press and hold MANUAL and insert the probe into each piece of meat.
USING THE PROBE IN DIFFERENT COOKING SCENARIOS:
Cooking 2 or more proteins of the same size to different levels of outcome:
- Set the cook level to the highest required
- Insert the probe in the protein with the highest desired cook level.
- After preheating, place proteins inside the grill. When the progress bar shows that the lowest cook level is reached, remove the protein without probe.
- Continue cooking the remaining protein until the next desired cook level is reached.
Cooking 2 or more proteins of different sizes:
- Insert probe in the smaller protein and use the Preset feature to choose the level of outcome.
- When that protein is cooked, remove it from the unit.
- Using oven gloves, transfer probe to the larger protein and use the arrows to the loft of the display to choose its level of outcome.
Cooking 2 or more different types of protein:
- Insert probe in the protein with the lower desired level of outcome.
- Use the Manual feature to choose the desired internal temperature.
-
When that protein is cooked, remove it from the unit.
-
Using oven gloves, transfer probe to the other protein and use the Manual feature to choose the desired internal temperature.
| FOOD TYPE: | PLACEMENT | CORRECT | INCORRECT |
| Steaks | • Insert probe horizontally into the centre of the thickest part of the meat. | ||
| Pork chops | • Make sure the tip of the probe is inserted straight into the centre of the meat, not angled toward the bottom or top of it. | ||
| Lamb chops | • Make sure the probe is close to (but not touching) the bone and away from any fat or gristle. | ||
| Chicken breasts | • Make sure the probe hits the centre of the breast and so desired results are achieved. | ||
| Burgers | |||
| Tenderloins | |||
| Fish fillets | |||
| NOTE: The thickest part of the fillet may not be the centre. It is important that the end of the probe hits the thickest part so desired results are achieved. | |||
| Whole chicken | • Insert probe horizontally into the thickest part of the breast, parallel to, but not touching, the bone. | ||
| • Make sure the top reaches the centre of the thickest part of the breast and doesn't go all the way through the breast into the cavity. | |||
COOKING FUNCTIONS
Grill
Cook with lid open for bottom heat only, best for cooking delicate foods and lean proteins such as kebabs or vegetables.
Cook with lid closed for top and bottom heat, which is best for thick cuts or frozen proteins.
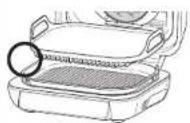
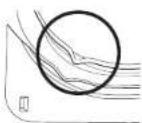
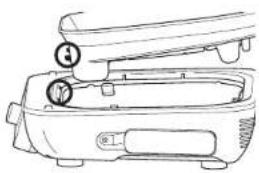
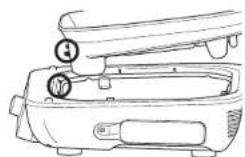
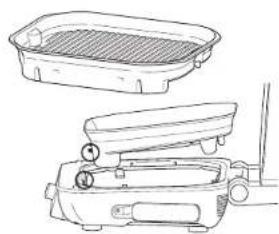
1 To install the grill plate, position it in the front of the base so it hooks in, then press down on the back of the plate until it clicks in place. Ensure the spatter guard is in place, then close the lid.

2 Make sure the unit is plugged in and press to turn the unit on. Grill will be selected by default.
3 The default Temperature setting will display. To adjust Temperature if desired, press TEMP button and turn dial.
4 Press the TIME button and turn the dial to select the desired time.
Press dial to begin prehearing. The progress bar will illuminate. It will take approximately 4-7 minutes to preheat.
6 When preheating is complete, the unit will beep and ADD FOOD will appear on the display.
7 Open the lid and place ingredients on the grill plate. Close the lid when cooking thick cuts of meats, frozen protein. Keep lid open when cooking delicate food or lean proteins.
8 When cook time is complete, the unit will loop and END will appear on the display.
9 Remove food from the grill plate.
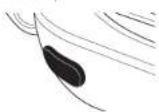
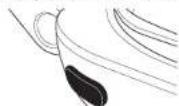
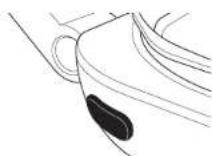
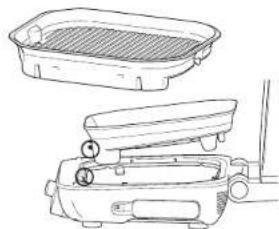
10 Remove the grill plate by pressing the orange release button on the left side of the unit. The plate will pop up from the back, then you can lift it up and out.
Plancha
Cook with lid open with heat from the bottom for foods that require flipping or stirring and constant attention like sliced vegetables or fried eggs.
Cook with lid closed for too and bottom heat, ideal for melting cheese, crisping toppings or quickly cooking thicker foods.
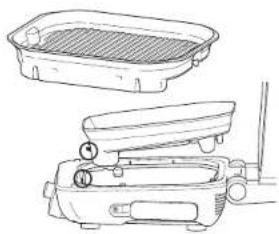
1 To install the grill plate, position it in the front of the base so it hooks in. Then press down on the back of the plate until it clicks in place. Ensure the spatter guard is in place.
2 Place piancha on the grill so plate sits (ever). Line up the lip on the piancha with the lip on the grill plate (if incorrectly installed it will tilt forward). Close the lid.
3 Make sure the unit is plugged in and press to turn the unit on.
4 Turn the dial to PLANCHA function. The default temperature setting will display To adjust temperature if desired, press TEMP button and turn dial.
5 Press the TIME button and turn the dial to select the time.
Press the dial to begin preheating. The progress bar will illuminate. It will take approximately 7-9 minutes to preheat.
PRE
COOKING FUNCTIONS - CONT.
7 When preheating is complete, the unit will beep and ADD FOOD will appear on the display.
8 Open the lid and place ingredients on the plancha. The countdown timer has a 15-second delayed start. Leave lid open unless recipe directs otherwise.
NOTE: If batch cooking meats, for best results, we recommend in between batches to close the lid and run the programmed function for 2-3 minutes before adding more food.
9 When cook time reaches zero, the unit will beep and END will appear on the display.
10 Remove food from the plancha, then remove the plancha from the grill plate.
1 Remove the grill plate by pressing the orange release button on the left side of the unit. The plate will pop from the back then lift up.
COOKING FUNCTIONS - CONT.
Roast
1 To install the grill plate, position is in the front of the base so it hooks in, then press down on the back of the plate until it clicks in place. Ensure the spatter guard is in place, then close the lid.
2 Make sure the unit is plugged in and press to turn the unit on.
3 Turn the dial to ROAST. The default temperature setting will appear on the display. To adjust temperature if desired, press TEMP button and turn dial.
4 Press the TIME button and turn the dial to select the desired time.
Press the dia to begin preheating. The progress bar will begin illuminating. It will take approximately 3 minutes to preheat.
NOTE: While preheating is strongly recommenced for best results, you can skip it by pressing the PREHEAT button. ADD FOOD will appear on the dispay
COOKING FUNCTIONS - CONT.
Air Fry
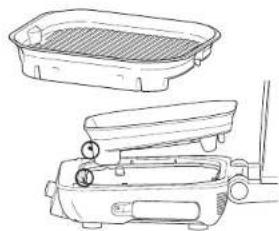
1 To install the grill plate, position it in the front of the base so it hooks in, then press down on the back of the plate until it clicks in place. Ensure the splatter guard is in place.
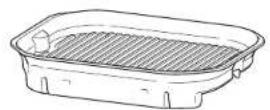
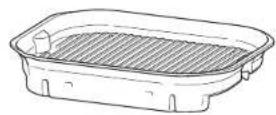
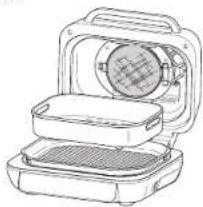
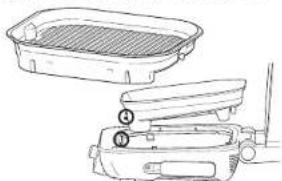
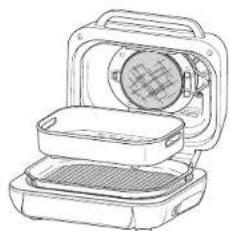
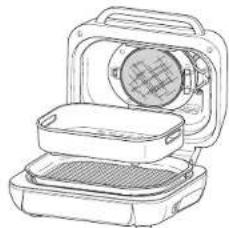
2 Place the crisper basket on the plate and position the basket to sit along the rear of the grill plate so the basket feet sit in the grill plate spaces, then close the lid.
3 Make sure the unit is plugged in and press to turn the unit on.
4 Turn the dial to AIR FRY. The default temperature setting will appear on the display. To adjust Temperature if desired, press TEMP button and turn dial.
5 Press the TIME button and turn the dial to select the desired time.
Press the dial to begin preheating. The progress bar will illuminate. It will take approximately 3 minutes to preheat.
7 When prehealing is complete, the unit will beep and ADD FOOD will appear on the display.
NOTE: While preheating is strongly recommended for best results, you can skip it by pressing the PREHEAT button. Display will show ADD FOOD, lift and close lid to begin cooking.
8 Open the lid and place ingredients in the crisper basket. Once the lid is closed, cooking will begin and the timer will start counting down.
9 For best results, we recommend shaking ingredients frequently. When you open the lid, the unit will pause. Use silicone-tipped tongs or oven gloves to shake the basket. When done, replace the basket and close the lid. Cooking will automatically resume after lid is closed.
10 When cook time reaches zero, the unit will beep and END will appear on the display.
1 Remove crisper basket from the grill plate.
12 Remove the grill plate by pressing the orange release button on the left side of the unit. The plate will pop from the back, then lift up.
COOKING FUNCTIONS - CONT.
Bake
To install the grill plate, position it in the front of the case so it hooks in, then press down on the back of the plate until it clicks in place. Ensure the splatter guard is in place, then close the lid.
2 Make sure the unit is plugged in and press to turn the unit on.
3 Turn the dial to BAKE. The default temperature setting will appear on the display. To adjust temperature if desired, press TEMP button and turn dial.
4 Press the TIME button and turn the dial to select the elapsed time.
Press the dial to begin preheating. The progress bar will begin illuminating. It will take approximately 3 minutes to preheat.
NOTE: While preheating is strongly recommended for best results, you can skip it by pressing the PREHEAT button. Display will show ADD FOOD, lift and close lid to begin cooking.
6 When preheating is complete, the unit will beep and ADD FOOD will appear on the display.
7 Open the lid and place ingredients on the plate or place loaf tin on the plate. Once the lid is closed, cooking will begin and the timer will start counting down.
8 When cook time reaches zero, the unit will keep and FND will appear on the display.
9 Remove food from the grill plate.
10 Remove the grill plate by pressing the orange release button on the left side of the unit. The pate will pop up from the pack, then you can lift it up and out.

Dehydrate
1 To install the grill plate, position it in the front of the case so it hooks in, then press down on the back of the plate until it clicks in place. Ensure the splatter guard is in place.
2 Place the crispener basket on the grill plate and add ingredients to the basket. Close the lid, as the unit does not require preheating for this function.
3 Make sure the unit is plugged in and cross to turn the unit on.
4 Turn the dial to DEHYDRATE function. The default temperature setting will display. To adjust temperature if desired, press TEMP button and turn dial.
5 Press the TIME button and turn the dial to select the desired time.
6 Press the dia to begin. (The unit does not preheat; in dehydrate mode.)
When dehydrate time reaches zero, the unit will stop and END will appear on the display.
8 Remove ingredients and basket from the grill plate.
9 Remove the grill plate by pressing the orange release button on the left side of the unit. The plate will pop up from the pack, then you can lift it up and out.

COOKING FUNCTIONS - CONT.
Reheat
1 To install the grill plate, position it in the front of the base so it hooks in, then press down on the back of the plate until it clicks in place. Ensure the scatter guard is in place.
2 Place the crisper basket on the plate and position the basket to sit along the rear of the grill. So the basket feet sit in the grill plate spaces. Add ingredients, then close the lid.
3 Make sure the unit is plugged in and press to turn the unit on.
4 Turn the dial to REHEAT The default temperature setting will appear on the display. To adjust temperature if desired, press TEMP button and turn dial
NOTE: If you would like to use the probe to check your food's internal temperature, press MANUAL for 2 seconds and the food's internal temp will appear on the screen for 5 seconds.
CLEANING & MAINTENANCE TROUBLESHOOTING
The unit should be cleaned thoroughly after every use. Always let the appliance cool before cleaning.
- Unplug the unit from the wall socket before cleaning. Keep the lid open after removing your food to allow the unit to cool more quickly.
- The grill plate, plancha, cisper basket and splatter guard are dishwasher safe. The probe and probe holder are NOT dishwasher safe.
For the best dishwasher cleaning results, we recommend rinsing the grill plate, plancha, crisper basket and splatter guard with warm water before pacing them in the dishwasher.
If hand-washing, air-dry or towel-dry all parts after hand-washing.
The inner lid should be wiped down with a damp towel or cloth after each use to deodorise the unit and remove any grease.
NOTE: The Digital Cooking Probe and holder are handwash only. DO NOT immerse any part of the probe in water or any other liquid. We recommend cleaning with a damp cloth only.
If food residue or grease are stuck on the grill plate, spatter guard, or any other removable part, soak in warm soapy water before clearing.
Clean the splatter guard after every use. Soaking the spatter guard overnight will help soften the baked-on grease. After soaking, use a cleaning brush to remove the grease from the stainless steel frame and front tabs.
Deep clean the splatter guard by putting it in a pan of water and boiling it for 10 minutes. Then, rinse with room temperature water and allow to dry completely.
Gently wipe down the inside of the lid with a damp cloth
NOTE:NEVER use abrasive tools or cleaners. NEVER immerse the main unit in water or any other liquid.
-
When stacking your coated accessories to store, place a cloth or paper towel between each piece to protect the coated surfaces.
-
"ADD FOOD" appears on the control panel display. The unit has completed preheating and it is now time to add your ingredients.
- "Shut Lid" appears on the control panel display. The lid is open and needs to be closed for the selected function to start.
- "Plug In" appears on the control panel display.
The probe is not plugged into the socket on the right side of the control panel. Plug the probe in before proceeding. Press the probe in until you hear a click.
- "PRBE ERR" appears on the control panel display.
This means the unit timed out before food reached the set internal temperature. As a protection for the unit, it can run for only certain lengths of time at specific temperatures. - "Add Plate" appears on the control panel display.
The grill plate must be installed in the base unit before cooking. Add the grill plate. - "E" appears on the control panel display.
The unit is not functioning properly. You can find online support at ninjakitchened u
- Why is my food overcooked or undercooked even though I used the probe?
It is important to insert the probe lengthwise into the thickest part of the ingredient to get the most accurate reading. Make sure to allow food to rest for 3-5 minutes to complete cooking. For more information, refer to the Using the Digital Cooking Probe section. - Why Is there no noise during Plancha preheat even though the preheat progress bars are showing?
As long as the progress bar shows, your unit is preheating. Plancha will preheat the bottom plate and switch on the fan several minutes into the preheat cycle.
Can I cancel or override preheating?
Preheating is highly recommended for best results, but you can skip it by selecting the PREHEAT button after you press the dial. Display will show ADD FOOD, lift and close lid to begin cooking.
- Should I add my ingredients before or after preheating?
for best results, let the unit preheat before adding ingredients.
- Why is my unit emitting smoke?
When using the Grill and Plancha functions, always select the recommended temperature setting. Recommended settings can be found in the Recipe Guide. Make sure the splitter guard is installed.
How do I pause the unit so I can check my food?
By opening the lid during a cooking function besides Grill and Plancha, the unit will automatically pause.
Will the probe grip melt if it touches the hot grill plate?
No, the grip is made of a high-temperature silicone that can handle the unit's high-temperatures.
- Why does the unit have a 1-9 scale for the Beef Preset?
Perception of how well something is cooked differs. The 1-9 scale provides a wide range of options for each level of cook so you can customise to your liking.
- Can I use the Plancha function and Plancha accessory after having cooked on the grill plate?
Yes, but we highly recommend cleaning the grill plate first so there is no debris to interfere with the flat top-to-grill plate contact.
PRODUCT REGISTRATIONPRODUCT REGISTRATIO
What Is covered by the guarantee?
Repair or replacement (st Ninja's discretion) of your Product, including all parts and labour in case of any defect in design, materials and workmanship (including transport and shipping costs). Our guarantee is in addition to your legal rights as a consumer.
What is not covered by the guarantee?
Normal wear and tear.
- Accidental damage, faults caused by negligent use or care, misuse, neglect, careless operation or handling of the kitchen appliance which is not in accordance with the Ninja Instruction Manual supplied with your machine.
- Use of the kitchen appliance for anything other than normal domestic household purposes.
- Use of parts not assembled or installed in accordance with the operating instructions.
- Use of parts and accessories which are not Ninja™ Genuine Components.
- Faulty installation (except where installed by Ninja)
- Repairs or alterations carried out by parties other than Ninja or its agents, unless you can show that the repairs or alterations carried out by others are not related to the defect for which you exercise the guarantee.
What happens when my guarantee runs out?
Ninja does not design products to last for a limited time. We do appreciate that there may be a desire for our customers to want to repair their kitchen appliance after the guarantee has ceased. You'll find more support at ninjakitchen cu.
Where can I buy genuine Ninja spares and accessories?
Ninja spares and accessories are developed by the same engineers who developed your Ninja kitchen appliance. You'll find a full range of Ninja spares, replacement parts and accessories for all Ninja machines at www.rinjakitchen.eu
Please remember that using non-Ninja spares may invalidate your manufacturer's guarantee. However, your statutory rights are unaffected.
TWO (2) YEAR LIMITED GUARANTEE
When you buy a product in Europe as a consumer, you get the benefit of legal rights relating to the quality of the product (your "statutory rights"). You can enforce these statutory rights against your retailer. However, at Ninja we are so confident about the quality of our products ("Products") that we give you a manufacturer's guarantee of two years. This guarantee only applies to the Product if it is bought in new and unused condition. These terms and conditions relate to our guarantees only - your statutory rights as a buyer are unaffected. Please note that the 2 year guarantee is available in all EU countries.
The conditions below describe the prerequisites and scope of our guarantees which are issued by SharkNinja Germany GmbH, c/o Regus Management GmbH, Excellent Business Center 10. +1/ Stock, Westhafenplatz 1, 60327 Frankfurt am Main (Germany) ("us", "our" or "we"). They do not affect your statutory rights or the obligations of your retailer and your contract with them. The same applies if you have purchased the product directly from Ninja.
Ninja Guarantees
A household kitchen appliance constitutes a sizeable investment. Your new machine needs to work properly for as long as possible. The guarantee it comes with is an important consideration - and reflects how much confidence the manufacturer has in its product and manufacturing quality.
You'll find online support at www.ninjaikitchen.eu.
How do I register my guarantee?
You can register your guarantee online within 28 days of purchase. To save time, you'll need the following information about your machine:
Model no.
Serial Number (only if available)
- Date of purchase of the Product (receipt or delivery note)
To register online, please visit www.ninjakitchen.eu
IMPORTANT
The guarantee covers your Product for 2 years starting on the date of purchase.
Please keep the receipt at all times. Should you need to use your guarantee we will need the receipt to verify the information supplied to us is correct. The inability to produce a valid receipt will invalidate your guarantee.
What are the benefits of registering my guarantee?
When you register your guarantee, you can choose to receive our newsletter containing tips, advice and competitions. Hear the latest news about new Ninja technology and launches. If you register your guarantee online, you'll get instant confirmation that we've received your details.
For details of our privacy policy please visit www.ninjakitchen.eu
How long are our Products guaranteed for?
Our confidence in our design and quality control means that your Product is guaranteed for two years.
GRACIAS
Reheat (Recalntar) 77
Colocacion cuestion de la vacoter.
I'm sorry for it. I'm sorry for the time spent in centro de la Universidad.
Dehydrate (Deshidratar)
TYPE D'ALIMENT:POSITIONNEMENT CORRECT INCORRECT
Dehydrate (Deshydrater)
Griglate consecutive 108
Griglate consecutive
PLENCHA (PLATINE PLA) Perfect for all ingredients including Zessi uen, cren, vs. of gait.
WELL
MED WELL
MED RARE
HOE U DE THERMOMETER MOET PLAATSEN
WELL
MED WELL
MED
MED RARE
RARE
TYPE MAT: SETT NIVA TIL
| Fisk Medium Rare (50°C) | |
| Medium (55°C) | |
| Medium Well (60°C) | |
| Well Done (65°C) | |
| Kyilling / kalkun Well Done (75°C) | |
| Svin Medium Rare (50°C) | |
| Medium (55°C) | |
| Medium Well (65°C) | |
| Well Done (70°C) | |
| Biff / lam Rare (50°C) | |
| Medium Rare (55°C) | |
| Medium (60°C) | |
| Medium Well (65°C) | |
| Well Done (70°C) | |
MERK: Horvissor 10 das britiske byrakt for matsstandard for arbefalte sikretemperatureter for mat.
MERK: Forhandinslittle tuberedining-shydrer for BEEF/LAMB (STOREKJDT/T LAM) or lavere en vanilig anbefalling. attorso erhenten beregnner hyvietlid 5-10°C.
BRUKENINJAA*FOODI*MAX PRO-FORTS.BRUKENIN
SLIK SETTER DU INN SONDEN
MERK:IKKEbrk sponden pa frossen mat erer til stykkor som er tynere en 1,5cm.
Air Fry (Luffthityr)
Reheat (Reaquecer) 177
Dehydrate (Desidratar)
valveen in suiuian pal aon
vienen jaojcvien pcrabpajen
22 ALA kayta tata laitetta
upppaistamseen.
KYPSENNYSTOIMINNOT - JATKUU
KYPSENNYSTOIMINNOT - JATKUU
Roast (Paahto)
KYPSENNYSTOIMINNOT - JATKUU
Air Fry (Kuumallmakypssennys)
KYPSENNYSTOIMINNOT - JATKUU
Bake (Palsto)
KYPSENNYSTOIMINNOT - JATKUU
Reheat (Uudelleenlammitys)
1 Asenna grillley palkaleen sjotlamila se jaustan etuosaan sitan, eta se knittty, ja paina sinter levy taksaaas alaspainkunnes levy npasahtaa palkaleon. Varrista, eta roiskesuo on pa klaan.
2 Asla repucuskori levyilo sio otse on grillevyn kaoassasa, korin jatl grillevyn aukossa. Lisaa enoksoj se juoi sitten kanst.
3 Varmsta, otla, lae on liite; yerkovirtaan ja kyaenistai sate palamnala
4 Kierra vallisin REHAT toimtoon (duulelelen lamnitsy).Nay, otte lute oletuslampotia-asotus. Jos halua sata lamseolila.pana TEMP-painketta (lampotia) a kierra vallinita.
© 2021 SharkNinja Operating LLC. GEDRUCKT IN CHINA
FRANÇAIS
© 2021 SharkNinja Operating LLC. IMPRIMPEN CHINE
ENGLISH
Illustrations may differ from actual product. We are constantly striving to improve our products, therefore the specifications contained herein are subject to change without notice.
FOOD and NINJA are registered trademarks of SharkNinja Operating LLC. © 2021 SharkNinja Operating LLC. PRINTED IN CHINA
DANSK
© 2021 SharkNinja Operating LLC. TRYKT KINA
ESPANOL
© 2021 SharkNinja Operating LLC. IMPRESO EN CHINA
ITALIANO
© 2021 SharkNinja Operating LLC. STAMPATO IN CINA
NEDERLANDS
© 2021 SharkNinja Operating LLC.
GEDRUKT IN CHINA
NORSK
© 2021 SharkNinja Operating LLC. TRYKKET I KINA
PORTUGUESE
© 2021 SharkNinja Operating LLC. IMPRESSO NA CHINA
SUOMI
© 2021 SharkNinja Operating LLC. PAINETTU KINASSA
SVENSKA
SharkNinja Europe Limited, 3150 Century Way, Thorpe Park, Leeds, LS15 8ZB, UK
ninjakitchen.eu
AG651EU_IB_MP_211013_Mv3
SharkNinja Germany GmbH, c/o Regus Management GmbH, Excellent Business Center 10.+11. Stock, Westhafenplatz 1,
60327 Frankfurt am Main, Germany
ninjakitchen.eu