THD315TB - DVD player THOMSON - Free user manual and instructions
Find the device manual for free THD315TB THOMSON in PDF.
| Brand | Thomson |
| Model | THD315TB |
| Product type | DVD player with HD DTT receiver |
| Power supply | AC 100-240 V ~ 50/60 Hz |
| Power consumption (DVD mode) | 10 W |
| Power consumption (DTT mode) | Less than 8 W |
| Standby consumption | Less than 1 W |
| Compatible disc formats | DVD, VCD, CD (according to manual) |
| USB video formats | MPEG4, H.264, MKV |
| Built-in HD DTT receiver | Yes (DVB-T2) |
| Video outputs | HDMI, SCART (TV) |
| Audio outputs | Analog (2 V into 10 kΩ), Digital (0.5 Vp-p into 75 Ω) |
| Remote control | Infrared, AAA 1.5 V batteries (not included) |
| Main functions | DVD playback, HD DTT reception, USB recording, teletext, audio description |
| Parental lock | Yes, default password 0000 |
| Available languages | OSD, audio, subtitles (multiple) |
| Channel search | Automatic and manual |
| Maintenance | Clean with a damp cloth, unplug before cleaning |
| Safety | Double insulation, class II |
| Recycling | Product subject to WEEE directive, do not dispose of with household waste |
| Spare parts and repairability | Repair by qualified personnel only |
| Dimensions (L x W x H) | Approximately 260 x 200 x 40 mm (estimate) |
| Weight | Approximately 1.2 kg (estimate) |
Frequently Asked Questions - THD315TB THOMSON
User questions about THD315TB THOMSON
0 question about this device. Answer the ones you know or ask your own.
Ask a new question about this device
Download the instructions for your DVD player in PDF format for free! Find your manual THD315TB - THOMSON and take your electronic device back in hand. On this page are published all the documents necessary for the use of your device. THD315TB by THOMSON.
USER MANUAL THD315TB THOMSON
(Bypass)IEC 169-2 malé
Gamage de fréquence
177.5-866MHz
Démodulation
Standard
ETSU EN300 744
(QPSK/QAM16/QAM64/QAM256)2k and 8K.
Décodeur video
Stand
ISO/IEC 13818-2 and ISO/IEC 14496-10
Flux de transport
ISO/IEC 13818-1
Décodage video
Multi formats
Rapport d'aspect
4:3,16:9
DECODEUR AUDIO
Standard
SO/IEC13818-3 TR1011154
Décodage audio
Multi formats
Please read this user manual before using or connecting this product. And keep it handy for future reference.
English
User Manual
Important Safety Instructions
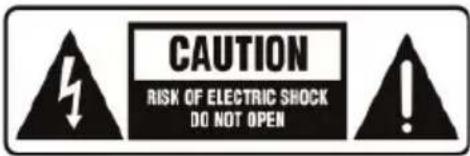
To reduce the risk of electric shock. Do not remove cover.
No user-serviceable parts inside. Refer servicing to qualified service personnel.

This symbol indicates "dangerous voltage" inside the product that presents a risk of electric shock or personal injury.

This symbol indicates important instructions accompanying the product.

This symbol indicates that when the end user wishes to discard this product, can be sent to collection and separation facilities for recovery and recycling. By separating these products from other household waste, the volume of waste sent to incinerators or crop fields is reduced and natural resources will be conserved.
1.Read, follow and keep these instructions.
2.Do not use this apparatus near water.
3.Clean only with a damp cloth. Please unplug power prior to cleaning.
4. Do not block any of the ventilation openings. Install in accordance with the manufacturer's instructions.
5.Do not install near any heat sources such as radiators, heat registers, stoves, or other apparatus (including amplifiers) that produce heat.
6. Protect the power cord from being walked on or pinched particularly at the plug, receptacles, and the point where they exit from the apparatus.
7.Only use attachments/accessories included within this package.
8. Unplug this apparatus during lighting storms or when unused for long periods of time.
9.Refer all servicing to qualified service personnel. Servicing is required when the apparatus has been damaged in any way; such as when the power supply cord or plug is damaged, liquid has been spilled or objects have fallen into the apparatus, the apparatus has been exposed to rain or moisture, does not operate normally, or has been dropped.
A Class II APPARATUS shall be permanently marked with the words "DOUBLE INSULATION" or "Double Insulated" and "When servicing use only identical replacement parts."
WARNING: To reduce the risk of fire or electric shock, do not expose this apparatus to rain or moisture.
User Manual
ABOUT THE UNITS Front panel identification

1.Open/Close button
2.DVD/DVB switch button
3.Play/pause button
4.DVD Disc door
5. Remote control signal sensor
6. LED display
7. USB/ESB jack
8. Stop button
9.Power button
Rear panel identification

1.ANTENNA IN Connect to the RF
2.ANTENNA OUT Connect to another TV
3.HDMI output
4.Scart output
5.Power cable to 100-240V~ power source
User Manual
ABOUT THE UNITS
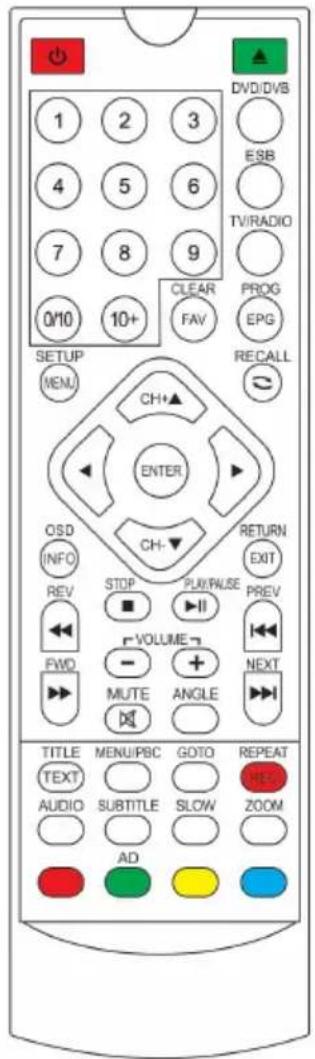
Remote control panel identification
Remark:
When using, direct the remote control to the infra-red sensor on the product (within 45 degrees angle.
Do not put remote control near sources of heat or in an environment where moisture or dampness is present.
Do not Immense the remote control in water or any other liquid.
Do not use old and new batteries and always use the same type of batteries.
Please replace batteries when you find the remote control does not work or works intermittently.
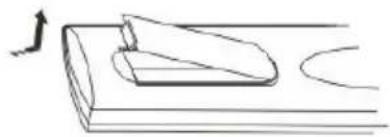
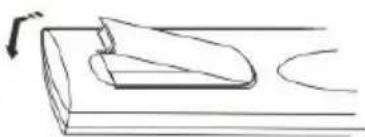
Insert Remote batteries(OPTION)
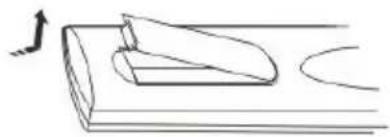
1. Remove the battery cover in the directions of the arrow.

2.Insert two 1.5V AAA batteries, paying attention to the correct polarities(+and-)
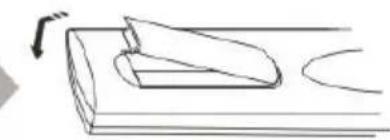
3. Replace the battery cover
Remote control buttons&functions
| NO. | Name | Function in DVD Mode | function in Digital TV Mode |
| 1 | POWER | Power/Standby | Power/Standby |
| 2 0-10+ Select track or chapter | Change channels, Enter numbers and letters into menu. | ||
| 3 | SETUP/MENU | enter the DVD setup menu | Enter the DVB setup menu |
| 4 | CH+(▲) | Move up in menu items | Move up in menu items/move up the channel |
| 5 | LEFT(▲) | Move left in menu items | Move left in menu items |
| 6 ENTER | Press to confirm the selected menu | Press to confirm the selected menu | |
| 7 | OSD/INFO | Display Title/Chapter/Tim | Display the TV program infirmination |
| 8 | STOP | Stop the playing | For reading ESB/USB files function |
| 9 | REV(▲) | Reverse search | For reading ESB/USB files function |
| 10 | VOL- | Volume down | Volume down |
| 11 | FWD(▲) | Fast Forward | For reading ESB/USB files function |
| 12 | MUTE | Mute | Mute |
| 13 TITLE/TEXT | Select the DVD title/No function | No function/Start & Stop digital teletext | |
| 14 PB/C/MENU | Display/Exit the DVD/VCD menu | No Function | |
| 15 | AUDIO | Select Audio Language | select Audio Language |
| 16 | SUBT | Select language subtitle | Switch Subtitle on/off |
| 17 | RED button | No function | Auxiliary function button |
| 18 | Green button(AD) | No function | Auxiliary function button (Press AD key, the sound of television signals by way play out, listen to TV programs for the blind, the television signal needs to support local television) |
| 19 | OPEN/CLOSE | Open or close the disc | No Function |
| 20 | DVD/DVB | Switch DVB/DVD mode | Switch DVB/DVD mode |
| 21 | ESB/USB | No function | Switch DVD/ESB/USB mode |
| 22 | TV/RADIO | No function | Switch the TV or Radio channel |
| 23 | CLEAR/FAV | Clear the screen display | Favorite channel setting switch |
| 24 | PROG/EPG | Change playback order | Display or exit EPG |
| 25 | RECALL | No function | Back to program functions |
| 26 | RIGHT(▲) | Move right in menu items | Move right in menu items |
| 27 | CH-(▼) | Move down in menu items | Move down in menu items/move down the channel |
| 28 EXIT/RETURN | Exit DVD/Return to the menu | Exit DVB | |
| 29 | PLAY/PAUSE | Play disc/Pause playback | For reading ESB/USB files function |
| 30 PREV( ) | ▲ | Skip to the prev chapter or track | For reading ESB/USB files function |
| 31 | VOL+ | Volume up | Volume up |
| 32 NEXT( ) | ▲ | Skip to the next chapter or tack | For reading ESB/USB files function |
| 33 ANGLE | To view scenes from different camera angles. | No Function | |
| 34 | REPEAT/REC | Title or chapter repeat | TV Program recording |
| 35 GOTO | Goto the title/chapter/time of the DVD/VCD you want to watch | When reading ESB/USB moves formats MPEG4/H264/MKV, that will be have goto function. | |
| 36 ZOOM | Reduce/Enlarge video output | Reduce/Enlarge video output | |
| 37 | SLOW | Slow play | No function |
| 38 | BLUE button | No function | Auxiliary function button |
| 39 | YELLOW button | No function | Auxiliary function button |
User Manual
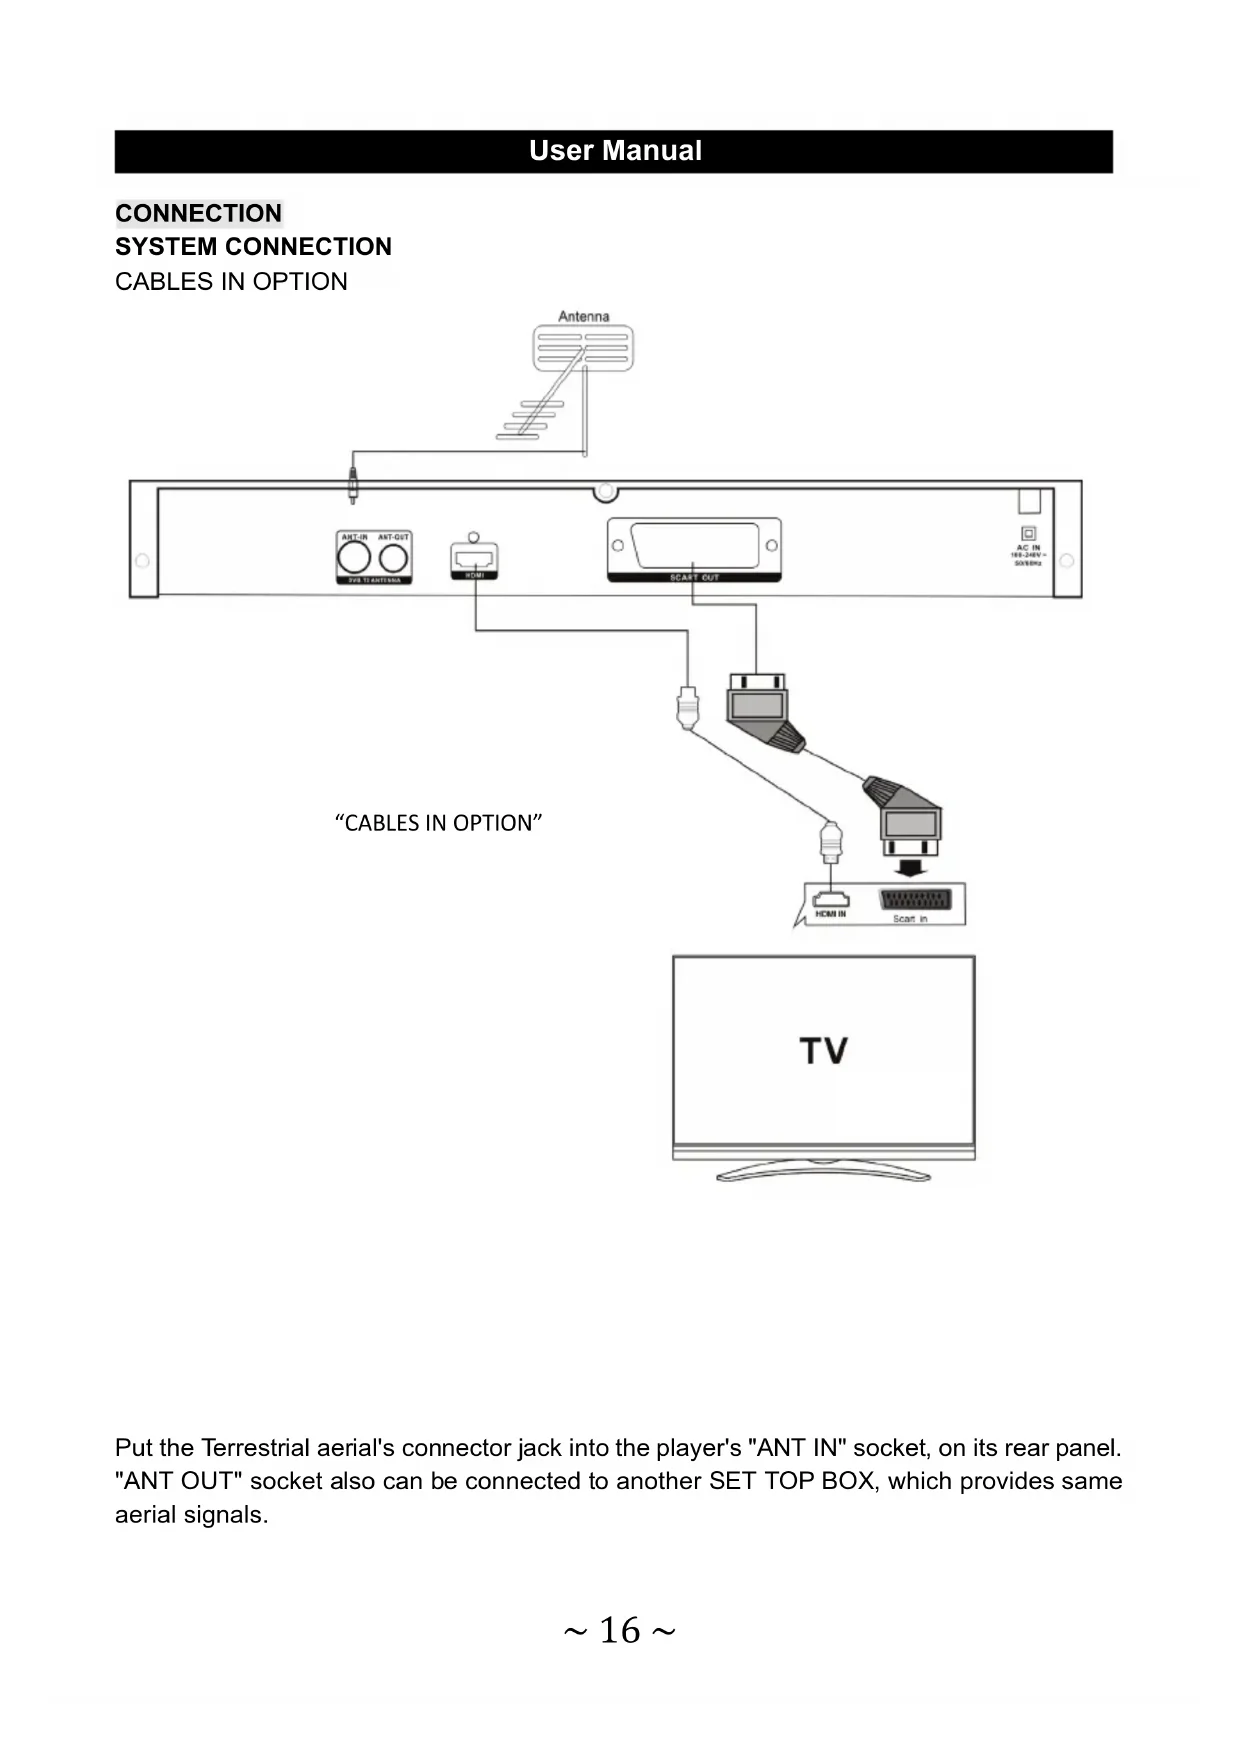
CONNECTION SYSTEM CONNECTION
CABLES IN OPTION
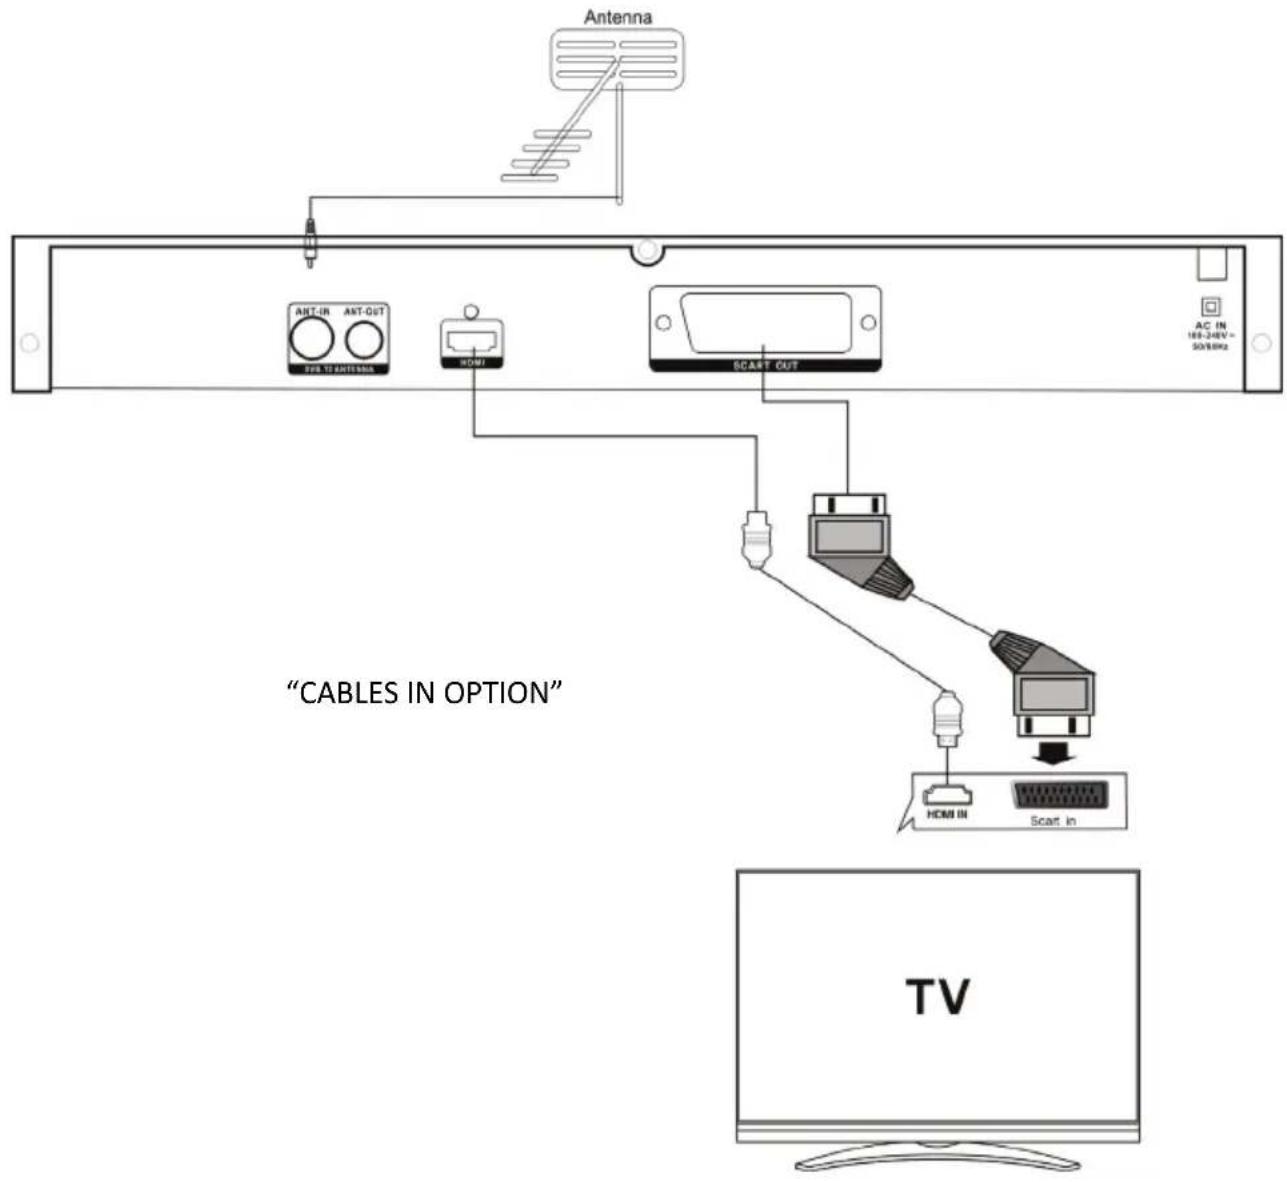
Put the Terrestrial aerial's connector jack into the player's "ANT IN" socket, on its rear panel. "ANT OUT" socket also can be connected to another SET TOP BOX, which provides same aerial signals.
User Manual
THE SETUP MENU SYSTEM OF DVD PLAYER
Press the Setup button, the main setup appears.
When the main menu displayed the DVD system will auto pause.
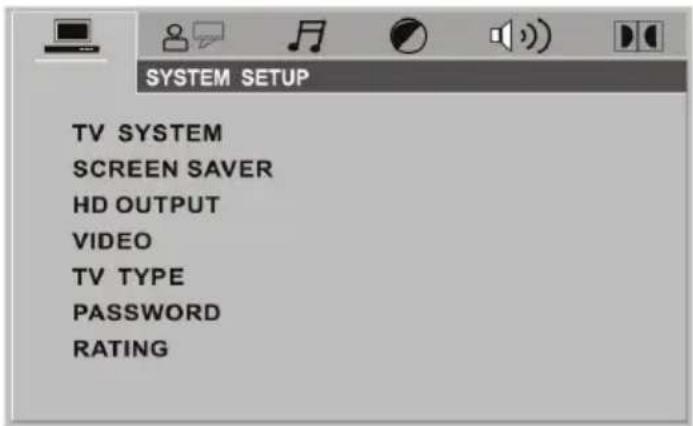
SYSTEM SETUP
TV SYSTEM
AUTOPLAY
HD OUTPUT
VIDEO
TV TYPE
Password
RATING
DEFAULT
POWERRESUME
VIDEO SETUP
BRIGHTNESS
CONTRAST
HUE
SATURATION
SHARPNESS
SPEAKER SETUP
DOWNMIX
LANGUAGE SETUP
OSD LANGUAGE
AUDIO LANG
SUBTITLE LANG
MENULANG
DIGITAL SETUP
OP MODE
DYNAMIC RANGE
DUAL MONO
AUDIO SETUP
AUDIO OUT
KEY
The password option is initialized locked, and you cannot set the parental limit or change the password. In order for the Parental feature word, the password mode must be turned on. If you want to set the parental limit, you will need to enter the default password, which is 0000, then press Enter to confirm. To change the password, you will be prompted for the old password, then be prompted for a new. Enter a 4-digit number (this is your password).
User Manual
THE SETUP MENU SYSTEM OF DVB-T2
When you want to the DVB-T2 mode, press "DVD/DVB(20)" button of the remote control.
INSTALLATION GUIDE
If you are using the unit for the first time or have restored the unit to Factory Default, the installation Guide Menu will appear on you TV screen. Follow the help information that at the bottom of the window to select preference menu language and suitable country (region)
and start channel search.
(1)[OSD Language] Press
RIGHT/LEFT(26/5) key to select a language.
(2)[Country] Press RIGHT/LEFT(26/5) key to select your country of residence.
(3)[Channel Search] Press
RIGHT/LEFT(26/5) or ENTER(6) key to begin Automatic channel search.
If no channels is found during the channel
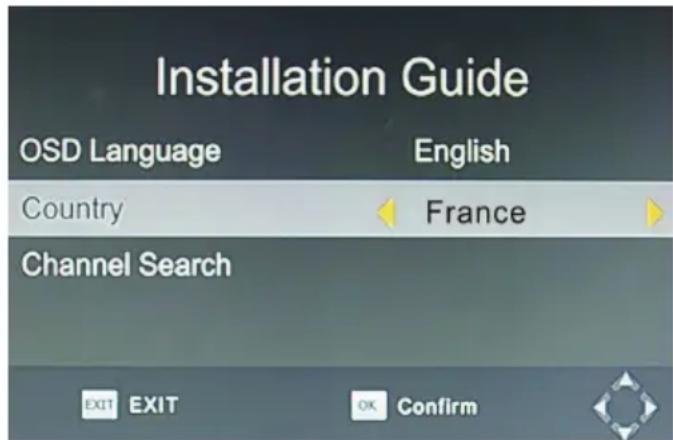
searching process, please check your antenna connections and antenna are in working order. After the scanning process is completed the receiver with automatically save the scanned channels and display the first channel in the list.
MENU
Most functions are available in main menu. Follow the operation help information on the bottom of the menu to modify the preference options. A password will be required when modifying advanced options in the Menu. The Default password is "000000".
Program
Program Edit
EPG
Sort
LCN
Picture
Aspect Ratio
Resolution
TV Format
Transparent
Channel search
Auto Search
Manual search
Country
Antenna Power
Time
Time Offset
Country Region
Time Zone
Sleep
Power On/Off
Daylight Time
Option
OSD Language
Subtitle Language
Audio Language
Digital Audio
Standby Show time
System
Parental Guidance
Set Password
Technical specifications of DVD
Pickup Wavelength: Wave length: 650nm
Signal System: PAL/NTSC/AUTO
Frequency Response: 20Hz-20000Hz ±2.5bB
Signal-to-Noise Ratio: =85db Audio distortion+Noise: ≤-80dB(1KHz)
Audio Dynamic Range: ≥85dB(1KHz)
Audio output(Analog audio): average output: 2V ± 10% , Load: 10K
Audio output(Digital audio): average output: 0.5Vp - p± 20% , Load: 75
Power supply: AC 100-240V ~ 50/60Hz
Power consumption: 10W
Technical specifications of DVB-T2
Tuner
Input connector
IEC16902.Female
Input Frequency range
VHF&UHF
Num of RF input
1
Input impedance
750hm
RF output connector
(bypass)IEC 169-2 male
Loop through
177.5-866MHz
Demodulation
Standard
ETSU EN300 744
Guard interval models
1/32,1/16,1/8 active symbol duration
FEC Modes rate
1/2,2/3,3/4,5/6.7/8
Carriers/constellation
all modes supported including non hierarchical
Demodulation
COFDM(QPSK/QAM16/QAM64/QAM256)2k and 8K.
Video decoder
Stand
ISO/IEC 13818-2 and ISO/IEC 14496-10
Transport stream
ISO/IEC 13818-1
Video decoding
Multiformats
Aspect ratio
4;3,16;9
Audio decoder
Standard
SO/IEC13818-3 TR1011154
Audio decoding
Multifomats
Sample rate
32KHZ, 22.1KHZ,44.1KHZ,48KHZ
Power
AC input range
AC100-240V 50/60Hz
Power consumption
<10w
Standby consumption
1w
User Manual
TROUBLESHOOTING GUIDE SYMPTOMS AND CORRECTION
| Symptom | Correction |
| No power | •Connect the power plug into wall outlet securely |
| No picture | •Verify the connection from the DVD video output to the TV video input. Then switch TV to appropriate mode (video 1)•Connect the video cable into the jacks securely. Refer to your television owner's manual. |
| No sound | •Connect the audio cable into the jacks securely.•Verify the connection from the DVD audio output to the TV or receiver audio input. Then switch to the appropriate source on the receiver. Refer to your audio amplifier owner's manual. |
| Black & White picture | •Damaged S-Video connector (bent pin) |
| The playback picture has occasional distortion: | •A small amount of picture distortion may appear because of a poor quality video/sound transfer to disc. This is especially true of some discs manufactured between 1997 -1998.•Scratched disc. |
| Brightness is unstable or noises are produced on playback picture | •Connect the DVD player directly through the TV and not through other source. What you are viewing is the effect of the copy protection circuitry required on all DVD players.If do not have a video input on your TV, you must purchase an adapter from your dealer |
| The DVD video player does not start playback | •Place the disc with the graphic side up.•Place the disc on the disc tray correctly inside the guide.•Make sure the disc is free from scratches & fingerprint.•Cancel the parental lock function or change the parental lock level.•Turn the power off then disconnect the power plug and reinsert it back into the wall outlet |
| The remote control does not work properly | •Replace the batteries with new ones |
This unit can play multiformats files.
In USB mode, some formats can not be supported (such as HDMP4 for ex) when you enter DVD Menu using DVD/ESB button on remote control.
In that case, please use MENU button on your remote control to display the 3 icons MUSIC/PHOTO/MOVIE, then enter into your USB key to see your files.
This is not a dysfunction.
THOMSON
THD315TB
2.Insert two 1.5V AAA batteries, paying attention to the correct polarities(+and-)
(BYPASS) IEC 169-2 Macho
Bucle de salute
177,5—866 Mhz
Demodulación
Estándar
ETSI EN300 744
Modos de intervalo de guarda
Insert Remote batteries(OPTION)


Loop through 177,5-866MHz
Demodulazione
Standard ETSU EN300 744
Consumo in standby 1w
Manuale Utente
GUIA DE SOLUÇÂO DE PROBLEMAS
SINTOMI CORREZIONE
This symbol indicates that when the end user wishes to discard this product, can be sent to collection and separation facilities for recovery and recycling. By separating these products from other household waste, the volume of waste sent to incinerators or crop fields is reduced and natural resources will be conserved.
(bypass)IEC 169-2, mannlich
Loop Through
177.5-866MHz
Demodulation
Standard
ETSU EN300 744
32KHZ, 22.1KHZ,44.1KHZ,48KHZ
Untertitel
Untertitel
DVB- Untertitel
Strom
pickup Golflength: 650nm
Signal System: PAL/NTSC/AUTO
frequenterespons: 20Hz-20000Hz ±2.5bB
Signaal - ruis verhouding: =85db Audio distortion+Noise:≤-80dB(1KHz)
Audio Dynamic Range: ≥85dB(1KHz)
Audio-uitgang (analoge audio): avenge output: 2V ± 10% , Load: 10K
Audio-uitgang (Digitale audio): avenge output: 0.5Vp-p±20%, Load: 75Ω
RF uitgang connector (bypass)IEC 169-2 male
Doorlus 177.5-866MHz
Demodulatie
Standaard ETSU EN300 744
Transport stream ISO/IEC 13818-1
Video decoding Multiformaten
Beeldverholding 4;3,16;9
AUDIO DECODER
Standaard SO/IEC13818-3 TR1011154
Audio decoding Multiformaten
Samplingfrequentie 32KHZ, 22.1KHZ,44.1KHZ,48KHZ