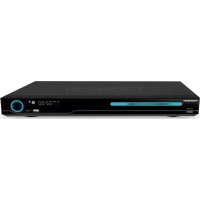
DP9200 - DVD player THOMSON - Free user manual and instructions
Find the device manual for free DP9200 THOMSON in PDF.
| Product type | Portable DVD player with TFT screen |
| Brand | THOMSON |
| Model | DP9200 |
| Dimensions (approx.) | 20 x 15 x 3 cm |
| Weight (approx.) | 0.8 kg |
| Power supply | DC IN 12V via AC adapter or cigarette lighter adapter |
| Power consumption | 12 W |
| Compatible disc types | DVD, VCD, CD, CD-R, CD-RW, DVD±R/RW, DVD+R DL |
| Readable formats | MP3, JPEG, MPEG4 |
| Video system | PAL / NTSC |
| Resolution | 500 lines |
| Outputs | AV OUT (audio/video), headphone jack |
| Connectivity | USB port, SD/MMC/MS card reader |
| Main functions | DVD, Audio CD, MP3, JPEG, MPEG4 playback; zoom, repeat, program, parental control |
| Screen | TFT screen with screen-off function (TFT) |
| Remote control | Yes, with CR2025 button cell battery |
| Included accessories | Earphones, AC adapter, remote control, CR2025 battery, cigarette lighter adapter, carrying case |
| Care and cleaning | Unplug before cleaning; soft cloth slightly damp; do not use abrasive products |
| Safety | Do not expose to water or moisture; do not open the casing (Class 1 laser); do not obstruct ventilation openings |
| General information | Manufactured under license from Dolby Laboratories; THOMSON trademark used under license by TECHNICOLOR S.A. |
Frequently Asked Questions - DP9200 THOMSON
User questions about DP9200 THOMSON
0 question about this device. Answer the ones you know or ask your own.
Ask a new question about this device
Download the instructions for your DVD player in PDF format for free! Find your manual DP9200 - THOMSON and take your electronic device back in hand. On this page are published all the documents necessary for the use of your device. DP9200 by THOMSON.
USER MANUAL DP9200 THOMSON
CLASS 1 LASER PRODUCT

DOLBY
DIGITAL
Carefully read the instructions of this manual, respecting recommendations for use and safety. Keep this document and tell potential users about it.
This appliance has been designed solely for domestic use; the manufacturer's liability shall not be engaged in the event of any professional use, any misuse or any use not complying with the operating instructions.

This symbol, representing a lightning bolt inside an equilateral triangle, is intended to alert the user to the presence of uninsulated, dangerous voltage in the product's enclosure that is high enough to present a risk of electrical shock.

This symbol, representing an exclamation mark inside an equilateral triangle, is intended to alert the user to the presence of operating and maintenance instructions in the documentation accompanying the product.

This symbol complies with the standards in force for this type of product.

Disposing of the appliance at the end of its life This appliance bears the WEEE mark (Waste of Electric and Electronic Equipment) signifying that, at the end of its life cycle, it should not be disposed of with household waste, but at a recycling centre.
The recycling of waste contributes to the conservation of our environment.

Disposing of batteries at the end of their life In order to respect the environment, do not throw used batteries out with household waste. Dispose of them at your nearest recycling centre or at a used battery collection point.

At full volume, prolonged listening can damage the user's hearing.
CLASS 1 LASER PRODUCT
ATTENTION: This symbol
indicates that this appliance is a Class 1 Laser product.
- Do not try to open the cover or look at the laser beam.
- Never touch the laser lens inside the compartment.

DIGITAL
Manufactured under license from Dolby Laboratories. "Dolby" and the double-D symbol are trademarks of Dolby Laboratories.
WARNING CONCERNING USE AND INSTALLATION
ATTENTION: To avoid all risk of fire or electrical shock, do not expose the appliance to rain or humidity. Therefore, the appliance should not be used near a water supply point or in a humid location (bathroom, swimming pool, sink, etc).
ATTENTION: Never immerse the appliance in water or in any liquid whatsoever.
- Do not place any object containing water (e.g. vases, etc.) on the appliance.
- Do not place the appliance in full sunlight, close to heating equipment or any heat source, or in a location subjected to excessive dust or mechanical shocks.
- Do not expose the appliance to extreme temperatures. The appliance is designed for use in moderate climates.
- Do not place any object that produces heat (candle, ash tray, etc.) close to the appliance.
- Place the appliance on a surface that is flat, rigid and stable.
- Do not install the appliance in an inclined position. It is designed to work solely in a horizontal position.
- Install the appliance in a location with sufficient ventilation to avoid internal overheating. Avoid restricted spaces such as bookcases, cabinets, etc.
- Do not obstruct the appliance's ventilation openings.
- Do not install the appliance on a soft surface, such as a carpet or blanket, that might block the ventilation openings.
- Do not place heavy objects on the appliance.
- This appliance is not a toy; do not allow children to use the appliance unsupervised.
- Never let children insert foreign objects into the appliance.
- Due to the effect of electrostatic and/or fast electrical transient phenomena, the product may not operate properly and will need to be reset by the user.
- Keep the player and disks away from appliances with powerful magnets, such as microwave ovens or powerful loudspeakers.
- Never move the appliance while you are using it, since this could damage it and affect the disk. Remove the disk before you move the appliance.
- If the appliance is moved directly from a cold location to a hot location, condensation may form on the lens located inside the disk compartment. Leave the appliance for at least 30 minutes before switching it on.
- Do not expose the remote control sensor to bright light.
SAFETY RECOMMENDATIONS
ABOUT THE DISKS
MAINS VOLTAGE ADAPTER
- This appliance is designed to operate with the adapter supplied. If you replace the adapter, use one that has the same characteristics.
- The adapter should not be obstructed or should be readily accessible during use.
- If you need to use an extension cord, take all necessary precautions to ensure that no-one can trip over it or get tangled up in it.
- Do not plug in or unplug the adapter when your hands are not dry.
- To avoid all risk of fire or electrical shock, do not expose the appliance to rain or humidity. Therefore, the appliance should not be used near a water supply point or in a humid location.
INFORMATION ABOUT BATTERIES
- The appliance must be equipped with the appropriate batteries in order to function properly.
- Only recommended batteries should be used.
- Polarity must be respected when inserting batteries.
- The batteries should be inserted in such a way as to avoid any short circuit.
- Do not mix used and new batteries.
- Do not mix alkaline, standard (carbon-zinc) and rechargeable (nickel-cadmium) batteries.
- Do not recharge or try to open the batteries. Do not throw the batteries in fire.
- Replace all batteries at the same time with new, identical batteries.
- Remove the batteries when unused for a long time.
If the liquid contained in the batteries comes in contact with eyes or skin, wash the area immediately and carefully with clear water and consult a doctor. - Battery shall not be exposed to excessive heat such as sunshine, fire or the like.
ATTENTION: Danger of explosion if batteries are not inserted correctly.
RISKS FOR TELEVISION SETS
This player can continue displaying a fixed video image or a menu on the television screen indefinitely. The screen may be permanently damaged if a fixed image is displayed on the television set for a prolonged period.
ABOUT THE DISKS

Handling
Do not touch the playback side of dis Hold disks by the edges to avoid leav fingerprints on the surface.
Any dust, fingerprints or scratches may cause a malfunction.
Never attach a label or sticky tape to the disk.

Storage
Put disks back in their case after playing them. Never expose disks to direct sunlight or heat sources. Never leave disks inside a car parked in full sunlight.
Cleaning
Use a clean soft lint-free cloth to clean the disk, working from the centre outwards in a straight line. Do not use solvents such as petrol, thinners, commercially available cleaners or antistatic sprays for vinyl disks.
Compatible disk types (see table opposite)
Note: Some DVD±R/RW and CD-R/RW disks may not be played by this player due to recording quality, the disk's physical status, or even recording system or software characteristics.
| DVD VIDEO | DVD-VIDEO | COMPACT DISC DIGITAL AUDIO | CD Audio |
| DVD R/RW | DVD-R DVD-RW | COMPACT DISC DIGITAL AUDIO RECODABLE COMPACT DISC ReWritable | CD-RW/-R |
| RW DVD+ReWritable | DVD+RW DVD+R DVD+R DL | CD VIDEO | CD VIDEO (VCD) |
Japan, Europe, South Africa, Middle East (including Egypt).
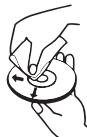
REMOTE CONTROL

| 1 | POWER | Power/standby. |
| 2 | AUDIO/ANGLE | Changes audio mode (if available). • Selects viewing angle (available only for some DVDs) or changes the picture scan mode. |
| 3 | SUBTITLE/TITLE | Press 2 seconds to access DVD subtitle mode (if available). • Changes subtitle mode with a slight touch (if available). |
| 4 | MENU/ZOOM | Acceses DVD root menu. • Enlarges an image. |
| 5 | STOP/SLOW | Stops the DVD. • Starts slow motion playback (x1/2, x1/4, x1/6, x1/8). |
| 6 | ▲▼ | Navigation keys: Scrolls through menus or options. |
| 7 | / VOL- | Navigation key Volume selector- |
| 8 | ENTER | Enters selection. |
| 9 | ■ | Stops or starts playback. |
| 10 | SOURCE | Selects DISC/USB/SD/MS/MMC modes. |
| 11 | MUTE | Mutes the sound or turns it on again.. |
| 12 | < / > | Lets you search forward or back. |
| 13 | | < / > | | Goes to the next chapter, title or track./Goes back to the previous chapter, title or track. |
| 14 | / VOL+ | Navigation key Volume selector+ |
| 15 | GOTO | Sets playback starting point. |
| 16 | SETUP | Accesses setup menus |
| 17 | Numeric keypad: Selects a numbered title/chapter/track. Select a number and press ENTER. | |
| 18 | REPEAT A-B | Repeats a sequence. |
| 19 | REPEAT/PROG | Modifies repetition mode. • Allows chapter programming (only in DVD mode). |
| 20 | DISPLAY | Displays DVD information during playback Disables standby mode. |
Insertion (lithium battery)
Replacing the button battery
The battery usually lasts for about 1 year.
Replace the battery if the remote control does not operate the appliance in normal use.
Button battery (lithium battery)
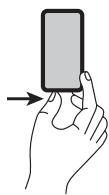
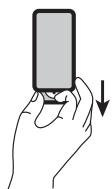
- Grip the battery compartment on the back of the remote control, then pull the strip to lift the battery holder up.
- Insert 1 CR.2025 3V lithium mini battery, taking care to respect the polarity indicated.
- Close the battery compartment.
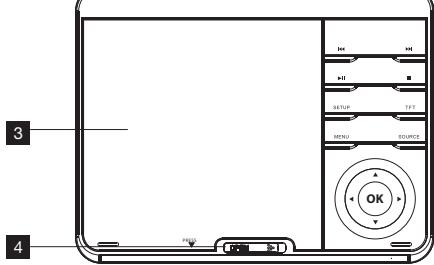
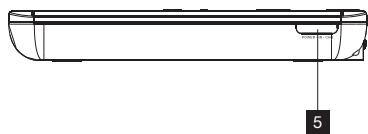
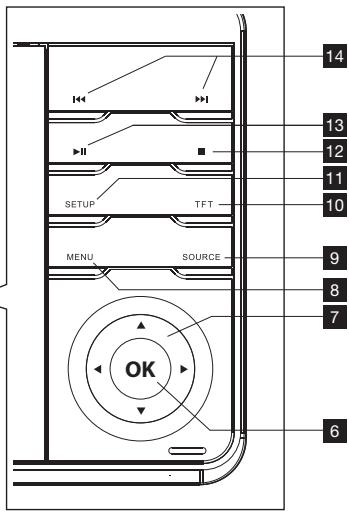
DESCRIPTION OF THE PRODUCT

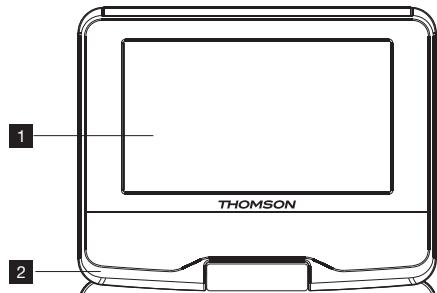
| 1 | LED screen | |
| 2 | Speaker | |
| 3 | Disc compartment | |
| 4 | OPEN | Slide it to open the compartment |
| 5 | Remote control infrared sensor | |
| 6 | ←▼▲ | Direction keys: Lets you move (left/right/up/down) |
| 7 | OK | Lets you confirm the selection. |
| 14 | K/ K | Goes back/next to the previous or next chapter, title or track. |
| 13 | II | DVD playback or pause. |
| 12 | ■ | Stops the DVD. |
| 11 | SETUP | DVD player setup menu. |
| 10 | TFT | Press to turn off the screen. |
| 8 | MENU | To access the DVD root menu. |
| 9 | SOURCE | For selecting DVD/USB mode. |
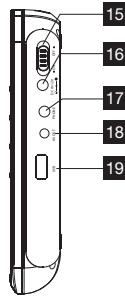
| 15 | ON/OFF | Lets you switch the player on or off. |
| 16 | DC IN | For connecting the mains voltage adapter or the ciga-rette lighter adapter. |
| 17 | PHONE | Earphone jack |
| 18 | AV OUT | Output jack audio/video |
| 19 | USB | Lets you select the playback medium. |
| 20 | SD*, MM C*, or MS* card player. |
An SD (Secure Digital) card is a removable memory card for storing digital data.
An MMC (MultiMediaCard) is a removable memory card for storing digital data.
*An MS (Memory Stick) card is a removable memory card for storing digital data.
CONNECTION TO A TELEVISION SET
PLAYER SETUP
- Connect the power supply cord to the product, then to the outlet.
- This device is designed to function using the power adaptor supplied. In case of a replacement, use an adaptor with similar characteristics and complies with the standards in force.
- If an extension chord is necessary, please take all necessary precautions to avoid tripping.
- Do not plug in or unplug the adaptor with wet hands.
TO not expose the device to rain or humidity to avoid the risk of a fire or electric shock. Consequently, do not use the device near a water source or in a damp room. - Press ON/OFF and select ON to switch the player on.
- In case of screen display faults (misadjusted picture or black and white), verify the playback mode: PAL or NTSC.
Connection to the TV with an audio/video power cord (cable not supplied)
- Switch on the device and select the Audio/Video channel.
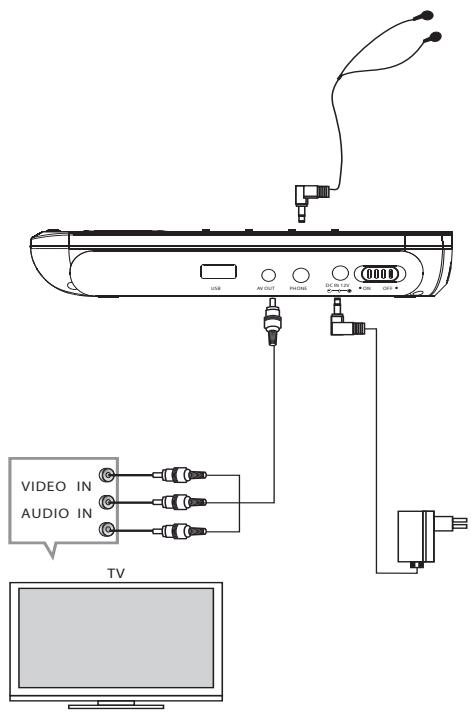
SUPPLIED ACCESSORIES
- Earphones
Adaptor
Remote control + 1 CR2025 battery
Cigarette-lighter adapter - travel bag with headrest fixation
THOMSON
PLAYER SETUP
Note: To enter a selection, press ENTER (remote control) or OK (player).
- Press SETUP to access the setup menus.
- Press the navigation buttons selects a menu, menu option or a parameter value.
- Use to access the menu options.
- Press ENTER to access parameter values, select one and press ENTER.
- Press to go back to the previous menu.
- After customizing the options, press SETUP to exit the menu.
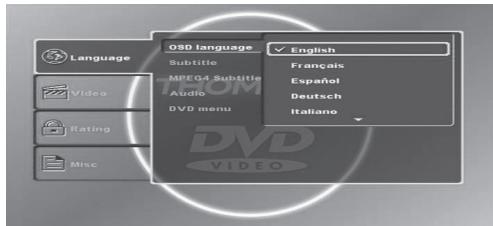
Menu language
- OSD: Selects a language for SETUP menu, and for on-screen display.
- Subtitle: Switches between different subtitle languages. Available subtitles depend on the source DVD. Press Stop to disable subtitles. Press Auto to select the original source language.
- MPEG4 Subtitle: Switches between different subtitle languages when watching an MPEG4 film. DVD must support subtitle feature.
Audio: Selects a language soundtrack. Available subtitles depend on the source DVD.
DVD Menu: Select a language for the DVD menu.
DVD SETUP
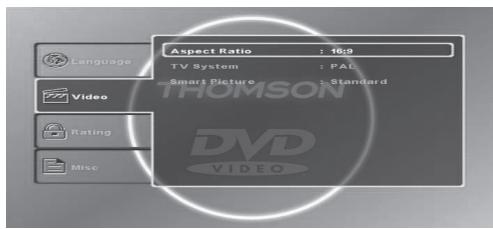
Video menu
- TV mode: Choose the display mode (aspect ratio) that best fits the TV dimensions: 4:3 or 16 for wide screen TVs. 4:3 has to display modes: Letterbox, that keeps the cinematic format; masking tapes may appear on top and on the bottom of the screen. Pan Scan adjusts the image to fit the whole screen, trimming the parts that do not fit the TV dimensions.
Note: If the image is distorted or misadjusted, choose a different picture format on the corresponding menu.
- TV system: Selects the video system that fits the TV. It differs by country. If the image is distorted or misadjusted, or displayed in black and white, this parameter needs to be modified.
- Image mode: Selects the image mode: Standard, clear, soft and dynamic.

Control menu
Parental control is a function that limits playback of the disc by the age of the users. The user will be prompted to enter a password.
Note: Parental control level depend on the disc used. Some discs do not allow parental rating.
The player has 8 parental control levels corresponding to the rating levels used on DVDs:
- Level 8 (least restrictive): All discs are played (default option).
- Level 7 to 2: DVDs approved for all audiences are played.
- Level 1 (strictest): DVD for children are played, adult/all audiences DVD are blocked.
To apply parental control, follow the following steps:
- Enter your four-digit password. Press ENTER. Note: Default password is 6666.
- Select Parental Control again, and then press ENTER: The control list level (1-8) is displayed. Select a level, and then press ENTER.
Note: Password is always required to adjust parental control level.
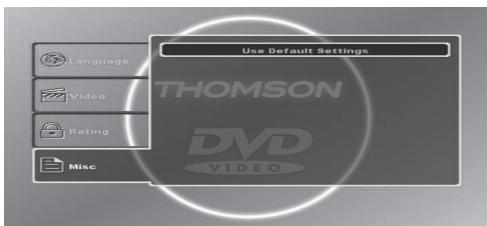
General menu
Manufacturer parameters
The values by default can be restored, i.e. in case of selecting the wrong settings.
Select Yes to restore default parameters.
Playing a DVD
- Open the disk compartment by sliding OPEN.
- Insert the disc, label facing downwards.
- Close the disc compartment.
A list of the files contained on the CD will appear on the screen.
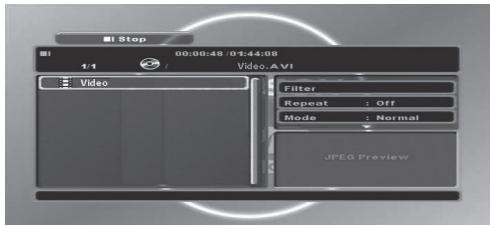
Playing MPEG4 files
A list of the MPEG4 contained on the CD will appear on the screen.
- Use or to select a film on the list that appears on the left, then press ENTER to start playback.
Stop
-
Press to quit playback.
-
Press to resume playback.
Note: When playing an MPEG4 file, you can press ENTER or OK to resume playback.
Pause
- Press during playback: The image freezes.
- Press to resume playback.
Search by title, chapter or time
Stops playback at a specific point.
In play mode:
Press GOTO: The search window appears.
Use , , and to select a search option:

- Title: Enter the title number using the numeric keypad.
Chapter: Enter the chapter number using the numeric keypad. - Time: Use and to select a field (hour, minutes, seconds). Use the numeric keypad to enter the field values.
Press ENTER to confirm: Playback starts from the title, chapter or time selected, of the value entered is valid. Press GOTO again to close the search window without making any selection.
Please note: When you are playing an MPEG4 file, the
"Time" option is the only one available.
Accessing title menu
In off mode:
Press SUBTITLE/TITLE during 2 seconds: DVD title menu will be displayed if available in disk recording.
Accessing room menu
Press MENU/ZOOM during 2 seconds to access root menu (chapter list). Use navigation buttons to select a chapter, then press ENTER to confirm.
Subtitle language selection
Press SUBTITLE/TITLE during playback to select Subtitle language.
Zoom
Press MENU/ZOOM during playback to enlarge the image as desired (x1, x2, x3). The image will return to the original size at the fourth touch (stop).
Use , , and . to move around on the enlarged image.
Playback information display
Press DISPLAY repeatedly to display Playback information on the screen.
Press DISPLAY to hide Playback information.
Chapter selection
Use and to select previous/next chapter.
Chapters can be selected using the numeric keypad. After pressing a key in the numeric keypad, the search window will appear:

For a description of the search window, see the paragraph "Search by title, chapter or time".
When reaching the last chapter, if you press one of the the message "Momentarily unavailable" appears.
Likewise, when reaching the first chapter, or when introducing the film, pressing one of and , will trigger display of the message "Momentarily unavailable".
Fast forward, fast reverse
During playback or pause, press and to once or more to select the required speed: x2, x4, x8, x16 (backward or forward). To return to normal speed, press a and five times.
PLAYING
Modifying viewing angle
If the angle indicator appears on the screen for a moment, it is possible to select a different camera angle by pressing AUDIO/ANGLE during 2 seconds.
Changing the audio language
During playback, press AUDIO/ANGLE repeatedly to select the audio language, channel or coding methods that the DVD title being viewed offers.
Repeat play modes
Press REPEAT/PROG repeatedly to select the following repeat modes.
- Repeat Chapter: Repeats currently playing chapter.
- Repeat title: Repeats currently playing title.
- Repeat Off: Cancels repeat mode. Returns to normal playback.
For MPEG4, repeat mode options are the following:
- Repeat one: Repeats currently playing file.
- Repeat folder: Repeats all files in a folder.
- Repeat Off: Cancel repeats mode.
Program playback
- During playback, press REPEAT/PROG during 2 seconds: The program menu appears on the screen.
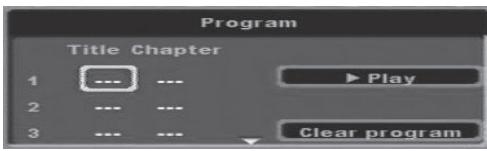
- Use , , and to scroll through the different fields.
Use numeric keypad to enter valid title/chapter number.
Maximum of 12 sequences. - Select Play and the presser ENTER to start playback.
- To clear the whole program, select Clear and press ENTER.
- Press REPEAT/PROG during 2 seconds to disable program playback feature.
Note: MPEG4 program playback is not supported.
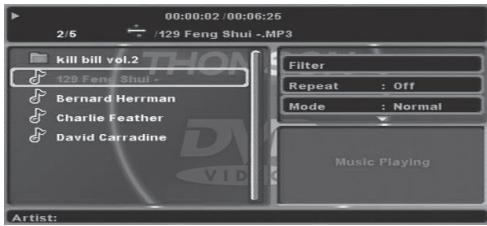
Playing mp3
- Open the disk compartment by sliding OPEN.
- Insert the disc, label facing downwards.
- Close the disc compartment.
- A list of the files contained on the CD will appear on the screen.
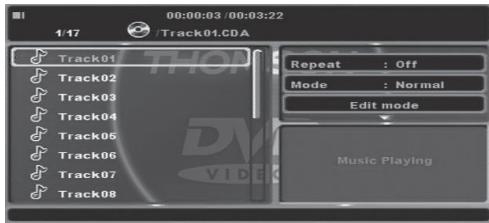
Browsing playback interface
- Use , , and to scroll through the lists on the right and left.
- Use , , and to select an element.
- Select an option, then press ENTER.
Note: When playing an MP3 file, if there is information available, it will appear at the bottom of the screen.
Playback
First track is played automatically.
Please note: If the player does not start automatically, press II.
Stop
- Press to quit playback.
- Press , ENTER or OK to resume playback.
Pause
- Press II during playback.
- Press▶II to resume playback.
File display according to type
Note: Feature not available for audio CD (however, it is available when the CD has different types of files).
- Select Filter on the right list, then press ENTER.
- Use , , and to scroll through the modes: Audio, Photo or Video. Press ENTER to enable/disable the selected mode. Active mode appears ticked.

Scrolling/searching inside a track
- Use and to scroll through the currently played track (forward/backward). Press repeatedly to speed up playback (x2, x4, x8, x16).
- Press to resume playback.
Note: Press and 5 times to resume playback.
Selecting another track during playback
- Use A and B to go to the next/previous track during playback.
- To play a track directly, enter the track number using the numeric keypad (0-9), then press ENTER.
Repeat play modes
Repeat playback can be set before or during playback. Press REPEAT/PROG repeatedly to select the following repeat modes:
- Repeat one: Repeats currently playing track.
- Repeat folder: Repeats all tracks in a folder.
- Repeat Off: Cancel repeats mode.
Note: Repeat playback is automatically disabled when playback is stopped.
You can select Repeat on the right list using , , and then press ENTER repeatedly to select a repeat mode.

Random playback
Before or during playback, you can select Mode on the right list using , , and and then press ENTER repeatedly to select a repeat mode.
Normal: Normal playback
- Random: Plays tracks in random order. Select another mode to disable random playback.
- Music Intro: Plays the first 10 seconds of each track.
Press REPEAT/PROG to repeat playback in the same random order.
Program playback
Program a CD track playback order.
Note: Only one program is available.
Saving program
Stop the player.
- Select « Mode Edition » on the right list using the directional buttons , , and . Then press ENTER. « Mode Edition » appears highlighted.
- Back to the list on the left with .
To select a track using and , and then press ENTER to confirm the name of the track is checked. - Press ENTER again to cancel the track you selected.
- Repeat the operation to include desired tracks.
- After track selection, use to return to the right list and then press to select Add program, then press ENTER.
Program playback
- Press to play the customized program when Edition is highlighted.
Clearing the program
To clear a program, it must be stopped.

- To clear the whole program, select View Program on the right list and press ENTER. The list on the right displays saved tracks.
- Use the navigation buttons to select the track you want to delete from the list on the right and then press ENTER: The track name appears ticked. Repeat the operation to include desired tracks for deletion.
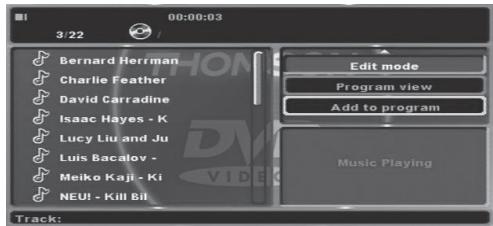
- Select View Browser to return to the CD track list.
PLAYING
Playingjpeg
The DVD player is able to read a CD with JPEG picture files.
- Open the disk compartment by sliding OPEN.
- Insert the disc, label facing downwards.
- Close the disc compartment.
- A list of the files contained on the CD will appear on the screen.
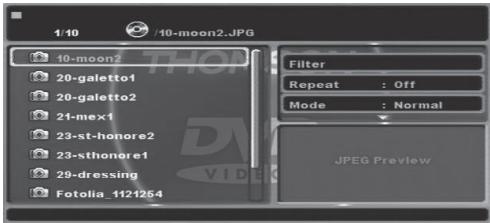
Browsing playback interface
- Use or to scroll through the lists on the right and left.
- Use or to select an element on each list. Select an option, and then press ENTER.
- Use , , to select a file for display, and then press ENTER.
File display according to type
- Select Filter on the right list using , and then press ENTER.
- Use or to scroll through the modes: Audio, Photo or Video. Press ENTER to enable/disable the selected mode. Active mode appears ticked.
Note: The option Filter is available only when the CD has different types of files.
Picture slide show
- Use or to select a picture. A picture summary (W=width, H=height) will appear on the right bottom of the screen. Press or ENTER: The selected picture will be displayed on the TV screen, and then the rest of the pictures of the selected file will be displayed in slide show
Note: You can select Repeat on the list on the right using and then press ENTER repeatedly to select File repeat mode.
Previous/next picture
- Press or to go to the next/previous picture.
Stopping Slideshow
- Press to pause the slideshow. Press again to resume slideshow.
- Press to stop the slideshow.
Enlarging pictures
Pause the picture, then press MENU/ZOOM repeatedly to enlarge the image as desired (x1, x2, x3). Use , , and to scroll through the enlarged image. Press MENU/ZOOM 4 times to return to original size.
Rotating pictures
Pause the picture, then , , and to modify picture orientation: 90^ , 180^ , 270^ , return to original orientation.
Modifying picture scan
Pause the picture, then press AUDIO/ANGLE during 2 seconds to modify scan mode.
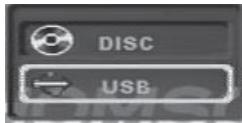
Reading a usb flash drive (not provided)
The device has a USB port to allow reading music files (MP3) and images (JPEG) from a USB flash drive.
- Make sure no disc is currently being played.
- Connect the USB flash drive to the port.
- Press SOURCE, then choose USB using navigation buttons, the press ENTER.
- USB flash drive files will be displayed on the screen. Playback features are the same than for CDs. See the paragraph for the type of file you want to read.
Note:
- You can change the mode USB to DISC and vice versa by pressing SOURCE, only if no disc is being played.
- Do not remove the USB drive when files are being read, as this might result in file damage.
It is recommended to save USB content to prevent data loss. - Warning: Use 2 GB USB flash drives only. The player does not support all USB devices (e.g. external hard drive, etc...).
USING AN SD/MMC/MS MEMORY CARD (not supplied)
PLAYBACK OF A SD/MMC MEMORY CARD (not included)
The player has a memory card port to allow you to read music (.mp3), image (.jpeg) and video (.avi) files from a memory card. Three types of memory cards are accepted:
SD, MMC and MS.
- Insert the memory card in the slot provided for that purpose, respecting the right way. Do not push the card in completely. It is normal for part of the card to stick out from the slot.
- Press SOURCE, choose the CARD mode with the arrow keys, then ENTER to confirm.
- The content of the memory card is displayed on the screen of the device.
The playback functions are identical to those of a USB key. Refer to the section corresponding to the type of files to be played.
Note:
- Do not remove the memory card when the files are being read.
- ATTENTION: Maximum capacity supported: 32GB.
TECHNICAL SPECIFICATIONS
- Playback Mode: NTSC/PAL
- Disc mode: DVD,VCD, CD, MP3, CD-R, CD-RW, JPEG, DVD+ -R/W, MPEG4,
- Resolution: = 500 lines
Video S/N: = 65dB
Frequency response in 96KHz fs: 20Hz-20KHz: ±1 dB
Audio S/N: 90dB
Dynamic range: 80dB
Distortion: < 0.01% - Converter N/A: 96KHz/24bit
Video outlet: 1Vp-p (75 Ω)
2.0 Outlet channels
Power consumption: 12W
Voltage: DC IN 12V
Note: Unit design and specifications are subject to change without notice. The manufacturer reserves the right to make the necessary improvements.
REPAIR AND MAINTENANCE
Consult the following table if there is a problem with the appliance.
| Problems | Solutions | Problems | Solutions |
| Picture without sound | ·Check that the audio connectors are connected properly. ·Check that the audio connectors are not damaged. ·Check that the volume is high in the VOL/CH section. ·Check that the audio parameters have been correctly defined for the player. ·Check that the audio parameters have been set up correctly for your television set. ·Check that the sound has not been turned off. | The remote control does not work | ·Check that the remote control's battery is working. ·Point the remote control towards the player's infrared sensor. ·Remove the obstacles between the remote control and the player. |
| No sound, no picture | ·Check that ON/OFF is set to ON. ·Check that the plug is plugged in correctly. ·Check that the electrical cable's plug has been plugged into the mains socket. ·Check that the indicator light (LED) is lit up. | “No disk” is displayed | ·Make sure that you have inserted a disk in the player. ·Check that the disk has been inserted correctly. ·Check that the disk is not deformed, dirty or scratched. |
REPAIR AND MAINTENANCE
| Sound without picture | ·Check the connections. ·Check that the video cable is connected to the video input of the television set (not to an audio output). ·Check that your television set's video input has been selected correctly. ·Check that the video connectors are not damaged. ·Check that the parameters have been set up correctly for your television set. | No sound | ·The volume is set to the minimum level. ·Make sure that the disk is not dirty, scratched or damaged. ·A pair of SPEAKERS is connected to the unit. |
| Poor picture or sound quality | ·Check that the audio parameters have been set up correctly for your television set. ·Check that the disk is clean and not scratched. ·Check that the AV connectors are in a good condition. | Picture dark | ·Adjust the brightness and contrast |
MAINTENANCE AND CLEANING
- Unplug the appliance before cleaning it.
- Remove fingerprints and dust with a soft and slightly damp cloth. Do not use abrasive products or solvents that may damage the appliance's surface.
ATTENTION: Never immerse the appliance in water or in any liquid whatsoever.
- If it is not used for a long time, unplug the appliance and remove the batteries.

Find us on Facebook

Follow us on twitter
THOMSON is a trademark of TECHNICOLOR S.A. used under license by:
Parsons International France - 19 Boulevard Albert Einstein 77420 Champs sur Marne - France

N°Azur

33)0825 745 770
call rate according to operator
French time: Monday to Thursday (from 9 am to 18 pm) and Friday (9 am to 3:30 p.m.)
www.thomsonaudiosideo.eu
According To Rate Bediennruf
CLASS 1 LASER PRODUCT
CLASS 1 LASER PRODUCT
Whenever I'll do my best to make sure that you don't get into a mess, I'll tell you that you're going to be in trouble.
CLASS 1 LASER PRODUCT