
RM 3618 LTX BL 46 - Lawn mower METABO - Free user manual and instructions
Find the device manual for free RM 3618 LTX BL 46 METABO in PDF.
| Product Type | Cordless Lawn Mower |
| Brand / Model | Metabo RM 3618 LTX BL 46 |
| Power Supply | Li-Ion 36 V Battery (Cordless Alliance System) |
| Battery Capacity | 4.0 / 5.5 / 8.0 Ah (LiHD) or 4.0 / 5.2 Ah (Li-Ion) depending on option |
| Cutting Width | 46 cm (estimated from reference) |
| Cutting Height Adjustment | Central, multiple positions (lever) |
| Operating Modes | Bagging, mulching, rear discharge |
| Collection Bag | Included, volume not specified in manual |
| Blade | Sickle blade, replaceable (ref. 628435000) |
| Handle | Foldable and height-adjustable (3 positions) |
| Safety Devices | Safety key, control lever (automatic stop), battery protection cover |
| Indicators | Central capacity indicator (battery charge level) |
| Maintenance | Clean after each use, replace blade, no lubrication required |
| Repairability | Original Metabo spare parts, repair by authorized electrician |
| Weight | Not specified in manual (estimated ~20 kg) |
Frequently Asked Questions - RM 3618 LTX BL 46 METABO
User questions about RM 3618 LTX BL 46 METABO
0 question about this device. Answer the ones you know or ask your own.
Ask a new question about this device
Download the instructions for your Lawn mower in PDF format for free! Find your manual RM 3618 LTX BL 46 - METABO and take your electronic device back in hand. On this page are published all the documents necessary for the use of your device. RM 3618 LTX BL 46 by METABO.
USER MANUAL RM 3618 LTX BL 46 METABO
natural_image
Black and white photo of a metabo lawn mower with visible branding and wheels (no text or symbols on the device itself)
natural_image
Top-down view of a small manual lawn mower with wheels and a handle (no text or symbols visible)
 | RM 36-18 LTX BL 46 | |
| *1) Serial Number 01606.. | ||
| U | V | 36 (2 x 18) |
| B | c | m 46((18 ^1/_8 ) i |
| H | mm | 25 - 80 (1 - 30 ^5/_32 ) |
| V | I | 55 |
| A _max | m ^2 | 800 |
| n /min (rpm) 2800 | ||
| m | k | g ( I |
| IP - IPX4 | ||
| a _h /K _h | m/s ^2 | < 2,5 |
| L _pA /K _pA | dB(A) 67 / 0,8 | |
| L _WA /K _WA | dB(A) 88 / 0,8 | |
| L _WA(G) *5) | dB(A) 88 | |


*2) 2014/30/EU, 2006/42/EC, 2011/65/EU, EN 55014-1, EN 55014-2
*3) EN 60335-1:2012, EN 60335-2-77:2010, EN 50581:2012
*4) 2247477.51-Noise; DEKRA Certification B.V., P.O. Box 5185, 6802 ED Arnhem, The Netherlands
Original instructions
1. Declaration of Conformity
We declare and accept sole responsibility for ensuring: these cordless lawnmowers identified by their type and serial number *1) conform to all relevant provisions of the directives *2) and standards *3). Test report *4), Issuing testing authority *4). Measured LWA(M) / guaranteed LWA(G) sound power level *5), technical documentation for *6) - see page 4.
2000/14/EC: Conformity assessment procedures in accordance with Annex VI
2. Specified Conditions of Use
The cordless lawnmowers are intended for cutting and mulching lawns.
The lawnmower must not be used for cutting bushes, hedges and shrubs, for cutting and crushing climbing plants or for cutting plants on roof gardens or in balcony boxes, as shredder for crushing tree or hedge cuttings, for levelling uneven ground.
The user bears sole responsibility for any damage caused by inappropriate use.
Generally accepted accident prevention regulations and the safety instructions must be observed.
3. General Safety Information

For your own protection and for the protection of your power tool, pay attention to all parts of the text that are marked with this symbol!

WARNING – Read the operating instructions to ce the risk of injury.

WARNING – Read all safety warnings, instructions, strations and specifications provided with this power tool.
Failure to follow all instructions listed below may result in electric shock, fire and/or serious injury.
Keep all safety instructions and information for future reference.
Always include these documents when passing on your power tool.
Residual risks: Even when the device is used as intended, there could be residual risks. Observe all safety warnings and instructions. Possible hazards:
-Injuries and material damage caused by flying parts.
- Lung damage if no suitable dust mask is worn.
-Hearing damage if no suitable hearing protection is worn.
- Health detriment, due to vibration emissions, if the machine is used over a long period of time or if it not properly guided or maintained.
4. Special Safety Instructions
4.1 Introduction
- Carefully read the operating instructions. Familiarise yourself with the controls and the proper use of the machine.
- Do not allow children, persons with reduced physical, sensory or mental abilities or lack of experience and/or knowledge, or persons not familiar with these instructions to use this machine. Local regulations may limit the age of the operator.
• Children should be supervised to ensure that they do not play with the tool.
- Do not operate the machine if persons, especially children, or pets are nearby.
- The user is responsible for injuries or material damage to other persons or their property.
- Do not modify the device.
ENGLISHen
4.2 Preparation
- Always wear sturdy shoes and long trousers when operating the machine. Do not operate the machine barefoot or with open shoes. Do not wear loose-fitting clothing or clothing with dangling strings or ribbons.
- Thoroughly check the area of use of the machine and remove all object that could be caught and ejected by the machine (e.g. branches, stones).
- Always inspect visually before use if the blade, the fixing screw and the blade assembly are worn or damaged. Worn or damaged components must be replaced in sets to avoid imbalance. Replace damaged or illegible markings.
- When working for long periods of time wear ear protectors. High noise levels over a prolonged period of time may affect your hearing.
4.3 Operation
- Use the machine only in daylight or good artificial light.
- Avoid using the machine on wet grass.
• Always ensure that you have a firm stand on slopes. - Guide the tool only at walking pace.
- When working on slopes, always move along horizontally, never mow up and down.
- Be extremely careful when changing direction on slopes.
- Do not work on steep slopes.
- Be extremely careful when turning, reversing or pulling the machine.
- Ensure stable footing. If you lose your balance, immediately let go of the gearshift.
- Do not mow near steep slopes, ditches or embankments.
- Watch out for holes, furrows, rocks and other hidden objects that can cause you to fall. Remove all obstacles such as stones and branches
- Wait until the blade stops when the machine needs to be tilted for transport, when you need to cross areas other than grass and when transporting the machine to and from the area to be worked on.
- Never operate the machine with damaged protective equipment or without protective equipment (safety key, rear ejection flap).
- Carefully start up the motor according to the instructions and with your feet far away from the blade.
- Do not tilt the machine when starting up the motor, except if the machine has to be tilted to start. In this case, do not tilt the machine more than absolutely necessary and only tilt the part furthest away from the operator.
- Do not start the machine when standing in front of the open rear ejection flap.
-
Do not put your hands or feet anywhere near or below rotating parts. Always keep away from the ejection opening.
-
Never lift or carry the machine with the motor running.
- Switch off motor, remove safety key. Ensure that all moving parts have come to a standstill:
- if you leave the machine unattended;
- before you remove jams or blockages e.g. in the ejection opening;
- before checking or cleaning the machine or before carrying out any work on the machine;
- if a foreign object has been hit. Check the machine for damage and have repairs carried out before putting the machine back into operation.
- If the machine starts to vibrate with unusual strength, an immediate check is required:
-check for damage;
- replace or repair damaged parts;
- ensure that all nuts, bolts and screws are tightened.
- In the event of an accident or malfunction, switch off the machine immediately and remove the battery pack.
4.4 Maintenance and storage
- All nuts, bolts and screws must always be tightened to ensure that the machine is in safe operating condition.
- Check the collection bag regularly for wear or loss of functionality.
- When adjusting the machine take care not to jam your fingers between moving blades and fixed parts of the machine.
- Remove the battery packs from the machine, wait until all moving parts have come to a standstill and the machine has cooled down before making any adjustments, retrofitting, maintenance, cleaning or before storing the machine.
- When servicing the blades, please note that the blades can still move although the battery pack has been removed.
- Replace worn or damaged parts for safety reasons. Use only original spare parts and accessories.
4.5 Use and handling cordless tools
- Only recharge with the charger specified by the manufacturer. A charger that is suitable for one type of battery pack may create a risk of fire when used with another battery pack.
- Use power tools only with specifically designated battery packs. Use of any other battery packs may create a risk of injury and fire.
- When not in use, keep batteries away from paper clips, coins, keys, nails, screws or other small metal objects that could bridge the contacts. Shorting the battery terminals together may cause burns or a fire.
- Under abusive conditions, liquid may be ejected from the battery. Avoid contact. If contact accidentally occurs, flush with water. If liquid contacts eyes, additionally seek medical help. Liquid ejected from the battery may cause irritation or burns.
- Do not use a battery pack or tool that is damaged or modified. Damaged or modified batteries may exhibit unpredictable behaviour resulting in fire, explosion or risk of injury.
- Do not expose a battery pack or tool to fire or excessive temperature. Exposure to fire or temperature above 130 °C (265 °F) may cause explosion.
- Follow all charging instructions and do not charge the battery pack or tool outside the temperature range specified in the instructions. Charging improperly or at temperatures outside the specified range may damage the battery and increase the risk of fire.
- Avoid accidental operation. Make sure that the machine is switched off before connecting the battery and before picking up or carrying the lamp. Carrying the machine with your finger on the switch or energising machines that have the switch on invites accidents.
-
Remove battery packs from the machine...
-
...before making any adjustments, changing tools, maintenance or cleaning.
- ...if the operator moves away from the tool.
- ...prior to the removal of blockages.
- ...after touching a foreign body in order to check the tool for damage.
- ...for immediate checking, when the machine starts to vibrate excessively.

Protect battery packs from water and moisture!
Do not expose battery packs to fire!
- Do not use faulty or deformed battery packs!
- Do not open battery packs!
- Do not touch or short circuit battery pack contacts!

A slightly acidic, flammable fluid may leak from defective Li-ion battery packs!

If battery fluid leaks out and comes into contact with your skin, rinse immediately with plenty of water. If battery fluid leaks out
and comes into contact with your eyes, wash them with clean water and seek medical attention immediately!
- If the machine is defective, remove the battery pack from the machine.
Transport of li-ion battery packs:
- The shipping of li-ion battery pack is subject to laws related to the carriage of hazardous goods (UN 3480 and UN 3481). Inform yourself of the currently valid specifications when shipping li-ion battery packs. If necessary, consult your freight forwarder. Certified packaging is available from Metabo.
- Only send the battery pack if the housing is intact and no fluid is leaking. Remove the battery pack from the machine for sending. Prevent the contacts from short-circuiting (e.g. by protecting them with adhesive tape).
4.6 Icons

WARNING – General hazards!

Read the operating instructions.

Always ensure that you have a firm stand on slopes. Do not work on steep slopes.

Ensure that nobody gets injured by catapulted foreign bodies. Keep other people away.

Keep persons nearby and pets at a safe distance to the device. Keep other people away.


Caution! Sharp cutting blades. Before cleaning or maintenance: Switch off the machine, remove the safety key and remove the battery packs.

Protect the device from water and moisture. Do not expose to rain.
5. Overview
See pages 2 and 3.
1 Central capacity display (shows the charge status of the battery packs after starting and stopping for several seconds)
2 On/off switch
3 Switch bracket
4 Handle (for pushing and steering the machine. Also carry handle.)
5 H a n d l e b a r s
6 Thumbs screws
7 Rear ejection flap
8 Collection bag
9 K n o b s
0 Mulching key
1 Carry handle
2 Carry handle
3 Protective cover (battery packs)
4 Lever (central cutting height adjustment)
5 Ejection opening
6 Safety key
7 Battery pack release button
8 Battery packs *
9 Capacity and signal indicator *
20 Capacity indicator button *
21 Locking screw for blade
22 Washer
23 Blades
24 Directional arrows (arrow-shaped holes in the blade must match the directional arrows on the machine)
*equipment-specific
6. Initial Operation
6.1 Unfold the handle, adjusting the handle height
Fig. A. Unfolding the handlebars (5)
- Pull on the knobs (9) and turn by 90^ .
- Unfold the handlebars (5).
- Set the desired handle height by aligning the knobs (9) in one of the three positions on the brackets.
- Rotate the knobs (9) by 90^ so that they engage in the holes of the brackets.
NOTE: Make sure that handle knobs (on both sides) are in the same position (1, 2, 3).

WARNING! Do not damage the cables when folding and unfolding.
Fig. B. Unfold the handle (4)
- Unfold the handle (4)
- Tighten the screws (6) (on both sides).
6.2 Preparation for grass collection, mulching or ejection
Collect grass / mount collection bag Fig. C
- Unfold the rear ejection flap (7) upwards and hold.
- Ejection opening (15) must be empty. If necessary remove mulching key (10) (lift and put aside).
- Hold collection bag (8) on its handles and attach the hooks to the flap rod.
- Close the rear ejection flap (7).
Mulching / mounting the mulching key. Fig. D
- Unfold the rear ejection flap (7) upwards and hold.
- Remove the collection bag (8).
- Hold the mulching key (10) on its handles and insert into the ejection chute. (Push in until the stop and press downwards. Ensure that the mulching key has engaged in the designated recesses.)
- Close the rear ejection flap (7).
Ejecting the grass.
- Unfold the rear ejection flap (7) upwards and hold.
- Remove the collection bag (8).
- Ejection opening (15) must be empty. If necessary, remove mulching key (10). (pull out and put aside).
- Close the rear ejection flap (7).
6.3 Set depth of cut.
Fig. on page 2.
Slightly pull the lever (14) outwards and shift the guide to the desired position. Let engage in the desired position.
Adjust the cutting height to the height of the grass to be cut. For an optimum result when cutting grass / mulching: do not cut too much grass in one pass.
6.4 Battery pack
Charge the battery pack before use.
Recharge the battery pack if performance diminishes.
Instructions on charging the battery pack can be found in the operating instructions of the Metabo charger.
In case of Li-Ion battery packs with capacity and signal display (19) (equipment-specific):
- Press the button (20), the LEDs indicate the charge level.
- The battery pack is almost flat and must be recharged if one LED is flashing.
Inserting and removing the battery pack
Fig. E
WARNING! Stop the machine and wait until the motor stops before removing or inserting battery packs.
Inserting: Fold the protective cover (13) upwards. Push both battery packs (18) until they engage. Close the protective cover (13).
Removing: Fold the protective cover (13) upwards. Pull off the safety key (16). Press the battery pack release (17) button and remove the battery pack (18). Close the protective cover (13).
7. Use
7.1 Transporting
Carrying:
- With 2 persons: Carry on handles (12) and (4)
- With 1 person: Carry when folded (with empty collection bag) on carry handle (12) and (11).
Driving: Wait until the blade stops when the machine needs to be tilted or carried for transport, when you need to cross areas other than grass and when transporting the machine to and from the area to be worked on.
7.2 Starting the machine
Fig. E, F.
- Insert the safety key (16). Close the protective cover (13).
- Press and hold the on/off switch (2).
- Pull switch bracket (3) in direction of handle (4).
- Release on/off switch (2).
NOTE:
Automatic adjustment of the motor power according to the height of the grass for maximum battery pack runtimes: Approximately 3 seconds after starting, the machine runs on full speed for about 5 seconds and then adjusts the motor power downwards.
NOTE: If the machine does not start: Pull out safety key (16) and remove the battery packs (18). Check the mowing unit to ensure that:
- no grass got caught in the blade;
- the blade can rotate freely.
7.3 Cutting and mulching lawns
Stand upright behind the tool. Hold the handle (4) with both hands and push the tool forward at walking pace.
7.4 Stopping the machine
Fig. F.
- Release the switch bracket (3) to stop the machine.

WARNING! Wait until the blade comes to a complete standstill before starting the
machine again. Do not switch the machine off and back on again in quick succession.

WARNING! Always remove the safety key (16) and the battery packs (18) after you have
finished your work.
7.5 Empty the collection bag
Fig. C
Regularly check the fill level in the collection bag (8) and empty it before it fills up too much.
- Stopping the machine.
- Pull off the safety key (16).
- Remove the battery packs (18).
- Unfold the rear ejection flap (7) upwards and hold.
- Hold collection bag (8) on its handles and detach the hooks from the flap rod.
- Close the rear ejection flap (7).
- Empty the collection bag (8).
8. Cleaning, storage

WARNING! Pull out safety key (16) and remove the battery packs (18). Unintentional
startup can cause serious injuries. The blade must be stationary.
8.1 Cleaning
- Clean the bottom of the mower unit after each use: Remove grass clippings, leaves, dirt and other deposits.
8.2 Storage
- Allow to the machine to cool before storage and cleaning.
- Make sure that the machine does not have any loose or damaged parts. If necessary:
- Tighten the screws.
- Have the machine repaired.
- Store the machine in a dry place.
- Ensure that children cannot get anywhere near the machine.
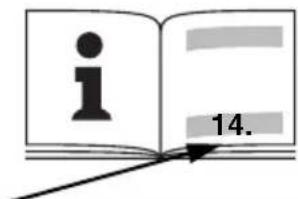
You can store the machine in a space-saving manner: Fig. G.
- Pull on the knobs (9) and turn by 90°.
- Fold the handles (4) downwards.
- Align the knobs (9) in the stop position on the brackets.
- Rotate the knobs by 90^ so that they engage in the holes of the brackets.
- Set up the machine as shown in fig. G.
9. Maintenance

WARNING! Pull out safety key (16) and remove the battery packs (18). Unintentional up can cause serious injuries. The blade must ationary.

WARNING! Keep motor and battery pack free from grass, leaves or grease.

CAUTION! Do not use strong solvents or cleaning agents on the plastic housing or components.
9.1 General maintenance
- Check the machine for damaged, missing or loose parts such as screws, nuts, bolts and caps before each use.
- Tighten all fasteners and caps properly.
- Clean the machine with a dry cloth. Do not use water.
- Never service damaged battery packs. Any service of battery packs should only be performed by the manufacturer or authorized service providers.
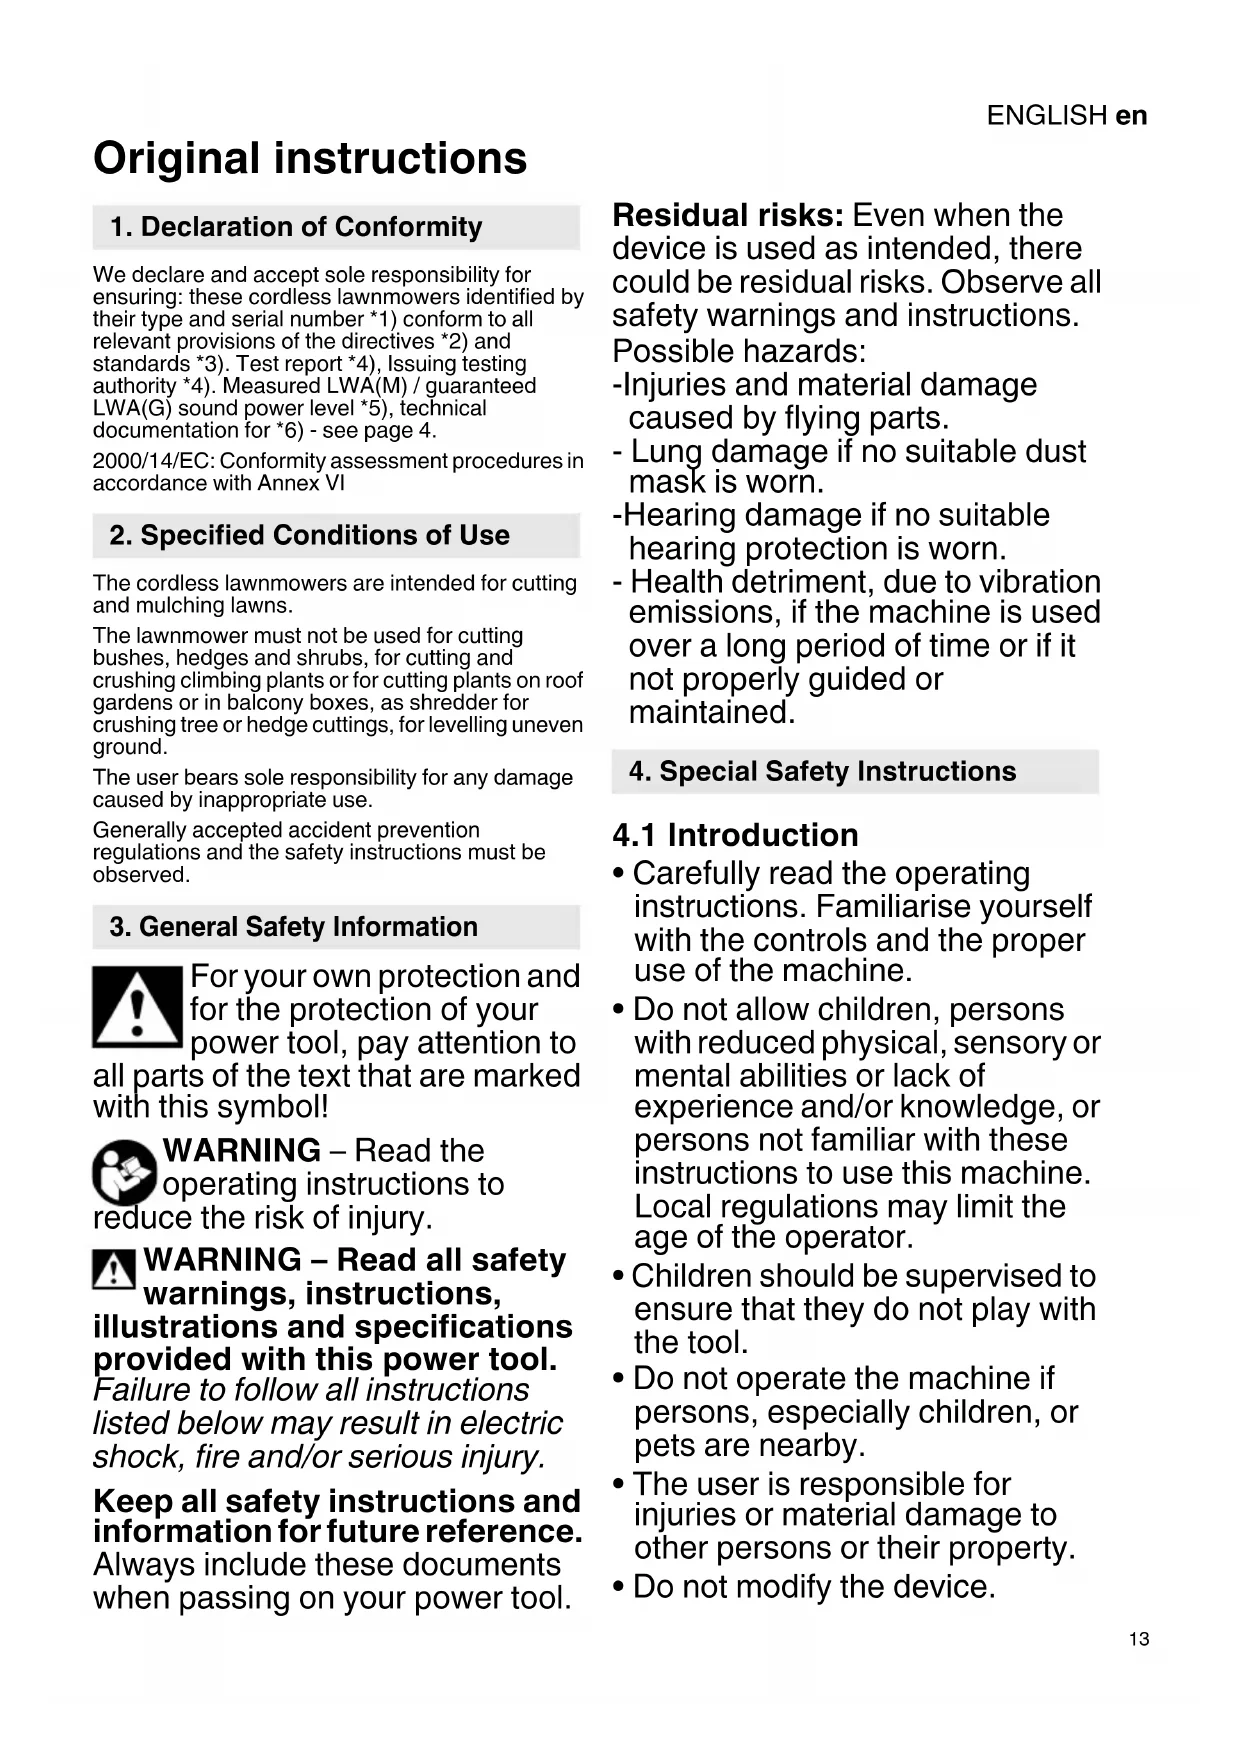
9.2 Replacing the blade

WARNING! Pull out safety key (16) and remove the battery packs (18). Unintentional up can cause serious injuries. The blade must ationary.

WARNING! Use only approved blades. See the Accessories chapter.

WARNING! Wear hard-wearing safety gloves and goggles. Pay attention to the sharp blades.
Fig. H.
- Stopping the machine.
- Pull off the safety key (16).
- Remove the battery packs (18).
- Make sure that the blade (23) has come to a standstill.
- Place the machine on its side.
- Position a sturdy piece of wood (5 cm x 5 cm x 60 cm) in such a way that the movement of the blade is prevented.
- Unscrew the fixing screw (21) (anti-clockwise) with a wrench (AF 15). Remove the fixing screw (21) and washer (22).
- Remove the worn blade (23).
- Position the new blade (23): Ensure that the arrow-shaped holes in the blade (24) match the directional arrows on the machine (24).
- Position a sturdy piece of wood (5 cm x 5 cm x 60 cm) in such a way that the movement of the blade is prevented.
- Insert washer (22) and fixing screw (21) and tighten with a wrench (AF 15) (clockwise).
9.3 Lubrication
Lubrication is not required.

WARNING! By no means lubricate the wheel components. Lubrication can cause damage in operation.
ENGLISHen
10. Troubleshooting Guide
One LED of the central capacity display (1) flashes.
At least one battery pack is empty.
- Charge the battery packs.
All LEDs of the central capacity display (1) flash.
Overload: The grass is too high or the cutting height is set too low.
- Adjust cutting height.
- Let machine cool down until the LED no longer flash.
The handle is not in position
The knobs (9) are not properly engaged.
- Adjust the height of the handle and make sure that the knobs (9) and screws (6) are properly aligned.
The machine does not start.
The battery pack performance is weak.
- Charge the battery packs.
The on/off switch (2) is defective.
- Have the on/off switch replaced.
The safety key (16) is not inserted.
- Insert the safety key.
The blade jams.
- Observe the warnings, see chapter 8. Cleaning.
The machine does not mulch properly.
The cutting height is set too low.
- Adjust cutting height.
Wet grass clippings stick to the mower unit.
- Wait until the grass has dried before mowing.
The mulching key (10) is missing.
- Insert the mulching key.
It is difficult to push the machine.
The grass is too high or the cutting height is set too low.
- Increase cutting height.
The machine vibrates heavily.
The blade is not balanced or worn.
- Replace the blade.
The motor shaft is bent.
-
Switch off the motor.
-
Pull out safety key (16) and remove the battery packs (18).
-
Check for damage.
-
Have the machine repaired before putting the machine back into operation.
The machine stops during the mowing process.
The cutting height is too low.
- Increase cutting height.
The battery packs are empty.
- Charge the battery packs .
Wet grass clippings stick to the mower unit or blade.
- Remove the battery packs (18) and check the mower unit.
The operating temperature of the machine is too high.
- Let the machine cool down.
Cuttings do not enter the collection bag.
- Empty the collection bag.
11. Accessories
Use only original Metabo or CAS (Cordless Alliance System) battery packs and accessories.
Use only accessories that fulfil the requirements and specifications listed in these operating instructions.
A Blade (sickle blade / as replacement): Order no.: 628435000
B Battery packs with different capacities. Buy battery packs only with voltage suitable for your power tool.
Order no.: 625367000 4.0 Ah (LiHD)
Order no.: 625368000 5.5 Ah (LiHD)
Order no.: 625369000 8.0 Ah (LiHD) etc.
Order no.: 625591000 4.0 Ah (Li-Ion)
Order no.: 625592000 5.2 Ah (Li-Ion) etc.
C Chargers: ASC 55, ASC 145, ASC 145 Duo, etc.
For a complete range of accessories, see www.metabo.com or the catalogue.
12. Repairs
Repairs to electrical tools must only be carried out by qualified electricians and only with original spare parts!
Contact your local Metabo representative if you have Metabo power tools requiring repairs. For addresses see www.metabo.com.
You can download a list of spare parts from www.metabo.com.
13. Environmental Protection
Observe national regulations on environmentally compatible disposal and on the recycling of disused machines, packaging and accessories.
Battery packs may not be disposed of with regular waste. Return faulty or used battery packs to your Metabo dealer!
Do not allow battery packs to come into contact with water!
Only for EU countries: never dispose of power tools in your household waste! According to European Directive 2012/19/EU on Waste from Electric and Electronic Equipment and implementation in national law, used power tools must be collected separately and recycled in an environmentally-friendly manner. Discharge the battery pack in the power tool before disposal. Prevent the contacts from short-circuiting (e.g. by protecting them with adhesive tape).
14. Technical Specifications
Explanatory notes regarding the specifications on page 4.
Changes due to technological progress reserved.
| U | = | v | o | l | t | a | g | e | ||||||
| B | = | c | u | t | t | i | n | g | w | i | d | t | h | |
| H | = | c | u | t | t | i | n | g | h | e | i | g | h | t |
H_X = number of cutting height stages
V = volume of collection bag
n = no-load speed
m = weight (incl. collection bag, mulching key and smallest battery packs)
IP = protection class
Measured values determined in conformity with EN 60335.
Permitted ambient temperature during operation: -20 °C to 50 °C (limited performance with temperatures below 0 °C). Permitted ambient temperature for storage: 0 °C to 30 °C.
Recommended ambient temperature when charging: 0 °C to 40 °C
= direct current
The technical specifications quoted are subject to tolerances (in compliance with relevant valid standards).

Emission values
These values make it possible to assess the emissions from the power tool and to compare different power tools. The actual load may be higher or lower depending on operating conditions, the condition of the power tool or the accessories used. Please allow for breaks and periods when the load is lower for assessment purposes. Arrange protective measures for the user, such as organisational measures based on the adjusted estimates.
Vibration total value (vector sum of three directions) determined in accordance with EN 60335:
a_h = vibration emission value
K_n = uncertainty (vibration)
Typical A-weighted sound levels:
L_pa = sound-pressure level
L_WA = a c o u s t i c p o w e r l e v e l
K_pA , K_WA/WA(G)=uncertainty
L_WA(G) = acoustic power level asper 2000 / 14 / EC

During operation the noise level can exceed 80 dB(A).

Wear ear protectors!
Notice originale
K_n = incertitude (vibration)
N. ordine: 625367000 4,0 Ah (LiHD)
N. ordine: 625368000 5,5 Ah (LiHD)
N. ordine: 625369000 8,0 Ah (LiHD) ecc.
N. ordine: 625591000 4,0 Ah (Li-Ion)
N. ordine: 625592000 5,2 Ah (Li-Ion) ecc.
C Caricabatterie: ASC 55, ASC 145, ASC 145 Duo ecc.
$$ \begin{array}{c c c c c c c c c c c} \mathsf {U} & = & \mathsf {T} & \texttt {e} & \texttt {n} & \texttt {s} & \tilde {\mathsf {a}} & \texttt {o} \ \mathsf {B} & = & \mathsf {L} & \texttt {a} & \texttt {r} & \texttt {g} & \texttt {u} & \texttt {r} & \texttt {a} & \texttt {d} \ \mathsf {H} & = & \mathsf {A} & \texttt {l} & \texttt {t} & \texttt {u} & \texttt {r} & \texttt {a} & \texttt {d} & \texttt {e} \end{array} $$
--- Corrente contínua
Best.nr: 625591000 4,0 Ah (lijon)
Best.nr: 625592000 5,2 Ah (lijon) osv.
C Laddare: ASC 55, ASC 145, ASC 145 Duo, etc.
Ett komplett tillbehörssortiment hittar du på www.metabo.com eller i katalogen.
12. Reparation
a_h = vibrationsemission
K_n = usikkerhed (vibration)

- Original instructions
- Declaration of Conformity
- Specified Conditions of Use
- General Safety Information
- Keep all safety instructions and information for future reference.
- Special Safety Instructions
- Introduction
- ENGLISHen
- Preparation
- Operation
- Maintenance and storage
- Use and handling cordless tools
- Transport of li-ion battery packs:
- Icons
- Overview
- Initial Operation
- Unfold the handle, adjusting the handle height
- Fig. A. Unfolding the handlebars (5)
- Fig. B. Unfold the handle (4)
- Preparation for grass collection, mulching or ejection
- Collect grass / mount collection bag Fig. C
- Mulching / mounting the mulching key. Fig. D
- Ejecting the grass.
- Set depth of cut.
- Fig. on page 2.
- Battery pack
- Inserting and removing the battery pack
- Fig. E
- Use
- Transporting
- Carrying:
- Starting the machine
- Fig. E, F.
- NOTE:
- Cutting and mulching lawns
- Stopping the machine
- Fig. F.
- Empty the collection bag
- Fig. C
- Cleaning, storage
- Cleaning
- Storage
- Maintenance
- General maintenance
- Replacing the blade
- Fig. H.
- Lubrication
- Troubleshooting Guide
- One LED of the central capacity display (1) flashes.
- All LEDs of the central capacity display (1) flash.
- The handle is not in position
- The machine does not start.
- The machine does not mulch properly.
- It is difficult to push the machine.
- The machine vibrates heavily.
- The machine stops during the mowing process.
- Accessories
- Repairs
- Environmental Protection
- Technical Specifications
- Emission values
- Notice originale
- Reparation
Brand : METABO
Model : RM 3618 LTX BL 46
Category : Lawn mower