CDG6CEB - Basket CANDY - Free user manual and instructions
Find the device manual for free CDG6CEB CANDY in PDF.
| Product type | Cooker hood |
| Brand | Candy |
| Model | CDG6CEB |
| Dimensions (W x D x H approximate) | 60 x 50 x 30 cm (main body) |
| Net weight approx. | 15 kg |
| Power supply | 220-240 V ~ 50 Hz |
| Recommended fuse | 3 A |
| Electrical class | Class I (earthing mandatory) |
| Number of speeds | 4 (low, medium, high, booster) |
| Booster function | Yes, can be activated for 5 minutes at maximum speed |
| Lighting | LED 1.5 W max (not individually replaceable) |
| Installation types | External extraction (150 mm duct) or recirculation (charcoal filter) |
| Recommended distance above hob | 65 to 75 cm |
| Grease filter | Metal, monthly cleaning (dishwasher or manual) |
| Activated carbon filter | Optional for recirculation, replace yearly |
| Regular maintenance | Clean with a damp cloth and non-abrasive household cleaner |
| Child safety | Supervision required, do not let children play |
| Environmental protection | Compliant with WEEE directive 2012/19/EU, do not dispose of with household waste |
| After-sales service | Contact consumer service with serial number (16 digits starting with 3) |
Frequently Asked Questions - CDG6CEB CANDY
User questions about CDG6CEB CANDY
0 question about this device. Answer the ones you know or ask your own.
Ask a new question about this device
Download the instructions for your Basket in PDF format for free! Find your manual CDG6CEB - CANDY and take your electronic device back in hand. On this page are published all the documents necessary for the use of your device. CDG6CEB by CANDY.
USER MANUAL CDG6CEB CANDY
Zanagnutipanel model
- potrebno izbušiti 2x8mm dodatne rupe i pričvrsne vijke i zaporne vrijke prije ugradnje
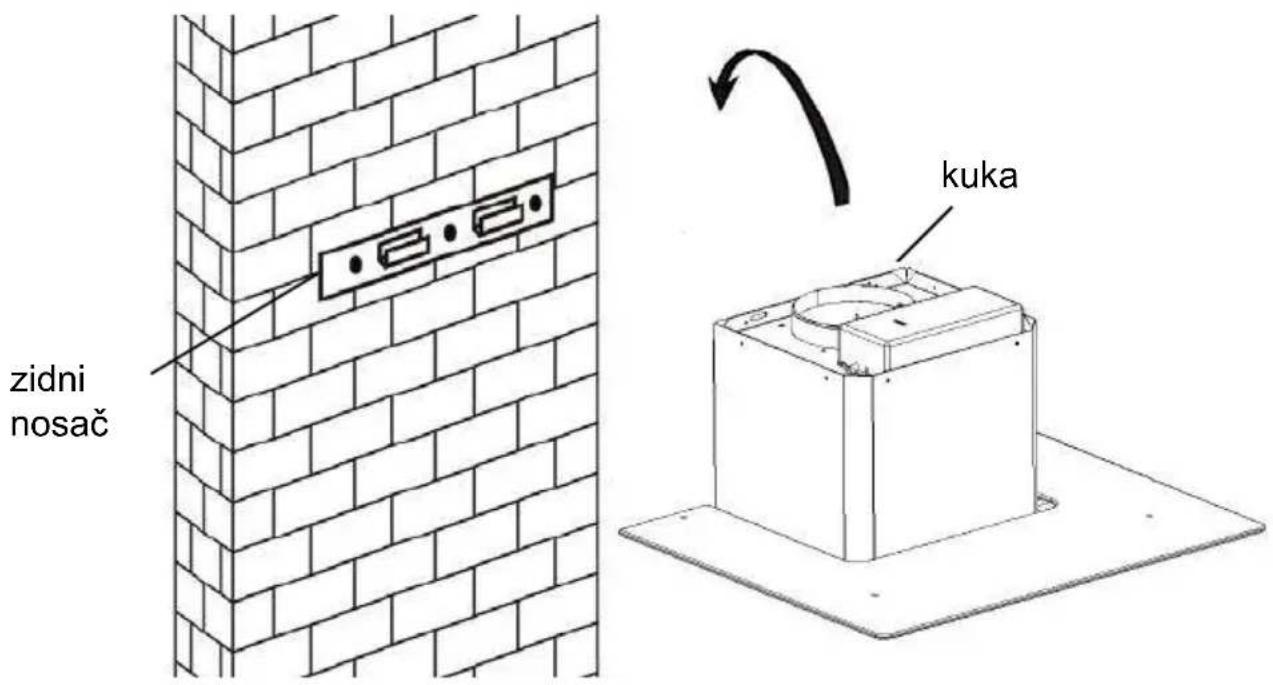
- Podignite napu i objesite je na zidni nosač pomócu kuke.
INSTALLATION AND USER'S MANUAL
CONTENT
INTRODUCTION 35
SAFETY PRECAUTION 35
SPECIFICATION 37
INSTALLATION (VENT OUTSIDE) 38
INSTALLATION (VENT INSIDE) 43
DESCRIPTION OF COMPONENTS 44
OPERATION 44
MAINTENANCE 47
TROBULESHOOTING 48
CONFORMITY WITH DIRECTIVES 48
ENVIRONMENTAL PROTECTION 49
INTRODUCTION
Thank you for choosing this cooker hood.
This instruction manual is designed to provide you with all required instructions related to the installation, use and maintenance of the appliance. In order to operate the unit correctly and safety, please read this instruction manual carefully before installation and usage.
The cooker hood uses high quality materials, and is made with a streamlin design. Equipped with large power electric motor and centrifugal fan, it also provides strong suction power, low noise operation, non-stick grease filter are easy assembly installation.
SAFETY PRECAUTION
Never let the children operate the machine.
The cooker hood is for home use only, not suitable for barbecue, no shop and other commercial purpose.
The cooker hood and its filter should be clean regularly in order to keep in good working condition.
Clean the cooker hood according to the instruction manual and keep the unit from danger of burning.
Forbid the direct baking from the gas cooker.
Please keep the kitchen room a good convection.
Before connecting this appliance check that the power supply cord is not damaged. A damage supply cord must be replaced by qualified service personnel only.
There shall be adequate ventilation of the room when the range hoc is used at the same time as appliances burning gas or other fuels;
he air must not be discharged into a flue that is used for exhausting fumes from appliances burning gas or other fuels;
Regulations concerning the discharge of air have to be fulfilled.
This appliance if not intended for use by persons(including children) with reduced physical, sensory or mental capabilities, or lack of experience and knowledge, unless they have been given supervision or instruction concerning use of the appliance by a person slide for their safety.
Children should be supervised to ensure that they do not play with appliance.
Do not flambé under the range hood.
CAUTION: Accessible parts may become hot when used with cooking appliance
Electrical Shock Hazard
Only plug this unit into a properly earthed outlet. If in doubt seek advice from a suitably qualified engineer.
Failure to follow these instructions can result in death, fire, or electrical shock.
The lamp used in this product is not suitable for use in the lighting of a room.
The purpose of this lamp is to provide illumination for using the product.
Electrical Installation
All installation must be carried out by a competent person or qualified electrician. Before connecting the mains supply ensure that the mains voltage corresponds to the voltage on the rating plate.
Direct Connection
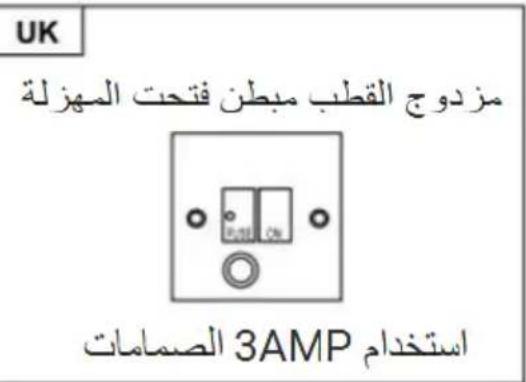
The appliance must be connected directly to the mains using an omnipolar circuit breaker with a minimum opening of 3mm between the contacts.
The installer must ensure that the correct electrical connection has been made and that it complies with the wiring diagram.
The cable must not be bent or compressed.
Regularly check the power plug and power cord for damage. If the supply cord is damaged, it must be replaced by a special cord or assembly available from the manufacturer or its service agent.
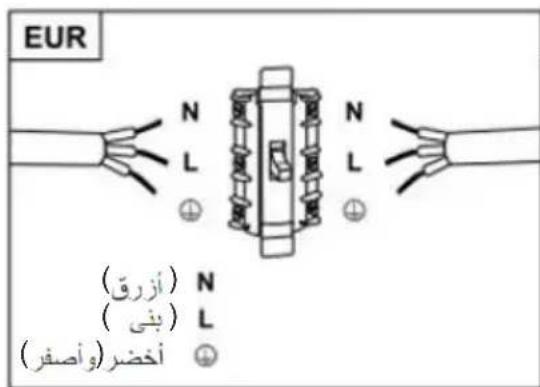
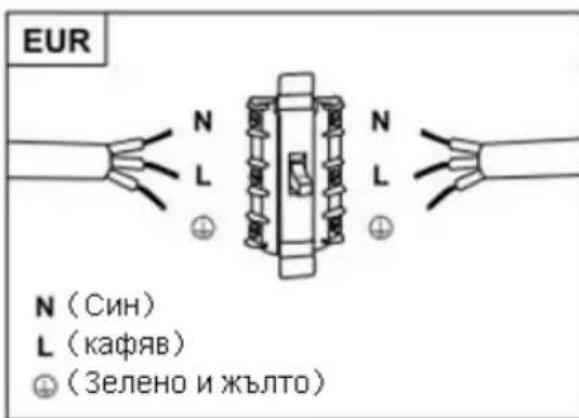
WARNING: This is a Class I appliance and MUST be earthed
This appliance is supplied with a 3 core mains cable coloured as follows:
Brown = L or Live
Blue = N or Neutral
Green and Yellow = E or Earth
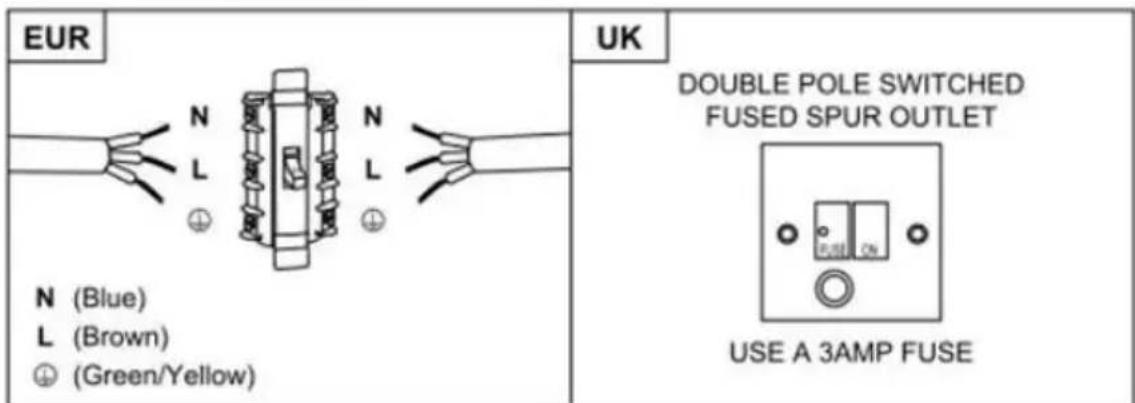
The fuse must be rated at 3 Amps.
Standard Installation Accessories List
| Spec. | Illustration Picture | Qty |
| Casing | 1 | |
| Upper Chimney | 1 | |
| Lower Chimney | 1 | |
| Lower chimney bracket | 1 | |
| Upper chimney bracket | 1 | |
| Hanging Board | 1 | |
| φ8 rawl plugs φ8×φ6 white color | 9 | |
| Screws ST4.0×30 | 9 | |
| φ7.2screws ST4.0×8 | 2 |
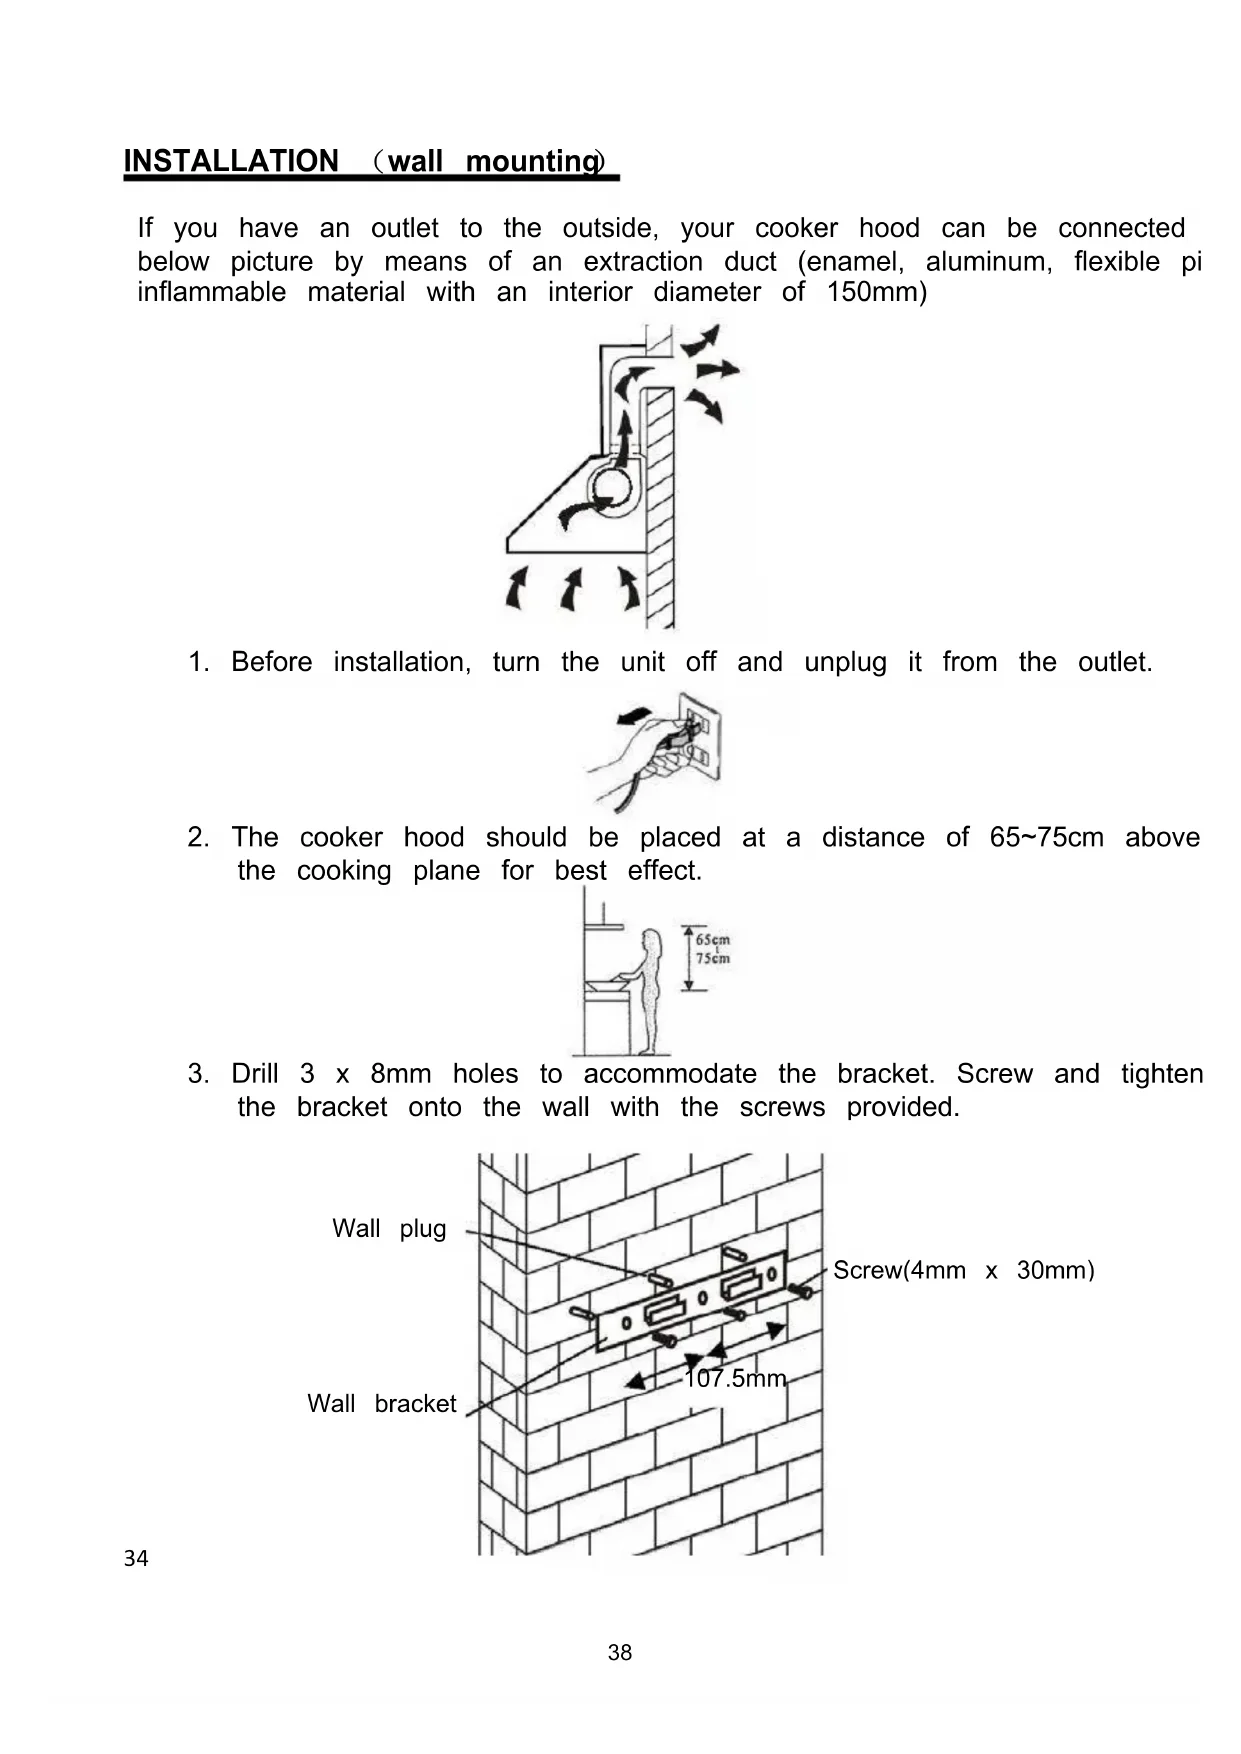
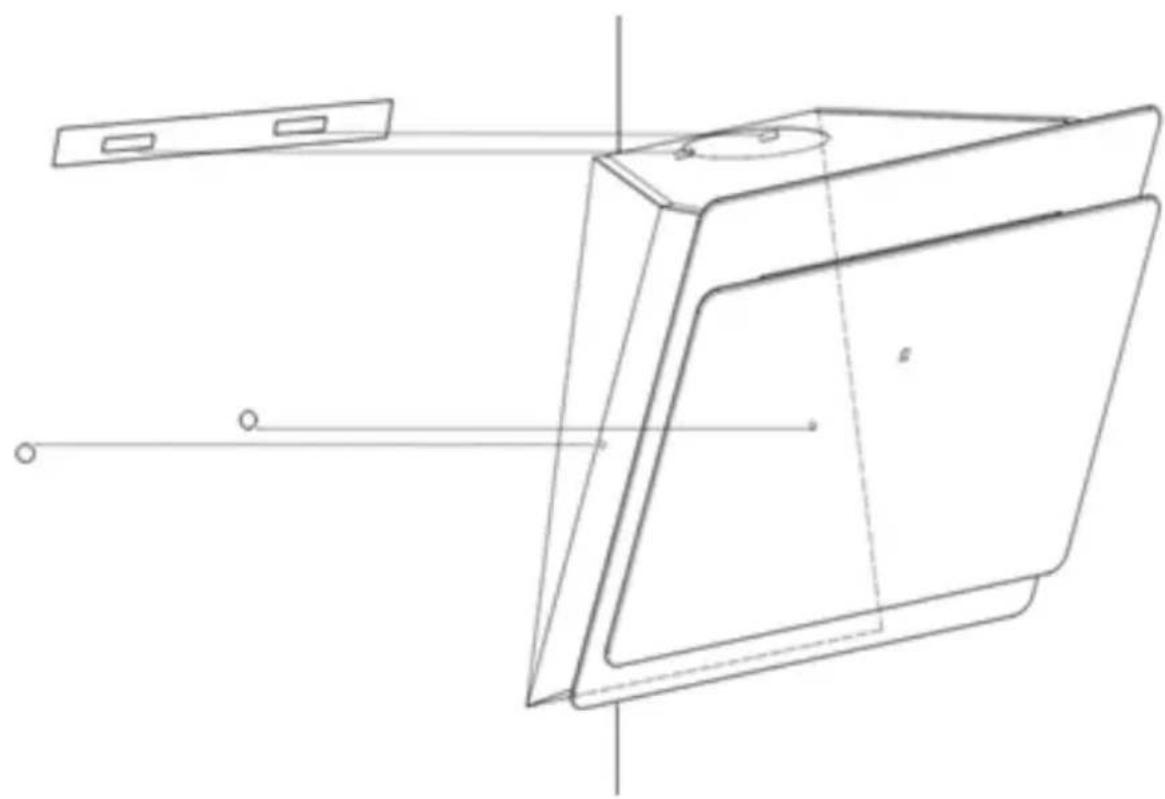
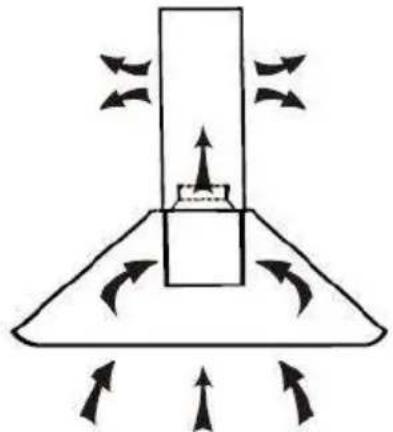
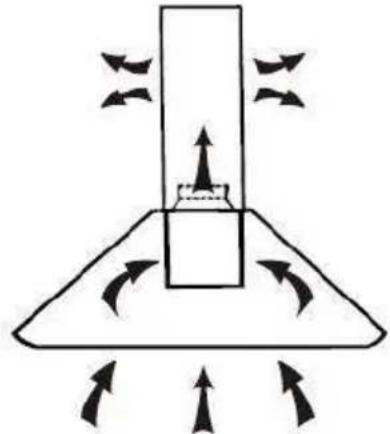
If you have an outlet to the outside, your cooker hood can be connected below picture by means of an extraction duct (enamel, aluminum, flexible pi inflammable material with an interior diameter of 150mm)

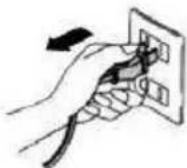
- Before installation, turn the unit off and unplug it from the outlet.
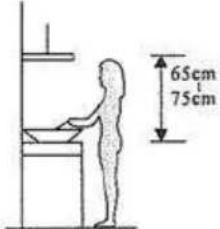
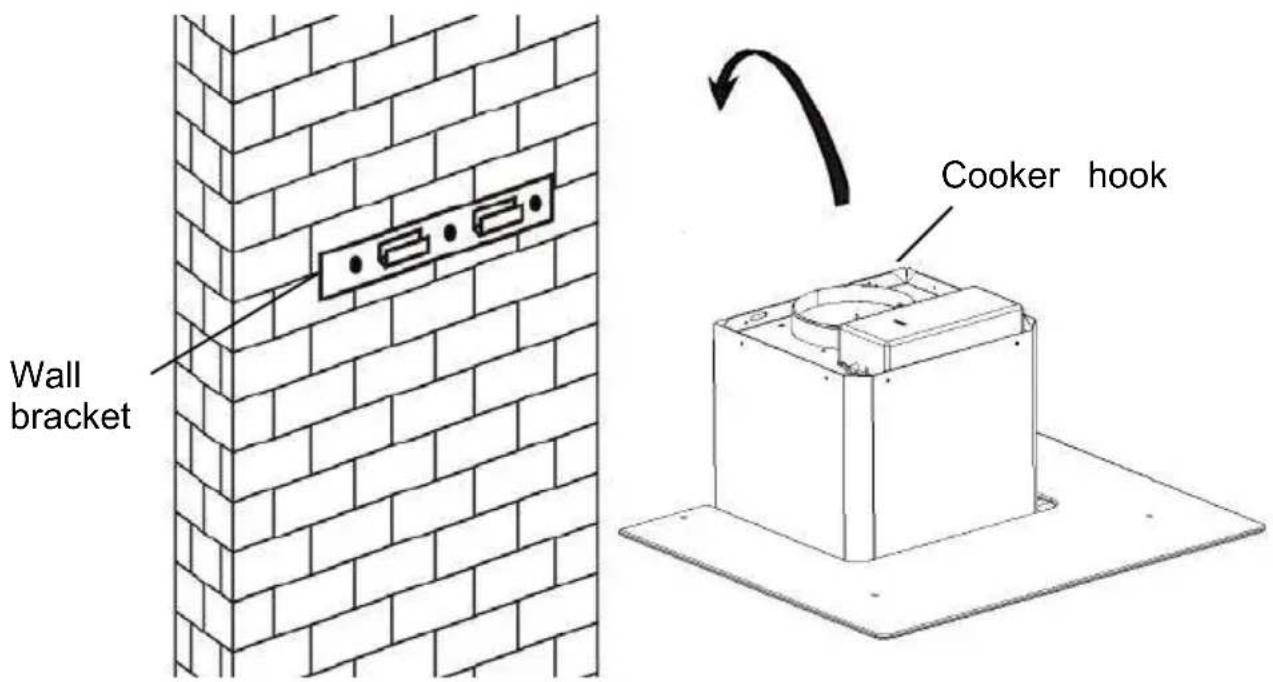
- The cooker hood should be placed at a distance of 65 75cm above the cooking plane for best effect.
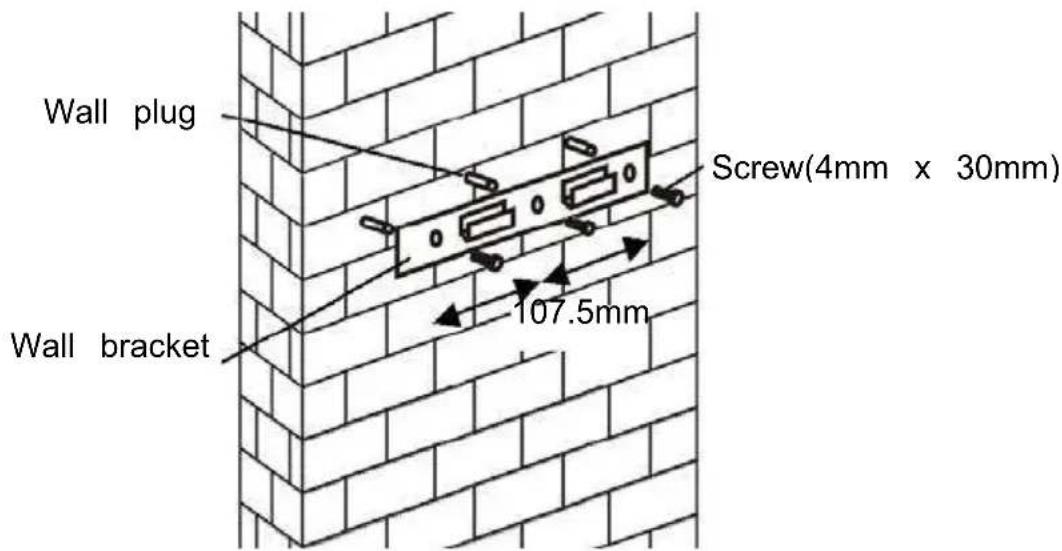
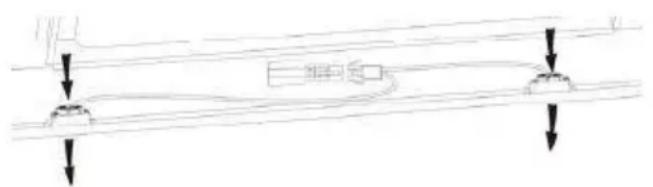
- Drill 3 × 8mm holes to accommodate the bracket. Screw and tighten the bracket onto the wall with the screws provided.
For inclined panel Model
- eed to drill 2x8mm extra holes & fixing screws & screw plugs before installation. Voor schuine modellen
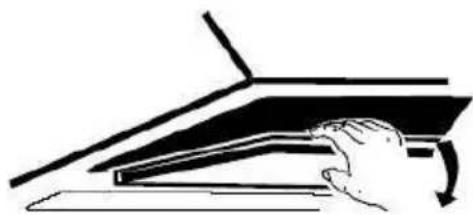
- Leave up the cooker hood and hang onto the wall bracket hook.
- Fix the one-way-valve to the air outlet of the cooker hood. Then, attached the exhaust pipe onto the one-way-valve as shown below.
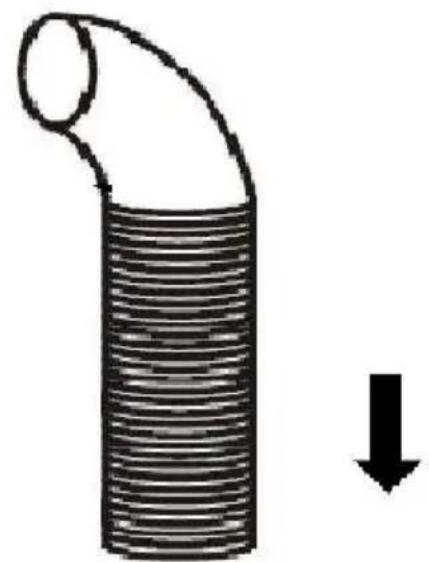
Exhaust pipe
Cooker hood
6.
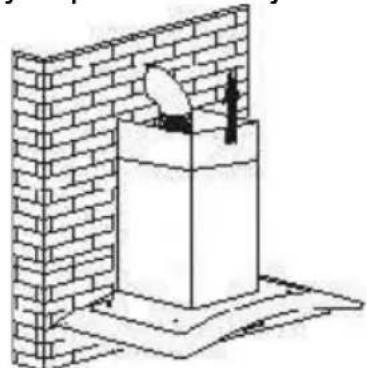
i. Place the glass in appropriate position on the top the cooker hood
ii. Fix with 4 screws and washer. In order to avoid the glass cracking, please do not tighten the screws too strongly.
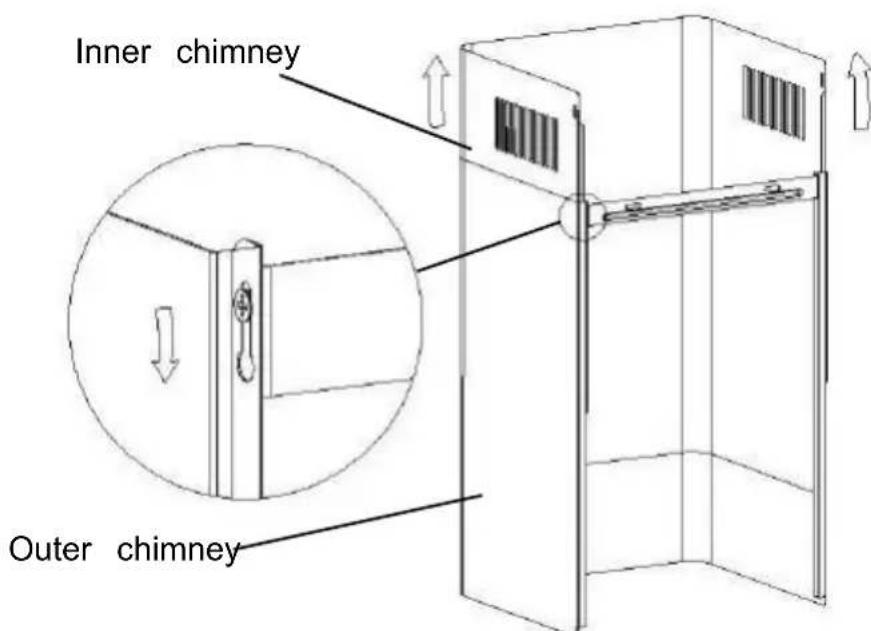
i. By Put the inner chimney into outer chimney .Then pulling out the inner chimney upwards. Adjust to reach the height required
ii. Sliding the chimney to adjust the chimney height. When the height you required is reached, then hang the fixing hole to the screws as showed in below pictures.
8.
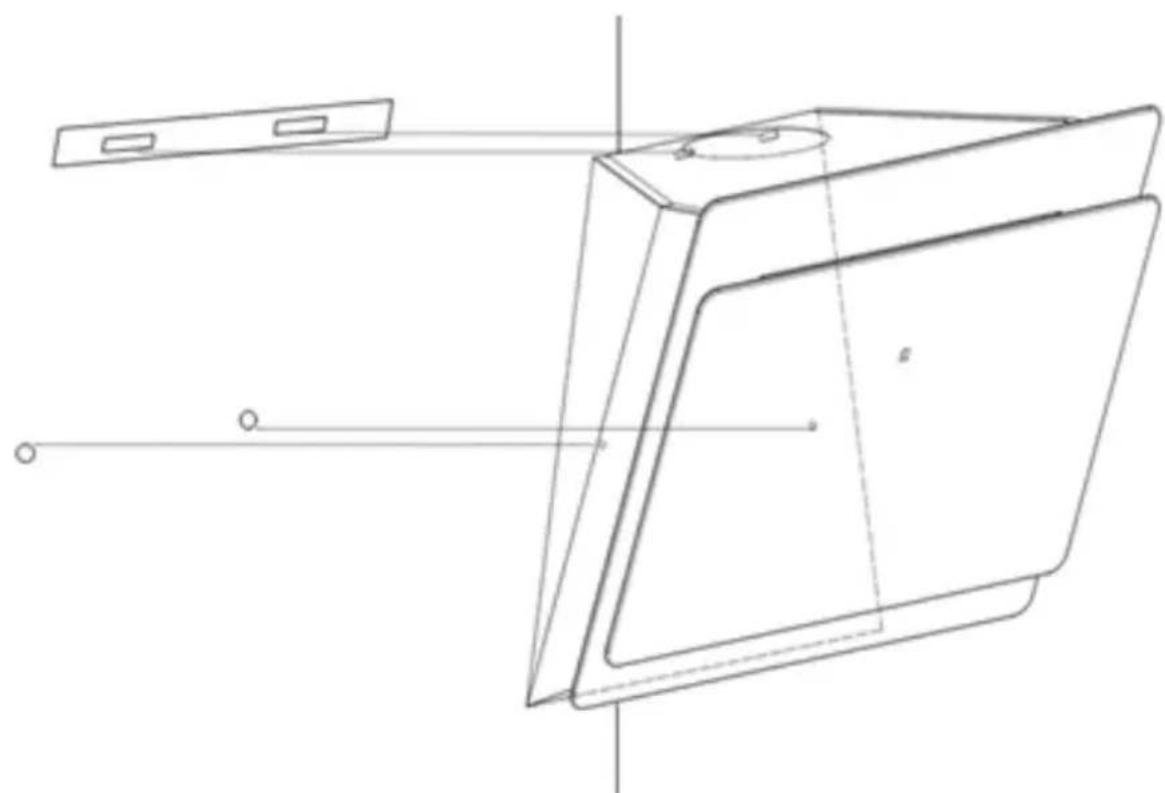
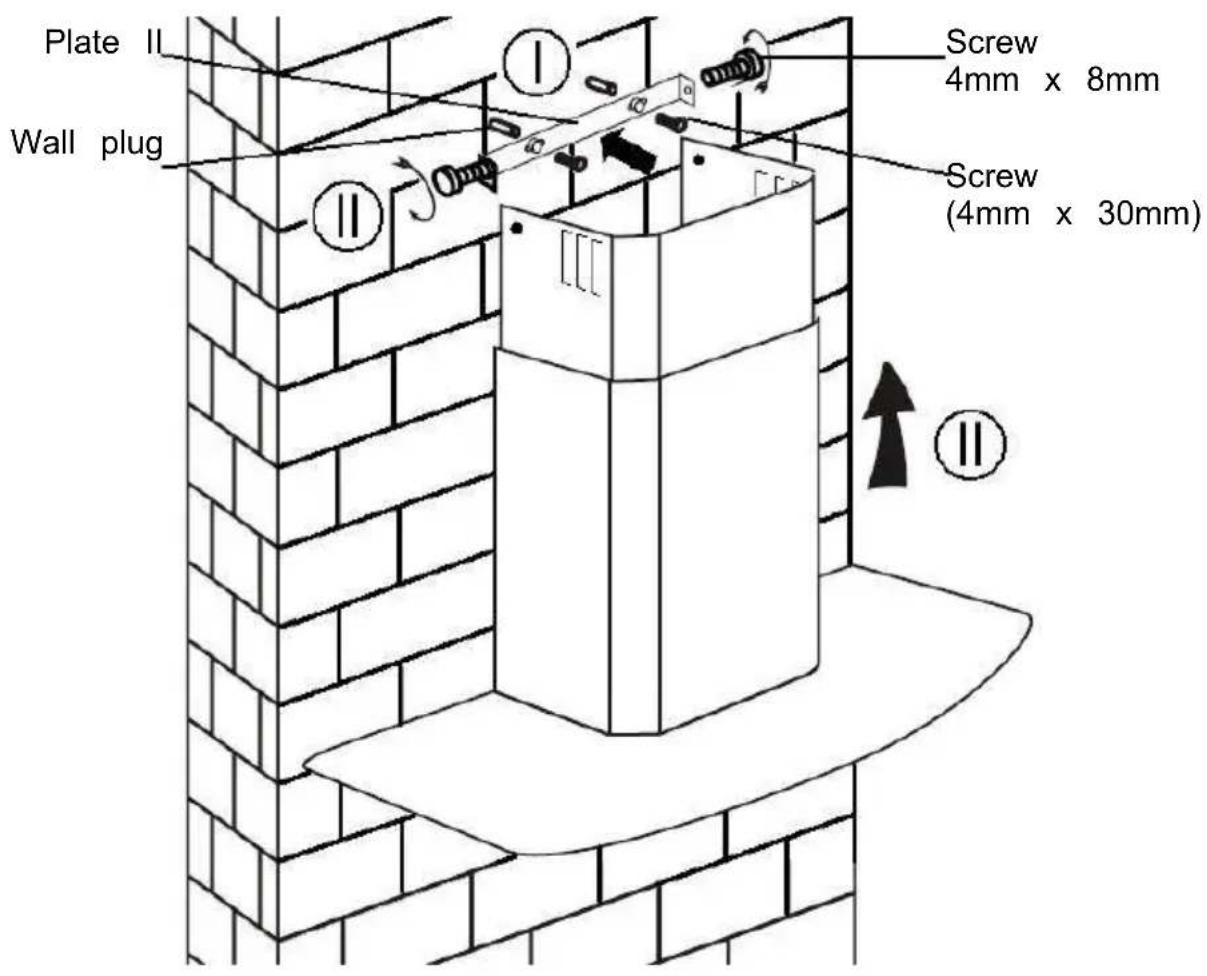
i. Drill 2 x 8mm holes to accommodate the plate II. Screw and tighten the plate II onto the wall with 2 screws provided.
ii. Assembly the chimney onto the unit and fix it with 2 screws.
INSTALLATION (VENT INSIDE)
If you do not have an outlet to the outside, exhaust pipe is not required. The installation is similar to the one show in section "INSTALLATION (VENT OUTSIDE)".
Activated carbon filter can be used to trap odors.
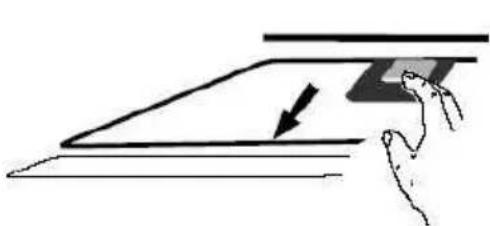
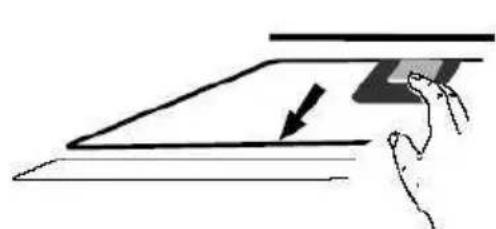
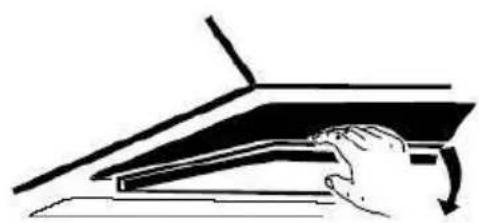
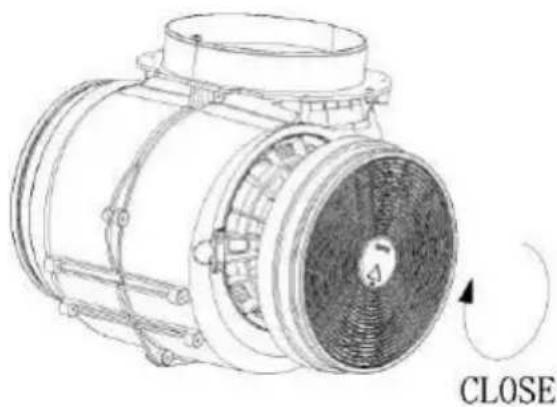
In order to install the activated carbon filter, the grease filter should be detached first. Press the lock and pull it downward.
Plug the activated carbon filter into the unit and turn it in clockwise direction. Repeat the same on the other side.

NOTE:
o Make sure the filter is securely locked. Otherwise, it would loosen and cause dangerous.
o When activated carbon filter attached, the suction power will be lowere
CONFIGURATION 1


OPERATION
Button 1

The button is with indicate backlit, when you press the button, the backlit will be turned on and the fan will be turned on at low speed. When press again, it will turn off the fan.
It's used for Ventilation on the kitchen. It is suitable for simmering and cooking which do not make much steam.
Button 2

The button is with indicate backlit, when you press the button, the backlit will be turned on and the fan will be turned on at Medium Speed. when press again, it will turn off the fan.
Airflow speed is ideally for ventilation in standard cooking operation.
Button 3

The button is with indicate backlit, when you press the button, the backlit will be turned on and the fan will be turned on at High Speed. when press again., it will turn off the fan.
When high density of smoke or steam produced, press high-speed button for highest effective ventilation.
NOTE: If Low / Medium / High speed buttons are press at the same time, the unit will only operate at the highest speed.
Light button

CONFIGURATION 2


OPERATION
Off button 0
It's used for turning off the fan.
Low Speed button

It's used for Ventilation on the kitchen. It is suitable for simmering and cooking which do not make much steam.
Medium Speed button

2
Airflow speed is ideally for ventilation in standard cooking operation.
High Speed button

3
When high density of smoke or steam produced, press high-speed button for highest effective ventilation.
NOTE: If Low / Medium / High speed buttons are press at the same time, the unit will only operate at the highest speed.
Light button

CONFIGURATION 3

① On/Off button
It's used for turning on/off the fan.
- Speed plus button
For increasing the speed of the fan
Speed decrease button
For decreasing the speed of the fan.
Light button
8 Digital display
Fan speed display:"1" for Low speed, "2" for Medium speed, "3" for High speed, "4" for Booster function.
Quick timer: Press & hold for 1 second, Digital display will flashing & into 5 minutes count down, after 5 minutes motor & will turn off automatic & Buzzer sound for 1 second.
Booster function
This hood has a booster function. To activate the booster, Press + to speed 4, enter into highest speed while the hood is in use and it will increase speed for 5 minutes, before slowing down again.
MAINTENANCE
Before cleaning switch the unit off and pull out the plug.
I. Regular Cleaning
Use a soft cloth moistened with hand-warm mildly soapy water or household cleaning detergent. Never use metal pads, chemical, abrasive material or stiff brush to clean the unit.
II. Monthly Cleaning for Grease Filter
ESSENTIAL: Clean the filter every month can prevent any risk of fire.
The filter collects grease, smoke and dust.... so the filter is directly affecting the efficiency of the cooker hood. If not cleaned, the grease residue (potential flammable) will saturate on the filter. Clean it with household cleaning detergent.
III. Annual Cleaning for Activated Carbon Filter
Apply SOLELY to unit that installed as a recirculation unit (not vented to the outside). This filter traps odors and must be replaced at least once a year
depending on how frequent the cooker hood used.
IV. Changing a light bulb
Remove the screws on the glass, take off the hood glass. Find the bulb that requires replacement, you will find it located in the light fixture which is inside the exposed section of the canopy.
Disconnect the light wiring point and remove the bulb holders and wiring from the hood. Important: It's not possible to replace the bulbs individually, it will be necessary to obtain the bulbs, bulb holders and wiring as a complete part. (LED light: MAX 1.5W)
Fit the replacement bulbs, bulb holders and wiring in the same manners as the originals. Then reconnect the light wiring point.
Refit the hood glass and fasten the glass screws. Make sure the screws fully tightened.
TROBULESHOOTING
| Fault | Cause | Solution |
| Light on, but fan does not work | The fan blade is jammed. | Switch off the unit and repair qualified service personnel only. |
| The motor is damaged | ||
| Both light and fan do not work | Halogen light bulb bur | Replace the bulb with correct rating. |
| Power cord looses. | Plug in to the power supply ag | |
| Serious Vibration of the unit | The fan blade is damaged. | Switch of the unit and repair b qualified service personnel only. |
| The fan motor is not fixed tightly. | Switch off the unit and repair i qualified service personnel only. | |
| The unit is not hung properly on the bracke | Take down the unit and check whether the bracket is in proper location. | |
| Suction performance not good | Too long distance between the unit and the cooking plane | Readjust the distance to 65-75c |
CUSTOMER ASSISTANCE SERVICE
If you cannot identify the cause of the operating anomaly, switch off the appliance and contact the Assistance Service.
PRODUCT SERIAL NUMBER. Where can I find it?
It is important you to inform the Assistance Service of your product code and its serial number (a 16 character code which begins with the number this can be found on the guarantee certificate or on the data plate located on the appliance.
It will help to avoid wasted journeys to technicians, thereby (and most significantly) saving the corresponding callout charges.
ENVIRONMENTAL PROTECTION
Waste electrical products should not be disposed of with household waste. Please recycle where facilities exist. Check with your Local Authority or retailer for recycling advice.
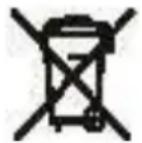
This appliance is marked according to the European directive 2012/19/EU on Waste Electrical and Electronic Equipment (WEEE).
By ensuring this product is disposed of correctly, you will help prevent potential negative consequences for the environment and human health, which could otherwise be caused by inappropriate waste handling of this product.
The symbol on the product indicates that this product may not be treated household waste. Instead it shall be handed over to the applicable collection point for the recycling of electrical and electronic equipment Disposal must be carried out in accordance with local environmental regulations for waste disposal.
For more detailed information about treatment, recovery and recycling of this product, please contact your local city office, your household waste disposal service or the shop where you purchased the product.
NOTICE D'INSTALLATION ET D'UTILISATION
Sommaire
The appliance must be connected directly to the mains using an omnipolar circuit breaker with a minimum opening of 3mm between the contacts.
The cable must not be bent or compressed.
Quick timer: Press & hold for 1 second, Digital display will flashing & into 5 minutes count down, after 5 minutes motor & light will turn off automatic & Buzzer sound for 1 second.
Blau = N Oder Neutral
Installation (Wandmontage)
(Waste Electrical and Electronic Equipment - WEEE).
MONTAZ (WERSJA WYWIEWOWA) 124
MONTAZ (WERSJA Z RECYRKULACJA) 129
PANEL STEROWANIA 131
DZIAŁANIE 131
OBSLUGA 133
MOZLIWE USTERKI 134
OCHRONA SRODOWISKA 135
WPROWADZENIE
Paraacularly, the ventricular septal thickness is a function of the diameter of the ventricle and the number of ventricles.

INSTALLATIE (VENTILATIE BUITEN) 209
INSTALLATIE (VENTLATIE BINNER) 214
BESCHRIJVING VAN DE COMPONENTEN 215
WERKING 215
ONDERHOUD 218
PROBLEM OPLOSSEN 219
OVEREENSTEMMING MET RICHTLIJNEN 219
MILIEUBESCHERMING 220
INTRODUCTIE
Blauw = N of Neutrale
This hood has a booster function. To activate the booster, Press to + speed 4, enter into highest speedwhile the hood is in use and it will increase speed for 5 minutes, before slowing down again.
ONDERHOUD
gAaal gAaiaaii aai (JbLg L) Jn Jn Jn Jn Jn Jn
j 1
Jgssn jglal
auiy jai yaii jai i 1
1 1
j 1
y
J
p
3mm 1
y
dD11 bbs 20 g j
1g 1
.
j 1
1
ClassI
3 1
:
g^ ( x) = h^ ( x)
中
j gE
3 1oLolal
aaii
ED = 20
,
He neyeTe dIpeKTHO OT r3OBnKOTnOH. MoJ,
POnDbpKaaTe Do6pa KOHBeKuia B KyxHraTa.
Ipei Da CbpxKeTe ypeia, npOBepTe daHn 3axpaHbaunr Ka6eI He e Nobpeien. NObpeHnT Ka6eI Tp6Ba Da ce nOdmeha camo OT KBAJIncu npaHO Jnue.
HyxHa Bn e noDxoJaMa BeHTnlaaunB CTAraTa, KbDeTo e MOHTnpaH abCop6aTopa N KbDeTo Ce n3NoJ3BaT ypeDi KaTO rA3OBN KOTLOH;
Bb3dYxbT He Tp86Ba Da ce OTBeJda npe3 dNMOOTbOda, npedHa3NaueH 3a n3napenra Ta OT ypeIte, KOnto pa60rTa Ha ra3 nIi npyri ropna. Peryaunite, CBp3aHn C Bb3dyxa Tp86Ba da 6bDaT cna3BaHn. YpeIbT He MoKe Da ce n3noJ3Ba OT Iuca (BKIOUHTeJIHO Deua) C HamaJeHn fN3nueckn, NCHXnueckn IIN yMCTBEHN cNoCO6HOCTn IIN JInCa Ha ONIT N 3HaHn, OCBEN aKO He Ce Na3npaBAt IIN Ca 6II INHCTpyKTIpaHn 3a n3NOJ3BaHeTo Ha ypeDa No 6e3OpaceH NaHH n pa3bupat CbOTBeTHnTe ONaCHOCTn.
IeuaTa Tp8bBa Da 6bDat Ha3npaBAn, 3a Da ce rapaHTnpa, Ye He cn nrgpaT cypeDa.
He pfam6npaIte noa6cop6atopa.
A6cop6aTopbT He Tp8Ba Da ce MOHTnpa Had KOTIOH C NOBeue OT YeTnpa KOTJHOHa.
Onachoct ot eIektpnueckn ydap
BkIIOUbaIte ypeDa cMo B npaBnH0 3a3eMeH KOHTaKT. Ako ce KOJIe6BaTe, CBbpxKeTe Ce C NOxOJaU KBaIINΦnUpaH INHXeHep.
Hecna3BaHeTo Ha Te3n HNCTpyKcnn MoKe Da DOBeDe Do CmbpT, NOxap NII TOKOB yIap.

Iamnata, n3noJ3BaHa B To3n npOdyKT, He e NOxOJa7a 3a N3NoJ3BaHe npN OCBeTJIeHne Ha
nomeuHne. TaHa Ta3n lamna e da ocNpyn oCBeTJeHne 3a n3noJ3BaHe Ha npOdyKta.
EneKtpnuecka nHcTaIaCnA
LJIaTaNCTaIauJrTpaDa Ce N3BbPShN OT KOMnTeHTHOJIuE IIN KBaIIuΦnUpaHo JIuCe eJeKTPoTeXnK . Ppei DaCBbPxKeTe 3axpaHbaHeTo Ce yBepTe , Ye MpexKaTaHAnpexKeHNeTO CbOTBeTcTBA Ha HAnpexKeHNeTO Ha TabeJaTa CMapKnIpOBka .
DnpeKTHa BpB3Ka
UpeEbT Tp6Ba Da 6bDe Cbbp3aH DnpeKTHO KbM
eNeKTPueckata Mpeka C NOMOuTa Ha BCENoJIocEH
PpeKbCBauch MmHmMaJIHO OTBaprHe MeJdy 3 MM KOHTaKTITE .
HNCTaIATOpbT Tp6Ba Da ce yBepi , ye npabUNHaT a
eNeKTPuecka Bpb3Ka IMa HAnpaBeHa N Ye TcBTBETCTBa Ha
cxemata Ha OKabeJBAHe .
Ka6eblT He Tp6Ba Da 6bDe OrbHat IIN KOMnPecIpaH .
PeDobHo nPoBepraIte UcenCeJa N 3axpaHbAunr Ka6eI 3a
NoBpeDi . Ako 3axpaHbAunr Ka6eI e NobpeJeH , ToI Tp6Ba
da 6bDe 3aMeHen Cbc CneUanEn Ka6eI IIN MOHTaX Ha
pa3noJooKeHne OT IpON3BOdnteJI INI HerOBnCepBn3eH
areHT.
BHHMAHNE: Toba e ypei on Knaic I n TPRAEBA da ce 3a3eMn
To3n ypeD e cHa6dE h C TpIXuJIeH 3aXpaHBaU Ka6eI , OcBteH KaTO cneDbA : KaFyB =L nII Ha XnBO CnH = N nII HeYtpaJIeH 3eJeHO uKbJTo = E nII 3emr
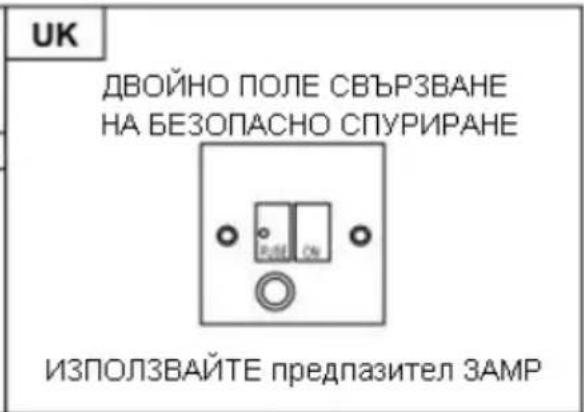
PpeDna3nteIaT Tp86Ba Da e c 3 ampepa.
CnncbK c akcecoapn 3a cTaHdapTeH MOHTaX
Ako He pa3noIarate C BbHsE H3BOD, n3nyckaTeJHaTa Tpb6a He e HuxHa mOHTaxbT e noo6eH Ha To3n, onncan B pa3dEi (MOHTAX (BbHsHA BEHTNJALU).
ФИЛТьрВСаКТиВeH Вьглeн Може Да ce H3ПОЛЗВa 3a уЯБЯHe Ha HeNPЯTHN МИРИЗМ.
3a da noctabnte fntbpa cakTNBEH BByIeH, npBPO Tp6Ba da CBAInTe fntbpa 3a Ma3HHn. HATNCHeTe 3akNouBaun eJeMeHT n N3DbPnaTe HaDony.
IocTaBte cHJIbpa C aKTHBeH BbIeH B ypeDa I rO 3aBbPTe Te NO Nocoka Ha YacOBnKOBaTa CTpeNka. NobTopeTe Ta3n Onepaunr O T dpyraTa cTpaHa.
3A6EJIEXKA:
o Ybepe me ce, ye fummbpbm nocmaeH kopekmno. B npomueh cnyau, moke da ce pa3xna6u u da cmahe onaceH.
o Kozamo nocmaeume qunmbpa c akmueh b2JeH, 3acMykaaama MouHocm ue 6bde no-Hucka.
KOHΦιΓΥΡΑΝΙΑ 1


PA5OTA
6yToH 1

Бутоньт « Инданкаши С посветka , КORAТо HaTиСHTe 6уTOHa ,ПОДСВЕТКATA Уе 6ьдe ВКЛЮЧЕHA И ВЕТиЛaTOРьТ USe 6ьдeВКЛЮЧЕН C HИСКA CКОРОCT . KORAТо HaTиСHTe OTHOBO , TOI USeИЗКЛЮЧИ BeHTиЛaTOpa .
I3noJ3Ba ce 3a BeHTnlaucn B KuxHraTa . IoXoJaUe 3a KbKpeHe IrotBeHe , npi KOnTO He ce o6pa3yBat n3napenr .
6yToH 2

БутонъЕ с Инданьця С посветka , KORATo HaTиСHTe 6byToHa ,ПОДСВETkata Уе 6ьдe ВКлочehа И BeHTиЛaTOpBJ T Ue 6ьдeВКлочeH Na CpeДha CkOpoCT . KORATo HATиСHTe OTHOBO , ToI UeИЗКЛЮчи BeHTиЛaTOpA .
Скорocта на вьздушни NOTOK e Идевална 3a BeHTиlaця по CTандартно ROTBEHE .
6yToH 3

БутонъЕ с Инданкаши С посВетka , KORATo HaTиСHTe 6уTOHa ,ПОДСВETКаТа Ше 6ьдe ВКЛюЧЕна и BeHTиЛaTOpьТ Шe 6ьдeВКЛюЧЕн C ВИСОКА 斯КОРОCT . KORATo HaTиСHTe OTHOBO , TOI ШeИЗКЛЮЧИ - BeHTиЛaTopa .
Ipn HaniuyeTo Ha rbcTa PJIbTHoCT Ha dIm NJI npa,HaTnCHete 6byToHa 3a BnCoka ckopoCT 3a Ha-eΦeKtNBHa BeHTnlaucn.
3AБЕЛЖKA: Ako bymoHume 3a Hucka/cpeDHa/Bucoka ckopocm ca Hamuchamu eDHOBpeMeHHO, ypeBm ue pa6omu cMo Ha Hau-Bucokama ckopocm.
Бутон 3a ocBeТленье

KOHΦιΓΥΡΑζησι 2


PABOTA
Бутон n3кл. 0
I3noJI3Ba ce 3a I3KJIIOUbaHe Ha BeHTnlaTopa.
① ByToH BkJI./n3KJI.
I3noI3Ba Ce 3a BkJIIOUbaHe I N3KJIIOUbaHe Ha BeHTnlaTopa.
- ByToH 3a yBEnuBaHe Ha CKOpocTta
3a yBelenuvaHe Ha cKOpocTtHa BeHTnlaTopa
- BytoH 3a HamaJIyBaHe Ha ckopoCTTa
3a HamaJIbaHe Ha CKOpOCTTa Ha BeHTnlaTopa.
Бутон за CBETЛина
B Dnrtanen dnncnne
Ekpan 3a ckopocT ha BeHTnlaTopa:"1" 3a Hncka ckopocT, "2" 3a CpeDHa ckopocT,
"3" 3a BncoKa ckopocT, "4" 3a cyHKuJaTa 3a ycINBaHe Ha MOUHOCCTTa (Booster).
Быртаймер:HaTиСHTe +и-3aДрьЖTe 3a 1 cekyHda,ДИГИТАЛНЯТ ДИСПЕЙ Ше пемигн e N CJIeD 5 MInHyTи MOTOpВТ И OCBETЛЕHNTo Μe ce n3KЛЮЧаT aBTOMaTиHNo, a 3ymEtbp Μe npO3ByuN 3a 1 cekyHda.
Функция за усильке на мошноста (Booster)
To3n abcop6aTop npntexkaba yHKun 3a ycINBaHe Ha MOUHOCTTa (Booster). 3a da akTbnpate yHKunraTa 3a ycINBaHe Ha MOUHOCTTa (Booster), n36epete +ckopocT 4, BbVeDeTe Hau-BvCOKaTa cKOpocT, dOkato abcop6aTopbT pa6OTn I TOI Ue yBENuN cKOpocTTa 3a 5 MInHyTN, ppei N OTHOBO Da J 3a6abN.
ПОДДРьЖKA
Ipei n oocBaHe Ha ypea, rO n3KIOUeTe OT eJIeKTPnueckaTa Mpeka, KaTO n3BaAnTE 3axpaHbauJnA uenCeI.
I. PeodBHO
NoucTbaHe
I3noJ3BaIte Meka Kbpna, HanoeHa C TOnJa canyHeHa Boda nIIN DOMaKInHcN IOUncTbAu, npenapat. Hnkora He I3noJ3BaIte MeTaJIHN IOJIOJKN, a6pa3nBHN MaTePnAIn nIIN rpy6n YETKn pRn NOUncTbaHeto Ha ypeDa.
II. Meceyu nouNCTBaHe Ha cnTbpa 3a Ma3HHn
BAKHO: Noucmeaume fummbpa eceku Meceu, 3a da npedomepamume pucka om noxap.
ФиNTbpyT c6bnpa Ma3HnHnTe,ДИма И npaxa.....Taka Ye ToI BnIe DInpeKTHO Ha eФиNKacHocCTTa Ha a6cop6aTopa. Ako He e NOUHCTeH, OCTaTBuHTe OT Ma3HnHn (KoINTO Ca NOTEHnJIH0 3aIaJIIMN) Ie Ce HATpyNaT Bbpxy ФиNTbpa. NOnuHCTeTe ro c O6nKHOBeH DomaknHcKn NouchTBAuI npenapat.