PL880 - Turntable Soundmaster - Free user manual and instructions
Find the device manual for free PL880 Soundmaster in PDF.
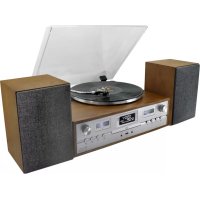
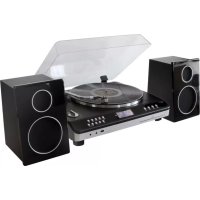
| Product Type | Turntable with CD/MP3/USB player, DAB+/FM radio, Bluetooth |
| Brand | Soundmaster |
| Model | PL880 |
| Power Supply | AC 100-240 V ~ 50/60 Hz |
| Output Power | 2 x 12.5 W RMS |
| Turntable Speeds | 33 ⅓ and 45 RPM |
| DAB+ Frequency Range | 174.928 – 239.200 MHz |
| FM Frequency Range | 87.5 – 108.0 MHz |
| Number of Preset Stations | 20 FM + 20 DAB+ |
| Supported Audio Formats | CD, CD-R/RW, MP3 (CD and USB) |
| Connectivity | Bluetooth, USB (recording and playback), AUX input (3.5 mm), RCA line output, Headphone jack (3.5 mm) |
| USB Recording Function | From CD, vinyl turntable, Bluetooth, AUX, DAB/FM |
| Equalizer | Pop, Classical, Rock, Jazz, Flat |
| Laser Type | Class 1 |
| Cleaning | Soft, dry cloth. Do not use detergents or abrasive products. |
| Maintenance | No user-serviceable parts. Refer to qualified personnel. |
| Safety Instructions | Do not open (risk of electric shock). Do not expose to moisture or heat. Use only indoors. |
| Remote Control Batteries | 2 x AAA (not included) |
| Dimensions | Approx. 430 x 130 x 360 mm (estimated) |
| Weight | Approx. 5.5 kg (estimated) |
| Included Accessories | FM/DAB antenna, 45 RPM adapter, counterweight, remote control |
Frequently Asked Questions - PL880 Soundmaster
User questions about PL880 Soundmaster
0 question about this device. Answer the ones you know or ask your own.
Ask a new question about this device
Download the instructions for your Turntable in PDF format for free! Find your manual PL880 - Soundmaster and take your electronic device back in hand. On this page are published all the documents necessary for the use of your device. PL880 by Soundmaster.
USER MANUAL PL880 Soundmaster
Germany Web: www.soundmaster.de
Copyright by Woerlein GmbH, 90556 Cadolzburg, www.soundmaster.de
Do not dispose of this product with the normal household waste at the end of its life cycle. Return it to a collection point for the recycling of electrical and electronic devices. This is indicated by the symbol on the product, user manual or packaging
The materials are reusable according to their markings. By reusing, recycling or other forms of utilization of old devices you make an important contribution to the protection of our environment.
Please contact your local authorities for details about collection points.

WARNING
Risk of electric shock Do not open!

Caution: To reduce the risk of electric shock, do not remove the cover (or back). There are no user serviceable parts inside. Refer servicing to qualified service personnel.

This symbol indicates the presence of dangerous voltage inside the enclosure, sufficient enough to cause electric shock.

This symbol indicates the presence of important operating and maintenance instructions for the device
Used batteries are hazardous waste and NOT to be disposed of with the household waste! As a consumer you are legally obligated to return all batteries for environmentally responsible recycling - no matter whether or not the batteries contain harmful substances*)
Return batteries free of charge to public collection points in your community or shops selling batteries of the respective kind.
Only return fully discharged batteries
*) marked Cd = cadmium, Hg = mercury, Pb = lead
- Only use mercury and cadmium-free batteries.
- Used batteries are hazardous waste and NOT to be disposed of with the household waste!!!
- Keep batteries away from children. Children might swallow batteries.
- Contact a physician immediately if a battery was swallowed.
- Check your batteries regularly to avoid battery leakage.
- Batteries shall not be exposed to excessive heat such as sunshine, fire or the like.
- CAUTION: Danger of explosion if battery is incorrectly replaced
- Replace only with the same or equivalent type

WARNING
DO NOT INGEST BATTERY, CHEMICAL BURN HAZARD
This product contains a coin/button cell battery. If the coin/button cell battery is swallowed, it can cause severe internal burns in just 2 hours and can lead to death.
Keep new and used batteries away from children. If the battery compartment does not close securely, stop using the product and keep it away from children.
If you think batteries might have been swallowed or placed inside any part of the body, seek immediate medical attention.

CAUTION - INVISIBLE LASER RADIATION WHEN OPENING THE COVER OR PRESSING THE SAFETY INTERLOCK. AVOID EXPOSURE TO THE LASER BEAM.

To prevent possible hearing damage, do not listen at high volume levels for long periods
Safety, Environmental and Setup Instructions
- Use the device in dry indoor environments only.
- Protect the device from humidity.
- This apparatus is for moderate climates areas use, not suitable for use in tropical climates countries.
- No objects filled with liquids, such as vases, shall be placed on the apparatus.
- The mains plug or an appliance coupler is used as the disconnect device, the disconnect devices shall remain readily operable.
- Connect this device to a properly installed and earthed wall outlet only. Make sure the mains voltage corresponds with the specifications on the rating plate.
- Make sure the mains cable stays dry during operation. Do not pinch or damage the mains cable in any way.
- A damaged mains cable or plug must immediately be replaced by an authorized service center.
- In case of lightning, immediately disconnect the device from the mains supply.
Children should be supervised by parents when using the device. - Clean the device with a dry cloth only.
- Do NOT use CLEANING AGENTS or ABRASIVE CLOTHS!
- Do not expose the device to direct sunlight or other heat sources.
- Install the device at a location with sufficient ventilation in order to prevent heat accumulation.
- Do not cover the ventilation openings!
- Install the device at a safe and vibration-free location.
- Install the device as far away as possible from computers and microwave units; otherwise radio reception may be disturbed.
- Do not open or repair the enclosure. It is not safe to do so and will void your warranty. Repairs only by authorized service/ customer center.
- No naked flame sources, such as lighted candles, should be placed on the unit.
- When you are necessary to ship the unit store it in its original package. Save the package for this purpose.
- In case of malfunction due to electrostatic discharge or fast transient (burst), remove and reconnect the power supply.
- If the unit is not using for a long period of time, disconnect it from the power supply by unplugging the power plug. This is to avoid the risk of fire.
- The device is equipped with a "Class 1 Laser". Avoid exposure to the laser beam as this could cause eye injuries.
LOCATIONS OF CONTROLS
FRONT VIEW
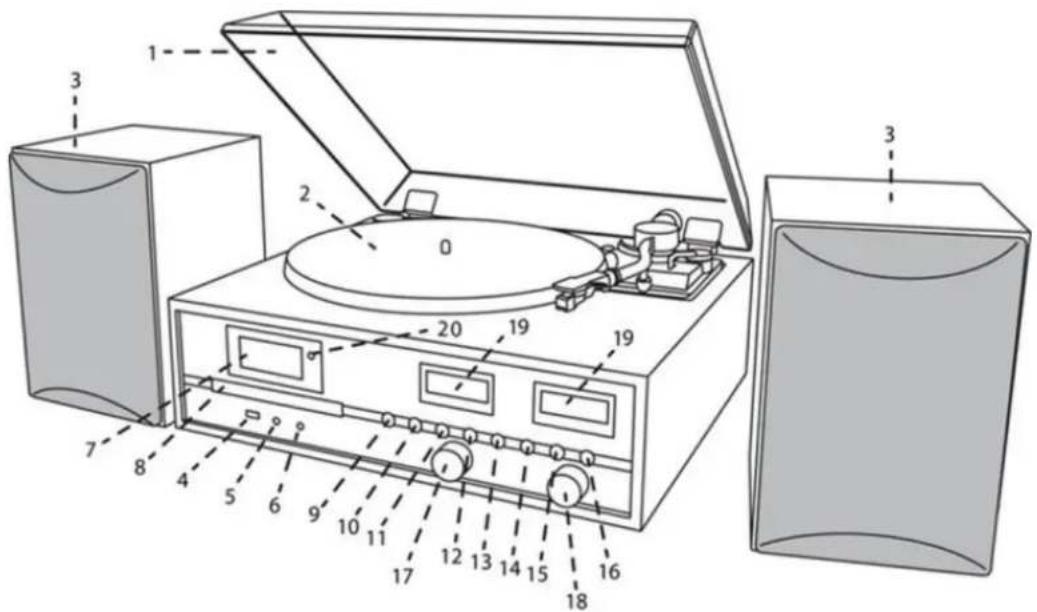
1 Dustcover
11 PLAY/MENU button
2 Turntable
12 STOP/PRESET button
3 Speaker
13 DN/F-R/SCAN button
4 USB socket
14 UP/F-F/INFO button
5 Headphone Socket
15 PLAY-MODE button
6 AUX-IN Socket
16 RECORD button
7 LCD display
17 VOLUME knob
8 CD door
18 SELECT/ENTER knob
9 OPEN/CLOSE button
19 VU meter
10 STANDBY/MODE button
20 Remote Sensor
BACK VIEW
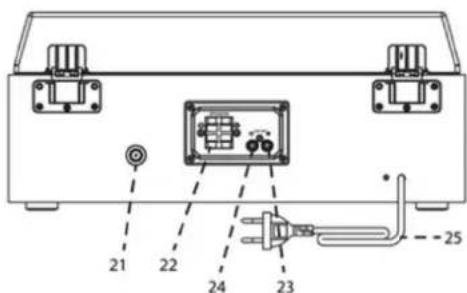
21 Antenna Socket
24 Right Line Out Socket
22 Speaker Terminal
25 AC Power Cord
23 Left Line Out Socket
REMOTE CONTROL
- RECORD
- Open Close
- EQ Sound settings
- DN Track backwards
- P.MODE - Repeat / Random
- VOL - Volume
- TUNER/MENU - Tuning/Menu down
- SCAN
- INFO Information
- Power On/Off
- MODE Function
- UP Track forwards
- Play/Pause Enter button
- FOLDER
- STOP
- VOL + Volume +
- TUNER/MENU + Tuning/Menu up
- MENU
- PRESET
45.PROGRAM - DELETE
- MUTE
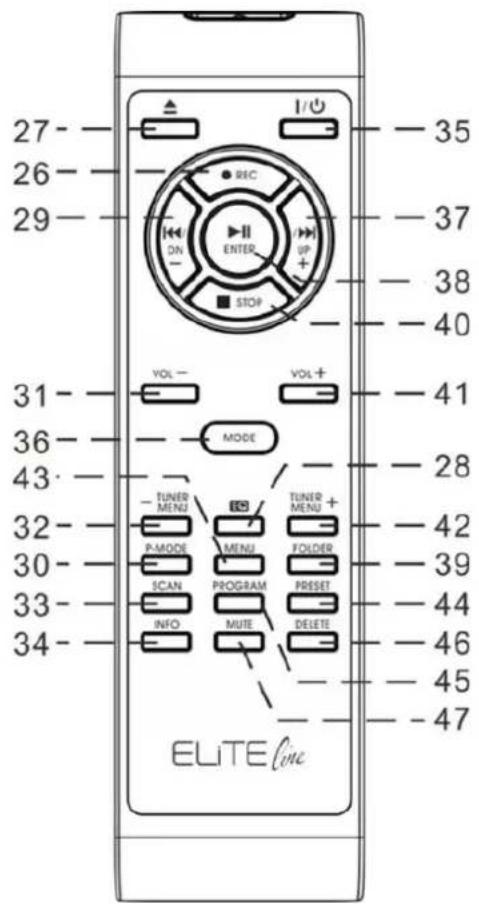
NOTE: All of the buttons on the remote control have same function as these buttons in the unit.
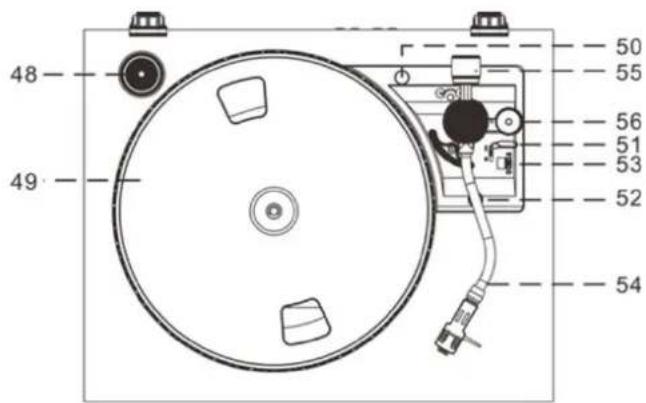
TURNTABLE
- Single 45 RPM Adaptor
- Turntable Platter
- Transit Screw
- Cue Lever
- Tone Arm Lock
- Speed Selector (33&45 rpm)
- Tone Arm with Stylus
- Counter Weight
- Pitch Control
GETTING STARTED
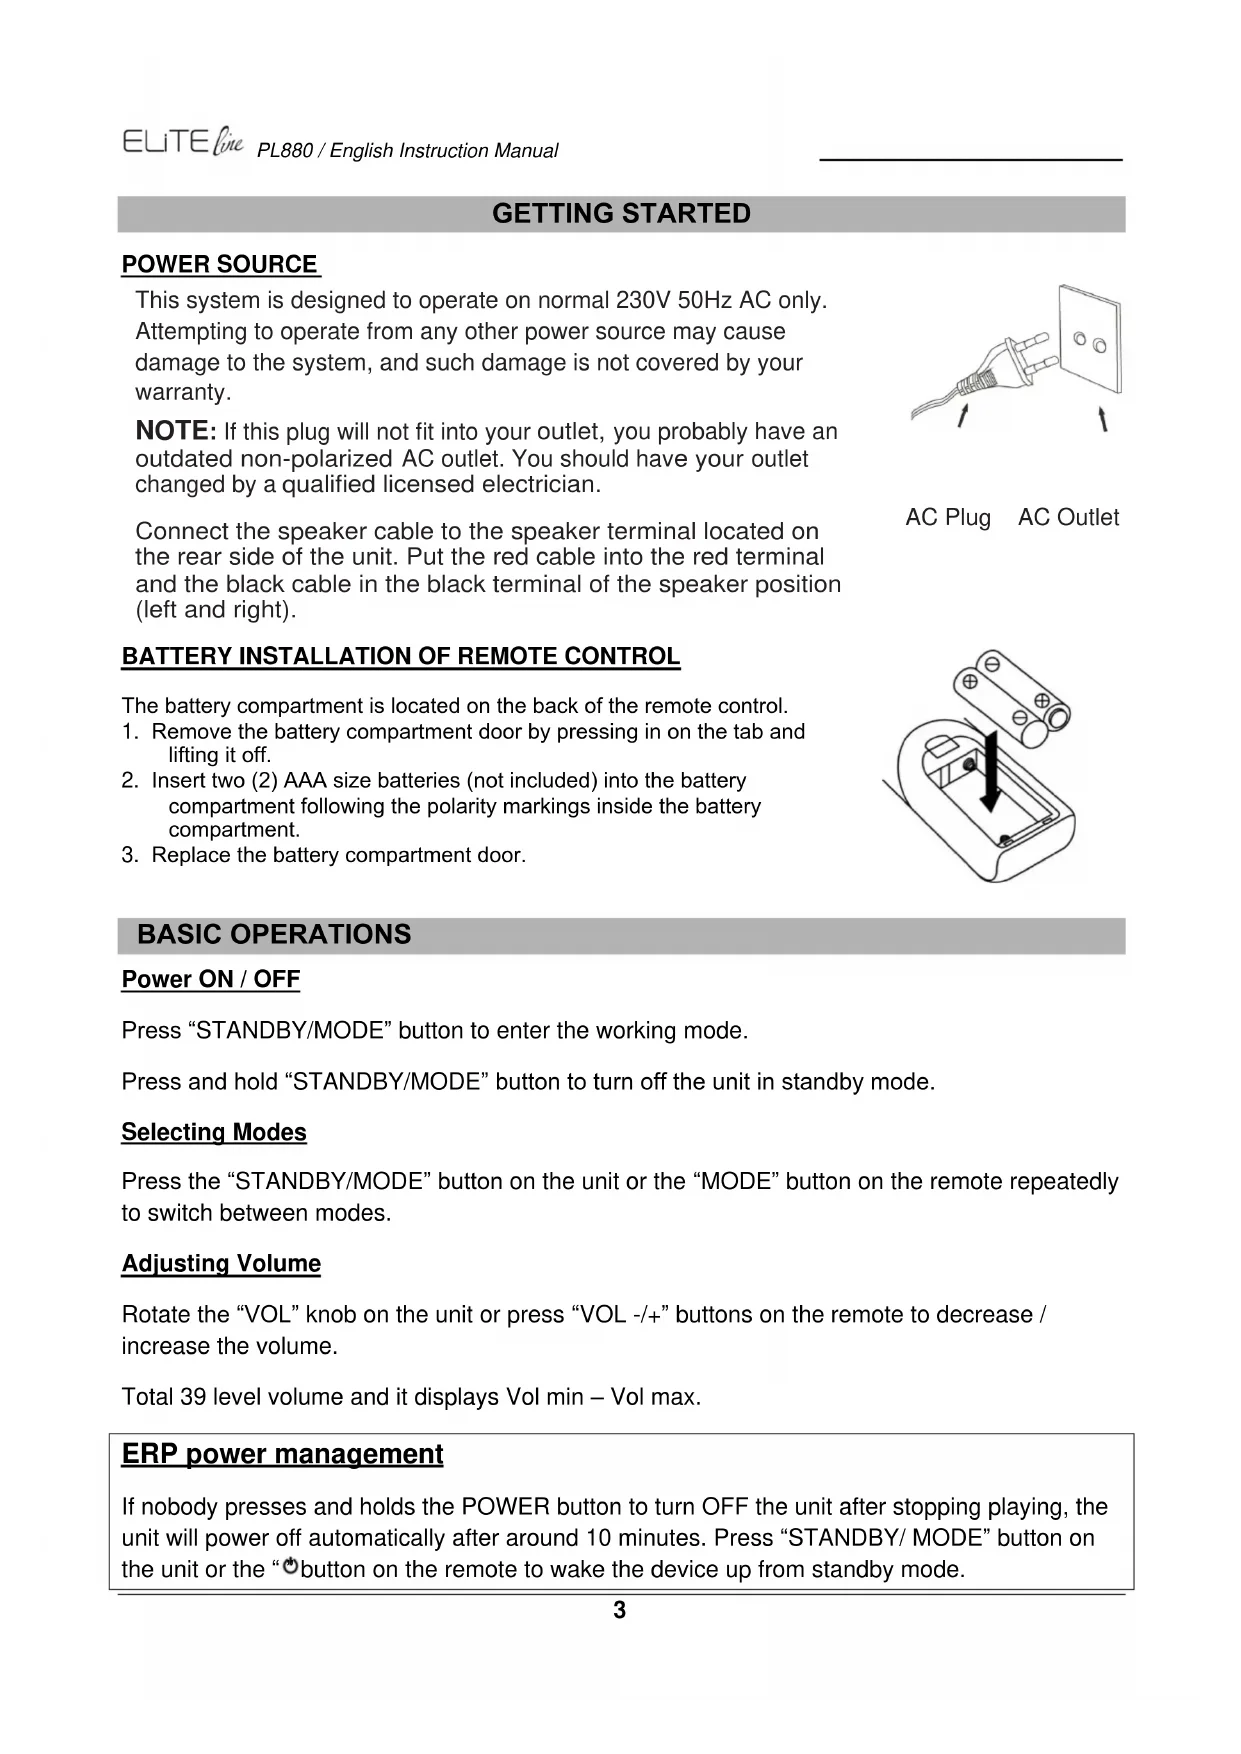
POWER SOURCE
This system is designed to operate on normal 230V 50Hz AC only. Attempting to operate from any other power source may cause damage to the system, and such damage is not covered by your warranty.
NOTE: If this plug will not fit into your outlet, you probably have an outdated non-polarized AC outlet. You should have your outlet changed by a qualified licensed electrician.
Connect the speaker cable to the speaker terminal located on the rear side of the unit. Put the red cable into the red terminal and the black cable in the black terminal of the speaker position (left and right).
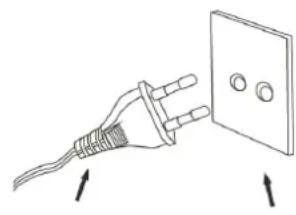
AC Plug AC Outlet
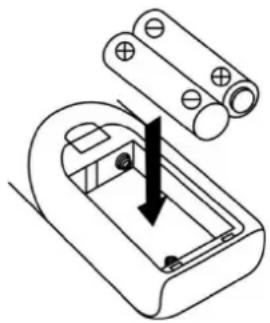
BATTERY INSTALLATION OF REMOTE CONTROL
The battery compartment is located on the back of the remote control.
- Remove the battery compartment door by pressing in on the tab and lifting it off.
- Insert two (2) AAA size batteries (not included) into the battery compartment following the polarity markings inside the battery compartment.
- Replace the battery compartment door.
BASIC OPERATIONS
Power ON/OFF
Press "STANDBY/MODE" button to enter the working mode.
Press and hold "STANDBY/MODE" button to turn off the unit in standby mode.
Selecting Modes
Press the "STANDBY/MODE" button on the unit or the "MODE" button on the remote repeatedly to switch between modes.
Adjusting Volume
Rotate the "VOL" knob on the unit or press "VOL -/+" buttons on the remote to decrease / increase the volume.
Total 39 level volume and it displays Vol min - Vol max.
ERP power management
If nobody presses and holds the POWER button to turn OFF the unit after stopping playing, the unit will power off automatically after around 10 minutes. Press "STANDBY/ MODE" button on the unit or the "按钮 on the remote to wake the device up from standby mode.
DAB OPERATION
- Connect the FM / DAB antenna at the back of the unit.
- Turn the system 'on' and press the "MODE" button to enter into DAB mode. The unit will scan the DAB station automatically till receive the DAB station.
- Press the "TUNER MENU -" or "TUNER MENU +" button to choose the DAB stations manually. Choose the desired DAB station and press "ENTER" to confirm to play.
- During DAB playing mode, press "INFO" button to see the information of the playing DAB station on the screen, i.e. Program Type, Ensemble Information, Transponder, Audio Bit-Rate, Signal-Strength, Time/Date, DLS Information.
DAB MANUAL TUNING
- Turn the system 'on' and press "MODE" button to enter into DAB mode.
- Press and hold the "SELECT" button, 'Manual tune' will show on the display.
- Turn the "SCROLL / " knob to select the transponder, then press the "ENTER" button to confirm to listen.
MEMORY FUNCTION IN DAB/FM MODE
- In DAB/FM playing mode, choose the desired radio station. Press and hold "PRESET" button for 2 seconds, "P1" flashes in the display. Press the "TUNER MENU +" or "TUNER MENU -" to choose the desired station.
- Press ENTER button to confirm and 'Preset 1 Stored' will show on the display.
- Repeat the above 1 - 2 steps to program 20 desired DAB stations or 20 FM stations.
- Press "PRESET" button one time to play the stored tracks. Press the "TUNER MENU +" or "TUNER MENU -" button to choose the stored tracks.
FM OPERATION
- Turn on the system and press the "MODE" button to enter into FM mode.
- Press the "SCAN" button to start auto-search the FM stations. Or press "TUNER MENU+ / TUNER MENU-" buttons to tune the desired radio station.
- If you tune to a FM stereo station, the 'stereo' will show on the display. If you tune to a weaker FM station, the reception will automatically switch to mono. You may press "SELECT" or "ENTER" to change Stereo or Mono mode
- During FM working mode, press "INFO" button to see the following information on the screen: Stereo/mono, Radio Text, Program Type, Signal Strength, Time/Date and Frequency.
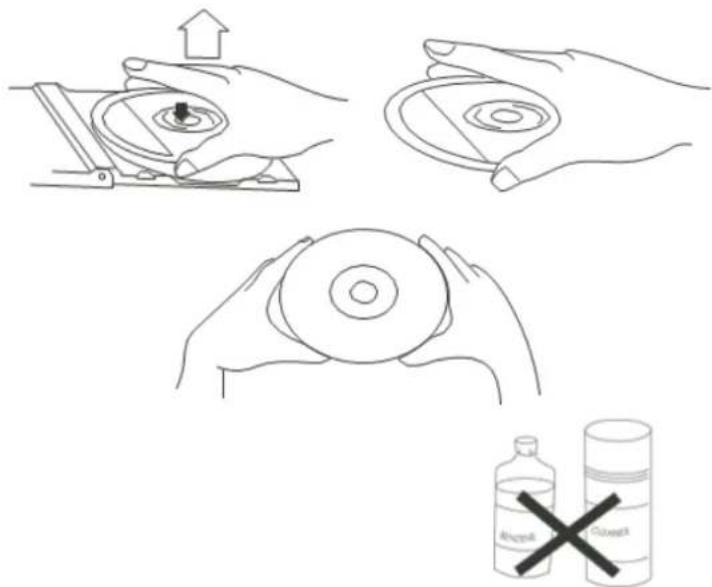
To remove a disc from its storage case, press down on the centre of the case and lift the disc out, holding it carefully by the edges.
Fingerprints and dust should be carefully wiped off the discs recorded surface with a soft cloth. Unlike conventional records, compact discs have no grooves to collect dust and microscopic debris, so gently wiping with a soft cloth should remove most particles. Wipe in a straight line from the inside to the outside of the disc. Small dust particles and light stains will have absolutely no effect on reproduction quality.
Note: CD or USB mode have the same operating procedures.
Playing CD or USB
- Turn on the system and press the "MODE" button to enter into CD or USB mode.
- CD: Press the "OP/CL" button to open the CD door. Place a CD with the printed side facing up inside the tray, then close the CD door. The first track will start playback. USB: Insert carefully USB drive in the USB socket. The first track will start playback.
- Press "PLAY/PAUSE" button to pause the playback. The track time will start blinking. Press "PLAY/PAUSE" button again to resume the playback.
- Press "STOP" to stop the playback.
TRACK SKIP AND HIGH SPEED TRACK SEARCH IN CD / USB MODE
- During CD/USB playback, press "UP/F-F" (Fast Forward) or "DN/F.R" (Fast Reverse) button repeatedly will skip to higher or lower tracks. The disc will begin to play from your selected track.
- To rapidly search forward or backward within a track and locate a specific passage of it, press and hold "UP/F.F" or "DN/F.R" button. The player will search forward or backward at a high speed. Release the button when you hear your desired passage and the playback will resume normal from that point.
- To select next folder (Album) press the "FOLDER" button on the remote control.
REPEAT and RANDOM Function
Press the "PLAY-MODE" button on the unit or the "P.MODE" button on the remote control to choose the Repeat-Mode:
Rep1: plays the current playing track
RepF: plays the current playing folder (only by MP3-CD or USB)
RepA: plays the complete CD or USB
Rand: Random Play-Mode
MEMORY FUNCTION IN CD/MP3 MODE
- In stop mode, press the "PROGRAM" button on the remote control to enter PROGRAM mode, 'DISC' 'MEM' P00' 'T01' will show on the screen.
- Press the "UP/F.F." button or "DN/F.R" button to select your desired track and then press the "PROGRAM" button to confirm.
- Repeat the step 1 and step 2 to continue to program. Note: You can save a total of 20 MP3 tracks and 20 CD tracks. 'PROGFULL' will show on the screen once over 20 MP3 tracks or 20 CD tracks.
- Press the PLAY/PAUSE button to play the saved tracks, press "UP/F.F" or "DN/F.R" to select a track in the sequence saved.
- Press the "STOP" button twice to leave program mode. The entire program stored in memory is canceled.
BLUETOOTH® FUNCTION
- Turn on the unit and press "MODE" button to select the Bluetooth® mode.
- Select from your portable device (Smartphone, Tablet...) the ID Bluetooth® tagged as 'PL880', then confirm connection.
- Now you can transfer the music to PL880 and all operations can only be operated from your mobile device.
TURNTABLE OPERATION
IMPROTANT
TO AVOID DAMAGING THE CABINET OR THE PHONO LID, NEVER FORCE THE LID CLOSED. ALWAYS RAISE THE LID TO RELEASE THE LID SUPPORT BRACKET.
DOOR SUPPORT BRACKET, PULL FORWARD TO RELEASE AND LOWER DOOR.
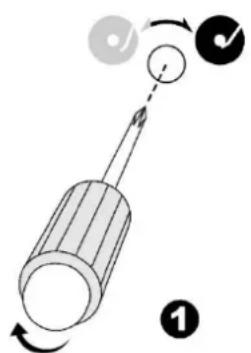
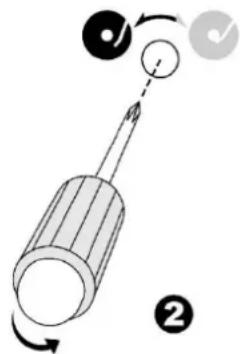
To protect the turntable from damage during transportation, a transit screw is located at the upper right of the turntable platform.
Before playing, please use a screwdriver to turn the transit screw in clockwise direction (screw going down) completely.
To lock the turntable again for transportation, please turn the screw in counter clockwise direction to lock the mechanism.
Speed alignment using the Pitch adjustment
The pitch adjust control is made adjust the turntable speed lightly. To check if the speed of a record that is playing is correct, and if it needs to be adjusted, do the following:
- During playback of for instance a 45rpm record, look at the appropriate strip of strobe calibration dots on the edge of the turntable platter.
- The upper one is for 33 rpm - the middle one for 45 rpm.
- If the strobe dots appear to be flowing to the right, it means the platter is revolving slower than the rated speed. Slowly turn the Pitch Control knob in the “+” direction.
- If the strobe dots appear to be flowing to the left, it means the platter is revolving faster than the rated speed. Slowly turn the Pitch Control knob in the “-” direction.
- Make small adjustments with the Pitch Control knob until the strobe dots appear to be stationary without moving left or right.
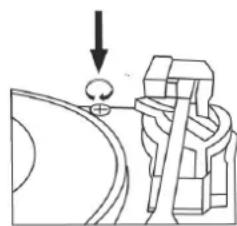
Tone arm stopping position alignment
- The position of the tone arm complete playback and return to the rest station can be adjusted at the alignment screw as follow:-
Before starting the alignment, please take out the hole covering rubber:
a. If the system cannot complete the playback of record and return earlier, use a cross head screw driver and turning the alignment screw inside the hole clockwise, the stopping and eject position of the tone arm will move more inward to the center of the record for playback completion.
b. If the system cannot return to rest position automatically after playback of record use a cross head screw driver and turning the alignment screw inside the hole anti-clockwise, the stopping and eject position of the tone arm will move more away from the center of the record for playback completion.
Remark:
- The stopping position is very subjective among difference customers, please select the most suitable position based on your own record collection. The ex-factory setting is based on the most common template.
- Please check the stopping position time by time during adjustment and avoid over turning of the screw inside
ADJUST THE WEIGHT OF THE STYLUS
- Slide in the counter weight completely into the rear of the tone arm until it reach the end, turn it clockwise until it click with pit inside.
- Twist the counter weight clockwise & backward until it reach the white line as figure 2
- Twist the counter marking until it reach " 1 " position
- Twist the counter weight anti-clockwise & inward until it reach the appropriate working pressure.
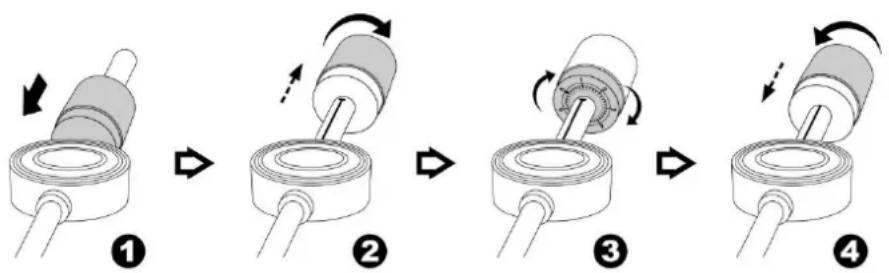
Remark : The working pressure of the provided stylus is from the range 4 - 6 grams. According to the cartridge manufacturer. All stylus has it own working pressure and please refer to the specification respectively.
PLAYING RECORDS
This system includes a full-size, 2-speed, belt-drive turntable. You can play 33 and 45 rpm records.
- Press the "MODE" button to enter the "PHONO" mode.
- Make sure that you have removed the stylus cover from the stylus and have released the tone arm lock that secured the tone arm to the tone arm rest.
- Set the turntable speed selector to the appropriate speed 33 or 45rpm. If you are playing 45 rpm 'singles', place the 45 rpm adapter on the centre spindle.
- Place your record on the centre spindle.
- Raise the cue lever to lift the tone arm off its rest. Move the tone arm to the edge of the record. The turntable starts automatically. Use the cue lever to gently lower the tone arm onto the record.
- Press the "VOL-/+ button to the desired level.
- When the tone arm reaches the end of the record it automatically returns to the tone arm rest and the record player stops.
NOTE: Do not turn or stop the turntable manually. Moving or jarring the turntable without securing the tone arm clamp could result in damage to the tone arm.
USB RECORDING
1. CD RECORDING
Recording one track:
- Plug USB drive into USB socket.
- During the playing mode the desired track, press the "RECORD" button one time, "CHECK" will show on the display and then "REC USB". "USB" is flashing.
- Press the "RECORD" button again, the display show "REC One".
- Press the "RECORD" button again, the display show "REC USB" and the disc starts playing the track.
Recording complete disc:
- Plug USB drive into USB socket
- Set the disc in Stop-mode.
- Press the "RECORD" button, the display will show "CHECK" and then "REC USB". "USB" is flashing.
- Press the "RECORD" button again, the display show "REC All".
- By pressing the "RECORD" button again the playback and the recording starts.
2. PHONO RECORDING
- Plug USB drive into USB socket
- During the PHONO playing mode, press the "RECORD" button one time, the display will show "CHECK" and then "REC USB". "USB" is flashing.
- Press the „RECORD“ button again, „REC USB“ is flashing in the display and the unit starts recording.
- Plug USB drive into USB socket
- During the BLUETOOTH® playing mode, press the "RECORD" button one time, the display will show "CHECK" and then "REC USB". "USB" is flashing.
- Press the „RECORD“ button again, „REC USB“ is flashing in the display and the unit starts recording.
4. AUX IN RECORDING
- Plug USB drive into USB socket
- During the AUX-IN playing mode, press the "RECORD" button one time, the display will show "CHECK" and then "REC USB". "USB" is flashing.
- Press the „RECORD“ button again, „REC USB“ is flashing in the display and the unit starts recording.
2. DAB/FM RECORDING
- Plug USB drive into USB socket
- During the DAB+ or FM playing mode, press the "RECORD" button one time, the display will show "CHECK" and then "REC USB". "USB" is flashing.
- Press the „RECORD“ button again, „REC USB“ is flashing in the display and the unit starts recording.
NOTE:
Press the "INFO" button of the remote control during Bluetooth/Aux or Phono-Recording, you can select the recording bit rate from 32 - 256kHz. Press "UP/F.F" or "DN/F.R" to choose the desired bit rate and press "INFO" button again to confirm.
The bit rate of DAB/FM recording is preset at 128kHz
It is not able to change the recording bit rate for CD recording.
DELETE USB TRACK
Delete one Track:
- During the USB stop mode, press the "DELETE" button on the remote control one time, 'DEL-T001' will show on the display.
- Choose the desired track with the "DN" or "UP" buttons on the remote control.
- Press the "DELETE" button again and choose with the "DN" or "UP" buttons on the remote control "YES". "YES" will begin flashing.
- Press the "DELETE" button to confirm delete.
Delete all tracks:
- During the USB stop mode, press and hold the "DELETE" button for few seconds on the remote control one time, 'DEL-A' will show on the display.
- Press the "DELETE" button again and choose with the "DN" or "UP" buttons on the remote control "YES". "YES" will begin flashing.
- Press the "DELETE" button to confirm delete.
- All tracks will be deleted.
AUX IN OPERATION
Press "MODE" button to select the AUX mode. Insert the audio cable (not included) into the matching 'AUX IN' socket of the unit (PL880).
Start the playback of the connected device and you can hear the sound in PL880.
MUTE / EQ OPERATION
During playing mode, press "MUTE" button on the remote control one time, the sound will not be heard from the speakers and 'MUTE' will show on the display; press "MUTE" button or "VOL +/-" or "EQ" button to cancel mute function and the sound can be heard again from the speakers.
During playing mode, press "EQ" button to choose the different sound effect from "POP/ CLASSIC /ROCK/ JAZZ / FLAT", you can choose the desired one.
PHONES OPERATION
During usual operation insert the earphone's cable (not included) into the matching 'PHONES' socket of the unit. Now you can hear the sound exported to your earphones.
Note: Adjust the volume lever lower during the PHONES operation.
To prevent possible hearing damage, do not listen at high volume levels for long periods.
SETTINGS
LANGUAGE SETTING
During FM or DAB playing mode, press "MENU" button and then press "TUNER MENU +" or "TUNER MENU -" to choose 'SYSTEM', press "ENTER" button to confirm.
Press "TUNER MENU +" or "TUNER MENU -" to choose 'Language' and press "ENTER" to confirm enter into "LANGUAGE" setting. You can choose from "English - Deutsch".
TIME
- Set the unit in Standby-Mode.
- Press and hold the "PLAY/MENU" button on the unit, "24 HR" is flashing in the display.
- Set the "12 HR" or "24 HR" mode by pressing the "DN/F-R/SCAN" or "UP/F-F/INFO" button. To confirm press the "PLAY/MENU" button, the hour begin flashing.
- Set the hour by pressing the "DN/F-R/SCAN" or "UP/F-F/INFO" button. To confirm press the "PLAY/MENU" button, the minutes begin flashing.
- Set the minutes by pressing the "DN/F-R/SCAN" or "UP/F-F/INFO" button. To confirm press the "PLAY/MENU" button again and the time setting is finished.
FACTORY RESET
In DAB mode, press and hold the "INFO" button on the unit, "Press Select Key to Reset" will show in the display. Press the "SELECT" button to confirm. "System Reset" will show in the display which means the factory reset is successfully.
LINE OUT
You can connect the unit to an external amplifier or record player (such as a tape recorder) via the line out jack. To do this, connect the device to a conventional RCA cable that you can get from a specialist dealer.
TECHNICAL SPECIFICATIONS
Power supply
:AC100-240V\~50/60Hz
Frequency Range
DAB+ 174.928-239.200MHz
FM 87.5-108.00MHz
Preset Stations
20 FM, 20 DAB+
Turntable Speed
33/45 RPM
Audio power output
: 2x12,5W RMS
IMPORTER
Germany Web: www.soundmaster.de
Copyright by Woerlein GmbH, 90556 Cadolzburg, www.soundmaster.de
SOURCE D'ALIMENTATION
Email: service@soundmaster.de
Allemagne
Site web: www.soundmaster.de
CLASS 1 LASER PRODUCT
KLASSE 1 LASER PRODUKT
LUOKAN 1 LASER LAITE
KCLASS 1 LASER APPARAT
PRODUCTO LASER CLASE 1
WAARSCHUWING-ONZICTBARE LASERSTRALING WANNEER DE BEHUIZING GEOPEND WORDT OF DE INTERNE BEVEILIGING UITGeschAKELD. VERMIJD BLOOTSTELLING AAN DE LASERSTRAAL.

Email: service@soundmaster.de
Duitsland
Website: www.soundmaster.de
SALTO TRACCE E RICERCA TRACCE AD ALTA VELOCITA IN MODALITA CD/USB
Email: service@soundmaster.de
Germania
Web: www.soundmaster.de
Taend/sluk for strømmen
Justering of tonearmens stopposition
Recording complete disc:
- Slut USB-drevet til USB-stikket.
- Indstil disken i Stop-tilstand.
- Tryk på "RECORD" knappen, displayet viser "CHECK" og derefter "REC USB". "USB" blinker.
- Tryk på knappen "RECORD" igen,displayet viser "REC All".
- Ved at trykke pa knappen "RECORD" ingen starter afpilningen og optagelsen.
2. OPTAGELSE AF PLADESPILLER
- Slut USB-drevet til USB-stikket.
- Under PHONO-afspilningstilstanden tryk på knappen "RECORD" en gang, displayet viser "CHECK" og derefter "REC USB". "USB" blinker.
- Tryk på knappen "RECORD" igen, "REC USB" blinker i displayet, og enheden begynder at optage.
3. OPTAGELSE AF BLUETOOTH
- Slut USB-drevet til USB-stikket.
- Under BLUETOOTH®-afspilningstilstanden tryk på knappen "RECORD" en gang, displayet viser "CHECK" og derefter "REC USB". "USB" blinker.
- Tryk på knappen "RECORD" igen, "REC USB" blinker i displayet, og enheden begynder at optage.
4. OPTAGELSE AF AUX-IND
- Slut USB-drevet til USB-stikket.
- Under AUX-IND -afspilningstilstanden tryk på knappen "RECORD" en gang, displayet viser "CHECK" og derefter "REC USB". "USB" blinker.
- Tryk på knappen "RECORD" igen, "REC USB" blinker i displayet, og enheden begynder at optage.
5. DAB/FM-OPTAGELSE
- Slut USB-drevet til USB-stikket.
- Under DAB+ eller FM-afspilningstilstanden tryk på knappen "RECORD" en gang, displayet viser "CHECK" og derefter "REC USB". "USB" blinker.
- Tryk på knappen "RECORD" igen, "REC USB" blinker i displayet, og enheden begynder at optage.
BEMAERK:
Web: www.soundmaster.de
MINNEFUNKSJON I DAB/FM-MODUS
- Velg ønsket radiostasjon i DAB/FM-avspillingsmodus. Holdinne «PRESET» i to sekunder. "P1" blinker i displayet. Trykk på «TUNER MENU +» eller «TUNER MENU -» for Å velge ønsket stasjon.
- Trykk på ENTER forå bekrefte. sövises «Preset 1 Stored» i displayet.
- Gjenta trinn 1 til 2 over for a programmere 20 DAB-stasjoner erler 20 FM-stasjoner.
- Trykk på «PRESET»-knappen en gang forå lagre de lagrede sporene. Trykk på «TUNER MENU +» eller «TUNER MENU -» forå velge lagrede spor.
BETJENE RADIOEN
MINNEFUNKSJON I CD/MP3-MODUS
4. OPPTAK MED AUX INN
MINNESFUNKTION I DAB/FM-LAGE
E-post: service@soundmaster.de
Germany
D 90556 Cadolzburg, Germany
Tel: +49 9103 71 67 0
Fax: +49 9103 71 67 12
E-Mail: info@soundmaster.de
Internet: www.soundmaster.de
Hereby, Worlein GmbH declares that this device is in compliance with the essential requirements and other relevant provisions of Directive 2014/53/EU.
A copy of the declaration of conformity can be obtained from the above address.