
Yes GTX - Stroller HARTAN - Free user manual and instructions
Find the device manual for free Yes GTX HARTAN in PDF.
| Product Type | Stroller |
| Brand | Hartan |
| Model | Yes GTX |
| Recommended Age | From 6 months up to 22 kg |
| Maximum Child Weight (carrycot) | 9 kg |
| Wheel Type | Swivel wheels with lock, removable |
| Brake | Locking brake with red/green push button |
| Suspension | Adjustable spring suspension (soft or sporty) |
| Handlebar | Telescopic, height-adjustable with rotating grip |
| Backrest | Multi-level recline from sitting to lying |
| Footrest | Adjustable (lower using red buttons) |
| Safety Harness | 5-point with magnetic buckle and adjustable loops |
| Hood | Removable protection bar and sun canopy |
| Folding | Compact fold via handlebar with lock |
| Textile Material | Fabrics tested according to Oeko-tex 100 standard |
| Care | Clean with clear water, machine wash 30°C (removable parts), lubricate axles |
| Warranty | 2 years |
| Included Accessories | Rain cover recommended (not included?) |
| Use | Not suitable for jogging or rollerblading. Single child only. |
Frequently Asked Questions - Yes GTX HARTAN
User questions about Yes GTX HARTAN
0 question about this device. Answer the ones you know or ask your own.
Ask a new question about this device
Download the instructions for your Stroller in PDF format for free! Find your manual Yes GTX - HARTAN and take your electronic device back in hand. On this page are published all the documents necessary for the use of your device. Yes GTX by HARTAN.
USER MANUAL Yes GTX HARTAN
Acceptance Certificate
Name/Name:
StraBe/Road:
PLZ.Orr/Town.postcode:
Phone (with area code):
e-mail:
Colour of fabric (design):
Zubehor / Accessories:
Kaufdatum/Date of purchase:
Salesperson (name in block letters)
Note: signing this acceptance certificate does not restrict the legal rights of the purchaser.
Handler/Dealer
001 100
*Vesicles Extraction
UV Suction, for Skeletal muscle
Sowrrnreeraii
m = 311
A
m = 311 ;


Hartan GmbH & Co.KG
Mihlenweg
■ regulatory underpwrism
- Unversehrtheit
Gestell überprüten
■SlofthelleCberlurher 关于本次重组的公告
- Completeness
- Functor
Folding mechanism
Road behaviour
Wheels
Adjusting mechanism
■ Brakes check
Suspension check - Intactness
Frame check
Fabric check
Plastic parts check
I have checked the product and have ascertained that it is supplied
complete, has no external, visible faults and that all functions are intact.
I have received sufficient information concerning the product and its
infections before purchase and have been instructed on care and maintenance.
Suitable from 6 months, up to 22kg
Under 6 months only in connection with an appropriate carrycot.
The product is not suitable to be used when jogging or skating.
1 Handle
2 Handlebar catch
3 Twist grip for telescopic adjustment
4 Wheel retention
5 Lock-type-swivel wheels
6 Swivel wheel holder
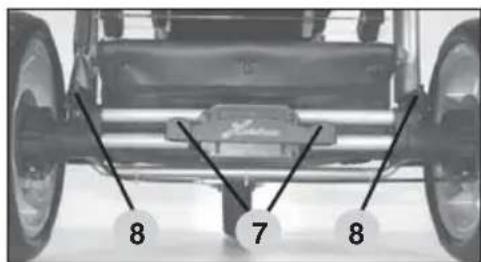
7 Parking brake
8 Adjustable suspension system
10 Climatic zone
11 Safety bar adjustment
12 Hood bar and safety bar removal
13 Tilt-adjustable backrest
14 Safety belts
15 Adjustable footrest
17 Automatic lock for upper section
20 Sun visor
21 Unlatching stop
22 front wheel suspension
Congratulations on your purchase
You want your baby to feel safe and secure, that's why you have purchased a high-quality product. You have made an excellent choice. Products are manufactured with the greatest possible care and monitored constantly by rigorous quality control assuring that your pram will provide life-long satisfaction. The textiles used for our products have been tested for harmful substances (chemical residues) according to the industry's own, Oko-Tex-Standard 100' to guarantee that all the fabric parts of your pram are safe for your baby.
IMPORTANT! PLEASE DO NOT USE THIS PRAM BEFORE READING THE INSTRUCTIONS CAREFULLY, AND KEEP THESE INSTRUCTIONS FOR QUERIES OR FUTURE REFERENCE. YOUR CHILD'S SAFETY MAY BE AFFECTED IF YOU DO NOT FOLLOW THESE INSTRUCTIONS.
If you do not understand the instructions or if you require more detailed information, contact your dealer. Please ensure that other users are also informed about the functions of the carriage and the notes on safety.
For the safety of your child
WARNING! - Before using the pram, make sure all catches are locked.
WARNING! - Before use, conduct an initial check of the carriage, and do not use it if it is damaged or if parts are torn or broken.
WARNING! - Make sure when unfolding the pram and folding it together that your child is at a safe distance, to avoid any injuries
WARNING! - Never leave your child unattended in the pram.
WARNING! - Make sure before using it that the carrycot or the seat unit or the child's car seat is correctly latched into place.
WARNING! - Negotiating stairs or steps as well as overloading may damage the pram and endanger your child.
WARNING! - When parking the pram, make sure the brake is engaged.
When using public transport, ensure the pram stands safely.
WARNING! - A pram, stroller or carrycot is not a substitute for a cradle or a bed. It is intended to be used exclusively as a means of transport.
WARNING! - Using this pram while jogging, skating, etc. can be dangerous and is therefore not allowed.
WARNING! - Do not allow children to play either near or with the pram.
WARNING! - Always use the restraint system.
WARNING! - Fix no bags, handbags or other loads to the handle, backrest or sides of the carriage, as this will affect its stability.
WARNING! - This model has been designed for 1 child.
WARNING! - A second child seat is not allowed for this model.
WARNING! - The seat unit and carrycot are not to be used for transporting in a car.
WARNING! - The rain cover may not be used when the hood is taken off (danger of suffocation). Never expose the rain cover hood to sun while the child is
in the carriage (overheating).
WARNING! - Keep the carriage away from open fires or other sources of heat.
WARNING! - Remove immediately all film packaging, and do not allow your child to play with it (asphyxiation).
WARNING! - Accessories and spare or replacement parts not approved by the manufacturer must not be used.
Instructions for use
WARNING! When opening out and folding down the frame and when adjusting the back-rest, pinch-points may be caused in which fingers etc. can be trapped unless care is exercised. Ensure that your child has plenty of clearance space.
Unfolding the carriage
Lift the handle 1 until the two lateral handle catches 2 have engaged.
Folding the carriage
Turn the twist grip 3 inwards and push at the same time the telescopic handle to the stop. With the grip 3 still twisted, depress the red button 21, and push the handle 1 forcibly until it disengages.
Height-adjustable Telescopic handle
Turn the twist grip 3 inward and slide the handle 1 in the desired position until it engages on both sides.
Changing the rear wheels
Release the parking brake 7. Depress push button 4 and pull the wheel off. Push the wheel right to the axle's stop. Make sure, all wheels are held in place properly. Then, depress the button again.
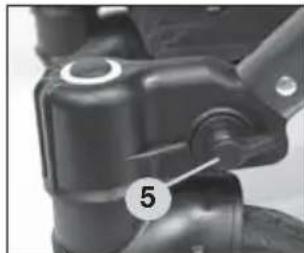
Lock-type-swivel wheels
Turn down the lock lever 5 to pre-select the straight-line motion mode, which will be activated the moment the wheels point in forward direction. To allow the wheels to swivel freely again, turn the lever 5 back to the horizontal position. On very uneven surfaces, and when going very fast, we recommend locking the swivel movement, to prevent the wheels from blocking.
Changing the swivel wheels
To remove the wheel, release the push-button in the centre of the cap 6 and pull the wheel off the holding device. To assemble the wheel, insert the fastening pin in the holding device, and engage it by a forcible push, which is indicated by a click sound.
Parking brake
Push the red brake button 7 to engage the brake. Having parked the pram, try to push it to check the brake. Push the green brake button 7 to release the brake.
WARNING! Make sure the brake is always closed when placing the baby in the carriage or taking it out of it.
Adjustable suspension system
By turning the selector 8, a "hard" or "soft" position can be selected for suspension.
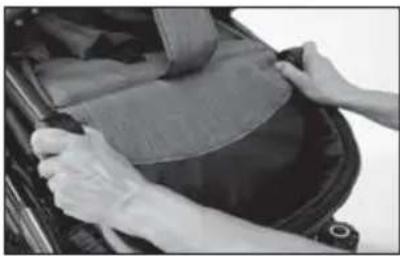
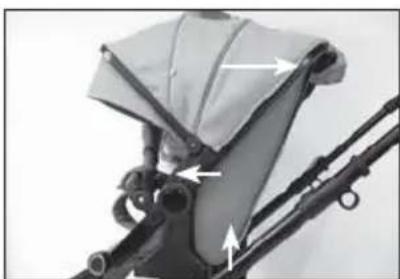
Hood and safety bar
By pressing the bayonet joint 12, the hood or the safety bar can be pulled out. When inserting it, make sure the safety bar locks into place correctly and be careful not to pinch any of the fabric parts. By pressing the buttons 11, the safety bar position can be changed.
WARNING! The hood bar of the stroller and the safety bar are not suitable for carrying the stroller.

Adjust the back rest to incline the seat frame
Tilt the adjustment lever 13 at the rear to bring the seat frame from the sitting to the lying position in two stages.
Adjusting the footrest
By pressing the two red safety buttons 15 at the same time, the footrest can be lowered. When lifting it, adjustment of positions is effected automatically.
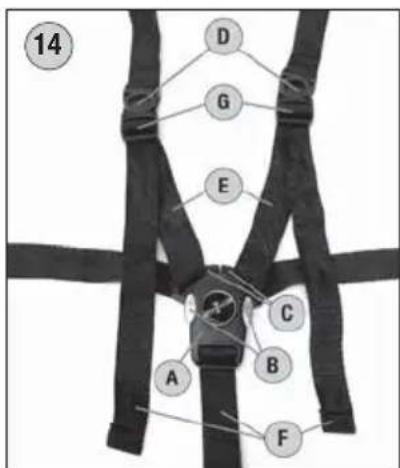
Safety harness WARNING!
Secure your child with the 5-point belt system 14.
Make sure that the shoulder belts D are inserted and the belt fits snugly against your child. You can adjust the length and tautness of the belts with the belt ends F. You can adjust the width of the shoulder and lap belts by tilting open the quick-release slider G and pulling on the belt E.
Opening the belt: Press the two buttons B at the same time and remove the magnetic closer A. The bottom fixing C can then be removed easily.
Closing the belt: Hold together the two fixings C and attach the magnetic closer A; the fastener locks automatically..
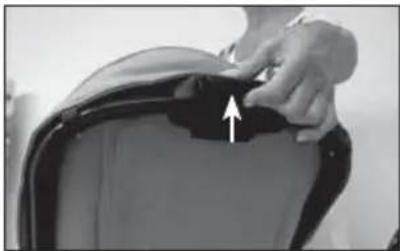
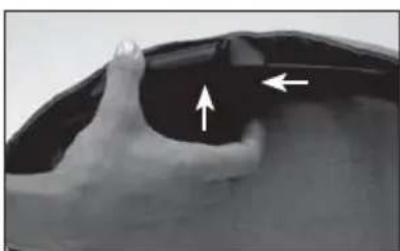
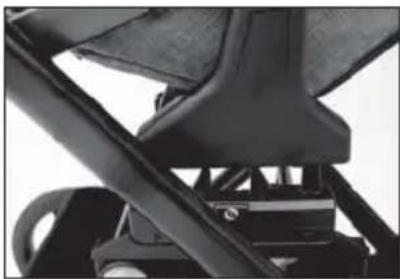
Automatic locking of the upper section
Place the seat frame on the chassis so that the two upper fastening components rest on the locking bolts provided for this purpose. Both sides of the lock mechanism 17 will automatically close when you press the seat frame down.
WARNING! Ensure that the seat frame is securely in place before use!
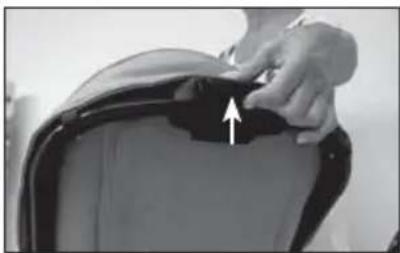
To release the lock mechanism, press the safety button to the right of the release button on the back of the inclining seat frame and then press the release button until the release is activated.
Grasp the hoop guard with your other hand to remove the seat frame.


Instructions for use
Suitability for the child
The seat unit is designed for a child from 6 months, and weighing up to 22kg
WARNING! This product is only suitable for a child which cannot yet sit up or roll onto its side on its own or support itself on hands and knees.
Maximum weight of the child: 9kg
Never use these carrycots on a stand.
Checking and care instructions
All the materials we use can easily be cared for.
Care of the fabric parts
Clean soiled fabrics when dry using a clothes-brush or lukewarm water (then use hair dryer). Do not rub fabrics extensively. Remove tenacious stains using a soft detergent. All removable fabric parts may be machine washed in lukewarm water at a gentle setting and reduced agitation, at 30^ . Let's say you have encountered a heavy rain shower. Dry your carriage with the hood still on in a dry and airy room using a cloth. This prevents marking as well as the underlining fabrics from moist soaking in through the seams. As a guaranteed protection against rain, we recommend that you use our rain cover, which is either included or can be purchased at your dealer's. Our fabrics have quite a number of distinctive features. However, they are very sensitive to excessive sunlight. That's why you should park your carriage in the shade whenever possible.
Care of the chassis
The chassis requires regular care. You should clean and slightly lubricate the wheel axles at a regular 4-weeks interval. Before oiling the wheels and push-in axles, make sure these are absolutely clean and free of sand etc., in order not to compromise the proper working of the locking mechanism. Use a silicone based lubricant spray for all moving plastic parts to maintain them in an operative condition. Keep all coated and chrome-plated metal parts in dry condition, and use a finish restorer or chrome paste if necessary. Remove smaller chassis paint damages by means of a touch-up applicator. Do not use high-pressure cleaners when cleaning your carriage, due to risk of damaging the ball bearings of the wheels (greased) and other functional parts (grinding and creaking noise). Wheels: Overpressure may result in accidents and personal injuries. Replace worn plain wheel bearings and springs in time. Replace worn plain wheel bearings and springs in time. Little stones in the thread, etc. may just as well damage the floor covering. When parking the carriage in the blazing sun or cramming it in the boot at temperatures of above 40^ , the semi pneumatic tires may flatten or become deformed.
2 YEARS WARRANTY
This product is guaranteed for a period of 2 years by your contract partner. For possible submission of proof, please keep your receipt, the completed warranty card as well as the hand-over check bearing your signature for the length of the warranty period. These documents must be submitted to qualify for service under the warranty.
IN CASE OF WARRANTY CLAIM
This product is warranted against defects in materials and workmanship that existed at the time it was handed over.
THIS WARRANTY DOES NOT COVER ....
We disclaim liability for defects in the object of purchase that are beyond our control.
This especially applies to:
natural wear and tear (wear-related defects) and defects due to excessive stress
■ consequential defects, originally caused by neglect of defects/damages but developing into conditions necessitating a more difficult repair
defects due to improper or inappropriate use (see Instructions)
defects due to incorrect assembly or operation
■ defects due to negligent handling or lack of maintenance of the product
defects due to improper alteration of the product.
WARRANTYCLAIM-YESORNO?
Rust: To provide a proper basic protection of the chassis, it has undergone a rust-proofing treatment. However, rust-stains may be found when lacking maintenance. This case will not be covered by the warranty.
Scratches: Scratches caused by wear and tear will not be covered by the warranty.
Mould formation: Fabric parts, having become wet, should be dried properly to prevent mould formation (see Instructions). Mould formation will not be covered by the warranty.
Bleaching of the fabrics: We confirm that the fabrics comply with the established standards. It cannot be ruled out that colours of the fabrics may fade while the parts are exposed to direct sunlight, washed too frequently, come into contact with sweat and detergents, or suffer abrasive wear (especially on those parts where the pram is handled). Consequently, colour fading is excluded from the warranty. It is unavoidable that colours sometimes differ slightly from one individual batch to the next, which is why this case will not be covered under the warranty.
Knob formation on fabrics: We recommend that you apply general clothes care. As with woollen sweaters, the knobs can easily be removed by using a clothes-brush or burling machine.
Tearing of seams, fabrics, press studs : At the time of purchase, please check carefully that all the fabric parts, seams and snap fasteners have properly been sewn and fastened. In case of a possible complaint concerning seams/defective snap fasteners, a claim must immediately be reported to your dealer after the defect has been discovered.
Wheels: As wheels used on prams will not be balanced, they may show slight run-outs (wobbles). Worn tires will be regarded as natural wear and tear. No claim can be raised if your pram, using pneumatic tired wheels, has a flat. This will be attributed to extraneous causes - a small hole caused by a pointed object, or pushing the pram about when it has not got enough air in the tire. This case will not be covered by the warranty.
WHAT TO REMEMBER WHEN BUYING YOUR PRAM
Check that your pram is complete when it is handed over and no parts are missing. Check the function of all parts and confirm this by signing the hand-over check.
WHAT TO DO IN CASE OF A COMPLAINT
Call your dealer, from whom you bought the pram, to file the complaint and to discuss how to handle the matter. In case of defects concerning safety regulations, your complaint must be filed at your dealer within a 30 days period from the date the defects have occurred, otherwise these defects will not be warranted for. When handling your warranty claims, we will apply product-specific depreciation rates. We refer you to our general terms and conditions displayed at our premises.
Make sure that the pram is in a clean condition before being sent in for repair. Repairs will not be carried out on prams which are in a dirty condition.
USE, CARE AND MAINTENANCE
To maintain the original quality of your pram as a means of transportation for your child, it requires care and maintenance according to the instructions.


VIP GTX / Yes GTX
Lock-type-swivel wheels
Lamplighet for barnet
O CEMU MORATE VODITI RACUNA PRILIKOM KUPNJE
Provjerite da li su kolica kompletna prilikom isporuke i da li nedostaju neki dijelovi. Provjerite da li sve funkcije kolica fungkioniraju u potpunosti i potvrdite ovo na listi o primopredaji.
POSTUPAK KOD REKLAMACJE
Dahn npoykt He niXoDHT bIy BnKOpunctaHHN iI qac 6iry, cy KaTaHHHa KOB3aHax.
1 PyuKa
2 PyuHi ralbMa
3 PerylboBaHa TeleckoniuHa pyka
4 BLOKyBaHHa KOleca
5 NobopoTHi KOleca 3 cncTeMoIO 6lokyBaHHa
6 Φikcatop nobopoTy koleca
7 RaIbMa
8 PerynboBaHa cnTeMa amOpTu3aui
10 3OHa BeHTnlaui
11 PerylIOBaHHa6amnepa
12 3HЯТЯ KaIIOsoHy Ta 6aMnepa
13 PerylboBaHa no HaxnIy cnnHka
14 Pemehi 6e3neKei
15 PerylboBaHa niiHixka
17 ABToMaTuHHe 6IOKyBaHHa3'EMHO6IOKy
20 CoHue3axnCHN KO3npOK
21 06mexyBaquo3fikcyBaHHa
22 Amoptn3aui nepeHbOro Koleca
Bitaemo 3 Bdannm npnd6aHnM
Bn xoyete, 06 Ba7a nHTHa noyBa7a ce6e y 6e3neu? Came TOMy, BN 3po6nHn npekpachn Bn6ip i npnd6ann npodyKT BncoKoi JAKOti ipmN
IpoDyKua Hantan CTBOpIOeTbca 3 BEnuye3HO IO BiNobiDaIaIbHicTTO Ta Tpy6oToIO NO BiIDHOWeHHIO Do CnoXnBaUIB, a TAKOx npoxoHTb NoCTIHn CyOBpN KOHTPOJI bIKoCTI, 0o 3a6e3neuyE DOBROTPINBAIICTb BKNOPNCtAHnHaWnX KOLACOK, Ta 3aIOBilbHNTb HaBnB6arInbIwO rOKynu. TeKCTINb, 0o BNKOpNCtobyETbcB HawaII npOkyu, TeCTYETBCa HA npeDMET BiIDcyTHocTi WkiDlnBnx peOBOH (XiMiyHnx 3aIINkIB) BiNObiDHO Do BmOR BlaChoro BnPo6HntBa, Ta Oko TexStandard 100, 0o rapaHTye 6e3neHicTb BNKOpNCtAHn HaWnX KOLACOK dIra 3DoopOB' BaWoR O MaIIOka.
BAKJIINBO! ByIb JIACKA, HE BNKOPNCTOBYTE KOJRACKY NONEPEHbO DOCKOHANO HE O3HANOMNBUNCb 3 IHCTPYKUIEIO NO EKCNIYATAUII, TA 3BEPI RAITE II DIA BNPIIeHHRA PI3HOMAHITHNX NITAHb, IIO MOKHTb BHNKHYTN B NODAJIbWOMY. 3AE3NEUYTE BE3NEKY BAWOI DIHTIHN DOTPMYIOUChc BCIX BNMOR NO EKCNIYATAUII DAHOrTOBAPY.
Rkto BInctpykuiBn 3naWnn 0ocb DnBac He 3pozymine, nn BBaxkaTe iHphiopmauio BnKlaeHy B Hi H NOBHOIO, 3BeptaIteCdo npodabua daHoro TObapy.
BybIaCKa, nepeKoHaITeCg, 0c BcXTo MoKe KOpNCTyBaTnCdAHOIO KOJaCKOIO,O3HaHOMLeHi 3 Ooc6lnBOCTAm II fYHKIOHyBaHHa, Ta npabnIam6e3neuHoro BkOpNCtAHH.
Дя 6e3neKn BaWooi dntnHn
3BEPHTb YBARY! -Ipeep BnKOpncTaHnM KOJACKn, nepekoHaTecra, 0o Bci fikcaTopn BiDpeYlboBaHO.
3BEPHTb YBARY! -IpeD BnKOpNCtAHHm, npOBeITb nepBnHHN orJrKaRKn, 0o6 nepekoHaTncra, 0o Bci eJeMeHTn Ta Detani He nowKOJKeHi. B pa3i BnBLeHHaTKNX - He BnKOpNCTOByTe KOLrCKy.
3BEPHTb yBARY! -3aIyHnKHeHH TaPabMyBaHH BaWoI dntHH, nepeKoHaTecra, 0iD yac cKaJaAHHa Ta po3KlaDaHH KOLrCKN, BOHa 3HaXoDntbcn Ha 6e3neuHi Bic Bac BiDcTaHI.
3BEPHTb yBARY- Hikoln He 3aIuwaTe dntnHy B KOJIacci 6e3 HaRJa.
3BEPHTb yBARY! -IpeE, BnKOpncTaHHa M IIOJbKn, npOryJHKOBO 6LOky uN dITyoro abTOKpicna nepekoHaTeC, 0o BOH npaBnJbHO yCTaHOBneHi.
3BEPHTb YBARY! -BnKOpncTaHn KOLaCKn DnI nepeBe3eHHcXoJaMn, a TaKoJNpeBaHTaKeHH MoKyTb npu3BecTn Do II NowKOJKeHH, 0e Bkpa H6e3neuHm dIra BaWooi dntuHn.
3BEPHTb YBARY! -3ynnHraUOu KOLrCKy, nepeKoHaTeC8 B cnpaBHOCTI raIbM. NepeBo3aHn KOJIaCKy, B rpoMaDcbKOmy TpaHCnOPTi, nepeBipTe u63neuHO BOHa CToITb.
3BEPHTb yBAR! -KoJcKa - k npOryJIHKnOBn 6Iok, TaK i IIOJIbKa - Hi B YAKOMy pa3i He MOXe BNKOpNCTOByBaTnCBA KIOCTI KOJNCKN qN LiXKa, BOHa MaE BNIKOpNCTOByBaTnCBAKJIHOHk 3acI6InepeCyBaHH.
3BEPHTb YBAR! - 3a6OpOHReTbcBnKOpHCTaHH KOLJCKN iId Yac 6iry, KaTaHHHa KOB3aHax Ta iH. , TaK Ye MoKe 6yTu BkpaH He6e3neuHIM.
3BEPHTb yBARY! -He Do3BOJnTe DntuHi rpaTnc 6iJa Ta 3 KOJIaCKHO. 3BEPHTb yBARY! -3aBxKn BnKOpNCTOByte peMeHi 6e3neKn.
3BEPHTb YBARY! -He BiwaTe pIOK3aKn, CymKn, Ta iHwi npeMeTn Ha pykcy, cnNkCy 6iHi eIeMeHTN KOJIACKN, Ta k Kc Ue MoKe HeRaTINBHO N03HaunTnca Ha II CTiIKOCTi.
3BEPHTb yBAY! -Dana MoedeJIb KOJIaCKn npN3HaueHa IJn nepeBe3eHHr IJHwe OdHiie dIHTHN.
3BEPHITb yBARY! -HaABHictb Micu Iy InepeBe3eHHa DpyroI dHTnH B daHi MoJeI He nepe6ayHo.
3BEPHTb yBARY! -PpOryJIaHkoBn 6Iok Ta IIOJIbKa He npNCTOCObaHi dJa TpaHCnOpTyBaHHa B aBTOMo6iJI.
3BEPHTb yBARY! -He Do3BOJRAETbcBnKOpNCtAHHr DOoOBnKa npn BiCyTHOCTi KaHOWOHa (e He6e3neKa ydyweHH).PiYac nepe6yBaHHr dHTuHn B KOJAcci He HAKPnBAtu KaIOwOH DooOBnKOM B COHry HOrOy (e He6e3neKa neperepy)
3BEPHTb'YBAty! -TpmaTe KOJrCKy noaI BiD BORHTo Ta iHnXx DkepeI TeIIa.
3BEPHTb yBAY! -HeraHIO 3HIMITb BcIO nIIbKY, IIO MICTNtBCa BYnakOBci, Ta, Hi B JAKOMy pa3i He Do3BOJrTe BaWiI dUTnHi rpaTncs 3 Heo (E He6e3neKa ydyweHHra).
3BEPHTb yBARY! -3a6oPOnHcTBc BnKOpNCtAHN aKceCyapiBa Ta 3anacnX qactnH, 0 He nepe6aueHi Bnp6HnKOM.
3BEPHTb YBARY! -Pn BnKOpncTaHHi KOJIaCKN 3 NOBOPOTHOpyKOIO 36Oky NOBOPOTHO KOleca, nepeKoHaITeC, 10 NOBOPOTHi KOleca 3aΦIKCOBaHl Ha Micci.
Ihctpykciia no ekcnlyatauii
3BEPHTb YBARY! ByTe oBepeKHi npCklaDaHHi Ta po3KladaHHi uaci Ta peryIIOBaHHi cHnHK KoJcKN, Taek icHyE mOBipHicTB nopAHNTn naLbci. CnIDkyte, 06 Ba7a dHTHa npu cboMy nepe6yBala Ha 6e3neuhi biCTahi.
Pozklaaou KolaCky
IiHIMITb pyky 1 Do Tnx nip, nOKn Dba 6iHi (ropn3oHTaJIbHi) fikCaTOpN 2 He 3anpaOIOJB.
CklaaOny KOLycky
Nobephitb nobopoTHy pyky 3 BCEpeDInHy Ta OndHocHO HaTnCHiB Ha TeleckoniuHy pyky Do ynpOy. NobeptaOnu pyky 3,HaTnCHiB YepBOHy KhoNky 21, Ta 3 npHTnCKOM wTOBXHITb pyky 1 nOKn BOHa He BNTaRHeTbcra.
PeryIbObaHa no BnCoti TeleckoniuHa pyka
Pobephi NobopoTHy pykY 3 BcepeDnHy, Ta pyxaIte pykY 1 donokn BOHa He cTaHe B noTpi6He Bam noJooKeHHa, Ta He 3aikcyTbcra 3 06ox 6okib.
3amHa 3aHix Konic
BiDnyctitb ralbma 7. HATNCHITb KONky 4 Ta 3HIMITb KOleco. NOBepHITb KOleco Bnpabo Do ynopy. IpepeKoHaTecra,
UO BcI KOleca HaDiH No 3akpInJIeHi. 3HOBy HATNCHITb KONky 4.
Tobopothi Koleca 3 cHCTeMoIO 6JOKyBaHHa
OnyctiBdoHN3y Baxinb 6IokyBaHHa5, 0o6 3aΦikCyBatn KOleca, kki 6dytb pyxatnc npamo. 106 po36lokyBatn KOleca, nobephitb Baxinb 5B rOpn3oHTaJIbHe noLoXeHHa. Pn Wbnkii XOdb6i Hn nporyJHkax No HepiBHX NOBepxHx MN peKomeHdyEmo 6mexkntn NobopoTHi pyxh, 3aIyHnKHeHH 6LOkyBaHHa KOnic.

3amihanobopothnxKoiic
ДяТOrO,иб 3HЯТКОLECo,HaTnCHiTB KHOнKy,ио 3HaxOДNTbCЯ NOцHTpy KpИshK6,iCTaRHiTbKOleco 3 TrPIMaUa (yTpmyuOoi OCI).IIO6 noCTaBnTu KOleco Ha Micue, BCTaBTe φikcatop B TpIMaU, Ta 3aΦikCyIe,HaTnCHyBUn Ha HbOrO 3 3ycnllm Do BiDnOBiDHoro KlaCaHn.
TalbMa
HaTnCHiB YePBOHy KHOJky ralbM 7, 0o6 BOHn npaIIOBAJI.
3aIIuAIOU KOLrCKy CToaTN, IereHbKO 8TOBXHITb II, 0o6
IpeKoHaTnC, 1O rALbMa npaIIOHTb. IJIr TOrO, 0o6 3HrTn rALbMa,
noTpi6Ho HaTnCHytn 3eJeHy KHOJky 7.
3BEPHTb YBARY! He caJkaIte dntnHy B KOJcKy, Ta He BuMaTe 3 Hei, He nepeKOHaBwncb, IIO KOJcKa CToITb Ha rAbMax.
Perylbobaha cnctema amoptn3auii
IobepHyBn nepemKau 8 B noJokHeHra «TBePdo》/«M'ko» Bn MoKeTe Bn6upaTn dIa ce6e cTyniHb amOptn3aui.
Kanchoon Ta 6amnp
Kanpooh Ta 6amnp MoHa 3Hn HaTncyBn nepemnkau 12. CTabnyn 6amnp Ha micue, nepekoHaItecA, 0o BIn npabNbHO 3aΦikcoBaHH i B Micua 3'EDHaHH He NOTpAnNI TEKCTNbHi eJeMeHTN KoJIaCKn. PIoXeHHa 6amnpa MoKa peryIIOBAtn 3a DOnOMOrO KhoNk 11.
3BEPHITb YBARY! He nepehocte nporyaHKOBn 6JOK, Tpmaoun Joro 3a 6amnpu duyr Ha KaIOHOHI.
BidperyIIOte cnnHky, Bn6paBn 6aXaHn Haxn CndiHn IotarHItb BaKilpeYIIOBaHH 13, 0o 3NaXoNDtbcr No3ady cnDinHn, 0o6 o6patn leKaue qn Cndy neNoLoKeHH.
PeryIIOBaHH niIDHIXKn
Ondohacno HaTnchBwn Dbi YepBOHi KhoNkn 15, NiDiHjKy MoJHa onyctntn DoHn3y. NiDhimaQun ii DorOpn, noLoXeHHa BnCTabJIeTbcra ABTomatnuHO.
TapaHriHe 06cIyROByBaHH He Hadaetbcra
Mn He Hecem BoiNobiaIbHocTi 3a defeKtn BnBLeHi Ha npOdykui, kKi E no3a HauM KOHTpOJeM To6To:
3BnuHn 3HOC npOkyu, Ta DeoekTN, OtpMaHI BhacIIOK HaMipHO BRKOpNCTAH
Biip3y He nomuehi deeKTN / nowkOjKeHH, kI nepepoCTaHb y 6iNb w cyTTcBi ta notpe6yIOBCKnaHOro DOCKOHANO peMOHTy
■ DekeTN, 03Bnnc BHaCNIoHnPaBnBHO BnKOpCTaHH (DnBiTbca IHcTpkyuio no eknnyaTauii)
I Deefektn, 30 3'BNiNCB HAcNIOK HenpaBnHOro MoTAtkY uEcknlyatauii
■ DeΦeKtn, 30 3'ВиИнсьнгддКн HeIb6aIOno BnKOpNCTaHHa YH BiCyTHOCTi TexHiHOrO 6cLyroByBaHHn npOdykii
I Deefektn, 30 3'BnncB Hacniok BHeceHHaMn B KOHcTpyKuio daHO npOykuii
TAPAHITIHIN BUNADOK-TAKHNI
Ipka: 66bepertu waci ipki, noptipno npobodntu noro aHTNKOPo3iHy o6p06ky. Ipote nIyMn ipki MOkytb 3'8BnTnc npn BiCyTHOCTI TexHIORO 6cnyroByBaHH npodykui. B TAKOMy BnnaAky rapaHTiHe 6cnyroByBaHH He HadaeTcb.
Iopnnn: Iopnpnnn OtpmaHbacniok 3Hocy (noctiHoro BnkOpncTahna) npdykTy He e rapaHTiHm BunaKom, i Tomy rapaHTiHe ocbnyrobyaHH He hadaetbcra.
YtBOpENHn nnichn: PnHAMOKaHHI TeKCTNbHNx eIemeHTIB BOHn NOTpe6yIOb rapHOI npocuKN, 0o6 yHKnHyTN YtBOpENHn nnichn (DnBiTbca IHCTpyKciio no ekcnnyataci). YtBOpENHn nnichHBn He e rapaHTiHm BnnaKom, i TOMy rapaHTiHe oClyroByBaHHa He hadaetbc.
BnBtAHN TKAHHN: M nCTBepKJyEMO, 0o Bc TEKCTnJIbHI eIeMeHTN, BNKOpNCaHI Ha Haui npOdykuii, BnROTOBJIeHi 3 DOrpIMAHHm BiNDOBINHX CTADAPTIB. Ane Mn HE BnKNIOUaEMO MOKJIINBICT b BuCItAHH KOBOpIB pni HaMipHomy nepe6yBaHHi Haoo i npOdykuii nd npAmm COHAnHM CBITLOM, YACTOMY ppaHI, KOHTAKTI 3 NOTOM u MHIOUHM 3aco6aMn 76baHbHorO CTnPAHH (OCo6lnBO B Tnx MicxJe 3a KOLIACKy Bepybcry PykAM).Tomy BnCBtAHH TKAHN He E rapaHTIHMM BnAPKom. Be3ymOBHO, KOJbOpn Pi3Hnx NapTi npOdykuii MoKyTB TPOXn BiDpi3HrTnc, Ipote rapaHTIHe 06cIyROByBaHH y TaNX BnNAkax He HadaeTbcra.
YbOpHHa KaTyBaHHa HtKaHHH: PeKomeHdyEmo Bam dOtpmByatnc 3araIbHx npabn DOrIy 3a TkaHHaMn. Hanpknad, 3 wepcTahnx Bnp6ib 3KaTyBaHHa Ierko MoJHa np6paTn 3a Donomoro 3BuaHoi OITKn dIra Odary a60 cneiaIbHorpo npictpoio.
Po3xodkeHHaBIB, po3pNB TkaHHH, HecnpabHicb KhoNOK: NiJ uac nokynn npOdykuii, 6yNb Iacka, yBaXHO nepeBipTe AkiCt b npoWbKn, BiDcYTHicTb po3xodkeHHaBIB Ta cnpabHicb BCix 3acti6ok. Y pa3i BnaBHeHH deΦeKty Takoro nnAhy, BiDpa3y 3BepHtbcra Do BaWo rno npodabua.
Koneca: Ka Koneca Koneca Koneca He 36aHcobahi, II MoKe KndTu (BOHTu B p3Hi 60Kn). 3Hoc uHn H e rapaHtiiHm BunaKom, TAK cAmo J npObTa WHa, YH HeDokayHa, 10 MoKe npN3BecTn Do po3roDyBaHHa Koneckn. B TaKnx BunaKaX rapaHTiHe oClyroByBaHHa He HaDaetbcra.
HA LTO TPE6A 3BEPHYTN YBARY KUYIOUOY KOJRACKY
Ipebeipte, uIOBHCIOYKOMnEeKToBaHa KOLrCKa, Aky Bn 36npaTeCg npu6aTn, uN cnpabHi Bci ii elemEnTu, Ta 3acbiDitb ce niDnncabun dorobip kynibni.
IOPOBNTUYPA3I BUNHKHEHHCKAP
3aTeNefoHyTe Bawomy npoabu,po3KaKtIb npo npo6lemy,ka y Bac BNHKla,ta o6robopitb wJnx II BpiweHHy. YBnAky BnABLeHna Depektib, 10 CTocyOToBCa npuyenHn npabn 6e3neKn, Bam Tpe6a noatn ckapry do BaWo rnoB auprrom 30 dHIB 3 uacy ix BnABLeHH, iHaKwe, ce He 6yde po3raDaTncr k rapaHTiHn BnAdoK. Otpmabw Bawi BnMOrn CTOCOBHO rapaHTIHoro 6cIyROBYBaHH Mn po3raAeMO nTahHn 3MeHWeHH BapTOCTi daHoro npodkTy. Mn 3aBxDi cnpaemoc Ha hwi 3araIbHI npabnTa yMOBn, 3 kIMN Bu MoKeTe O3HaNoMTncB H aWux MaarhHex. Npeed TIm, kB ViDabatn Bawy KOLsKy B peMOHT, nepekoHteCg IO Bci ii elemEnTu ncti. BpyHi KoJIACKn B pEmOHr He npimMaOTbcra.
BKNKOPNCTAHH,DOJLADTATEXHUYEOBCJYROBYAHHH
Kolacka -e, B nepuy epry, 3ac6 dny nepebeesnbaaoi dntnn. Tomy, 3a7n toro, o6 36epertn II B 6e3doraHOMy cahi, BOHa notpe6ye noctiHoro dorgnaTy aTexHHoro 0cCnyroByaHH, BiNobIDHO do IHCTpykii no ekcnnyataui.

VIP GTX / Yes GTX
primeren za otroke od 6 mesecev do 22kg za mlajse od 6 mesecev s primerno nosilno turbo.
Tento vyrobok nie je urcený na beh ani na jazdu na kolieskovych korculiach Či skatebarde.
WADY OBJECTE GWARANCJA
GWARANCJA NIE OBEJMUJE...
BnMaHne! 3aPpeSeHO nCnoIb3OBaHne npHaJNeKHOCTe N CMeHHbIX DeTaeN, He ODo6peHHbIX npOn3BOdnteJIem.
HCTPYKZI NO 3KcJIYATAZNI
BHIMAHHE! PnCknaDbBHaHn npacklaadbBaHnn paMbI KOJIACKN, a TAKKe npu N3MeHeHH NO3UcN CNHNK KOLCKN BO3MOxHO 3aueMJIeHne, YTO MOxET npNBecTn K NOBpeJdeHnM BCJeDCTBNE HeBHmAtelbHoCTn. O6aTeNbHO CLeDHTb 3a TEM, YTO6bI B TAKoI cnTuayuun peBeHOK He HaxOdiNlrc prdom.
PaknaDbVahne KOLAeK
POnHnMnTe pyKy 1 Do TOrO MoMeHTa, noka 3AmOK pyKu 2 C DByx CTOpOH He 3aΦNKcPyHOTcA.
CklaDbIbAHne KOJIaCKn
BnHTOBO 3aunTHbI 3AMOK 3 CneDyET KpyTntB BO BHYtpEHIO CTOPOHY ONDHOpeMeHHBO BIDBnraTb pyky - TeNEcKoN Do 6LOKINPOBKn. DePKeNTe BnHTOB0 3AMOK 3 OTKpbITbIM HAnKMITE Ha KpachHy KOHNkY 21 N BblBnraTe pyky 1, noka OHa He 3a6loKnpyeTcA.
Pyka-Teleckon C BO3MOXHOCTbIO nepectaHOBKN NO Blicote
IIN3MeHHeHnNo3nHnpyKn Heo6xOaHmO KpyTb BpaAouyoc pyky 3 BO BHyTppeHHIO CTOpOH N BbICTabNtB pyky 1 B HJHHyHO No3nHIO DO TOTOMoMeHTa, noka OHa HE 3a6JokpyeTc CDbYx CTOpOH.
ChTne 3aDnX KOIEc
CHIMMTE KOJIACKY CO cTOrHOHOrO TOpMO3a 7. HAKMITE HA KONKY 4 N BbIHbTe KOJECo. BCTaBbTe KOJECo DO yNopa B COOTBeTcByIOUe MEcTO HA OCN. IOKJIyIcTA, O6paTIte BHIMAHHe Ha To, YTO6bl CE KOJeca 6bln IpabINbHO BCTABHeHb, a NOTOM YTONITE KHONKY.
CKlaHOBepxN3aunTHbINXOMyT
Iocne Haxkatna 7bIKOBoro 3AMka 12 BO3MOxHBO BbIHMaHHe cKlaHORO Bepxa IIN 3aUHTHO XOMyTa. Pn3aKpeNleHnn 3aUHTHO XOMyTa o6paTInTe BHIMAHne Ha To, UTo6bl OH CTan Ha CBOe MeCtO n 3aΦHKcnpoBAnc, a TAKKe npOBepbTe, He nonaJI IN B 3aMOK MaTepHaJ. Haxkab HA KONky 11, BO3MOxHIO N3MeHrTB HaKIOH 3aUHTHO XOMyTa.
BHIMAHHE! XOMyT cKlaadHoro Bepxa CnpTnBHO KOLaCKN 3aunTHbI XOMyT He npedHa3NaueHbI dI HooEHNAcTNBHO KOJACKN.
IpepecTabLeHne cnnHKn
PpnoDnmaXOMyT 13, HaxoJusnca Ha o6paTHo cTOpOHe KOJACKn, BO3MOxHO nlaBHOe nepeCTaBHeHne CnHHKn 13 cnJaUero B Jekayee noLoXKeHne.
BHIMAHHE! O6paTte BHIMaHHe Ha To, YTo6bI npn nepeCTabLeHn cnDeHn BaW pe6EHK He nonan MeJy DnKxuMnca TaCTaMn NTO6bI KpEnJIeHne CnIHKn XOPOo W BCTaBnIOcb B na3.
PerynpoBka cnnHKn noBopOt qaun cnDeHbA
PerynpoBouhim pbyarom 13 Ha 3aHHe CnIHKe HAKIOH cINeHb MoKet 6bIb OTperyIpOBaH B Dba 3TaHa - H3 NIOXKeHr CNDB NIOXKeHne leka.
IpepecTaHOBkaIOHOHKN
Pn OJHOBpeMeHHOM HaKaTHN DByX KpaChbIX 3aunTHbIX KHONOK 15 MOKHO NOHOCbIO ONyCTNTb NODHOKKy. Pn NOHaTNI NOHOKKN BbICTABHeHne N03nI INPOCXoDHT ABTOMATueCKN.
PemeHb6e3oNaChocTHBHHMAHHe!
PnucTeHnTe pe6eHka c nOMOuBIO 5-TOueuHbIX pemHei 6e3oNaChocTn 14.
Y6eNTecb, yTO nIeueBbIe JAMKn D BCTaBHeHbI, a peMeHb NIOTHO npneraet. Bbl MoKeTe 3aTHyTb JAMKn NO dJIHe C NOMoUbIO KOHcOB F
N OTPeRyIINPOBaTb 06XBaT NJIeueBOrO INoRCHOrO peMHe, HAKIOHNB npKk Ky G nOTnHyB 3a JeHTy E.
PacCTeHTb pemeh 6e3oNaChocTHn:HaKMnTe Ha o6e KHOKN B ONDHOpeMeHHO N BbIHbTe MaHHTHyO 3aCTeKky A. Pocne 3tOrO MOxH0 JeTko ydaJIHTb HxKHN #KCaTop C.
3acterybpeMeHb6e3onacHocTH:coeHNHTe oba fHKcaTopa Cn yCTaHOBITE MaHHTHyO 3actEKKy A -peMeHb 3actERNaETcABTOMaTHueCKN.
ABTomatnueckaФнкcaиВерхнeчactn
YcTaHOBnTE 6nOK CnDEHb Ha WACCn TaKIM O6pa3OM, YTO6bl ObE BepxHne
yactn KpePJIeHnO kA3aJIncb Ha IpeDyCMOTpeHHbIX JIIN 3TOTO FHKCaTOPax.
PiN HAKATnHa 6nOK CnDEHb 3AMKn 17 aBTOMaTHueCKN 3aKpbIBaOTcC
06Enx CTOpOH.
BHIMAHHE! Ipeed nCnoJb3OBAHHe m y6eHTecb, uTo 6JOK cnHeBa HaJeHHo 3aKpeIeH!
YTO6bl OTKpbIb 3aMKn, HaxMMTe CTONOPHyO KHONKy Ha npaBoi CTOPOHe KnaBnPa36JOKNPOBKn, KOtOpA HaxODNTcH Ha 3aDHei CnIHKe NOBOPOTHO rCnDEHb, a 3aTeM HaxMMTe KNONKy pa36JOKNPOBKn Do ynopa.
Btopo pyKOB 03bMNTecb 3a npedoxpaHntbHyIO cKO6y: Tenepb Bbl MOKeTe CHrTB 6nOK cndeHb.


HCTPYKUNI NO 3KcNJYATAUIN
Bɔзpacʌn Beç pe6eHka
PnppeMOHTe nHcMeHe 3nEMeHTOB KOJIaCKn MaTepuTbIe NOKpbITHa He MeHApOTca.
TapaHTnHbI clyaH nn He?
PxabHnHa: Kopnyc o6pa6oTaH coCTaBOM, npedTbpaauiouM npocecc noBHe Hn pKaBunHbI, OTCyTcBne 06CnyKnBaHHn KOJIaCKN MoKeT npBecTN NOBHeHHIO MeCT, nopAkeHHbIX pKaBHHoH. Ha TAKNE cIyuaH rapaHTna He pacnpocTpaHaretca.
UapannHbI: POBBHeHne 1apanHH He BXoNt B CnyaH, Ha KOTOpbIe pacnpocTpaHReTcra papaHTn, T.K. OHn ABJIHOCTC HOPMaJIbHbIMn npn3HaKaMn n3HOca.
06pa3oBaHne rpn6ka: B clyae ecnn MaTePnA1 KOJcCKn CnIbHO npOMOK, eO Heo6xoJIMO TuaTeNbHO npocuHTb, yTo6blnpedOTBpATNTb o6pa3oBaHne rpn6ka. POnBHeHne rpn6ka He RaJIeTcra pAraHTnHbIM cLyuaem.
BbCBeTahne MaTePnaIaOB: Bce MaTePnaIbI, nCIOJIb3yHOUeNCB HauINx N3DeJIINx, COOTBeCTBYOT TEKUYIM HOpMaM.
BcneCTBnBE 03deNCTBnCOnHe N CInuKOM YactoR O MyTbE He NCKIOeHO BbIcBeTaHne Maepna, N 3TO He ABJETcP npUHNO peKJaMaucn. He3NaHTeNbHO eOtnue MeJy pa3NuHbIM NaCTaMn npOdykTA He Bcerda ydaetc n36ekatb npn pOn3BOODCTBE, No3tOMy TaKne Cnyan TaKxe He ABLIOTc npnuHNo peKJaMaucn.
CkTaBHaHne TkaHN: Cnyaun cKaTbIaHHe TkaHN He OTHocTcK rapaHTnHbIM Clyaam, OHN MOrYt 6bItydaJIeHbI CTaHApTHbIM nCnocobm no yxOdy 3a WepCTraHbIM N CInTeTnueckmM BeuAMn, C NOMoCbIO CneuaJIbHO uETKN IIN MaIHKn.
Pacxoxkdenne wBOB: IoxaIyIcTa, npOBepbTe Wbbl N KONKn npn nOKynn 3denn. B cnyae o6hApyeHn noBpeJdHn WBOB HN KHOK, He3aMeIInTeIbHo 06paTntecb B Maar3Hn, rde 6blno npno6peTeHO 3denn.
Koneca: Tak KAK KOleca Ha KOJrcke He 6aHaHCnpyOTc, BO3MOKeH IerKIn Dnc6bAnaHc. CTePtIe KOleca RaBIAOTc HATypaIbHbIM n3HOCOM. IpOKoJIb B KOlecax MOyT 6bITb Bbl3BaHbI TOnbKO BHeuHm BO3JeNCTBnEM, PO3TOMy BCE 3TN CInyauH He RAJIOTc rapaHTnHbIMn.
Kac cne dyet ce6y BcTn B clyuae peknaaun
He3aMeIInTeBHO coo6uHrE O npOBeMe B cneuaHnIOBaHb MaarH, B KOTOpOM Bbl npO6peN KOJIcKy, PpeCTaBtEnb MaarHa COo6uHT O TOM, KaK DeHCTBOBaTb DaJIbe. Ha HenoJaIKN, CBraaHHbIe C 6e3OnaHocTbO, O KOTOpBX He 6blIO 3aABLeHO B CneuaHn3IOpaOBaHb MaarH B TeueHne 30 DHe C daTbI NOKyKN rapaHTnE He paNpOcTaPAnreTcR.
C npo6hocTmN C83aHHbIMn C o6pa60Ko peKlamauHbIX 3aBHeHn, kacaOuXcra npOyKun Hawei pnpMbI, Bbl MoKeTe O3HaKOMtbcra B UcTaBe HaWero npedpntna.
Ha cIeJyET 6paTb BHMaHne npn NOKynke.
IpoBepbTe ynaKOBky c npno6peTeHHo KOLaCKo Ha HalaUne Bcex Heo6xoJIMbIX 3aunacteH pa6OTocnOco6HoCTb Bcex fYHKuHaJIbHbIX qacTei.
IcnoIb3OBaHne, yXoI n o6cIyXuBaHne.
Kolacka YBlaeTcra CpeDCTBOM TpaHcnpTnpoBKn BaWero pe6eHka, no3Tomy 3a Hei Heo6xOJIMO yXaJNBAb B COOTBeTCTBNN C INHCTpyKuznei NO eKcIpyaTuIN, UTo6bl CoXpaHHTb ee n3HaayalbHOe KaueCTBO.
Pn otnpaBke cIeINTb 3a Tem, yTo6bl KOJIaCKa 6bla YIcTOn. rpa3HbIe KOJIaCKn Ha peMOHT He npHHMaIOTcra.
ΦOPMUYIAP KOHTPOJI IPII NOKYNIKE
MoeJIbTeTcKoKolrKn
UBeT
Даразпокурки
I npOBepnKOMnJIeKTHOcTb DeTcKOJ KOJIaCKN I NOJIHOCTbIO yDOCTOBepnLcra, YTO KOJIaCKa nepeDaHa MHe B NOIHOM KOMnJIeKTe N BCE ee yHKuN DeiCTBYOT B NOHOM Osbeme
I noIyHn IocTaOHTHyIO nHΦopMauio 6 n3dEeINn npHnK CBeDeHNO yKa3aHnNo ee 3KcNpyaTuin
Iopnnscb nokynatela
UtamnpoDabua/npdncb


- Congratulations on your purchase
- For the safety of your child
- Instructions for use
- Unfolding the carriage
- Folding the carriage
- Height-adjustable Telescopic handle
- Changing the rear wheels
- Lock-type-swivel wheels
- Changing the swivel wheels
- Parking brake
- Adjustable suspension system
- Hood and safety bar
- Adjust the back rest to incline the seat frame
- Adjusting the footrest
- Safety harness WARNING!
- Automatic locking of the upper section
- WARNING! Ensure that the seat frame is securely in place before use!
- Suitability for the child
- Checking and care instructions
- Care of the fabric parts
- Care of the chassis
- YEARS WARRANTY
- IN CASE OF WARRANTY CLAIM
- THIS WARRANTY DOES NOT COVER ....
- WARRANTYCLAIM-YESORNO?
- WHAT TO REMEMBER WHEN BUYING YOUR PRAM
- WHAT TO DO IN CASE OF A COMPLAINT
- USE, CARE AND MAINTENANCE
- VIP GTX / Yes GTX
- Lamplighet for barnet
- O CEMU MORATE VODITI RACUNA PRILIKOM KUPNJE
- POSTUPAK KOD REKLAMACJE
- Bitaemo 3 Bdannm npnd6aHnM
- Дя 6e3neKn BaWooi dntnHn
- Ihctpykciia no ekcnlyatauii
- Pozklaaou KolaCky
- CklaaOny KOLycky
- PeryIbObaHa no BnCoti TeleckoniuHa pyka
- 3amHa 3aHix Konic
- Tobopothi Koleca 3 cHCTeMoIO 6JOKyBaHHa
- 3amihanobopothnxKoiic
- TalbMa
- Perylbobaha cnctema amoptn3auii
- Kanchoon Ta 6amnp
- PeryIIOBaHH niIDHIXKn
- TapaHriHe 06cIyROByBaHH He Hadaetbcra
- TAPAHITIHIN BUNADOK-TAKHNI
- HA LTO TPE6A 3BEPHYTN YBARY KUYIOUOY KOJRACKY
- IOPOBNTUYPA3I BUNHKHEHHCKAP
- BKNKOPNCTAHH,DOJLADTATEXHUYEOBCJYROBYAHHH
- WADY OBJECTE GWARANCJA
- GWARANCJA NIE OBEJMUJE...
- HCTPYKZI NO 3KcJIYATAZNI
- PaknaDbVahne KOLAeK
- CklaDbIbAHne KOJIaCKn
- Pyka-Teleckon C BO3MOXHOCTbIO nepectaHOBKN NO Blicote
- ChTne 3aDnX KOIEc
- CKlaHOBepxN3aunTHbINXOMyT
- IpepecTabLeHne cnnHKn
- PerynpoBka cnnHKn noBopOt qaun cnDeHbA
- IpepecTaHOBkaIOHOHKN
- PemeHb6e3oNaChocTHBHHMAHHe!
- ABTomatnueckaФнкcaиВерхнeчactn
- BHIMAHHE! Ipeed nCnoJb3OBAHHe m y6eHTecb, uTo 6JOK cnHeBa HaJeHHo 3aKpeIeH!
- HCTPYKUNI NO 3KcNJYATAUIN
- Bɔзpacʌn Beç pe6eHka
- TapaHTnHbI clyaH nn He?
- Kac cne dyet ce6y BcTn B clyuae peknaaun
- ΦOPMUYIAP KOHTPOJI IPII NOKYNIKE
Brand : HARTAN
Model : Yes GTX
Category : Stroller