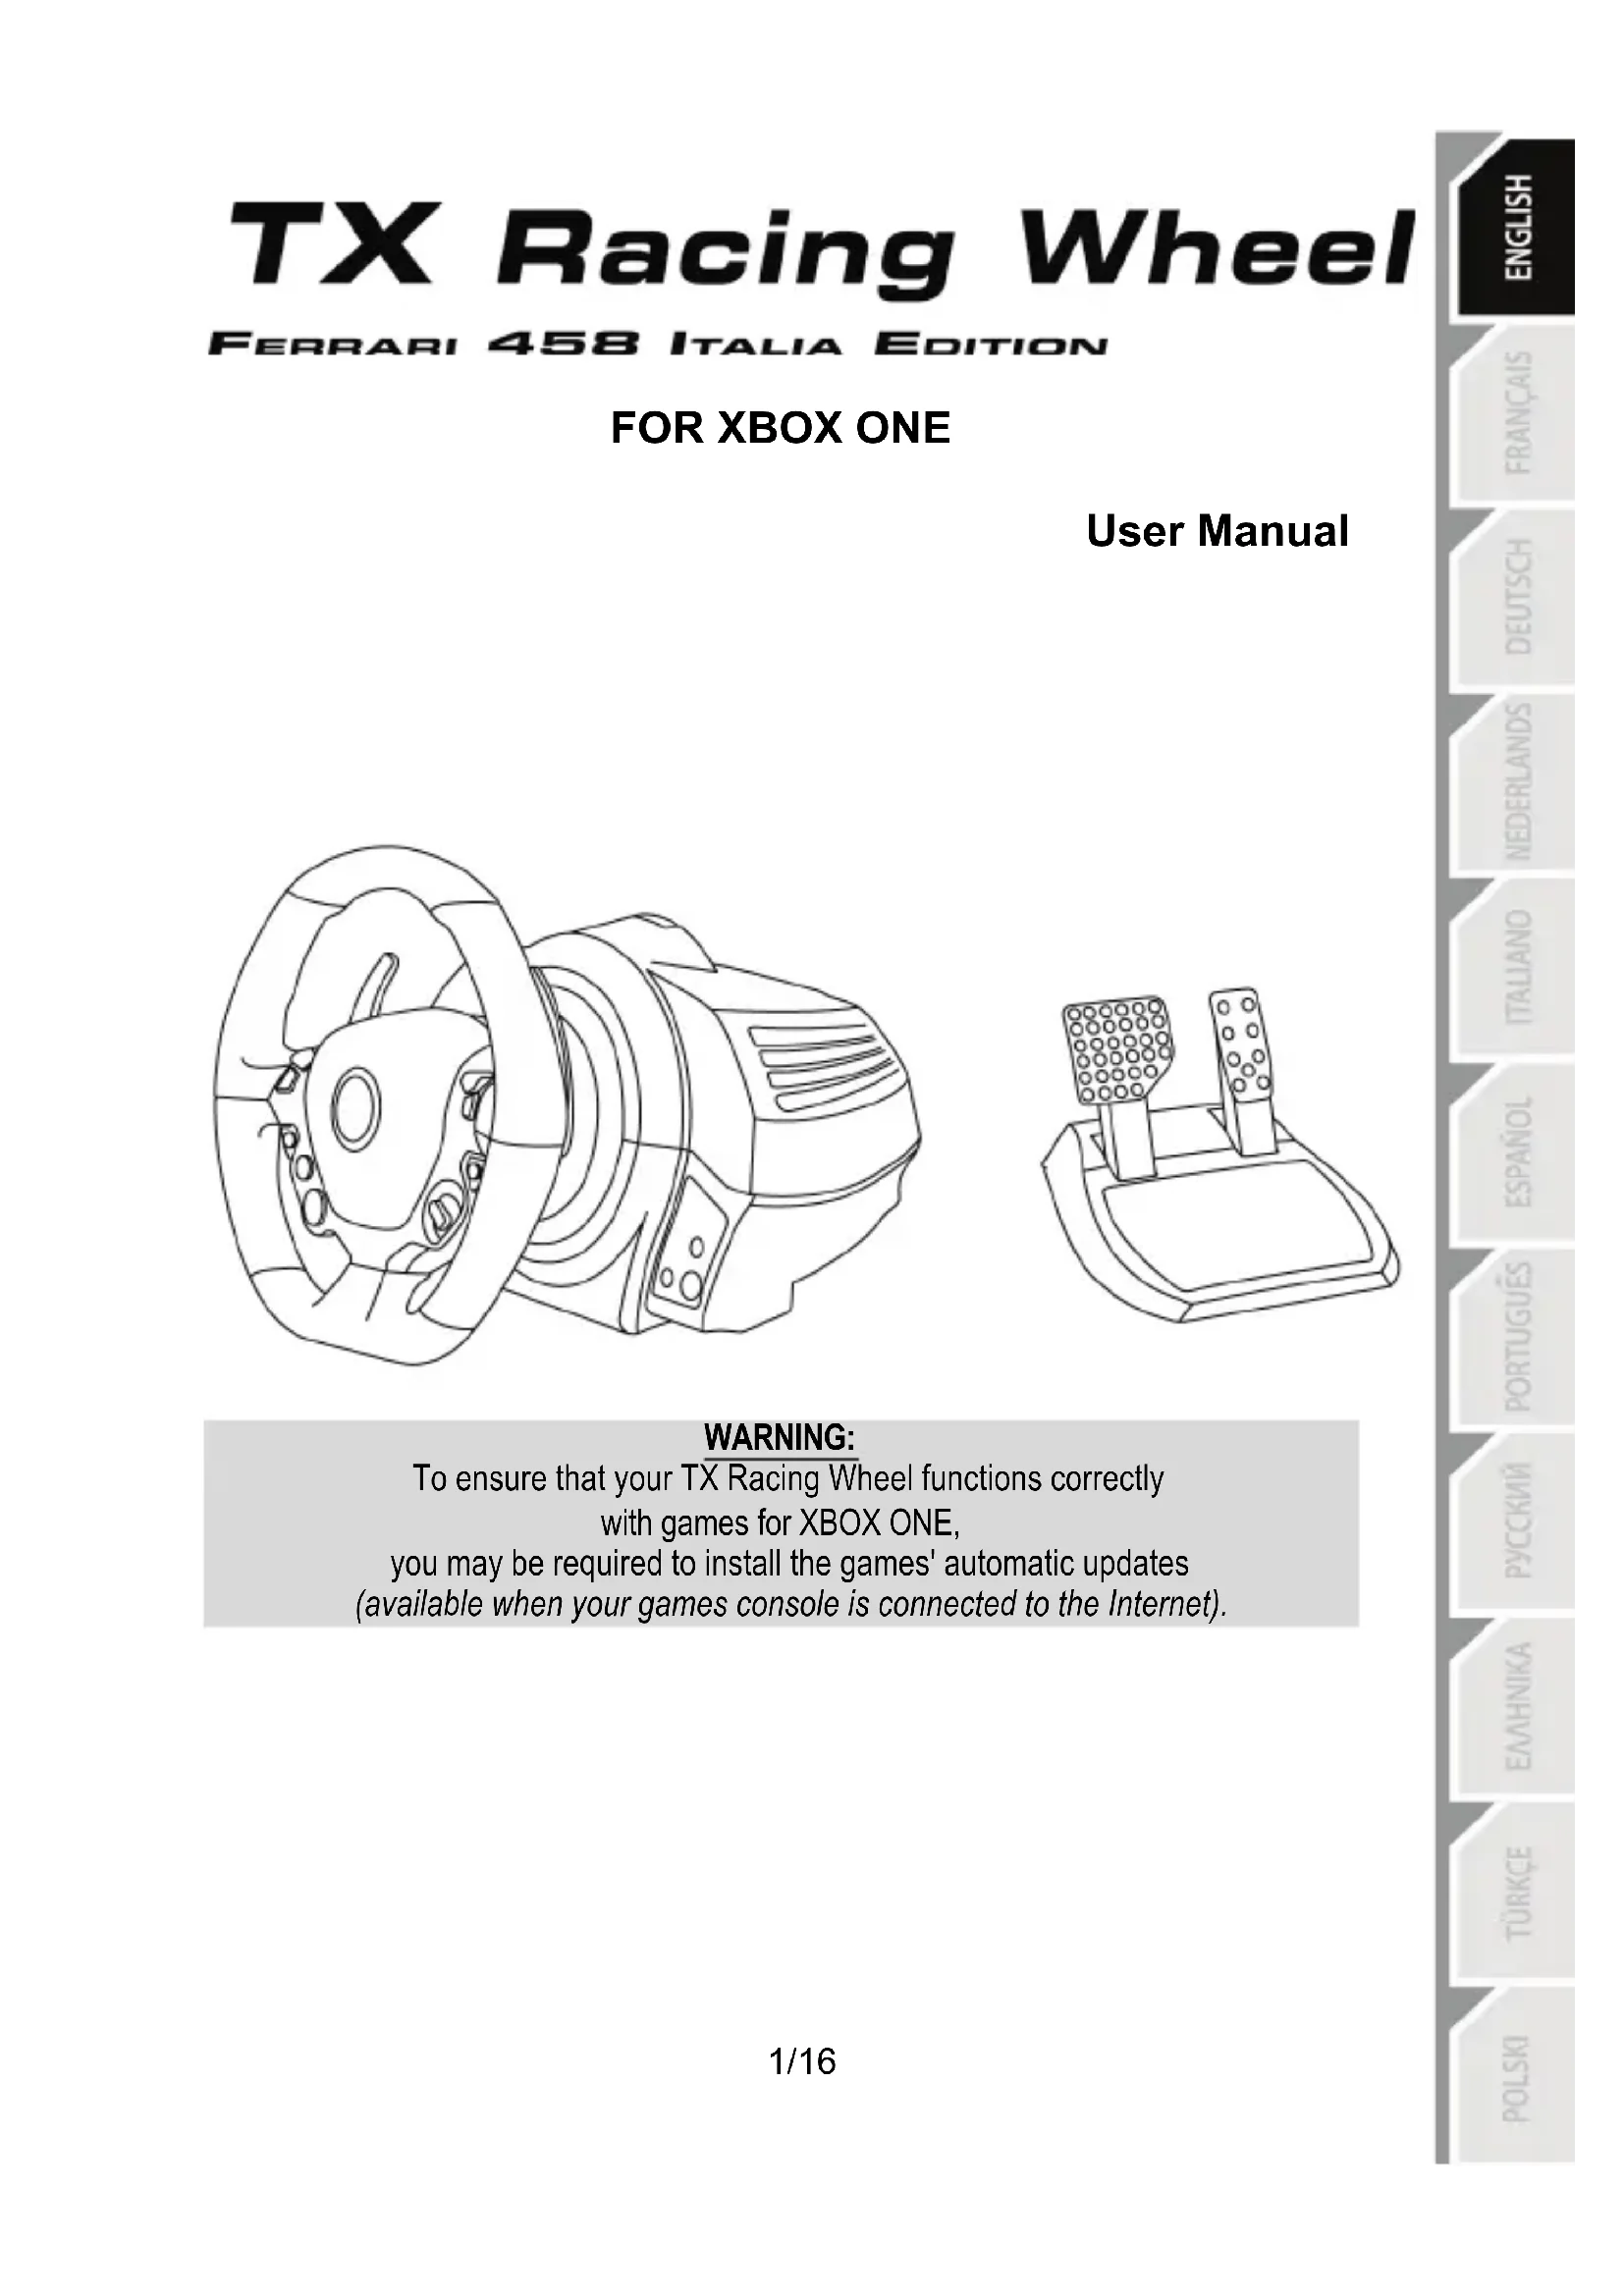
— Video game steering wheel — Mode d'emploi PDF")
TX Ferrari Italia (Xbox One) - Video game steering wheel THRUSTMASTER - Free user manual and instructions
Find the device manual for free TX Ferrari Italia (Xbox One) THRUSTMASTER in PDF.
| Product Type | Video Game Steering Wheel with Force Feedback |
| Brand | Thrustmaster |
| Model | TX Ferrari Italia (Xbox One) |
| Compatibility | Xbox One, PC (via firmware update) |
| Rotation Angle | 900° (auto-calibration) |
| Attachment Technology | Thrustmaster Quick Release (rotating collar) |
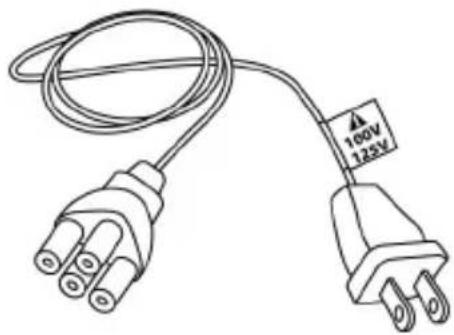
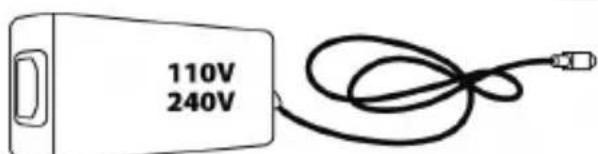
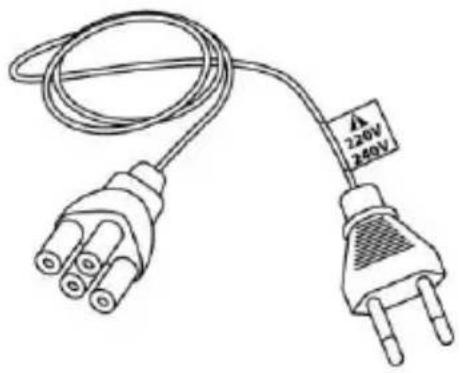
| Power Supply | Internal or external depending on version: 220-240 V (type A) or 100-125 V (type A) or 110-240 V (type B) |
| Connectors | USB (console), pedal set (RJ12), gearbox (future), power supply |
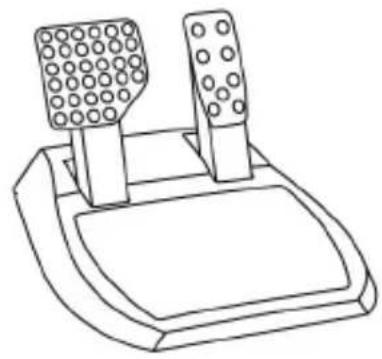
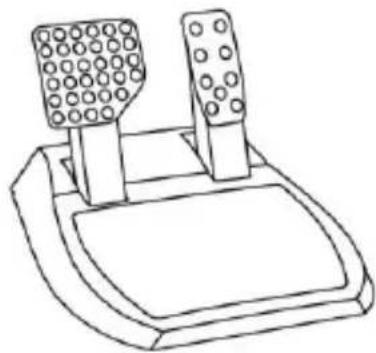
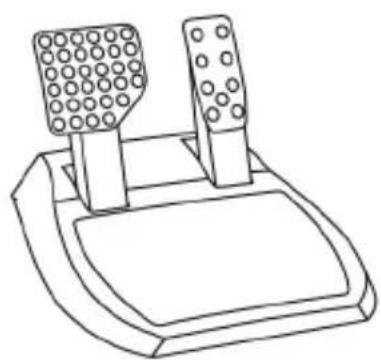
| Included Pedal Set | 2 pedals (accelerator, brake) with invertible mode (long press on MODE) |
| Main Functions | Force feedback, sequential paddles, 2-position manettino, directional pad, MODE button, RGB indicator, Kinect pairing |
| Internal Temperature Sensor | Yes (safety shutdown in case of overheating) |
| Firmware Update | Via PC at support.thrustmaster.com |
| Mounting | On table/desk (clamping screw + fastening system) or on cockpit (M6 screws not included) |
| Maintenance and Cleaning | Dry cloth, avoid dust and humidity, do not obstruct ventilation grilles |
| Safety | Do not open, use only the provided cable, respect voltage, play with shoes on, take breaks, keep out of reach of children |
| Spare Parts and Repairability | No user-serviceable parts; contact technical support for any repairs |
| Weight | Approximately 4-5 kg (estimated, base + wheel) |
| Dimensions (Base) | Approximately 30 x 28 x 20 cm (estimated) |
| Warranty | Minimum 2 years (according to local legislation) |
Frequently Asked Questions - TX Ferrari Italia (Xbox One) THRUSTMASTER
User questions about TX Ferrari Italia (Xbox One) THRUSTMASTER
0 question about this device. Answer the ones you know or ask your own.
Ask a new question about this device
Download the instructions for your Video game steering wheel in PDF format for free! Find your manual TX Ferrari Italia (Xbox One) - THRUSTMASTER and take your electronic device back in hand. On this page are published all the documents necessary for the use of your device. TX Ferrari Italia (Xbox One) by THRUSTMASTER.
USER MANUAL TX Ferrari Italia (Xbox One) THRUSTMASTER
To ensure that your TX Racing Wheel functions correctly
with games for XBOX ONE,
you may be required to install the games' automatic updates
(available when your games console is connected to the Internet).
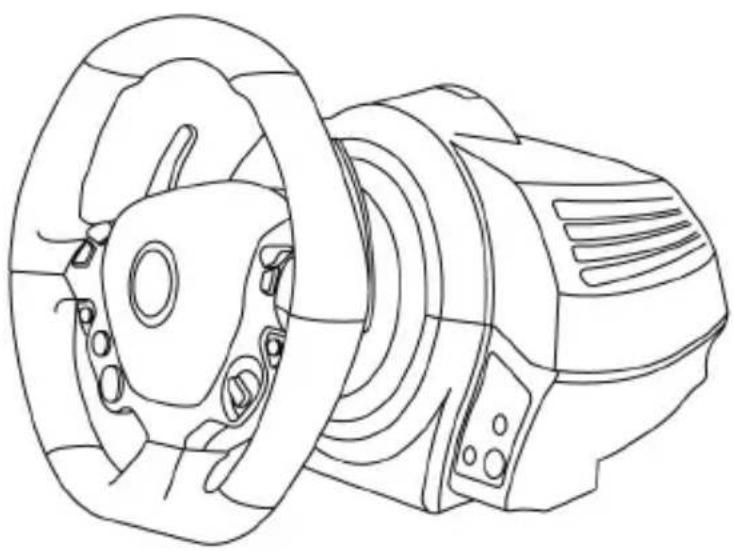
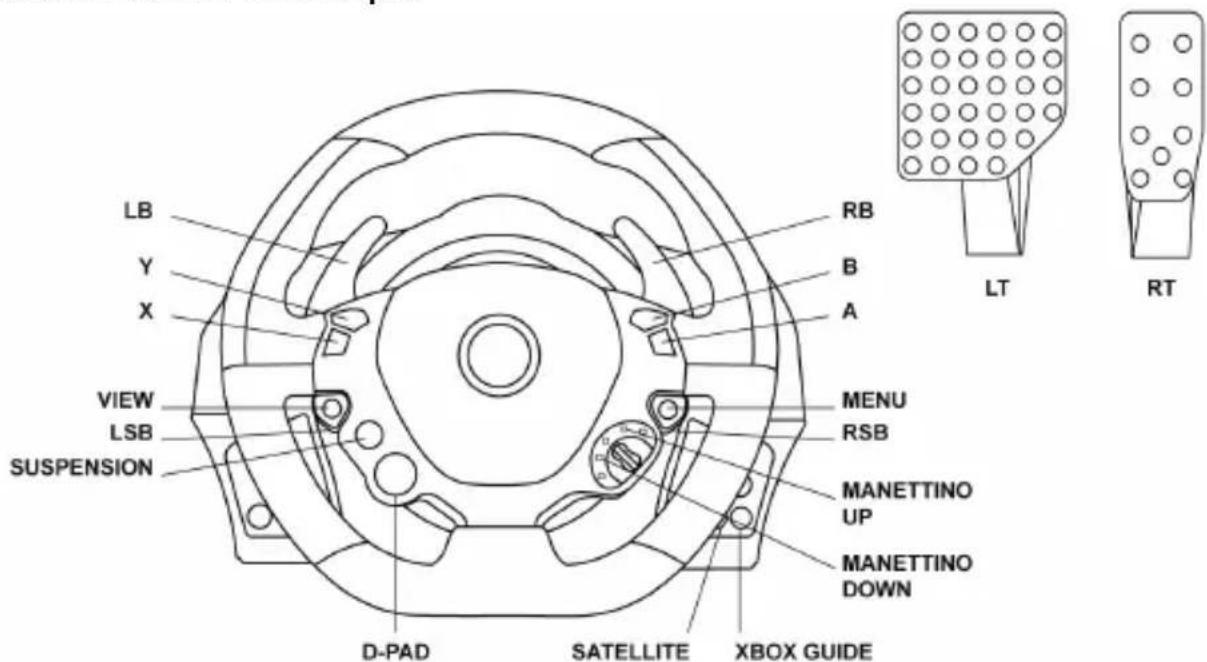
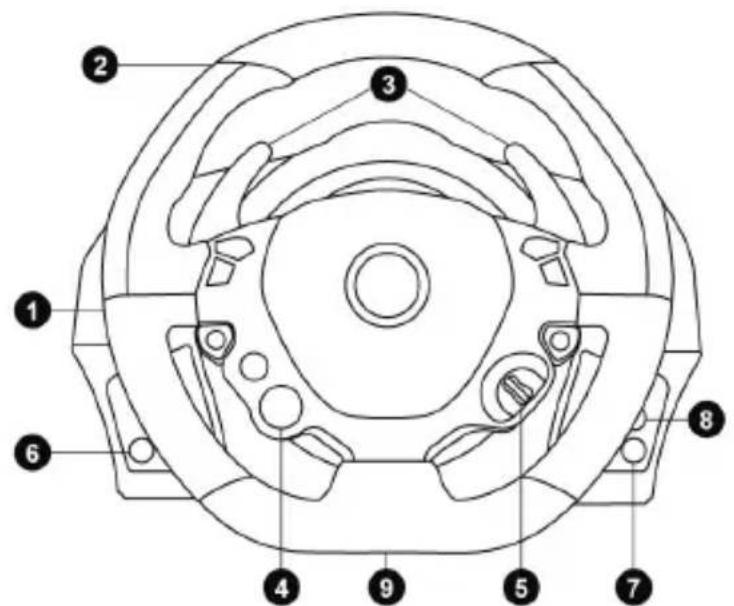
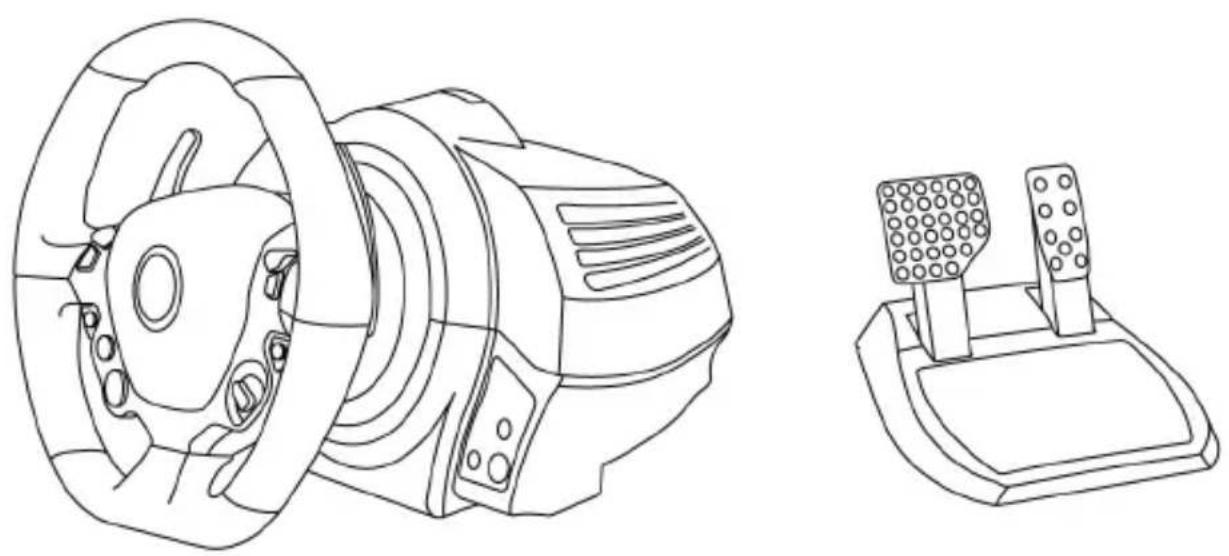
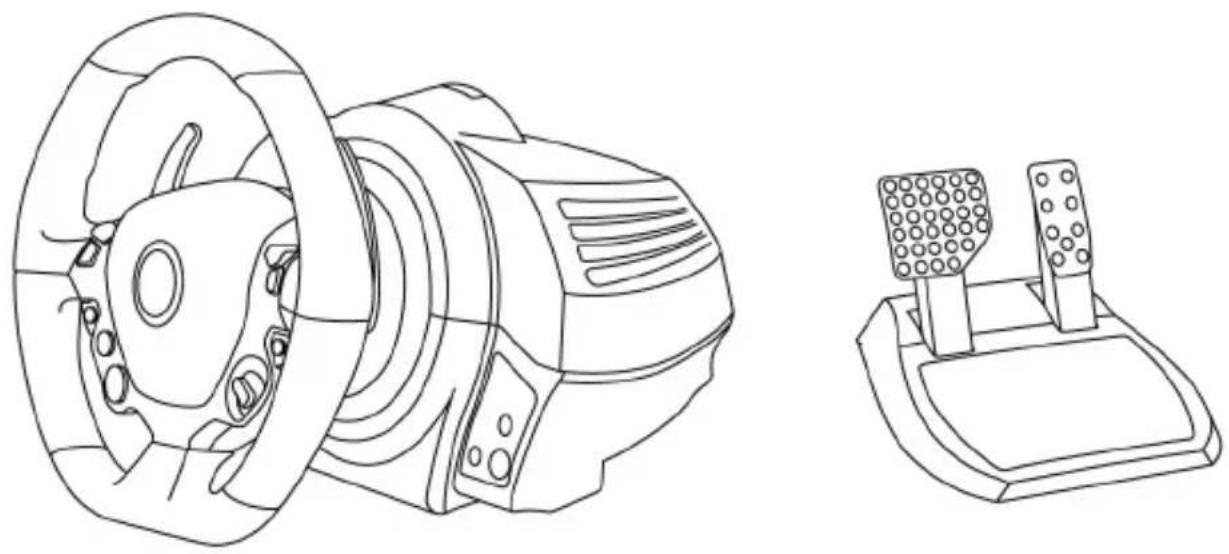
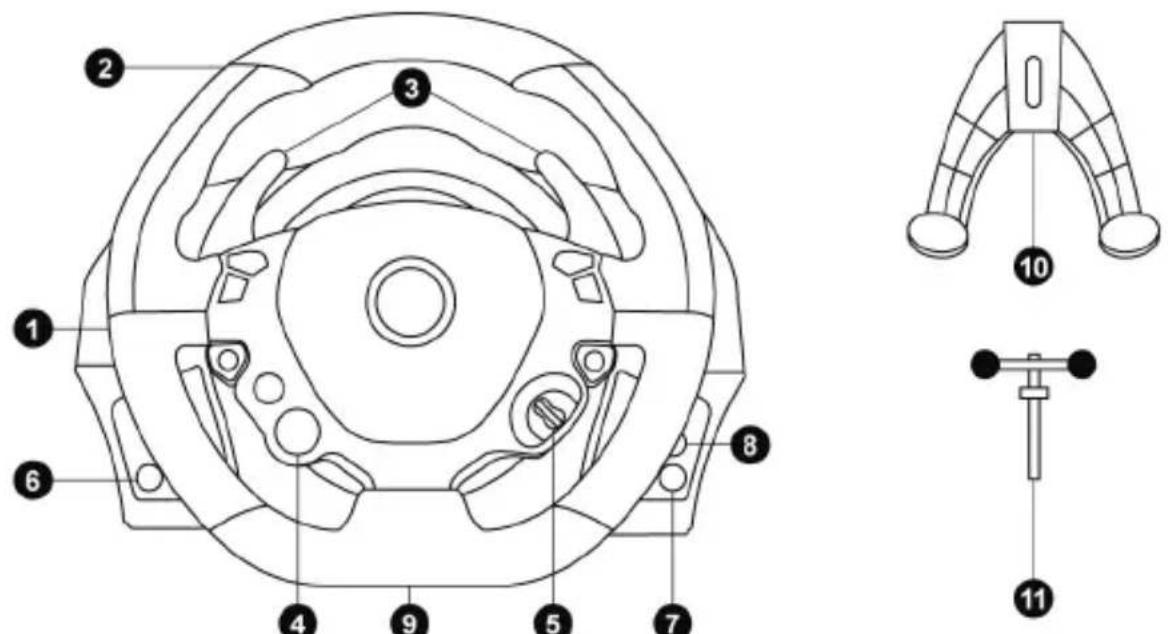
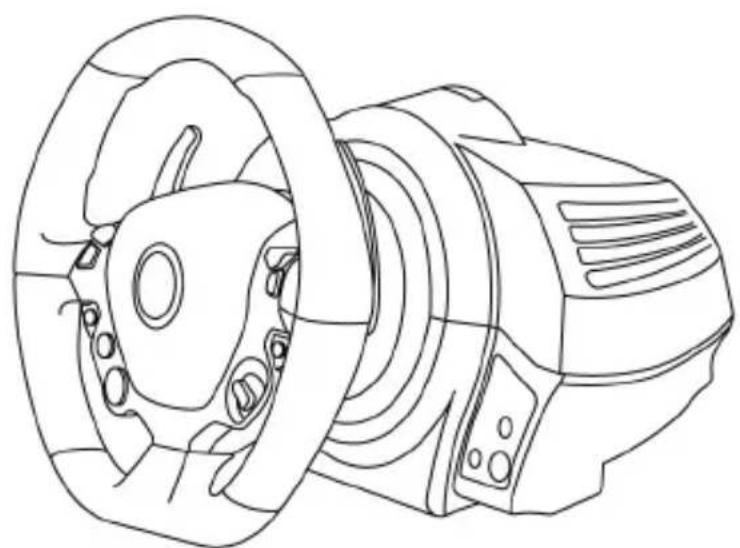
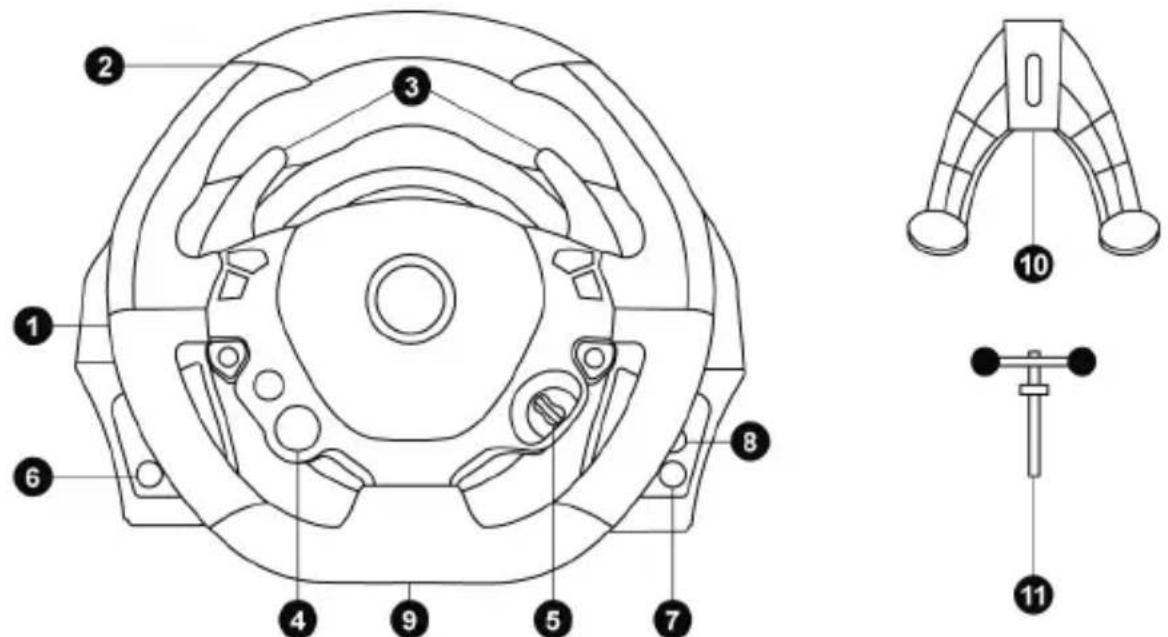
TECHNICAL SPECIFICATIONS

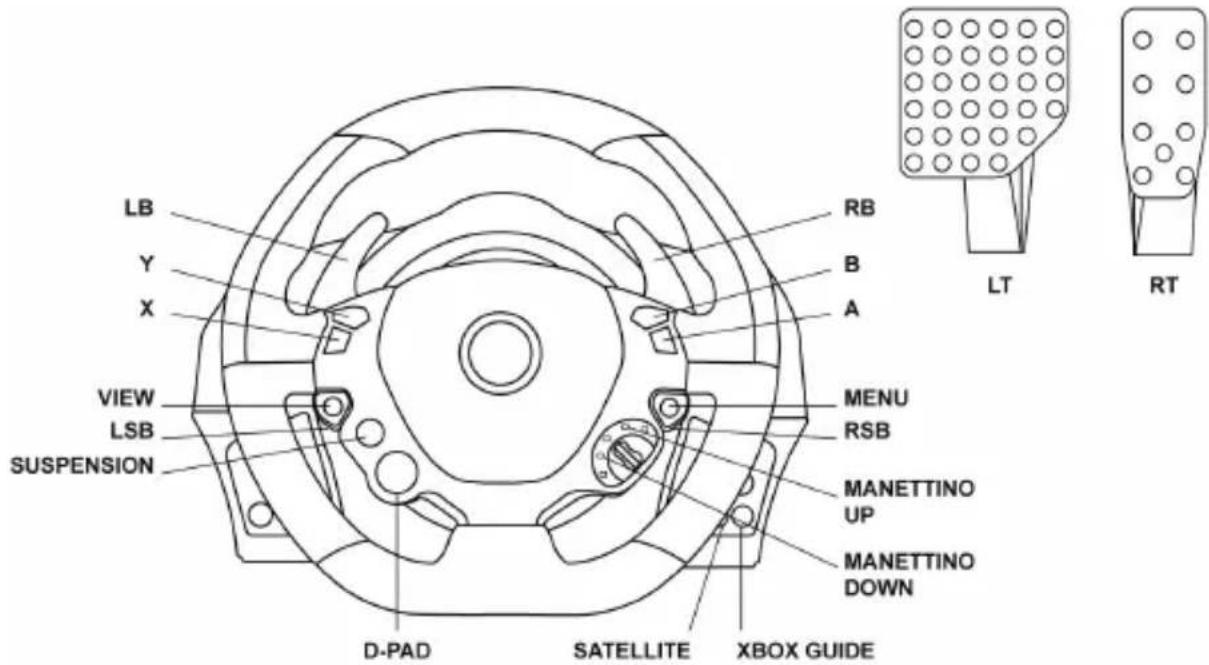
1 Racing wheel base
2 Racing wheel
3 2 sequential gear shift levers (Up & Down)
4 Multidirectional D-Pad (Engine Start)
5 Manettino (2 positions)
6 MODE button + Red/Green indicator light
7 Xbox Guide button
8 White indicator light
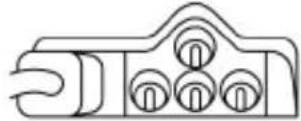
9 Large threaded hole (for attachment system and tightening screw)
10 Attachment system
11 Metal fastening screw

12 Thrustmaster Quick Release
13 Controller pairing (for KinectTM detection)
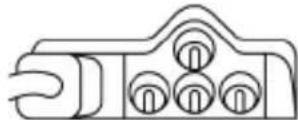
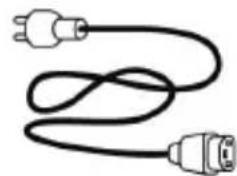
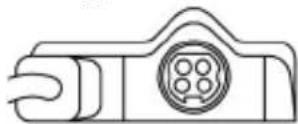
14 Mains supply connector (type A or B) (Varies from one country to another)
15 Racing wheel USB cable and connector
16 Gearbox connector (sold separately, forthcoming release)
17 Pedal set connector
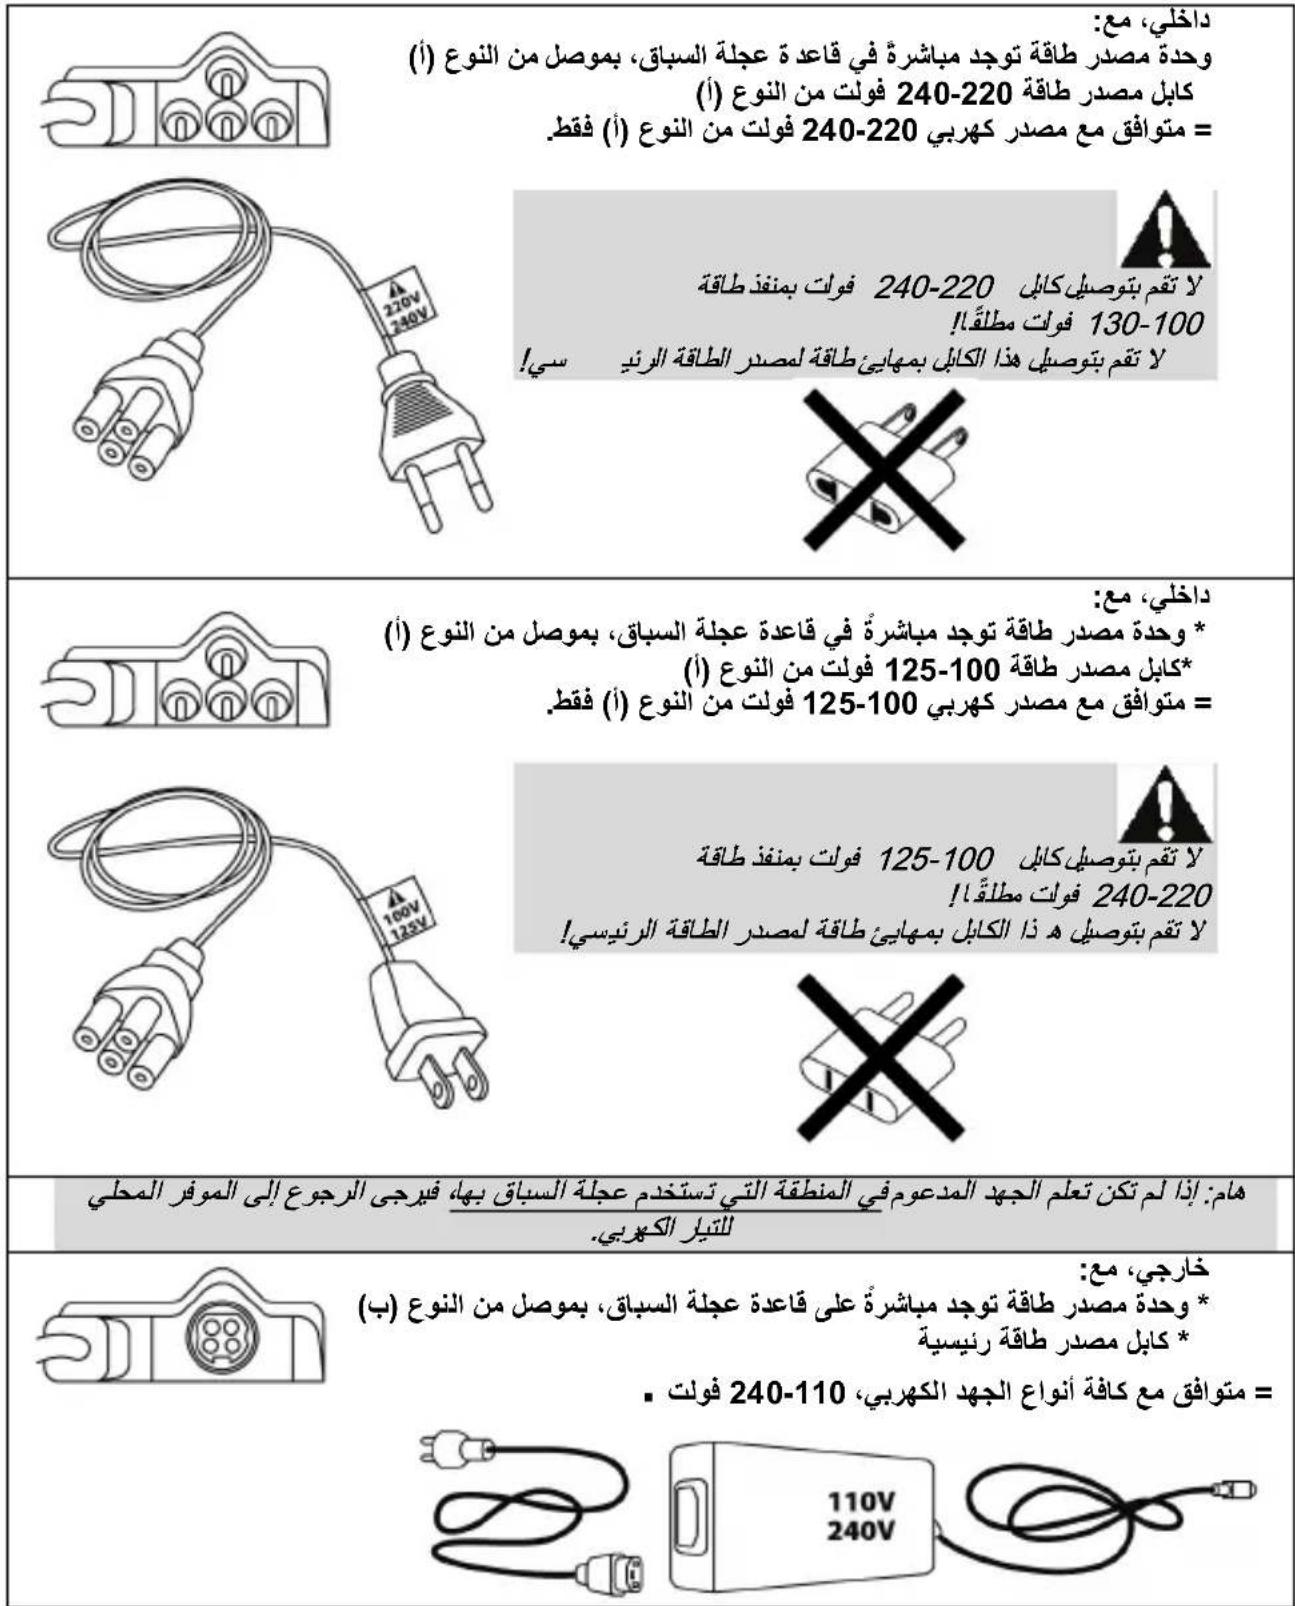
CONNECTING THE RACING WHEEL TO THE MAINS = PLEASE READ BEFORE PROCEEDING!
Your racing wheel's power supply varies according to the country where you purchased your device.
The mains supply can be:
Internal, with:
* A power supply unit located directly inside the racing wheel's base, with a type A connector
^ A 220-240V mains power supply cable
= compatible only with a 220-240V electrical supply.

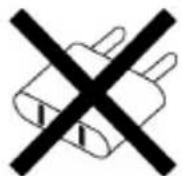
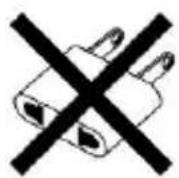
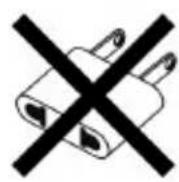
Never connect the 220-240V cable
to a 100-130V power outlet!
Never connect this cable to a mains power adapter!
Internal, with:
* A power supply unit located directly inside the racing wheel's base, with a type A connector
^* A 100-125V power supply cable
= compatible only with a 100-125V electrical supply.
Never connect the 100-125V cable
to a 220-240V power outlet!
Never connect this cable to a mains power adapter!
IMPORTANT: if you do not know which voltage is supplied in the area in which you are using your racing wheel, please refer to your local electricity supplier.
External, with:
- An external power supply unit located on the racing wheel's base, with a type B connector
- A mains power supply cable
= compatible with all supply voltages, 110-240V.
WARNING
Before you use this product, please read this documentation carefully and keep it safe should you need to consult it later.

Warning - Electric shock
- Store the product in a dry location and do not expose it to dust or sunlight.
- Respect the connection direction.
- Do not twist or pull the connectors and cables.
- Do not spill any liquid on the product or its connectors.
- Do not short-circuit the product.
- Never dismantle the product; do not throw it onto a fire and do not expose it to high temperatures.
- Do not use a power supply cable other than the one provided with your racing wheel.
- Do not use the mains power supply cable if the cable or the connectors are damaged, split or broken.
- Make sure that the mains power cable is properly inserted into the power outlet and the connector located on the rear face of the racing wheel's base.
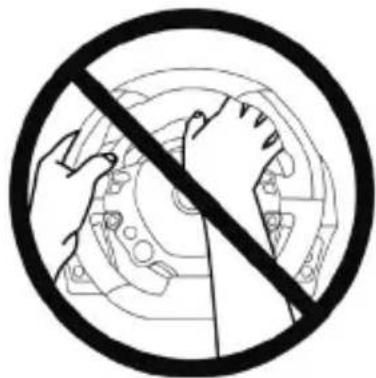
- Do not open. No user replaceable parts inside. Refer servicing to manufacturer, specified agency or qualified technician.
- Only use attachments/accessories specified by the manufacturer.
- If the steering wheel is operating unusually (if it is emitting any abnormal sounds, heat or odors), stop using it immediately, disconnect the power cable from the socket and disconnect the other cables.
- If you are not going to be using the steering wheel for an extended period, disconnect the mains adaptor from the wall socket.
- The electrical outlet must be located near the equipment and must be easily accessible.

Air vents
Make sure that you do not block any of the air vents on the steering wheel base. For optimum ventilation, respect the points below:
- Position the base at least 10 cm away from any wall surfaces.
- Do not place the base in any tight spaces.
- Do not cover the base.
- Do not let any dust build up on the air vents.

For safety reasons, never use the pedal set with bare feet or while wearing only socks on your feet.
THRUSTMASTER © DISCLAIMS ALL RESPONSIBILITY IN THE EVENT OF INJURY RESULTING FROM USE OF THE PEDAL SET WITHOUT SHOES.

Warning - Injuries due to force feedback and repeated movements
Playing with a force-feedback steering wheel may cause muscle or joint pain. To avoid any problems:
- Avoid lengthy gaming periods.
- Take 10 to 15 minute breaks after each hour of play.
- If you feel any fatigue or pain in your hands, wrists, arms, feet or legs, stop playing and rest for a few hours before you start playing again.

Warning - Injuries due to force feedback and repeated movements (suite)
- If the symptoms or pain indicated above persist when you start playing again, stop playing and consult your doctor.
- Keep out of children's reach.
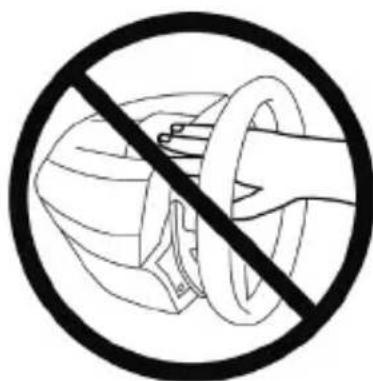
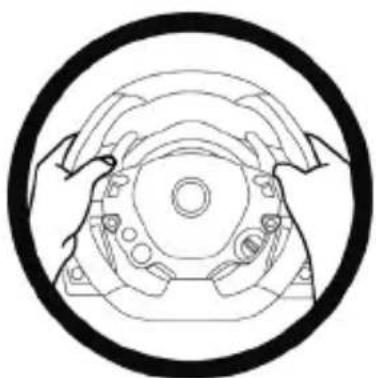
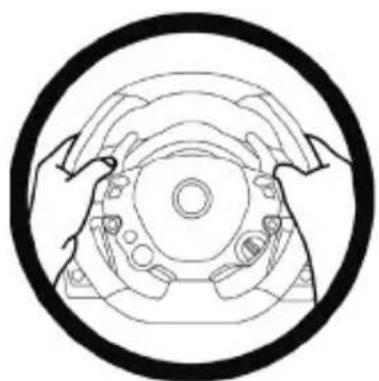
- During games, always leave both hands correctly positioned on the steering wheel without letting it go completely.
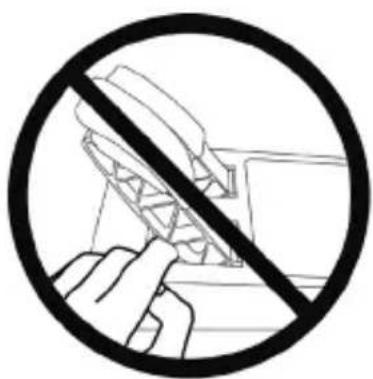
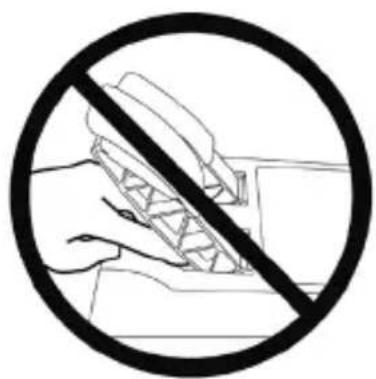
- During gameplay, never place your hands or your fingers under the pedals or anywhere near the pedal set.
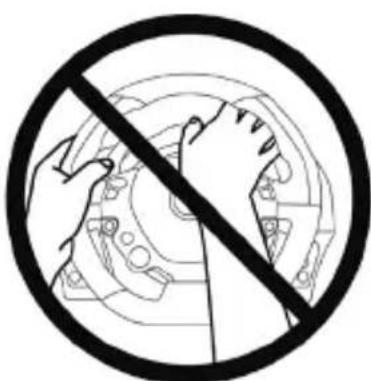
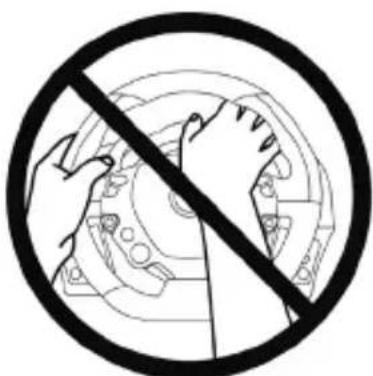
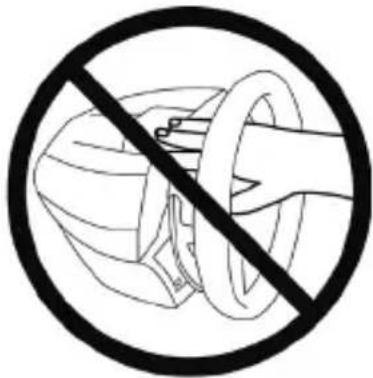
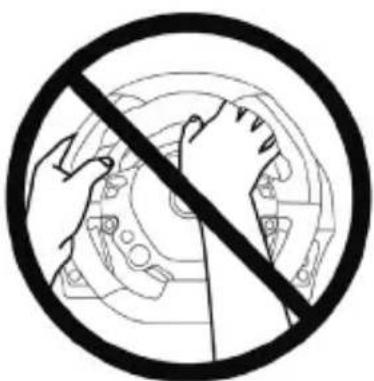
- During calibration and gameplay, never place your hand or your arm through the openings in the racing wheel.
- Check the steering wheel base is carefully clamped as per manual's instructions.

HEAVY PRODUCT
To be handled only by users 16 years of age or older

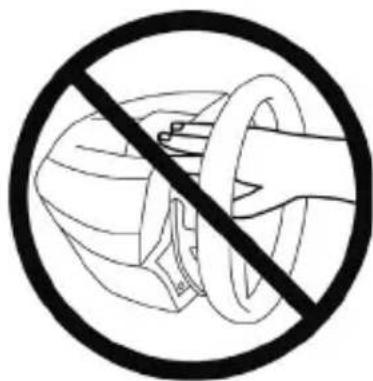
Be careful not to drop the product on yourself or on anyone else!
ALWAYS NEVER NEVER

Warning - Pedal set pinch hazard when playing
- Keep the pedal set out of children's reach.
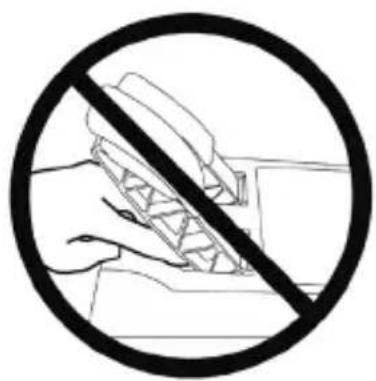
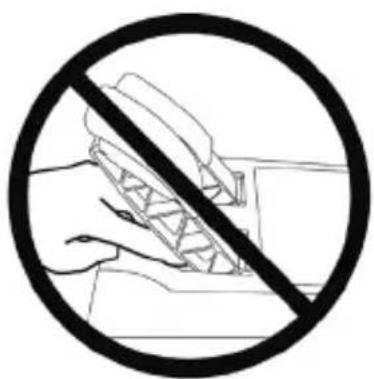
- When playing, never place your fingers on or anywhere near the sides of the pedals.
- When playing, never leave your fingers on or anywhere near the pedals' rear base.
- When playing, never place your fingers on or anywhere near the pedals' front base.
NEVER NEVER NEVER


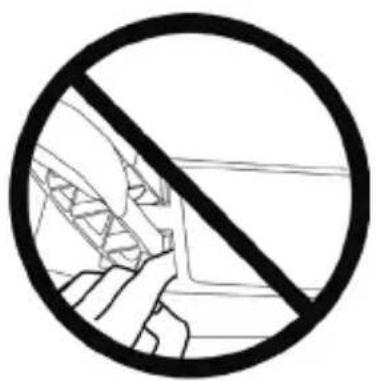
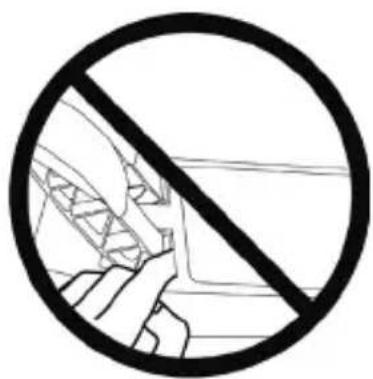
Warning - Pedal set pinch hazard when not playing
- Store the pedal set in a safe place, and keep it out of children's reach.
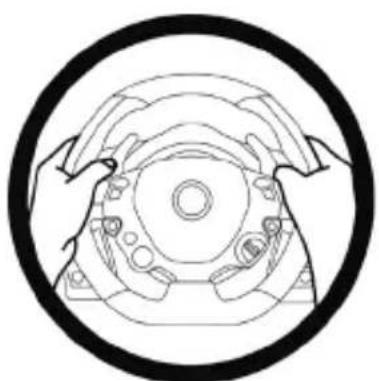
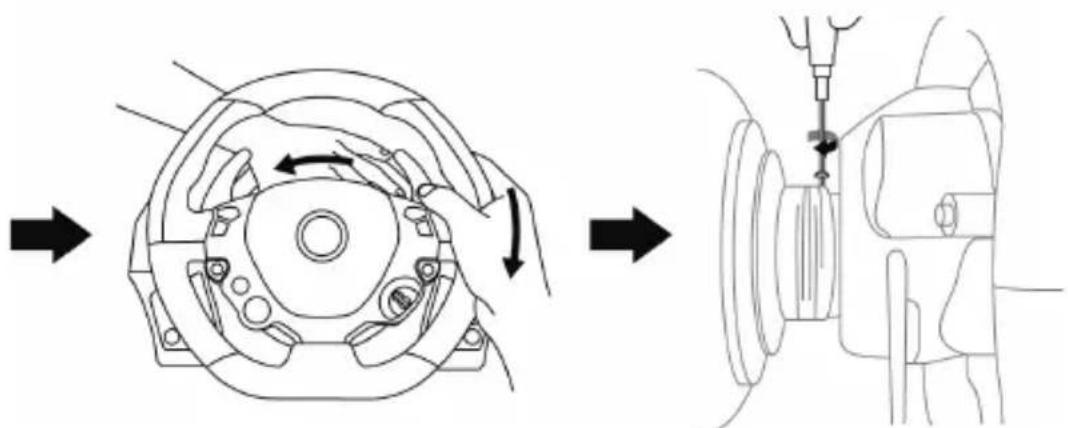
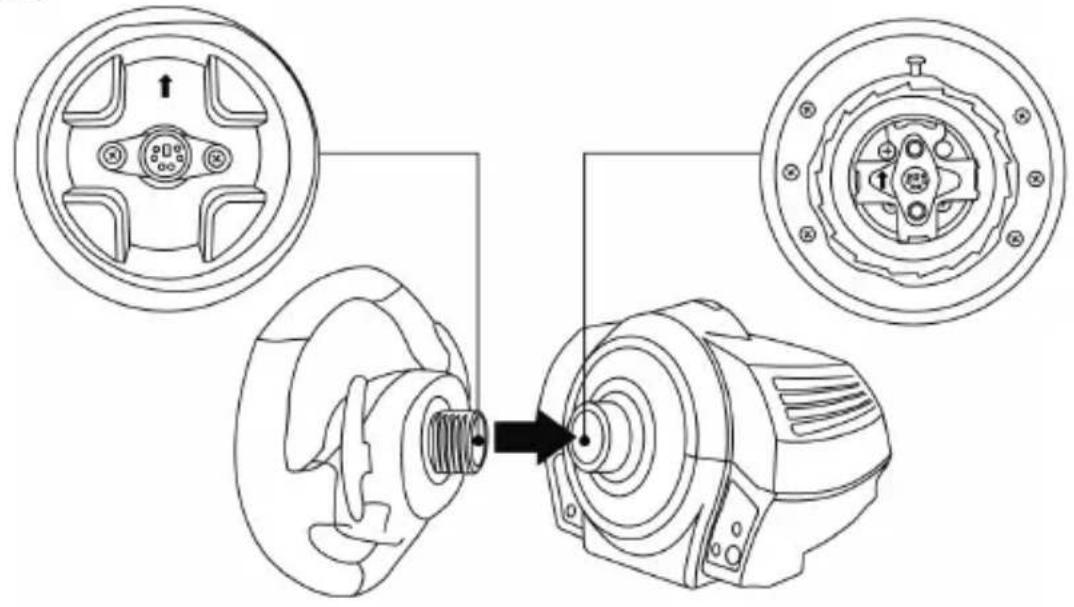
ATTACHING THE FERRARI 458 ITALIA RACING WHEEL TO ITS BASE
Align the connector locations using the arrows:
Base (1) connector: Arrow pointing upwards
Racing wheel (2) connector: Arrow pointing upwards
Once the connectors are correctly positioned, simply rotate the Thrustmaster Quick Release (12) device's ring counterclockwise, while holding the racing wheel (2) in position.
Then, tighten the ring as much as you can; to do so, hold the ring in position and rotate the racing wheel clockwise.
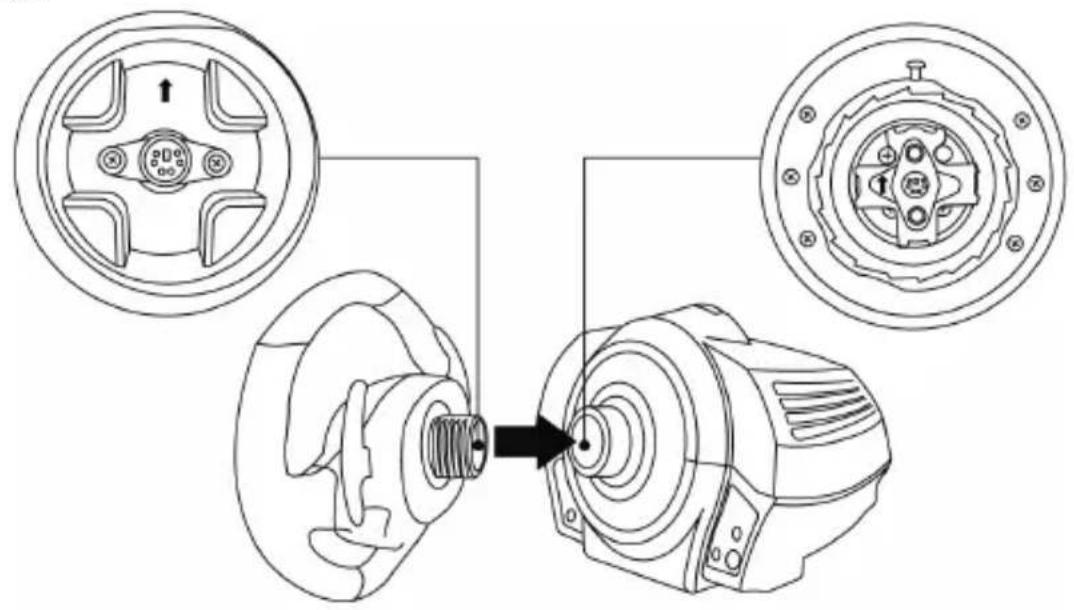

Once you have installed the FERRARI 458 ITALIA racing wheel, rotate it 180^ (when facing the wheel, the FERRARI logo should be upside down) to access the small attachment screw located on the Thrustmaster Quick Release (12) device. Use a large cross-slot screwdriver to tighten the small attachment screw (do not use excessive force), turning it clockwise.

Do not use excessive force when screwing the small attachment screw (using a cross-slot screwdriver)!
Stop turning the screw as soon as you feel some resistance.
ATTACHING THE RACING WHEEL
Attaching the racing wheel to a table or a desktop
- Place the racing wheel on a table or any other horizontal, flat and stable surface.
- Insert the fastening screw (11) in the attachment system (10), then tighten the device by turning the screw counterclockwise, so that it feeds into the large threaded hole (9) located beneath the racing wheel, until the device is perfectly stable.

ALWAYS NEVER

WARNING: Never tighten the screw alone, without the attachment system! (This could damage the racing wheel).
| ATTACHMENT / REMOVAL | DIRECTION |
| To tighten: Turn the screw counterclockwise | |
| To release: Turn the screw clockwise |
| POLSKI | TÜRKIKE | EMAHNIKA | PYCCKMI | PORTUGUES | ESPÁNOL | ITALIANO | NEDERLANDS | DEUTSCH | FRANZGIAS |
Attaching the racing wheel's base to a cockpit
-
Place the racing wheel's base on the cockpit shelf.
-
Drive two M6 screws (not included) through the cockpit shelf, then feed them into the two small threaded holes located beneath the racing wheel.
Important: The length of the M6 screws should not exceed the thickness of the shelf + 12 mm; longer screws could cause damage to internal components located in the racing wheel's base.
- If required, tighten the standard attachment system by inserting the fastening screw in the large threaded hole.
Attaching the pedal set to a cockpit
-
Attach the pedal set using the small threaded holes located beneath it.
-
Drive two M6 screws (not included) through the cockpit shelf, then feed them into the two small threaded holes located beneath the pedal set.
Important: The length of the M6 screws should not exceed the thickness of the shelf +10 mm; longer screws could cause damage to internal components located in the pedal set.
MAPPING

At product launch on Xbox One, different action buttons on the wheel will have identical features in the game.
In the near future, automatically updating your games (automatic updates will be available if your console is connected to the Internet) and updating your racing wheel's firmware will enable you to remove these duplicate features and increase the number of individual buttons.
UPGRADING YOUR RACING WHEEL'S FIRMWARE
The firmware included in your racing wheel's base can be upgraded to a more recent version featuring product enhancements.
To display the firmware version that your racing wheel is currently using and update it if required: on PC, visit http://support.thrustmaster.com. Click Racing Wheels / TX Racing Wheel, then select Firmware and follow the instructions describing the download and installation procedure.
SETTING UP THE RACING WHEEL FOR THE XBOX ONE
- Connect the pedal set to the connector (17) located at the back of the racing wheel's base.
- Connect the power supply cable to the connector (14) located at the back of the racing wheel's base.
- Connect the power supply cable to a mains outlet with proper voltage specifications.

For more information about this, please refer to the CONNECTING THE RACING
WHEEL TO THE MAINS section, on page 3 in this manual.
- Connect the racing wheel's USB connector (15) to one of the console's USB ports.
You are now ready to race!
AUTOMATIC RACING WHEEL AND PEDAL SET CALIBRATION
The racing wheel automatically self-calibrates when you connect the racing wheel to the mains and the racing wheel's USB connector to the console.
During this phase, the racing wheel will rotate quickly towards the left and the right, covering a 900 degree angle, before stopping at the center.

WARNING:
Never touch the racing wheel during the self-calibration phase!
(This could cause an incorrect calibration and/or personal injuries).
AUTOMATIC CALIBRATION OF THE PEDAL SET
Never connect the pedal set to the racing wheel's base (or disconnect it from the base) when it is connected to the console or during gameplay (this could cause incorrect calibration).
Always connect the pedal set before connecting the racing wheel to the console.
Once the racing wheel's calibration is done and the game has been launched, the pedals are automatically calibrated after a few presses.

WARNING:
Never press the pedals
during the racing wheel's self-calibration phase or while a game is loading!
(This could cause incorrect calibration)
If your racing wheel and pedal set do not operate correctly, or if calibration seems incorrect: Turn off your console, disconnect your racing wheel entirely, reconnect all cables (using the mains power supply cable and pedal set), then restart your console and your game.
CONTROLLER PAIRING (13)
To ensure correct detection of your racing wheel, the device's controller pairing (located on the upper section of the racing wheel's base) must always remain in the KINECT™ camera's field of vision.

INTERNAL TEMPERATURE SENSOR
For safety reasons, the racing wheel's base features a temperature sensor. If the device's temperature becomes too high, your racing wheel can shut down suddenly. In this event:
- Unplug the mains power supply cable and the device's USB connector.
- Wait for the racing wheel's base to cool down entirely.
- Then, reconnect the device.
MODE BUTTON AND INDICATOR LIGHT (6)
MODE button for the pedal set
The pedal set included with the TX Racing Wheel features 2 pedals.
When using this pedal set, make sure that the indicator light remains red, or the accelerator pedal will not function correctly.
The TX Racing Wheel is also compatible with Thrustmaster pedal sets featuring 3 pedals (sold separately; forthcoming release); these enable you to electronically swap the accelerator and clutch pedals.
To do so, simply press the MODE button (6) for 2 seconds.
The racing wheel's internal memory stores whether the pedals have been swapped around or not.
| ACCELERATOR AND CLUTCH PEDALS | Color of the MODE indicator light (6) |
| NORMAL | RED |
| SWAPPED AROUND | GREEN |
Other hints for the MODE button
To learn more about the MODE button and indicator light, please visit http://support.thrustmaster.com. Click Racing Wheels / TX Racing Wheel, and then select Manual or FAQ.
HELP FILES AND FAQs (not stated in this manual)
Please visit http://support.thrustmaster.com. Click Racing Wheels / TX Racing Wheel, and then select Manual or FAQ.
CONSUMER WARRANTY INFORMATION
Worldwide, Guillemot Corporation S.A., whose registered office is located at Place du Granier, B.P. 97143, 35571 Chantepie, France (hereinafter "Guillemot") warrants to the consumer that this Thrustmaster product shall be free from defects in materials and workmanship, for a warranty period which corresponds to the time limit to bring an action for conformity with respect to this product. In the countries of the European Union, this corresponds to a period of two (2) years from delivery of the Thrustmaster product. In other countries, the warranty period corresponds to the time limit to bring an action for conformity with respect to the Thrustmaster product according to applicable laws of the country in which the consumer was domiciled on the date of purchase of the Thrustmaster product (if no such action exists in the corresponding country, then the warranty period shall be one (1) year from the original date of purchase of the Thrustmaster product).
Notwithstanding the above, rechargeable batteries are covered by a warranty period of six (6) months from the date of original purchase.
Should the product appear to be defective during the warranty period, immediately contact Technical Support, who will indicate the procedure to follow. If the defect is confirmed, the product must be returned to its place of purchase (or any other location indicated by Technical Support).
Within the context of this warranty, the consumer's defective product shall, at Technical Support's option, be either replaced or returned to working order. If, during the warranty period, the Thrustmaster product is subject to such reconditioning, any period of at least seven (7) days during which the product is out of use shall be added to the remaining warranty period (this period runs from the date of the consumer's request for intervention or from the date on which the product in question is made available for reconditioning, if the date on which the product is made available for reconditioning is subsequent to the date of the request for intervention). If permitted under applicable law, the full liability of Guillemot and its subsidiaries (including for consequential damages) is limited to the return to working order or the replacement of the Thrustmaster product. If permitted under applicable law, Guillemot disclaims all warranties of merchantability or fitness for a particular purpose.
This warranty shall not apply: (1) if the product has been modified, opened, altered, or has suffered damage as a result of inappropriate or abusive use, negligence, an accident, normal wear, or any other cause unrelated to a material or manufacturing defect (including, but not limited to, combining the Thrustmaster product with any unsuitable element, including in particular power supplies, rechargeable batteries, chargers, or any other elements not supplied by Guillemot for this product); (2) if the product has been used for any use other than home use, including for professional or commercial purposes (game rooms, training, competitions, for example); (3) in the event of failure to comply with the instructions provided by Technical Support; (4) to software, said software being subject to a specific warranty; (5) to consumables (elements to be replaced over the product's lifespan: disposable batteries, audio headset or headphone ear pads, for example); (6) to accessories (cables, cases, pouches, bags, wrist-straps, for example); (7) if the product was sold at public auction.
This warranty is nontransferable.
The consumer's legal rights with respect to laws applicable to the sale of consumer goods in his or her country are not affected by this warranty.
Additional warranty provisions
During the warranty period, Guillemot shall not provide, in principle, any spare parts, as Technical Support is the only party authorized to open and/or recondition any Thrustmaster product (with the exception of any reconditioning procedures which Technical Support may request that the consumer carry out, by way of written instructions - for example, due to the simplicity and the lack of confidentiality of the reconditioning process - and by providing the consumer with the required spare part(s), where applicable).
Given its innovation cycles and in order to protect its know-how and trade secrets, Guillemot shall not provide, in principle, any reconditioning notification or spare parts for any Thrustmaster product whose warranty period has expired.
In the United States of America and in Canada, this warranty is limited to the product's internal mechanism and external housing. In no event shall Guillemot or its affiliates be held liable to any third party for any consequential or incidental damages resulting from the breach of any express or implied warranties. Some States/Provinces do not allow limitation on how long an implied warranty lasts or exclusion or limitation of liability for consequential or incidental damages, so the above limitations or exclusions may not apply to you. This warranty gives you specific legal rights, and you may also have other rights which vary from State to State or Province to Province.
Liability
If permitted under applicable law, Guillemot Corporation S.A. (hereinafter "Guillemot") and its subsidiaries disclaim all liability for any damages caused by one or more of the following: (1) the product has been modified, opened or altered; (2) failure to comply with assembly instructions; (3) inappropriate or abusive use, negligence, an accident (an impact, for example); (4) normal wear; (5) the use of the product for any use other than home use, including for professional or commercial purposes (game rooms, training, competitions, for example). If permitted under applicable law, Guillemot and its subsidiaries disclaim all liability for any damages unrelated to a material or manufacturing defect with respect to the product (including, but not limited to, any damages caused directly or indirectly by any software, or by combining the Thrustmaster product with any unsuitable element, including in particular power supplies, rechargeable batteries, chargers, or any other elements not supplied by Guillemot for this product).

FCC STATEMENT
- This device complies with Part 15 of the FCC Rules. Operation is subject to the following two conditions:
(1) This device may not cause harmful interference, and
(2) This device must accept any interference received, including interference that may cause undesired operation.
- Changes or modifications not expressly approved by the party responsible for compliance could void the user's authority to operate the equipment.
COPYRIGHT
© 2017 Guillemot Corporation S.A. All rights reserved. Thrustmaster® is a registered trademark of Guillemot Corporation S.A. Ferrari® is a registered trademark of Ferrari Idea S.p.A. All other trademarks are the property of their respective owners. Illustrations not binding. Contents, designs and specifications are subject to change without notice and may vary from one country to another. Made in China.
ENVIRONMENTAL PROTECTION RECOMMENDATION
In the European Union: At the end of its working life, this product should not be disposed of with standard household waste, but rather dropped off at a collection point for the disposal of Waste Electrical and Electronic Equipment (WEEE) for recycling.
This is confirmed by the symbol found on the product, user manual or packaging. Depending on their characteristics, the materials may be recycled. Through recycling and other forms of processing Waste Electrical and Electronic Equipment,
you can make a significant contribution towards helping to protect the environment.
Please contact your local authorities for information on the collection point nearest you.
For all other countries: Please adhere to local recycling laws for electrical and electronic equipment.
Retain this information. Colours and decorations may vary.
Plastic fasteners and adhesives should be removed from the product before it is used.
www.thrustmaster.com
*Applicable to EU and Turkey only


TX Racing Wheel
FERRARI 458 ITALIA EDITION
POUR XBOX ONE
INFORMATIONS RELATIVES A LA GARANTIE AUX CONSOMMATEURS
www.thrustmaster.com
FERRARI 458 ITALA EDITION
FÜR XBOX ONE
Benutzerhandbuch

WARNING:
www.thrustmaster.com
www.thrustmaster.com
www.thrustmaster.com
FERRARI 458 ITALA EDITION
PARA XBOX ONE
Manual del usuario

AVISO:
www.thrustmaster.com
FERRARI 458 ITALA EDITION
PARA XBOX ONE
Manual do Utilizador


ATENÇA:
www.thrustmaster.com
FERRARI 458 ITALA EDITION
ДЛЯ XIIIBOX ONE
HctpyKua no 3Kcnnyataaun


BHIMAHHE!
Дя obecneueHЯ ONTIMaJIbHOI COBmecTmOcTn pyJeBOI CnCTeMbl TX C nrgam Na XBOX ONE
MOKET NOTpe6oBaTbCRAyCTaHOBKa ABTomatUeCKNX O6HOBJIeHNI INrP (ux MOxHo 3a2py3umb, noDknIOuue uapOeYIO KOHCOnb K NHmepHemy).
TEXHUNECKNEXAPAKTEPNUKNI

1 Ba3a roHouHoro pyra
2ToHOChbIpyNb
3 2ceKBeHcUHOHHbIX nepeKIOuOaTeIaNepeDaU (BBepxN BnI3)
4 MhoronOnuHnHa KhoIka D-Pad (Engine Start)
5 PepeKIOUOaTeJIb Manettino (2 noIIOKeHnIa)
6 Khonka MODE (PeKm) + KpaChb/3eHbI uHdkaTOp
7 Khonka Xbox Guide
8 BeBbHnDnKaTOp
9 Pe3b6a noI 60JIbWOn BnHT (dIa CnCTeMbI KpeIIeHnI KpeNexKHO BnHTa)
10 CnCTema KpePHeHna
11MetaJIINueckn KpeIeKHbI BNHT

12 Cnctema KpenneHn Thrustmaster Quick Release
13 Μηθηνικατορ coŋρχεην κΟHTροπηρερα (ДЯ pañɔnəsHaBæHry Kinetc™)
14 Pa3bEm dIg Ka6eI nIaHnA (TnA A nnB) (pa3HbIe cmaHapmbI dIg pa3HbIX cmpaH)
15 USB-ka6eB npa3bempyeBOCNCTeMbI
16 Pa3bEm dIy Kopo6kI nepeaay (npuobpemaemc omdenbHo, bInyck oxudaemc)
17 Pa3bem nIeIaJIbHoro 6noka
- pa3meaainTe 6a3y Ha pacctoarHn He MeHee 10 cm ot cTeH;
- He pa3MeuTe 6a3y B CTecHeHHOM IPOCTpaHCTBe;
- HNCHEN He NaKpbIbaiTe 6a3y;
- He donyuckaia Te CKonneHn IbIIN Ha BeHTnlaUHOHHbIX OTBepCTnX.

I3 coo6paKeHn 6e30nacHocTn HNKOrda He HaxmuTe Ha neaHn 6ocOHorO nHOROBHOCKe (6e3 06yBn).
KOMIIAHNA THRUSTMASTER® OTKA3bIBAETC8 OT JIIOBOI OTBETCTBEHHOCTN B CJIyUAE IONJUeyHnI TPABMbI B PE3yJIbTATE HAXIMAHnI HA IeIaI IN HEOByTbIMN HOAMN.

BHHMaHHe - pnc TpaBMnPoBaHn B pe3yIbTaTe NOBTOpAIOxCra DBNXeHm I DeCTBn
CNJIOBOI 6paTHO CB83N
IcnoB3OBAHne pyeBOCnCTeMbICnOBoOB o6paTHo CBa3bMOKeT Bb3BaTb 60nb MBiUax nIycyctabax. CoBeTI NO npedOTbpaueHHIO np6JIem co 3dOpOBbEM:
- He npoBODnTe 3a Inrpoi npoDoJknTeJIbHoe BpeM;
* nocne kaxdoro yaca nrpbl danaTe 10-15-MnHyThb nepepbIB;
*ecnB KnCTaX, 3aAeTbax, PpeIpIeYbax, CTonax IIN HORAX NOBUNacb yCTaIOcTB IIN 6oJIb, npeKpaNTe INpy N OTdoxHInTe B TeueHne HeckOJIbKnx YacOB, PpeJe Yem CHOBA pnpCTyNTb K INrpe.
*ecnBbIeYka3aHHbIe npu3HaKn IpOraBnaKOTcHOBa Pn BO3BpaUeHN K Irgpe, PpeKpaTnte ngpy n o6paTntEc b K BpaCy;
* Depxnte CnCTemy BHe Doctyna DeTei;
* BO BpeMnIrpbl npabunbHo paonolaraTe oBe pyKn Ha pyneBOM KOnece n He no3BOJnTe emy Bpaatbcra 6eckoHTpOlbHO; - BO BpemrIrpbl Hn B Koem cIpyae He 3acOBbIbAitepykn IIN paIbci Iod peaII IN He depKHTe IX prdOM CpeaIbHbIM 6ILOKOM;
* BO BpeM KaIi6bpBKN IIrpbI HN B KOEM Cnyuae He 3acOBbIaBte pyKn B pyNeBOe KOJIeCO;
* y6eHntecb, yTO 6a3a pyneBoro KOJeca HadeXHO 3aKpePJIeHa B COOTBeTCTBn C yKa3aHnMn B INHCTpykCNI NO 3KcNPyatauIN.

TAXENOI3IDENNE
He donyckaetcnaonb30BaHne NiucmMOnOxke 16 neT

He poHryTe n3dennie Ha ce6a nn Ha dpyHX Iu!
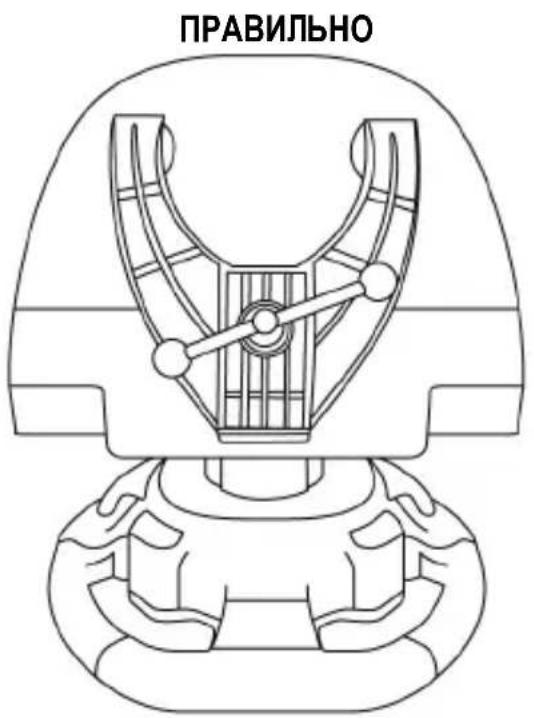
PABINbHO
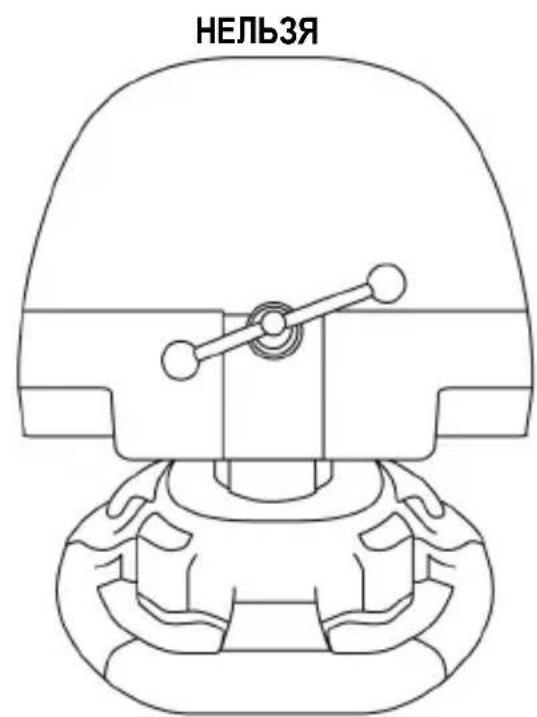
HEnb3

HEnb3

IpeynpexdHne - BO3MOXHO CKaTne neaIbHorO 6loka Bo BpeMnRpbl
* Derknte neaJIbHbI bIOK BHe doCTyNa deTei.
*Bo Bpemn npbl Hn B KOem cnuyae He KnaIte nanbUHa neaHn He 3acOBbAaTe nx C 60KOBbx CTOPOH ndaHoro 6noka.
*BoBpemnIpybHnBkoemcnyaeHe3acOBbBaIteHxC3aDnB6a3ypeJaIbHOro6Joka.
*Bo Bpemn Hn B Koem Cnyae He 3acobbaiTe nxCpeenB6a3y neaIbHoro 6noka.

HEnb3a
HElb3
HEnb3a

IpeynpekdeHne - BO3MOKHO cKaTne neaJIbHorO 6noka BO Bpem npocToA
* XpaHnTe neJaIbHbI 6JIOK B 6e3OpanCHom MeCTe BHe 30HbI DoCTyNa DeTei.
YCTAHOBKA PYJIEBOTO KONECA FERRARI 458 ITALIA HA BA3Y
C NOMOUsbIO CTpeJIOK COOTHEcNTe pa3beMBbl.
Pa3bem Ha 6a3e (1): cTpeJka yka3bIbaet BBePx.
Pa3bem Ha pyne (2): cTpeNka yKa3bIbAeT BBepX.
Iocne npabnIbHoro no3nHIOHOPOBaHH pa3bEmOB npocTo NOBepHnte KJIbTO KpeNEXHO CNTeMbI
Thrustmaster Quick Release (12) npoTnB yacobO B CTpeJkn, ydepkBaB a Ha MeCTe pyIb (2).
3aTeM C MaKcIMMaJIbHbIM ycJIeHMe 3aTHe KOJIbO, yIepXnBaer oHa MeCTe I NOBopauNBa pyIb (no Yacoboi cTpeNke).

YctahOBuB pyIb FERRARI 458 ITALIA, noBepHnte ero ha 180^ (ecn CMOTpeb Ha pyIb, JorotnFERRARI doJxhen 6bItb nepeBepHyT «BBePx HorAmN»), qTO6bl nOlyuHT bOCTyn K MaIOMy KpeEnxHomy BnHTy Ha cnCTeMe Thrustmaster Quick Release (12). C nomoubIO 6oIbwo KpceToo6pa3HOI OTBepTKI 3aTAHTE MaIbI KpeENXhBI BnHT (6e3 Upe3MepHoro ycINIIa) no Yacoboi CTpeJIke.
He npnnaarTe ype3MePbIX ycHIn npn 3aTARnBaHN MaJIO KpeNExKHO BnHTa (c NOMOJIbU KpeCToo6pa3HOI OTBePTKN)!
Ppekpatnte 3aTnBahnne, KaK TOnbko NoCyBCTByeTe cOpnoTnBJeHne
YCTAHOBKA PYJEBOI CNTEMbl
Pa3meHne pyIeBoro KOleca Ha cTone.
- PacnoIoxnTe roHOyHbI pyIb Ha cToJe nIu IHOJ rOpuaHTaJIbHOJ pIOCKoN yCTOuHBOINOBepxHocTn.
- BCTaBbTe KpeNekHbI BnHT (11) B CnCTeMy KpeNneHnra (10) n HadeXHO 3aΦNKcnpyIte pynb, 3aTgNBaB BnHT npOTnB YacOBoB CTpeJKN, TAK YTO6bl OH BOWeB B 6OJIbWoE pe3b6OBoE OTBepCTne (9), paCnoJoxKeHHoe HnKpepyIa.
BHIMAHNE! HEnb3a 3akpyuBaTb BnHT 6e3 cnCTembl KpePJIeHNA! B npOTNBOM cIyuae BO3MOxHo NOBpeXdHne pyJeBOI cnCTembl.
| UCTAHOBKA / DEMOHTAX | НAPРABLENHIE |
| Фиksача Зakрочаиме вунmnpомue часов смрелкu | |
| ОCLASSION Рacksочьaime e вунm no часов смрелke |
3aKpenenne 6a3bIpyneBoro KOleca Ha KOKnTe
-
Pa3mecnte 6a3y pvneBOrO KOJecHa hUNTKE KOKNITa.
-
Upe3 OTBepCTN B uNTke KOKnTa BCTaBbTe Dba BNHTa M6 (He BXoJrT B KOMnJIeKT) B Dba He6OJIbIuX BuHTOBbIX OTBepCTN Ha HxKHe CTOpOHe Ba3bl PVna.
Baxho! Dnua HbHmoe M6 He donxha npebbiawmb monuhy uumka + 12 MM; 6onee dnuHHbE bHmb Mozym eb3aamb noepexdehue eHympenhux demaneu ba3by pynebozo koneca.
- Pn Heo6xOIMOCT 3aTAHNTe CTAHdAPTHYIO CNCTeMy KpeJIeHHN, BCTaBUB KpeIeXHbI BNHT B 60JIbJooe pe3b6OBoE OTBepCTne.
3aKpenJIeHne neJaIbHoro 6noka B KOKnITe
-
3aKpeNTe neaIbHbI 6nOK c nOMOuBIO He6oJIbuxx pe3b6OBbIX OTBepCTn Ha erO HxHeN IOBEXHOCTN.
-
Ypees 0TBepTnB uNTke KOKnTa BCTaBbTe Dba BNHTa M6 (He BXoJr T B KOMJIeKT) B Dba He6OJIbuxx BuHToBbIX OTBeCttn Ha HxKHe CTOpOHe neDaIbHorO 6noka.
Baxho! Dnua HbHmOB M6 He donxHa npebbiawb monuHy uumka + 10 MM; 6onee dnuHHbE bHmb Moeymb b3aamb noepexdeHue hympeHHux demaneu nepaBHO 6noka.
COOTHECEHNE ΦyHKU
Pn 3anycke cnctembl Ha Xbox One pa3HbIe yHKUHOHaIbHbIe KHOKN pyJIa IMeIOT aHaIoruHbIe yHKUIN B nIpe.
B 6nKaiMsem 6yDusem aBTOMaTnueckne 6OBnEHHa nIgP (nra 6HOBnHn KOHcObdoJnxHa 6bItb IOnkJIIOUeHa K INTEpHety) n 6OBnEHHne pOoINBKN pyNeBOu CNCTeMbI NO3BOJIaY cTpaHITb dy6npoBaHHe yHKmN uYBeINuHTb KOINueCTBO pa3NJuHbIX KHOPOK.
OBHOBJEHNIE PPOUWBKN PYJEBOI CNTEMbl
IpoWbky B 6a3e pyJeBoro KOJeca MoXHO o6HOBnTb Do 6Oone n03dHeBercn, coepkaueycoBepweHCTBOBaHn.
ДяnpocmOTpa yCTaHOBJIeHHoB B DaHHbI MOpENT BepCn IpoUWBKn I ee O6HOBJIeHnI npi Heo6xOJIMOCrN OTkPoIte caT http://support.thrustmaster.com. Bbl6epnte TOnOHbIe pyu / TX Racing Wheel, 3aTeM IpouWbKa BblONHInTe yKa3aHnI NO 3aRpy3Ke I yCTaHOBKe.
HACTPOIKA PYJIeBOI CnCTEMbl IJXBOX ONE
- NpdknHHTe neaIbHbI 6Jok K pa3bemy (17) Ha 3aIHei cToPOHe 6a3bl pyJeBOrO KOleca.
- Поdkночи Кабелпитаня К разьему (14) Ha 3aДнй сторонбаы руневого кoleca.
3.ПоdkнчiteKa6eNB nHTaHnK 3JIeKtpopo3eTke COOTBcTeCTbYUeero HAnpJxehnIy.

Iodpo6hee 3mo onucano e pa3dene «ПОДКЛIOUCHNE PYJIEBOИ CNTEMbl K 3JIKTPONITAHNIO» ha cmp. 3 hacmouezo pykoobodcma.
- CoeHHTe USB-pa3bem (15) pyJeBOI CnCTEmbl cOHNm n3 USB-nOpTob KOHCOJI.
Tenepb Bce roTOBO nra irpbl!
ABTOMATUeCKA KAJINbPOBKA PYJI N I EJaIbHOrO BIOKA
KanibpoBka roHouHoro pyra BbINOJIHaeTcA ABTOMATUeCKn npN NOKIIuOHeHH pUJeBOI CnCTeMbI K ceTINITAHNA I K INrpoBoi KOHCOJI Upe3 USB-pa3bem.
Bo Bpem 3toi npoceDpybl 6bictpo BpaAaetcBnEBO n BnpaBO, coBepaia nobopot Ha 900 rpaucob, u 3atem octaHaBnBaetc B ceHTpe.

BHIMAHHE!
Bo BpemraabToKaH6pOBKn HeJIb3a DoTpparNaBtbcn do pyia!
(B npomueHOM cIyuae 8O3MOxEn c6ou KaIu6poBku /Un meJeChra mpaema).
ABTOMATUHECKA KAJINBPOBKA PEAJIbHOrO BJOKA
HeIb3a noDKnIOUaTb neDaIbHbI 6Iok K 6a3e pyNeBOrO KOleca (u OTKnIOUaTb ero ot 6a3bl), ecn CnCTema noDknIOUeHa K KOHcONn I BO BpeM nIrpbl (B npOTNBHom cnyae Bo3MOxeh C60J KaNbPobKN). PedaIbHbI 6Iok CneJeT NOkNIOUaTb K pyNEBOI CNCTeMe npeed ee NOkNIOUeHNEM K KOHcONn. Nocne 3abepseHnraKan6pOBKn puJI n 3aynCka nIrpbl HeckOnbKIMn HaxatmHa neJaNN BkNIOUaETcR INX ABOMATNUeCKa KaIN6pOBKa.

BHIMAHNE!
Hn3HaXMaTb Ha neJaI
BO Bpem aBtOKaIIb6poBk npIy BO Bpem 3arpy3kn nRpbl!
(B npomueHOM cnyyae 03MOKeH c6oKaIu6po8Ku).
Ecnr roohbmy npeaHbI 6nK He pa6oTaOT DOJXHbIM o6pa3OM nn KaNN6pOBKa BblrrnT HeBepHo
BbIKIOHTe KOHcOJIb I NOJIHOCTbI O TKIIIOHTe pyNeByo CnCTeMy, 3aHOBO NODKIIIOHTe BCE Ka6eJIIN (NITAHIN I neJaIbHorO 6JOKa) INpeE3anyCTte KOHcOJIb INIRpy.
CONPRAKHEHNA KOHTPOJIPEPA (13)
B cenx kopkekthoro pacno3haHn pynebo cnCTeMb nIeHTuKaTOp cnpjKeHn KOHTpOJIpea (8 cepxue yacmu 6a3bI pyneoo KOleca) Bcerda dOnKeH octBaTbcB None 3peHn KaMepbl KINECTTM.

BCTPOEHHbI DATyIK TEMNEPATypbl
B ueJx 6e3oNaChocTn B 6a3y pyJeBOr KOleca BCTpoEh DaTCHK TempepaTybl.
Pn upe3MepHOM HArpeBe pyJeBOr CnCTembl OHa MOKeT BHe3aHHO BBIKIIOHTbCRA.
B 3tOM cnyae:
-OTKJIOUHTe OYcTPOINCTBa Ka6eJIb NITaHnI N USB-Ka6eJIb;
-DOXDNTECB NOHORO OCTbIBAHNA6a3bI pyneBoro KOJeca;
- 3aTEM CHOBA NOДКПЮЧNTe YCTpoIcTBO.
KHONKA IN INDINKATOP MODE (6)
Khonka MODE nna neaJbHoro 6noka
PetaBnB 6Jok, BxOaIuN B KOMJIeK T pyNeBOI CNTEmb TX, Ochauen DBym neaIamn.
Pn nCnoB3OBaHn neaIbHoro 6Ioka HndkaTOp DoJxeh RopeTb KpaChbIM, HNaYe peJaIb ra3a He 6ydet pa6oTaTb DOJXHbIM o6pa30M.
Pyneba cncTeMa TX coBmeTima TaKKe C neaIbHbIMN 6nokam Thrustmaster c TpeM nedanm (npuobpemaomc omdeNbHO; bInyck Oxuaemc); Ha KOTOpbIX MOXHO 3JIeKTPOHHbIM CTOOCOBOM NOMEHTb MeCTAm Ni dann CcENNeHn I r3a.
ДлгэТOrOdoCTaToUHнжаьннкнky MODE (6)Ha 2ceK.
Bo BCTpoEHNO nAMrT pyJeBOu CnCTeMbI COxpaHraIOc DaHHbIe O nepeHoce neJaJIe.
www.thrustmaster.com


TX Racing Wheel
FERRARI 458 ITALA EDITION
TIA XBOX ONE
Eeyεipidio xρησης


ПОНДОПОIH:
Tia va 8eBaiw0eite oTI n Tioviepa TX Racing Wheel Aitoupyei Oomega ta naivia yia tvkovola XBOX ONE,
iOws xpeiaotei va Eykaataohtnoete Tc autouatec evnpoeicTwv Taiyviidow (Eivai diaeoi aotav n kovola naivxviiodw ivai ouvodoeve n otro Internet).
TEXNIKE ΠΝΟΔIΑΓΑΦΕΣ

Eomegaepikn,ue Ta eEnc:
* Mia movada tpofooiaac peuatoC toTOnBteNuev aneUthetaic oTo eowtepiKo Tns foans n
TIOVIEpAs, E UTOOxH TUTou A
Kaawio tropoobooiac pεμaotc 220-240V
Eomegaepikn, ta eic:
* Mia movada tropofoosiae pufato c totoetneevn aeneuethiae oTo eowtepiKo Tns baonstns tiouiepac, uutoboxn tuou A
*Kaawio tropoosoiac pEuMaToS 100-125V
AaEs ouuoueysia to koupi MODE
www.thrustmaster.com
FERRARI 458 ITALA EDITION
XBOX ONE iCIN
Kullanim Kilavuzu


UYARI:
100-130V prize baglamayin!
220-240V prize baglamayin!
DAHILI SICAKLIK SENSORU
www.thrustmaster.com
www.thrustmaster.com
| Thrustmaster Quick Release (KinectTM sallty) pailll yajn jil13 ((w) g1 (j) gill) aaiy jil lal lal lal lal lal lal lal lal lal lal lal lal lal lal lal lal lal lal lal lal lal lal lal lal lal lal lal lal lal lal lal lal lal lal lal lal lal lal lal lal lal lal lal lal lal lal lal lal lal lal lcal lal lal lal lal lal lal lal lal lal lal lal lal lal lal lal lal lal lal lal lal lal lal lal lal lal lal lal lal lal lal lal lal lal lal lal lal lal lal lal lal lal lal lal lal lal lal lal lal lal lAL |
1
a 1
1 1 1 1 1 1 1 1 1 1 1 1 1 1 1 1 1 1 1 1 1 1 1 1 1 1 1 1 1 1 1 1 1 1 1 1 1 1 1 1
A 1
1
(g))slll
Jabsl y Jglua jy b
Jls KsIgla Jyj 12dolll alge gao gai ydi kdl qil
a 1
aalil aiee gaaagall llae e 100
a
J 1
16+
16 16

1 1
m = 311

a
自卫士
Jab Jglio jy aol gai agaia
iio 1

Lalba
lalb
[ \Leftrightarrow {10} > 0]
Guillemot 1983) Guillemon Corporation S.A.
Gullemot Corporation S.A.
Chantepie, France
Thrustmaster
Thrustmaster
Thrustmaster
Thrustmaster
Thrustmaster
Thrustmaster
Thrustmaster
Thrustmaster
Thrustmaster
Thrustmaster
Thrustmaster
Thrustmaster
Thrustmaster
Thrustmaster
Thrustmaster
Thrustmaster
Thrustmaster
Thrustmaster
Thrustmaster
Thrustmaster
Thrustmaster
Thrustmaster
Thrustmaster
Thrustmaster
Thrustmaster
Thrustmatter
(1) p5
J 1000000000000000000000000000000000000000000000000000000000000000000000000000000
Jg 111111111111111111111111111111111111111111111111111111111111111111
Guillemot 1000000000000000000000000000000000000000000000000000000000000000000000000000000000
www.thrustmaster.com


TX Racing Wheel
FERRARI 458 ITALIA EDITION
Xbox One® 用
一-一-一-三二一
警告:
www.thrustmaster.com

紙:外箱


TX Racing Wheel
FERRARI 458 ITALIA EDITION
适用于XBOXONE®
用户手册
警告:
为确保TX方向盘能够正常操控
XBOX ONE 游戏机的游戏,
您可能需要安装游戏的自动更新
(当您的游戏主机连接到互联网时可用)。
技术规格
www.thrustmaster.com
CE
TX Racing Wheel
FERRARI 458 ITALIA EDITION
XBOX ONE®

孕藥藥藻藻藻藻藻藻藻藻藻藻藻藻藻藻藻藻藻藻藻藻藻藻藻藻藻藻藻藻藻藻藻藻藻藻藻藻藻藻藻藻藻藻藻藻藻藻藻藻藻藻藻藻藻藻藻藻藻藻藻藻藻藻藻
卡
叫
*
**220-240V
= 220 - 240V

220-240V 100-130V 100-130V
#
本,

#
图远皂增曾增电原藻藻藻藻藻藻藻藻藻藻藻藻藻藻藻藻藻藻藻藻藻藻藻藻藻藻藻藻藻藻藻藻藻藻藻藻藻藻藻藻藻藻藻藻藻藻藻藻藻藻藻藻藻藻藻藻藻藻藻藻藻藻藻藻藻藻藻藻藻藻藻藻藻藻藻藻藻藻藻藻藻藻藻藻藻藻藻藻藻藻藻藻藻藻藻藻藻
XBOXONB号
- 2.10
1.

0000 00000000000000000000000000000
4.101H 1
0
中 电
i 900
L 雷山 恒 1
www.thwartmaster.com


TX Racing Wheel
FERRARI 458 ITALIA EDITION
FOR XBOX ONE®
User Manual
WARNING:
To ensure that your TX Racing Wheel functions correctly with games for XBOX ONE,
you may be required to install the games' automatic updates (available when your games console is connected to the Internet).
TECHNICAL SPECIFICATIONS
1 Racing wheel base
2 Racing wheel
3 2 sequential gear shift levers (Up & Down)
4 Multidirectional D-Pad (Engine Start)
5 Manettino (2 positions)
6 MODE button + Red/Green indicator light
7 Xbox Guide button
8 White indicator light
9 Large threaded hole (for attachment system and tightening screw)
10 Attachment system
11 Metal fastening screw
12 Thrustmaster Quick Release
13 Controller pairing (for KinectTM detection)
14 Mains supply connector (type A or B) (Varies from one country to another)
15 Racing wheel USB cable and connector
16 Gearbox connector (sold separately, forthcoming release)
17 Pedal set connector
CONNECTING THE RACING WHEEL TO THE MAINS = PLEASE READ BEFORE PROCEEDING!
Your racing wheel's power supply varies according to the country where you purchased your device. In Korea, the power supply is:
Internal, with:
*a power supply unit located directly inside the racing wheel's base, with a type C connector.
* a 220-240 V power supply cable.
= compatible only with 220-240 V electrical power.


Never connect the 220-240 V cable to a 100-130 V electrical outlet!!! Never connect this cable to a power adapter!!!
WARNING
Before you use this product, please read this documentation carefully and keep it safe should you need to consult it later.

Warning - Electric shock
- Store the product in a dry location and do not expose it to dust or sunlight.
- Respect the connection direction.
- Do not twist or pull the connectors and cables.
- Do not spill any liquid on the product or its connectors.
- Do not short-circuit the product.
- Never dismantle the product; do not throw it onto a fire and do not expose it to high temperatures.
- Do not use a power supply cable other than the one provided with your racing wheel.
- Do not use the mains power supply cable if the cable or the connectors are damaged, split or broken.
- Make sure that the mains power cable is properly inserted into the power outlet and the connector located on the rear face of the racing wheel's base.
- Do not open. No user replaceable parts inside. Refer servicing to manufacturer, specified agency or qualified technician.
- Only use attachments/accessories specified by the manufacturer.
- If the steering wheel is operating unusually (if it is emitting any abnormal sounds, heat or odors), stop using it immediately, disconnect the power cable from the socket and disconnect the other cables.
- If you are not going to be using the steering wheel for an extended period, disconnect the mains adaptor from the wall socket.

Air vents
Make sure that you do not block any of the air vents on the steering wheel base. For optimum ventilation, respect the points below:
- Position the base at least 10 cm away from any wall surfaces.
- Do not place the base in any tight spaces.
- Do not cover the base.
- Do not let any dust build up on the air vents.

For safety reasons, never use the pedal set with bare feet or while wearing only socks on your feet.
THRUSTMASTER © DISCLAIMS ALL RESPONSIBILITY IN THE EVENT OF INJURY RESULTING FROM USE OF THE PEDAL SET WITHOUT SHOES.

Warning - Injuries due to force feedback and repeated movements
Playing with a force-feedback steering wheel may cause muscle or joint pain. To avoid any problems:
- Avoid lengthy gaming periods.
- Take 10 to 15 minute breaks after each hour of play.
- If you feel any fatigue or pain in your hands, wrists, arms, feet or legs, stop playing and rest for a few hours before you start playing again.

Warning - Injuries due to force feedback and repeated movements (continued)
- If the symptoms or pain indicated above persist when you start playing again, stop playing and consult your doctor.
- Keep out of children's reach.
- During games, always leave both hands correctly positioned on the steering wheel without letting it go completely.
- During gameplay, never place your hands or your fingers under the pedals or anywhere near the pedal set.
- During calibration and gameplay, never place your hand or your arm through the openings in the racing wheel.
- Check the steering wheel base is carefully clamped as per manual's instructions.

HEAVY PRODUCT
To be handled only by users 16 years of age or older

Be careful not to drop the product on yourself or on anyone else!
ALWAYS NEVER NEVER

Warning - Pedal set pinch hazard when playing
- Keep the pedal set out of children's reach.
- When playing, never place your fingers on or anywhere near the sides of the pedals.
- When playing, never leave your fingers on or anywhere near the pedals' rear base.
- When playing, never place your fingers on or anywhere near the pedals' front base.
NEVER NEVER NEVER


Warning - Pedal set pinch hazard when not playing
- Store the pedal set in a safe place, and keep it out of children's reach.
ATTACHING THE FERRARI 458 ITALIA RACING WHEEL TO ITS BASE
Align the connector locations using the arrows:
Base (1) connector: Arrow pointing upwards
Racing wheel (2) connector: Arrow pointing upwards
Once the connectors are correctly positioned, simply rotate the Thrustmaster Quick Release (12) device's ring counterclockwise, while holding the racing wheel (2) in position.
Then, tighten the ring as much as you can; to do so, hold the ring in position and rotate the racing wheel clockwise.

Once you have installed the FERRARI 458 ITALIA racing wheel, rotate it 180^ (when facing the wheel, the FERRARI logo should be upside down) to access the small attachment screw located on the Thrustmaster Quick Release (12) device. Use a large cross-slot screwdriver to tighten the small attachment screw (do not use excessive force), turning it clockwise.

Do not use excessive force when screwing the small attachment screw (using a cross-slot screwdriver)!
Stop turning the screw as soon as you feel some resistance.
ATTACHING THE RACING WHEEL
Attaching the racing wheel to a table or a desktop
- Place the racing wheel on a table or any other horizontal, flat and stable surface.
- Insert the fastening screw (11) in the attachment system (10), then tighten the device by turning the screw counterclockwise, so that it feeds into the large threaded hole (9) located beneath the racing wheel, until the device is perfectly stable.
ALWAYS NEVER

WARNING: Never tighten the screw alone, without the attachment system! (This could damage the racing wheel).
| ATTACHMENT / REMOVAL | DIRECTION |
| To tighten: Turn the screw counterclockwise | |
| To release: Turn the screw clockwise |
Attaching the racing wheel's base to a cockpit
-
Place the racing wheel's base on the cockpit shelf.
-
Drive two M6 screws (not included) through the cockpit shelf, then feed them into the two small threaded holes located beneath the racing wheel.
Important: The length of the M6 screws should not exceed the thickness of the shelf + 12 mm; longer screws could cause damage to internal components located in the racing wheel's base.
- If required, tighten the standard attachment system by inserting the fastening screw in the large threaded hole.
Attaching the pedal set to a cockpit
-
Attach the pedal set using the small threaded holes located beneath it.
-
Drive two M6 screws (not included) through the cockpit shelf, then feed them into the two small threaded holes located beneath the pedal set.
Important: The length of the M6 screws should not exceed the thickness of the shelf +10 mm; longer screws could cause damage to internal components located in the pedal set.
MAPPING
At product launch on Xbox One, different action buttons on the wheel will have identical features in the game.
In the near future, automatically updating your games (automatic updates will be available if your console is connected to the Internet) and updating your racing wheel's firmware will enable you to remove these duplicate features and increase the number of individual buttons.
UPGRADING YOUR RACING WHEEL'S FIRMWARE
The firmware included in your racing wheel's base can be upgraded to a more recent version featuring product enhancements.
To display the firmware version that your racing wheel is currently running and upgrade it if required: on PC, connect to http://support.thrustmaster.com. Click Racing Wheels / TX Racing Wheel, then select Firmware and follow the instructions describing the download and setup procedure.
SETTING UP THE RACING WHEEL FOR THE XBOX ONE
- Connect the pedal set to the connector (17) located at the back of the racing wheel's base.
- Connect the power supply cable to the connector (14) located at the back of the racing wheel's base.
- Connect the power supply cable to a mains outlet with proper voltage specifications.

For more information about this, please refer to the CONNECTING THE RACING WHEEL TO THE MAINS section, on page 3 in this manual.
- Connect the racing wheel's USB connector (15) to one of the console's USB ports.
You are now ready to race!
AUTOMATIC RACING WHEEL AND PEDAL SET CALIBRATION
The racing wheel automatically self-calibrates when you connect the racing wheel to the mains and the racing wheel's USB connector to the console.
During this phase, the racing wheel will rotate quickly towards the left and the right, covering a 900 degree angle, before stopping at the center.

WARNING:
Never touch the racing wheel during the self-calibration phase! (This could cause an incorrect calibration and/or personal injuries).
AUTOMATIC CALIBRATION OF THE PEDAL SET
Never connect the pedal set to the racing wheel's base (or disconnect it from the base) when it is connected to the console or during gameplay (this could cause incorrect calibration).
Always connect the pedal set before connecting the racing wheel to the console.
Once the racing wheel's calibration is done and the game has been launched, the pedals are automatically calibrated after a few presses.

WARNING:
Never press the pedals
during the racing wheel's self-calibration phase or while a game is loading!
(This could cause incorrect calibration)
If your racing wheel and pedal set do not operate correctly, or if calibration seems incorrect: Turn off your console, disconnect your racing wheel entirely, reconnect all cables (using the mains power supply cable and pedal set), then restart your console and your game.
CONTROLLER PAIRING (13)
To ensure correct detection of your racing wheel, the device's controller pairing (located on the upper section of the racing wheel's base) must always remain in the KINECT™ camera's field of vision.
INTERNAL TEMPERATURE SENSOR
For safety reasons, the racing wheel's base features a temperature sensor. If the device's temperature becomes too high, your racing wheel can shut down suddenly. In this event:
- Unplug the mains power supply cable and the device's USB connector.
- Wait for the racing wheel's base to cool down entirely.
- Then, reconnect the device.
MODE BUTTON AND INDICATOR LIGHT (6)
MODE button for the pedal set
The pedal set included with the TX Racing Wheel features 2 pedals.
When using this pedal set, make sure that the indicator light remains red, or the accelerator pedal will not function correctly.
The TX Racing Wheel is also compatible with Thrustmaster pedal sets featuring 3 pedals (sold separately; forthcoming release); these enable you to electronically swap the accelerator and clutch pedals.
To do so, simply press the MODE button (6) for 2 seconds.
The racing wheel's internal memory stores whether the pedals have been swapped around or not.
| ACCELERATOR AND CLUTCH PEDALS | Color of the MODE indicator light (6) |
| NORMAL | RED |
| SWAPPED AROUND | GREEN |
Other hints for the MODE button
To learn more about the MODE button and indicator light, please visit http://support.thrustmaster.com. Click Racing Wheels / TMX Force Feedback, then select Manual or FAQ.
HELP FILES AND FAQs (not stated in this manual)
Please visit http://support.thrustmaster.com, click Racing Wheels / TMX Force Feedback, then select Manual or FAQ.
COPYRIGHT
© 2017 Guillemot Corporation S.A. All rights reserved. Thrustmaster® is a registered trademark of Guillemot Corporation S.A. Ferrari® is a registered trademark of Ferrari Idea S.p.A. All other trademarks are the property of their respective owners. Illustrations not binding. Contents, designs and specifications are subject to change without notice and may vary from one country to another. Made in China.
This product conforms to all standards regarding children 16 years of age and older. This product is not suitable for use by children less than 16 years of age.
www.thrustmaster.com