
OMH 460BTB - Radio OK - Free user manual and instructions
Find the device manual for free OMH 460BTB OK in PDF.
| Product type | Mini hi-fi system with radio, CD player, Bluetooth, USB, AUX |
| Brand | OK |
| Model | OMH 460BTB |
| Power supply | 230 V~, 50 Hz |
| Power consumption in operation | 10 W |
| Standby power consumption | < 1 W |
| FM radio | Frequency range 88 - 108 MHz |
| CD player | Compatibility CD, CD-R/RW, MP3, WMA; frequency response 20 Hz - 20 kHz |
| USB port | USB 2.0 |
| Bluetooth | Version 2.1 + EDR; profiles HFP, A2DP, AVRCP, HSP, GAVDP; range 8 m (open field) |
| Auxiliary input | 3.5 mm jack socket (AUX IN) |
| Headphone output | 3.5 mm headphone jack |
| Speakers | 2 × 2 W RMS (output power) |
| Main unit dimensions | 135 × 165 × 224 mm (W × H × D) |
| Speaker dimensions | 98 × 162 × 152 mm (W × H × D) |
| Total weight | 2.05 kg (main unit + two speakers) |
| Remote control | CR2025 battery (not included) |
| Main functions | FM radio, CD player, USB playback, Bluetooth, AUX, alarm, sleep, track programming, equalizer (Rock, Jazz, Pop, Classic, Normal), repeat/random playback |
| Cleaning and maintenance | Unplug before cleaning; use a soft, damp cloth, avoid solvents and abrasives |
| Safety | Do not expose to rain or moisture; do not open the device (laser radiation in CD mode); use in a moderate climate |
| Repairability | Entrust repairs to a qualified professional; do not attempt to repair yourself |
| General information | For household use only; do not use outdoors |
Frequently Asked Questions - OMH 460BTB OK
User questions about OMH 460BTB OK
0 question about this device. Answer the ones you know or ask your own.
Ask a new question about this device
Download the instructions for your Radio in PDF format for free! Find your manual OMH 460BTB - OK and take your electronic device back in hand. On this page are published all the documents necessary for the use of your device. OMH 460BTB by OK.
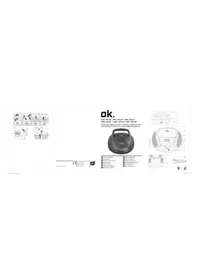
USER MANUAL OMH 460BTB OK
E
10.2.14 EQUATION 2
MATERIALS AND METHODS 2
MOOCDENPLO
00H 00H
PROVINCIENTIATION OF THE CIRCUITS AND THE COMPLIANT VOLTAGE

HERZLICHEN GLUCKWUNSCH!
A2DP (Advanced Audio Distribution Profile)
Thanks for your purchase of an ok. product. Please read this manual carefully and keep it for future reference.
IMPORTANT SAFETY INSTRUCTIONS. READ CAREFULLY AND KEEP FOR FUTURE REFERENCE.
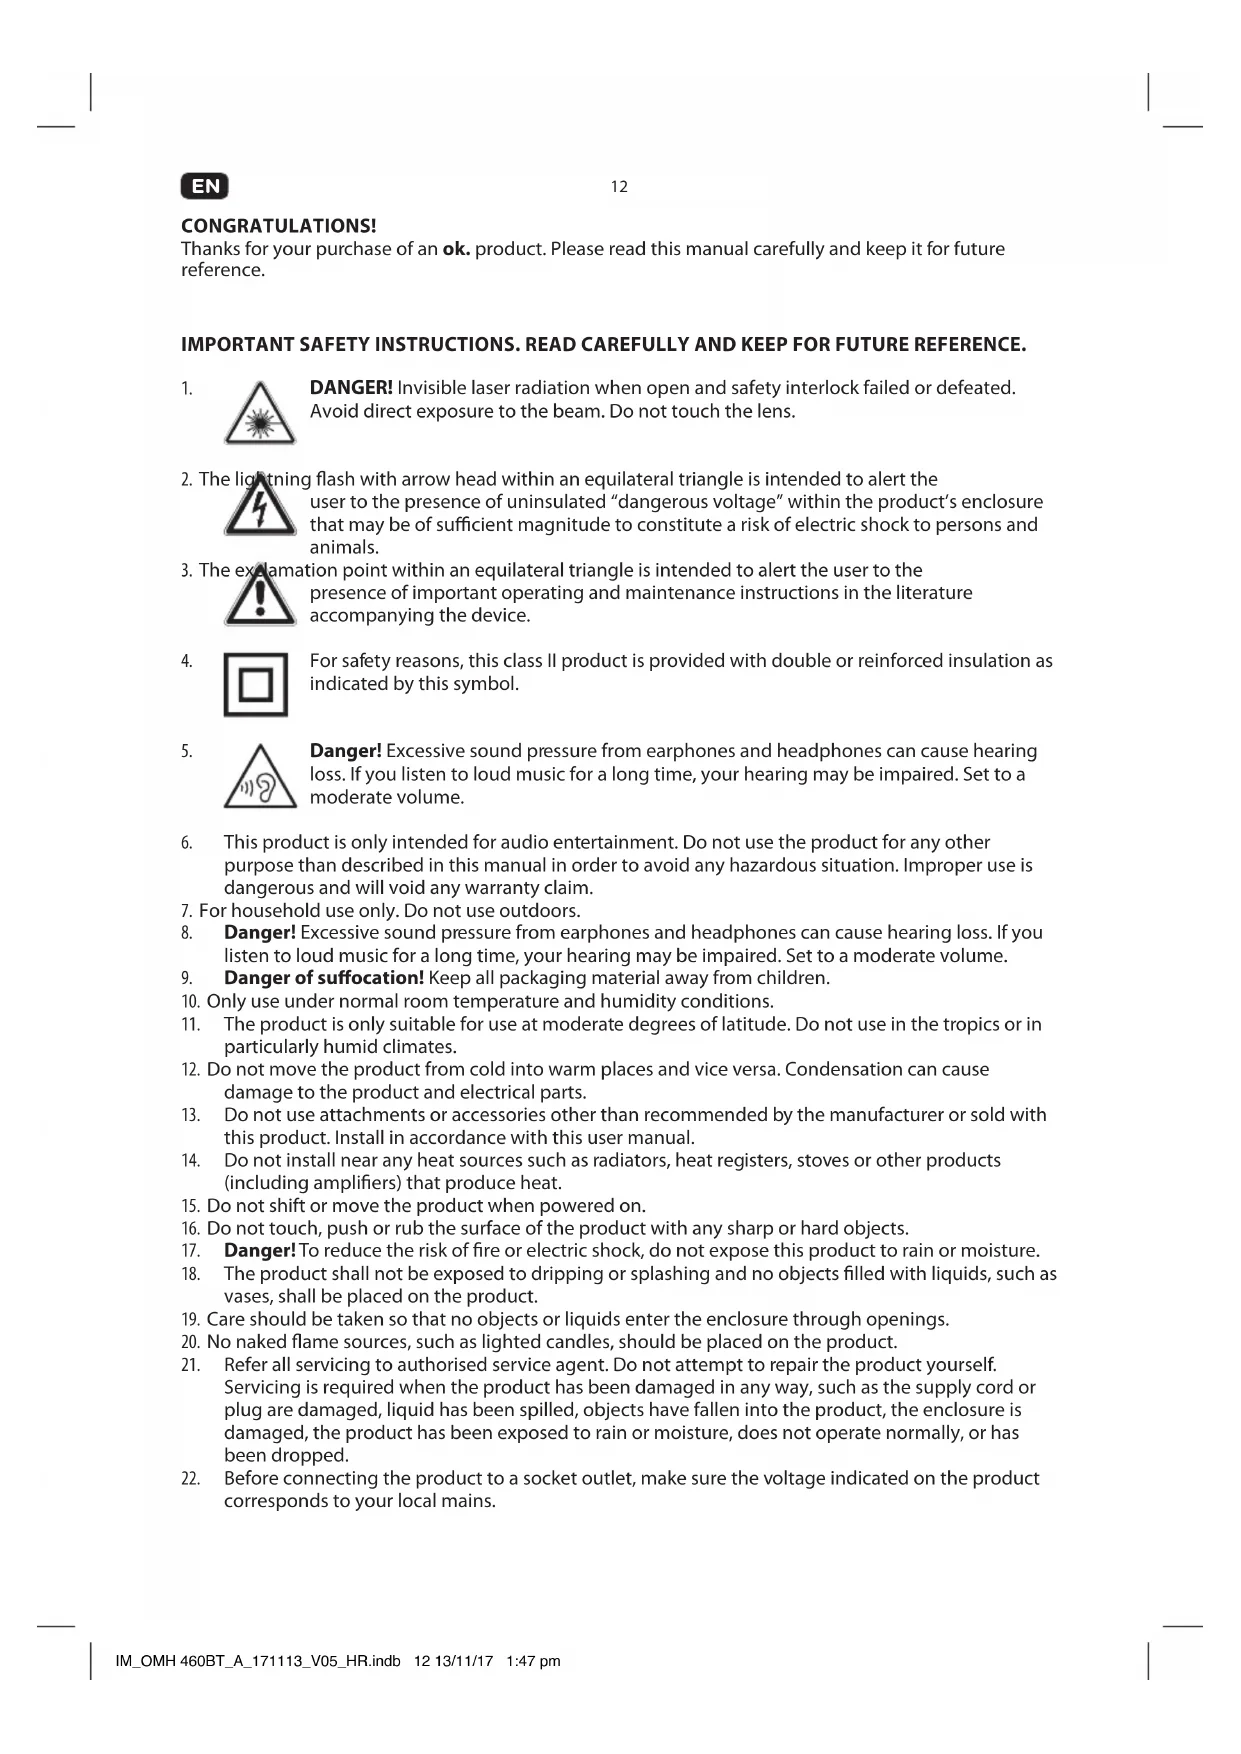
1.

DANGER! Invisible laser radiation when open and safety interlock failed or defeated. Avoid direct exposure to the beam. Do not touch the lens.
- The lightning flash with arrow head within an equilateral triangle is intended to alert the
user to the presence of uninsulated "dangerous voltage" within the product's enclosure that may be of sufficient magnitude to constitute a risk of electric shock to persons and animals.
- The explanation point within an equilateral triangle is intended to alert the user to the
presence of important operating and maintenance instructions in the literature accompanying the device.
4

For safety reasons, this class II product is provided with double or reinforced insulation as indicated by this symbol.
5.
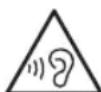
Danger! Excessive sound pressure from earphones and headphones can cause hearing loss. If you listen to loud music for a long time, your hearing may be impaired. Set to a moderate volume.
-
This product is only intended for audio entertainment. Do not use the product for any other purpose than described in this manual in order to avoid any hazardous situation. Improper use dangerous and will void any warranty claim.
-
For household use only. Do not use outdoors.
- Danger! Excessive sound pressure from earphones and headphones can cause hearing loss. If you listen to loud music for a long time, your hearing may be impaired. Set to a moderate volume.
- Danger of suffocation! Keep all packaging material away from children.
- Only use under normal room temperature and humidity conditions.
- The product is only suitable for use at moderate degrees of latitude. Do not use in the tropics or in particularly humid climates.
- Do not move the product from cold into warm places and vice versa. Condensation can cause damage to the product and electrical parts.
- Do not use attachments or accessories other than recommended by the manufacturer or sold with this product. Install in accordance with this user manual.
- Do not install near any heat sources such as radiators, heat registers, stoves or other products (including amplifiers) that produce heat.
- Do not shift or move the product when powered on.
- Do not touch, push or rub the surface of the product with any sharp or hard objects.
- Danger! To reduce the risk of fire or electric shock, do not expose this product to rain or moisture.
- The product shall not be exposed to dripping or splashing and no objects filled with liquids, such as vases, shall be placed on the product.
- Care should be taken so that no objects or liquids enter the enclosure through openings.
- No naked flame sources, such as lighted candles, should be placed on the product.
- Refer all servicing to authorised service agent. Do not attempt to repair the product yourself.
Servicing is required when the product has been damaged in any way, such as the supply cord or plug are damaged, liquid has been spilled, objects have fallen into the product, the enclosure is damaged, the product has been exposed to rain or moisture, does not operate normally, or has been dropped.
-
Before connecting the product to a socket outlet, make sure the voltage indicated on the product corresponds to your local mains.
-
If the supply cord is damaged, it must be replaced by the manufacturer or its service agent or similarly qualified person in order to avoid hazard.
- Regularly check if the supply cord, product or extension cable is defective. If found defective, do not put the product into operation. Immediately pull the plug.
- Place the supply cord and, if necessary, an appropriate extension cable in such away that pulling or tripping over it is impossible. Do not allow the supply cord to hang down within easy reach.
- Do not jam, bend or pull the supply cord over sharp edges.
- The power plug is used as the disconnect device; the disconnect device shall remain readily operable. To completely disconnect the power input, disconnect the mains plug.
- The product may not function properly or not react to the operation of any control due to electrostatic discharge. Switch off and disconnect the product; reconnect after a few seconds.
- Protect the supply cord from being walked on or pinched particularly at the plug, convenience receptacles and the point where it exits from the product.
- Never pull the plug by the supply cord or with wet hands.
- Disconnect the power plug in case of faults during use, during lightening storms, before cleaning and when not using the product for a longer period of time.
- Danger! Before cleaning, switch the product off and disconnect the power plug from the socket.
- When the product has reached the end of its service life, make it defective by disconnecting the plug from the socket and cutting the cord in two.
- Caution! There is danger of explosion from improper replacement of the batteries. Replace batteries only with the same or equivalent type of battery.
- Always change the entire battery pack. Do not mix old and new batteries, or batteries with different charge state.
- Make sure the batteries are correctly inserted. Observe the polarity (+) plus / (-) negative on the battery and the housing. Improperly inserted batteries can lead to leakage or, in extreme cases, a fire or an explosion.
- Remove used batteries. Remove the batteries if you know that the product will not be used for a longer period of time. Otherwise, the batteries could leak and cause damage.
- If the batteries leak, remove them with a cloth and dispose of them accordingly. Prevent battery acid from coming into contact with skin and eyes. If you do get battery acid in your eyes, flush them thoroughly with lots of water and consult a physician immediately. If battery acid comes into contact with your skin, wash the affected area with lots of water and soap.
- When installing the device, leave sufficient space for ventilation. Do not install in bookcases, built-in cabinets or the like.
- Do not impede ventilation by covering the ventilation openings with items, such as newspapers, table-cloths, curtains, etc. Do not insert any objects.
- WARNING! Do not ingest the battery, Chemical Burn Hazard.
- This product (remote control) contains a coin/button cell battery. If the coin/button cell battery is swallowed, it can cause severe internal burns in just 2 hours and can lead to death.
- Keep new and used batteries away from children.
- If you think batteries might have been swallowed or placed inside any part of the body, seek immediate medical attention.
- If the battery compartment does not close securely, stop using the product and keep it away from children.
EN
14
INTENDED USE
This product is intended for audio playback via Bluetooth® CD, FM-Radio and audio input (AUX IN). Any other use may result in damage to product or injuries. This product is designed for household use only and not intended for commercial use.
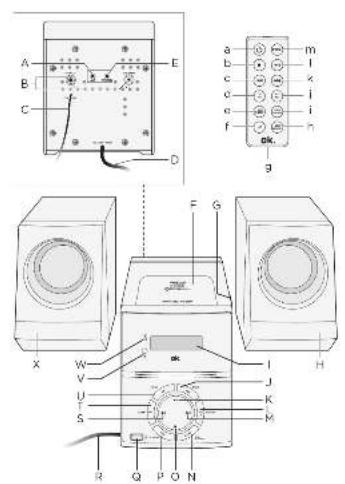
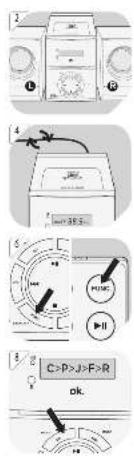
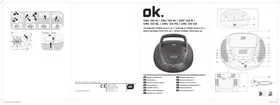
COMPONENTS
| Mini-Hifi system | Remote control |
| A. AUX IN jackB. Speaker right/left jackC. Wired antennaD. Power cable with plugE. Headphone jackF. CD lid with SNOOZE/SLEEPG. CD lid openerH. SpeakerI. DisplayJ. AMS/MODE (memory mode)K. Playback/Pause buttonL. VOL+/ALARM2 buttonM. Forward buttonN. CLK SET/PRE/FOLDER buttonO. Stop buttonP. FUNC. button(select source)Q. USB slotR. Power cable with plugS. Backward buttonT. VOL-/ALARM1 buttonU. EQ/FM ST. buttonV. Infrared sensorW. Bluetooth sensorX. Speaker | a. POWER button (on/off switch)b. STOP buttonc. REPEAT (repeat playback)d. V-/AL1 buttone. PRE-/ALBUM buttonf. EQ buttong. BATTERYh. AMS/MODE buttoni. PRE+/ALBUM buttonj. V+/AL2 buttonk. Forward buttorm. WIEDERGABE-/PAUSE buttonm. FUNC. button |
Note
The keys on the remote control function the same way as the keys on the device. All main functions can be accessed with the remote control. If the remote control does not work, please check the followings:
If there any object between the product and remote control causing obstruction.
Try to darken the room or to reduce the distance between device and remote control.
Is the battery installed with correct polarity (+ to +,- to-?
Try with a brand new battery.
BEFORE FIRST TIME USE
Remove the product and accessories from the original packaging carefully. For disposal of the original packaging, follow applicable legal requirements. If you have questions about correct disposal, contact your local authority.
Check the package contents for completeness and damage. If the package content is incomplete or damages can be found, contact your place of purchase immediately.
BATTERY OF REMOTE CONTROL
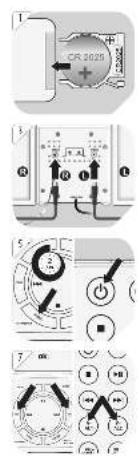
Open the battery compartment. Insert one new battery of type CR2025 observing the + and - polarities as indicated on the battery and inside the battery compartment.
INSTALLATION
2 Place the hi-fi system and loudspeakers on an even, horizontal and steady surface. The speakers should be placed one to the left and one to right of the hi-fi system.
3 Connect the cinch-plugs of both loudspeakers to the cinch-sockets.
4 Put the end of wire aerial up to receive at best signal strength. Connect the power plug to the mains.
CLOCK SETUP
- When product is connected with mains, 0:00 appears on the display in standby mode.
- Press and hold CLK SET for 2 seconds. Select with or buttons the time format 24H/12H and confirm with CLK SET.
- Set the hours and minutes each with the I or buttons and confirm each bz pressing CLK SET.
SETTING ALARM
Note:
The alarm can only be set when the product is in off mode (standby)
Ensure the time is set correctly
ALARM 1
- Press and hold the ALARM1 button (AL1 on the remote control) until the symbol and the alarm time flash on the display. Note: If no settings done within 5 seconds the display will turn off into standby.
- Set the hours and minutes each with the or . Confirm the each with ALARM1 button (AL1 on the remote control).
- Use to select one of the below alarm functions:
BELL > tan > CD > USB
- Confirm with ALARM1 button (AL1 on the remote control).
- Press ALARM1 button (AL1 on the remote control) to activate or de-activate the alarm.
ALARM 2
For setup, switching on/off of ALARM 2 follow the instructions as given for setup of ALARM 1. But instead of pushing ALARM2 button (AL2 on the remote control) push the ALARM1 button (AL1 on the remote control).
STOP ALARM
- Snooze function: Press SNOOZE button to suspend alarm sound for a few minutes. The alarm will start again after approx. 9 minutes. The set alarm mode will remain flashing on the display.
- Press STANDBY to stop alarm. Press ALARM1 or ALARM2 to cancel (de-activate) alarm.
EN
16
OPERATION Switching ON and OFF
Press STANDBY button on hi-fi system or on remote control to switch ON. For switching off. Press STANDBY button on hi-fi system for at least 2 seconds or press button on remote control.
Mode selection
Press the STANDBY button on hi-fi system or FUNC. button on remote control to select mode in order tuner (Radio) > CD (CD-mode) > USB > BT (Bluetooth) > AUX (AuX IN).
Volume control
The loudspeaker volume can be easily controlled by pressing buttons VOL + / V+ or VOL - / V- on the hi-fi system or remote control. The volume is shown in display for a moment.
Sound settings
The sound profile can be set according to individual needs. There are five sound profiles, ROCK/JAZZ/POP/CLASSIC/NORMAL available.
C = Classic
P=Pop
J = Jazz
F=Flat
R = Rock
Press EQ to switch through the sound profiles. If no sound profile is shown in display the sound is set to NORMAL which is not indicated.
Sleep function
9 Press and hold SNOOZE/SLEEP button on the CD player lid button until OFF shows on display. Press SNOOZE/SLEEP each time shortly to adjust the sleep timer in 10 Minutes steps from 120 to 5 Minutes.
RADIO MODE
Tuning
10 1. Press and hold or button 2 seconds to start automatic tuning process.
- When a station is tuned in the tuning process, it will stop automatically and you can listen to your desired station.
- For manually selection or fine adjustment push the let buttons quickly only (< 0.5s) to change the frequency in steps of ± 0.1MHz
Memory preset
30 radio stations can be preset to a program list.
11 1. Select FM-radio mode (rAd). Set a station by tuning acc. to chapter Tuning.
2. Press the AMS/MODE button to start the presetting process.
3. Display will show P01 flashing.
4. Press the PRE- or PRE+ buttons to set the desired preset station number.
5. Press the AMS/MODE button again to save the radio station to the desired preset station number.
6. Once all the stations were preset, press the PRE- or PRE+ buttons to listen to your desired station.
Auto scan and preset
This product is equipped with automatic station search and saving function.
12 1. Press and hold button AMS/MODE for approx. 3 seconds. The FM-radio will auto search and save all available radio stations.
2. Once all the stations are preset, press the PRE- or PRE+ buttons to listen to your desired station.
CD MODE
13 Open the CD-player lid. Remove the carton disc transportation protection.
14 Insert a CD. Make sure it fits correctly on the arbor. Close the CD-player lid by pushing down.
- Select CD-player mode.
- For playing CD press Play
- For skipping songs forward or back press buttons I#
4.For fast-forward or rewind hold down buttons I. - For pausing a song press button Play again.
- To stop playing press buttons
Note: When skipping songs the title no. is shown in display for a moment. During playback, the play time is shown in display.
EN
18
REPEAT/RANDOM FUNCTION
During playback, press AMS/MODE repeatedly to switch the playback modes as follow:
| Press Display Result | ||
| 1x OFF Normal Playback | ||
| 2x REP 1 Repeat one track | ||
| 3x REP FOLD Repeat album (only for MP3) | ||
| 4x REP ALL Repeat all tracks | ||
| 5x RAND Play a track randomly |
Notes:
This product reads CD, CD-R/RW and MP3-CD discs. Other discs are not supported.
- When playing CD-R/RW discs the playback quality might be influenced by the quality of the burned disc. When burning CD-R/RW disks with audio files we recommend using the slowest burning speed.
USB MODE
15 Connect a USB drive to the USB socket.
- Select USB mode
- The system is scanning the USB drive and starts playing the first song automatically.
- The playback can be controlled in the same way as for CD player. All basic functions as play/ pause , skipping songs forward or back or fast-forward or rewind are available.
Note: All songs to be played shall be in one folder on USB drive. Music which is saved in sub folders cannot be played. The order of playing is given by the order of songs in folder.
Note: Connect the USB device directly to the USB port of the unit. Using an extension cable is not recommended and may cause interference and failure of data transfer. This product supports USB 1.1 and 2.0.
PROGRAM PLAYBACK CD/USB
Notes:
- Up to 20 CD tracks or up to 99 MP3 tracks can be programmed for a playback in any desired order.
-
Programmed playback can only be made from one single source - it cannot include tracks from CD disc and USB storage at the same time.
-
Stop playback: Press the button
- Enter program settings: Press the AMS/MODE button. P01 flashes on the display.
- Select desired track: Press b
- Save selected track into program memory: Press again the AMS/MODE button. P02 flashes on the display.
- Repeat step 3 and 4 to program additional tracks.
- After programming all the desired tracks, press button to start the program playback.
- Stop playback: Press 1x button.
- Cancel program playback: Press 2x button
BLUETOOTH®-MODE
This mode allows you to use the product as a speaker for an external device (e.g. mobile phone or MP3 player). The signal is transmitted wirelessly via Bluetooth®.
Hinweis:
Before playback, you must pair the product (in this case the Bluetooth® receiver) and the device (transmitter). The Bluetooth® ID is OMH 460BT-B.
COMPATIBILITY
This product is compatible with Bluetooth® enabled mobile phones and music devices. It features Bluetooth® version 2.1+EDR. It also works with devices featuring other Bluetooth® versions that support e.g.
Wireless stereo listening
A2DP (Advanced Audio Distribution Profile)
Wireless music control
AVRCP (Audio/Video Remote Control Profile)
Note:
- Keep the range of 8 meter when pairing.
- Before pairing a Bluetooth® AV source, refer to the AV source user guide regarding safety instructions and use with other devices.
BLUETOOTH® PLAYBACK
16 Turn ON the Bluetooth connection on your Bluetooth-player.
- Select Bluetooth® mode (BT).
- Connect your Bluetooth® player to the hi-fi system which is indicated as device OMH 460BT-B. If OMH 460BT-B is not shown, perform a scan with your Bluetooth® player. A password is not required for connection.
- Once both devices are connected you can start playback at your Bluetooth® player.
- In this mode the basic functions as play/pause , skipping songs forward or back or fastforward or rewind! are not available at the hi-fi system. Use the controls of your Bluetooth® player to control the playback. Only the volume can be controlled by pushing buttons VOL+/V+ or VOL-/V- at the hi-fi system or remote control.
- To end stop the playback and turn off Bluetooth connection at your Bluetooth player.
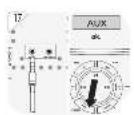
AUX IN - MODE
17 Connect your music player and the hi-fi system by audio cable with 3.5mm stereo jacks.
- Once both devices are connected you can start playback at your music player.
- Use the controls of your mediaplayer to control the playback.
- The volume can be controlled by pushing buttons VOL + / V+ or VOL - / V- at the hi-fi system or remote control.
CLEANING AND CARE
- Disconnect the product from the power supply before cleaning it. Clean the product with a soft, damp cloth and a mild cleaning agent. Finish by wiping it with a dry cloth. Do not use alcohol, acetone, benzene, scouring cleansers etc. to clean the product. Do not use hard brushes or metal objects.
- Warning! Never immerse electrical parts of the product in water during cleaning or operation. Never hold the product under running water.
- Warning! When cleaning, never use solvents or abrasive materials, hard brushes, metallic or sharp objects. Solvents are harmful to human health and can attack plastic parts, while abrasive cleaning mechanisms and tools may scratch the surface(s).
EN
20
SPECIFICATION
POWER SUPPLY
Input: 230V , 50 Hz
Operation power consumption : 10 W
Standby power consumption: < 1 W
Radio
Frequency range: 88 - 108 MHz
CDPlayback
Frequency response : 20 Hz - 20 KHz
Compatibility: CD/CDR/CDRW/MP3/WMA
Remote control
Batteries:CR2025,3Vnot included)
Connectivity
USB:USB2.0
Bluetooth:F-6188
Bluetooth profiles : HFPV1.5 , A2DPV1.2 , AVRCPV1.4 , HSP1.2 , GAVDP1.2 , IOP
Bluetooth range: 2.402 GHz - 2.480 GHz
Bluetooth version : V 2.1 + EDR
Frequency range: 2.4 GHz - 2.480 GHz
Max. RF: -3.92 dBm
AUX
:3.5mm
Speaker
Output power (RMS)
:2×2W
Sound Enhancement
: Amplifier IC: TA8227P
Sound System
:2 way speaker
Dimension
Main unit (W× H× D)
:135×165×224mm
Speaker box (W x H x D)
:98x162x152mm
Weight (Main unit and two speakers)
:2.05 kg
DECLARATION OF CONFORMITY
Hereby, [Imtron GmbH] declares that the radio equipment type [OMH 460BT-B] is in compliance with Directive 2014/53/EU. The full text of the EU declaration of conformity is available at the following internet address: http://de.ok-online.com/nc/de/suche.html
DISPOSAL

Do not dispose of this product as unsorted municipal waste. Return it to a designated collection point for the recycling of WEEE. By doing so, you will help to conserve resources and protect the environment. Contact your retailer or local authorities for more information.

Please dispose of batteries in an environmentally friendly manner. Do not put batteries into the household waste. Please use the return and collection systems in your community or contact the dealer where you purchased the product.
ENHORABUENA
A2DP (Advanced Audio Distribution Profile)
PROGRAMMARE LA RIPRODUZIONE CD/USB
Note:

- HERZLICHEN GLUCKWUNSCH!
- IMPORTANT SAFETY INSTRUCTIONS. READ CAREFULLY AND KEEP FOR FUTURE REFERENCE.
- EN
- INTENDED USE
- Note
- BEFORE FIRST TIME USE
- BATTERY OF REMOTE CONTROL
- INSTALLATION
- CLOCK SETUP
- SETTING ALARM
- Note:
- ALARM 1
- ALARM 2
- STOP ALARM
- OPERATION Switching ON and OFF
- Mode selection
- Volume control
- Sound settings
- Sleep function
- RADIO MODE
- Tuning
- Memory preset
- Auto scan and preset
- CD MODE
- REPEAT/RANDOM FUNCTION
- Notes:
- USB MODE
- PROGRAM PLAYBACK CD/USB
- BLUETOOTH®-MODE
- Hinweis:
- COMPATIBILITY
- Wireless stereo listening
- Wireless music control
- BLUETOOTH® PLAYBACK
- AUX IN - MODE
- CLEANING AND CARE
- SPECIFICATION
- POWER SUPPLY
- Radio
- CDPlayback
- Remote control
- Connectivity
- Speaker
- Dimension
- DECLARATION OF CONFORMITY
- DISPOSAL
- ENHORABUENA
- PROGRAMMARE LA RIPRODUZIONE CD/USB
Brand : OK
Model : OMH 460BTB
Category : Radio