
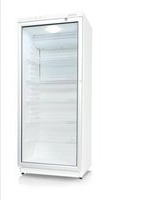
KS 9918 - Freezer SEVERIN - Free user manual and instructions
Find the device manual for free KS 9918 SEVERIN in PDF.
| Product type | Upright freezer |
| Brand | SEVERIN |
| Model | KS 9918 |
| Dimensions (H x W x D) | 1450 x 600 x 650 mm |
| Weight | 53 kg |
| Power supply | 230 V ~ 50 Hz |
| Energy class | A++ |
| Annual energy consumption | 193 kWh/year |
| Freezer net capacity | 196 L |
| Freezing capacity | 12 kg/24 h |
| Autonomy in case of power failure | 20 h |
| Climate class | T (16 °C to 43 °C) |
| Noise level | 41 dB(A) |
| Defrost type | Manual |
| Refrigerant | Isobutane (R600a) |
| Number of drawers | Not specified (several drawers including a Fast Freeze) |
| Temperature adjustment | Rotary thermostat (0 to max) |
| Indicator lights | Green (power), Red (high temperature alarm) |
| Reversible door | Yes (left/right) |
| Cleaning | Warm water and mild detergent |
| After-sales service | Contact an authorized agent |
| Spare parts | Available through authorized service |
Frequently Asked Questions - KS 9918 SEVERIN
User questions about KS 9918 SEVERIN
0 question about this device. Answer the ones you know or ask your own.
Ask a new question about this device
Download the instructions for your Freezer in PDF format for free! Find your manual KS 9918 - SEVERIN and take your electronic device back in hand. On this page are published all the documents necessary for the use of your device. KS 9918 by SEVERIN.
USER MANUAL KS 9918 SEVERIN
GB Instructions for use Cabinet freezer 12
In this German version, the German translation of the German translation is: In this German translation, the German translation of the German translation is: In this German translation, the German translation of the German translation is:
Before using the appliance, read the following instructions carefully and keep this manual for future reference. The appliance must only be used by persons familiar with these instructions.
Transporting the appliance
- To prevent damage to the unit during transport, ensure that all accessories and components inside and around the appliance are securely fastened.
- The unit must only be transported in its vertical position; do not tilt any more than 30^ . For positioning, we recommend that you tilt the unit slightly backwards. In this way, the transport rollers can be used to move it to its intended place of installation.
- Once the unit has been positioned, wait for about 30 minutes before it is connected to the mains.
- If the unit has been tilted more than 30^ during transport, allow it to stand in an upright position for at least 4 hours before it is connected to the mains.
Connection to the mains supply
- The appliance should only be connected to an earthed socket installed in accordance with the regulations. Make sure that the supply voltage corresponds with the voltage marked on the rating label.
- This product complies with all binding CE labelling directives.
Do not operate this unit by means of a transformer. - To prevent noise vibration, ensure that the power cord does not touch any part of the rear of the unit.
Intended use
- This compressor-freezer unit is designed for deep-freezing and long-term storage of deep-frozen food, as well as for making ice-cubes.
Using it in any way other than the above is not advised. -
No responsibility is accepted if damage results from improper use, or if these instructions are not complied with.
This appliance is intended for domestic or similar applications, such as -
in staff kitchens in shops, offices and similar working environments,
- in agricultural working environments,
- by customers in hotels, motels etc. and
similar accommodation,
- in bed-and breakfast type environments.
This appliance is not intended for commercial use, nor for use in the catering business or similar wholesale environments.
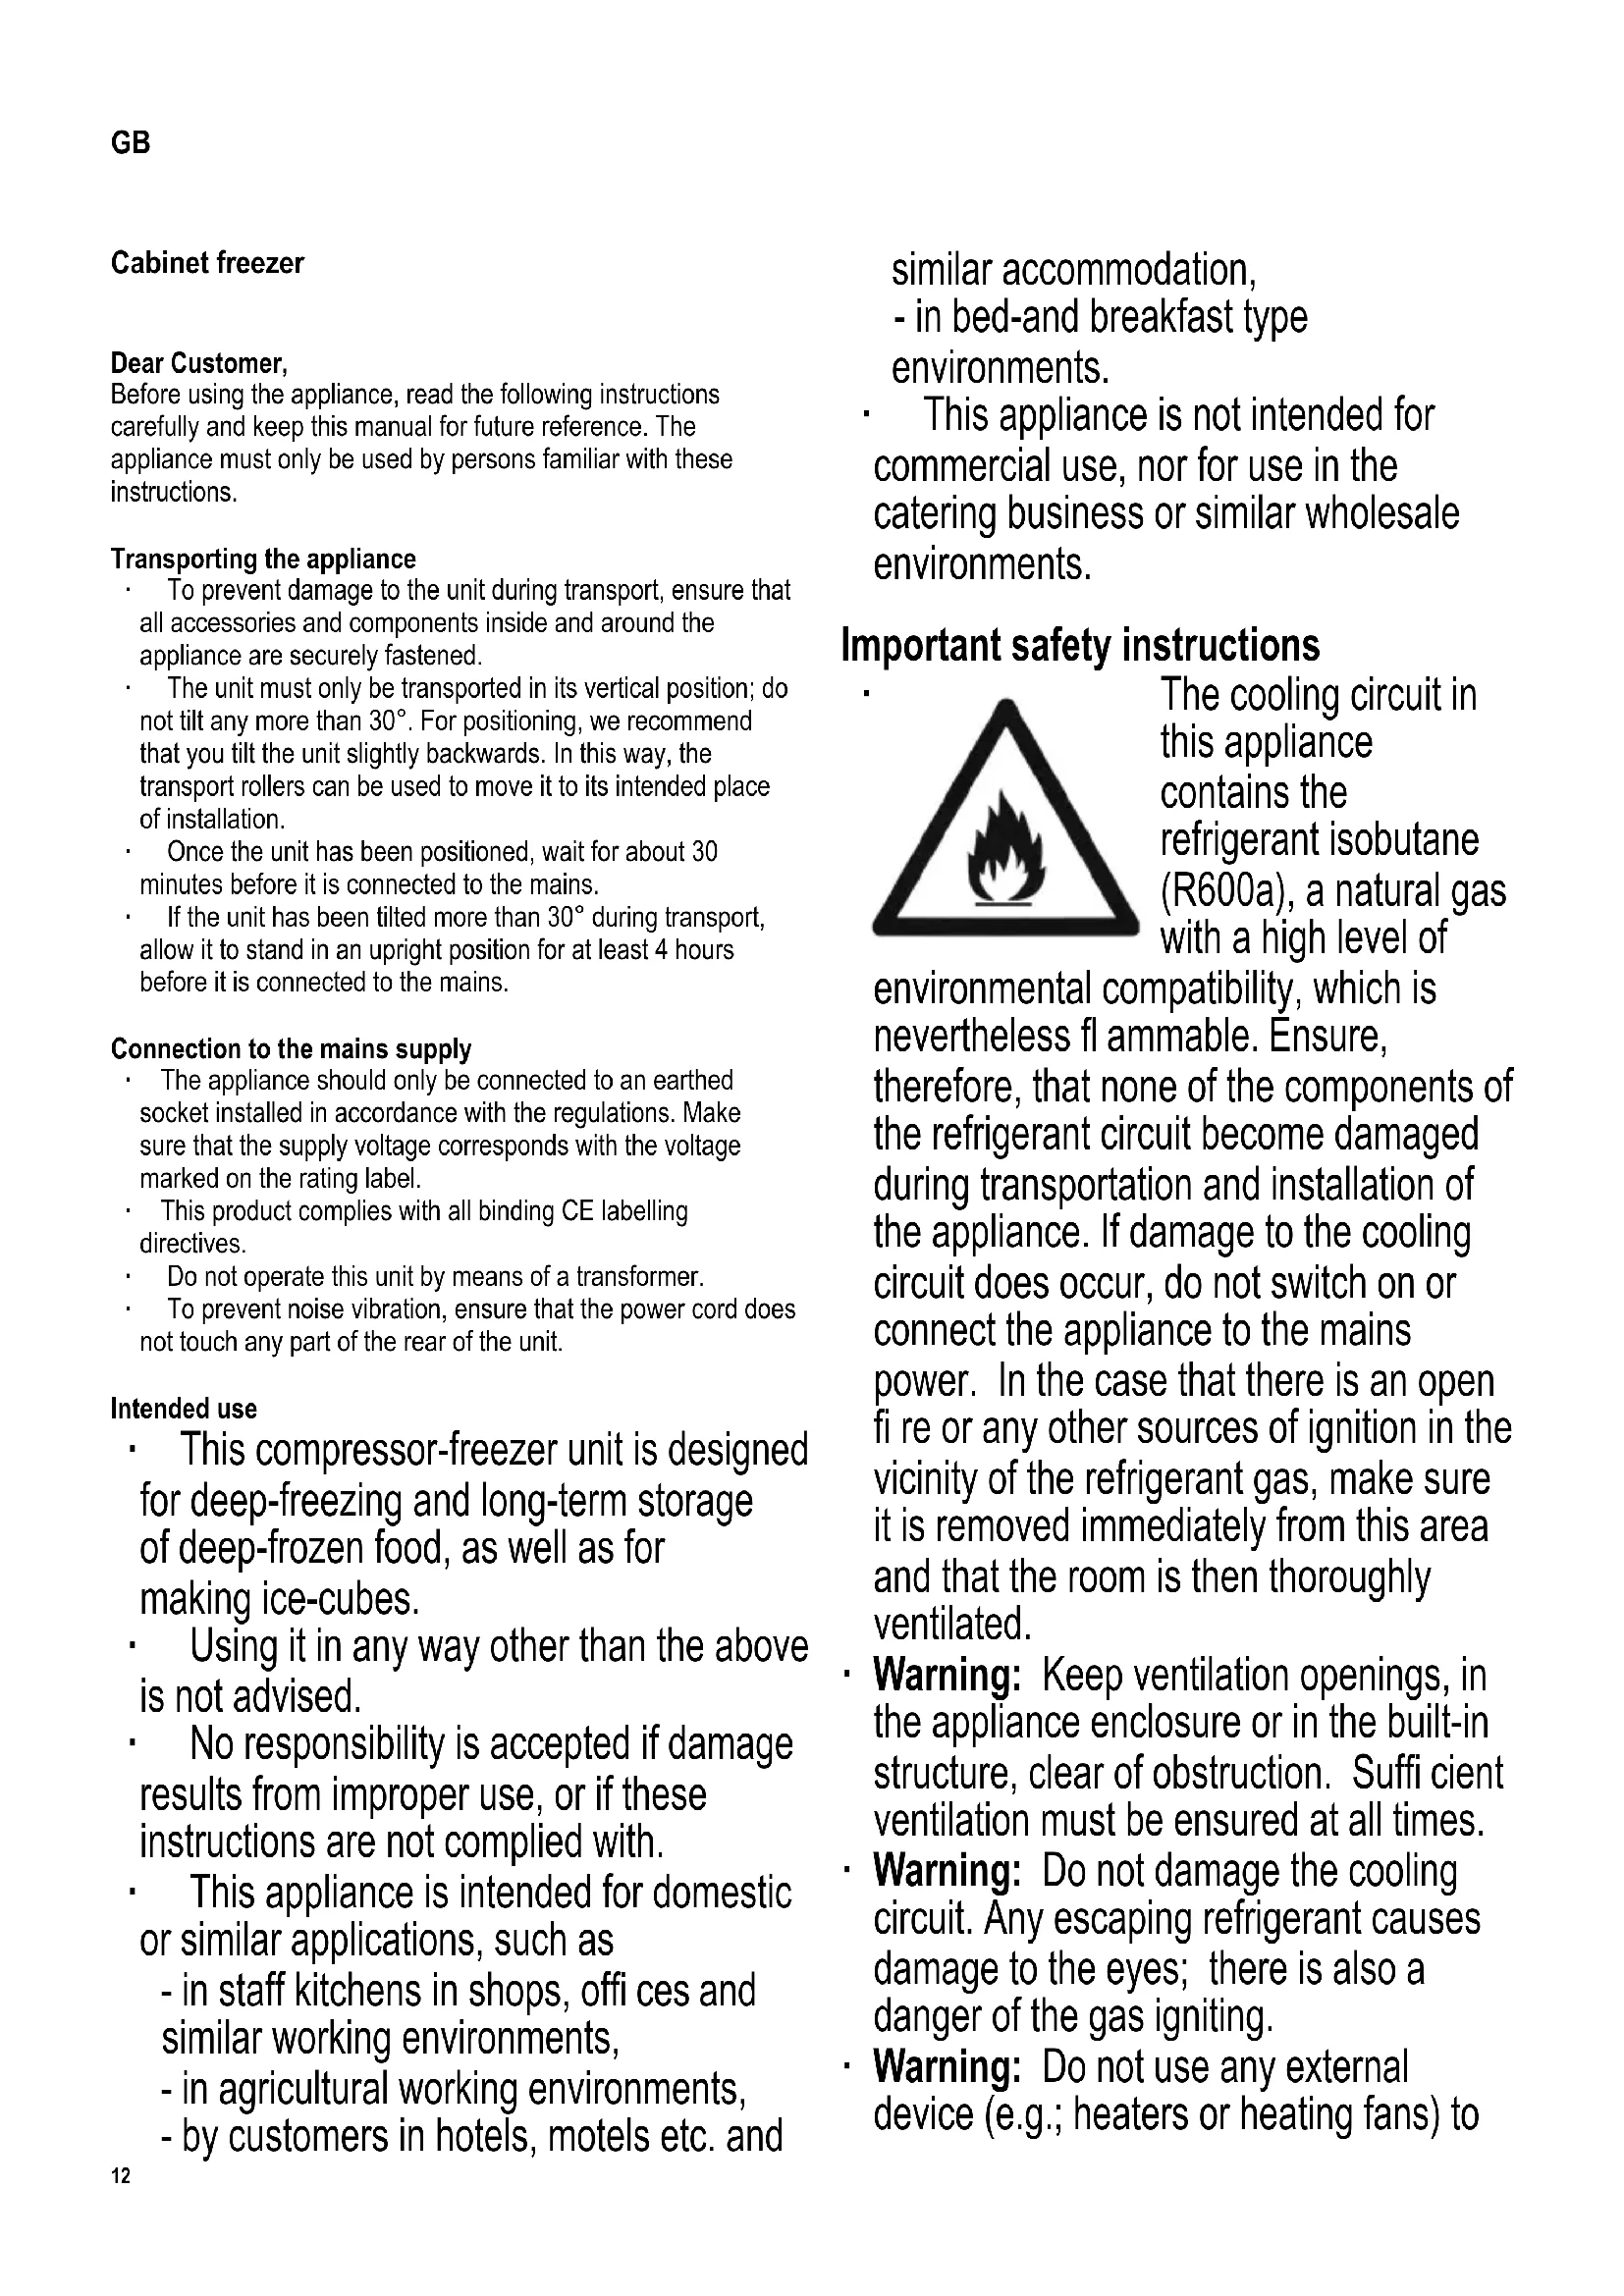
Important safety instructions
The cooling circuit in this appliance contains the refrigerant isobutane (R600a), a natural gas with a high level of
environmental compatibility, which is nevertheless flammable. Ensure, therefore, that none of the components of the refrigerant circuit become damaged during transportation and installation of the appliance. If damage to the cooling circuit does occur, do not switch on or connect the appliance to the mains power. In the case that there is an open fire or any other sources of ignition in the vicinity of the refrigerant gas, make sure it is removed immediately from this area and that the room is then thoroughly ventilated.
- Warning: Keep ventilation openings, in the appliance enclosure or in the built-in structure, clear of obstruction. Sufficient ventilation must be ensured at all times.
- Warning: Do not damage the cooling circuit. Any escaping refrigerant causes damage to the eyes; there is also a danger of the gas igniting.
- Warning: Do not use any external device (e.g.; heaters or heating fans) to
accelerate de-frosting; follow only the methods recommended in this manual.
- Warning: Do not operate any electrical appliances (e.g. ice makers) inside the storage compartment that are not specifically permitted in these instructions.
Before it is connected to the mains power, the unit must be thoroughly checked for transport damage, including its power cord. In the event of any such damage being found, the appliance must not be connected to the mains. - This appliance is not designed for the storage of explosive substances such as aerosol cans with a flammable propellant.
If the unit is sold, handed over to a third party or disposed of at a suitable recycling facility, attention must be drawn to the presence of the insulation agent 'cyclopenthane' as well as to the refrigerant R600a. For additional information on correct recycling please refer to the Disposal section.
In order to comply with safety regulations and to avoid hazards, any repairs or modifi cations to this unit must be carried out by our authorised service personnel, including the replacement of the power cord. - This appliance may be used by children (at least 8 years of age) and by persons with reduced physical, sensory or mental capabilities, or lacking experience and knowledge, provided they have been given supervision or instruction concerning the use of the appliance and fully understand all dangers and safety
precautions involved.
Children must not be permitted to play with the appliance.
Children must not be permitted to carry out any cleaning or maintenance work on the appliance.
-
For frequent cleaning we recommend the use of warm water with some mild detergent. For detailed information on cleaning the appliance, please refer to the section De-frosting and cleaning.
-
To prevent the risk of personal injury or damage to the unit, it must only be transported while in its original packaging. Two people are required for unpacking and installation.
-
Caution: Keep any packaging materials well away from children: there is a risk of suffocation.
The ice removed from the unit during de-frosting or cleaning is not suitable for human consumption.
-
The power cord should be regularly examined for any signs of damage. In the event of such damage being found, the appliance must no longer be used.
-
To avoid the risk of fire, do not place any thermo-electric appliances on top of the unit. Do not place liquid containers on top of the unit, to prevent any leaking or escaping liquid damaging the electrical insulation.
This unit is designed for storing food only.
Alcoholic substances may be stored only in properly sealed containers and in upright positions.
-
Do not store any glass bottles containing carbonated or other freezable liquids in the unit: such bottles may burst during the freezing process.
-
To avoid the risk of food poisoning, do not consume food after its storage time has expired. Thawed foods must not be frozen a second time.
-
Do not lean or put undue weight on the shelves, compartments, door etc.
-
Protect the inside of the refrigerator at all times from open fl ames and any other sources of ignition.
-
Remove the plug from the wall socket
-
in case of any malfunction,
- before de-frosting,
-during cleaning, -
before maintenance or repair work is carried out.
-
When removing the plug from the wall socket, never pull on the power cord; always grip the plug itself.
If the unit is not used for an extended period of time, we recommend keeping the door open.
We reserve the right to introduce technical modifications.
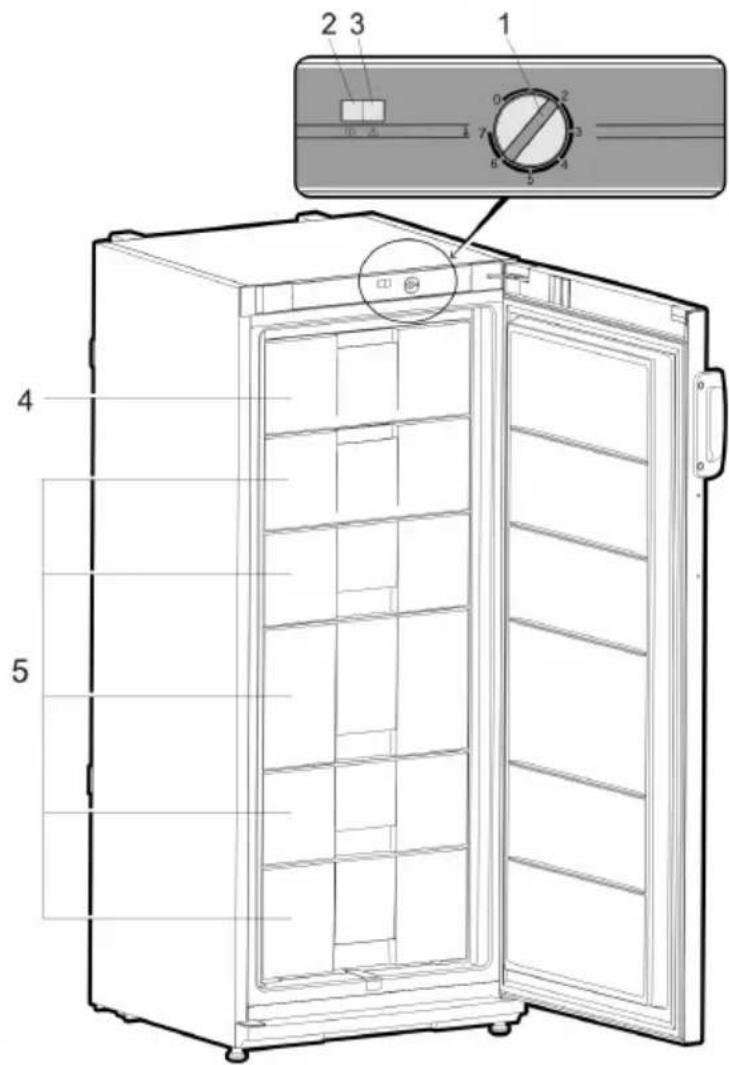
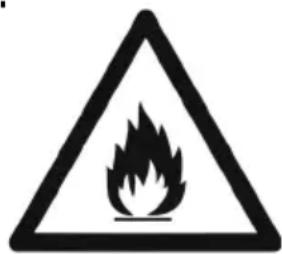
Familiarisation
Diagram similar!
- Temperature control
- Mains connection indicator (green)
- High-temperature alarm (red)
- Rapid-freeze drawer
- Freeze drawers
- Condenser
- Compressor
Before using for the first time
- Remove any exterior and interior packaging materials completely, including the transport securing devices.
The packaging materials must be properly disposed of.
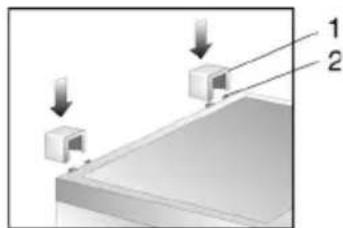
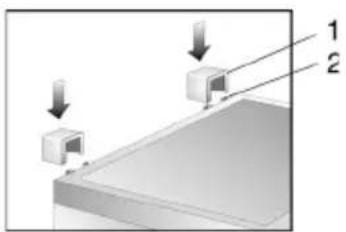
NOTE: When the door to the freezer unit is opened, a small red component will fall out; this is for transport only and can be disposed of. - Fit the two spacer elements (1, provided) into the corresponding guide slots (2) on the rear.
Before it is connected to the mains, the unit must be thoroughly checked for transport damage, including its power cord.
- Clean the unit as described in the section De-frosting and cleaning.
- When the unit is first switched on, a slight 'new' smell may be noticed. However, this will disappear once the cooling process has begun.
Installation
The appliance should be set up in a well-ventilated, dry room.
It should be operated in conditions where the relative humidity is no more than 70% .
- Refrigeration appliances are classified into certain climate classes. This classifi cation indicates the ambient temperature at which the device can be operated. Please
refer to the product data sheet for information on the classifi cation for this unit; the data sheet can be found at the end of this manual.
Do not use the appliance outdoors.
- Ensure that the plug is accessible and can be removed from the wall socket at any time.
- Do not expose the appliance to direct sunlight, and do not position it next to any heat sources (radiators, cookers etc). If this cannot be avoided, however, suitable insulation must be in installed between the heat source and the unit.
- The unit must not be installed inside a cabinet, nor directly below a hanging cupboard, shelf or similar object.
- In the case of uneven floors, the adjustable front feet on the unit can be used to compensate and ensure optimum stability.
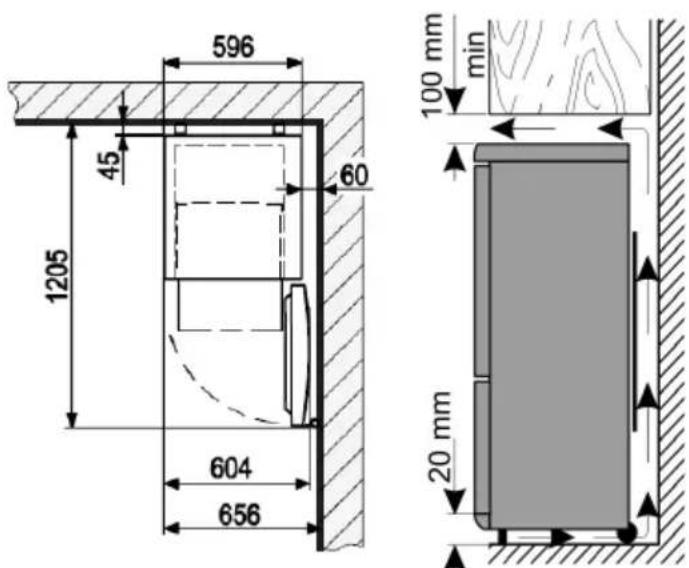
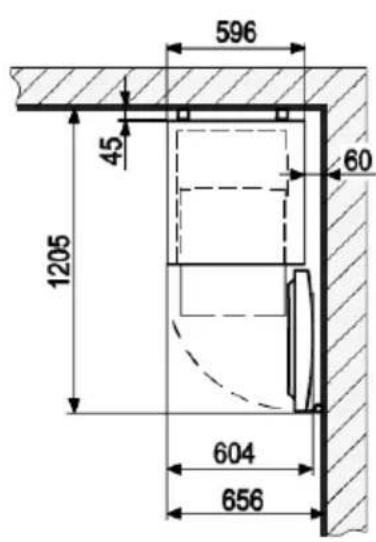
Set-up dimensions
Ventilation
If the cabinet freezer is installed with its side against a wall, ensure a minimum clearance of 60mm with the wall; this is to ensure that the freezer door can open suffi cientsly wide to slide out the drawers.
Temperature control
- The unit is re-activated by connecting it to the mains. It is only switched off completely when the plug is removed from the wall socket. In position '0', the cooling function is switched off, though the appliance is still connected to the mains.
- The temperature in the refrigerator cabinet can be adjusted by setting the temperature control. Turning the control clockwise will decrease the temperature, while turning it anticlockwise will increase it.
- The medium settings are usually most suitable for home use.
- We recommend using a thermometer to check the actual temperature inside the cabinet and make adjustments as necessary.
- Following a power interruption, or if the unit has been switched off on purpose, it may take around 5 minutes
before it switches on again.
Indicator lights

Mains connection indicator (green)
With the unit connected to the mains, the green light is permanently on.

High-temperature alarm indicator (red)
This light comes on if the internal temperature rises above 9^
Storing and freezing food
The temperature inside the unit depends mainly on the ambient temperature, the temperature control setting and the amount of food stored. It should also be noted that the interior temperature may increase every time the door is opened.
- The unit is designed for deep-freezing and long-term storage of frozen food, and for making ice cubes.
To ensure that nutritious elements such as vitamins are not lost, fresh food should be deep-frozen right through as quickly as possible. For this reason, prepared food should be put in the quick-freeze compartment, spaced out in one or two rows. The quick-freeze area inside the freezer compartment is marked Fast Freeze, where we recommend you first put the food to be frozen for quick-freezing, before moving it to other compartments (as appropriate) after 24 hours.
Caution:
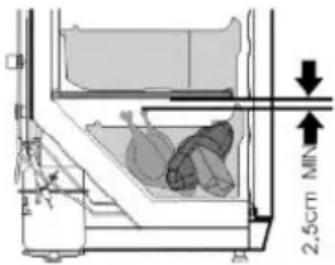
To ensure sufficient distribution of cold air, keep a minimum distance of 2.5cm between the vapouriser assembly and the tray containing the food to be frozen.

- Do not allow unfrozen food to come into contact with food that is already frozen.
- Caution: Do not exceed the maximum freezing capacity per day. The product data sheet at the end of this manual contains details of the maximum daily freezing capacity.
- For quick-freezing, set the temperature control to Max. After 24 hours, once the food is well frozen, the temperature control can be set back to its original position.
The time required to freeze food may be shortened by dividing it into smaller portions. - Suitable packaging materials for frozen food are transparent (i.e. non-coloured) plastic wrap or bags, or aluminium foil. The packaging materials should be well aired before use; check that the package is air-tight before freezing the food. We strongly recommend that you label every item stored in the freezer with all relevant information such as type of food,
freezing date and use-by date.
- Do not attempt to deep-freeze carbonated beverages, warm food or any kind of bottled liquids.
- Frozen food should first be defrosted in the refrigerator. This way, the food is defrosted at a slower rate, retaining its taste.
Use-by dates for frozen food are specified (in months) in the table below.
- Do not exceed these storage times.
However, always observe the manufacturer's use-by dates for the frozen food. - If the unit remains switched off for an extended period (eg during a power failure), the door should be kept closed; this will help to maintain the lowest possible temperature in the cabinet. The product data sheet contains detailed information of the maximum safe storage time in case of malfunction. Even a slight rise in the inside temperature will shorten the storage life of the food.
Making ice cubes
A special ice-cube tray is provided for making ice cubes. Fill the tray up to 34 with drinking water and place it in the freezer compartment for a few hours. The ice cubes are easier to remove from the tray if the tray is left standing at room temperature for 5 minutes.
De-frosting and cleaning
Always remove the plug from the wall socket before cleaning.
After a certain period of operation and depending on several factors (e.g. how often the door has been opened), a layer of ice will form on the evaporators located below the drawers and on the drawer fronts themselves. Once the build-up of ice has reached a thickness of 3 to 5mm the unit must be de-frosted, as the build-up of ice increases the power consumption of the appliance.
The freezer should be thoroughly cleaned at least twice a year.
Any accessories should be cleaned separately with soapy water. Do not put them in a dishwasher.
- Do not use abrasives or harsh cleaning solutions or any cleaning agents that contain alcohol.
Take care not to remove or damage the rating plate inside the cabinet during cleaning.
- Remove all food from the compartment and store it in a cool location, eg together with pre-frozen freezer-packs in a closed plastic container. Note that, even with a slight
increase in temperature, the storage life will be shortened and the food should be used as soon as possible.
- Keep the door open.
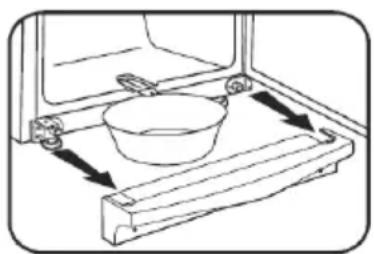
- Remove the cover panel.
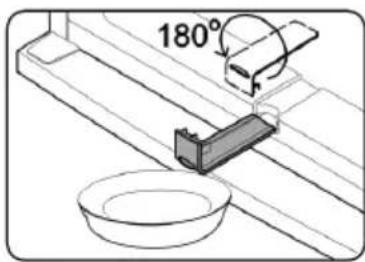
Pull out the drain channel from the freezer cabinet, turn it 180^ and secure it (see diagram). Place a suitable container underneath the channel outlet.
To accelerate defrosting, one or several containers with hot (but not boiling) water may be placed inside the freezer compartment. Do not pour water over or inside the unit.
- Warning: Do not use any external device or other means (e.g. heaters or heating fans) to accelerate de-frosting.
Clean the unit with a damp cloth and a little detergent. Wipe thoroughly dry afterwards.
Replace the drain channel and cover panel.
- Set the temperature control to its maximum position. After 24 hours, it may turned back to its normal setting.
Energy saving tips
The appliance should be set up in a well-ventilated, dry room.
- Do not expose the appliance to direct sunlight, and do not position it next to any heat sources (radiators, cookers etc.). If this cannot be avoided, however, suitable insulation must be installed between the heat source and the unit.
- Ensure sufficient air circulation around the sides of the unit.
- The compressor (at the rear) should be cleaned at regular intervals. Accumulated dust causes an increase in energy consumption.
Warm food should be allowed to cool down before it is stored inside.
- To prevent an increased build-up of ice, do not leave the doors of the unit open for too long when loading or taking out food.
- Frequent de-frosting helps to save energy. For detailed information on cleaning the appliance, please refer to the section De-frosting and cleaning.
- Do not set a lower-than-necessary temperature. For detailed information on the temperature settings, please refer to the section Temperature control.
Operating noise
Certain typical sounds can be heard when the appliance is switched on. These sounds are:
caused by the electrical motor within the compressor assembly; during compressor start-up the sound level will be slightly higher for a limited period of time.
caused by the cooling agent flowing through the circuit.
Trouble-shooting
The following table lists possible malfunctions and their probable causes and solutions. In the event of operational problems, check first whether a solution can be found using this table. If the problem persists, disconnect the appliance from the mains power and contact our Customer Service Department.
| Problem Possible cause and solution | |
| The appliance is not working at all. | ·The temperature control is set to ‘0’. → Use a higher temperature setting. ·The wall socket is defective. → Check the fuse. If necessary, have the wall outlet checked by a qualified electrician. |
| The inside temperature is not low enough. | ·Too much food has been stored in the appliance. → Do not store excessive food (see product data sheet). ·The doors are not properly closed. → Ensure that the doors are properly closed. ·The door seals are defective. → Check the door seals and contact our Customer Service if necessary. ·There is too much dust on the condenser. → Clean the condenser regularly. ·Insufficient ventilation: the unit is too close to a wall or other structure or object. → see section ‘Ventilation’. ·The temperature control is set too low. → Use a higher setting. |
| The normal operating sound changes or becomes louder. | ·The unit is not firmly set on the floor. → Use the adjustable front feet to align the unit properly. ·Adjacent furniture or objects are affected by the running of the cooling unit (i.e. causing them to vibrate). → Keep the stated clearances. ·Any objects on top of the unit might be vibrating → Remove such objects. |
| Excessive build-up of frost inside the freezer compartment. | ·It is necessary to de-frost the freezer compartment manually. → See ‘De-frosting and cleaning’ |
Reversible door
If required, the door may be reversed, i.e. from right-handed (default installation) to left.
- To avoid the risk of personal injury or damage to the unit, two people are needed to reverse the door.
- Warning: Always disconnect the unit from the mains before any maintenance or repair work is carried out.
Before you start, please note the following:
Always ensure that the correct number of washers is used on all hinge bolts and screws.
- So that the doors can close tightly against the frame, take the utmost care that they are properly aligned during re-assembly.
Diagram similar!
- Open the freezer door.
- Remove the four covers C from the housing and inside of the door.
-
Replace the extension of the 2-part cover, turned through 180, on the opposite side.
-
Unscrew the hinge bolt on the inside of the door in the area C/6. Caution: Support the door.
- Take off the freezer door and place it on a soft surface. Remove the hinge support from the underside of the door and fit the hinge support provided on the opposite side.
- Take out the fi xing screws and remove the upper bracket 6.Note the small plastic plate underneath the bracket.
- Turn the bracket 6 including the small plastic plate through 180^ and replace it on the other side of the cabinet freezer, using the two screw holes adjacent to each other.
- Remove the lower panel 1 by lifting it up slightly.
- Take out the fixing screws and remove the bracket 2 with its hinge bolt.
- Unscrew the hinge bolt, together with the serrated lock washers, from the bracket, and fit it into the corresponding opening on the opposite side of the bracket.
- Remove the bracket 7 and replace it with the holding bracket 2 with its hinge bolt.
- Now install the holding bracket 7 in the previous position of the bracket 2.
- Place the freezer door onto the hinge bolt on holding
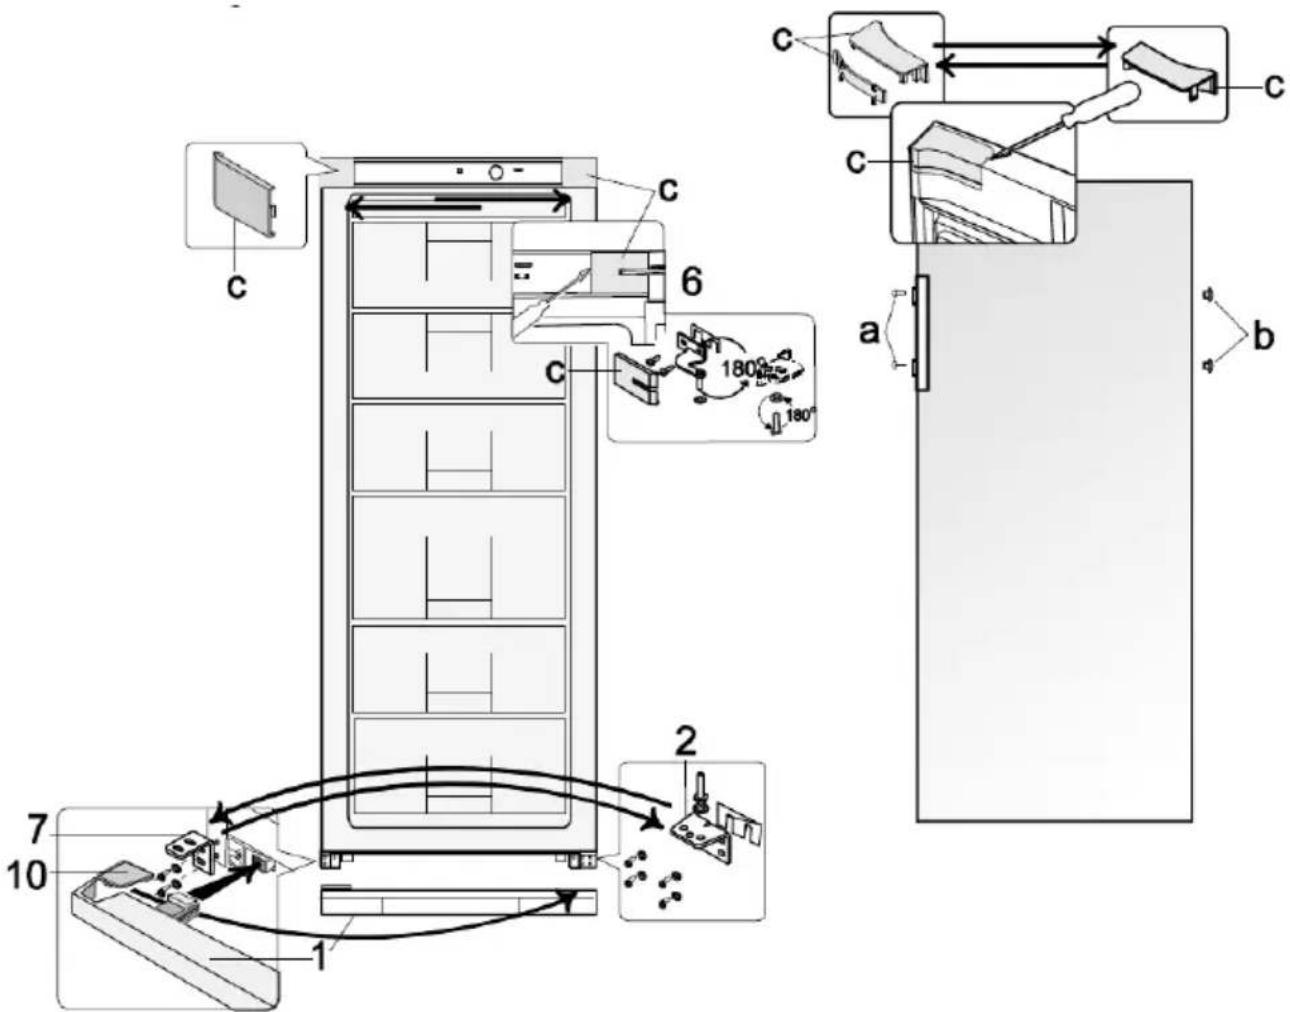
bracket 2. Caution: Support the door.
- Insert the hinge bolt of the bracket 6 into the freezer door and secure the bracket on the unit.
- Fit the four covers C over the bracket and the openings.
- Take out the cover 10 from the lower panel 1 and replace it on the opposite side.
- Replace the panel 1 on the appliance.
- Remove the screw covering caps a and the sealing plugs b.
- Take out the screws holding the door handle. Fit the handle on the opposite side, using the fixing screws to secure it. Push the sealing plugs into the now empty openings in the door and replace the covering caps on the screw heads.
Disposal
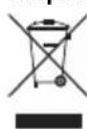
Devices marked with this symbol must be disposed of separately from your household waste, as they contain valuable materials which can be recycled.
Proper disposal protects the environment and human
health. Your local authority or retailer can provide information on the matter. The refrigerant and the chemical agent in the insulation foam must be disposed of through a competent agency. Take special care not to damage the cooling circuit before the unit is handed over for such disposal.
Guarantee
This product is guaranteed against defects in materials and workmanship for a period of two years from the date of purchase. Under this guarantee the manufacturer undertakes to repair or replace any parts found to be defective, providing the product is returned to one of our authorised service centres. This guarantee is only valid if the appliance has been used in accordance with the instructions, and provided that it has not been modifi ed, repaired or interfered with by any unauthorised person, or damaged through misuse.
This guarantee naturally does not cover wear and tear, nor breakables such as glass and ceramic items, bulbs etc. This guarantee does not affect your statutory rights, nor any legal rights you may have as a consumer under applicable national legislation governing the purchase of goods. If the product fails to operate and needs to be returned, pack it carefully, enclosing your name and address and the reason for return. If within the guarantee period, please also provide the guarantee card and proof of purchase.
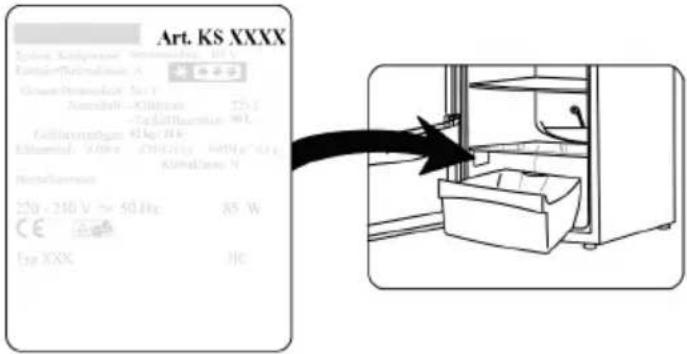
Information needed by the Customer Service Department Should repairs to the appliance become necessary, please contact our Customer Service Department, providing a detailed fault description and quoting the model number KS ... on the rating plate of the appliance (see picture). This information will help us to handle your request effi ciently.
In case of any malfunction or other problem, please contact our Customer Services Department. The address can be found in the appendix to this manual.
Product data sheet for refrigerating appliances *
| Art. no. KS 9799, 9918 | |
| Household refrigerating appliance category 8 - Freezer | |
| Energy efficiency classification | A++ |
| Energy consumption in kWh/year ** 193 | |
| Usable capacity - Refrigerator (litres) --- | |
| Usable capacity - Zero-degree zone compartment (litres) --- | |
| Usable capacity * * * * - Freezer unit (litres) (without drawers) | 196 |
| Frost-free : refrigeration unit --- | |
| Frost-free : freezer unit no | |
| Safe storage time in case of malfunction, hrs. 20 | |
| Freezing capacity, kg/24h 12 | |
| Climate classifi cation T | |
| Ambient temperature range, °C 16-43 | |
| Noise emission in dB(a) 41 | |
| Dimensions (H x W x D) in mm | 1450 x 600 x 650 |
| Weight (kg) | 53 |
| Electrical specifi cations | See rating plate |
- In accordance with EU directive 1062/2010 Annexe III
** The actual consumption depends on the pattern of use and the location of the appliance
Congélateur armoire
Chere cliente, Cher client,
Transport of apparatus
Regulator temperature
Neped npBbIM BkJIIOHeHHeM
IOnHocTbU ydaJIte BCE BHeuHHe n BHyTpEHHne ynaKOBOyHbIe MaTePnAbl, BKIOUaY TpaHCnOpTIpoBOyHbIe 3aUHTbIe npncnooc6JeHn.
- YnakoBouHbI MaTePnaJIbI DOnJXbI 6bITb yTnIN3NpOBAHbI COOTBETCTByUOIM O6pa3OM.
PIMMEAHHE. PnOtKpbBaHm DBepuM OPO3nIbHO 1kaFa BbIaTe MaIeHbKm KOMNoHET KpaCHOrO cBETA; OH PpeHa3HaueH ToIbKO IJa TpaHCnOpTnpOBKn N NOJIeXHT yTNIN3aUH.
BCTaBbTe DBe npocTabKn (1, BXoJrT B KOMnJIeK T NOCTaBKn) B COOTBeTcTByIOUne HAppaBnIIOUne Na3bl (2) Ha 3aHHe CTehKe npnbopa.
Ipeep BkIOUeHnem np6opBa Cetb eTo HxHO TuaTeJIbHO IPOBepHTb Ha HAIuYHe BO3MOXhIx IOBpeXJeHm BO BpEmr TpaHCnOpTnOBoK, BkIOUaH uHyp nITaHn.
BbIMOnTe np6Op B COOTBETCTBn C yka3aHnMa, daHHbIMN HnKe B pa3dJe «Pa3MopaxueaHue u Yucmka».
- Ppi nepBOM BkHoueHn np6opa MOKeT NOBtbcra JERKn 3aJax, KOTOpbI, OHaKO, NcHe3HT NocIe HaJaI pOcecca OxJaXdEHH.
YctaHOBka
- Pnp6opdoJxhen 6bIb yCTaHOBJeH B cyXoKOMHaTe C XopoWei BeHTnJIaUeN.
- Пибор должень Экглуатураься пи OTHOCHTeHBHOBlaЖHOCTN He 60Jee 70 %.
XonodnHbIe np6opbl KnaCnOuPyOTcno onpeJeHHbIM KImMaTHueCKM KNaCCAM.3Ta KnaCcnPkauny yka3bIBaET TempeaTy pOkpyKaHOse Cpebl,piKOTOpo MoKeT NcNoB30BaTc DaHHOe ycTPOCTBO. HΦopMaun O KInMaTHueCKOM KNaCCe 3TOrO n3dEINa Dana B Ta6Ntce CTexHueCKMn XapakTePncTnKam; Ta6Ntca C TexHueCKMn XapakTePncTnKam HxOuNTcB KOHc 3TOrO pyKOBODCTBA.
He nCIOJIb3yIe 3OT np6Op BHe nOmeueHn.
Y6eIITecB HAnuHnIOCTyNa KHTeNCEJbHOB BuJIke N B TOM, YTO ee MoXHo 6yDet BbyHyTb n3 PO3ETKN B IHO6oe BpeM.
He noDbepraTe np6Op BO3eCTBnO npMOro COJIHeuHOro CBeta n He yCTaHaBnBaIte erO B6n3n IIO6bIX NcTOUHKOB TELNa (paInaTOpOB, KxOHbIX PNT nT. d.). EcII NToro n36ExKaTb HeJIb3r, Heo6XoIMO yCTaHOBTb COOTBETCTByUOyU O30JLaMmEO MEXdY np6OpOM n NcTOUHKOM TEJIa.
He yctahabnaBaIte npnbop B ukafty nHEnocpeDCTBeHHo NOd HabeChbIM KxOHbIM ukaΦOM, noIKOu NIOIO6HbIM PpeMetOM.
Ecnn noHepOBhBm,TO nIaKOMneHcaunn HEPOBHOCTn N o6ecneueHn ONTtMaJIbHOJ yCTOuNBOCTM MOXHO NCIOJB3OBaTB HOKKn Pnpoopa.
YcTaHOBOHbIe pa3Mepbl

Bentnlaucn
Ecnu MOpO3nBbI uKaΦ yCTaHbNBAeTc60KOBoB CTeHKO K CTeHe, oecneYbTe 3a3Op He Mehee 60 MM MExdy uKaΦOM n CTeHKO; 3TO NO3BOJNT OTKpbITb DBepuy uKaΦa DOCTaTOUHO WnPOKO, YTO6bl BbIDBNHyTB Raunk.
PerynpoBka TemnepaTpybI
- Pnp6op haunhaet pa6oTaB npn noKluyeHn erO K cetN. POnHocTbIO OH oTKluoyaetc TaIbKO nocne n3BLeueHn ceTeBOB BuIKn 13 po3eTKn. PpynycTHOBKe pyuKn B noJooXHe «0» fpyHKU OxJaXdHn OTKluoyaETc, Ondako np6op BCE eue octaeTcnoKluoyehhblIM K cetN.
Tempepatya B MOp03nIbHOM 1ka4py peynpyeTc pyko peyIaTopa Tempeatypbl. Pn noBopote pyn No yacoboi cTpeIke Tempepatya nOnJxKaETc, a npn Nobopote npOTNB Yacoboi cTpeKN - NObIiAeTc. - Ppi 3KcPnyataun npnbopa B Domaunx yCNoBnX pyky peryIaTopa TempepaTybl peKOMeHdyETcra yCTaHOBnTB B cpeDHee NIOJKeHne.
UTo6bI npOBepntb TeKuSyTu TemnepaTyB uKafty, Mbl peKOMeHdyem NcNOJb3OBaTb TepMOMeTp N,ecNtNotpe6byTcB, BblONHHTb Heo6xOdmyo peryInpOBky. - Pnp npkepauehen nntaHn Hn npn HamepeHHOM OTKnHoueHnn np6opa MoKet npoHT npmepHOOT 5 MNHyT, npexde yem OH BKJIIOHTC8 CHOBA.
HdNkaTophBie JAmnoQKn

HnKaTOpHaJaMNoUka BKnIOueHnB CeTb (3eHeHa)
Korda npnbop nodkloucen K cetn, 3eJeHaj NaMnoquKa rOpNT NOCTOARHHO.

AbarHnHa HndKATOpHnJaMNoQKa BbICOKo Tempeatpy (kpachn)
3Ta lamnoyka 3aropaeTcra, KOrda BHyTppeHHra TemnepaTypa NOBbIwaeTcRaBbIe9 ^ C
XpaHeHne 3amopaxBaHne npOdyKTOB
Tempepatya BHytpn MOp03nlbHoro 6ka4a 3abncntB OCHOBHOM OT Tempepatby OkpykaIOUeI Cpebl, NOLOKeHHa PeryIaTopa Tempepatby IN KOJIueCTBa 3aIOKeHHbIX npOyKTOB. Heo6xOIMO ToKke 3aMeTtB, YTO Tempepatya BHytpn MOp03nlbHoro 6ka4a MoKet NObblaTbcr npi KaJDOM OTKpbIBaHHIN DBepbl.
Mop03nHbHbI ukaΦ npedHa3NaueH dЯ rIy6okO 3amOp03Kn IdoIroBpeMeHHoro XpaHeHna 3amOp0KeHHbIX npOdyKToB, a TaKxe dЯ pnpiroTOBneHry K6kOB Nbda.
YTO6bI O6ecNeuHb COxpaHHe TAKNX NITATEHBIX 3JIEMeHTOB KAK BNTAMINbI, CBExne IPOdyKTbI DOJXhBbI 6bITb NODBepHyTb Iy6OKoN 3AmOpO3Ke KAK MOxHO 6bICTpee. Dnra 3TORO pnproTOBJIeHbIe DnRA XpaHEnr IPOdyKtbl HxKHO NIOxKNTB B OTDeJeHne 6bICTpO 3AMOpO3Kn B OOnH INn DBA Pya, OCTaBnIg MEXy HmMn COOTBeCTByIOUne npomexkTN. OTDeJeHne 6bICTpO 3AMOpO3Kn BHYTPn MOP03NJbHOrO WkaFpa HmEeT MapKnPobKy Fast Freeze (5bICTpar 3AMOpO3Ka).Mb peKOMeHdyem NIOxKtB IPOdyKTb Iy 3AMopaxKBaHn CHaJaI B 3TO OTDeJeHne, Dnra INx 6bICTpO 3AMOpO3Kn, a NOTOM, yepez 24 yaca, nepeMeCTnTB INx B DPyrNe OTDeJeHnR (B COOTBeTCTBnC TINOM IPOdyKToB).
IpeynpexdneHie!
- UTo6bI oBecneuHb DoCTaTOHoe paCnpedeJeHne
XOIOHORO BO3Dyxa, Heo6xOIMO, yTo6bIM MeJy NCnAPnTeJIbHbIM y3IOM ILOTKOM C pOdyKTAMN DJIa 3amopaxkINBaHH6 bIIO He MeHee 2,5 cm.
HeDonyckaIte,HTo6bI He3amopOkeHHbIe npOdyKTbIKacannc b yKe 3amopOkeHHbIX npOdyKTOB.
- PpeynpexdHne! He npeBbIaTe MaKcMaJIbHyO CyTOUHYo MOUHOCTb 3aMOpaxNBaHn. DaHHbIe MaKcMaJIbHOy CyTOUHO MOUHOCTn 3aMOpaxNBaHn YKa3aHbI B TabIuNcE C TexHnueCKMN XapaKTepNCtNKaMn np6opap, NOMEeHNHOB KOnCe DaHHOpyKOBODCTBa.
ДябьICTpo3amopo3kn yCTaHOBnTe pykny perynITopa TempepatpybIB noIOKeHne Max (MaKc.).Yepez 24 Yaca, KOrda npOdyKTbI 6yDyT yKe XopoIo 3amopoKeHbl, perynITop TempepatpybMoXHo yCTaHOBnTB B NepBOHaJaIbHoe NOIOKeHne.
Bpem3amop03KMOxHOcOKpaNTb,pa3eINB 3amopaxnBaEMble npOdykTbHa He6oNbune nopun.
- YnakoBOUHbIe MaTePnAJIbI, npriOdHbIe dIa 3AmOpOKeHHbIX npoDyKTOB,doJXHbI 6bITbN3 npo3paHoi NOIMepHOI pHeKN iIN naKeTob NnN n3 aJIOMNHueBOI qoJIbr. Ipeed 3amopaxHBaHMe mpoDyKTOB yNaKOBOUHbIe MaTePnAJIbI HeoBXOIMTO TAteJIbHO npOBeTpNTb, a 3aTeM npOBepNTb, He npOnyckaOT JIn OOH BO3dyx. Mbl HactoTaeTbHO peKomeHdyem Bam HaHocNTb 3TNKeTKy Ha KaJdbI npoDyKT, XpaHrauNCB B npiBope, c yka3aHMe TakoI HeoBXOIMo INHcOpMaun KAK TUN, daTa 3amopaxBaHry n CpOK roHDocTH npoDyKTA.
He nbTaTaeB noDBepratb rny6oko3aMOp0Ke ra3npoBaHHbIe HAnNTK, TeNbIe npOyKtBI NIN JIO6bIe XNDKocTN B 6ytblkax.
3amopoxeHHbI npOyKbI CHaHaH HyXHO pa3MOp03HTb B XoIOINbHNke. PnTakOM CnoCo6e npOyKbI pa3MopaxNBAOTcMaJIeHHeE, C COxpaHeHEm CBOero BKyCa.
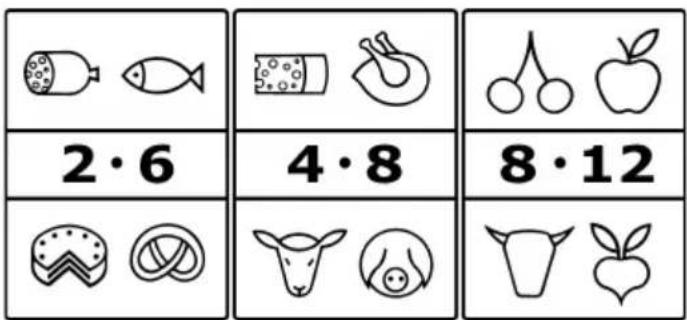
CpOKn roDHOCTn 3amOpOxehHbIX npOdyKTOB yka3aHbI (B Mecraax) B HNKePnPBeDeHHoT Ta6nue.
| 2·6 | 4·8 | 8·12 |
He npebbiwaiTe 3Tu cpoK xpaHEnHa.
Kpome TOrO, Bcerda co6nIouaTe cpoKn XpaHEnna 3amopoxKeHHbIX npOdyKTOB,yKa3aHHbIe pOn3BOJNTeJIeM.
Ecni npn6op ocTaeTc8 OTKnHoueHHbIM Ha dIInTeJIbHbI nepnoB BpeMeHn (HaNPmEep, npn nepepbBe B 3HepeOCha6KeHnn), DePKeTc DBepCu 3aKpbToi; 3TO NOMoKet COxpaHHTB B np6ope MaKcMaJIbHO BO3MOXHy HO H3KyU ToMnepaTpy. NOpmaun O MaKcMaJIbHO BO3MOXHom BpeMeHn 6e3OnacHO xpaHEnr IPOdyKTOB B Cnyaee HeNoJaKn CoepJNTc8 BA TabNue C TeXHnueckmX xapakTepcntkamn np6opa. DaXe He6oJIbWoE IOBbIWeHne TEMnpaTpbl BHyTpN MOpO3NJbHO WkaFa npNBedeT K COKpaUeHNIO cPoka rOdHOCTn IPOdyKTOB.
PnroTOBneHne Ky6NKOB Nbda
Pnp6op ykomnneKToBAn CneuaJIbHbIM IOTKOM DnI npriTOBHeHna Ky6NKOB Nbda. HanOJHnTe IOTOK Ha 3/ nITBeBOI BOoI NIOCTaBBte erO B MOpO3NbHbI WkaΦ Ha HECKOJIbKO YacOB. Ky6KN JbDa I3BNEKaOTcR N3 IOTKa IeYe, ecIn OCTaNTb Ero Ha 5 MNHT npn KOMHaTHoTemNepaType.
Pa3mopaxnBaHne n uCtka
Iocne 3KcNpyataunu WkaΦa B TeueHne HeKOtOPOB BpemeHn B 3aBNCIMoCTn OT HeCKOJIbKnxΦaKTOpOB (HaNPmep,OT TOR, Kaq YacTo OTKpbIbAlacb DBePca), Ha NcnapTeJx, paCNOJIOKeHHbIX IOd BvIDBIVHbIMn IaUNKaMn, H aΦpoHTaJIbHOINOBEPXHOCTn CamIX BvIDBHXbIX JaIKOB o6pa3yeTcSNoI Nbda. Korda ToJIuHa cNoI JbDa IOCTnHET 3-5 MM, WkaΦHyxHo pa3MOPo3ntb, TaK KaK Obpa3OBaHne NbDa yBeINuHBaET NOTpe6JIeHne 3Heprnn np6obopom.
Mop03nBHyI uKaΦ Heo6xOuMo TuaTeNbHO MbITb He MeHee 2 pa3 B roJ.
Bcerda BbHMaTe WTeNceJbHyIO BNky n3 po3eTKn nepeq YnCTKo npnbopa.
ПинадлесхочиHyжHoMbITbOTdJIbHO TENIOI MblbHOBoJe.He MoTe INB NOcyDOMOeHOH MaUNHe.
He nCnoB3yIte a6pa3nBhIe BeueCTBa nn cnIbHOeNCTByIOUne MOIOUne paCTBOpbl, a TaKKe cnpTocOdepJkaUne YnCTAunie CpeDCTBa.
BybTe BHNMaTeIbHbI, YTo6bl He OToPbTa b Nn He NOBpeiHT b BO Bpem qNCTK 3aBOdCKy To6JIuKy BHyTp npi6opa.
BbHbTe n3 WkaFa Bce npOdyKbI IN NOIOXHTe Nx B IpOxJaADHe MeCTO, HApPIMep, B pNACTIKOBbl KOHTeHep BMeCTe C npEaBapNTeJIbHO 3amOpOKeHHbIMn aKKyMylrTopAmN xOJOna. ObpaTne BHNMaHne Ha TO, YTO daXe np He3NaHTeNBOM NOBbIeHNN TempePaTypbI CpOK XpAHENr IPOdyKTOB COKpaUaTcR IN NX CNeDyET yNOTpe6ntb KaK MoXHo Ckopee.
OCTaBte DBepey OTKpbIToI.
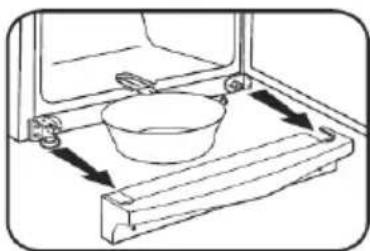
- CHIMITE DEKOPATNBHYI NaHeNb.
BbIBHbTe n3 ukaFa dpeHaXhbl KaHAp, nobepHnTe ero Ha 180^ n 3aФNKcnpyTe (cm. cxemy). NocTabte COOTBeTCTByIOUyO EMKoCTb NOd CJIINBHOe OTBepCTne DpeHaXHOrO KaHAp.

YTO6bI yCKOpNTb pa3MopaxNBaHHe, B MOpO3nBHyBn IkaΦ MOXHO IOCTABNTb HECKoJIbKO EMKoCTeN C TOrpeuB OBOOn (Ho He c KInrTkom). He JeTe BDOy Ha np6Op nIN BHyTpbeo.
- PpeDynpexdHne. He nCnOJb3yUte KaKHe-Ni6o BHeuHne npncno6JIeHnI nn DpyIe CpeIcTBA (HaNPmep, HArpeBaTeII nn TEnNoBeHTINrTopbl) dIy yCKOpEHn pa3MopaxNBaHn.
OuHCTIe np6Op BJIaXHOJ TKAHbIO C pINMeHENEM He6oJIbIoo KOJIYeCTBa MOJOe rO cpeIcTBA. 3aTeM TuaTeJIbHO BbITpIte np6Op HAcyxo.
- YctaHOBNTe Ha MeCTO dpeHaxHbI KaHaJI N DeKopaTUBHyIO naHeJIb.
- UctahOBHTpe peryIaTOp TemnepaTypbHa MaKcImaJIbHoe 3NaueHne. Ypeez 24 yaca peryIaTOp TemnepaTypb MoXHO CHOBA UCTAHOBITb B HopMaJIbHoe NOLOKeHne.
Pone3HbIe COBtI no 3KoHOMn 3JIeKtpO3Heprn
Mop03nHbHmkaΦdoJIkeH6blb yCTaHOBHeH B cyXoI KOMHaTe C xopoWe BeHTNJrAnei.
He noDBepraIte MOpO3nIbHbI uKaΦ Bo3DeiCtBnIO nprAmoro coJIneHOrO CBeTa n He yCTaHaBnBaIe ee B5JIn3n IIO6bIX NcTOUHKnOB TeNna (paDnAToPOB, KxOHbIX PNT n T. d.). Ecnn 3TOrO n36ExaTb HEnb3r, Heo6XoIMo YCTaHOBnTB COOTBeTCTByOuYIO N3OJaUNo MeKdY npu6Opom n NcTOUHKnOM TeNna.
- ObecneYbTe DoCTaToCHyU CnPKyIaIIO BO3dYxa BOKpyr npu6opa.
Heo6xOIMOpeyIpaTbKOMPecCOP(ha 3aHne CTENKe np6opa).HaKaIIINBaIOUaCra Ha KOMPecCope IIbIb IpNBOiNT K yBeJIuYeHIO IOTppe6JeHnA 3JIeKtpo3Heprnn.
- PpexJe yem NIOXnTB TeNbIe IpoDyKtbl B MOpO3nHbIu KaΦ, DaIte NM IOCTaTOH OcTbITb.
YTo6bI He DoIpyCTnTb yBeJIuYeHnO OTIOKeHnA Nbda,He OCTaBnIe TcIIuWkOM DOIIO OTKpbITbIM NDbepUbI pnp6opa, KOrDa Bbl KlaTe mNl DoCTaeTe npOdyKtbl.
- Yactoe pa3MopaxnBaHne cnoc6CTBye Tc6epexHNO 3JIeKTPo3Heprnn. Yo6bI nOlyuHTb 60Jee NOpDpo6HyOnHΦopMaUIO OOnCTKe Pnp6opa, O6paTntEcB, IoxaNyInCTa, K pa3dEny Pa3MopaxueaHue u Uucmka.
He yctaHaBnBaIte Tempeatpy Hxke Heo6xoIMoH. TTo6bI nOlyuHTb 6OJIe e NoDpo6HyIO INΦopMaUIO o peryJInpOBKe Tempeatpybl, NOXAJYnCTa, K pa3dEny PeaynpO8ka memnpamypbl.
Pa6ochn yum
Korda npn6op BkIoueH, MoXHO ycNbIwaTb HeKOtOpbI TnnuHbIe Wymbl. 3TN Wymbl:
IPOIN3BOJATC8 3JIeKTPoDVBiratTeJIeM B KOMPpeCCOPHOM y3JIe; BO BpEma 3aynska KOMPpeCCopa ypoBeHb IyMaB npnbope 6ydt Bblwe B TeueHne HeKOTOpORO BpemEH;
PON3BOADTcXnAdareHTOM,uKpUpyuOUMBNCTeMe.
Ponck yctpaHHe HncnpabHocTei
B npBvEeHHo 3decb Ta6nue nepeuCneHb BO3MOxHbI HeNoJaKn, INX BO3MOxHbI npuHbI n CnOCobI yCTpaHeHr. PnB O3HNKHOBeHn np6Jem BO BpEma KcNpyaTcuN np6opa Chauana npOBepTe HaJIyHe BO3MOxHOrO CnOC6a INx ycTaPaeHnB 3ToI Ta6nue.
| Пюблеса | Возможнaya причина и сносob устрасаня |
| Пюбор He paBOTaET. | · Perулитор Tempepatуры установлен Ha '0'. → YctanobITE peperЯтор Tempepatуры Ha 6oJIe Be bICOKOE 3HaueHne. · HeuCnравна steHная рo3etka. → Пюверьte predoхpaHntelb.Если Heo6xOДМо,образпесь к KBaIIINФИцрOBaHHOMу 3IeKTPNKUдЯ пюверкп рo3etkn |
| Нedoстаточно НИЗКая Tempepatура BHytrpNi Shkaфa. | ·В пюборе xpaHNTССЛшКOM MHOОPreODYKTOB.→He xpaHNTe CSLSHCOM MHOOr ppoJyKToB (CM. TabIицу cTexHnueckIMM xapaKTePrcNCTKAMn Prn6bopa). ·ПLOXO 3akpyITbI dBePcbl.→YbeDInTECB,чTo BCEdEptbI PIIOTHO 3akpyITbI. ·HeuCnравны уллOTнEHня DBepeZ.→Пюверьte уллOTнEHня DBepeZ И сIJ NEX6xOДМо,образпесь B NaIly cepBnchNo cIyJ6b. ·Ha nCnapitele сLshKOM MHOОпbl.→PeryIyRPhO OUYIaIte ИсnapiteNB. ·HeoCtatoчно ВeHTINJIaIzma: пюбор сToIT CSLSHCOM 6IIN3KO OT CTeHb IIN OT dpyroJ KOHCTpyKUnI INI ppeMeta.→CM. pa3deJ «BeHmUJIaIzma」. ·PeryIyTAPot Tempepatуры установлен Ha cLShKOM HIN3KOE 3HaueHne.→YctanobITE peperЯтор Tempepatуры Ha 6oJIe Be bICOKOE 3HaueHne. |
| Hoprmaльный уровень shума пюбора в pa6Oчem coSTOnHni N3MeHЯется ИП CTahOBITcR BbISe. | ·Пюбор установлен Ha пОн HeuCTOчИBO.→ВырOBЯITE пюбор пriп пomoшипппегдИХ ругь. ·Ha paCnoIooJeuHbIe ряДOM Me6eIb IIN ppeDMeTbI Bo3dEyCTByET pa6Ota XolodINlbHoro arperaTa (TO ectb, BbI3bIaEТИxBi6paIu).→CobIIOJaIte yka3aHHble 3a3Opbl. ·Взможная ВИБаципPrepeMtToB,нaxOДшИХСЯ на пюбор.→Y6eRite 3TNпpeMtBl. |
| Чeзмерhoe образование ИHERВ МороЗильnom Shkaфу. | ·Heo6xOДМо Pa3MopO3NtB МороЗильский shkaФВуЧMu.→CM. pa3dJI«Рa3MopaxuaBaHue uчusmka». |
IpehenabeWbMaMdBepa
- PnHHeo6xOIMOCrN DBePcUy MoXHo IpeHaBecNTb Ha dpyryTOCTOPHy, TO eCTb C npaBoI CTOpOHbI (3aBOIDcKa yctaHOBA) Ha neByIO.
UTo6bI He NOpLyuHTb TpaBMy n He NOBpeiNTb npu6op, IpeHabeWunBaHne DBePcBi Heo6xOaMBOBbIOJNHTb BDOEM. - PpeDynpexdHne! Bcerda otKlnouaTe npnbop ot cetn pepeBbIIOJIHeHnem pa60 T NO TEXHnueckomy obcnyxBAHNO nIIN pemOnTy npnbopa.
- Pered NaHauanom pa6oTbI o6paTnTe, noXaNyIcTa, BHIMaHHe Ha cJeDyUoJee:
BCERda CNEINTe 3a TEM, YTO6bl OCN DBePbIX ITeTJIb IN KpeIeXHbIe BnHTbI 6blnn yCTaHOBHeHbIC npaBnJIbHbIM KOJIueCTBOM 7ai6;
TO6bI DBePcI IIOTHO npINerAaN K pame, cTapaNTecb KaK MOxH0 TtuaTeNbHee BbIPOBnRb Nx npu opaTHo cbOpKe.
B4-061/062 NO,181 Exhibition Road
Jiangdong District, Ningbo
Tel.: +86 400 166 0336
Fax: +86 0574 55331669
Web: www.nbautin.com.cn
Web: www.autin.com.cn
Czech Republic
BVZ Commerce s.r.o.
Parkerova 618
CZ 25067 Klecany
Tel.: +420 233 55 94 74
Fax:+420233558159
Danmark
F&H of Scandinavia A/S
Gl. Skivevei 70
DK-8800 Viborg
Tel.: +45 8928 1300
Fax:+4589281301
26 Oaktree Business Park
Trim Co., Meath
Tel.:0469483100
Fax:0469483663
Web: www.bluestone.ie
Italia
ASSISTENZA POST-VENDITA
NUMERO VERDE 800224155
E-Mail: assistenza@severinitalia.it
Indonesia
PT. Setai Modern Elektronik
Email: info@severin.co.id
Web.: www.severin.co.id
Jakarta
Komp. Glodok Plaza Blok F No. 9, JI. Pinangsia Raya, Jakarta
Barat
02165911888/0216592889
Medan
JI. Apel No. 88 Kom. Cemara Asri
061 6620186 / 061 6625836
Surabaya
Perqudanqan Mutiara Margo Mulyo Indah,
Blok DC No. 2
Telp:(031)749 1012,(031)749 1016
Banjarmasin
Pergudangan Sumber Baru Jin A. Yani KM 17.9 Gudang B 15,
Gambut
05116730101
Tangerang
JI. Industri Raya III Blok AD No. 3, Cikupa
021 5902219-21
Cirebon
501, Megaventuretower 77-9
Moonrae-Dong 3qa, Yongdeungpo-Gu
Seoul, Korea
Tel.: +82-22-637 3245~7
Fax:+82-22-6373244
Service Hotline: 080-001-0190
Kuwait
Mohammed Abdulrahman Al Bahar
Al Bahar Building P.O.Box 148
Safat 13002 Kuwait
Tel.: +965 4810855
Latvia
SIA GTCL BALTIC
Piedrujas iela 7
LV-Riga 1073
Tel.: +371 29119989
Fax:+37167297769
Lebanon
Khoury Home
7th Floor, Cité Dora 3 Building, Dora
P.O.Box 70611
Antelias, Lebanon
Tel.: +961 244200
Fax:+9661253535
E-Mail: info@khouryhome.com
Internet: www.khouryhome.com
Luxembourg
Ser-Tec
A.A.K & Partners L.L.C.
P.O Box:-1650, Muttrah
Postal Code - 114
Sultanate of Oman
Tel.: +968 24834470
Fax.: +968 24835186
E-Mail: aakpllcc@gmail.com
Philippines
Mezzanine 1, South Center Tower
2206 Venture Street, Madrigal Business Park
Alabang, Muntinlupa City
Tel.: 8093441
E-Mail: severinconsumercare@colombophils.com.ph
Polska
Severin Polska Sp.z o.o.
Al.Jerozolimskie 56 C
00-803 Warszawa
Tel.: +48 882 000 370
E-Mail: reklamacie@severin.pl
Russian Federation
Orbita Service
123362 Moskau
ul. Svobody 18,
Tel.: (495) 585 05 73
Op6HtCaBnC
123362 r. MockBa
yn.Cb60db1.18
Ten.: (495)585-05-73
Serbia
SMIL doo
Pasiceva 28, Novi Sad
Serbia and Montenegro
Tel.: +381-21-524-638
Tel.: +381-21-553-594
Fax:+381-21-522-096
Singapore
Beste (S) Pte. Ltd.
Tagore Building
6 Tagore Drive, #03-04
Singapore 787623
Tel.: +65 6455 0005
Fax: +65 6455 4010
Web: www.beste.com.sg
E-Mail: info@beste.com.sg
Slovenia
SEVTIS d.o.o.
Smartinska 130
1000 Ljubljana
Tel.: +386 1542 1927
Fax:+38615421926
Slowak Republic
PREMT.S.R.O.
Skladova 1
917 01 Trmava
Tel.: +421 33 55 45 007
Fax:+421335545007
E-Mail: premt@premt.sk
South Africa
AL&CD Ashley (PTY) Ltd.
3rd Floor, Grove Exchange
9 Grove Avenue
Claremont
South Africa
7708
Tel:+27 216740294
Fax:+27 216740295
Web: http://www.alcdashley.co.za
Mail: service@alcdashley.co.za
Svenska
Rakspecialisten HS
Mollevängsgatan 34
214 20 Malmö
Tel.: +46 40 12 07 70
Fax:+46 40 6110335
E-Mail: info@rakspecialisten.se
Switzerland
BLUEPOINT Service Sagl
Via Cantonale 14
CH-6917 Barbengo
Tel.: +41 91 980 49 72
Fax:+41916053755
E-Mail: info@bluepoint-service.ch
Thailand
Verasu Ltd. part.
83/7 Wireless Rd., Lumpini,
Patumwan, Bangkok 10330
Tel.: +662 254 81008
E-Mail: askverasu@verasu.com
United Arab Emirates
Juma al Majid Est
P.O.Box 156
Dubai U.A.E.
Tel.: 04 266 5210
Fax:042623431
E-Mail: shahid-saleem@al-majid.com
Web: www.al-majid.com
United Kingdom
Homespares Centres Limited
Firwood Industrial Estate
Thicketford Road
Bolton, BL2 3TR
Tel.: 01204 558160
Fax:01204558169
E-Mail: off ce@hsc.linfo
Web: www.hsc1.info
Vietnam
Brand Partner
W.22, D. Binh Thanh
180/38 Nguyen Huu Canh Street
Ho Chi Minh City, Vietnam
Tel.: +84 862 899 648
Fax:+84862899649
E-Mail: info@brandpartner.vn
Stand: 10.2016 (Special Edition)

- Transporting the appliance
- Connection to the mains supply
- Intended use
- Important safety instructions
- Familiarisation
- Before using for the first time
- Installation
- Temperature control
- Indicator lights
- Mains connection indicator (green)
- High-temperature alarm indicator (red)
- Storing and freezing food
- Use-by dates for frozen food are specified (in months) in the table below.
- Making ice cubes
- De-frosting and cleaning
- Always remove the plug from the wall socket before cleaning.
- Energy saving tips
- Operating noise
- Trouble-shooting
- Reversible door
- Diagram similar!
- bracket 2. Caution: Support the door.
- Disposal
- Guarantee
- Congélateur armoire
- Chere cliente, Cher client,
- Transport of apparatus
- Regulator temperature
- Neped npBbIM BkJIIOHeHHeM
- YctaHOBka
- PerynpoBka TemnepaTpybI
- HdNkaTophBie JAmnoQKn
- HnKaTOpHaJaMNoUka BKnIOueHnB CeTb (3eHeHa)
- AbarHnHa HndKATOpHnJaMNoQKa BbICOKo Tempeatpy (kpachn)
- XpaHeHne 3amopaxBaHne npOdyKTOB
- CpOKn roDHOCTn 3amOpOxehHbIX npOdyKTOB yka3aHbI (B Mecraax) B HNKePnPBeDeHHoT Ta6nue.
- PnroTOBneHne Ky6NKOB Nbda
- Pa3mopaxnBaHne n uCtka
- Pone3HbIe COBtI no 3KoHOMn 3JIeKtpO3Heprn
- Pa6ochn yum
- Ponck yctpaHHe HncnpabHocTei
- IpehenabeWbMaMdBepa
- Czech Republic
- Danmark
- Italia
- Indonesia
- Jakarta
- Medan
- Surabaya
- Banjarmasin
- Tangerang
- Cirebon
- Kuwait
- Latvia
- Lebanon
- Luxembourg
- Philippines
- Polska
- Russian Federation
- Serbia
- Singapore
- Slovenia
- Slowak Republic
- South Africa
- Svenska
- Switzerland
- Thailand
- United Arab Emirates
- United Kingdom
- Vietnam
Brand : SEVERIN
Model : KS 9918
Category : Freezer