
KS 9798 - Freezer SEVERIN - Free user manual and instructions
Find the device manual for free KS 9798 SEVERIN in PDF.


| Brand | Severin |
| Model | KS 9798 |
| Product type | Chest freezer |
| Dimensions (H x W x D) | 85 x 80 x 60 cm |
| Net weight | 35 kg |
| Net capacity | 200 liters |
| Energy class | F |
| Annual consumption | 250 kWh |
| Power supply | 220-240 V ~ 50 Hz |
| Power | 100 W |
| Noise level | 42 dB(A) |
| Adjustable temperature | -18 °C to -24 °C |
| Fast freeze function | Yes |
| Interior light | No |
| Temperature alarm | No |
| Power indicator | Yes |
| Defrost type | Manual |
| Climate class | SN-T |
| Adjustable feet | Yes |
| Security lock | Yes |
| Storage basket | 1 included |
| Tub material | Plastic |
| Cable length | 1.5 m |
| Refrigerant | R600a |
Frequently Asked Questions - KS 9798 SEVERIN
User questions about KS 9798 SEVERIN
0 question about this device. Answer the ones you know or ask your own.
Ask a new question about this device
Download the instructions for your Freezer in PDF format for free! Find your manual KS 9798 - SEVERIN and take your electronic device back in hand. On this page are published all the documents necessary for the use of your device. KS 9798 by SEVERIN.
USER MANUAL KS 9798 SEVERIN
natural_image
White rectangular refrigerator with 'SOVARIN' branding on top (no other text or symbols visible)KS 9798
KS 9859
GB Instructions for use Cabinet freezer 12
natural_image
Diagram showing two labeled components (1 and 2) with downward arrows indicating motion or force, no text or symbols present.natural_image
Diagram of a kitchen sink with a bowl and directional arrows indicating flow or movement (no text or symbols)Abbildung ähnlich!
Before using the appliance, read the following instructions carefully and keep this manual for future reference. The appliance must only be used by persons familiar with these instructions.
Transporting the appliance
- To prevent damage to the unit during transport, ensure that all accessories and components inside and around the appliance are securely fastened.
- The unit must only be transported in its vertical position; do not tilt any more than 30^ . For positioning, we recommend that you tilt the unit slightly backwards. In this way, the transport rollers can be used to move it to its intended place of installation.
- Once the unit has been positioned, wait for about 30 minutes before it is connected to the mains.
- If the unit has been tilted more than 30^ during transport, allow it to stand in an upright position for at least 4 hours before it is connected to the mains.
Connection to the mains supply
- The appliance should only be connected to an earthed socket installed in accordance with the regulations. Make sure that the supply voltage corresponds with the voltage marked on the rating label.
- This product complies with all binding CE labelling directives.
- Do not operate this unit by means of a transformer.
- To prevent noise vibration, ensure that the power cord does not touch any part of the rear of the unit.
Intended use
- This compressor-freezer unit is designed for deep-freezing and long-term storage of deep-frozen food, as well as for making ice-cubes.
- Using it in any way other than the above is not advised.
- No responsibility is accepted if damage results from improper use, or if these instructions are not complied with.
- This appliance is intended for domestic or similar applications, such as
- in staff kitchens in shops, offices and
similar working environments,
- in agricultural working environments,
- by customers in hotels, motels etc. and similar accommodation,
- in bed-and breakfast type environments.
- This appliance is not intended for commercial use, nor for use in the catering business or similar wholesale environments.
Important safety instructions

The cooling circuit in this appliance contains the refrigerant isobutane (R600a), a natural gas
with a high level of environmental compatibility, which is nevertheless fl ammable. Ensure, therefore, that none of the components of the refrigerant circuit become damaged during transportation and installation of the appliance. If damage to the cooling circuit does occur, do not switch on or connect the appliance to the mains power. In the case that there is an open fire or any other sources of ignition in the vicinity of the refrigerant gas, make sure it is removed immediately from this area and that the room is then thoroughly ventilated.
- Warning: Keep ventilation openings, in the appliance enclosure or in the built-in structure, clear of obstruction.
Suffi cient ventilation must be ensured at all times. - Warning: Do not damage the cooling
circuit. Any escaping refrigerant causes damage to the eyes; there is also a danger of the gas igniting.
- Warning: Do not use any external device (e.g.; heaters or heating fans) to accelerate de-frosting; follow only the methods recommended in this manual.
- Warning: Do not operate any electrical appliances (e.g. ice makers) inside the storage compartment that are not specifically permitted in these instructions.
- Before it is connected to the mains power, the unit must be thoroughly checked for transport damage, including its power cord. In the event of any such damage being found, the appliance must not be connected to the mains.
- When positioning the appliance, ensure the supply cord is not trapped or damaged.
- Do not locate portable multible socket-outlets or portable power supplies at the rear oft he appliance.
- This appliance is not designed for the storage of explosive substances such as aerosol cans with a fl ammable propellant.
- If the unit is sold, handed over to a third party or disposed of at a suitable recycling facility, attention must be drawn to the presence of the insulation agent ‘cyclopenthane’ as well as to the refrigerant R600a. For additional information on correct recycling please refer to the Disposal section.
• In order to comply with safety regulations and to avoid hazards, any repairs or modifications to this unit must be carried out by our authorised service personnel, including the replacement of the power cord.
- This appliance may be used by children (at least 8 years of age) and by persons with reduced physical, sensory or mental capabilities, or lacking experience and knowledge, provided they have been given supervision or instruction concerning the use of the appliance and fully understand all dangers and safety precautions involved.
• Children aged from 3 to 8 years are allowed to load and unload refrigerating appliances.
• Children must not be permitted to play with the appliance.
• Children must not be permitted to carry out any cleaning or maintenance work on the appliance.
- For frequent cleaning we recommend the use of warm water with some mild detergent. For detailed information on cleaning the appliance, please refer to the section De-frosting and cleaning. To avoid contamination of food respect the following instructions:
- Opening the door for long periods can cause a significant increase of the temperature in the compartments of the appliance.
- Clean regularly surfaces that can come in contact with food and accessible drainage systems.
- Store raw meat and fish in suitable containers in the refrigerating appliance so that it is not in contact with or drip onto other food.
- If the refrigerating appliance is left empty for long periods switch off, defrost, clean, dry and leave the door open to prevent mould developing within the appliance.
- To prevent the risk of personal injury or damage to the unit, it must only be transported while in its original packaging. Two people are required for unpacking and installation.
- Caution: Keep any packaging materials well away from children: there is a risk of suffocation.
- The ice removed from the unit during de-frosting or cleaning is not suitable for human consumption.
- The power cord should be regularly examined for any signs of damage. In the event of such damage being found, the appliance must no longer be used.
- To avoid the risk of fire, do not place any thermo-electric appliances on top of the unit. Do not place liquid containers on top of the unit, to prevent any leaking or escaping liquid damaging the electrical insulation.
• This unit is designed for storing food only.
• Alcoholic substances may be stored only in properly sealed containers and in upright positions.
- Do not store any glass bottles containing carbonated or other freezable liquids in the unit: such bottles may burst during the freezing process.
• To avoid the risk of food poisoning, do not consume food after its storage time has expired. Thawed foods must not be frozen a second time.
- Do not lean or put undue weight on the shelves, compartments, door etc.
- Protect the inside of the refrigerator at all times from open flames and any other sources of ignition.
- Remove the plug from the wall socket
- in case of any malfunction,
- before de-frosting,
- during cleaning,
- before maintenance or repair work is carried out.
- When removing the plug from the wall socket, never pull on the power cord; always grip the plug itself.
• We reserve the right to introduce technical modifications.

Familiarisation
Diagram similar!
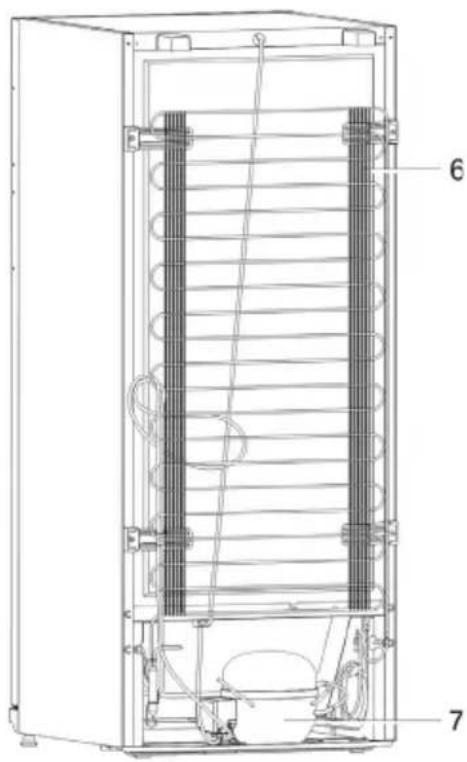
- Temperature control
- Mains connection indicator (green)
- High-temperature alarm (red)
- Rapid-freeze drawer
- Freeze drawers
- Condenser
- Compressor
Before using for the first time
- Remove any exterior and interior packaging materials completely, including the transport securing devices.
The packaging materials must be properly disposed of.
NOTE: When the door to the freezer unit is opened, a small red component will fall out; this is for transport only and can be disposed of. - Fit the two spacer elements (1, provided) into the corresponding guide slots (2) on the rear.
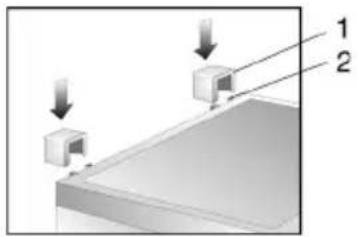
- Before it is connected to the mains, the unit must be thoroughly checked for transport damage, including its power cord.
- Clean the unit as described in the section De-frosting and cleaning.
- When the unit is first switched on, a slight 'new' smell may be noticed. However, this will disappear once the cooling process has begun.
Installation
- The appliance should be set up in a well-ventilated, dry room.
- It should be operated in conditions where the relative humidity is no more than 70 %.
- Refrigeration appliances are classified into certain climate classes. This classifi cation indicates the ambient temperature at which the device can be operated. Please refer to the product data sheet for information on the classifi cation for this unit; the data sheet can be found at the end of this manual.
• Do not use the appliance outdoors.
- Ensure that the plug is accessible and can be removed from the wall socket at any time.
- Do not expose the appliance to direct sunlight, and do not position it next to any heat sources (radiators, cookers etc). If this cannot be avoided, however, suitable insulation must be in installed between the heat source and the unit.
- The unit must not be installed inside a cabinet, nor directly below a hanging cupboard, shelf or similar object.
- In the case of uneven floors, the adjustable front feet on the unit can be used to compensate and ensure optimum stability.
Set-up dimensions Ventilation

If the cabinet freezer is installed with its side against a wall, ensure a minimum clearance of 60 mm with the wall; this is to ensure that the freezer door can open sufficiently wide to slide out the drawers.
Temperature control
- The unit is re-activated by connecting it to the mains. It is only switched off completely when the plug is removed from the wall socket. In position '0', the cooling function is switched off, though the appliance is still connected to the mains.
- The temperature in the refrigerator cabinet can be adjusted by setting the temperature control. Turning the control clockwise will decrease the temperature, while turning it anti-clockwise will increase it.
- The medium settings are usually most suitable for home use.
• We recommend using a thermometer to check the actual temperature inside the cabinet and make adjustments as necessary. - Following a power interruption, or if the unit has been switched off on purpose, it may take around 5 minutes before it switches on again.
Indicator lights

Mains connection indicator (green)
With the unit connected to the mains, the green light is permanently on.

High-temperature alarm indicator (red)
This light comes on if the internal temperature rises above 9 °C.
Storing and freezing food
- The temperature inside the unit depends mainly on the ambient temperature, the temperature control setting and the amount of food stored. It should also be noted that the interior temperature may increase every time the door is opened.
- The unit is designed for deep-freezing and long-term storage of frozen food, and for making ice cubes.
- To ensure that nutritious elements such as vitamins are not lost, fresh food should be deep-frozen right through as quickly as possible. For this reason, prepared food should be put in the quick-freeze compartment, spaced out in one or two rows. The quick-freeze area inside the freezer compartment is marked Fast Freeze, where we recommend you first put the food to be frozen for quick-freezing, before moving it to other compartments (as appropriate) after 24 hours.
- Caution:
- To ensure sufficient distribution of cold air, keep a minimum distance of 2.5 cm between the vapouriser assembly and the tray containing the food to be frozen.

- Do not allow unfrozen food to come into contact with food that is already frozen.
- Caution: Do not exceed the maximum freezing capacity per day. The product data sheet at the end of this manual contains details of the maximum daily freezing capacity.
- For quick-freezing, set the temperature control to Max. After 24 hours, once the food is well frozen, the temperature control can be set back to its original position.
- The time required to freeze food may be shortened by dividing it into smaller portions.
- Suitable packaging materials for frozen food are transparent (i.e. non-coloured) plastic wrap or bags, or aluminium foil. The packaging materials should be well aired before use; check that the package is air-tight before freezing the food. We strongly recommend
that you label every item stored in the freezer with all relevant information such as type of food, freezing date and use-by date.
- Do not attempt to deep-freeze carbonated beverages, warm food or any kind of bottled liquids.
- Frozen food should first be defrosted in the refrigerator. This way, the food is defrosted at a slower rate, retaining its taste.
Use-by dates for frozen food are specified (in months) in the table below.
| 2·6 | 4·8 | 8·12 |
- Do not exceed these storage times.
- However, always observe the manufacturer's use-by dates for the frozen food.
- If the unit remains switched off for an extended period (eg during a power failure), the door should be kept closed; this will help to maintain the lowest possible temperature in the cabinet. The product data sheet contains detailed information of the maximum safe storage time in case of malfunction. Even a slight rise in the inside temperature will shorten the storage life of the food.
Making ice cubes
A special ice-cube tray is provided for making ice cubes. Fill the tray up to 34 with drinking water and place it in the freezer compartment for a few hours. The ice cubes are easier to remove from the tray if the tray is left standing at room temperature for 5 minutes.
De-frosting and cleaning
• After a certain period of operation and depending on several factors (e.g. how often the door has been opened), a layer of ice will form on the evaporators located below the drawers and on the drawer fronts themselves. Once the build-up of ice has reached a thickness of 3 to 5 mm, the unit must be de-frosted, as the build-up of ice increases the power consumption of the appliance.
- The freezer should be thoroughly cleaned at least twice a year.
- Always remove the plug from the wall socket before cleaning.
• Any accessories should be cleaned separately with soapy water. Do not put them in a dishwasher.
- Do not use abrasives or harsh cleaning solutions or any cleaning agents that contain alcohol.
• Take care not to remove or damage the rating plate inside the cabinet during cleaning.
- Remove all food from the compartment and store it in a cool location, eg together with pre-frozen freezer-packs in a closed plastic container. Note that, even with a slight increase in temperature, the storage life will be shortened and the food should be used as soon as possible.
- Keep the door open.
- Remove the cover panel.

natural_image
Line drawing of a kitchen sink with a bowl and directional arrows indicating flow or movement (no text or symbols)- Pull out the drain channel from the freezer cabinet, turn it 180° and secure it (see diagram). Place a suitable container underneath the channel outlet.

- To accelerate defrosting, one or several containers with hot (but not boiling) water may be placed inside the freezer compartment. Do not pour water over or inside the unit.
- Warning: Do not use any external device or other means (e.g. heaters or heating fans) to accelerate defrosting.
- Clean the unit with a damp cloth and a little detergent. Wipe thoroughly dry afterwards.
- Replace the drain channel and cover panel.
- Set the temperature control to its maximum position. After 24 hours, it may turned back to its normal setting.
Energy saving tips
• The appliance should be set up in a well-ventilated, dry room.
- Do not expose the appliance to direct sunlight, and do not position it next to any heat sources (radiators, cookers etc.). If this cannot be avoided, however, suitable insulation must be installed between the heat source and the unit.
- Ensure sufficient air circulation around the sides of the unit.
- The compressor (at the rear) should be cleaned at regular intervals. Accumulated dust causes an increase in energy consumption.
- Warm food should be allowed to cool down before it is stored inside.
• To prevent an increased build-up of ice, do not leave the doors of the unit open for too long when loading or taking out food.
- Frequent de-frosting helps to save energy. For detailed information on cleaning the appliance, please refer to the section De-frosting and cleaning.
- Do not set a lower-than-necessary temperature. For detailed information on the temperature settings, please refer to the section Temperature control.
Operating noise
- Certain typical sounds can be heard when the appliance is switched on. These sounds are:
- caused by the electrical motor within the compressor assembly; during compressor start-up the sound level will be slightly higher for a limited period of tir
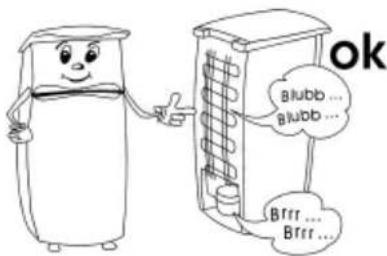
- caused by the cooling agent flowing through the circuit.
Trouble-shooting
The following table lists possible malfunctions and their probable causes and solutions. In the event of operational problems, checkfi rst whether a solution can be found using this table. If the problem persists, disconnect the appliance from the mains power and contact our Customer Service Department.
| Problem Possible cause and solution | |
| The appliance is not working at all. | · The temperature control is set to ‘0’. → Use a higher temperature setting.· The wall socket is defective. → Check the fuse. If necessary, have the wall outlet checked by a qualified electrician. |
| The inside temperature is not low enough. | · Too much food has been stored in the appliance. → Do not store excessive food (see product data sheet).· The doors are not properly closed. → Ensure that the doors are properly closed.· The door seals are defective. → Check the door seals and contact our Customer Service if necessary.· There is too much dust on the condenser. → Clean the condenser regularly.· Insufficient ventilation: the unit is too close to a wall or other structure or object. → see section ‘Ventilation’.· The temperature control is set too low. → Use a higher setting. |
| The normal operating sound changes or becomes louder. | · The unit is not firmly set on the floor. → Use the adjustable front feet to align the unit properly.· Adjacent furniture or objects are affected by the running of the cooling unit (i.e. causing them to vibrate). → Keep the stated clearances.· Any objects on top of the unit might be vibrating → Remove such objects. |
| Excessive build-up of frost inside the freezer compartment. | · It is necessary to de-frost the freezer compartment manually. → See ‘De-frosting and cleaning’ |
Reversible door
- If required, the door may be reversed, i.e. from right-hinged (default installation) to left.
• To avoid the risk of personal injury or damage to the unit, two people are needed to reverse the door. - Warning: Always disconnect the unit from the mains before any maintenance or repair work is carried out.
• Before you start, please note the following:
• Always ensure that the correct number of washers is used on all hinge bolts and screws.
- So that the doors can close tightly against the frame, take the utmost care that they are properly aligned during re-assembly.

Diagram similar!
- Open the freezer door.
- Remove the four covers C from the housing and inside of the door.
- Replace the extension of the 2-part cover, turned through 180, on the opposite side.
- Unscrew the hinge bolt on the inside of the door in the area C/6. Caution: Support the door.
- Take off the freezer door and place it on a soft surface. Remove the hinge support from the underside of the door and fit the hinge support provided on the opposite side.
- Take out the fixing screws and remove the upper bracket 6. Note the small plastic plate underneath the bracket.
- Turn the bracket 6 including the small plastic plate through 180° and replace it on the other side of the cabinet freezer, using the two screw holes adjacent to each other.
- Remove the lower panel 1 by lifting it up slightly.
- Take out the fixing screws and remove the bracket 2 with its hinge bolt.
- Unscrew the hinge bolt, together with the serrated lock washers, from the bracket, and fit it into the corresponding opening on the opposite side of the bracket.
- Remove the bracket 7 and replace it with the holding bracket 2 with its hinge bolt.
- Now install the holding bracket 7 in the previous position of the bracket 2.
- Place the freezer door onto the hinge bolt on holding bracket 2. Caution: Support the door.
- Insert the hinge bolt of the bracket 6 into the freezer door and secure the bracket on the unit.
- Fit the four covers C over the bracket and the openings.
- Take out the cover 10 from the lower panel 1 and replace it on the opposite side.
- Replace the panel 1 on the appliance.
- Remove the screw covering caps a and the sealing plugs b.
- Take out the screws holding the door handle. Fit the handle on the opposite side, using the fi xing screws to secure it. Push the sealing plugs into the now empty openings in the door and replace the covering caps on the screw heads.
Disposal
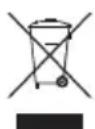
Appliances that are marked with this symbol have to be disposed of separately from household rubbish. These appliances contain valuable resources that can be recycled. A correct waste disposal protects the environment and the health of those around you. To get informed about it, either defer to your municipal administration or the retailer.
- Pull the mains plug out of the socket and disconnect it from the appliance before getting rid of it.
The cooling medium Isobutane (R600a) and the propellant in the isolation Cyclopentane (C5H10) are infl ammable substances, thus,
need to be appropriately disposed of. - Make sure the tubes of the cooling circuit don't get damaged before the proper disposal.
Guarantee
This product is guaranteed against defects in materials and workmanship for a period of two years from the date of purchase. Under this guarantee the manufacturer undertakes to repair or replace any parts found to be defective, providing the product is returned to one of our authorised service centres. This guarantee is only valid if the appliance has been used in accordance with the instructions, and provided that it has not been modified, repaired or interfered with by any unauthorised person, or damaged through misuse.
This guarantee naturally does not cover wear and tear, nor breakables such as glass and ceramic items, bulbs etc. This guarantee does not affect your statutory rights, nor any legal rights you may have as a consumer under applicable national legislation governing the purchase of goods. If the product fails to operate and needs to be returned, pack it carefully, enclosing your name and address and the reason for return. If within the guarantee period, please also provide the guarantee card and proof of purchase.
Information needed by the Customer Service Department
Should repairs to the appliance become necessary, please contact our Customer Service Department, providing a detailed fault description and quoting the model number KS ... on the rating plate of the appliance (see picture). This information will help us to handle your request efficiently.

In case of any malfunction or other problem, please contact our Customer Services Department. The address can be found in the appendix to this manual.
Appliance specifi cation sheet
| Model identifi er KS 9798 / 9859 | ||||||
| Type of refrigerating appliance : | ||||||
| Low-noise appliance : no Design type : Free-standing | ||||||
| Wine storage appliance : no Other refrigerating appliance : yes | ||||||
| Overall dimensions (H x W x D in mm) 1450 x 600 x 650 | ||||||
| Total volume (in l) 202 | ||||||
| EEI 95 | ||||||
| Energy effi ciency class E | ||||||
| Annual energy consumption (in kWh/a)* 201 | ||||||
| Airborne acoustical noise emission class C | ||||||
| Airborne acoustical noise emissions (in dB(A) re 1pW) 41 | ||||||
| Climate class | N-T | |||||
| Ambient temperature (in °C) | 16 - 43 | |||||
| Temperature rise time (in h) | 15 | |||||
| Weight (in kg) | 53 | |||||
| Winter setting | no | |||||
| Compartment Parameters : | ||||||
| Typ | Volume (in l) | Recommended temperature (in°C) | Freezing capacity (kg/24h) | Defrosting type A = auto M = manuel | Fast freezing facility | |
| 4-star | 202 | -18 | 12 | M | no | |
| Light source parameters : | ||||||
| Type of light source | - | |||||
| Energy effi ciency class | - | |||||
| Electric data | see rating label | |||||
*) The actual consumption depends on the use and the location of the appliance.
Congélateur armoire
Chère cliente, Cher client,
natural_image
Diagram showing two labeled components (1 and 2) with arrows indicating direction, no text or symbols present.natural_image
Line drawing of a kitchen appliance with a bowl and directional arrows indicating motion (no text or symbols)natural_image
Diagram showing two labeled components (1 and 2) with arrows indicating direction, no text or symbols present.natural_image
Line drawing of a kitchen appliance with a bowl and utensils, showing directional arrows indicating movement (no text or symbols)
Puesta en marcha
natural_image
Diagram showing two labeled components (1 and 2) with arrows indicating direction, no text or symbols present.natural_image
Line drawing of a kitchen appliance with a bowl and utensils, showing directional arrows indicating movement (no text or symbols)
Al primo utilizzo
natural_image
Diagram showing two labeled components (1 and 2) with arrows indicating direction, no text or symbols present.natural_image
Line drawing of a kitchen appliance with a bowl and directional arrows indicating motion (no text or symbols)natural_image
Diagram showing two labeled components (1 and 2) with arrows indicating direction, no text or symbols present.natural_image
Line drawing of a kitchen appliance with a bowl and directional arrows indicating motion (no text or symbols)Diagram (tilsvarende)!
natural_image
Line drawing of a kitchen appliance with a bowl and directional arrows indicating motion (no text or symbols)Liknande bild!
natural_image
Diagram showing two labeled components (1 and 2) with arrows indicating direction, no text or symbols present.natural_image
Diagram of a kitchen sink with a bowl and directional arrows indicating flow or movement (no text or symbols)Regulator temperature
natural_image
Simple line drawing of a kitchen appliance with a bowl and utensils, no text or symbols presentUtylizacja

natural_image
Diagram showing two labeled components (1 and 2) with arrows indicating direction of movement or connection, no readable text or symbols present.natural_image
Simple line drawing of a kitchen sink with a bowl and directional arrows indicating flow or movement (no text or symbols)natural_image
Diagram of a kitchen sink with a bowl and directional arrows indicating flow or movement (no text or symbols)Утилизация

1 Angel Kanchev, 5th floor
1000 Sofia, Bulgaria
Tel.: +359 2 973 11 31, 973 55 33
Fax: +359 2 944 96 49
E-Mail: vihra.koleva@pirita.bg
Czech Republic
BVZ Commerce s.r.o.
Parkerova 618
CZ 25067 Klecany
Tel.: +420 233 55 94 74
Fax: +420 233 55 81 59
Danmark
F&H of Scandinavia A/S
Gl. Skivevej 70
DK-8800 Viborg
Tel.: +45 8928 1300
Fax: +45 8928 1301
26 Oaktree Business Park
Trim Co., Meath
Tel.: 046 94 83100
Fax: 046 94 83663
Web: www.bluestone.ie
Italia
ASSISTENZA POST-VENDITA
NUMERO VERDE 800224155
E-Mail: assistenza@severinitalia.it
Indonesia
PT. Setai Modern Elektronik
Email.: info@severin.co.id
Web.: www.severin.co.id
Jakarta
Komp. Glodok Plaza Blok F No. 9, Jl. Pinangsia Raya,
Jakarta Barat
021 65911888 / 021 6592889
Medan
Dr.Waleed Maraga commercial center, Level 1
Khalda, Amman Zip code: 11953
Tel: +962 6 5346429
Fax: +962 6 5341706
Mob Jordan : +962 797426108
Kuwait
Mohammed Abdulrahman Al Bahar
Al Bahar Building P.O. Box 148
Safat 13002 Kuwait
Tel.: +965 4810855
Latvia
SIA GTCL BALTIC
Piedrujas iela 7
LV - Riga 1073
Tel.: +371 29119989
Fax: +371 67297769
Lebanon
Khoury Home
7th Floor, Cité Dora 3 Building, Dora
P.O.Box 70611
Antelias, Lebanon
Tel.: +961 1 244200
Fax:+966 1 253535
E-Mail: info@khouryhome.com
Internet: www.khouryhome.com
Luxembourg
Ser-Tec
A.A.K & Partners L.L.C.
P.O Box:-1650, Muttrah
Postal Code - 114
Sultanate of Oman
Tel.: +968 24834470
Fax.: +968 24835186
E-Mail: aakpllc@gmail.com
PERU
SEVERIN PERU / Comercial Rebeca S.R.L
Mezzanine 1, South Center Tower
2206 Venture Street, Madrigal Business Park
Alabang, Muntinlupa City
Tel.: 809 34 41
E-Mail: severinconsumercare@colombophils.com.ph
Polska
Severin Polska Sp.z o.o.
6 Tagore Drive, #03-04
Singapore 787623
Tel.: +65 6455 0005
Fax: +65 6455 4010
Web: www.beste.com.sg
E-Mail: info@beste.com.sg
Slovenia
SEVTIS d.o.o.
Smartinska 130
1000 Ljubljana
Tel.: +386 1 542 1927
Fax: +386 1 542 1926
Slowak Republic
BVZ Commerce s.r.o.
Parkerova 618
CZ 25067 Klecany
Tel.: +420 233 55 94 74
Fax: +420 233 55 81 59
South Africa
AL&CD Ashley (PTY) Ltd.
3rd Floor, Grove Exchange
Grove Avenue
Claremont
South Africa
7708
Tel: +27 21 674 0294
Fax: +27 21 674 0295
Web: http://www.alcdashley.co.za
Mail: service@alcdashley.co.za
Svenska
El & Digital Service AB
Folkungagatan 144
11630 Stockholm
Tel.: +46 8 845180
www.eldigital.se
E-Mail: info@eldigital.se
Switzerland
SPC Electronics AG
Mövenstrasse 12
CH-9015 St. Gallen
Tel.: +41 71 227 99 99
E-Mail: service@spcag.ch
www.spc.ch
Thailand
Verasu Ltd. part.
83/7 Wireless Rd., Lumpini,
Patumwan, Bangkok 10330
Tel.: +662 254 81 008
E-Mail: askverasu@verasu.com
Tunisie
GEI
54, rue du Mercure
Zone Industrielle 2013-BEN AROUS
TUNISIE
Ukrayina
Service for Modern Electronics LLC
Sim'i Khokhlovykh Str.8
4119 Kiev
Tel.: +38 044 247 67 34
E-Mail: info1@photoservice.com.ua
United Kingdom
Homespares Centres Limited
Firwood Industrial Estate
Thicketford Road
Bolton, BL2 3TR
Tel.: 01204 558160
Fax: 01204 558169
E-Mail: office@homespares.co.uk
Web: www.homespares.co.uk
Vietnam
BRAND PARTNER
CTY TNHH DOI TAC NHAN HIEU
2/7 NGUYEN THANH Y
DA KAO WARD, DISTRICT 1
HO CHI MINH CITY, VIETNAM
Tel.: +84 862 899 648
Fax: +84 862 899 649
E-Mail: info@brandpartner.vn
Stand: 10.2020 (Special Edition)


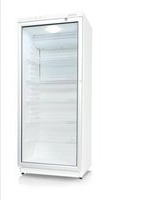
- Abbildung ähnlich!
- Transporting the appliance
- Connection to the mains supply
- Intended use
- Important safety instructions
- Familiarisation
- Before using for the first time
- Installation
- Temperature control
- Indicator lights
- Mains connection indicator (green)
- High-temperature alarm indicator (red)
- Storing and freezing food
- Use-by dates for frozen food are specified (in months) in the table below.
- Making ice cubes
- De-frosting and cleaning
- Energy saving tips
- Operating noise
- Trouble-shooting
- Reversible door
- Diagram similar!
- Disposal
- Guarantee
- Information needed by the Customer Service Department
- Congélateur armoire
- Chère cliente, Cher client,
- Puesta en marcha
- Al primo utilizzo
- Diagram (tilsvarende)!
- Liknande bild!
- Regulator temperature
- Utylizacja
- Утилизация
- Angel Kanchev, 5th floor
- Sofia, Bulgaria
- Tel.: +359 2 973 11 31, 973 55 33
- Fax: +359 2 944 96 49
- E-Mail: vihra.koleva@pirita.bg
- Czech Republic
- BVZ Commerce s.r.o.
- Parkerova 618
- CZ 25067 Klecany
- Tel.: +420 233 55 94 74
- Fax: +420 233 55 81 59
- Danmark
- F&H of Scandinavia A/S
- Gl. Skivevej 70
- DK-8800 Viborg
- Tel.: +45 8928 1300
- Fax: +45 8928 1301
- Oaktree Business Park
- Trim Co., Meath
- Tel.: 046 94 83100
- Fax: 046 94 83663
- Web: www.bluestone.ie
- Italia
- ASSISTENZA POST-VENDITA
- NUMERO VERDE 800224155
- E-Mail: assistenza@severinitalia.it
- Indonesia
- Setai Modern Elektronik
- Email.: info@severin.co.id
- Web.: www.severin.co.id
- Jakarta
- Komp. Glodok Plaza Blok F No. 9, Jl. Pinangsia Raya,
- Jakarta Barat
- 65911888 / 021 6592889
- Medan
- Dr.Waleed Maraga commercial center, Level 1
- Khalda, Amman Zip code: 11953
- Tel: +962 6 5346429
- Fax: +962 6 5341706
- Mob Jordan : +962 797426108
- Kuwait
- Mohammed Abdulrahman Al Bahar
- Al Bahar Building P.O. Box 148
- Safat 13002 Kuwait
- Tel.: +965 4810855
- Latvia
- SIA GTCL BALTIC
- Piedrujas iela 7
- LV - Riga 1073
- Tel.: +371 29119989
- Fax: +371 67297769
- Lebanon
- Khoury Home
- 7th Floor, Cité Dora 3 Building, Dora
- P.O.Box 70611
- Antelias, Lebanon
- Tel.: +961 1 244200
- Fax:+966 1 253535
- E-Mail: info@khouryhome.com
- Internet: www.khouryhome.com
- Luxembourg
- PERU
- Polska
- Slovenia
- Slowak Republic
- South Africa
- Svenska
- Switzerland
- Thailand
- Tunisie
- Ukrayina
- United Kingdom
- Vietnam
Brand : SEVERIN
Model : KS 9798
Category : Freezer