
VCC 7750 A - Vacuum Cleaner GRUNDIG - Free user manual and instructions
Find the device manual for free VCC 7750 A GRUNDIG in PDF.

| Product type | Canister vacuum cleaner |
| Brand | Grundig |
| Model | VCC 7750 A |
| Net weight | 5.1 kg |
| Power supply | 220-240 V ~ 50/60 Hz |
| Energy class | A |
| Filter type | HEPA 13 |
| Noise level | 70 dBA |
| Tank capacity | Dust bag (not specified) |
| Included brushes | Brush for hardwood/carpet, crevice tool, furniture brush |
| Main functions | Tactile and handle power adjustment, fill indicator, automatic cord rewinder |
| Storage | Vertical and horizontal with storage hook |
| Maintenance | Change dust bag, clean foam and HEPA filters every 5 bags |
| Safety | Unplug before maintenance, do not use on wet surfaces, do not vacuum ashes or cigarette butts |
| Recommended spare parts | Original Grundig or Swirl® dust bags |
| Warranty | Manufacturer's warranty (conditions not specified) |
Frequently Asked Questions - VCC 7750 A GRUNDIG
User questions about VCC 7750 A GRUNDIG
0 question about this device. Answer the ones you know or ask your own.
Ask a new question about this device
Download the instructions for your Vacuum Cleaner in PDF format for free! Find your manual VCC 7750 A - GRUNDIG and take your electronic device back in hand. On this page are published all the documents necessary for the use of your device. VCC 7750 A by GRUNDIG.
USER MANUAL VCC 7750 A GRUNDIG
Please read this instruction manual thoroughly prior to using this appliance! Follow all safety instructions in order to avoid damages due to improper use!
Keep the instruction manual for future reference. Should this appliance be given to a third party, then this instruction manual must also be handed over.
The appliance is designed for domestic use only. Improper use will void the warranty.
- Observe these instructions in order to prevent damage to the appliance or danger arising from improper use.
- Do not use on wet surfaces and do not attempt to use on wet objects.
- Do not use the appliance in wet surroundings.
- Do not use the appliance with wet hands.
This appliance is designed for vacuuming dirt and dust particles. Do not attempt to use it on large objects which could block the appliance and damage the appliance.
- Do not use to clean cigarette stubs, ash from a fireplace or matches. This could cause a fire.
This appliance is not designed for cleaning people or animals. - Do not insert any foreign objects into the suction intake. Always keep the suction intake free of all objects.
- Do not stand the appliance upright while you are cleaning.
- Do not roll the appliance over the power cord.
- Do not close any doors on top of the power cord.
- Do not pull the power cord around sharp edges and do not squash it.
If you move the appliance to another room, always disconnect the power cord and carry the appliance by the handle. - Never move the appliance by pulling on the power cord.
- Never operate the appliance without the dust bag or filter.
-
Change the filter when necessary.
-
Change the dust bag, if the indicator switches to red.
- Only use original GRUNDIG accessories or Swirl® dust bags for replacement.
Always pull out the power cord before cleaning or carrying out any maintenance on the appliance. - Whenever possible, insert the power cord plug directly into the socket. Avoid using extension cables or multipoint connectors.
Pull out the power plug after use. Do not disconnect the plug by pulling on the cable. - Never use if the appliance or the power cord is visibly damaged. This also applies if the appliance has accidentally become wet. Please contact a service centre in this case.
If the power cord is damaged, it must be replaced by the manufacturer, its service centre or a similarly qualified person to prevent danger arising. - Keep the appliance away from children.
This appliance can be used by children aged from 8 years and above and persons with reduced physical, sensory or mental capabilities or lack of experience and knowledge if they have been given supervision or instruction concerning use of the appliance in a safe way and understand the hazards involved. Children shall not play with the appliance. Cleaning and user maintenance shall not be made by children without supervision.
- Do not open the appliance under any circumstances. No warranty claims are accepted for damage resulting from improper handling.
Dear Customer,
congratulations on purchasing Grundig Vacuum Cleaner VCC 7750 A.
Please read the following user guide carefully to ensure that you have many years of enjoyment from your quality Grundig product at home.
Responsible trading!

Both internally and for suppliers, GRUNDIG insists on contractually guaranteed social working conditions with fair wages, efficient use of raw materials with continuous reduction in waste of
several tonnes of plastic each year - and at least 5 years availability for all accessories.
For a future worth living.
For a good reason. Grundig.
Controls
A Display and touch control panel
Cable winding button
On/Off button
D Wheel
Hose cap
F Suction nozzle
Upper cover
H Button for opening the dust container
Carriage handle
J Hose
K Parquet/carpet brush adjustment latch
Parquet/carpet brush
M Telescopic tube adjustment latch
N Telescopic tube
Vacuum control
P Handle
R Hard floor brush
Inserting/removing the hose
1 Push the hose nozzle E in the arrow direction into to the hose inlet F.
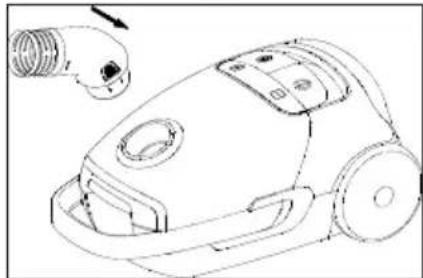
The fasteners on the hose nozzle should click into position.
2 Press the fasteners on the hose nozzle in order to remove the hose J.
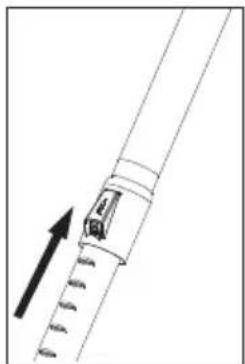
Inserting/removing the telescopic tube
Insert the telescopic tube into the end of the handle.
2 Pull the telescopic tube N from the handle P to remove it.
3 Push the height setting switch in the arrow direction and pull from its end in order to adjust the length of the telescopic tube.
Attaching/removing the parquet/carpet brush
1 Attach the telescopic tube to the parquet/ carpet brush L.
2 Pull the telescopic tube N from the parquet/ carpet brush L to remove it.
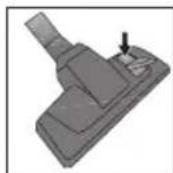
Adjusting the multi-floor brush
Shift the latch on the multi-floor brush L
to "111111111111111111111111111111111111111111111111111111111111
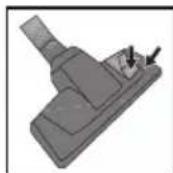
to "position for carpets and rugs.
Operation
Pull the plug behind the appliance and plug it in the socket.
2 Press the ON/OFF button to start or stop the appliance.
Adjusting the suction power
You can adjust the suction power using the A + / - keys of the touch control panel found on the vacuum cleaner.

1 Use your appliance at level to clean sofas.
2 Use your appliance at level to clean curtains and table cloths.
3 Use your appliance at level to clean carpets.
4 Use your appliance at levels to clean rugs.
5 Use your appliance at level to clean hard surfaces.
Suction power adjustment control
You can lower the suction power of the parquet/ carpet brush at a certain level by pulling backward the suction power adjustment control located on the handle P without the need to use the control panel A found on the product.

Dust indicator
When your dust bag is full, all icons on the display and on the touch control panel A will start to flash simultaneously. Replace the dust bag.
Accessories
Crevicetool
Suitable for cleaning "hard-to-reach" areas including spaces between chairs and furniture.
Upholstery tool

Suitable for floors, cleaning stairways, automobiles, sofas and chairs etc.
Caution
Do not use it by holding the outer end of the handle P.
Hard floor brush
The hard floor brush R was developed for use on hard floors such as tile, ceramic, parquet, wooden floors etc.
It prevents potential scratches while cleaning hard floors thanks to its specially-developed soft hair.
Warnings regarding the energy label
This is a general-purpose vacuum cleaner. In order to reach the highest energy efficiency and cleaning performance class specified in carpet and parquet cleaning, please use the regular high-performance parquet/carpet brush L. The specified values regarding the energy label were determined according to the predefined measurement methods (in line with EN60312-1).
Turning off the vacuum cleaner and parking
1 Turn off the device by pressing the ON/OFF button and plug it out.
2 Wind the power cable by pressing the power cable winding button B.
Vertical parking
Insert the hook of the combination floor brush L into the lower parking channel on the underside of the device.
Horizontal parking
Attach the hook of the multi-floor brush to the parking slot behind the appliance.
Before cleaning your appliance, turn off and unplug.
Caution
Never use gasoline, solvent, corrosives, metal objects or hard brushes for cleaning your appliance.
Replacing the dust bag
When your dust bag is full, all icons on the display and on the touch control panel A will start to flash simultaneously. Replace the dust bag.
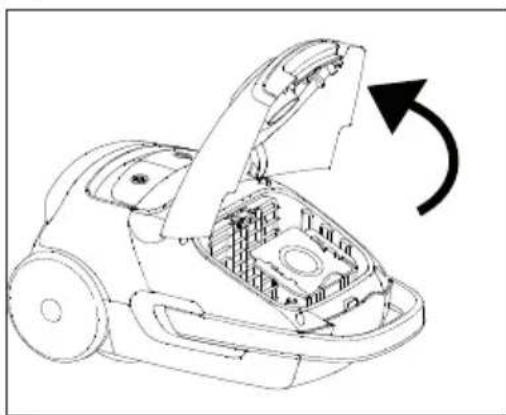
1 Open the upper cover G by pressing the button for opening the dust container H. Open the top cover until it locks and remains in the open position by itself.
2 Remove the full dust bag from its guide by pushing it upwards. For easier handling, the bag holder can be removed from the device by pulling upwards
3 Disposethefulldustbag.
4 Insert the new dust bag in the direction indicated on it by the arrow. Make sure that it is correctly seated.
5 Close the upper cover of the appliance.
Caution
Do not force the upper cover G to close it, otherwise the plastic parts can be damaged.
Dust bags not purchased from authorized dealers or services are not original. Such dust bags have a lesser quality and they become torn in
a shorter period and render your appliance inoperable. Faults caused by using unauthentic dust bags are not covered by the scope of the warranty.
Do not wash a dust bag.
Cleaning the filters
After 5 dust bag replacements (this number varies depending on the usage frequency and area), clean the filters.
Caution
For drying filters, do not use appliances such as hairdryers, stoves or other sources of hot air.
Do not mount back the filters before they are dried properly; otherwise a smell of humidity may disseminate on the air, water may splash from the rear part or filters may get damaged.
Put the filters back to their original place when they are dry.
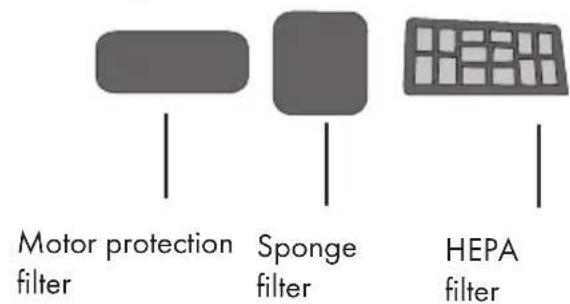
Motor protection filter
1 Open the upper cover G by pressing the button for opening the dust container H.
2 Push the filter cover latches towards the arrow direction shown to open up the filter lid.

3 Remove the sponge from its caging.
4 Shake off and rinse it with water. After rinsing, gently squeeze the sponge.
Sponge filter
1 Push down the rear cover opening latch to open the cover.
2 Remove the sponge placed on the back of the lid to rinse it.
3 After rinsing, gently squeeze the sponge.
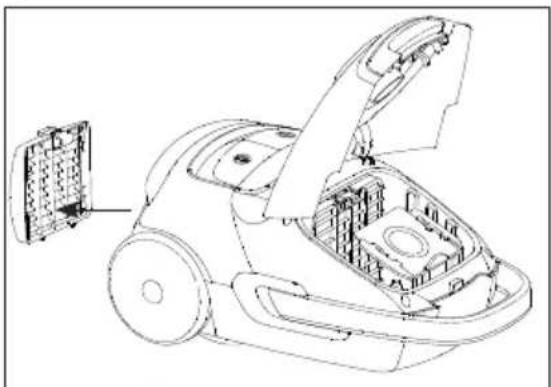
HEPA filter
Press the rear lid button to open and remove the HEPA filter.
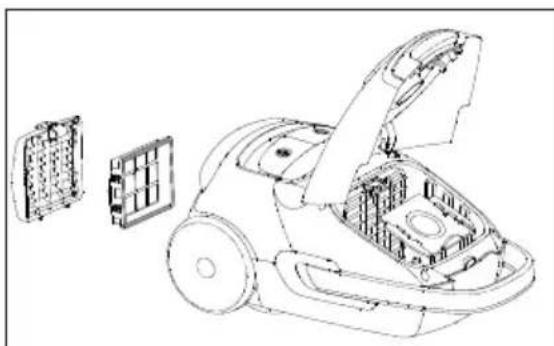
2 Shake off and rinse it with water.
3 Leave the HEPA filter for drying after rinsing.
Storage
Store the appliance carefully when you do no want to use it for a long time.
Plug out the appliance.
Keep it away from children.
Compliance with the WEEE Directive and Disposing of the Waste Product
This product complies with EU WEEE Directive (2012/19/EU). This product bears a classification symbol for waste electrical and electronic equipment (WEEE).

This product has been manufactured with high quality parts and materials which can be reused and are suitable for recycling. Do not dispose of the waste product with normal domestic
and other wastes at the end of its service life. Take it to the collection center for the recycling of electrical and electronic equipment. Please consult your local authorities to learn about these collection centers.
Compliance with RoHS Directive
The product you have purchased complies with EU RoHS Directive (2011/65/EU). It does not contain harmful and prohibited materials specified in the Directive.
Package information
Packaging materials of the product are manufactured from recyclable materials in accordance with our National Environment Regulations.
Do not dispose of the packaging materials together with the domestic or other wastes. Take them to the packaging material collection points designated by the local authorities.
Technical specifications

Power :800W
Sound level : 70 dBA
Net weight : 5.1 kg
Supply voltage
220-240V\~,50-60Hz
Dust volume : 2.5 L
Operating radius : 9 m
Energy class : A
Filter :HEPA13
Dust collecting on carpet : C
Dust collecting on hard
surface : A
Dust emission : A
Technical and design modifications are reserved.
Toz torbasini yikamayin.
Specifications techniques

Puisance:800W
Imutehon saatopainike


- Responsible trading!
- Controls
- Inserting/removing the hose
- Inserting/removing the telescopic tube
- Attaching/removing the parquet/carpet brush
- Adjusting the multi-floor brush
- Operation
- Adjusting the suction power
- Suction power adjustment control
- Dust indicator
- Accessories
- Crevicetool
- Upholstery tool
- Caution
- Hard floor brush
- Warnings regarding the energy label
- Turning off the vacuum cleaner and parking
- Vertical parking
- Horizontal parking
- Replacing the dust bag
- Cleaning the filters
- Motor protection filter
- Sponge filter
- HEPA filter
- Storage
- Compliance with the WEEE Directive and Disposing of the Waste Product
- Compliance with RoHS Directive
- Package information
- Technical specifications
- Specifications techniques
- Imutehon saatopainike
Brand : GRUNDIG
Model : VCC 7750 A
Category : Vacuum Cleaner