G24AB - Blower GREENWORKS - Free user manual and instructions
Find the device manual for free G24AB GREENWORKS in PDF.
User questions about G24AB GREENWORKS
0 question about this device. Answer the ones you know or ask your own.
Ask a new question about this device
Download the instructions for your Blower in PDF format for free! Find your manual G24AB - GREENWORKS and take your electronic device back in hand. On this page are published all the documents necessary for the use of your device. G24AB by GREENWORKS.
USER MANUAL G24AB GREENWORKS
English (original instructions)
SPECIFICATIONS
| Type 2402207 | |
| Voltage | 24V DC |
| AIR volume | 9.4 m³/min |
| Air speed | 161 KM/H |
| Weight (Without Battery) | 1.5 kg |
| Battery Pack | 2902707/2902807 |
| Charger | 2903607 (VDE PLUG)/2903507 (BS PLUG)/2913907 (For both VDE nd BS PLUG) |
| Sound pressure level | LpA: 86.8 dB(A) k: 3 dB(A) |
| Sound power level | LwA: 106 dB(A) K: 3.0dB(A) |
| Vibration level | ah: <2.5 m/s2; K: <1.5 m/s2 |
DESCRIPTION
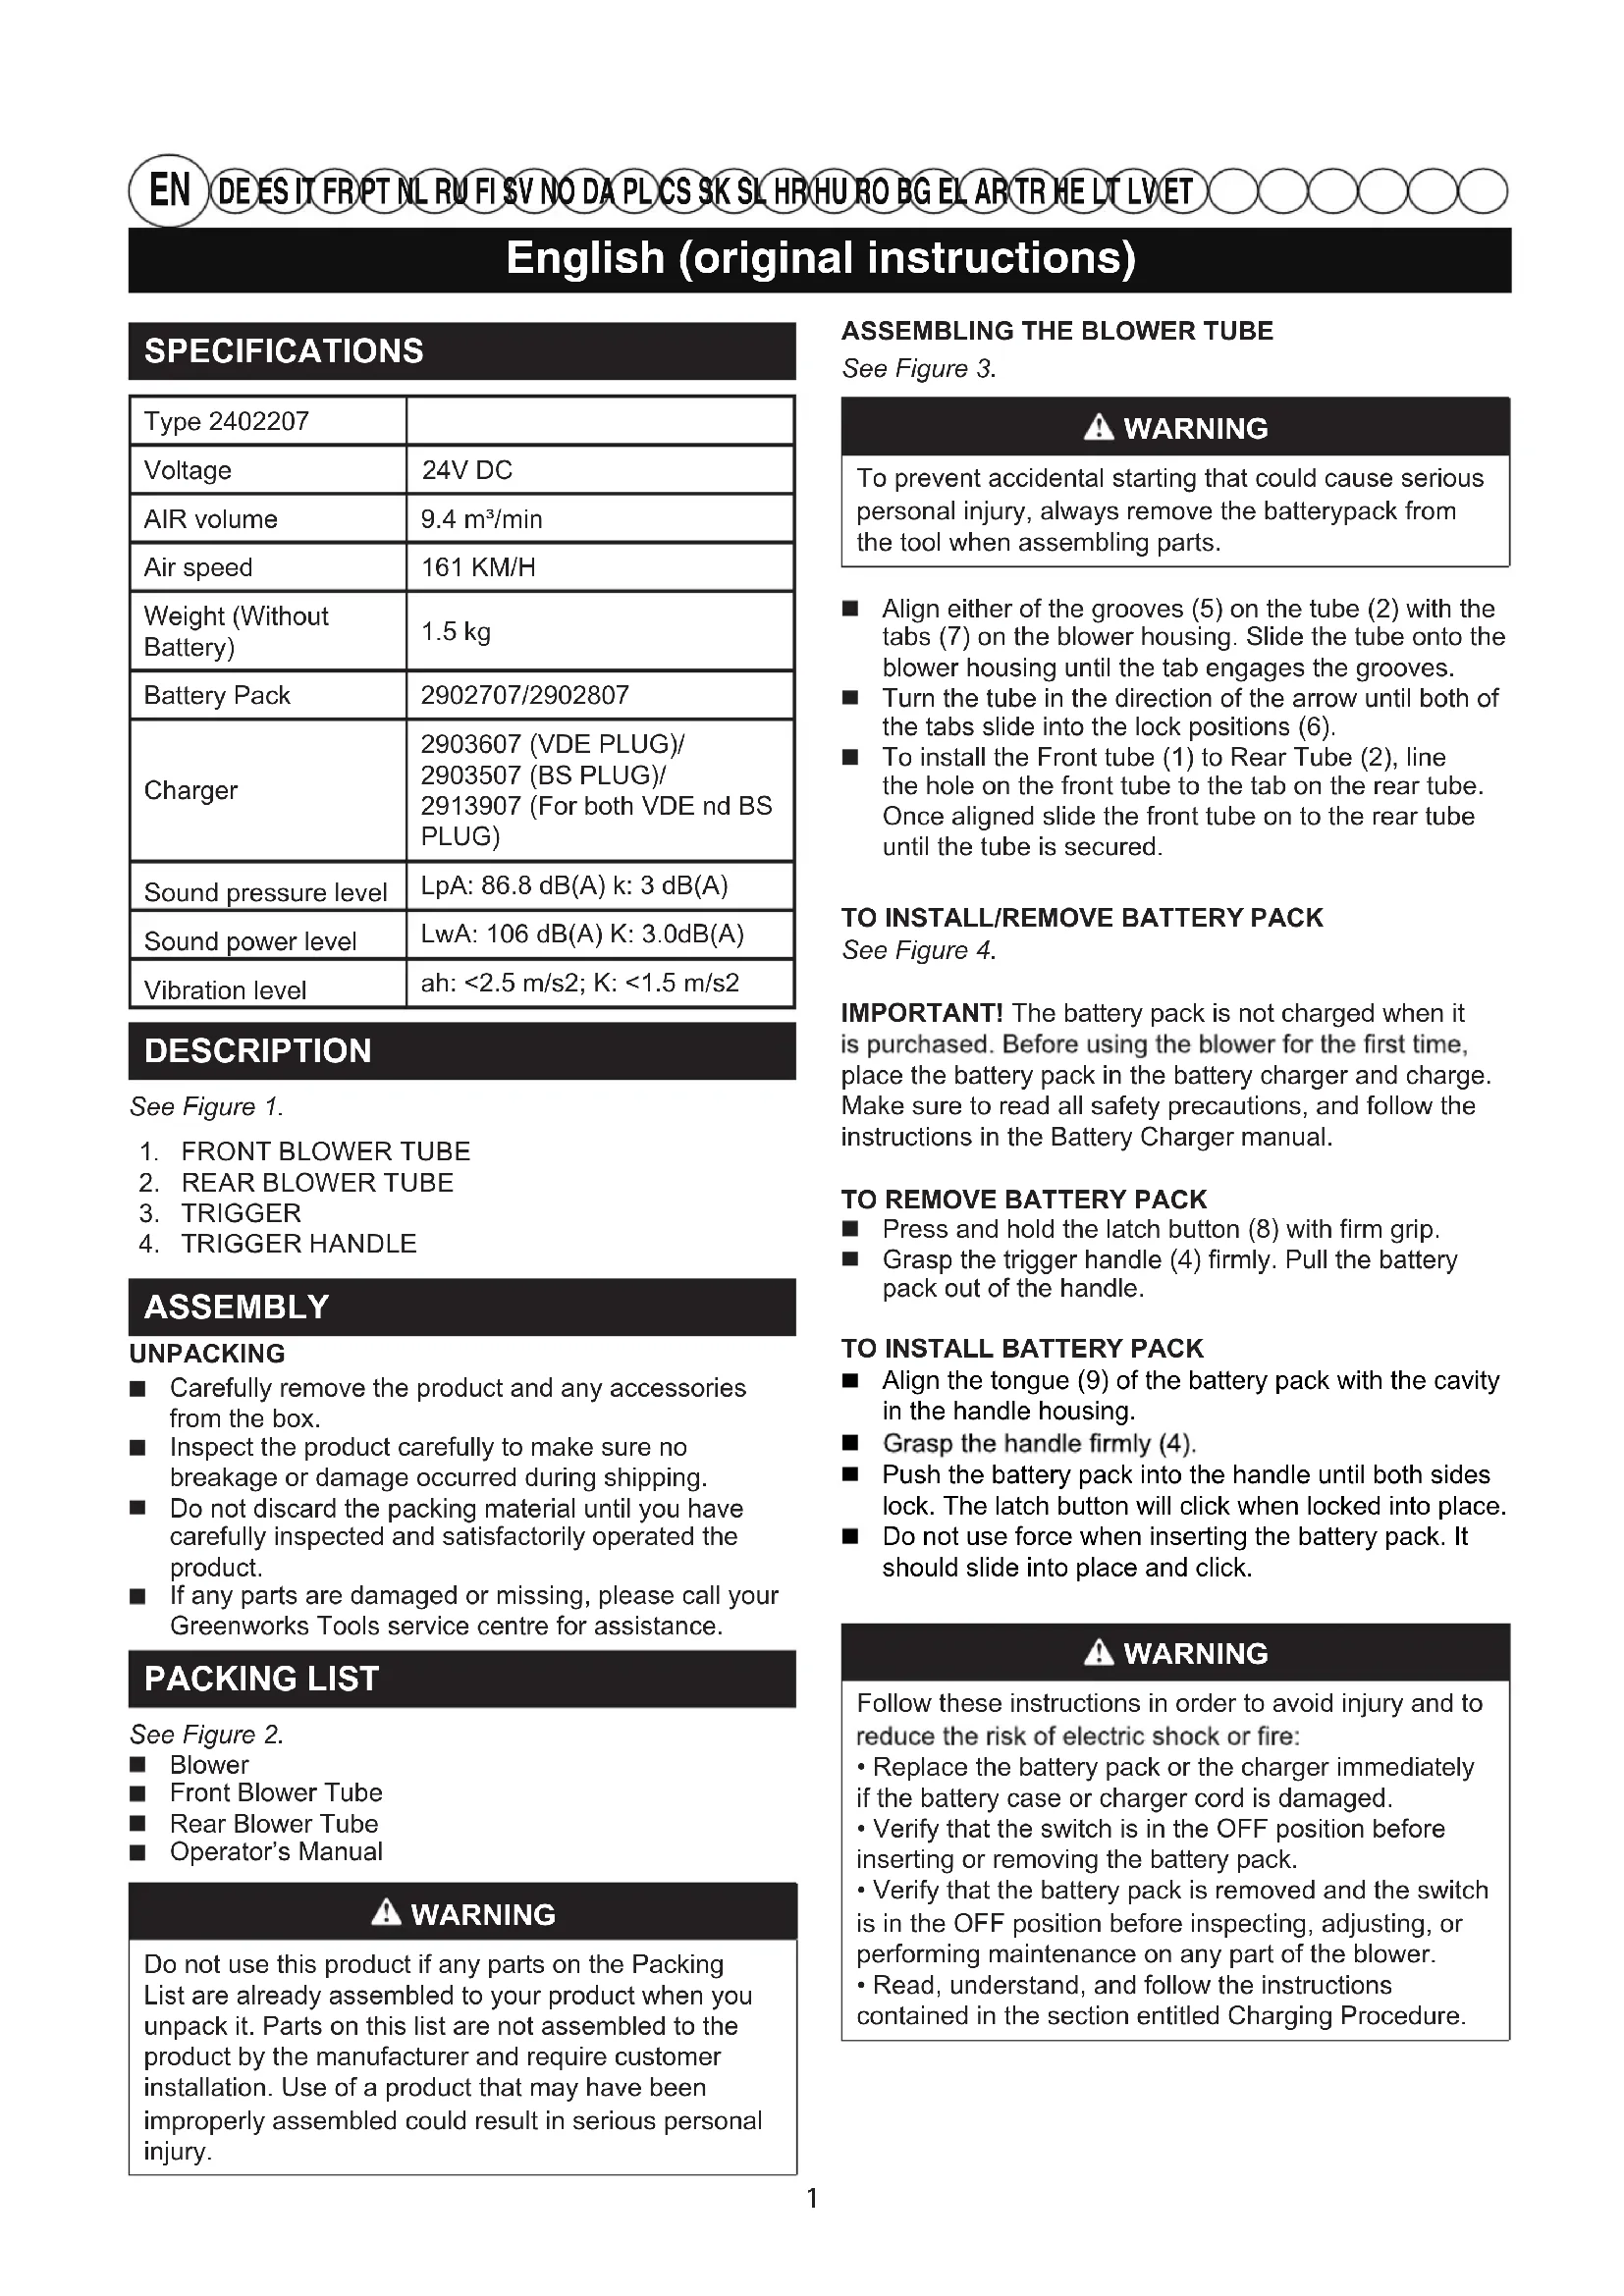
See Figure 1.
- FRONT BLOWER TUBE
- REAR BLOWER TUBE
- TRIGGER
- TRIGGER HANDLE
ASSEMBLY
UNPACKING
Carefully remove the product and any accessories from the box.
Inspect the product carefully to make sure no breakage or damage occurred during shipping.
- Do not discard the packing material until you have carefully inspected and satisfactorily operated the product.
If any parts are damaged or missing, please call your Greenworks Tools service centre for assistance.
PACKING LIST
See Figure 2.
Blower
Front Blower Tube
Rear Blower Tube
Operator's Manual
WARNING
Do not use this product if any parts on the Packing List are already assembled to your product when you unpack it. Parts on this list are not assembled to the product by the manufacturer and require customer installation. Use of a product that may have been improperly assembled could result in serious personal injury.
ASSEMBLING THE BLOWER TUBE
See Figure 3.
WARNING
To prevent accidental starting that could cause serious personal injury, always remove the batterypack from the tool when assembling parts.
Align either of the grooves (5) on the tube (2) with the tabs (7) on the blower housing. Slide the tube onto the blower housing until the tab engages the grooves.
Turn the tube in the direction of the arrow until both of the tabs slide into the lock positions (6).
To install the Front tube (1) to Rear Tube (2), line the hole on the front tube to the tab on the rear tube. Once aligned slide the front tube on to the rear tube until the tube is secured.
TO INSTALL/REMOVE BATTERY PACK
See Figure 4.
IMPORTANT! The battery pack is not charged when it is purchased. Before using the blower for the first time, place the battery pack in the battery charger and charge. Make sure to read all safety precautions, and follow the instructions in the Battery Charger manual.
TO REMOVE BATTERY PACK
Press and hold the latch button (8) with firm grip.
- Grasp the trigger handle (4) firmly. Pull the battery pack out of the handle.
TO INSTALL BATTERY PACK
Align the tongue (9) of the battery pack with the cavity in the handle housing.
Grasp the handle firmly (4).
Push the battery pack into the handle until both sides lock. The latch button will click when locked into place.
- Do not use force when inserting the battery pack. It should slide into place and click.
WARNING
Follow these instructions in order to avoid injury and to reduce the risk of electric shock or fire:
- Replace the battery pack or the charger immediately if the battery case or charger cord is damaged.
- Verify that the switch is in the OFF position before inserting or removing the battery pack.
- Verify that the battery pack is removed and the switch is in the OFF position before inspecting, adjusting, or performing maintenance on any part of the blower.
- Read, understand, and follow the instructions contained in the section entitled Charging Procedure.
English (original instructions)
WARNING
The battery pack fits into the backpack snugly in order to prevent accidental dislodging. It may require a strong pull to remove it.
WARNING
Always take care of your feet, children, or pets around you when pressing the battery release button. Serious injury could result if the battery pack falls. NEVER remove the battery pack when in a high location.
OPERATION
WARNING
Do not allow familiarity with this product to make you careless. Remember that a careless fraction of a second is sufficient to inflict serious injury.
WARNING
Always wear eye protection with side shields marked to comply with ANSI Z87.1, along with hearing protection. Failure to do so could result in objects being thrown into your eyes and other possible serious injuries.
WARNING
Do not use any attachments or accessories not recommended by the manufacturer of this product. The use of attachments or accessories not recommended can result in serious personal injury. Before each use, inspect the entire product for damaged, missing, or loose parts, such as screws, nuts, bolts, caps, etc. Tighten securely all fasteners and caps and do not operate this product until all missing or damaged parts are replaced.
CHARGE BEFORE FIRST USE.
WARNING
Always remove battery pack from the product when you are assembling parts, making adjustments, cleaning, or when not in use. Removing battery pack will prevent accidental starting that could cause serious personal injury.
STARTING/STOPPING THE BLOWER
Before start-up, make sure that the blower is in perfect condition to guarantee safe operation.
■Ensure that the battery is installed in the blower.
Squeeze the trigger to start the blower.
■Release the trigger to stop.
WARNING
To avoid serious personal injury, wear goggles or safety glasses at all times when operating this unit. Wear a face mask or dust mask in dusty locations.
WARNING
To prevent serious personal injury or damage to the unit, make sure the blower tube is in place before operating the unit.
WARNING
To avoid serious personal injury, do not wear looseclothing or articles such as scarves, strings, chains, ties, etc., that could be drawn into the air vents. Tie back long hair to make sure it does not get drawn into the air vents.
To keep from scattering debris, blow around the outer edges of a debris pile. Never blow directly into the center of a pile.
To reduce sound levels, limit the number of pieces of equipment used at any one time.
Use rakes and brooms to loosen debris before blowing. In dusty conditions, slightly dampen surfaces when water is available.
■Conserve water by using power blowers instead of hoses for many lawn and garden applications, including areas such as gutters, screens, patios, grills, porches, and gardens.
Watch out for children, pets, open windows, or freshly washed cars, and blow debris safely away.
After using blowers or other equipment, clean up. Dispos of debris properly.
MAINTENANCE
WARNING
In order to avoid personal injury and the risk of fire and electric shock, remove the battery pack before adjusting, inspecting, or cleaning the blower.
CLEANING
Remove the battery pack.
Brush or blow dust and debris out of the air vents using compressed air or a vacuum. Keep the air vents free of obstructions, sawdust, and wood chips. Do not spray, wash, or immerse the air vents in water.
■Wipe off the housing and the plastic components
English (original instructions)
using a moist, soft cloth. Do not use strong solvents or detergents on the plastic housing or plastic components. Certain household cleaners may cause damage, and may cause a shock hazard.
BATTERY PACK
Store the battery pack charged.
Once the charging light turns green, remove the battery from the charger and disconnect the charger from the outlet.
- Recharge the battery pack anytime you have notice there is less power. Never let the battery pack become completely discharged.
After charging, the battery pack may be stored in the charger as long as the charger is not plugged in.
WARNING
When servicing use only identical replacement parts. Use of any other parts may create a hazard or cause product damage.
Avoid using solvents when cleaning plastic parts. Most plastics are susceptible to damage from various types of commercial solvents and may be damaged by their use. Use clean cloths to remove dirt, dust, oil, grease, etc.
WARNING
Do not at any time let brake fluids, gasoline, petroleum based products, penetrating oils, etc. come in contact with plastic parts. They contain chemicals that can damage, weaken or destroy plastic.
WARNING
To avoid serious personal injury, always remove the battery pack from the tool when cleaning or performing any maintenance.
STORING THE BLOWER
Clean the blower thoroughly before storing. Store the blower in a dry, well-ventilated place that is inaccessible to children. Keep away from corrosive agents such as garden chemicals and de-icing salts.
Store and charge your batteries in a cool area. Temperatures above or below normal room temperature will shorten battery pack life.
Once the light on the charger turns solid green, remove the battery from the charger and disconnect the charger from the outlet.
■Do not store the battery pack on the tool.
■ Never store batteries in a discharged condition. Wait for battery pack to cool and fully charge immediately.
All batteries gradually lose their charge. The higher the temperature, the quicker they lose their charge. If you store your unit for long periods of time without using it, recharge the batteries every month or two. This practice will prolong battery pack life.
TROUBLESHOOTING
| PROBLEM | POSSIBLE CAUSE | SOLUTION |
| Motor fails to start when switch trigger is depressed. | Battery is not secure. | Ensure that the battery is fully secured in the blower. Refer to Installing the Battery section in this manual. |
| Battery is not charged. | Charge the battery pack according to the instructions included with your model. | |
| Unit will not start. | Defective speed switch. | Have the defective parts replaced by an authorized service center. |
| Defective motor. | ||
| Defective PCB board. | ||
| The unit will start, but air will not flow through the tube. | The air inlet or tube outlet is blocked. | Clear the blockage. |
Before start-up, make sure that the blower is in perfect condition to guarantee safe operation.
CLEANING THE COLLCTION BAG
CHARACTERISTIQUES PRODUIT
BESCHRIJVING (AFB.1)
- VOORSTE BLAZERBUIS
- ACHTERSTE BLAZERBUIS
- AAN-/UITKNOP
- AAN-/UITHENDEL
MONTAGE
ALS MULCHER MONTEREN (afb.3)
WAARSCHUWING
NONCK N YCTPAHEHNE HENCNPABHOCTE
| ПОНБЛЕМА BO3MOЖНА | ПРИЧИHA | PEШЕНЕ |
| Двигател NG He 3anyskaetcng, KOFDA KhoIGNka 3anyska NaJgata. | Баразец NG He 3akpenlleHa. | Убенистсь,чTo 6aразец NG naDEЖно 3akpenlt-eha BG 03dUxOyBVe.Сm. pa3deI «YctaHO-Bka 6aразец NG B daHOM ryKOBODCTBE. |
| Баразец NG He 3apJgKeHa. | Зaporдente 6aразец NG COOTBeTCTBnC INHCTpyKuziMyN, OTHOCZIMMCS K Baшeŋ MOdelen. | |
| Устюст BO He 3anyskaetcng. | Heinchnpaben NG pepeknLoyatel NG的整体可。 | HeinchnpabHbIe DeTaII N Heo6xOДmO 3amEHTb B abTOPIN3OBAHHom cepBVCHOM ueHTpe. |
| Heinchnpaben NG Dvigratel | ||
| HeinchnpabHa NaHel NG bNoka uypablenia | ||
| Устюст BO 3anysk- aETcrg,NG BO3dUnG He noCTynaet chepe3 Tpy6ky. | Во3dUnGoz3a6OpHnik ng Nn NBInyckHaN Tpy6ka 3acopeHbl. | Очирпte 3acopenerne. |
TUOTTEEN TEKNISET TIEDOT
| Tyyppi 2402207 | |
| Motor 24V DC | |
| Ilmamäärä 9.4 m3/min | |
| Ilman virtausnopeus | 61 KM/H |
| Vekt ( akkuei mukana) | 1.5 kg |
| BAkkulaturi | 2902707/2902807 |
| Oplader | 2903607 (VDE PLUG)/2903507 (BS PLUG)/2913907 (For both VDE nd BS PLUG) |
| Äänenpaineen taso | LpA: 86.8 dB(A) k: 3 dB(A) |
| Äänitehon taso | LwA: 106 dB(A)K: 3.0dB(A) |
| Värähtelytaso | ah: <2.5 m/s2; K: <1.5 m/s2 |
KUVAUS (KUVA .1)
- ETUMAINEN PUHALLINPUTKI
- TAKIMMAINEN PUHALLINPUTKI
- LIIPAISIN
- LIIPAISINKAHVA
KOKOAMINEN
PAKKAUKEN PURKAMINEN
3APEXDAHE INPEENINbPBA YNOTPEBA.
A PENEYIPPEXJEHNE
BnHaHn n3BaXdaIte aKymyIaTOPHaT a6aTePnO r npOdykTa, KOrato crIIO6BaTe yactN, n3BbPWBaTe HAcTPOIKN, NOcHCTBaTe IIN He n3NON3BaTe ypeDa. N3BaXdaHeTo Ha aKymyIaTOPHaT a6aTePnIe npEoTBPaTI eBEHTyaJIHO HenpeHnAmepeHo cTApTnpaHe, KoEt MOKe Da DOBeDe Do CepNo3Hn fnsuYeckn HapaHraBaHH.
CTAPTIPAHE/CINPAHE HA YPEDA 3A O6dyXBAHE YBepete ce, ye akymylaTophata 6aTepe nocTaBeHa B ypeDa 3a 6dyXbaHe.
HaTnchete cnycbka, 3a da cTaptnpate ypeda 3a 06dyxbane.
OtnycheTe cnycbka, 3a da cnpete ypeda.
A PENEYIPEXJEHNE
BnHaH KOrato pa6oTe C ypeJa, HocTe 3aUHTN OUYIa, 3a Da npEeOtBpaTte CepNo3HcN pN3UeCKn HapaHbAHJy. B npAunu ycnoBna HocTe Macka 3a JInCe NmMacka npOTNB npax.
A PENEUYPEXJEHNE
3a da npedotbpaTte cepno3n fni3nueckn HapaHbaHn I NOBpeNi no ypeDa, npede 3anOVAhe Ha pa6oTa npOBepBaTe daHn o6dyXbaUata Tp6a e Ha MCTOTO cN.
A PENEYIPPEXJEHNE
3a da npedotbpaTne cepno3nФn3nueckn HapaHЯBaHnI npi pa6ota cypeda, He HocTe Umpokn Dpexn, WAnOBe, Bpb3Kn, LaHcN, BpaTOBpb3Kn Ipynn NOo6Hn PpeMeTH, KOITMOrAT Da 6bDat 3acMyKaHN BbB BEHTINaUIOHHTE OTBOpN. 3abPkTe DeBnITE KOCN 3ad InaBaTaN, Taka Ye Da He MOrat Da 6bDaT 3acMyKaHN BBB BEHTINaUIOHHTE OTBOpN.
BbIrapckn (PpeBOd ot opuHnHaJIHnTe nHCTpyKcnn)
PABOTA C YPEDA 3A OБДУХBAHE
Korato nouCTBaTe KynHcA OtnaBun, 6dyXbaTe r OT nepnpepna KBm cHTbpa, 3a Da n36erHete pa3nnIyBaHe. Hkora He hacOyBaTe Tpb6aTa 3a 6dyXbaHe dIpeKTHo KbM cHTbpa Ha KynHHaTa.
3a da HamaNTe HNBOTo Ha UyMa, He n3noJI3BaIte eHOBpeMeHHo MHOrO ypeNi pa3nUHO o6OpYDaHe.
Pa3peTe OTnabuTc NOMOHTa Ha rpe6no mEtla, npEn Da TpETnPate C ypeDa 3a 0bDyXbaHe. Pnpapota B npaHn ycNOBn HABNaXHete JeKo C BOda NOBbpxHOCTTa, KOrTO ue 0bDyXBATE.
CnecTeTe BOda, KaTO BmecTo MapKyuN 3NON3BaTe ypeuN 3a O6dyXbaHe, 3a Da NOpNCTBaTe rpaDHN, INBaDN, KaHaBKN, NapaBAHIN, BbTpEuHN DBOPOBe, CKAPN, BepaHUN Ip.
Korato nounchbate OTnabu, ce ctabaTe da He nO6dyxbate No Nocoka Ha Deua, XNBOTHn, OTBOPEHn PpO3OpN IN KON.
Bunarn noocBaIte cneCce6cn, cneKaTo CTe pa6oTnIn CypeDn 3a o6dyXbaHe nIn dpyN NOO6Hn CbOpXeHn. N3XBpIaTe OTnaDbuTe Ha NOxOJaN 3a UeJI Ta MecTa.
IODPbXKA HA OCTPNETATA
A PENEYNPEXKDEHNE
3a da npedotbpaTne HapaHbAHnI Na orpaHnHTe PnCKa OT Bb3HNKBaHe Ha NOxap N TOKOB yAp, INBaxJaTe AkymyNaTophata 6aTePnAOT ypeDa 3a O6dyXBaHe, npedn Da ro HacTpOBAte, INCNEKTnpaTe INN NOHCTBaTe.
ПОЧИСТВАЕ
I3BaTe akyMylatOpHata 6aTepey.
C NOMOHTa Ha CbCTeH Bb3dY uNn Ha npaxocmykaKa npemaxheTe HATpyINBaHHraTc O npax n OTnaDbuB OBnactTa Ha BEHTnlaQIOHNTE OTBOpN BeHTnlaQIOHNTE OTBOpN Tp8Ba BuHaRn Da ca YnCTn OT OTnAdbuC, CTbPROTNn n TpeKn. Hnkora He TpeInpaTBeHTnlaQIOHNTE OTBOpN cbc CnpEioBe n nepuHn PpenapaTu Hr nnOTanJaTe BBBBoa.
I OunCTeKopnyca nIIaTMacOBte KOMnoHEHTn C NOMOuTa Ha BnaXHa N MeKa KbPna. He TpeTpauTe IJIaCTMacOBn KOpNc NIIaCTMacOBte KOMNoHEHTn CbC cINH NoUcTBAuN npenapatN uIN pa3TBOpNTeN. HApou NoUcTBAuN npenapatN Morat da NobpeJr Tyega N da yBeInuHAT pNcKa OT TOKOB ydap.
AKMYJATOPHA BATEPNA
CbxpahraBaTe akyMynaTophata 6aTepya3apeHa.
Cne KaTO CBeTINHHNt INHnKATOp Ha 3apAnHOTO yctpoiCTBO 3aONUHe Da CBeTN 3eJeHo, INBaTe Te akyMylatopHaTa 6aTePnO rT 3apAnHOTo n ro n3KnIOyTe OT 3axpaHbAHeTo.
Ipe3apeKdaIte akymyNatopHata 6aTepeN BnHaN KOrato 3a6eJIeXKeTHe HamaJIraBaHe Ha MOUHOCTTa. HkORA He octabYIte akymyNatopHata 6aTepeN da ce N3TOuHN HANbJHo.
CneI npKIOUbaHe Ha 3apeXdaHTo akyMylatopHaTa6aTePm MOKe Da ocTaHe B 3apJHOTO yCTpoCTBO,
CTnraTOdaeN3KJIIOUeHOOT3aXpaHBAHeTo.
A PEPENPEXDEHNE
Pn n3BbPbBaHe Ha peMOHT n3NON3BaIte cAmO nJeHTnUHn pe3epBHN qactn. n3non3BaHTo Ha dpyrn qactn MOxE da cb3dae onaCHOCTn IIN da nobpeDn npOdykTa.
I368raBaiTe I3noI3BaHeto Ha pa3TbOpnteI npn noocCTbaHeto Ha nIacTMacOBte Yactn. NobeHTo IIaCTMacCa yBCTBNTeJIHN KbMa p3NIuHN BINOBe pa3TBopnteN MoRat Da ce nobpeJr npn I3noI3BaHTo Ha TaKbA. I3noI3BaTe YcCTNs KbpN, 3a Da npemaxHeTe Mpbcotna, npax, MacNo, rpec n dp.
A PENEYIPPEXJEHNE
B HnkaBcnyaH He No3BOJBAe Te nactMacOBte yactn da Bn3at B KOHTaKT cbc Cnpaun TeyhoCTn, 6eHN, Netponn npOdykTN, pOnHKBaUN Macna n dp. Te cbDbpxat XmUeCKn BeueCTBa, KOUTo MOraT da nobpejrt, Ocna6r nn pa3pywat nactmacata.
A PENEYIPPEXJEHNE
To avoid serious personal injury, always remove the battery pack from the tool when cleaning or performing any maintenance.
CbXPAHEHNE HA YPEDA 3A O6DyXBAHE
IouncTeTe cIIOCTHO ypea 3a o6dyXBaHe, npei Da ro npnbepete 3a cbxpanHeHne. CbxpnaHbaIte ypeHa h cyxo Idope npOBeTpeHo MrcTo, KOeTo e HeIOCTbNHO 3a deua. DpbkTe ypea daJeue OT pa3JkaUN BeIecTBA KATO rpaHnckn Xmikaiu n pa3mpa3raBau ciOn.
CbxpaHbAteu 3apeJdaTe aKymNaTOPHnTe 6aTePNB XJaNDHO NOMEueHne. TempeaTpUte HaI INI IOH HopMaHnHaTc TaNHa TEMpeaTpApIe CbKpATr KINBOTa H aKymNaTOPHaTc 6aTePnI.
Cne KaTO CBETNHHNr INHnKATOp Ha 3apJHOTO yCTPOIcTBO 3aONUHe Da CBETN NOCTOARHNO B 3eJIeHO, n3BaTeAkyMylaTOPHaTa 6aTePn8 OT 3apJHOTO I TO N3KJIIOHTe OT 3axpaHBAHeTo.
He cbxpanraBaiTe akyMylatopHata 6aTepeRn B HNCTpyMeHTa.
Hnkora He cxbxaPbAaIe He3apeDeHn aKyMnaTOpHN 6aTePN. H3yaKaIte 6aTePnraTa da ce oxnaN BeHara J 3apeTe OTHOBO DOKpaN.
Bcukn 6aepnn r6y3 3apna cn c Teehne Ha Bpemeto. KOnkoto no-Bucoka e Temnepaypata, TOKOBa no-6bp3o 6aepnnte ry6r 3apra cn.Ako npnbepete 3a cbxpaheHne ypeda 3a npodblnnteH nepnoD OT BpeMe, 6e3 da ro n3non3BaTe, npesapeKdaiTe akyMnaTopnHe 6aepnHa BCEkn EHN INI DBA Meceua. TOBa ue ydbJnxnTexnna XNBOT.
BbJIrapckn (PpeBOD OT opuHHaJIHNTe NHCTpyKcnn)
OTCTPAHRABAHE HA HEN3ПРABHOCTN
| ПОНБЛЕМ | ВъЗМоЖHA ПРИЧИHA | PEШЕНЕ |
| МOTOPьТ He ce StapтURA при Нацхале на спubeska. | Батугияа He e пocstавенha павилно. | Уверетe сe, Que bateуряta e noctabavena празвilно B уреда 3a обухванe.Прегледайte раддени "Пocstавянe Ha akumулatopнatura bateуря"В настаяюTo ръковоюстBO. |
| Бaтугияа He e Зараз dedиа. | Заразete akumулatopнatura bateуряВ съответCTВи e Инструкципe, рindprжаваши вашя моden. | |
| УрedingТ He ce StapтURA. | Пов federйп reвкlioчbatel на скоростта. | Пов federйпte ча'trпбва дa ce замен't OT OTоризирани сервизи. |
| Пов federй duител. | ||
| Пов federй nbok 3a контол нa мошноcttra. | ||
| УрedingТ ce StapтURA, ho празе обухвашиата trьба He поим纳ва Вьздушина Stрuya. | Вхождшит Вентilatedонen OTВОР ип OTВОрьт Ha trьбата e skolicsран. | Отстаре Тэпшваhtо. |
ENAPEH/ADIAKONHΦYEHTHPA
Piv Ekvnoe, Bepaiwtheta oio quannpac Bioketao e apiwn kataoyn ia va egaopaiaote aqpaan Aetoupyia.
Bεβaiωθειτοιημπαταρία exει totoθειηθει στον φιστήρα.
PiEOTovdiakottnyvaEkvnoTeTovquontnpa.
AopnoTe Tov biakottn yia va otapatnoeTE.
ANPOEIAOIOIHsH
TnV aTOOuyn oOapou TpaUaIou, Opate TPOoTaTeutika MAtiw n yuaia aopaaia cKae Fopa Tou xnpoiopoToIEte to poiov.
1 1
1
11 1
Greenworks Tools
i#
U2
1
1
1
A C
JU 100000000000000000000000000000000000000000000000000000000000000000000000000
C
3
A C
J 1 J 1 J 1 J 1 J 1 J 1 J 1 J 1 J 1 J 1
A C
1 1 1 1 1 1 1 1 1 1 1 1 1 1 1 1 1 1 1 1 1 1 1 1 1 1 1 1 1 1 1 1 1 1 1 1 1 1 1 1 1 1 1 1 1
A C
J 1 J 1 J 1 J 1 J 1 J 1 J 1 J 1 J 1 J 1 J 1 J 1 J 1 J 1 J 1 J 1 J 1 J 1 J 1 J 1 J 1 J 1 J 1 J 1 J 1 J 1 J 1 J 1 J 1 J 1 J 1 J 1 J 1 J 1 J
1000000000000
A
12e 1j0 1u 1u 1u 1u 1u 1u 1u 1u 1u 1u 1u 1u 1u 1u 1u 1u 1u 1u 1u 1u 1u 1u 1u 1u 1u 1u 1u 1u 1u 1u 1u 1u 1u 1u
(16)
1
1
1
A
J 1 J 1 J 1 J 1 J 1 J 1 J 1
A
1
A C
JU 1 JU 1 U 1 U 1 U 1 U 1 U 1 U 1 U 1 U 1 U 1 U 1 U 1 U 1 U 1 U 1 U 1 U 1 U 1 U 1 U 1 U 1 U 1 U 1 U 1 U 1 U 1 U 1 U 1 U 1 U 1 U 1 U 1 U 1 U 1 U
#
1
U 1
1 1
1 1 1 1 1 1 1 1 1 1 1 1 1 1 1 1 1 1 1 1 1 1 1 1 1 1 1 1 1 1 1 1 1 1 1 1 1 1 1
1
L 1
JU
C
A C
J 1 J 1 J 1 J 1 J 1 J 1 J 1 J 1 J 1
j1j0c jao 1jaojoo
Remove the battery pack.
1 1 1 1 1 1 1 1 1 1 1 1 1 1 1 1 1 1 1 1 1 1 1 1 1 1 1 1 1 1 1 1 1 1 1 1 1 1 1 1 1 1 1
1 1
CjooUoUo
cji jao ujla yso auiyio.
1
1 1
1 1
A C
eJU 1uue 1uue 1ue 1ue 1ue 1ue 1ue 1ue 1ue 1ue 1ue 1ue 1ue 1ue 1ue 1ue 1ue 1ue 1ue 1ue 1ue 1ue 1ue 1ue 1ue 1ue 1ue 1ue 1ue 1ue 1ue 1ue 1ue 1ue 1ue 16
1 1 1 1 1 1 1 1 1 1 1 1 1 1 1 1 1 1 1 1 1 1 1 1 1 1 1 1 1 1 1 1 1 1 1 1 1 1 1 1 1 1 1 1 1 1 1
A
12uEus EpaUaW uGisU UJpU, UJxuUgUgUgU 1uUgU 1uUgU 1uUgU 1uUgU 1uUgU 1uUgU 1uUgU 1uUgU 1uUgU 1uUgU 1uUgU 1uUgU 1uUgU 1uUgU 1uUgU 1uUgU 1uUgU
A C
Jc Jc Jc Jc Jc Jc Jc Jc Jc Jc Jc Jc Jc Jc Jc Jc Jc Jc Jc Jc Jc Jc
c
JU 100000000000000000000000000000000000000000000000000000
1 111111111111111111111111111
1 1
1j 1j1j1j1j1j
1 1
Czg Czg Llal yk Czjol Czg Sgl jx 20
Ljy Czg Llal yk Czjol Czg Ljx
Czjol Ljx Jyso Jyso Jyso Jyso Jyso Jyso Jyso Jyso Jyso Jyso Jyso
1
| الإستعمال | الإستعمال | الإستعمال |
| الإستعمال الحرفية و صحي的女孩 محيى بعسانيت حانب لابعبيه. | الإستعمال الحرفية و صحي的女孩 محيى بعسانيت حانب لابعبيه. | الإستعمال الحرفية و صحي的女孩 محيى بعسانيت حانب لابعبيه. |
| ال,enough to be done | ال,enough to be done | |
| ال,enough to be done | ال,enough to be done | ال,enough to be done |
| ال,enough to be done | ال,enough to be done | ال,enough to be done |
| ال,enough to be done | ال,enough to be done | ال,enough to be done |
| ال,enough to be done | ال,enough to be done | ال,enough to be done |
| ال,enough to be done | ال,enough to be done | |
| ال,enough to be done | ال,enough to be done | |
| ال,enough to be done | ال,enough to be done | |
| ال,enough to be done | ال,enough to be done | |
| ال,enough to be done | ال,enough to be done | |
| ال,enough to be done | ال,enough to be done | |
| ال,enough to be done | ال,enough to being done | |
| ال,enough to be done | ال,enough to be done | |
| ال,enough to be done | ال,enough to be done | |
| ال,enough to be done | ال,enough to be done | |
| ال,enough to be done | ال,enough to be done | |
| ال,enough to be done | ال,enough to be done | |
| ال,enough to be done | ال,engho to be done | |
| ال,enough to be done | ال,engho to be done | |
| ال,enough to be done | ال,engho to be done | |
| ال,enough to be done | ال,engho to be done | |
| ال,enough to be done | ال,engho to be done | |
| ال,enough to be done | ال,engho to be done | |
| ال,engho to be done | ال,engho to be done | |
| ال,engho to be done | ال,engho to be done | |
| ال,engho to be done | ال,engho to be done | |
| ال,engho to be done | ال,engho to be done | |
| ال,engho to be done | ال,engho to be done | |
| ال,engho to be done | The child is pum in the room. |
Do not use this product if any parts on the Packing List are already assembled to your product when you unpack it. Parts on this list are not assembled to the product by the manufacturer and require customer installation. Use of a product that may have been improperly assembled could result in serious personal injury.
YAPRAK UFLEME MAKINESI BORUSUNUN MONTAJI
Bk. Sekil 3,
UYARI
Remove the battery pack.
ninn
yINn
yINN
nnnnu
A xin
77 7777777777777777777777777777777777777777777777
n nn nnn
3
A
IMPORTANT! The battery pack is not charged when it is purchased. Before using the blower for the first time, place the battery pack in the battery charger and charge. Make sure to read all safety precautions, and follow the instructions in the Battery Charger manual.
n nn no7n
nynnnnnnnnnnnn (8).
nnt nnn (4).nn noh nn anan.
noon noth
nxxnn (9)no nnn nn
(4).
n nn no nnnn nn nnnn nn nnnn nn nnnn nn nnnn nn nnnn nn nnnn nn nnnn nn nnnn nn nnnn nn nnnn nn nnnn nn nnnn nn nnnn nn nnnn nn nnnn nn nnnn nn nnnn nn nnnn nn nnnn nn nnnn nn nnnn nn nnnn nn nnnn nn nnnn nn nnnn
x no n no 1n. y nn nn nn
A
y n nn n nn n nn n nn n nn n nn n nn n nn n nn n nn n nn n nn n nn n nn n nn n nn n nn n nn n nn n nn n nn n nn n nn n nn n nn n nn n nn n nn n nn n nn n nn n nn n nn n nn n nn n nn n nn n nn n nn n nn n nn n nn n nn n nn n nn n nn n nn n nn n nn n nn n
x(nnn nn)
A
977 nnnn nn 7nny nyn nno nnnnnn nn:
no n no 107n nn y 107n n no 107n nn noy.
17x unnnn nn nnnn noon noon no 07 no7n.
11X uoiy n iixn nnnnn nn 791 Tn, 1111 X yiyin nn nnnn nn nn nn nn.
n nn nnnnnnnnnnnnnnnnnnnnnnnnnnnnnnnnnnnnnnnnnnnnnnnnnnnnnnnnnnnnnnnnnnnnnnnnnnnnnnnnnnnnnnnnnnnnnnnnnnnnnnnnnnnnnnnnnnnnnnnnnnnnnnnnn
A xnnn
no nnnn nn noannnnnnnnnnnnnnnnnnnnnnnnnnnnnnnnnnnnnnnnnnnnnnnnnnnnnnnnnnnnnnnnnnnnnnnnnnnnnnnnnnnnnnnnnnnnnnnnnnnnnnnnnnnn
PACKING LIST
A
77nn nn nnnn nn nn nn nn nn nn nn nn nn nn nn nn nn nn nn nn nn nn nn nn nn nn nn nn nn nn nn nn nn nn nn nn nn nn nn nn nn nn nn nn nn nn nn nn nn nn nn nn nn nn nn nn nn nn nn nn nn nn nn nn nn nn nn nn nn nn nn nn nn nn nn nn nn nn nn nn nn nn nn nn nn nn nn nn nn nn nn nn nn nn nn nn nn nn nn nn nn nn nn nn
A xnnn
n nn nnnn nn nnnn nn nnnn nnnn nnnn nnnn nnnn nnnn nnnn nnnn nnnn nnnn nnnn nnnn nnnn nnnn nnnn nnnn nnnn nnnn nnnn nnnn nnnn nnnn nnnn nnnn nnnn nnnn nnnn nnnn nnnn nnnn nnnn nnnn nnnn nnnn nn
A
77 nnne niosin iNnD ynny yynn n. yniu niosin x nytnoynnyyyn 77 nonoynpn. 77 yniu, tniy nyn 171 nnu, ynu nooN oN, kui, NnO,
n7 n7 7 np7nD n7 np7 np7 np7 np7 np7 np7 np7 np7 np7 np7 np7 np7 np7 np7 np7 np7 np7 np7 np7 np7 np7 np7 np7 np7 np7 np7 np7 np7 np7 np7 np7 np7 np7 np7 np7 np7 np7 np7 np7 np7 np7 np7 np7 np7 np7 np7 np7 np7 np7 np7
yni nni ni
A
n nn no nnnnnnnnnnnnnnnnnnnnnnnnnnnnnnnnnnnnnnnnnnnnnnnnnnnnnnnnnnnnnnnnnnnnnnnnnnnnnnnnnnnnnnnnnnnnnnnnnnnnnnnnnnnnnnnnnnnnnnnnnnnnnnnnnnnnnnnnnnnnnnnnnnnnnnnnnnnnnnn
nynnnnnn
7nyny7n,ITXnnnINnNn70nT'7n2n n 10nin.
INXnOIOHnnn nnNsin.
nynnnnnnnnnnnn
mnnnnn7
A xnnn
Tnynnnn nn nynnnn nn nnnn nn nnnn nn.
nnoon nn noon nn noon nn noon nn noon nn.
A
yynynynynnynnnynnnnnnnnnnnnnnnnnnnnnnnnnnnnnnnnnnnnnnnnnnnnnnnnnnnnnnnnnnnnnnnnnnnnnnnnnnnnnnnnnnnnnnnnnnnnnnnnnnnnnnnnnnnnnnnnnnn
A
yNn, xNn yNn, xNn, xNn, xNn, xNn, xNn, xNn, xNn, xNn, xNn, xNn, xNn, xNn, xNn, xNn, xNn, xNn, xNn, xNn, xNn, xNn, xNn, xNn, xNn, xNn, xNn,
unin
777777777777777777777777777777
ywnynnnn n7, nnnn no9n n7n nn ywn nn nn.
nannnnnnnnnnnnnnnnnnnnnnnnnnnnnnnnnnnnnnnnnnnnnnnnnnnnnnnnnnnnnnnnnnnnnnnnnnnnnnnnnnnnnnnnnnnnnnnnnnnnnnnnnnnnnnnnnnnnnn
nono 17 yn nnnn nn nnnn nn nnnnnnnnnnnnnnnnnnnnnnnnnnnnnnnnnnnnnnnnnnnnnnnnnnnnnnnnnnnnnnnnnnnnnnnnnnnnnnnnnnnnnnnnnnnnnnnnnnnnnnnnnnnnnnnnnnnnnnnnnnnnnnn
W 7777777777777777777777777777777777777
XnNnNnNnNnNnNnNnNnNnNnNnNnNnNnNnNnNnNnNnNnNnNnNnNnNnNnNnNnNnNnNnNnNnNnNnNnNnNnNnNnNnNnNnNnNnNnNnNnNnNn
n (nnnnnn)
nnr
A
Tn yyn 100nn nn nnnnnn, nnn no nnnn
n nn no n.
n nn no7n.
nui nui nui nui nui nui nui nui nui nui nui nui nui nui nui nui nui nui nui nui nui nui nui nui nui nui nui nui nui nui nui nui nui nui nui nui nui nui nui nui nui nui nui nui nui nui nui nui nui nui nui
n nn nnnn nn nnnnnnnnnnnnnnnnnnnnnnnnnnnnnnnnnnnnnnnnnnnnnnnnnnnnnnnnnnnnnnnnnnnnnnnnnnnnnnnnnnnnnnnnnnnnnnnnnnnnnnnnnnnnnnnnnnnnnnnnnnnnnnnnnnnnnnnnnnnnnn nn nn nn nn nn nn nn nn nn nn nn nn nn nn nn nn nn nn nn nn nn nn nn nn nn nn nn nn nn nn nn nn nn nn nn nn nn nn nn nn nn nn nn nn nn nn nn nn nn nn nn nn nn nn nn nn nn nn nn nn nn nn nn nn nn nn nn nn nn nn nn nn nn nn nn nn nn nn nn nn nn nn nn nn nn nn nn
017n
XnOJ nn noHnn nn.
nnn nn noyn nno nnnn nn no nnnn nn no nnnn nn
yni noiyn nn nnnn nn nnnn.
nnn noyn, nnoi nn noyni ynnny nnni nn.
A
Greenworks Tools Warranty Policy for DIY machines
PERIOD OF WARRANTY
All new Greenworks Tools machinery is supplied with a 2 year parts and labour warranty from original date of purchase. A 30 day warranty is available for machines used professionally as Greenworks Tools are designed primarily to be used by DIY consumers. This warranty is non-transferable.
LIMITATIONS
This warranty applies only to defective parts/components and does not cover repairs due to:
- Normal wear and tear.
- Routine tune up or adjustment.
- Damage caused by improper handling/abuse/misuse or neglect.
- Overheating due to lack of maintenance
- Damage due to fittings/fasteners becoming loose/detached through lack of maintenance.
- Damage caused by cleaning with water.
- Machines serviced or repaired by non-authorised Greenworks Tools service centres.
- Machines incorrectly assembled or adjusted.
- Damage caused by improper use of the machine.
- Damage caused by improper winterisation (pressure washers)
-
Items considered as consumable parts are not normally covered by the warranty, including but not limited to:
-
Batteries
Electric cables - Blade and blade assemblies
- Belts
- Filters
-
Chucks and tool holders
-
Certain products may contain components such as engines, transmissions from an alternative manufacturer, these items will be subject to the appropriate manufacturer's warranty policy except where Greenworks Tools Europe GmbH agrees to underwrite any claims outside the said manufacturer's warranty period.
- Second hand goods are not covered under this warranty policy.
- The fitting of spares, replacements or extra components which are not supplied or approved by Greenworks Tools Europe GmbH.
Warranty
To claim a warranty on any product under this policy a proof of original purchase is required. Credit card statement do not qualify as sufficient proof of purchase. In the first instance of a warranty event occurring the consumer should return the product to the original place of purchase with their proof of purchase. The machine will be sent to our central service facility and an inspection made. If the machine be found to be at fault it will be repaired and sent back to the address of the consumer free of charge. Machines that retail for less than €100 euros including sales taxes will generally be replaced.
If the central service facility finds that machine is not found to be at fault then the consumer will be advised they will need to pay for the cost of the repair.
This warranty policy is subject to change from time to time to accommodate the needs of new products. A copy of the latest warranty policy will be available at www.greenworkstools.eu.

Poccy. MockBa, 2-ri PaayBPOHOBCKn Ipoe3d 48
TexHOceBpnc
Greenworks Tools garanti for hobbymaskiner
GARANTIPERIOD
TapaHOnHH npaBnHa Ha Greenworks Tools 3a camoDEnH MaunHH
IEPNOI HA TAPAHUNTA
BcNKn MaunHn Ha Greenworks Tools ce npedoctabrt c 2-roDnHa rapaun3a cepBn3Ha deHoc n pe3epBN qactn, CHTnHO OT daTata Ha 3akynBaHe Ha npodykTa. PnpodctABrCe camo 30-dHeBnra rapauu 3a npocecnoHAnHO n3noJ3BaHnTe MaunHn, 3aTO npOyKNTte Ha Greenworks Tools ca npedHa3haeHn npedmH0 3a KIneHTn, paOteu cn cbCcamoepHnMaunHn
Hactoata rapaun He moke da ce npexBbprna.
OTPAHUEHNA
Hactoata rapaunie e BaIuHa cAmO 3a DepekTHn Yactn/KOMnoHeHTn He nokpBa pemOHn, noPOeHN OT:
HopMaJIHO H3HOCBaHe n amOpTn3aUra.
PyTuHHN HAcTpoKn Nm DeHocTn No peRyInpaHe.
Tobpei, npuHHeH oT HnPaBnHO 6opabe/3JoynoTpe6a/rpeHOnI03BaHe IIN PpOBA Ha He6peXHOCT.
IperpRABeHnopaNIOwA NOdPbJka.
Tobpeu npa pa3xaheH/pa3kaeHn cHaKn n nn cKpeuTeHHemEnB CneDCTBne Ha NoaNoDpBkKa.
Tobpei, npuHHeH B CJeDCTBHe Ha NOUcTBAHe C BODa.
MaunH, o6cnybaHn nn pmoHTnpaHn OT cepBn3Hn ceHTpOBe, ITO He ca otOpN3npaHn OT Greenworks Tools.
MaunH, KOITc crno6eHN nn perynpaHn HnpaBnHO.
Tobpei, npoDHeN OTHenpaBnHNo 6opabeHe C MaunHaTa.
IobpeNi, npoDoEHn OT HenpaBUNHO 3a3IMBaHe (BOOcTpyn)
- EJEMENTN, KONTO CE CHTAT 3a KOHCymatNBH, HO O6NKHOBEHO He ce NOKPNAbT OT rapaHnraTA, BKJIQUHTeINHO (HO HE CAMO):
BaTePmN
EneKtpueecknKa6en
- OctpneTa n KOMnNeKtn OcTpneTa
Pembln
ΦHTPN
- IaTPOHHHnN nIbPkaa3a IHCTpyMeHTn
12.HaKoN npOdykTN MoRat Da cbDbpkat KOMNoHEHn (HaNPmep DBrnATEHNI, TpaHCmncn) OT dpYr npOn3BODHTEN - 3a Te3n EneMeHTn Ca B CnIa TaPapaUIOHNHITe ycNOBna HA CbOTBeTHn PpOn3BODHTEN OCBHe B cnyAte, Korato Greenworks Tools Europe GmbH ce cbrracn da NOKPme UeTITE, KOtHO He CE nokpnbAT OT rapaHcIOHHn nepnoD Ha To3n npOn3BODHTen.
- CTOKI BTOPA yonTppeBa He ce NOKPBAAT Oht HactoMaT a TapaHnA
- MoHTnpaHTo Ha pe3epBnH qACTn, 3ameCTBaun nn DonbHNrTeHH
KOMIOHETN, KOnTo He ca npedocTaBeH nN oOobpeHn OT Greenworks
Tools Europe GmbH.
TapaHua
3a npedraBaHe h rapaHnoHnck 3a dahen npodyk Tpr6Ba da ce npedoctabn Doka3ateJCTBO 3a nbpBOHaayHNO My 3akyuBaHe.
N3BneHnraTc ot KpeiHTnKaptn He npdctabnBaBnHO
DOKa3ateJCTBO 3a knyBaHe. Ppi NpBPOTb B3HNKBaHe Ha ycNoBne,
N0BONBAIo npedraBaHe Ha rapaHnOHe nck, KIneHTb Tpr6Ba Da
3aHece npOyKaHa MaCTOHa HerOBOTO NpBoHaayHnO 3aKyuBaHe,
KBDETO Tp8Ba Da npedocTabn Doka3atEnCTBO 3a knyBaHTo.
MaunHata 6bDe n3npaTeHa No haunr rnaBe cepBnEh cenTp,
KBDETO 6bDe N3BpUeHa HnCnEQUA. AKe y CteTahOBnFa6pnueH
dePekn no MaunHata, Ta 6bDe 6e3nnAHO pemOHtupaHa
m3nPaeHa 6paTHo Ha aDpeca Ha KIneHTa. MaunHnTe Ha na3apHa
ctOnHocT no100 EBPO (BKN. dAnbK npOdaX6a) obNKHObeHo 6bDat
NDMeHnC HOBn.
Ako haunr rnaBcH cepBn3e H cHTbP He yCTaHO B pa6pHn DepeKtn no MaunHata, KneHtBt 6e 6Be yBEdOMe, Ye Toi Te Tp6Ba da 3anatn paXoNDte No pMOHTHa npOyKta.
HactoIte rapaunohn npabina moat da 6bdat npomehnh nepnouho,3a da 6bdaT akTyanHO aadTnpaHI KbM HOBtpe npOyKTN. Konne Ha hai-aktyaHInTe rapaunOHn npabina e HainHo Ha aDpec www.greenworkstools.eu.
Nolitik yyyunonc oukeuwv maotopepaoc Greenworks Tools
NEPIOOZ ERTYHHE
Ola ta vea unxavnma tnc Greenworks Tools ouvoduovtai ato eyyunon 2 etw yia ta eapntnata kai ta epyatikauos, atno tv apxikn npopounvia ayopac. Eyyunon 30 npewpnu pexetai ia unxavnata Tnou xpoiotiouovtai etayeeApatikka, kaohc Ta ttpoivta nTgreenworks Tools ateuobuvotai kupiw cEpaaitexvec katavaawtec troiovvtuv maotopaeutoc. H eyyunon elvai m uetabiai
IIEPIOEMOI
H TAPOUSA EYUNON IOXUEI MOVIOA EATWATKIA EApTnMATAEVOTNTC KAI DEV KAUTTEI ETIOKEUEC TOU OPEIAoVTaI OE:
duoioloyiknΦopá.
2.Συνθεις επιακημες n Προσαρμογες.
3. Znuiéc Tnou pokalovtai ato avapuoTo xeipioKataxpnon/ eoqalueyn xphon n qeAia.
4. Yπερθερμανολόγω ελλειης συντήρησης.
5. Znmuia loyw xaapwnc/antooaonc Eapntmuatwv/ouvdeoovxgianc eAAeysn ouvtnpns.
6. Znmu Tou PpokAnkE aTko Kaapioo vepo.
7. Mnxavnata Tnou UTOBaalovtai Oe eppic n Etnakeuesc e μη Εουσιδοπμενα Kevtpa σερβic ts Greenworks Tools.
8. Eσφαλμενn συναρολόγησι n Πτροσαρογή μηχανηματων.
9. Znuiec 和 lyw akataaanns xphons tou nxaivnatoc.
10. Znuiies loyw eopaaevnc evkataoataons yia to xiemuva (pOeAes
11. TAOxieia Touewoqvtai avawai, dev kalutovtaouvthcTnv Eyyunon, ouptepiaaubavouevw vEiktikacwEhC:
- Mttatapie
-
UUUUUUUUUUUUUUUUUUUUUUUUUUUUUUUUUUUUUUUUUUUUUUUUUUUUUUUUUUUUUUUUUUUUUUUUUUUUUUUUUUUUUUUUUUUUUUUUUUUUUUUUUUUUUUUUUUUUUUUUUUUUUUUUUUUUUUUUUUUUUUUUUUUUUUUUUUUUUUUUUUUUUUUUUUUUUUUUUUUUuuuuuuuuuuuuuuuuuuuuuuuuuuuuuuuuuuuuuuuuuuuuuuuuuuuuuuuuuuuuuuuuuuuuuuuuuuuuuuuuuuuuuuuuuuuuuuuuuuuuuuuuuuuuuuuuuuuuuuuuuuuuuuuuuuuuuuuuuuuuuuuuuuuuuuuuuuuuuuuuuuuuuuuuuuuuuuuuuuuuuuuuuuuuuuuuuuuuuuuu uu
-
iJbUcpeuue uua Uca
-
UuurjUuuee uuuu/ uuuu/ uuuu
6.1
10:UuUuuuue uuuuuuuuuuuuuuuuuuuuuuuuuuuuuuuuuuuuuuuuuuuuuuuuuuuuuuuuuuuuuuuuuuuuuuuuuuuuuuuuuuuuuuuuuuuuuuuuuuuuuuuuuuuuuuuuuuuuuuuuuuuuuuuuuuuuuuuuuuuuuuuuuuuUU
- 1u, u, u, u, u, u, u, u, u, u, u, u, u, u, u, u, u, u, u, u, u, u, u, u, u, u, u, u, u, u, u, u, u, u, u, u, u, u, u, u, u, u, u, u, u, u, u, u, u, u, u,
| x - 2| = | x - 4| = 1
1
·
(20
S OBC = S COD + S_ BOC
·山
Uus uusuusususususususususususususususususususususususususususususususususususususususususususususususususususususususususususususususususus
10 10
cuiuue uuiuuiuue uuuuue uuuuue uuuuue uuuuue uuuuue uuuuue uuuuue uuuuue uuuuue uuuuue uuuuue uuuuue uuuuue uuuuue uuuuue uuuuue uuuuue uuuuue uuuuue uuuuue uuuuue uuuuue uuuuue uuuuue uuuuue u
GARANTI SURESI
EC DECLARATION OF CONFORMITY FOR MACHINERY
Manufacturer:Changzhou Globe Co., Ltd.
Address: No.65 Xinggang Road Zhonglou Zone Changzhou, Jiangsu 213000
P.R.China
Name and address of the person authorised to compile the technical file:
Name: Gary Gao Naixin (Director of Outdoor Power Equipment)
Address: Greenworks Tools Europe GmbH
Wankelstrasse 40.
50996Koln
Company
Germany
Herewith we declare that the product
Category CORDLESS BLOWER
It is used to propel air out of a tube to move yard debris such as leaves.
Model 2402207
Serial number. See product rating label
Year of Construction . See product rating label
-
is in conformity with the relevant provisions of the Machinery Directive
-
is in conformity with the provisions of the following other EC-Directive
MD Machinery Directive 2006/42/EC
2014/30/EU (EMC-Directive), and
2000/14/EC (Noise-Directive) incl. modifications (2005/88/EC)
And furthermore, we declare that
- the following (parts/clauses of) European harmonised standards have been used
EN 60335-1, EN 50636-2-100:
EN 62233, EN ISO 3744; EN 55014-1;
EN 55014-2
Measured sound power level
LWA: 102.8 dB(A)
106 dB(A)
Conformity assessment method to Annex V/ Directive 2000/14/EC
Place, date: Changzhou, 22/07/2016
MIET) Vice president of Engineering
Signature: Gary Gao Naixin (BEng, CEng,


MD Machinery Directive 2006/42/EC
MD Machinery Directive 2006/42/EC
MD Machinery Directive 2006/42/EC
MD Machinery Directive 2006/42/EC
2014/30/EU (Directive EMC), et
2000/14/CE (Directive Emissions Sonores) y-comprismodifications (2005/88/CE)
Endereço: No.65 Xinggang Road Zhonglou Zone Changzhou, Jiangsu 213000
China
MD Machinery Directive 2006/42/EC
2014/30/EU (Directiva EMC), e
Naam: Gary Gao Naixin (Director of Outdoor Power Equipment)
Adres: Greenworks Tools Europe GmbH
Wankelstrasse 40.
50996Koln
Germany
HactoIIMMb3aBnEM,HTOdaHHbI npOdyKT
Katero pna BECNPBOHOE BO3DyXOvBHOE YCTPOIcTBO
YcTPOCTBOHCNOLb3yETCnBbDyBaHnB03dyxa n3 Tpy6Kn nIepeMeueHn Mycopa BO DBope, HApnPmep, NtCTbeB.
Moe 2402207
3aBODCK O HOMep... CM. nacnopTHyTO TaBmUky npOdykTa
TOrBbInycka Cm.nacnopThHyTo Ta6nnykny npOdykTa
COOTBECTBYETBCEMBAKHeIMM NIOJKeHnM DInpeKTINBbI NO MExAHueckomy 6060
coOTBeTCTByeT Bcem NOIOKeHnM CneDyIOuXn DnpeKtNB EC
MD Machinery Directive 2006/42/EC
2014/30/EU(DinpeKTHBa EMC).e
2000/14/EC (Директва no wум) c ИзMeнен�m (2005/88/EC)
Kpome 3Toro, Mbl 3aBnREM, 4TO
6bIINICIOJI3OBAHbI CNEJyUoiue qCTIn IITN CTaTBn EBPOJIeCKHX CORIACOBAHbIX cTaNADTOB
EN 60335-1, EN 50636-2-100;
EN 62233, EN ISO 3744; EN 55014-1;
EN 55014-2
I3MepeHHbI ypoBeHb 3ByKOBoM OuHocTn LWA:102.8dB(A)
IapaHTpyeMbI ypoBeHb 3BykoBoM MoocHcTn 106 dB(A)
OueHka cooTBcTbna npoBeHa corlacho npnIOxKeHHIO V K dIpeKTHBe 2000/14/EC
Mecro, data: Changzhou, 07/22/2016 Pdncb: Gary Gao Naixin (BEng, CEng,
MIET) Bnue-npe3nueHT no pa3pa60tkam

FI LAITTEIDEN EY:N VAATIMUSTENMUKAISUUSVAKUUTUS
Namn: Gary Gao Naixin (Chef for Outdoor Power Equipment)
Adress: Greenworks Tools Europe GmbH
Wankelstrasse 40.
50996 Koln
Germany
MD Machinery Directive 2006/42/EC
MIET)Chef for Engineering
NO EC SAMSVARSERKLAERING FOR MASKINER
Produsent: Changzhou Globe Co., Ltd.
Adresse: No.65 Xinggang Road Zhonglou Zone Changzhou, Jiangsu 213000
P.R.China
MD Machinery Directive 2006/42/EC
2014/30/EU (EMC-Direktivet), og
2000/14/EC(Stoydirektiv) inkl. endringer (2005/88/EC)
MD Machinery Directive 2006/42/EC
2014/30/EU (EMC-direktivet) og
2000/14/EQF (stojdirektivet) inkl. modifikationer (2005/88/EQF)
Vi erklær desuden, at
der er anvendt falgende (dele/klausuler af) europaeiske harmonisered
standard:
EN 60335-1, EN 50636-2-100;
EN 62233, EN ISO 3744; EN 55014-1;
EN 55014-2
Malt lydefeffektniveau
LWA:102.8 dB(A)
Garanteret lydefeffektniveau
106 dB(A)
Overensstemmelsesvurderingsmetode iht. Tillaeg VI / Direktiv 2000/14/EØF
Sted, dato: Changzhou, 22/07/2016 Underskrift: Gary Gao Naixin (BEng, CEng,
MIET) Vicedirektor for maskinteknik


DEKLARACJA ZGODNOSCI WE DLA MASZYN
Producent: Changzhou Globe Co., Ltd.
Adres: No.65 Xinggang Road Zhonglou Zone Changzhou, Jiangsu 213000 P.R.
Chiny
MD Machinery Directive 2006/42/EC
MD Machinery Directive 2006/42/EC
MD Machinery Directive 2006/42/EC
2014/30/EU (Smernica EMC) a
2000/14/EC (Smerica pre hluk) vratane modifikacii (2005/88/EC)
MD Machinery Directive 2006/42/EC
MD Machinery Directive 2006/42/EC
2014/30/EU (EMC-Direktiva) i
2000/14/EC (Direktiva o buci) uključujuci preinake (2005/88/EC).
MD Machinery Directive 2006/42/EC
2014/30/EU(EMC iranyelv) es
2000/14/EK (Zaj iranyelv), beleertve a modositaskat (2005/88/EK) is.
the provisions of the following other EC-Directive:
MD Machinery Directive 2006/42/EC
Ppoun3bOuTeI:Changzhou Globe Co., Ltd.
Adec: No.65 Xinggang Road Zhonglou Zone Changzhou, Jiangsu 213000, KHTai
Ime n aDPEC Ha JInuTeO, yNbHNOMoUeHO da CbCTaBn TEXHnueCKnTE DOKyMeHTN:
Ime: Gary Gao Naixin (DnapeKTop Ha OToeHa 3a BbHsHo MExaHn3npaHo
obopydbahe)
Adpec: Greenworks Tools Europe GmbH
Wankelstrasse 40
50996Koln
Germany
C HactoToDeknapnpame,Ye npOyKTbT
Kateropn .
YpeBt ce 3eMn038a 3a daBxBA He b3dux N3bH Tp6ba, c cen npemctBaHe H aDOBHN OTNADlbuNT KATO NCTA.
Moen 2402207
CepneH Homep BnKTe eTKeTa c HOMHaHHTe CToHOCTM
GOnHua H npom3BODCTBO . BmKte erNkEa C homnAHNHTe ToOHIOCTn OTOBAPRa H cbOTBeNTHnate PA3nOpE6n HaIpeKINbATA OTHOCHO MAuHInHne
OTROBAPHa pa3nope6nTe Ha cneHnTe pytn DnpeKtNBn HA EO
MD Machinery Directive 2006/42/EC
2014/30/EU (DnpeKtnBa 3a EMC) n
2000/14/EC (N3MbBHaH Wm OT MaHHn H cbOpbKeHn, KOTo pa6oTt Ha OTKpTuO)
BKNIOHTeHNO npOMeHnTe (2005/88/EC)
OcbEN ToBa DeKnapnpame, Ye
ca cna3eHN(actn/klay3nOT)cneHNTe oBunTe eBponeNCK CTahdaptN
EN 60335-1, EN 50636-2-100;
EN 62233, EN ISO 3744; EN 55014-1;
EN 55014-2
U3MepeHo HINBO Ha UyM
LWA: 102.8dB(A)
TapaHTnpaHO HnBO Ha 乌M
106 dB(A)
MeToHa OueHBAHe Ha cBoTBcTBnETo Cbo6pa3Ho npHIOKeHne VOT DnpeKTHBa
2000/14/EC
MRCTo, dATo: Changzhou, 22/07/2016
Bnuepe3ndent,
Poiin: Gary Gao Naixin (BEng, CEng, MIE)
MaJINHOCTpoeHe


Address: Greenworks Tools Europe GmbH
Wankelstrasse 40.
50996Koln
Germany
Aia Tou npovtoe hawoupe on to poiov
AESPMATO ΦYTHTPA
To mXavna xpoiionoeirai yia nV wOe aepa peow aywyou eokono tvy metakivnon
unoeipmuatuw onwoc puaa.
Movélo 2402207
Aipuoc eipas .BA. tKaTa Baoovounon Tpoiovto
EToC kataoKeurc .BA. EtiketaaBauovouanpTpoioVTO
- evai ouuwpwo u Tis oxetikc biataeic nOcbnyia Mxavnpatw
To Tpoov eivai ouuwo vo tic npouTBoeoi ts w npakatw loiw Onyiw ts EK
2014/30/EE (O8nyia EMC) kai
2000/14/EK (Odyia 8opou) ouuTepa aauavovvTwv TpoTOnoi (2005/88/EK)
Kai emtiaoeo hawoume o
oiakolouBεg (pep / phtpε) Ta eupwtaikd evapovioeva npotuaexouv
XpnoiopoToin8e1
EN 60335-1, EN 50636-2-100;
EN 62233, EN ISO 3744; EN 55014-1;
EN 55014-2
Metpnevo EITIEBO Evtaos hou
LWA:102.8dB(A)
106 dB(A)
MeBoooc aioooyonc ouiuopwongn npoc Napaptnma V/Oynla 2000/14/EK
Place, date: Changzhou, 22/07/2016
YToypa: Gary Gao Naixin (BEng, CEng,
MIET) Avinpoedpoc mXavaoyikou tmuatos


Leuvi Upbilispe Updiogos U3g
Changzhou Globe Co., Ltd.
No.65 Xinggang Road Zhonglou Zone Changzhou
Jiangsu 213000 P.R.China
U
U:Gary Gao Naixin (p)
Greenworks Tools Europe GmbH
Wankelstrasse 40.
50996 Koln
Germany
1
Gooe Ooe Uoie Uoie Uoie Uoie Uoie
..2402207
U
xuue 1
-
EC-Directives
2014/30/EU (
2000/14/EC (Lg)
#
- the following (parts/clauses of) European harmonised standards have been used
EN 60335-1, EN 50636-2-100;
EN 62233, EN ISO 3744; EN 55014-1;
EN 55014-2
102.8
u
106 1
200/14/EC
22/07/2016
Gary Gao Naixin
()
Jxjxjxjxj


AT UYGUNLUK BEYANI
Uretici: Changzhou Globe Co., Ltd.
Adres: No.65 Xinggang Road Zhonglou Zone Changzhou,
- the following (parts/clauses of) European harmonised standards have been used
EN 60335-1, EN 50636-2-100;
EN 62233, EN ISO 3744; EN 55014-1;
EN 55014-2
Imza: Gary Gao Naixin (BEng, CEng,
MIET) Muhendislik Departmani Baskan Yardimcisi


nannnnnnnnnnnnnnnnnnnn
Changzhou Globe Co., Ltd.
mian: No.65 Xinggang Road Zhonglou Zone Changzhou, Jiangsu 213000 P.R.China
P
yo:Gary Gao Naixin (mthnnnwnny)
Address: Greenworks Tools Europe GmbH
Wankelstrasse 40.
50996 Kohn
1
P
ywnnnn nn nynnnn anan
Tao 2402207
no'07
y
y
- yinTnynncnncnncnncnncnncnncnncnncnncnncnncnncnncnncnncnncnncnncnncnncnncnncnncnncnncnncnncnncnncnncnncnncnncnncnncnncnncnncnncnncnncnncnncnncnncnccnn
2014/30/EU (nnnnnnnnnnnnnnnnnnnnn)
2000/14/EC (nnnnnnnn) (2005/88/EC)
109,
- the following (parts/clauses of) European harmonised standards have been used
EN 60335-1, EN 50636-2-100;
EN 62233, EN ISO 3744; EN 55014-1;
EN 55014-2
ywn ywn
102.8 dB(A)
106 dB(A)
wnnnn nn nnnn 2000/14/EC
nD,NNY:X'KxN12/07/2016
Signature: Gary Gao Naixin
(BEng, CEng, MIE) om" naton
LT EKIRENGIMUATITIKTIESDEKLARACIJA
Gamintojas: Changzhou Globe Co., Ltd.
Adreas: No. 65 Xinggang Road Zhonglou Zone Changzhou, Jiangsu 213000 P.R. Kinija
Asmens, jgaloti tvarkyti technine byla, vardas, pavarde ir adreas:
Vardas, pavarde: Gary Gao Naixin (Elektros jrangos darbui lauke direktorius)
Adresas: Greenworks Tools Europe GmbH
Wankelstrasse 40
50996 Kohn
Germany
MD Machinery Directive 2006/42/EC
2014/30/EU (EMC-direktyva), in
2000/14/EK (Triuksmo direktyva) Jskaitant pakeitimus (2005/88/EK).
Parasas: Gary Gao Naixin (BEng,
CEng,MIET)Viceprezidentas,Inzinerija

LV MASINU EK ATBILSTIBAS DEKLARACIJA
Razotajs: Manufacturer:Changzhou Globe Co., Ltd.
Adrese: No.65 Xinggang Road Zhonglou Zone Changzhou, Jiangsu 213000
P.R.China
Personas, kas pilvarota sastadit tehnisko dokumentaciju, vards, uzvards un adre:
Vards, uzvards: Gary Gao Naixin (Lauka iekartuugas direktors)
Adrese: Greenworks Tools Europe GmbH
Wankelstrasse 40
50996 Kln
Germany
Ar so mēs pazinojam, ka prece
To Izmanto, Iai virizitu gaisu ara no trubas un parrviototu pagalma sanesi, ka, plemērān, lapas.
Kategorija BEZVADA ELEKTRISKAIS PUTEJS
Modelis. 2402207
Serihas numurs Skatit preces specifikacju etiketi
Uzbuvesanas gads ...Skafit preces specifikacju etiketi
-
atbilst attiecgajiem Mehanismu direktivas noteikumiem
-
atbilst attiecqajiem citu sekoosu EK direktivnu noteikumiem
MD Machinery Directive 2006/42/EC
2014/30/EU (Elektromagnetiskas atbilstibas (EMC) direktiva), un
2000/14/EK (Direktiva par trokšnu emisiju), ieskaitot grozijumus (2005/88/EK)
Turklat, mes pazinojam, ka
- ir tikusi izmantoti sekojisie Eiropas saskanotie standarti (dalas / panti)
EN 60335-1, EN 50636-2-100;
EN 62233, EN ISO 3744; EN 55014-1;
EN 55014-2
Izmirais skanas jaudas limenis
Garantéais skanas jaudas limenis 106 dB(A)
Atbilstibas novertesana saskana ar pielikumu V/ 2000/14/EK direktiva
Vieta, datums: Changzhou, 22/07/2016
Paraksts: Gary Gao Naixin (BEng)
CEng,MIET)
Masinbues das prieksddetaja vietnieks
ET MASINA EC VASTAVUSDEKLARATSIOON
Tootja:Changzhou Globe Co., Ltd.
Aadress: No.65 Xinggang Road Zhonglou Zone Changzhou, Jiangsu 213000
P.R.China
MD Machinery Directive 2006/42/EC
2014/30/EU (elektramagnetilise uhilduvuse direktiv) ja