CEG5311X - Coffee machine BEKO - Free user manual and instructions
Find the device manual for free CEG5311X BEKO in PDF.
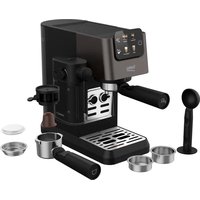
| Type of product | Automatic coffee machine with grinder |
| Brand | Beko |
| Model | CEG5311X |
| Power | 1350 W |
| Supply voltage | 220-240 V ~ 50-60 Hz |
| Type of coffee used | Coffee beans |
| Built-in grinder | Yes, adjustable fineness |
| Main functions | Strong espresso, Mild espresso, Steam, Hot water, Frothy milk |
| Operating modes | ECO mode, Speed mode, Default mode |
| Automatic shut-off | Yes (10 min in ECO, 20 min default, 30 min in Speed) |
| Coffee volume adjustment | Yes, from 25 to 250 ml (programmable) |
| Milk frother | Steam nozzle with removable cover |
| Self-cleaning | Yes (monthly automatic cycle recommended) |
| Descaling | Yes (indicator light) |
| System drain function | Yes (for long disuse or frost protection) |
| Drip tray | External and internal, with level indicator |
| Control panel | Touch with indicator lights |
| Safety | Protection against burns, use by children from 8 years old under supervision |
| Cleaning and maintenance | Removable brew unit washable with water, cleaning brush and needle included |
| Country of manufacture | Not specified (manufactured in environmentally friendly facilities) |
Frequently Asked Questions - CEG5311X BEKO
User questions about CEG5311X BEKO
0 question about this device. Answer the ones you know or ask your own.
Ask a new question about this device
Download the instructions for your Coffee machine in PDF format for free! Find your manual CEG5311X - BEKO and take your electronic device back in hand. On this page are published all the documents necessary for the use of your device. CEG5311X by BEKO.
USER MANUAL CEG5311X BEKO
Fully Automatic Espresso Machine
User Manual

CEG5311X
EN-DE-FR-TR-ES-CS-IT-PL-RO-SK-RU-NL-AR
CONTENTS
ENGLISH 3-22
DEUTSCH 23-44
FRANÇAIS 45-65
TÜRKÇE 66-89
ESPANOL 90-112
ČESKY 113-132
ITALIANO 133-154
POLSKI 155-177
ROMÁNă 178-199
SLOVENSKY 200-219
PYCCKN 220-242
NEDERLANDS 243-263
Please read this user manual first!
Dear Customers,
Thank you for selecting an Beko product. We hope that you get the best results from your product which has been manufactured with high quality and state-of-the-art technology. Therefore, please read this entire user manual and all other accompanying documents carefully before using the product and keep it as a reference for future use. If you handover the product to someone else, give the user manual as well. Follow all warnings and information in the user manual.
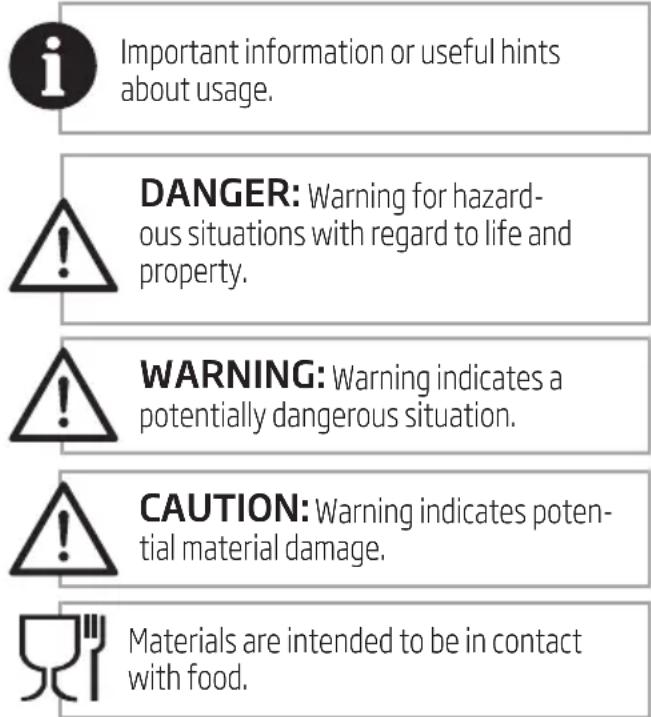
Meanings of the symbols
Following symbols are used in the various section of this manual:

This product has been produced in environmentally-friendly, state-of-the-art facilities.
1 Important instructions for safety and environment
This section includes the safety instructions that will help providing protection against personal injury and material loss risks. Failure to follow these instructions invalidates the granted warranty.
1.1 Danger of electric current
Danger to life by electric current!
Contact with live wires or components could lead to serious injury or even death!
Observe the following safety precautions to avoid electric shocks:
- Do not use it if the power cable or the appliance itself is damaged. Contact an authorised service.
-
Do not open the housing of the coffee machine. Danger of electric shock if live connections are touched and/or the electrical and mechanical configuration is changed.
-
Before cleaning the bean container, pull the mains plug of the appliance out of the socket. Danger from rotating coffee mill!
1.2 Danger of burning or scalding
Parts of the coffee machine can become very hot during operation! Dispensed drinks and escaping steam are very hot!
Observe the following safety precautions to avoid burning/scalding yourself and/or others:
- Do not touch either of the metal sleeves on both coffee spouts.
- Avoid direct contact of the skin with escaping steam or hot rinsing, cleaning and descaling water.
1 Important instructions for safety and environment
1.3 Fundamental safety precautions
Observe the following safety precautions to ensure safe handling of the coffee machine:
- Never play with packaging material. Risk of suffocation. Keep all the packaging materials away from children.
Inspect the coffee machine for visible signs of damage before use. Do not use a damaged coffee machine. Contact an authorised service. -
If the connecting cable is damaged, it should only be replaced by a service agent recommended by the manufacturer in order to prevent any danger! Please contact the manufacturer or his customer service.
-
Repairs to the coffee machine must only be carried out by an authorised specialist or by the works customer service. Unqualified repairs can lead to considerable danger for the user. They will also void the warranty.
- Repairs to the coffee machine during the warranty period may only be carried out by service centres authorised by the manufacturer, otherwise the warranty will become void in the event of subsequent damage.
- Defective parts may only be replaced with original spare parts. Only original spare parts guarantee that the safety requirements are met.
1 Important instructions for safety and environment
-
This appliance can be used by children from the age of 8 up as well as by persons with reduced physical, sensory or mental abilities or with lacking experience and/or knowledge, if these persons are supervised or have been instructed how to use the appliance in a safe way and have understood the hazards which could arise from using it. Children must not play with the appliance. Cleaning and user maintenance shall not be made by children unless they are older than 8 and supervised.
This appliance is intended to be used in household and similar applications such as: -
staff kitchen areas in shops, offices and other working environments,
-farm houses, -
by clients in hotels, motels and other residential type environments,
-
bed and breakfast type environments.
-
Protect the coffee machine against the effects of weather such as rain, frost and direct sunlight. Do not use the coffee machine outdoors.
- Never immerse the coffee machine itself, the mains cable or the mains plug into water or other liquids.
- Do not clean the coffee machine or accessories in a dish washer.
- Do not pour any other liquids apart from water or place foodstuffs into the water tank.
- Do not fill the water tank beyond the maximum mark (lower edge of the filling hole).
- Only operate the machine when the waste container, drip tray and the cup grate are fitted.
1 Important instructions for safety and environment
- Do not pull the cable to remove the plug from the mains socket or touch with wet hands.
- Do not hold the coffee machine with the mains cable.
- Keep the appliance and its cord out of reach of children aged less than 8 years.
The appliance can only be used to prepare coffee.
Children should be supervised to ensure that they do not play with the appliance. - Unplug the appliance before each cleaning and when the appliance is not in use.
-
Place the appliance in a way so that the plug is always accessible.
Always use the appliance on a stable, flat, clean dry, and non-slip surface. -
Appliance is not built-in coffee-makers and is not designed use in cabinet. The coffee maker shall not be placed in a cabinet when in use.
- Do not squeeze or bend the power cord and do not rub it on sharp edges in order to prevent any damage. Keep the power cord away from hot surfaces and naked flame.
- Your mains power supply should comply with the information supplied on the rating plate of the appliance.
- Use the appliance with a grounded outlet only.
- Do not use the appliance with an extension cord.
- Do not touch the appliance or its plug with wet or damp hands when the appliance is plugged in.
1 Important instructions for safety and environment
1.4 Intended use
The fully automatic coffee machine Beko is intended for use in homes and similar applications, for instance in staff kitchens, shops, offices and similar areas or by customers in bed & breakfast, hotels, motels and other living accommodation. This coffee machine is not intended for commercial use. The machine is only intended for preparing coffee and heating milk and water. Any other use other than previously stated is considered as improper use.
Danger resulting from improper use!
If not used for its intended purpose or used in any other way, the coffee machine may be or become a source of danger.

WARNING: Therefore, the coffee machine may only be used for its intended purpose.

WARNING: Observe the procedures described in this user manual.
No claims of any kind will be accepted for damage or injury resulting from use of the coffee machine for other than its intended purpose.
The risk has to be borne solely by the machine owner.
1.5 Limitation of liability
All technical information, data and instructions on installation, operation and maintenance of the coffee machine contained in these operating instructions represent the current status at the time of printing and are based on the best possible knowledge gained by experience and knowhow. No claims can be derived from the information, illustrations and descriptions in this user manual. The manufacturer assumes no liability for damage or injury resulting from failure to observe the user manual, use for other than the intended purpose, unprofessional repairs, unauthorised modifications or use of non-approved spare parts.
1.6 Compliance with the WEEE Directive and Disposing of the Waste Product:
This product complies with EU WEEE Directive (2012/19/EU). This product bears a classification symbol for waste electrical and electronic equipment (WEEE).

This symbol indicates that this product shall not be disposed with other household wastes at the end of its service life. Used device must be returned to official collection point for
recycling of electrical and electronic devices. To find these collection systems please contact to your local authorities or retailer where the product was purchased. Each household performs important role in recovering and recycling of old appliance. Appropriate disposal of used appliance helps prevent potential negative consequences for the environment and human health.
1.7 Compliance with RoHS Directive
The product you have purchased complies with EU RoHS Directive (2011/65/EU). It does not contain harmful and prohibited materials specified in the Directive.
1.8 Package information

Packaging materials of the product are manufactured from recyclable materials in accordance with our National Environment Regulations. Do
not dispose of the packaging materials together with the domestic or other wastes. Take them to the packaging material collection points designated by the local authorities.
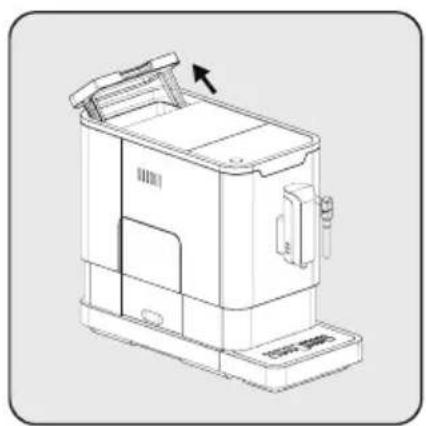
2 Your Fully Automatic Coffee Machine
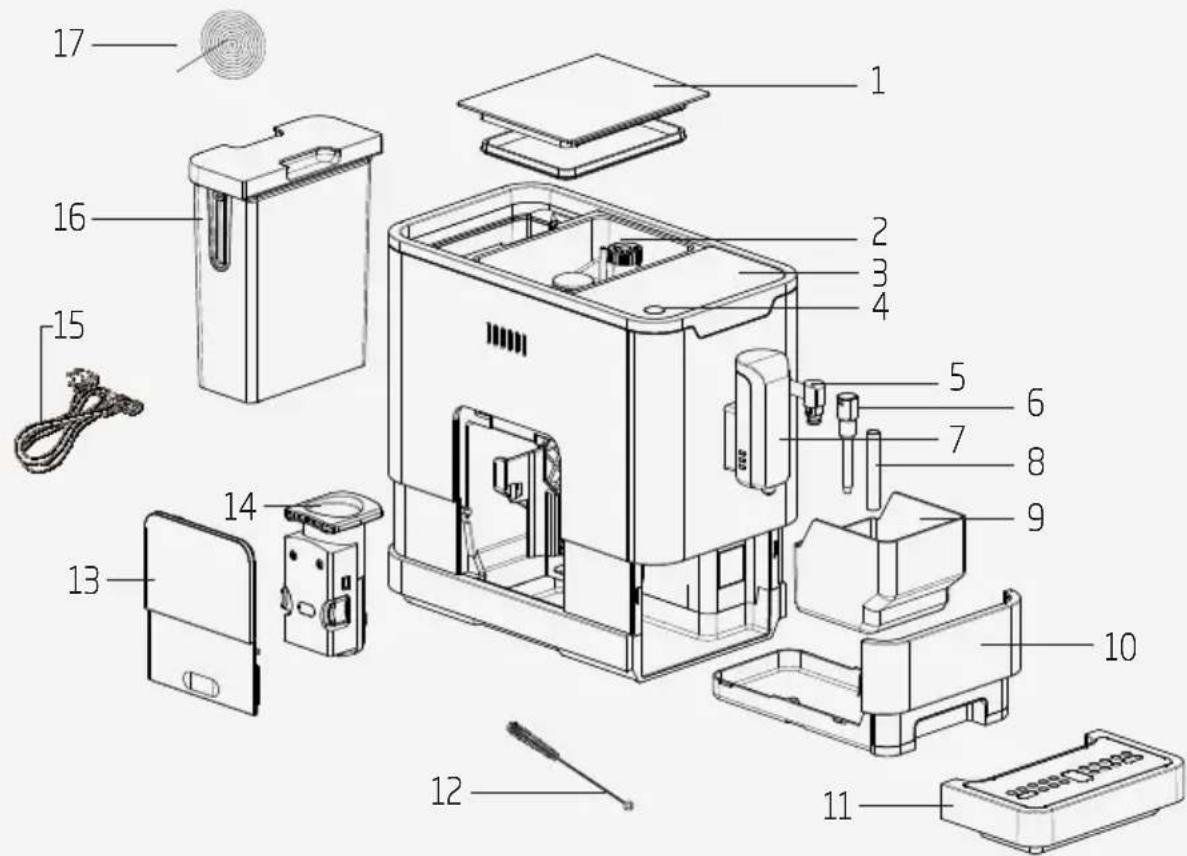
- Coffee Bean Container Cover
- Coffee Bean Container
- Control Panel
- On/Off button
- Steam Nozzle
- Nozzle cover
- Adjustable coffee spout
- Metal tube
- Coffee Grounds Container
- Internal Drip Tray
- External Drip Tray
- Cleanness brush
- Service Door
- Brewer
- Power cord
- Water Tank
- Cleanness needle
Technical data
Power supply:
220-240V\~,50-60Hz
Power: 1350 W
Technical and design modifications reserved.
All declared values on the product and on the printed leaflets are picked up after laboratory measurements performed according to related standarts. These values may differ upon usage and ambient conditions.
3 Display
3.1 Control Panel
| Flashing: Low water level/ Water tank missing | |
| Not enough coffee beans | |
| Steady warning light: The coffee grounds container is full Flashing light: The internal Drip Tray/coffee grounds container is missing | |
| Steady warning light: Brewer is missing/ installed improperly Flashing light: Service door is opened / installed improperly | |
| Steady warning light: Requires descaling Flashing light: Descaling is under way | |
| Empty System Function is running | |
| Power ON/OFF Button | |
| Steam Button | |
| Hot Water Button | |
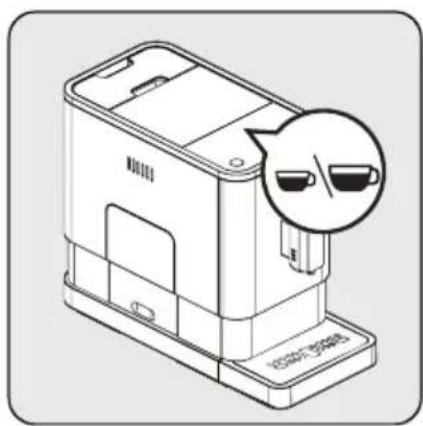
| Strong Espresso Button (25-40 ml coffee with one press on button) | |
| Mild Espresso Button (51-69 ml coffee with one press on button) |
4 Preparation
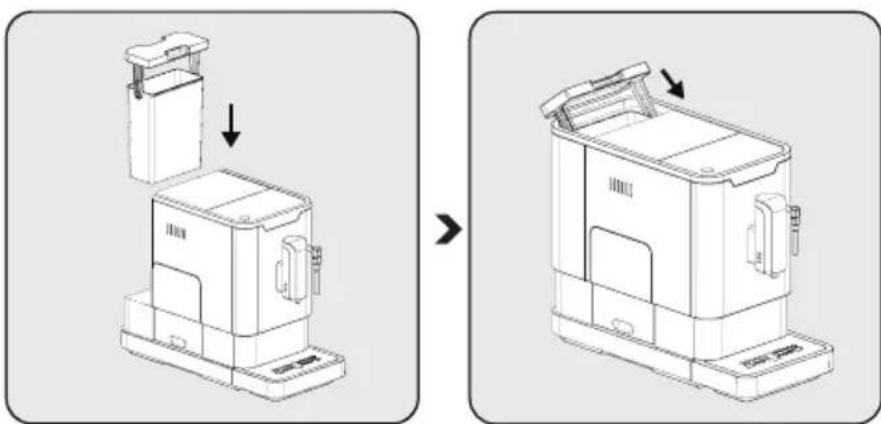
4.1 Installation

Remove any protective films, stickers and any other packing material on the appliance.
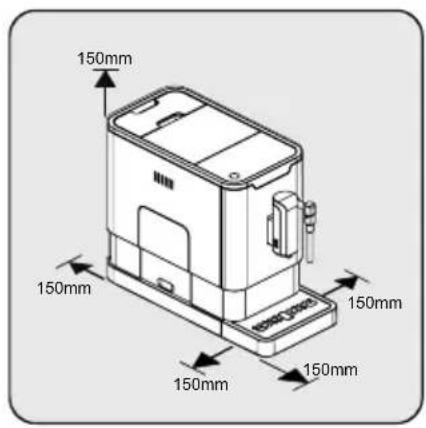
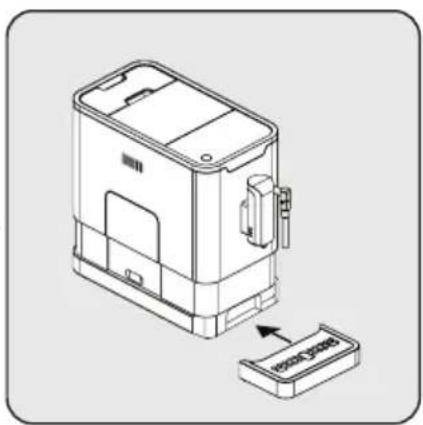

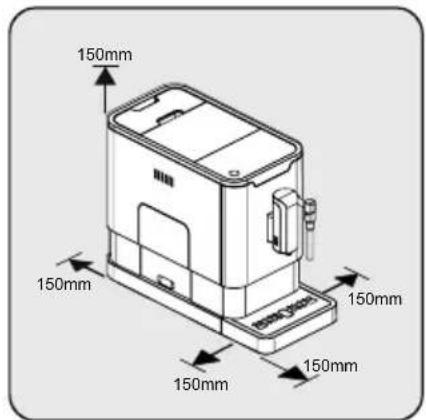
Choose a safe and stable surface with an easily reachable power supply and allow minimum distance from the sides of the machines.
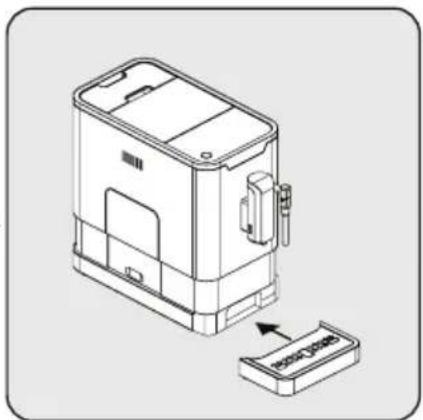
Insert the external drip tray. Make sure it is inserted correctly.
Unwind and straighten the power cord and insert the plug into the socket located on the back of the machine. Insert the other end of the power cord into a wall socket with suitable power voltage.
4.2 Filling the water tank
About the protect program: If the water tank is not fully placed into the machine, a protection mode will be activated in 15 seconds during brewing process. Hot water button will lights on control panel.
- Make sure that the water tank is fully inserted into the machine.
- Press the hot water button. After the hot water is dispensed, the machine will be in standby condition.
WARNING: When is flashing, the water tank is at a low water level and requires filling.
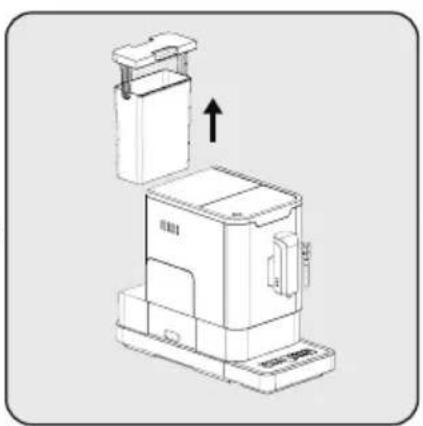

Lift the water tank by using the lid as the handle.
Take the water tank out. Rinse the water tank with fresh water
and then fill the tank to the Max level and place it back into the machine. Make sure it is fully inserted.
4 Preparation

To prevent overflow of water from the water tank, do not add water directly into the appliance with another container.

WARNING: Never fill the water tank with warm or hot water, sparkling water or any other liquid which might damage the water tank and the machine.
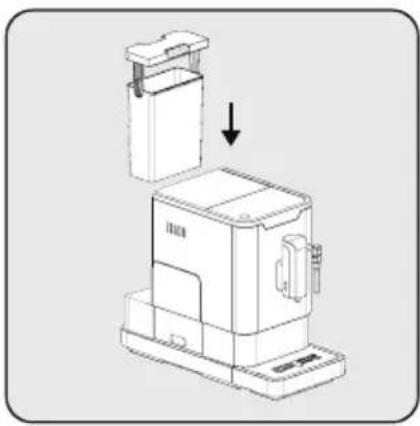

Place the water tank back by using the lid as the handle.
Close the water tank by using the lid.
5 Operation
5.1 Grinding Adjustment
You can adjust the grinder to suit the roast of your coffee by turning the adjuster knob in the bean container:
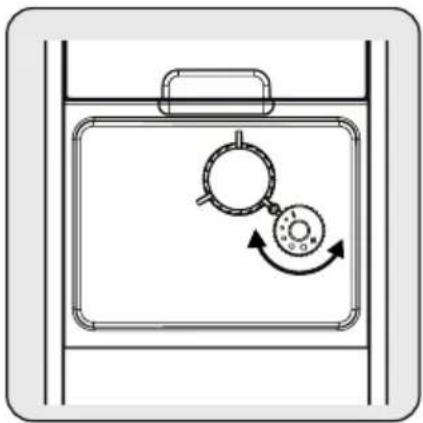
WARNING: Never adjust the grinder when it is in use.

The dots on the adjuster knob indicate the fineness of the grind.
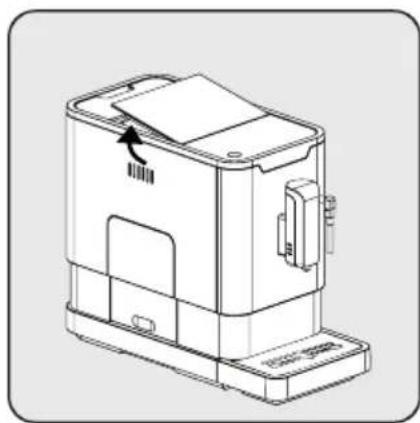
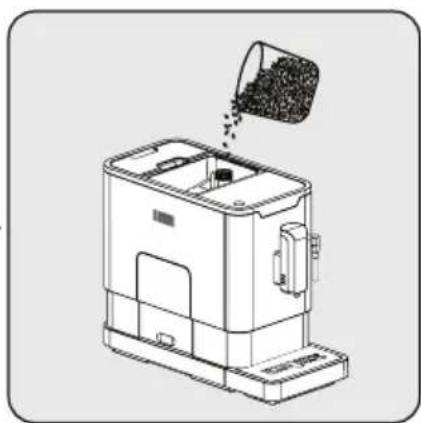
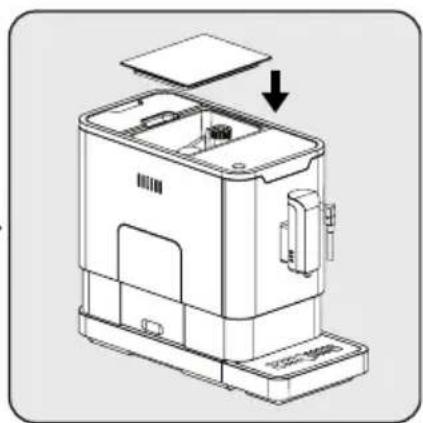
5.2 Filling the bean container

When flashing, the appliance needs to be filled with coffee beans.
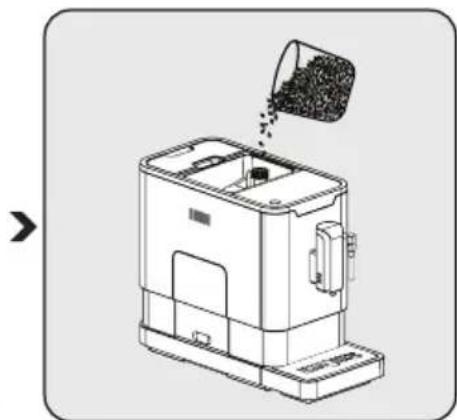
Remove the bean container lid. Slowly pour in the coffee beans. Place the container lid back.

WARNING: Fill the coffee bean container only with coffee beans. Ground coffee, instant coffee, caramelized coffee or any other objects may damage the machine.
5 Operation

Press the hot water button to clean the inside of the coffee maker before first use.
5.3 Making Your Coffee
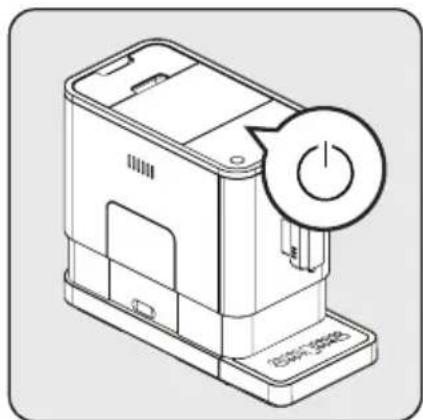
Switch on the appliance by pressing the power on/off button. The appliance turns on in standby mode and will be ready for use by flowing some hot water from coffee spout.
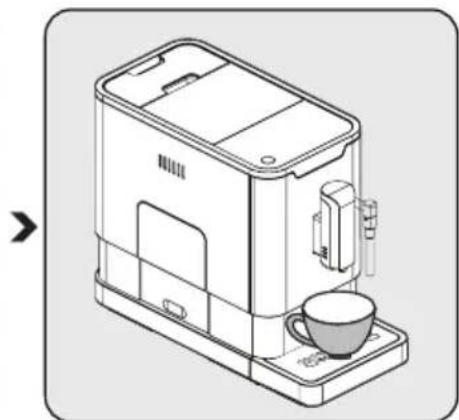
Place a cup under the coffee spout and adjust the height of the spout the fit the cup.
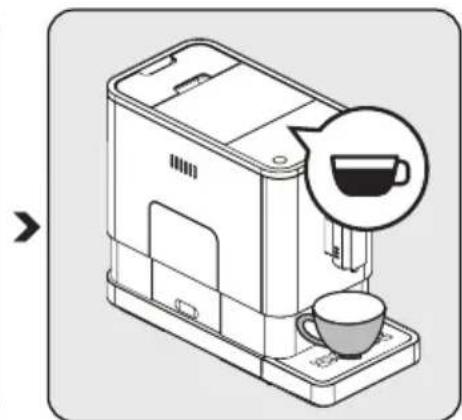
Press the espresso button and the light will turn on, with the illumination lights indicating that the appliance is preparing a cup of coffee. When the appliance is back on standby, the coffee is ready to serve.

Switch off the appliance by pressing the power on/off button.

Press the strong espresso or mild espresso button depending on the taste of coffee you'd prefer.

Press the hot water button to clean the inside of the coffee maker before first use.

The Appliance is equipped with auto-shut off. Depending on the mode you have selected, the appliance will have different auto-shut off timing.
5 Operation
5.4 Adjusting The Volume of Your Coffee/Hot Water
You can save your desired volume of coffee for both strong espresso and mild espresso and also the hot water from 25ml to 250ml.
When making your coffee (either strong espresso or mild espresso) press and hold the button you selected. The appliance will continue to make the cup of coffee while holding on the button.
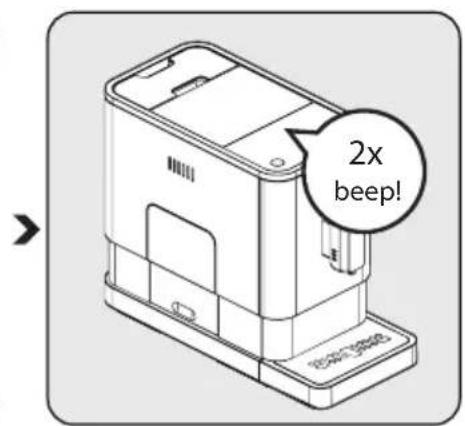
When the volume of coffee meets your desired volume, release the button. If you hear two beeps, that indicates the machine has saved the volume of coffee that you prefer.
To reset to the default/factory settings;
In order to reset to the default settings of coffee and hot water volume selection recorded in memory, it is necessary to reset to the factory settings.
- When the device is off, remove the inner and outer drip pans,
- Remove the service cover,
- Remove the carafe,
- Place the service cover.
- Press down the on-off key for 5 seconds (It beeps 2 times)
- Open the service cover.
- Place the carafe,
- Close the service cover.
- Place the drip tray.
It has been resetted to factory settings.
5 Operation
5.5 Preparing Frothy Milk for Coffee

As the temperature of steam is higher than the temperature of espresso, the espresso should be prepared before making frothy milk. Otherwise the espresso might get burnt.

Prepare the espresso coffee with a larger cup. Turn the steam nozzle toward to the Drip tray.
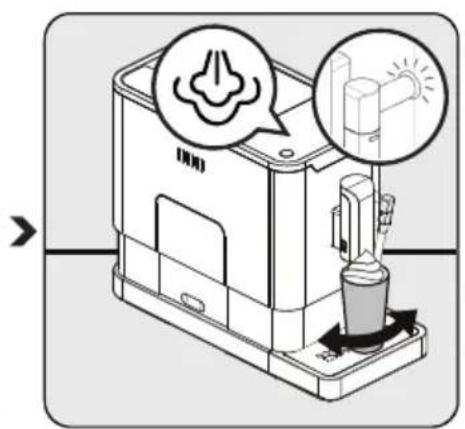
Press the steam button. The steam indicator light will flash. Then the appliance will heat up and drain the residual water into the Drip Tray or another container. After the steam indicator light stops flashing and stays steady, place a container with milk under the steam nozzle and immerse the steam nozzle about 5cm deep into the container. Swivel the container while the hot steam comes out.
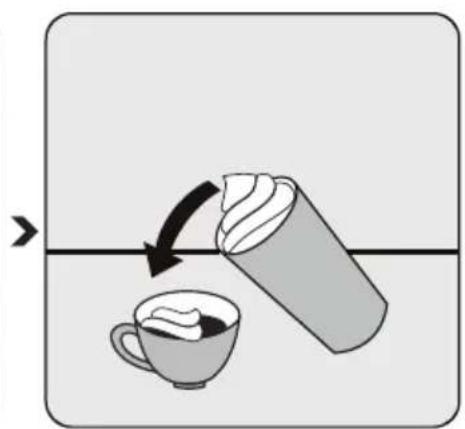
Pour the hot frothy milk into the espresso. Now you can enjoy your coffee!

After the usage of steam nozzle, please clean the nozzle from the milk residue by wiping away the nozzle with a wet rag.

It is recommended to remove any milk residue that may accumulate at the tip of the nozzle by activating hot water function from the nozzle.
5.6 Hot Water
The appliance can dispense hot water by simply pressing the hot water button. The hot water button and the illumination lit up indicates that the appliance is heating up the water. When the hot water button and the illumination turn off, the water is ready to serve.
5.7 Mode Selection
The machine has three different settings: the default setting, ECO mode and speed mode. In ECO mode, the appliance saves more energy. In speed mode, the user can make their coffee faster than in the default setting.
5 Operation
| ECO Mode Speed Mode Default | Setting | ||
| Illumination Light No Yes Yes | |||
| Pre-brewing* Yes No Yes | |||
| Auto shut off time 10mins 30mins 20mins | |||
| Cup Volume memory Yes Yes Yes |

The pre-brewing function moistens the ground beans in the brewer with a small amount of water before full extraction. This expands the coffee grounds to build up greater pressure in the brewer, which helps extract all the oils and bring out the full flavour of the beans.
- When the machine is in standby, press and hold the for 5 seconds.
- The will then flash and the next button will have the following indications for different settings:
| Hot water button | Strong espresso button | Mild espresso button | |
| In ECO Mode Lights On | Flashing | Flashing | |
| In Speed Mode | Yes No Flashing | ||
| In Default Setting | Flashing | Flashing | Lights On |
- Press the hot water button for ECO mode, strong espresso button for speed mode and mild espresso button for default settings. You'll hear two beeps when the mode has been selected. (Note: If you are pressing the lights on button for each mode, the machine will not respond).
- If you would like the setting to remain unchanged, press again or wait for 5 seconds for the machine to return to standby condition.
6 Cleaning
6.1 Cleaning of the appliance
- Disconnect the power cord from the mains supply outlet.
- Pour away all the water in the internal and external drip tray.
- Use a damp cloth or non-scratching cleaner to clean the water stains on the appliance.
WARNING: Never use any abrasive, vinegar or descaling agents not included in the box to clean the appliance.
Timely cleaning and maintenance of the appliance is very important in prolonging its life.
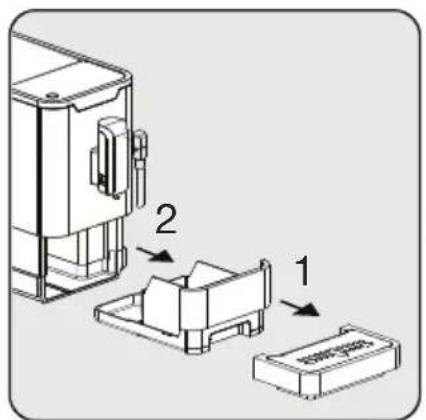
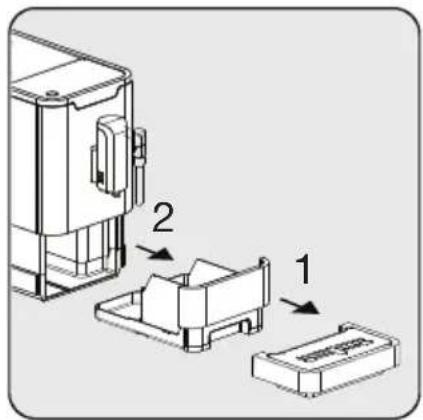
Remove the external drip tray. Slide open the internal drip tray and the coffee grounds container.
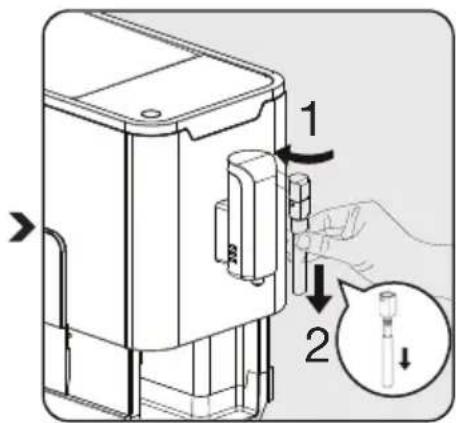
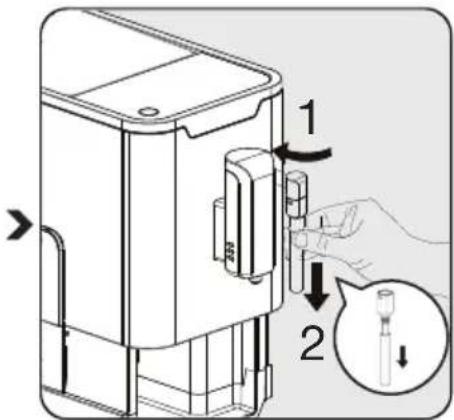
Remove metal tube by pulling it down. Then unlock the nozzle cover by turning it to left to disassemble the nozzle cover and metal tube.
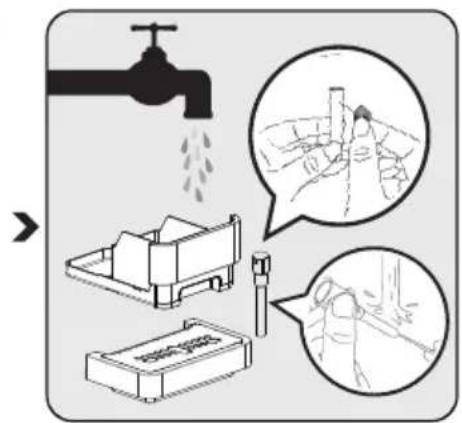
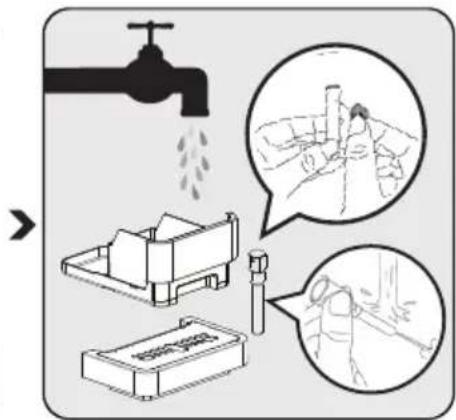
Empty the coffee grounds container and external drip tray. Wash the metal tube with warm running water and use needle or bristle of brush to clean the hole. Wash the nozzle cover with warm running water and use needle or bristle of brush to clean the hole. Dry them afterwards.
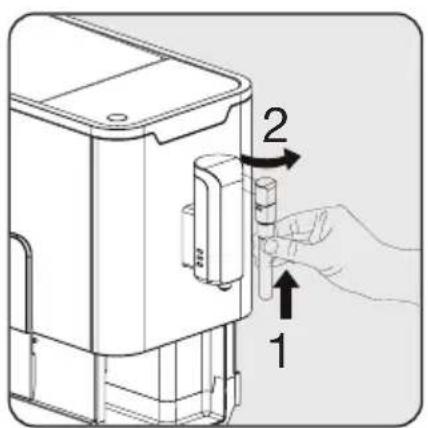
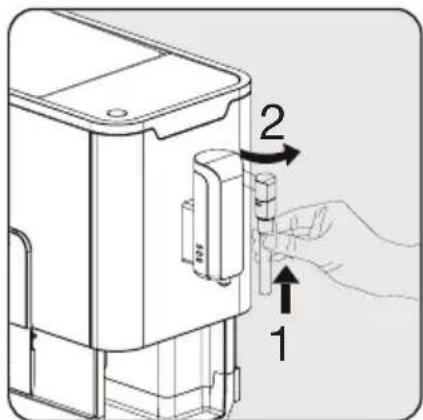
Assembly the metal tube back to the nozzle cover. Then push upward to place the nozzle cover back. And turn it to right to lock it.

When lights up, the coffee grounds container needs to be emptied. This icon will light up after every 10 coffee brews. Clean the container to reset the icon. If the container is clean, It will be enough to remove the container and put it back in place.
6 Cleaning
Press unlock area, sevice door will pop out. Then pull out the service door.
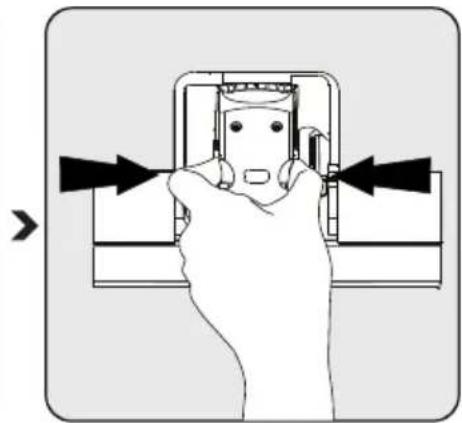
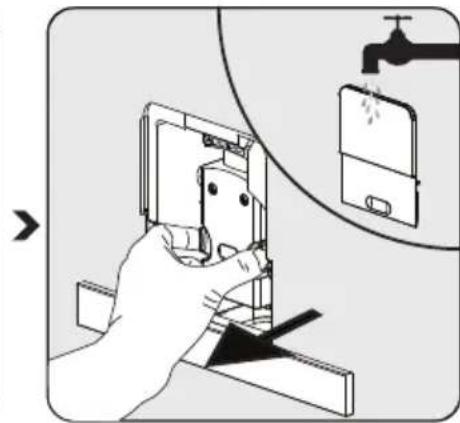
Press release knobs and pull out. Remove the brewer. Wash the brewer
with fresh water. Dry the brewer afterwards.

When lights up, it indicates that the brewer is missing / installed improperly. When is flashing, it indicates that the service door is missing/installed improperly.
6.2 Self-Cleaning

WARNING: Please wait to finish the self-cleaning process and then switch off the machine.
When flashing, it indicates that the appliance needs to undergo self-cleaning. The appliance will remain in the best condition if this function is performed at least once a month or more regularly depending on the hardness of water used. You should also
- Fully fill the water tank.
- Add one pack of cleaning agent included in the box to the water tank.
WARNING: Do not use vinegar or other cleaning agents for the self-cleaning of this appliance. The cleaning agent might damage the appliance.
- Plug in the appliance.
- Place a sufficiently large container under the coffee spout and nozzle.
- In standby, press and hold and the strong espresso button for 5 seconds. You'll hear a beep with and the strong espresso button will flash.
- Press the strong espresso button to confirm the self-cleaning process. To resume back to the standby, press
- If it's flashing, that indicates that the appliance is self-cleaning.
6 Cleaning

WARNING:Keep skin/body away from hot water.
- When all the water in the water tank has been emptied, the and self cleaning button will flash. Remove all the remaining solution in the water tank and fill the tank with normal tap water up to the max position. When the tank is full, the will goes off. Then the appliance will continue the self-cleaning process.
- When the self-cleaning process is completed, the appliance will switch off automatically.
6.3 Empty System Function
Use the empty system function before a long period of non-use, for frost protection, and before talking to a repair agent.
- In standby condition, press and hold the and the mild espresso button together for 5 seconds.
- will then start flashing.
- Remove the water tank from the appliance. will light up indicating that the empty system is under way. Press before removing the water tank to return back to the standby.
- When the empty system function is completed, the appliance will switch off automatically.

WARNING: After performing the EMPTY SYSYEM FUNCTION; press the hot water button until water can comes out from the spout when the coffee maker is reused again.
6.4 Manual Rinsing
You can manually rinse to clean the coffee nozzle after use. If the appliance has not been used for a long period of time, a manual rinse may be a good idea.
- In standby, press and hold the and the hot water button together.
- The hot water button, the strong espresso button and the mild espresso button will then go off. The coffee nozzle will then dispense a small amount of water which is used for rinsing.

WARNING: The water comes out of the coffee nozzle is hot and is collected in the drip tray underneath. Avoid contact as it splashes around.
- After rinsing, the appliance will return to the standby.
6 Cleaning
Cancelling the auto-clean mode
Your appliance cleans itself automatically before and after each brewing operation. You may follow the steps below to cancel the auto-clean mode.
-
Turn on the appliance by pressing the On-Off switch and wait until it engages the Stand-by position.
-
Open the service cover.
- Press the On-Off switch for 5 seconds, a beep shall be heard.
- Close the service cover.
- Now, the auto-clean operation is cancelled.

We recommend you to use the auto-clean mode actively for a healthy operation.
7 Troubleshooting
| Problem Cause Solution | ||
| The appliance does not work. The appliance is not connected to the mains. | Plug in and press the switch. Check the cable and the Plug. | |
| No or delayed response in several trials of pressing a function key on the panel | Appliance is under an electromagnetic interference. Dirt over the panel. | Unplug the appliance. Restart after a few minutes Clean the panel with the cloth provided. |
| The coffee is not hot enough. The cups have not been preheated. The brewing unit is too cold. | Warm up your cup by using steam func- tion before you make coffee or rinse the cup with hot water. Make sure that the water in the water tank is not too cold. | |
| The coffee cannot come out from spout. | Empty system function maybe used before. Coffee spout may not have been cleaned and blocked by coffee residues. | Press the hot water button until water can come out from the spout. Clean the coffee spout. |
| The first cup of coffee is poor quality. The first run of the grinder does not pour a sufficient quantity of coffee into the brewing unit. | Throw the coffee away. The next cups will be better. | |
| The water tank is removed / the water level is very low in the water tank but there's no alert. | The area near the water tank connector is wet. | Wipe off the water around the water tank connector. |
| The internal drip tray is filled with a lot of water. | The ground coffee is too fine, which blocks the water from coming out. | Adjust the coffee fineness to bigger dot during grinder operation. |
| Coffee is delivered too slowly or a drop at a time. | Coffee grounds are too fine, which blocks the water from coming out. | Adjust the coffee fineness to bigger dot during grinder operation. |
| The indicator flashes that there's not enough coffee beans, but there are plenty inside the container. | The internal coffee grounds outlet is blocked. | Follow the steps described for Cleaning coffee grounds outlet. |
| The brewer or the coffee ground tray is impossible to remove. | The appliance did not finish the self-cleaning process and was switched off. | Please switch on the machine again and let it finish its auto cleaning process. |
| The appliance no longer performs the rinsing cycle when switched on or off. | Improper handling when servicing the appliance may be the cause. | 1. When the appliance is on, remove the service door. 2. Press and hold the on/off button until you hear 2 beeps. 3. Replace service door. |
| The touch buttons are not sensitive. Not pressing the touch button from the front direction of the appliance. | Press the lower bottom part of the icon of the touch button from the front direction of the appliance. |
Las partes de la cafeteriaSEOSEOSEOSEOSEOSEOSEOSEOSEOSEOSEOSEOSEOSEOSEOSEOSEOSEOSEOSEOSEOSEOSEOSEOSEOSEOSEOSEOSEOSEOSEOSEOSEOSEOSEOSEOSEOSEOSEOSEOSEOSEOSEOSEOSEOSEOSEOSEOSEOSEOSEOSEOSEOSEOSEOSEOSEOSEOSEOSEOSEOSEOSEOSEOSEOSEOSEOSEOSEOSEOSEOSEOSEOSEOSEOSEOSEOSEOSEOSEOSEOSEOSEOSEOSEOSEOSEOSEOSEOSEOSEOSEOSEOSEOSEOSEOSEOSEOSEOSEO SEOEO SEO SEO SEO SEO SEO SEO SEO SEO SEO SEO SEO SEO SEO SEO SEO SEO SEO SEO SEO SEO SEO SEO SEO SEO SEO SEO SEO SEO SEO SEO SEO SEO SEO SEO SEO SEO SEO SEO SEO SEO SEO SEO SEO SEO SEO SEO SEO SEO SEO SEO SEO SEO SEO SEO SEO SEO SEO SEO SEO SEO SEO SEO SEO SEO SEO SEO SEO SEO SEO SEO SEO SEO SEO SEO SEO SEO SEO SEO SEO SEO SEO SEO SEO SEO SEO SEO SEO SEO SEO SEO SEO SEO SEO SEO SEO SEO SEO SEO SEO SEO
pykoBODCTBa 10JIb3OBaTeJIa
NcnoIb3yIOCTcCleDyIOUneO603NaueHnra:

Baxnay nHΦopMauny IIN IOne3HbIe NOdcka3Kn IO NcNoJIb3OBaHIno MaunHbI.

ONACHO: PpeDynpexKdEHeN O BO3HKnHOBeHN ONaChbIX CnTyauN, PpeDCTabJIaIOx yrpo3y Kn3H N NMyuEcTBy.

PNEyPExHHeN: PpeynpeKdHne yka-3bIaet Ha noteHnnaIbHo onaChyO cTuauHO.
BHIMAHNE: Ppeynpexdene yka3bIBaET Ha nTeHnAaNbMy MaTePnaIbHbY uep6.

MaTePnAJIbI npEHa3NaueHbI IJRA KOHTaK-Ta C NIIeBbIMN IpOdyKTAMN.

3TOT npodukT 6bl npou3BeHn Ha 3koIOnuYeCKn YnCTOM, COBpeMeHHOM o6OpudBaHn.
1 Baxkhble iHctpyKuIN IO TexHnKe 6e30napocTn n 3aunTe OkpykaUoJe Cpebl
B 3TOT pa3dJI BKNIOUeHbI INHCTpyKcII N O TEXHKe 6e3O-NAcHOCTN, KOTOpbIe NOMOryT oBeCpeHTb 3aIHTy OT TpaBM n MaTePnaJIbHOrO yUeRb6a. Heco6JIIODeHne 3Tnx INHCTpyKcII aHHyInpyET IpeIoCTaBJIeHNHyIO rapaHTnIO.
1.1 Onachoctb əneK-tpnueckoro Toka
IPEyPExEHE: HkOrda He perynpyte Koemolky, KOrda OHa nCnoB3yeTc.

Tochn Ha pyuKe peRyJnTopa yKa3bIBaHr Ha TOHKoCTb NOMOJa.
5.2 HanoJIHeHne KOHTeHepa dIy KoFeiHbIX 3epeH

Korda mraet, 6o6xOJMo 3aONHtB np6op 3epHaM Kope.
CHIMITE KpbIkiKy KOHTeHepa IJIr Ko-FeiHbIX 3epeH.
MeIeHHO hacbInbTe KopeHbIe 3epHa.
3aKpOHTe KOHTeHep KpbIkwOJ.

PPEyPPEXDEHNE: HanonHnIe KOHTeHep Ira KoPeHbIX 3epe HToIbKO KoPeHbIMN 3epHAM. MoIOTbIKoPe, pactBopMbIKoPe, KapaMeIN3uPoBaHHbIKoPe INII NIO6ble dpyrVe PpeMeTb MOrYT NOBpeNTb MaunHy.
5 Исторьоганne

Haxmte KhONky noaun ropayen BODbl, uTObI Ounchntb KoepeBapky n3Hytpn neped nepBbIM NCNoJIb3OBAHNEM.
IPEyPExEHE: HkoRa He nCnoB3yIe Ira YnCTKn npnbopa a6pa3NBhe BeueCTBa, yKcyc nn CpeDCTBa Ira YdaJeHna HAKIN, He BXODaIe B KOMNKeT NOCTABKN.
CboeBpeMeHHa YnCTka N yXoJ 3a npnbopom OueH baxhbl IpnOJIeHna erO cPoka cnjx6bl.
CHMMTE BHeHn noDoH nJa Ka- neB. BbDnHbTe BHyTpEnHn noDoH nJa KaneBn KOHTeHep dJa KoPeHnHOI rUuN.
CHIMITE MeTALNueckyTOpy6ky, noTAYB ee BHN3. 3aTeMa3bNOkpyTe KpbIuKy conJa, NOBepHyB ee BNeBO, UTO6bl CHaTB KpbIuKy conJa mMeTALnueckyTOpy6ky.
OnopoxHNTe KOHTeHep DnI KoFeH HON rUuN IN BHeuH NIOdoH dNk Ka neJIb. PpOMoHTe MetaJInuYeCKyO Tpy6Ky TEnNo IpoToCHoB BOoN IN CNOJb3yTe NfNy NIN NcTnY KcCTN, YTO6bl OChCTNb OTBepCTne. PpOMoTe KpbIuKy CoIIa TEnNo IpoToCHoB BOoN IN OChCTNe OTBepCTne INIIO NIN UcTHoN. PocSe 3tOrO npocuyuIne ux.
YcTaHOBnTe MeTaNInueckyTo Tpy6ky 6paTHo Ha KpbIuKy cOnna.3aTeM HaxMMTeBBepx, YTO6bI yCTaHOBnTB KpbIuKy CoJIHa MeCTO. INOBePHnTe ee BnPaBO, YTO-6bI 3a6nOKnPOBaTb.
6 OuInCTka

Korda 3aropaetc, Heo6xOJIMO onopoxHnTB KOHTHeP dIg KoPeHOn rUu. 3TOT 3HaOK 3aropaetc nocIe kaxdbix 10 npiroTOBneHm KoPe. OunCTnte KOHTHeP, UTObI c6pocntb 3HaQok. EcnN KOHTeHep uHCTbI, DOCTaTOUHO bYdET CHrTB eOu yCTaHOBNTb Ha MeCTO.
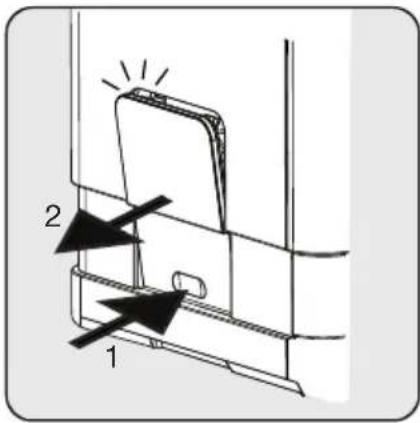
HaKMTe Ha 06nactb pa36noknpOBKn, cepBnCHa nBepua BbICKOHT. 3aTeM BbITAHTe cepBnCHyIO DBepy.
HaKMTe Ha qKcnpuOne pyKn N BbTaunTe.
CHMNTe Yactb Dnla 3abapuBaHn.
IpomoyTe Yactb Dnla 3abapuBaHn
PpeCHO BDOJ. 3aTe M BbCyUHTe
Yactb Dnla 3abapuBaHn.

Korda ropnt 130 O3Naayet, yTO qactb dIy 3aBapnBaHnO TcyTCTByET / yCTaHOBJIeHa HEnpaBnIbHo. Korda MMraet, 3TO O3Naayet, yTO cepBnchA DBepua OTCytCTByET / yCTaHOBJIeHa HEnpaBnIbHo.
6.2 Camoocntka

IPEyPExEHE: IoOxnte, noka 3aBepuNTc npoucc cmoocntkn, a 3aTEM BbIKIOHTe MaunHy.
MiraHne 03Haayet, yTO np6bpy Heo6xOIMO npoTn cmoocntky. YcTpoiCTBO 6ydet OCTaBaTbcB HauLywem COCTOHN, ecN 3Ty fYHKUIO BblONHrTB He pexe Ondoro pa3a B Mecau IIN Yaue, B 3aBNCIMOCTN OT XeCTKOCTN NCNOJb3yeMOB OdbI. Bbl TakoKe DoJXhbl
(Tunbow Electrical (Huizhou) Limited Jiang Bei,82 Hao, 84 Hao, 85 Hao Xiao Qu, Xiao Jin Kou Town, Huizhou City,GuangDong Province, 516023 P.R.C.) Kntai
Импорту на терптори PФ: OOO «БЕКО»
IOpndueckn aDpec: 601021 Pocn, BnaMmPcka obl., Knpkauchn p-H, dep.
ΦeOpOBCKoe,yI.CeIbcka,I.49
Даразпoin3ВODCTBA BKNIOUeHa B cepINHbI HOMep npOdyKTa, yka3aHHbI Ha 3TNKeTke, pacnoJIOxEHHoH Na npOdyKTe, a IMeHHO:
IepBbIe DBe uCpBcEpiHOrO Homepa O6o3Haayot rOd npOn3BOndTBA,a IocJIeHNHe DBe - MecaU.
Haprimep, «10-100001-05» obo3naaet, yTo npOdyKT npOn3BeDeH B Mae 2010 roHa.
ДeнсТуЕТолькоHa TeppuTOpN PФ / Valid for Russian Federation only

TAPAHNTY2TODA
Ampc: 109004, Pocn, MockBa, yn. CtaHncIaBckoro, 21, ctp 1. http://www.beko.ru
Tepeon ropaei 8-800-200-23-56 (3BOHok 6ecnnaTHbHa BcEe TeppuTopu Pocnn)
TapaHTnHbI TaIOH cepra RUS No
Modenb
CepnHbH Homep
Data npodaxn
KomnaHn
Noanncb npoabua
NE4ATb
Data yctaHOBKn
KoMaHn
Pnncb MacTepa
NE4ATb
NokynaTeNb
TeneoH
| الإستعمال | الإستعمال | ||||
| الإستعمال | الإستعمال | ||||
| الإستعمال | الإستnzients | ||||
| الإستnzients | الإستnzients | ||||
| الإستnzients | الإستnzients | ||||
| الإستnzients | ال,ennzients | ||||
| ال,ennzients | ال,ennzients | ||||
| ال,ennzients | ال,ennzients | ||||
| ال,ennzients | ال,ennzients | ||||
| ال,ennzients | ال,ennzients | ||||
| ال,ennzients | ال,ennzients | ||||
| ال,ennzients | ال,ennzients | ||||
| ال,ennzients | ال,ennzients | ||||
| ال,ennzients | ال,ennzients | ال,ennzients | ال,ennzients | ||
| ال,ennzients | ال,ennzients | ||||
| ال,ennzients | ال,ennzients | ||||
| ال,ennzients | ال,ennzients | ||||
| ال,ennzients | ال,ennzients | ||||
| ال,ennzients | ال,ennzients | ||||
| ال,ennzients | ال,ennzients | ||||
| ال,ennzients | ال'enzients | ||||
| ال,ennzients | ال'enzients | ||||
| ال,ennzients | ال'enzients | ||||
| ال,ennzients | ال'enzients | ||||
| ال,ennzients | ال'enzients | ||||
| ال,ennzients | ال'enzients | ||||
| ال,ennzients | ال'enzients | ||||
| ال,ennzients | ال'enzients | ||||
| ال,ennzcents | ال'enzients | ||||
| ال,ennzcents | ال'enzients | ||||
| ال,ennzcents | ال'enzients | ||||
| ال,ennzcents | ال'enzients | ||||
| ال,ennzcents | ال'enzients | ||||
| ال,ennzcents | ال'enzients | ||||
| ال,ennzcents | ال'enzients | ||||
| ال,ennzcents | ال'enzients |
J 1
Jilalll a.hill gng sll olil aagall cglal lclay 5g jasla lac Js yolaluai jlgj
.
5 5
.
J 1 J 1 J 1 J 1 J 1 J 1 J 1 J 1 J 1 J 1 J 1 J 1 J 1 J 1 J 1 J 1 J 1 J 1 J 1 J 1 J 1 J 1 J 1 J 1 J 1 J 1 J 1 J 1 J 1
.
y

7.
jlll jll j 1yps / jll

a a a a a a a a a a a a a a a a

5.2

e 100
1
jll 1
j 100000000000000000000000000000000000000

jlll lal j 111 111 111 111 111 111 111 111
aill 1
jgl 1s jg jg g g g g g g g g g

Jyab Jyab Jyab Jyab Jyab Jyab Jyab Jyab Jyab Jyab Jyab Jyab Jyab Jyab Jyab Jyab Jyab Jyab Jyab Jyab Jyab Jyab Jyab Jyab Jyab Jyab Jyab Jyab Jyab Jyab Jyab Jyab
K 1

al 4.2
aalll alall alal alal alal alal alal alal alal
aLall pssw 10gulll bll! gI y aal l 100gall aSLo plsswl all g 10000000000000000000000000000
iLpssipu 1g:

1i 1

aJilll lIg JrJrJrJrJrJrJrJrJrJrJrJrJrJrJrJrJrJrJrJrJrJrJrJrJrJrJrJrJrJrJrJrJrJrJrJrJrJrJrJrJrJrJrJrJrJrJrJrJrJrJr
1.5
aaiiaollllgl. llllgl aaiall Logal all gao Jieiill Caleo iaggall aillo 1aiLg Jieiig aegoo jaiwog aclbll agg aillll alll Jia aJdIg oJyJc auiuS O aiSao aagglg wJg Logal all Iii Iliol y Jull Iiaol g aaiyajg ll ogjg 8x Jaxjj 8 x axall yjplnWg jpssmall Jldolp qg Jg Czwlq Jlocj g
J Lai Jn Jn Jn Jn Jn Jn Jn Jn Jn Jn Jn Jn Jn Jn Jn Jn Jn Jn Jn Jn Jn Jn Jn Jn Jn Jn Jn Jn Jn Jn Jn Jn Jn Jn Jn Jn Jn Jn Jn Jn Jn Jn Jn Jn Jn Jn Jn Jn Jn Jn J
aLx1 aJLwC
a 100 g 8g lall jx
ao 8o 4s k slll jx
a 100 4k 8k
a01s5g aegy 8!
gaii 1
J 1
.
jai jai
Jnnnnaaal 1 aegaa 8gagall
slll aod aeg y jnd
s
JLac
sLgJLo5. 1
Jl!
x · 41 = 51
j51r8y8x1Jg2Jg 1
a9 = 7 + a_62 = 12
X! aal gall Jwol pcc
j 1
12( 1 + u1 - 1) + ·s + ( 1 - 1) + 2 = ( 1 + u) u2 > ( 1 + u) u2 < 2
.
ab = 12,ac = - 13,b^2 + c = 3
与 AQ = 1 : , = = 1 : = 1 : = 1 : = 1 :
J 1
-
A 1g/9 a 1s g
1
jglgJl p1w 4.5 jLw g
g1 1.2
bocunl
a:slwoggall a:sLslo sljC
aagaae aegggege ggege
Jg Jc 1
aJlll aLwlll lalol
g
bc = 10
aJ1 1 J
aagaae
aossssssssssssssssssssssssssssssssssssssssssssssssssssssssssssssssssssssssssssssssssssssssssssssssssssssssss
.11j1g.
1.3
+ = +
a
:ogg aLsLo gO jol
c 1
aollll cai jie pwwll lao
aLacJgJcLw
JLgA
Lololololololololololololololololololololololololololololololololololololololololololololololololololololol
J 1
1.1
1
1111 1
y
iOgjgjoh
1
:
1
a 155g jai.
a_0 = 2
S OBC = S BOC + S_ BOC
aIgS aodJ Jh.oggall
aH aH aH aH aH aH
g1y
S
·
1
aagaae aeaee
1a
3 1
- 1.1
- 1.2
- 1.3
- 14
- 15
7:leio jalil, ojol 11yai aolll gill Jia21 1.6 - 1.7
- 1.8
a 2
8
8.
9 3
- 3.1
10 4
- 4.1
- 4.2
12 5
- 5.1
- 5.2
- 5.3
- 14 5.5
- 5.6
- 5.7
17 6
17 6.1
18 6.2
19. 63
19. 6.4
21 7
jgl
j 1