
L16VB10E - Vacuum Cleaner Logik - Free user manual and instructions
Find the device manual for free L16VB10E Logik in PDF.
| Brand | Logik |
| Model | L16VB10E |
| Product Type | Bagless Vacuum Cleaner |
| Power Supply | 230-240 V ~ 50 Hz |
| Power | 1200-1400 W (1600 W max) |
| Dustbin Capacity | 2.5 L |
| Power Cord | With yellow mark (ideal length) and red mark (max length) |
| Main Filter | HEPA filter with holder |
| Motor Protection Filter | Yes, washable |
| Exhaust Filter | Yes, washable |
| Included Accessories | Hard floor brush, multi-function nozzle, telescopic tube, hose |
| Cord Rewind Function | Yes, rewind button |
| Carrying Handle | Handle on body and hose handle |
| Weight | Approx. 4.5 kg (estimated) |
| Dimensions (W x D x H) | Not specified, but dustbin volume 2.5 L |
| Noise Level | Not specified |
| Maintenance | Empty dustbin, clean filters (HEPA, motor, exhaust) |
| Safety | Unplug before maintenance, do not vacuum liquids, do not use without filter |
| Usage | Hard floors (adjustable brush), corners and crevices (multi-function nozzle) |
| Warranty | Not specified, but spare parts available |
Frequently Asked Questions - L16VB10E Logik
User questions about L16VB10E Logik
0 question about this device. Answer the ones you know or ask your own.
Ask a new question about this device
Download the instructions for your Vacuum Cleaner in PDF format for free! Find your manual L16VB10E - Logik and take your electronic device back in hand. On this page are published all the documents necessary for the use of your device. L16VB10E by Logik.
USER MANUAL L16VB10E Logik
natural_image
Black vacuum cleaner with coiled hose and control panel, displayed against a patterned background (no text or symbols visible)MANUEL D'INSTRUCTIONS
FR
MANUAL DE INSTRUÇÕES
PT
BEZSÁČKOVÝ VÁLCOVÝ VYSAVAČ
NÁVOD K OBSLUZE
CZ
BEZSÁČKOVÝ CYKLÓNOVÝ VYSÁVAČ
NÁVOD NA POUŽÍVANIE
SK
ODKURZACZ BEZWORKOWY Z FILTREM
CYLINDRYCZNYM
PL
Preparation Before Use 8
Operation 8
Powering Off and Storage 8
Emptying the Bin 9
Cleaning the HEPA Filter Unit 9
Cleaning the Motor Protection Filter ....10
Cleaning the Exhaust Filter 10
Specifications ....10
Safety First! 91
Innhold
NO
Å pakke opp 11
Produktoversikt 12
Congratulations on the purchase of your new Logik Vacuum Cleaner.
We recommend that you spend some time reading this instruction manual in order to fully understand all the operational features it offers.
Read all the safety instructions carefully before use and keep this instruction manual for future reference.
Unpacking
Remove all packaging from the vacuum cleaner. Retain the packaging. If you dispose of it please do so according to any local regulations.
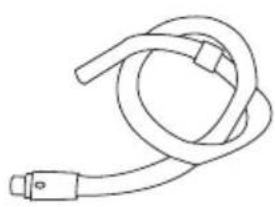
The following items are included:

natural_image
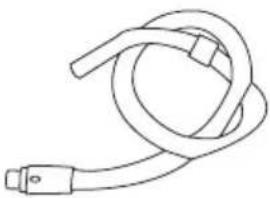
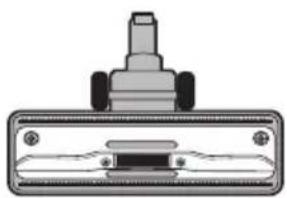
Line drawing of a mechanical device with no visible text or symbolsThe Main Unit

natural_image
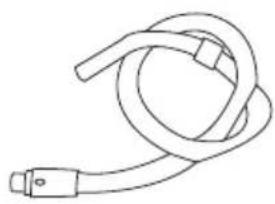
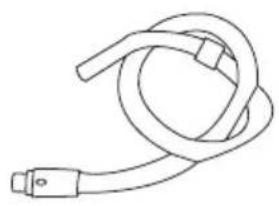
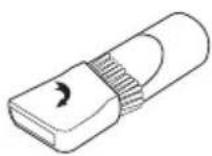
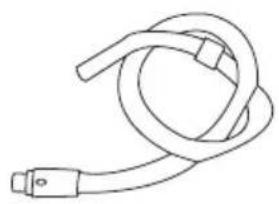
Simple line drawing of a coiled cable or hose with a connector (no text or symbols)natural_image
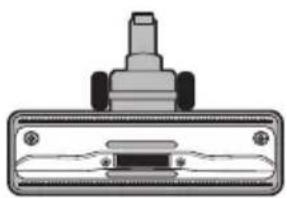
Pure mechanical component diagram without any text, numbers, or symbolsHard Floor Brush (P.N.: CH812B-HF)

Combination Nozzle (P.N.: CH812B-CN)

Instruction Manual (P.N.: CH812B-IM)
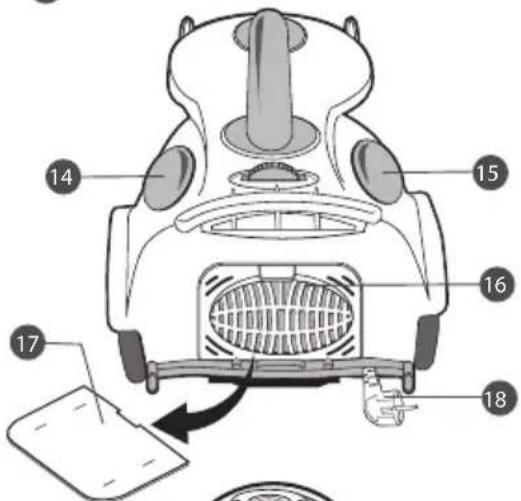
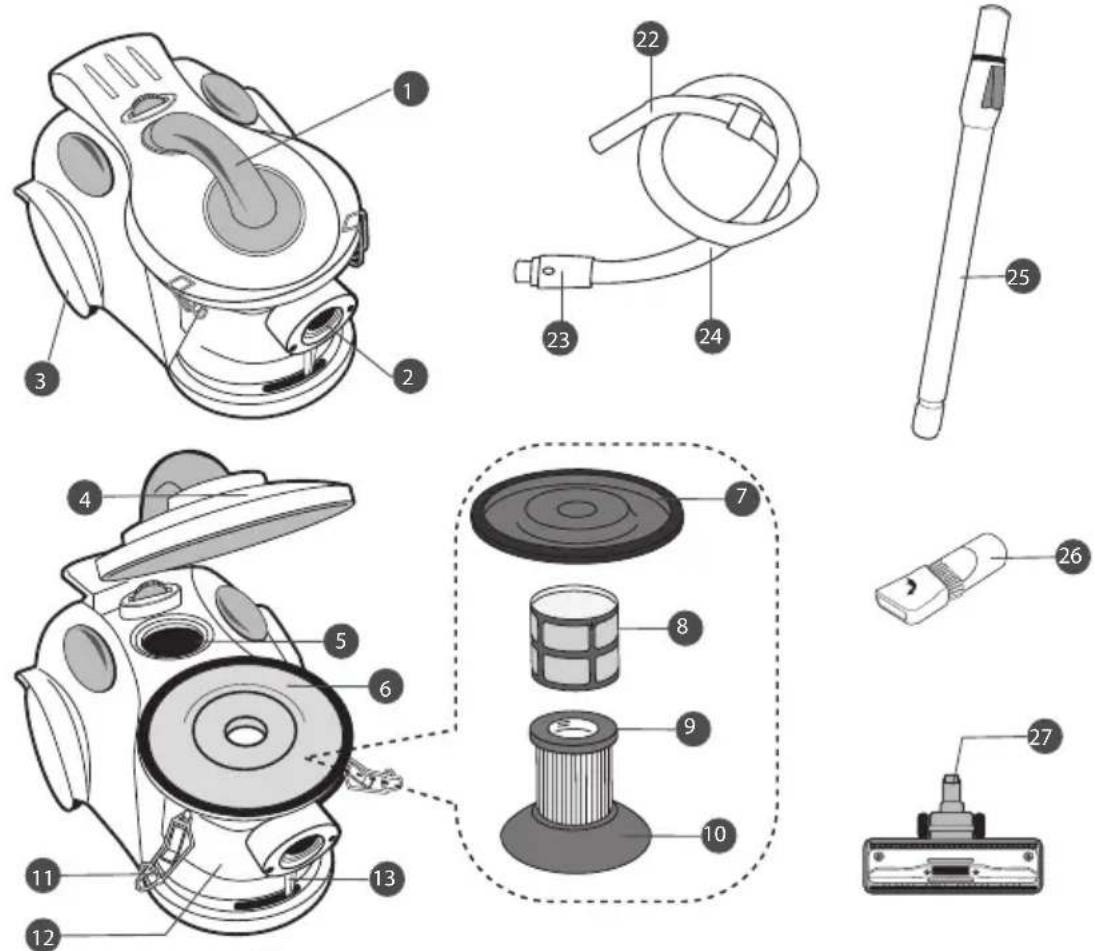
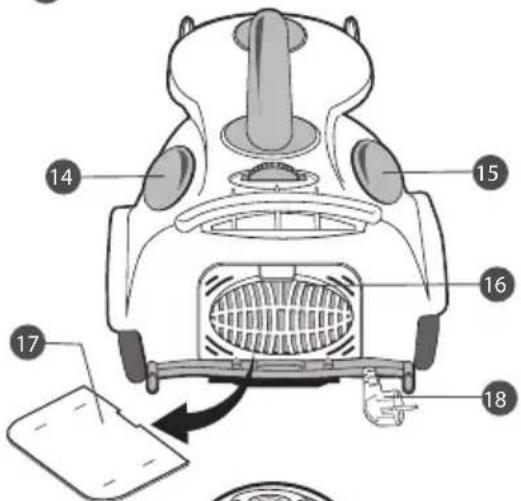
Product Overview
GB
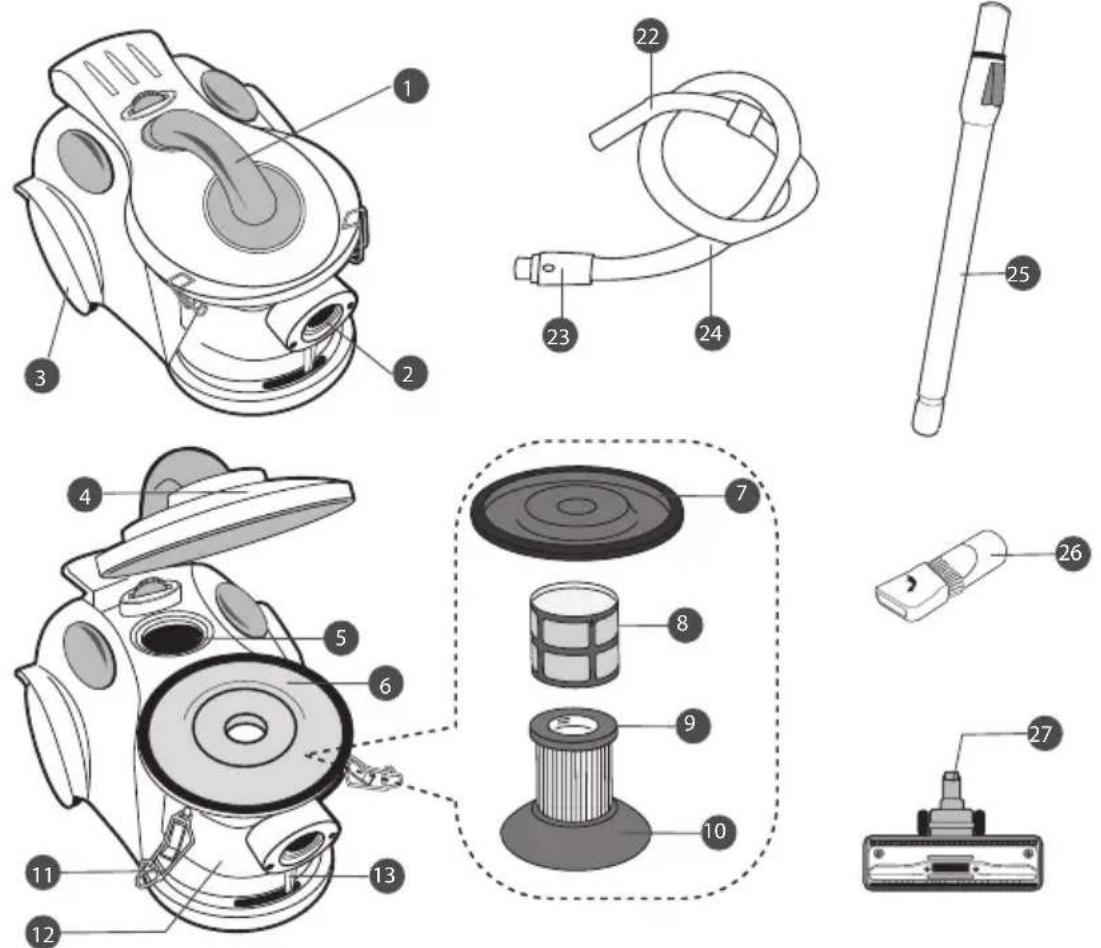

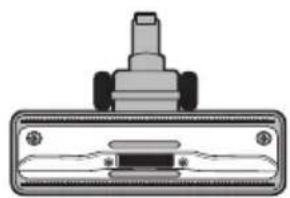
1 Handle
② Hose connection opening
3 Rear wheels
4 Cover
5 Motor Protection Filter
6 HEPA filter unit
7 Top
8 Mesh guard
9 HEPA filter
10 Base
11 i.ever clasps
12 ain
13 bin handle
14 ON/OFF button
15 Cord rewind button
16 Grill
17 Exhaust filter
18 Mains plug
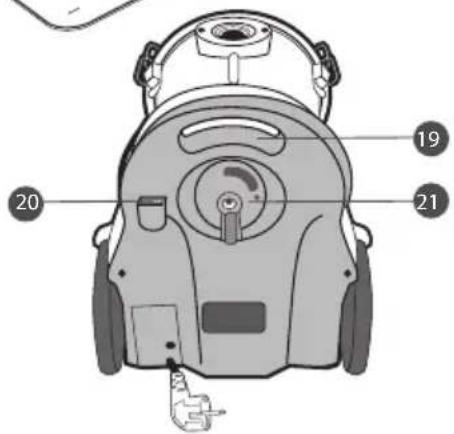
19 Handgrip
20 Clip
21 Wheel
22 Handgrip of hose
23 Hose connector
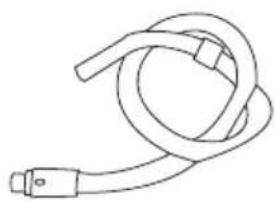
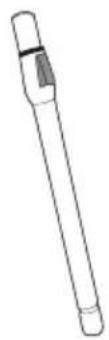
Hose
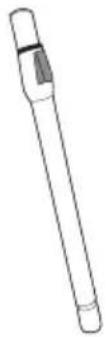
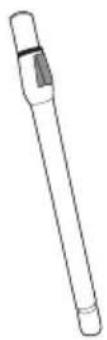
Telescopic tube
Combination nozzle
Hard floor brush
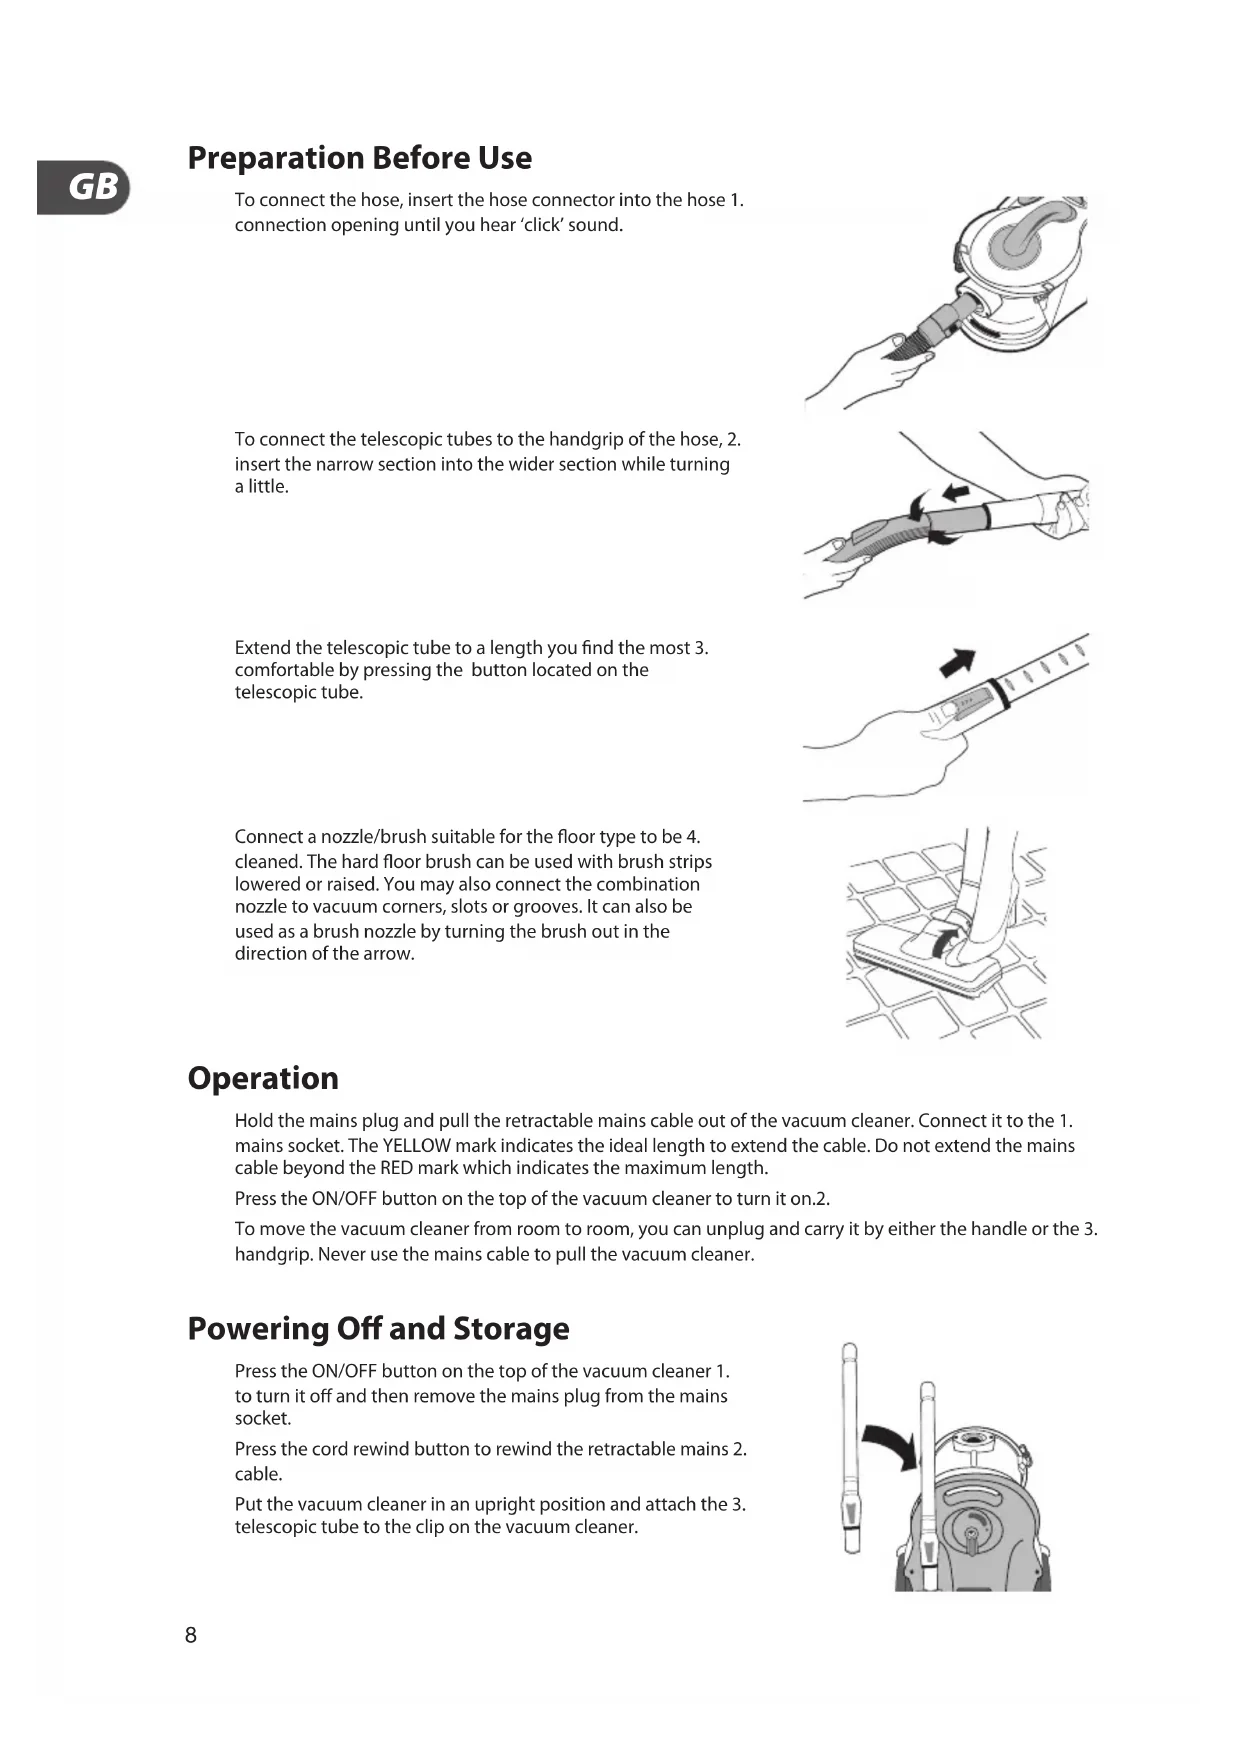
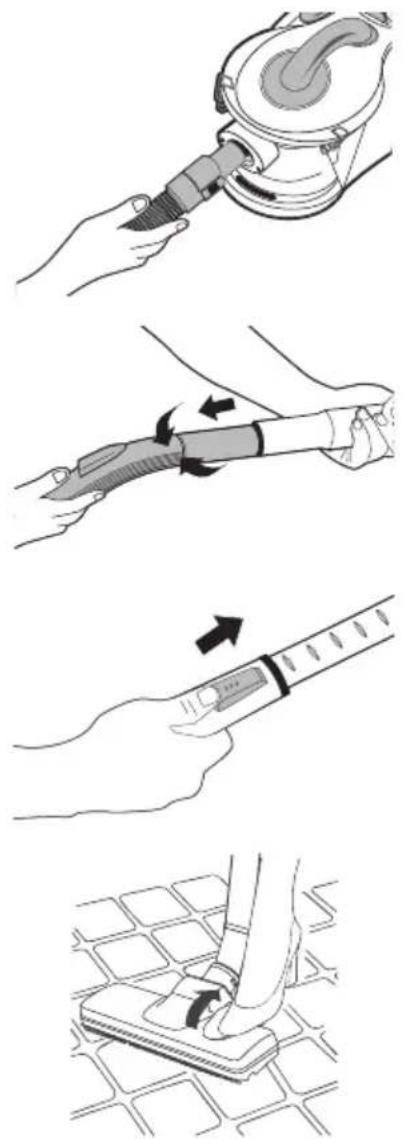
Preparation Before Use
To connect the hose, insert the hose connector into the hose 1. connection opening until you hear 'click' sound.
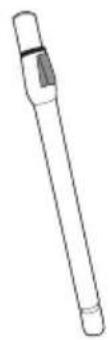
To connect the telescopic tubes to the handgrip of the hose, 2. insert the narrow section into the wider section while turning a little.
Extend the telescopic tube to a length you find the most 3. comfortable by pressing the button located on the telescopic tube.
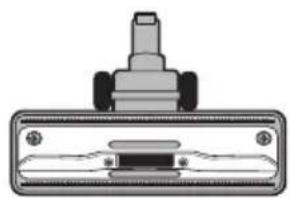
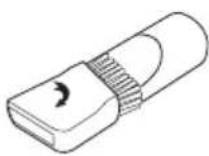
Connect a nozzle/brush suitable for the floor type to be 4. cleaned. The hard floor brush can be used with brush strips lowered or raised. You may also connect the combination nozzle to vacuum corners, slots or grooves. It can also be used as a brush nozzle by turning the brush out in the direction of the arrow.
Operation
Hold the mains plug and pull the retractable mains cable out of the vacuum cleaner. Connect it to the 1. mains socket. The YELLOW mark indicates the ideal length to extend the cable. Do not extend the mains cable beyond the RED mark which indicates the maximum length.
Press the ON/OFF button on the top of the vacuum cleaner to turn it on.2.
To move the vacuum cleaner from room to room, you can unplug and carry it by either the handle or the 3. handgrip. Never use the mains cable to pull the vacuum cleaner.
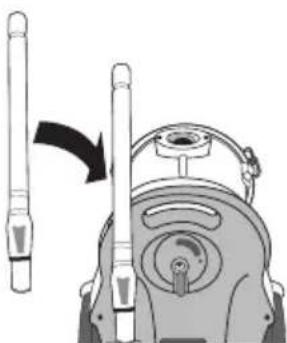
Powering Off and Storage
Press the ON/OFF button on the top of the vacuum cleaner 1. to turn it off and then remove the mains plug from the mains socket.
Press the cord rewind button to rewind the retractable mains 2. cable.
Put the vacuum cleaner in an upright position and attach the 3. telescopic tube to the clip on the vacuum cleaner.
natural_image
Diagram of a mechanical device with two vertical rods and a circular component, showing a curved arrow indicating motion (no text or symbols present)Emptying the Bin
Always unplug the vacuum cleaner from the mains socket before emptying the bin.
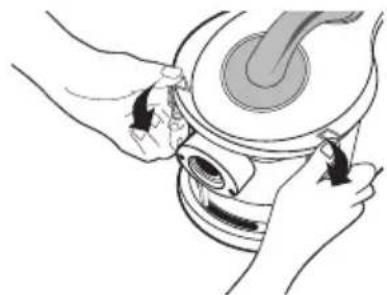
Remove the hose connector from the cleaner. Unclip the 1. lever clasps and open the cover.

natural_image
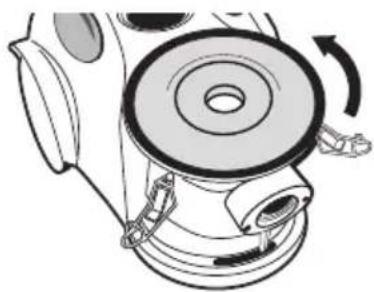
Illustration of hands operating a mechanical device with a curved handle (no text or symbols visible)Use the bin handle to turn the bin anti-clockwise till it stops, 2. then lift the bin up.
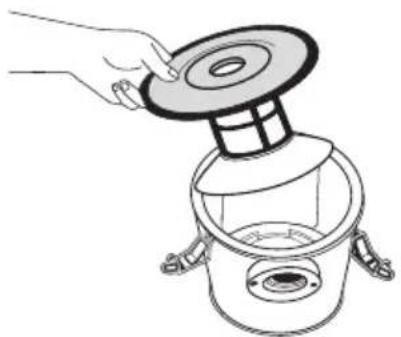
To prevent the dust dispersing, lower the bin into your 3. dustbin. Take out the filter unit to empty the bin.
If you find the filter unit is blocked or dirty, follow the steps in 4. "Cleaning the HEPA Filter unit". If not, skip this step.
Relocate the filter unit back into the bin and then put them 5. back to the vacuum cleaner by aligning the tabs at the bottom of the bin with the slots on the vacuum cleaner. Turn the bin clockwise with the bin handle until it locks in place.
Close the cover and clip the lever clasps.6.
natural_image
Technical illustration of a mechanical device with rotating components and adjustment arrows (no text or symbols)Cleaning the HEPA Filter Unit
Always unplug the vacuum cleaner from the mains socket before cleaning.
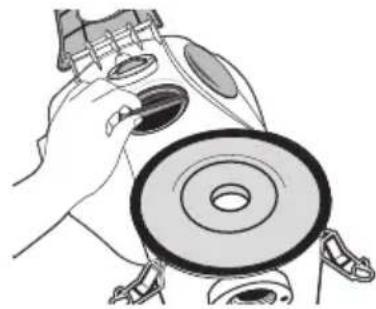
To take out the filter unit from the bin, tilt it a bit to get the 1. base past the inlet.
Hold the base then untighten the top of the filter unit.2.
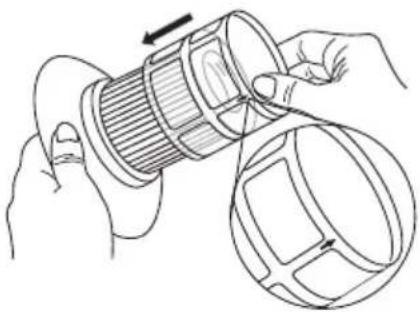
Lift the mesh guard from the HEPA filter and shake out the 3. dust accumulated on the mesh guard gently over your dustbin. You may rinse it gently under a running tap.
Shake out the dust accumulated on the HEPA filter. You may 4. soak it in warm soapy water for a few minutes, and then rinse it under a running tap to remove all traces of soap. Do not reassemble the filter unit until it is completely dry.
natural_image
Line drawing of a hand pouring liquid into a cylindrical container with a lid (no text or symbols)To reassemble the filter unit, hold the mesh guard with the 5. arrows pointing up, and lower it over the HEPA filter.
Fit the top of the filter unit to the top of the HEPA filter, and 6. turn it clockwise. Do not over-tighten it.
Relocate the filter unit back in the bin again, tilt it a bit to get 7. the base past the inlet.
natural_image
Illustration of hands assembling a cylindrical component with an arrow indicating rotation (no text or symbols)
Cleaning the Motor Protection Filter
The motor protection filter should be cleaned twice a year, or when it appears to be visibly clogged.
Always unplug the appliance from mains socket before replacing the filter.
Unclip the lever clasps and open the cover.1.
natural_image
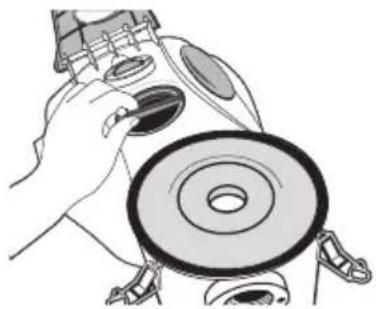
Illustration of hands operating a mechanical device with arrows indicating motion (no text or symbols)Take out the motor protection filter.2.
natural_image
Illustration of a hand holding a camera lens and a circular component (no text or symbols)Shake out the dust accumulated on the filter into a dustbin.3.
Relocate the filter back. Close and clip the cover.4.
Cleaning the Exhaust Filter
Always unplug the appliance from mains socket before replacing the filter.
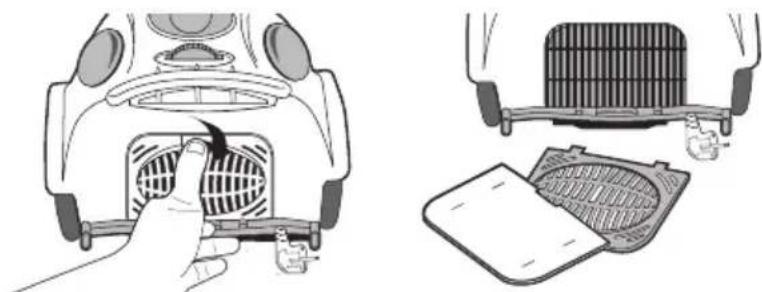
Unclip the grill and take out the exhaust filter.1.
natural_image
Illustration showing a hand inserting a fan into a car air vent into a rack, with a close-up of the rack component being placed on a cover (no text or symbols present)Shake out the dust accumulated on the filter into a dustbin.2.
Relocate the filter and the grill.3.
Specifications
Supply voltage: 230-240V\~50Hz
Power input: 1200-1400W (1600 MAX)
Dust capacity: 2.5L
We continually strive to improve our products, specifications may change without prior notice.
natural_image
Line drawing of a mechanical device with no visible text or symbolsHovedenheten

natural_image
Simple line drawing of a coiled cable or hose with a connector (no text or symbols)natural_image
Pure mechanical component diagram without any text, numbers, or symbols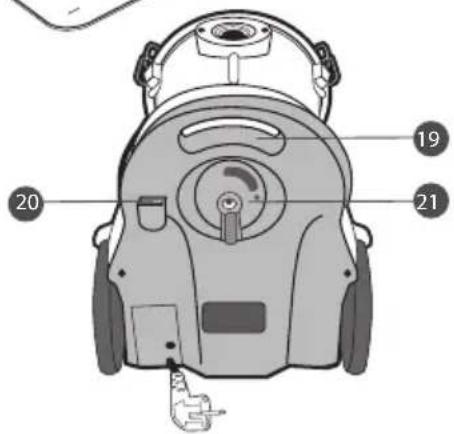
1 Händtak 15 Kabelspole-knapp
2 Hull for slangetilkobling 16 Utluftningsdeksel
3 Bakre hjul 17 Utluftningsfilter
4 Deksel 18 Stikkkontakt
5 Motorfilter 19 Bærehåndtak
6 HEPA filter-enhet 20 Bøyle
7 Topp 21 Fremre hjul
8 Deksel (nett) 22 Slangens håndtak
⑨ HEPA filter
⑳ Slangens tilkobling (til støvsugeren)
24 Slange
12 Zusckips
25 Teleskoprør
13 Händtak (beholder)
26 Kombinasjonsmunnstykke
14 RÅ (AV) knapp
27 Munnstykke til gulv
natural_image
Illustration of a hand using a handheld tool to interact with a mechanical device (no text or symbols visible)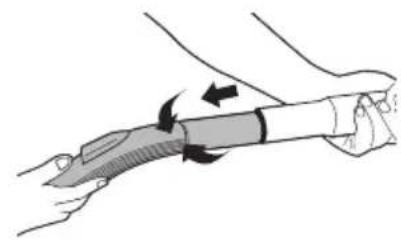
natural_image
Illustration of a hand holding a pen or tool with arrows indicating motion (no text or symbols)
natural_image
Illustration of a hand holding a syringe with an arrow indicating force or movement (no text or symbols)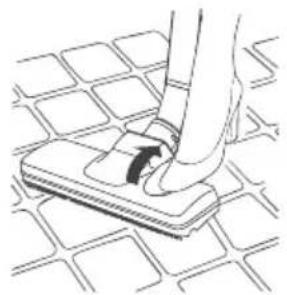
natural_image
Line drawing of a hand pressing down on a tiled floor (no text or symbols)Bruk
natural_image
Diagram showing a mechanical device with two vertical rods and a circular component, no text or symbols present.Å tømme beholderen
natural_image
Illustration of hands operating a mechanical device with a handle and valve (no text or symbols)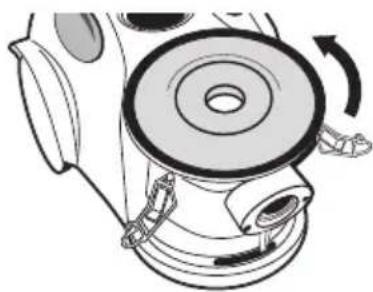
natural_image
Diagram of a mechanical device with rotating components and directional arrows (no text or symbols)natural_image
Line drawing of a hand pouring liquid into a container with a lid (no text or symbols)natural_image
Line drawing of hands assembling a mechanical component with a magnified inset showing the circular component (no text or symbols)natural_image
Illustration of hands operating a mechanical device with arrows indicating motion (no text or symbols)NO
Ta ut motorfilteret. 2.
natural_image
Illustration of a hand using a camera lens to adjust the lens (no text or symbols present)natural_image
Illustration of a hand pressing down on a car's front panel with a fan grille (no text or symbols)
natural_image
Diagram showing a car air conditioner unit with cooling fan and internal panel (no text or symbols)natural_image
Line drawing of a mechanical device with no visible text or symbolsHuvudenhet
natural_image
Simple line drawing of a coiled cable or hose with a connector (no text or symbols)Slang (P.N.: CH812B-HS)
natural_image
Pure electrical circuit lines without any symbols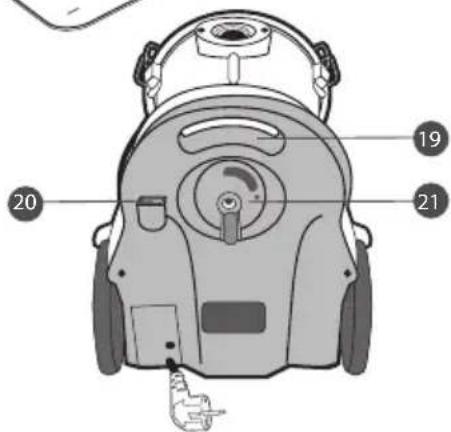
natural_image
Diagram of a mechanical device with two vertical rods and a central hub, showing a curved arrow indicating motion (no text or symbols present)natural_image
Illustration of hands operating a mechanical device with a handle and valve (no text or symbols)SE

natural_image
Diagram of a mechanical device with rotating components and directional arrows (no text or symbols)natural_image
Line drawing of a hand pouring liquid into a container with a lid (no text or symbols)natural_image
Illustration of hands assembling a cylindrical mechanical component with a magnified inset showing internal structure (no text or symbols)natural_image
Illustration of hands operating a mechanical device with a handle and lever (no text or symbols)natural_image
Illustration of a hand holding a camera lens and a circular component (no text or symbols)natural_image
Illustration showing a hand inserting a fan into a car's vent, and the lid of a radiator partially filled with contents (no text or symbols)natural_image
Line drawing of a mechanical device with no visible text or symbolsYksikkö
natural_image
Simple line drawing of a coiled cable or hose with a connector (no text or symbols)Letku
(P.N.: CH812B-HS)

Teleskooppiputki
(P.N.: CH812B-TB)

natural_image
Pure diagram of a mechanical component with no text or symbolsKovan lattian harja (P.N.: CH812B-HF)
natural_image
Illustration of a hand using a handheld tool to interact with a mechanical device (no text or symbols visible)
natural_image
Illustration of a hand holding a wrist with a curved bandage and directional arrows indicating motion (no text or symbols)
natural_image
Illustration of a hand holding a syringe with an arrow indicating force or movement (no text or symbols)
natural_image
Line drawing of a hand pressing down on a tiled floor (no text or symbols)Käyttö
natural_image
Diagram of a mechanical device with a cylindrical component and a curved arrow indicating rotation (no text or symbols)Säiliön Tyhjennys
natural_image
Illustration of hands operating a mechanical device with a curved handle (no text or symbols visible)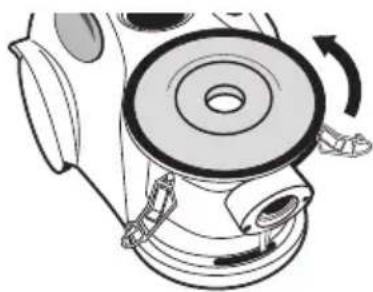
natural_image
Diagram of a mechanical device with rotating components and directional arrows (no text or symbols)
natural_image
Line drawing of a hand pouring liquid into a cylindrical container with a lid (no text or symbols)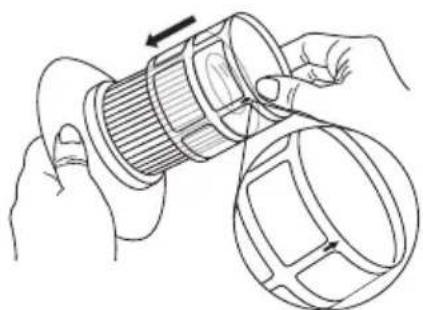
natural_image
Diagram of hands assembling a mechanical component with a magnified inset showing the circular component (no text or symbols)natural_image
Illustration of hands operating a mechanical device with a handle and valve (no text or symbols)natural_image
Illustration of a hand holding a camera lens and a circular target (no text or symbols)natural_image
Illustration of a hand pressing down on a car's front panel with fan blades (no text or symbols)
natural_image
Diagram showing a car interior with heat sink and fan cover, no text or symbols presentnatural_image
Line drawing of a mechanical device with no visible text or symbolsHovedenhed
natural_image
Simple line drawing of a coiled cable or hose with a connector (no text or symbols)Ledning
(P.N.: CH812B-HS)
Teleskoprør
(P.N.: CH812B-TB)
natural_image
Pure mechanical component diagram without any text, numbers, or symbolsBørste til hårdt gulv (P.N.: CH812B-HF)

Mundstykke
(P.N.: CH812B-CN)

Brugsvejledning
(P.N.: CH812B-IM)
Produktoversigt

natural_image
Diagram of a mechanical device with two vertical rods and a central hub, showing a curved arrow indicating motion (no text or symbols present)Tømning af Beholder
natural_image
Illustration of hands operating a mechanical device with a handle and valve (no text or symbols)natural_image
Technical illustration of a mechanical device with rotating components and a central hub (no text or symbols)natural_image
Line drawing of a hand pouring liquid into a container with a lid (no text or symbols)natural_image
Illustration of hands holding a cylindrical device with an arrow indicating rotation (no text or symbols)natural_image
Illustration of hands operating a mechanical device with a handle and valve (no text or symbols)DK
natural_image
Illustration of a hand holding a circular device with a ring, no text or symbols presentRyst støvet, der har samlet sig, ned i en skraldespand.3.
natural_image
Illustration showing a hand inserting a fan into a car's vent, and the lid of a grating device being placed on a tray (no text or symbols)natural_image
Line drawing of a mechanical device with no visible text or symbolsUnité Principale
natural_image
Simple line drawing of a coiled cable or hose with a connector (no text or symbols)natural_image
Technical illustration of a mechanical component with a central shaft and mounting holes (no text or symbols)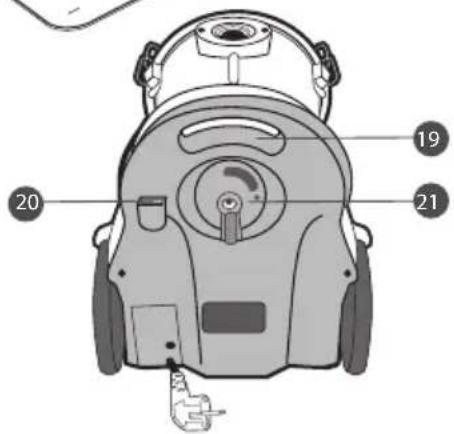
natural_image
Illustration of a hand using a handheld device to interact with a mechanical device (no text or symbols visible)
natural_image
Illustration of a hand holding a cylindrical object with arrows indicating motion (no text or symbols)
natural_image
Simple line drawing of a syringe with an arrow indicating motion (no text or symbols)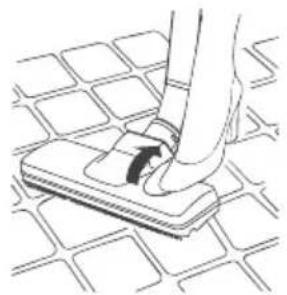
natural_image
Line drawing of a hand pressing down on a tiled floor (no text or symbols)Fonctionnement
natural_image
Diagram of a mechanical device with a lever and handle, showing a curved arrow indicating motion (no text or symbols present)natural_image
Illustration of hands operating a mechanical device with a handle and valve (no text or symbols)FR
natural_image
Technical illustration of a mechanical device with rotating components and a central circular component (no text or symbols)natural_image
Line drawing of a hand pouring liquid into a cylindrical container with a lid (no text or symbols)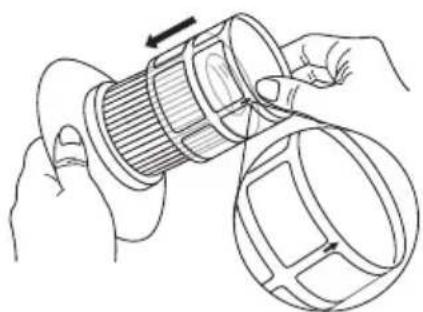
natural_image
Illustration of hands assembling a mechanical component with a magnified inset showing internal structure (no text or symbols)natural_image
Illustration of hands operating a mechanical device with a handle and valve (no text or symbols)natural_image
Illustration of a hand holding a camera lens and a circular lens component (no text or symbols)natural_image
Illustration of a hand pressing down on a car air vent (no text or symbols visible)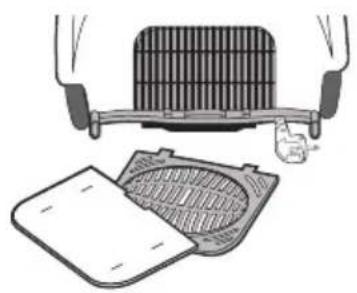
natural_image
Diagram showing a car hood with heat sink and plastic cover, no text or symbols presentnatural_image
Line drawing of a mechanical device with no visible text or symbolsEl aparato principal

natural_image
Simple line drawing of a coiled cable or hose with a connector (no text or symbols)Manguera (P.N.: CH812B-HS)
Tubo Extensible (P.N.: CH812B-TB)
natural_image
Pure mechanical component diagram without any text, numbers, or symbolsCepillo para Suelos Duros (P.N.: CH812B-HF)
Boquilla Combinada (P.N.: CH812B-CN)

Manual de Instrucciones (P.N.: CH812B-IM)
natural_image
Diagram of a mechanical device with two vertical rods and a handle, showing a curved arrow indicating motion (no text or symbols present)natural_image
Illustration of hands operating a mechanical device with a handle and base (no text or symbols)
natural_image
Diagram of a mechanical device with rotating components and a central circular component (no text or symbols)natural_image
Line drawing of a hand pouring liquid into a cylindrical container (no text or symbols)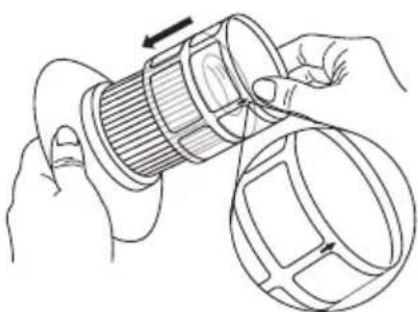
natural_image
Illustration of hands assembling a mechanical component with a magnified inset showing internal structure (no text or symbols)natural_image
Line drawing of hands operating a mechanical device with a handle and valve (no text or symbols)natural_image
Illustration of a hand holding a camera lens and a circular component (no text or symbols)natural_image
Illustration showing a hand inserting a fan into a car's vent, and a close-up of the fan's internal structure (no text or symbols)natural_image
Line drawing of a mechanical device with no visible text or symbolsL'unita principale

natural_image
Simple line drawing of a coiled cable or hose with a connector (no text or symbols)Tubo (P.N.: CH812B-HS)
Tubo telescopico (P.N.: CH812B-TB)
natural_image
Pure mechanical component diagram without any text, numbers, or symbolsSpazzola pavimenti (P.N.: CH812B-HF)
natural_image
Illustration of a hand using a handheld tool to interact with a mechanical device (no text or symbols visible)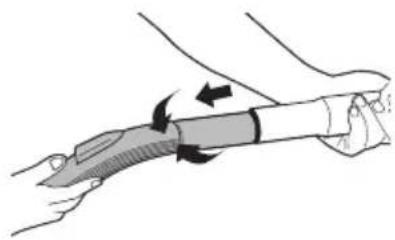
natural_image
Illustration of a hand holding a pen or tool with arrows indicating motion (no text or symbols)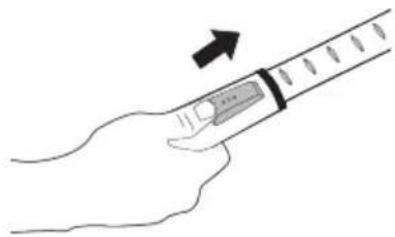
natural_image
Simple line drawing of a syringe with an arrow indicating motion (no text or symbols)
natural_image
Line drawing of a hand pressing down on a tiled floor (no text or symbols)Funzionamento
natural_image
Diagram of a mechanical device with a lever and handle, showing a curved arrow indicating motion (no text or symbols present)natural_image
Illustration of hands operating a mechanical device with arrows indicating motion (no text or symbols)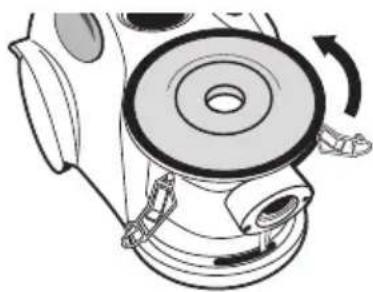
natural_image
Diagram of a mechanical device with rotating components and directional arrows (no text or symbols)natural_image
Line drawing of a hand pouring liquid into a cylindrical container (no text or symbols)
natural_image
Diagram of hands holding a cylindrical mechanical component with an arrow indicating rotation (no text or symbols present)natural_image
Illustration of hands operating a mechanical device with a handle and valve (no text or symbols)natural_image
Illustration of a hand holding a camera lens next to a circular disc (no text or symbols)natural_image
Illustration showing a car interior with fan and vent, and its exterior view of the roof (no text or symbols)natural_image
Line drawing of a mechanical device with no visible text or symbolsHauptgerät

natural_image
Simple line drawing of a coiled cable or hose with a connector (no text or symbols)natural_image
Pure mechanical component diagram without any text, numbers, or symbols
natural_image
Diagram of a mechanical device with two vertical rods and a handle, showing a curved arrow indicating motion (no text or symbols present)natural_image
Illustration of hands operating a mechanical device with a handle and valve (no text or symbols)
natural_image
Technical illustration of a mechanical device with rotating components and adjustment arrows (no text or symbols)natural_image
Line drawing of a hand pouring liquid into a container with a lid (no text or symbols)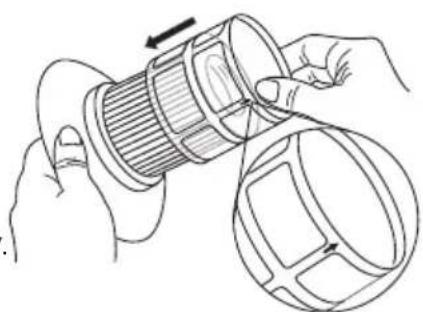
natural_image
Illustration of hands assembling a cylindrical mechanical component with a magnified inset showing internal structure (no text or symbols)
natural_image
Illustration of hands operating a mechanical device with arrows indicating motion (no text or symbols)natural_image
Illustration of a hand holding a camera lens with a circular lens (no text or symbols)natural_image
Illustration showing a hand inserting a fan into a car's air vent, and a close-up of the fan cover with a grille (no text or symbols)natural_image
Line drawing of a mechanical device with no visible text or symbolsHoofdapparaat

natural_image
Simple line drawing of a coiled cable or hose with a connector (no text or symbols)Slang (P.N. CH812B-HS)

Telescopische buis (P.N. CH812B-TB)
natural_image
Pure mechanical component diagram without any text, numbers, or symbolsHarde vloerborstel (P.N. CH812B-HF)
Combinatie-mondstuk (P.N. CH812B-CN)


natural_image
Illustration of a hand using a handheld device to interact with a mechanical device (no text or symbols visible)
natural_image
Illustration of a hand holding a pen or tool with arrows indicating motion (no text or symbols)
natural_image
Simple line drawing of a syringe with an arrow indicating motion (no text or symbols)
natural_image
Line drawing of a hand pressing down on a small electronic component on a grid-patterned surface (no text or symbols)Bediening
natural_image
Diagram of a mechanical device with two vertical rods and a handle, showing a curved arrow indicating motion (no text or symbols present)Het stofvak ledigen
natural_image
Illustration of hands operating a mechanical device with a lid and base (no text or symbols)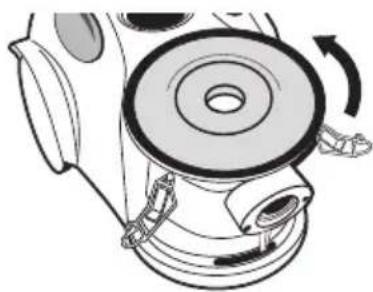
natural_image
Diagram of a mechanical device with rotating components and directional arrows (no text or symbols)natural_image
Line drawing of a hand pouring liquid into a cylindrical container with a lid (no text or symbols)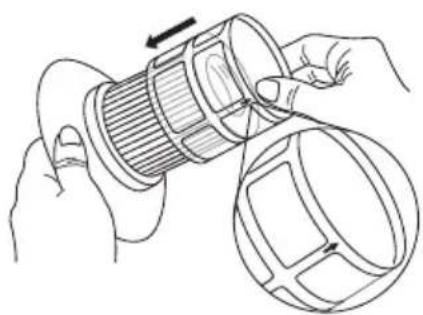
natural_image
Illustration of hands assembling a mechanical component with a magnified inset showing internal structure (no text or symbols)natural_image
Illustration of hands operating a mechanical device with a curved handle (no text or symbols visible)natural_image
Illustration of a hand holding a camera lens and a circular lens (no text or symbols)natural_image
Illustration of a hand opening a car's air vent (no text or symbols)
natural_image
Diagram showing a car interior with a gridded grille and a mesh fan cover (no text or symbols)natural_image
Line drawing of a mechanical device with no visible text or symbolsUnidade principal

natural_image
Simple line drawing of a coiled cable or hose with a connector (no text or symbols)Mangueira (P/N.: CH812B-HS)
natural_image
Pure electrical connector diagram without any text or symbols
natural_image
Diagram of a mechanical device with a lever and handle, showing a curved arrow indicating motion (no text or symbols present)natural_image
Illustration of a mechanical device with hands operating a lid and rotating its components (no text or symbols)natural_image
Line drawing of a hand pouring liquid into a container with a lid (no text or symbols)natural_image
Illustration of hands holding a cylindrical device with a magnified inset showing internal components (no text or symbols)natural_image
Illustration of hands operating a mechanical device with arrows indicating motion (no text or symbols)natural_image
Illustration of a hand holding a circular device with a ring, no text or symbols presentSacuda o pó acumulado no filtro para o balde do lixo.3.
natural_image
Illustration showing a hand inserting a fan into a car's vent, and the lid of a grating device being placed on a plastic panel (no text or symbols)Sacuda o pó acumulado no filtro para o balde do lixo.2.
natural_image
Line drawing of a mechanical device with no visible text or symbolsHlavní jednotka

natural_image
Simple line drawing of a coiled cable or hose with a connector (no text or symbols)Hadice (č.d.: CH812B-HS)
natural_image
Pure diagram of a mechanical component with no text or symbols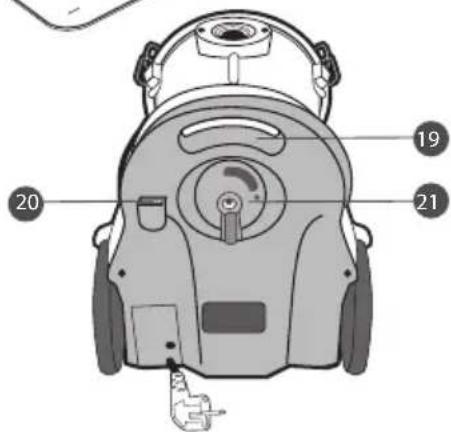
natural_image
Diagram of a mechanical device with a cylindrical component and a curved arrow indicating rotation (no text or symbols)natural_image
Illustration of hands operating a mechanical device with a handle and valve (no text or symbols visible)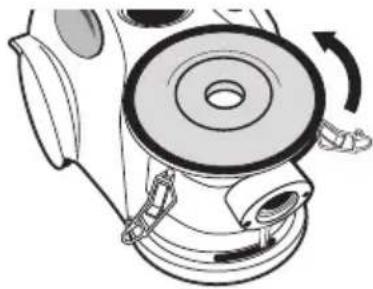
natural_image
Diagram of a mechanical device with rotating components and a central circular component (no text or symbols)zásobník.
natural_image
Line drawing of a hand pouring liquid into a cylindrical container (no text or symbols)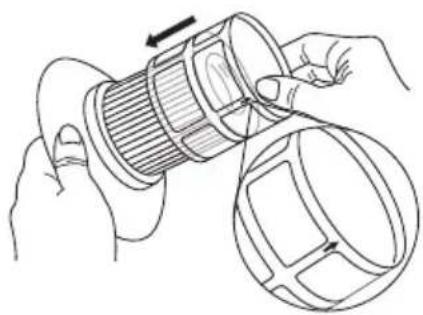
natural_image
Illustration of hands assembling a cylindrical mechanical component with a magnified inset showing internal structure (no text or symbols)natural_image
Line drawing of hands operating a mechanical device with a handle (no text or symbols)natural_image
Illustration of a hand holding a camera lens and a circular disc component (no text or symbols)natural_image
Illustration of a hand pressing down on a car's front panel with a fan inside (no text or symbols)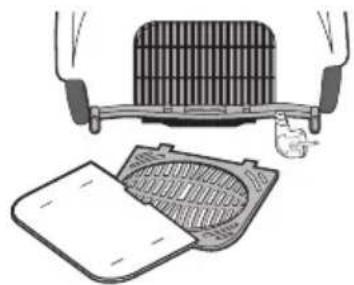
natural_image
Illustration of a heating fan with cooling cover and heat sink (no text or symbols)
Technické údaje
natural_image
Line drawing of a mechanical device with no visible text or symbolsVysávač
natural_image
Simple line drawing of a coiled cable or hose with a connector (no text or symbols)natural_image
Pure mechanical component diagram without any text, numbers, or symbols
1 Rúčka
2 Otvor na pripojenie hadice
3 Zadné kolieska
4 Kryt
5 Filter na ochranu motora
6 Jednotka HEPA filtra
7 Vrchná čast
8 Kryt sietky
9 HEPA filter
10 Podstavec
11 :pony páky
12 v'recko
13 Rúčka vrecka
14 Vypínač
15 Tlačidlo na navíjanie
16 Mriežka
17 Výstupný filter
18 Napájací konektor
19 Rukovät
20 Úchytka
21 Koleso
22 Rukovät hadice
23 Prípojka hadice
Hadica
Teleskopická trubica
Kombinovaný
nadstavec
27 Kefa na podlahy
natural_image
Illustration of hands operating a mechanical device with arrows indicating motion (no text or symbols)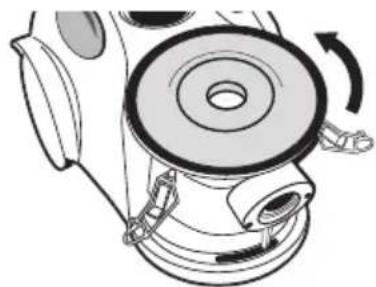
natural_image
Technical illustration of a mechanical device with rotating components and a central hub (no text or symbols)natural_image
Illustration showing a hand using a filter to lift a component, with no text or symbols present.Čistenie filtra na ochranu motora
natural_image
Illustration of hands operating a mechanical device with a handle and valve (no text or symbols)Vytiahnite filter na ochranu motora.2.

natural_image
Illustration of a hand holding a circular device with a ring, no text or symbols presentnatural_image
Illustration showing a hand inserting a fan into a car's vent, and the lid of a grating device being placed on a tray (no text or symbols present)natural_image
Line drawing of a mechanical device with no visible text or symbolsJednostka centralna

natural_image
Simple line drawing of a coiled cable or hose with a connector (no text or symbols)natural_image
Pure diagram of a mechanical component with no text or symbolsSsawkoszczotka (P.N.: CH812B-HF)
natural_image
Illustration of a hand using a tool to interact with a mechanical device (no text or symbols visible)
natural_image
Illustration of a hand holding a pen or tool with arrows indicating motion (no text or symbols)
natural_image
Simple line drawing of a syringe with an arrow indicating motion (no text or symbols)
natural_image
Line drawing of a hand pressing down on a small electronic component on a grid-patterned surface (no text or symbols)Użytkowanie
natural_image
Diagram of a mechanical device with two vertical rods and a handle, showing a curved arrow indicating motion (no text or symbols present)
natural_image
Line drawing of hands operating a mechanical device with a handle and valve (no text or symbols)natural_image
Technical line drawing of a mechanical device with rotating components (no text or symbols)natural_image
Line drawing of a hand pouring liquid into a cylindrical container (no text or symbols)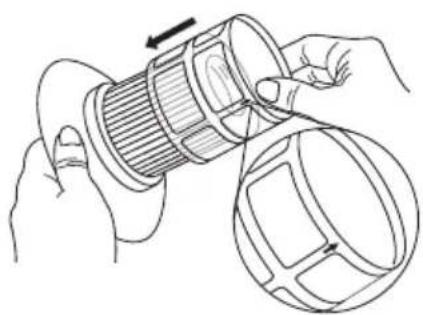
natural_image
Diagram of hands assembling a mechanical component with a magnified inset showing internal structure (no text or symbols)natural_image
Illustration of hands operating a mechanical device with a handle and base (no text or symbols)natural_image
Illustration of a person using a camera lens system to adjust the lens (no text or symbols present)natural_image
Illustration showing a car interior with fan blades and a cooling fan cover (no text or symbols)natural_image
Line drawing of a mechanical device with no visible text or symbolsA porszívó

natural_image
Simple line drawing of a coiled cable or hose with a connector (no text or symbols)natural_image
Pure mechanical component diagram without any text, numbers, or symbols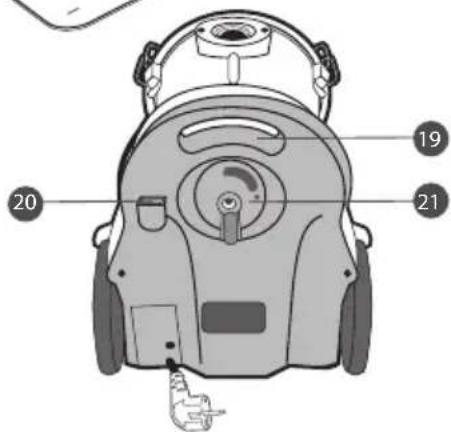
natural_image
Diagram of a mechanical device with two vertical rods and a circular component, showing a curved arrow indicating motion (no text or symbols present)natural_image
Illustration of hands operating a mechanical device with a curved handle (no text or symbols visible)
natural_image
Mechanical device diagram showing a rotating component with no visible text or symbolsnatural_image
Line drawing of a hand holding a lid above a cooking pot (no text or symbols)natural_image
Illustration of hands holding a cylindrical mechanical component with an arrow indicating rotation (no text or symbols)
natural_image
Illustration of hands operating a mechanical device with arrows indicating motion (no text or symbols)natural_image
Illustration of a hand holding a circular device with a ring, next to a mechanical component (no text or symbols visible)natural_image
Illustration of a hand pressing down on a car's front panel with a fan inside (no text or symbols)
natural_image
Diagram showing a car air conditioner unit with cooling fan and exhaust cover (no text or symbols)natural_image
Line drawing of a mechanical device with no visible text or symbolsΚεντρική Μονάδα
natural_image
Simple line drawing of a coiled cable or hose with a connector (no text or symbols)natural_image
Pure diagram of a mechanical component with no text or symbolsnatural_image
Illustration of a hand using a power tool to adjust a mechanical component, showing step-by-step assembly (no text or symbols)Λειτουργία
natural_image
Diagram of a mechanical device with two vertical rods and a circular component, showing a curved arrow indicating motion (no text or symbols present)
'Αδειασμα του Κάδου
natural_image
Illustration of hands operating a mechanical device with a curved handle (no text or symbols visible)natural_image
Technical illustration of a mechanical device with rotating components and a central circular component (no text or symbols)natural_image
Line drawing of a hand pouring liquid into a cylindrical container (no text or symbols)natural_image
Illustration of hands operating a mechanical device with arrows indicating motion (no text or symbols)natural_image
Illustration of a hand holding a camera lens and a circular disc component (no text or symbols)natural_image
Illustration showing a car interior with fan and vent, and its exterior view of the air conditioner unit (no text or symbols)natural_image
Line drawing of a mechanical device with no visible text or symbolsAna Ünite

natural_image
Simple line drawing of a coiled cable or hose with a connector (no text or symbols)Hortum
(Ürün No.: CH812B-HS)
Teleskopik Boru
(Ürün No.: CH812B-TB)

natural_image
Pure electrical circuit lines without any symbols
natural_image
Diagram of a mechanical device with two vertical rods and a circular component, showing a curved arrow indicating motion (no text or symbols present)Kutuyu Boşaltma
natural_image
Illustration of hands operating a mechanical device with a curved handle (no text or symbols visible)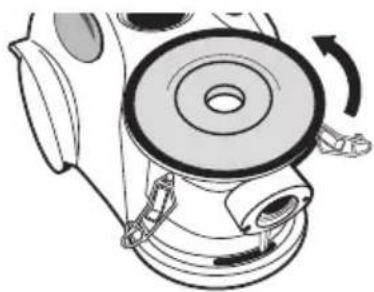
natural_image
Mechanical device diagram showing a rotating component with no visible text or symbolsnatural_image
Line drawing of a hand pouring liquid into a cylindrical container with a lid (no text or symbols)
natural_image
Illustration of hands assembling a mechanical component with a magnified inset showing internal structure (no text or symbols)TR
natural_image
Illustration of hands operating a mechanical device with a handle and valve (no text or symbols)natural_image
Illustration of a hand holding a camera lens and a circular component (no text or symbols)natural_image
Illustration showing a hand inserting a fan into a car's vent, and the lid of a grating device being placed on a plastic panel (no text or symbols present)For your continued safety and to reduce the risk of injury or electric shock, please follow all the safety precautions listed below.
Read all the instructions carefully before using the appliance and keep them • for future reference.
Retain the manual. If you pass the appliance onto a third party make sure to include this manual.
Check that the voltage marked on the rating label matches your mains voltage.
Consult your dealer if you are ever in doubt about the installation, operation or safety of your appliance.
Do not remove any fixed cover as this may expose dangerous voltages.
Do not allow any electrical appliance to be exposed to dripping or splashing.
To protect against electrical shock, do not immerse mains cable, mains plug, or any part of the appliance in water or other liquids.
Make sure the dust bag is properly installed before use.
Never vacuum up water or any other liquids. Never vacuum up flammable substances and do not vacuum up ashes until they are cold.
Never use the appliance without the motor protection filter. This damages the motor and shortens the life of the appliance.
If a blockage is found in the brushes, hoses or tubes, it should be removed • before use.
Store and use the appliance well away from heat sources such as radiators or gas/electric fires.
Do not run over the mains cable with the appliance.
Close supervision is necessary when any appliance is used by or near children. This appliance is not intended for use by persons (including children) with reduced sensory or mental capabilities, or lack of experience and knowledge unless they have been given supervision or instructions concerning the use of the appliance by a person responsible for their safety.
Children should be supervised to ensure that they do not play with the appliance.
Do not point the hose, tube or any other accessory at the eyes, ears or mouth during operation.
Unplug the appliance from the mains socket when it is not in use and before replacing filter.
Allow the appliance to cool completely before cleaning or storing.
- Do not use the appliance for other uses than its intended use.
- The use of accessories not recommended by the appliance manufacturer may cause injuries.
• Do not use the appliance outdoors. - Do not operate an appliance with a damaged mains cable or mains plug, or in an abnormal state. If the mains cable is damaged it must be replaced by the manufacturer, its service agent, or similarly qualified persons in order to avoid a hazard.
- Do not continue to operate the appliance if you are in any doubt about it working normally (e.g. abnormal noise, smell, smoke), or if it is damaged in any way - switch off, withdraw the mains plug and consult your dealer.
- Any maintenance and repair must be handled by a professional technician. Do not try to repair by yourself..
Sikkerheten först!
NO
This symbol on the product or in the instructions means that your electrical and electronic equipment should be disposed at the end of its life separately from your household waste. There are separate collection systems for recycling in the EU. For more information, please contact the local authority or your retailer where you purchased the product.
NO
- Innhold
- Unpacking
- Product Overview
- Preparation Before Use
- Operation
- Powering Off and Storage
- Emptying the Bin
- Cleaning the HEPA Filter Unit
- Cleaning the Motor Protection Filter
- Always unplug the appliance from mains socket before replacing the filter.
- Cleaning the Exhaust Filter
- Specifications
- Bruk
- Å tømme beholderen
- Käyttö
- Säiliön Tyhjennys
- Produktoversigt
- Tømning af Beholder
- Fonctionnement
- Funzionamento
- Bediening
- Het stofvak ledigen
- Technické údaje
- Čistenie filtra na ochranu motora
- Użytkowanie
- Λειτουργία
- 'Αδειασμα του Κάδου
- Kutuyu Boşaltma
- Sikkerheten först!
- NO
Brand : Logik
Model : L16VB10E
Category : Vacuum Cleaner