L14VUR12 - Vacuum Cleaner Logik - Free user manual and instructions
Find the device manual for free L14VUR12 Logik in PDF.

User questions about L14VUR12 Logik
0 question about this device. Answer the ones you know or ask your own.
Ask a new question about this device
Download the instructions for your Vacuum Cleaner in PDF format for free! Find your manual L14VUR12 - Logik and take your electronic device back in hand. On this page are published all the documents necessary for the use of your device. L14VUR12 by Logik.
USER MANUAL L14VUR12 Logik
Upright Bagless Vacuum Cleaner
Instruction Manual L14VUR12
natural_image
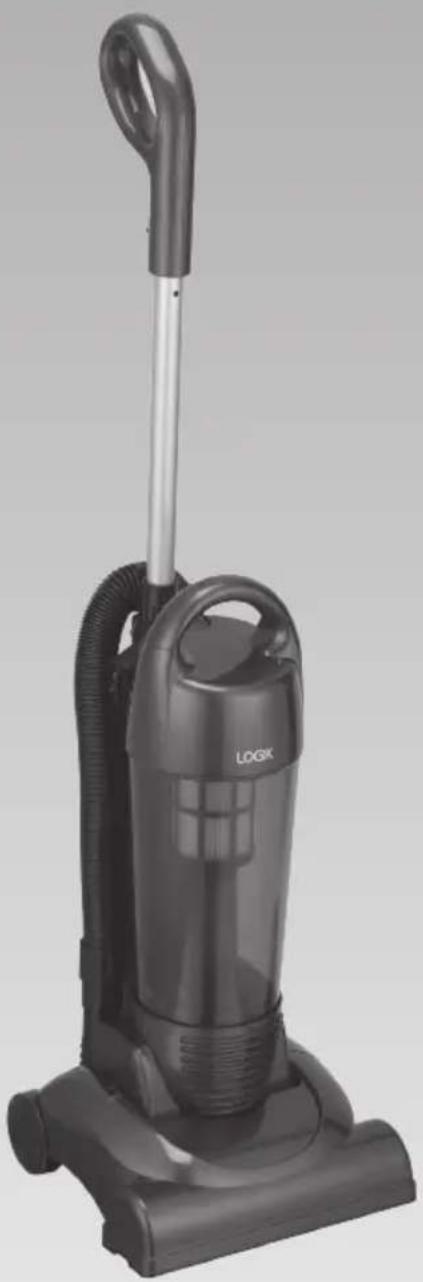
Black LOGIK vacuum cleaner with handle and control panel (no visible text or symbols on body)
natural_image
Gradient gray background with no text, symbols, or identifiable objectsSafety Warnings....4
Unpacking....7
Product Overview......8
Front View 8
Back View....8
Getting Started....9
Handle Release....9
Using the Mains Cable Holders 9
Using the Vacuum Cleaner....10
Removing and Emptying the Dust Tank 11
Cleaning the HEPA Dust Tank Filter 12
Cleaning the HEPA Filter Frame....13
Changing and Cleaning the Motor Protection Filter 14
Cleaning the Dust Tank 15
Cleaning and Changing the Belt ....16
Hints and Tips ....17
Specifications....17
For your continued safety and to reduce the risk of injury or electric shock, please follow all the safety precautions listed below.
- Read all the instructions carefully before using the appliance and keep them for future reference.
- Retain the manual. If you pass the appliance onto a third party make sure to include this manual.
- Check that the voltage marked on the rating label matches your mains voltage.
- Consult your dealer if you are ever in doubt about the installation, operation or safety of your appliance.
- Do not remove any fixed cover as this may expose dangerous voltages.
- Do not allow electrical appliance to be exposed to dripping or splashing.
- To protect against electrical shock, do not immerse mains cable, mains plug, or any part of the appliance in water or other liquid.
- Never suck up water or any other liquid. Never suck up flammable substances and do not suck up ashes until they are cold.
- Never use the appliance without the motor protection filter. This damages themotor and shortens the life of the appliance.
- If a blockage is found in the brushes, hoses or tubes, it should be removed before use.
-
Do not store or use the appliance close to high temperature places.
-
Do not run over the mains cable with the appliance.
- Close supervision is necessary when any appliance is used by or near children.
- This appliance is not intended for use by persons (including children) with reduced sensory or mental capabilities, or lack of experience and knowledge unless they have been given supervision or instructions concerning the use of the appliance by a person responsible for their safety.
• Children should be supervised to ensure that they do not play with the appliance. - Do not point the hose, tube or any other accessories at the eyes, ears or mouth during operation.
- Allow the appliance to cool completely before cleaning or storing.
- Do not use the appliance for other uses than its intended use.
- The use of accessories not recommended by the appliance manufacturer may cause injuries.
- Do not use the appliance outdoors.
- Do not operate an appliance with a damaged mains cable or mains plug, or in an abnormal state. If the mains cable is damaged it must be replaced by the manufacturer, its service agent, or similarly qualified persons in order to avoid a hazard.
- Do not continue to operate the appliance if you are in any doubt about it working normally (e.g. abnormal noise, smell, smoke), or if it is damaged in any way - switch off, withdraw the mains plug and consult your dealer.
• Any maintenance and repair must be handled by a professional technician. Do not try to repair by yourself.


- The lightning flash with arrowhead symbol, within an equilateral triangle, is intended to alert the user to the presence of uninsulated “dangerous voltage” within the unit’s enclosure that may be of sufficient magnitude to constitute a risk of electric shock.

- The exclamation point within an equilateral triangle is intended to alert the user to the presence of important operating and maintenance (servicing) instructions in the manual accompanying the unit.
Remove all packaging from the unit. Retain the packaging. If you dispose of it please do so according to local regulations.
The following items are included:
natural_image
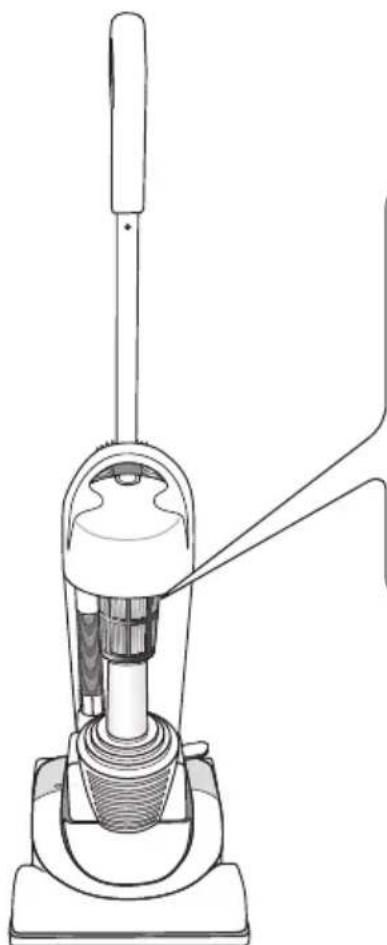
Line drawing of a vacuum cleaner with handle and base mount (no text or symbols)The Main Unit
Dust Tank Cover
(P.N.: L14VUR12 - 003)
Dust Tank
(P.N.: L14VUR12 - 008)
HEPA Filter
(P.N.: L14VUR12 - 005)
HEPA Filter Frame
(P.N.: L14VUR12 - 006)
Motor Protection Filter
(P.N.: L14VUR12 - 026)
Screws
(P.N.: L14VUR12 - 031)
Drive Belt
(P.N.: L14VUR12 - 064)

If items are missing or damaged, please contact Partmaster (UK only).
Tel: 0844 800 3456 for assistance.
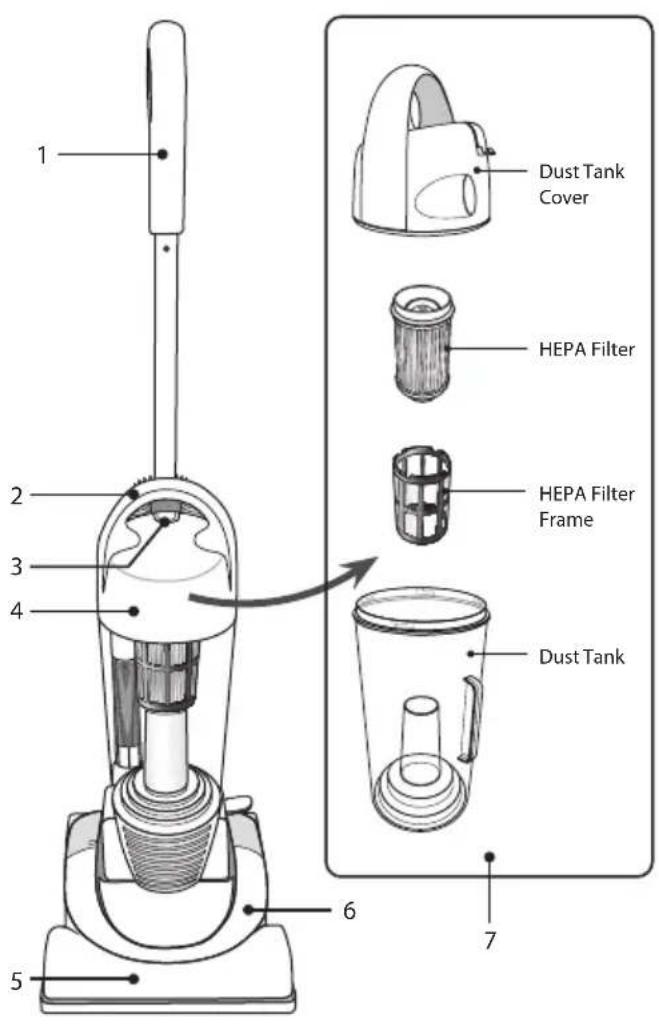
Front View Back View
text_image
1 2 3 4 5 6 7 Dust Tank Cover HEPA Filter HEPA Filter Frame Dust Tank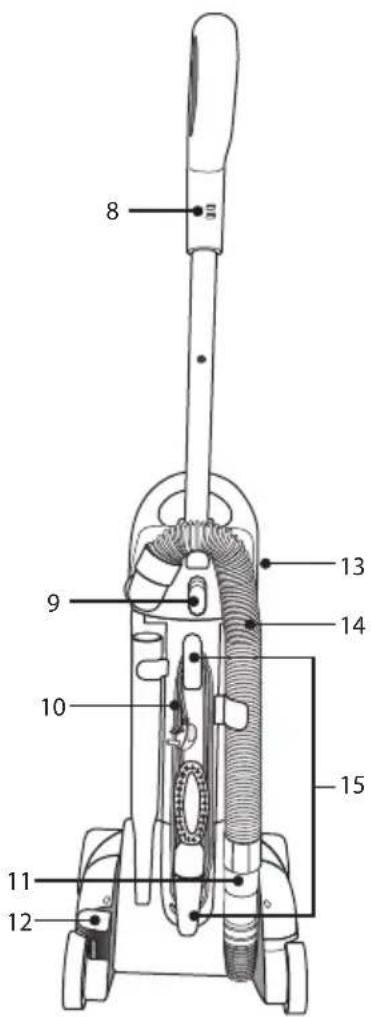
text_image
8 9 10 11 12 13 14 15- Extendable Handle
- Carrying Handle
- Dust Tank Assembly Release Button
- Main Body
- Power Head
- Belt Chamber
-
Dust Tank Assembly
-
Mains Cable Hook
- Handle Release Button
- Mains Cable
- Lower Hose Blockage Clean Out
- Power Head Release Pedal
- On/Off Switch
- Hose
- Mains Cable Holder
Handle Release

Before getting started, you may need to insert the handle into the main unit. Push down firmly until handle locks into place.
- Press the handle release button until you hear a click. Then lift the handle to an upright position, the handle will lock automatically.
- To lower the handle, press the handle release button, and push down gently but firmly.
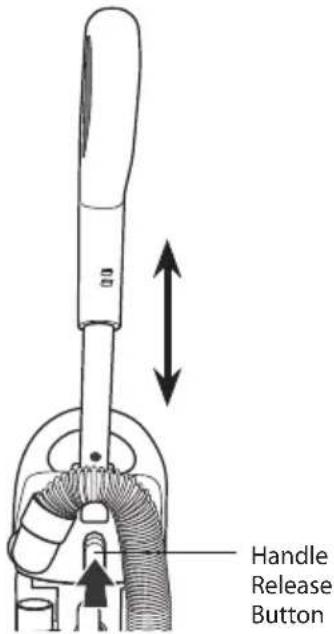
text_image
Handle Release ButtonUsing the Mains Cable Holders
- To quick release the mains cable, simply rotate the upper mains cable holder to unwrap the mains cable. Hang the unwrapped mains cable on the mains cable before using the vacuum cleaner.

text_image
Mains Cable Holder Mains Cable Hook- To store the mains cable, make sure the upper mains cable holder is in an upright position. Wrap the mains cable into place by wrapping in a clockwise direction around at the lower mains cable holder first. Don't over tighten the mains cable as this may damage the mains cable.

Using the Vacuum Cleaner
- Turn the mains cable holder to release the mains cable.
- Plug the mains cable into the mains socket.
- Push down on the handle release pedal to release the unit.
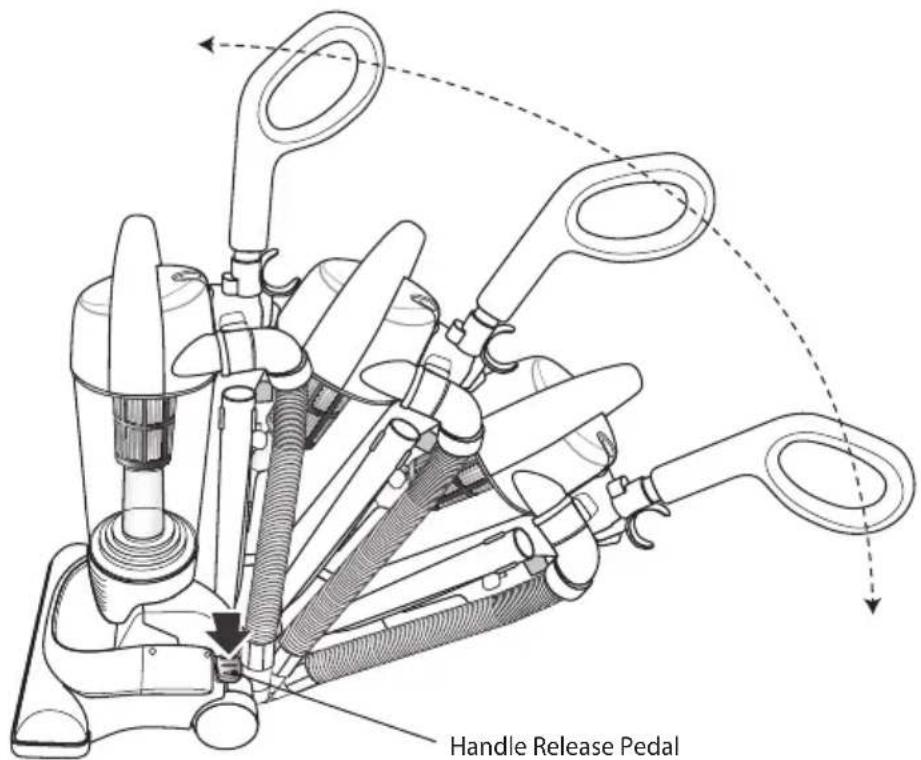
text_image
Handle Release Pedal- Switch the On/Off Switch to the "I" position to turn the vacuum cleaner on.
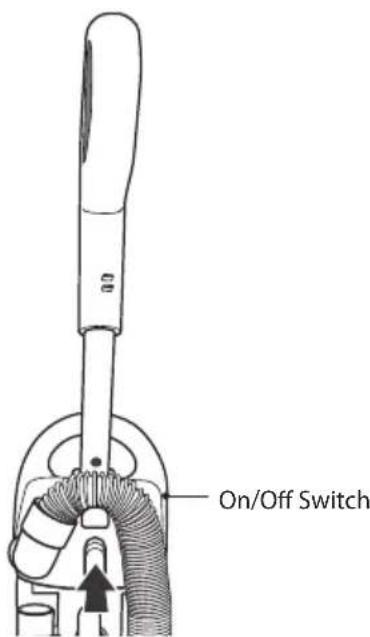
text_image
On/Off Switch
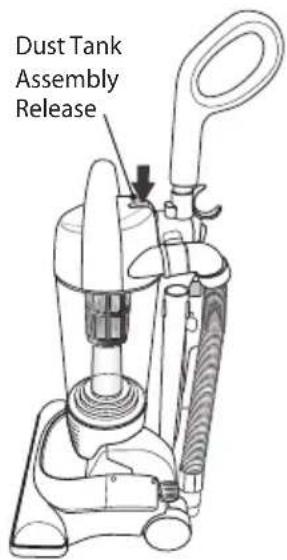
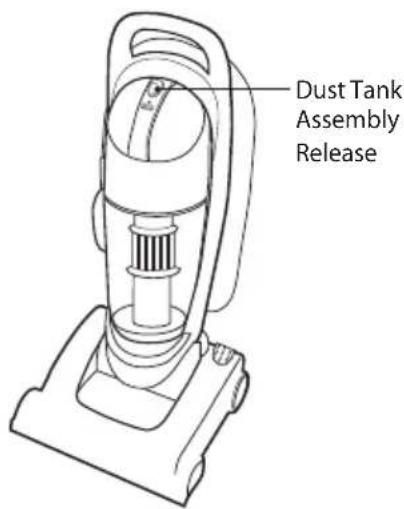
Removing and Emptying the Dust Tank

To reduce the risk of electric shock, the power cord must be disconnected before removing the dust tank or dust tank filter; changing the filters; or performing maintenance/trouble shooting checks. The "Dust Tank" must always be emptied when the dirt level reaches the "MAX" line on the dust tank to maintain optimum performance.
- Press the dust tank assembly release button.
text_image
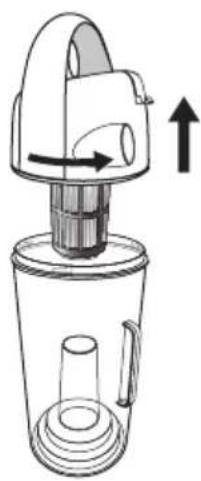
Dust Tank Assembly Release- Empty the dust tank by opening the trap door by twisting the lid to the unlock icon 🔒.
natural_image
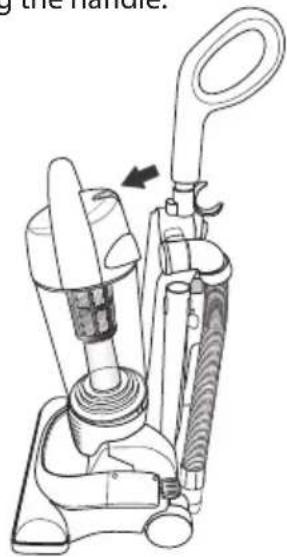
Line drawing of a hand-operated blender with directional arrows indicating motion (no text or symbols)- Remove the dust tank assembly by lifting it out of the vacuum cleaner using the handle.
natural_image
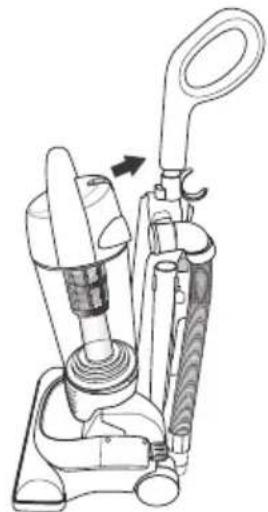
Line drawing of a vacuum cleaner with handle and internal components (no text or symbols)- Align the ✗ the on the lid and tank. Twist the lid to 🔒. Return the dust tank assembly back to the unit.
natural_image
Line drawing of a vacuum cleaner device with handle and internal components (no text or symbols)
To obtain the best result from your cleaner the dust tank needs to be cleaned regularly, otherwise the airflow and cleaning power will be reduced. When performance deteriorates, the dust tank should be cleaned. Check if there are any blockages in the accessories or tubes and follow the filter cleaning instructions for optimum performance.

The washable HEPA dust tank filter will stop 99.97% of all particles as small as 0.3 microns-many times smaller than a human hair. The filter stops most of these tiny particles and airborne allergens from re-entering the air you breathe. Because of this incredible filtration performance, the HEPA dust tank filter will quickly accumulate many fine dust particles inside the white filter folds that are difficult to see but which will eventually block or reduce your suction power, if not cleaned properly.
- To remove the HEPA filter, unlock and remove the dust tank cover by turning the cover anti-clockwise.
- Remove the washable HEPA filter from the dust tank by turning the cover.
- Vigorously tap the HEPA filter on a hard surface until no more dust can be seen falling out.
- Alternatively, the HEPA filter may also be washed by running it under the tap. We recommend that you wash the filter once a week or when the suction appears to have been reduced. Always allow 24 hours for drying before inserting it back into the vacuum cleaner.

natural_image
Diagram of a mechanical device with directional arrows indicating motion or force (no text or symbols)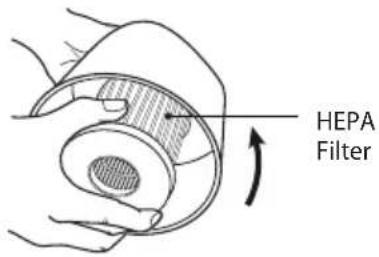
text_image
HEPA Filter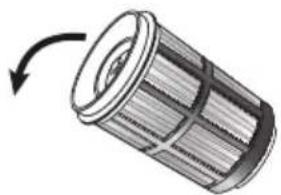
natural_image
Diagram of a cylindrical mechanical component with internal structure and rotation arrow (no text or symbols)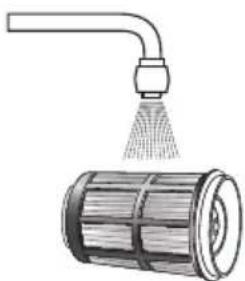
natural_image
Illustration of a spray gun dispensing water onto a cylindrical container (no text or symbols)
- The white material in the HEPA filter will discolour over time. This is NORMAL and will NOT affect the performance of the filter.
- Never overfill the dust tank. Remove dirt and clean the HEPA filter each time the dust tank is emptied. Failure to keep the filter clean could result in the motor becoming damaged.

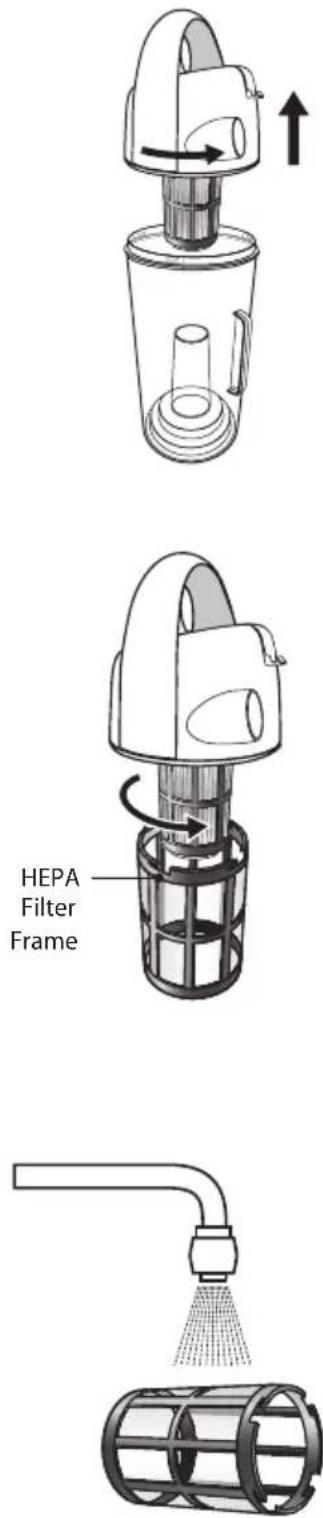
Cleaning the HEPA Filter Frame
-
Unlock and remove the dust tank cover by turning the cover anti-clockwise.
-
Unlock and remove the filter frame from the dust tank by turning the dust tank cover anti-clockwise.
-
Rinse the frame in lukewarm water by running it under the tap to remove any dust that is adhering to the frame. Do NOT place in dishwasher.
-
Make sure the filter frame is completely dry before reinserting it back into the dust tank.

Changing and Cleaning the Motor Protection Filter

- Never use the vacuum cleaner without the motor filter protection and exhaust filter installed, otherwise damage to the vacuum cleaner may occur.
-
Failure to keep the filters clean, will result in a loss of performance.
-
Unplug the vacuum cleaner from the mains socket.
- Press the dust tank assembly release.
text_image
Dust Tank Assembly Release- Pull the dust tank out of the vacuum cleaner.
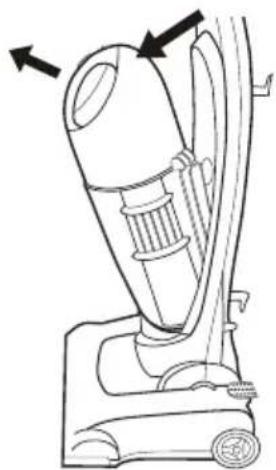
natural_image
Line drawing of a vacuum cleaner with directional arrows indicating motion (no text or symbols)- Remove the Motor Protection filter and clean in warm soapy water. Ensure the filter is totally dry before re-assembly.
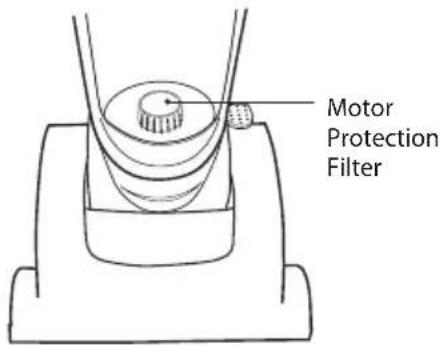
text_image
Motor Protection Filter- Reinsert the filter and dust tank.

Inserting wet filters into the vacuum cleaner will create an electrical hazard.

Never use the vacuum cleaner without the dust tank installed, otherwise damage to the vacuum cleaner may occur.
- Unplug the vacuum cleaner from the mains socket.
- Pull the dust tank assembly out of the vacuum cleaner.

natural_image
Technical line drawing of a vacuum cleaner device with handle and valve mechanism (no text or symbols)- Unlock and remove the dust tank cover by turning the cover forward the 🔒.
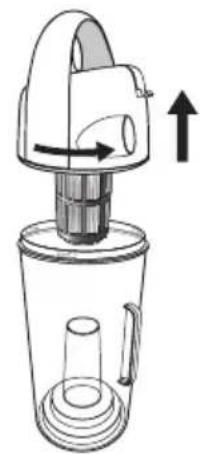
natural_image
Line drawing of a blender with handle and spout, showing internal structure and directional arrow (no text or symbols)- Clean the dust tank in warm soapy water. Ensure the dust tank is totally dry before re-assembly.

text_image
Dust Tank- Reassemble the dust tank and reinsert it back into the vacuum cleaner.

• We recommend cleaning the dust tank at regular intervals. • Inserting a wet dust tank into the vacuum cleaner will create an electrical hazard.
Should the drive belt become worn or it slips, you can replace the drive belt.
-
Switch Off the vacuum cleaner and unplug from the mains socket.
-
Make sure the vacuum cleaner is locked in its upright position.
-
Carefully lie the vacuum cleaner down and remove the 6 fixing screws. Ensure you keep all the screws in a safe place.
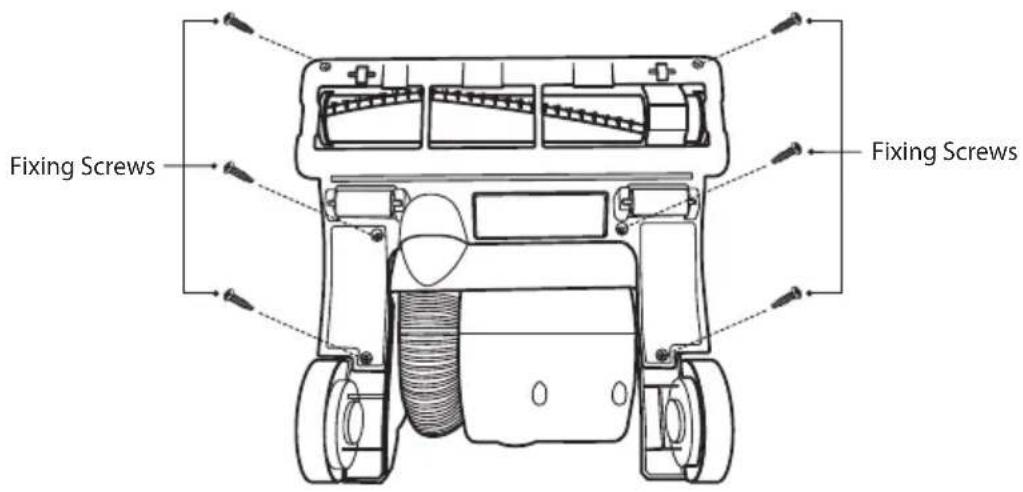
text_image
Fixing Screws Fixing Screws- Take off the cover of the power head starting from the back of the power head.
- Remove the roller brush lifting it firmly upwards to release it.
- Slide out the belt from the rolling rod.
- Replace the worn out drive belt with a new one (not included). Place the new belt drive onto the rolling rod. Carefully stretch the new belt over the roller brush and ensure it is correctly fitted before reinserting the roller brush.
- Refit the cover and secure with the 6 fixing screws.
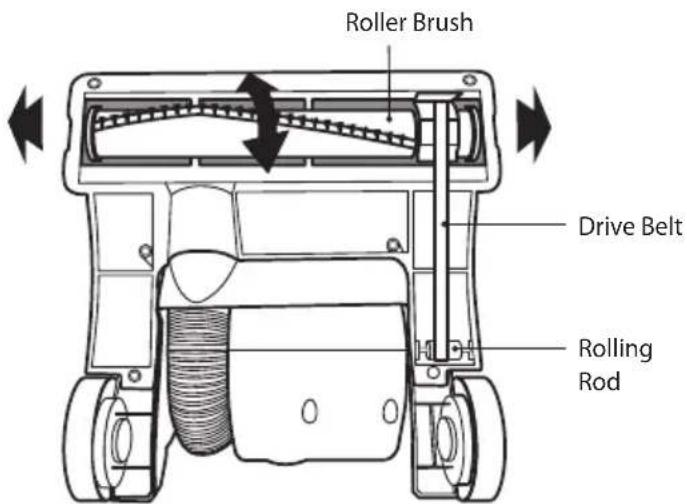
text_image
Roller Brush Drive Belt Rolling Rod
Only use the right belt. Using another belt could create a hazard and would invalidate the warranty.
| Problem Solution | |
| Vacuum cleaner does not work. | Not properly plugged into the mains socket. Plug in firmly.No electricity in mains wall socket. Check fuse or breaker.On/Off switch not turned on. Push On/Off switch to on. |
| Suction performance is reduced. | Full or clogged dust cup. Clean dust cup.Clogged nozzle or dust inlet port. Remove obstruction.Clogged hose. Remove obstruction.Broken belt. Replace with a new one.Host not inserted fully. Push hose in securely.Dirty HEPA filters. Clean HEPA filters. |
| Agitator does not turn. | Broken belt. Replace the belt.Belt installed incorrectly. Reinstall the belt and check that it is clean and does not need changing. |

Specifications
| Model L14VUR12 | |
| Voltage 220 ~ 240V ~ 50Hz | |
| Power Consumption 1200 (Nominal), 1400W (Max.) | |
| Dust Tank Capacity 2.8 Litres | |
| NOTE: If you require a replacement for any of the items listed below, please quote their corresponding part numbers: | |
| Replacement Part Part Number | |
| Dust Tank Cover L14VUR12 - 003 | |
| Dust Tank L14VUR12 - 008 | |
| HEPA Filter L14VUR12 - 005 | |
| HEPA Filter Frame L14VUR12 - 006 | |
| Motor Protection Filter L14VUR12 - 026 | |
| Screws L14VUR12 - 031 | |
| Drive Belt L14VUR12 - 064 | |

Visit Partmaster.co.uk today for the easiest way to buy electrical spares and accessories. With over 1 million spares and accessories available we can deliver direct to your door the very
next day. Visit www.partmaster.co.uk or call 0844 800 3456 (UK customers only). Calls charged at National Rate.
This symbol on the product or in the instructions means that your electrical and electronic equipment should be disposed at the end of its life separately from your household waste. There are separate collection systems for recycling in the EU.
For more information, please contact the local authority or your retailer where you purchased the product.

natural_image
Gradient gray background with no text, symbols, or identifiable objects