L185VC15E - Vacuum Cleaner Logik - Free user manual and instructions
Find the device manual for free L185VC15E Logik in PDF.


| Product type | Canister vacuum cleaner |
| Brand | Logik |
| Model | L185VC15E |
| Dimensions (W x D x H) | Approx. 30 x 40 x 25 cm |
| Weight | Approx. 4.5 kg |
| Power consumption | 1500 W |
| Dust capacity | 1.5 L |
| Filtration system | HEPA washable filter |
| Power cord length | 6 m |
| Noise level | 78 dB(A) |
| Attachments included | Crevice tool, dusting brush, upholstery nozzle |
| Floor nozzle type | Combination floor head (carpet/hard floor) |
| Dust bag or bagless | Bagless (cyclonic) |
| Washable filter | Yes, rinse under water and dry before reuse |
| Safety features | Thermal cut-off protection, automatic cord rewind |
| Repairability | User-replaceable filters; professional service for major components |
| Warranty | 1 year manufacturer warranty |
| Manual availability | PDF download from website |
Frequently Asked Questions - L185VC15E Logik
User questions about L185VC15E Logik
0 question about this device. Answer the ones you know or ask your own.
Ask a new question about this device
Download the instructions for your Vacuum Cleaner in PDF format for free! Find your manual L185VC15E - Logik and take your electronic device back in hand. On this page are published all the documents necessary for the use of your device. L185VC15E by Logik.
USER MANUAL L185VC15E Logik
Stick/Handheld Vacuum
Instruksjonsmanual
natural_image
Exterior view of a black and silver Lianghe vacuum cleaner (no text or symbols visible)Contents
GB
Safety Warnings 4
Unpacking....19
Product Overview....20
Preparation Before Use 21
Connecting Handle to Main Body 21
Installing the Unit Stand....21
Connecting to the Brush....22
Charging the Vacuum Cleaner 23
Operation 24
Cleaning the Dust Tank and Filter 25
Cleaning the motor filter....27
Cleaning and Changing the Agitator 28
Cleaning the Agitator....28
Changing the Agitator 28
Hints and Tips....29
Specifications....29
Innhold
NO
For your continued safety and to reduce the risk of injury or electric shock, please follow all the safety precautions listed below.
- Read all the instructions carefully before using the appliance and keep them for future reference.
- Retain the manual. If you pass the appliance onto a third party make sure to include this manual.
- Check that the voltage marked on the rating label matches your mains voltage.
- Consult your dealer if you are ever in doubt about the installation, operation or safety of your appliance.
- Do not remove any fixed cover as this may expose dangerous voltages.
-
Do not allow any electrical appliance to be exposed to dripping or splashing.
-
To protect against electrical shock, do not immerse mains cable / mains adapter / mains plug, or any part of the appliance in water or other liquids.
- Never vacuum up water or any other liquids. Never vacuum up flammable substances and do not vacuum up ashes until they are cold.
- Never use the appliance without the motor protection filter. This damages the motor and shortens the life of the appliance.
• If a blockage is found in the brush or tubes / nozzle, it should be removed before use. -
Store and use the appliance well away from heat sources such as radiators or gas/electric fires.
-
Do not run over the mains cable with the appliance.
- Close supervision is necessary when any appliance is used by or near children.
- This appliance can be used by children aged from 8 years and above and persons with reduced physical, sensory or mental capabilities or lack of experience and knowledge if they have been given supervision or instruction concerning use of the appliance in a safe way and understand the hazards involved. Children shall not play with the appliance. Cleaning and user maintenance shall not be made by children unless they are older than 8 and supervised.
- Keep the appliance and its cord out of reach of children less than 8 years.
• Children should be supervised to ensure that they do not play with the appliance.
- Do not point the tube / nozzle or any other accessory at the eyes, ears or mouth during operation.
- Unplug the appliance from the mains socket when it is not in use and before replacing filter.
- Allow the appliance to cool completely before cleaning or storing.
- Do not use the appliance for other uses than its intended use.
- The use of accessories not recommended by the appliance manufacturer may cause injuries.
- Do not use the appliance outdoors.
- Do not operate an appliance with a damaged mains cable or mains plug, or in an abnormal state. If the mains cable is damaged it must be replaced by the manufacturer, its service agent, or similarly qualified persons in order to avoid a hazard.
- Do not continue to operate the appliance if you are in any doubt about it working normally (e.g. abnormal noise, smell, smoke), or if it is damaged in any way - switch off, withdraw the mains plug / mains adapter and consult your dealer.
• Any maintenance and repair must be handled by a professional technician. Do not try to repair by yourself.
• This appliance should only be used with the power adapter provided.
- Check and ensure the brush is rotating normally during operation.
- The cord of the mains adapter cannot be replaced; if the cord is damaged, the mains adapter should be scrapped.
• Make sure all the parts and accessories are properly installed before use.
Thank you for purchasing your new Logik Vacuum Cleaner.
We recommend that you spend some time reading this instruction manual in order that you fully understand all the operational features it offers. You will also find some hints and tips to help you resolve any issues.
Read all the safety instructions carefully before use and keep this instruction manual for future reference.

Unpacking
Remove all packaging from the unit. Retain the packaging. If you dispose of it, please do so according to any local regulations.
The following items are included:


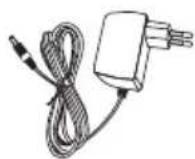
Mains Adapter

Instruction Manual
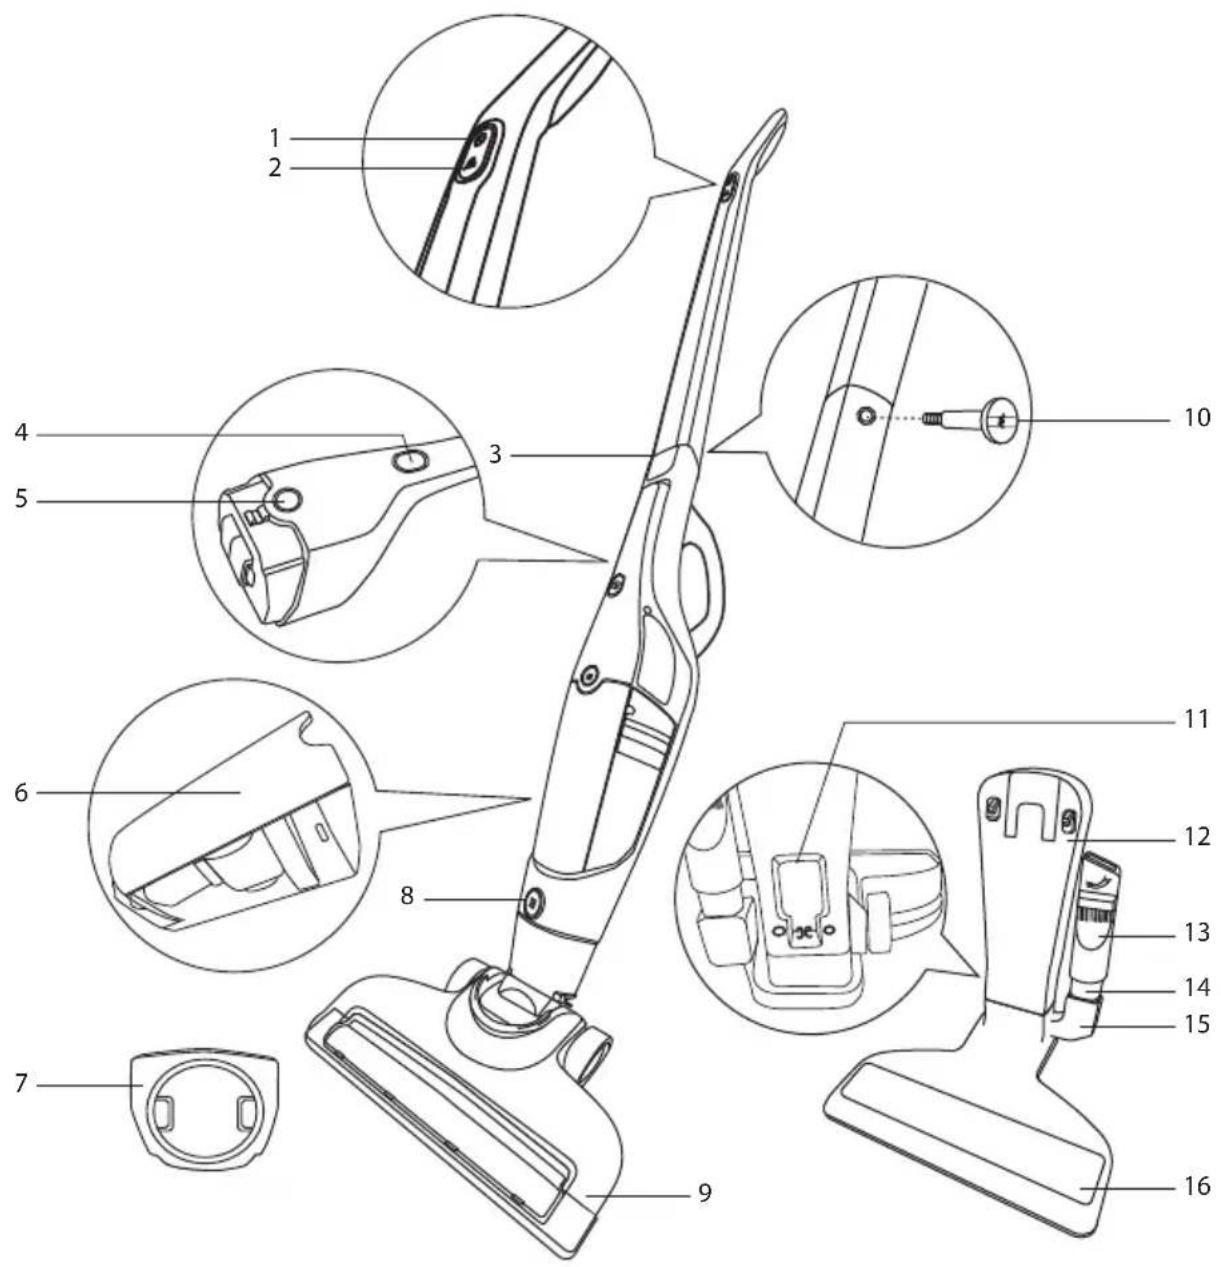
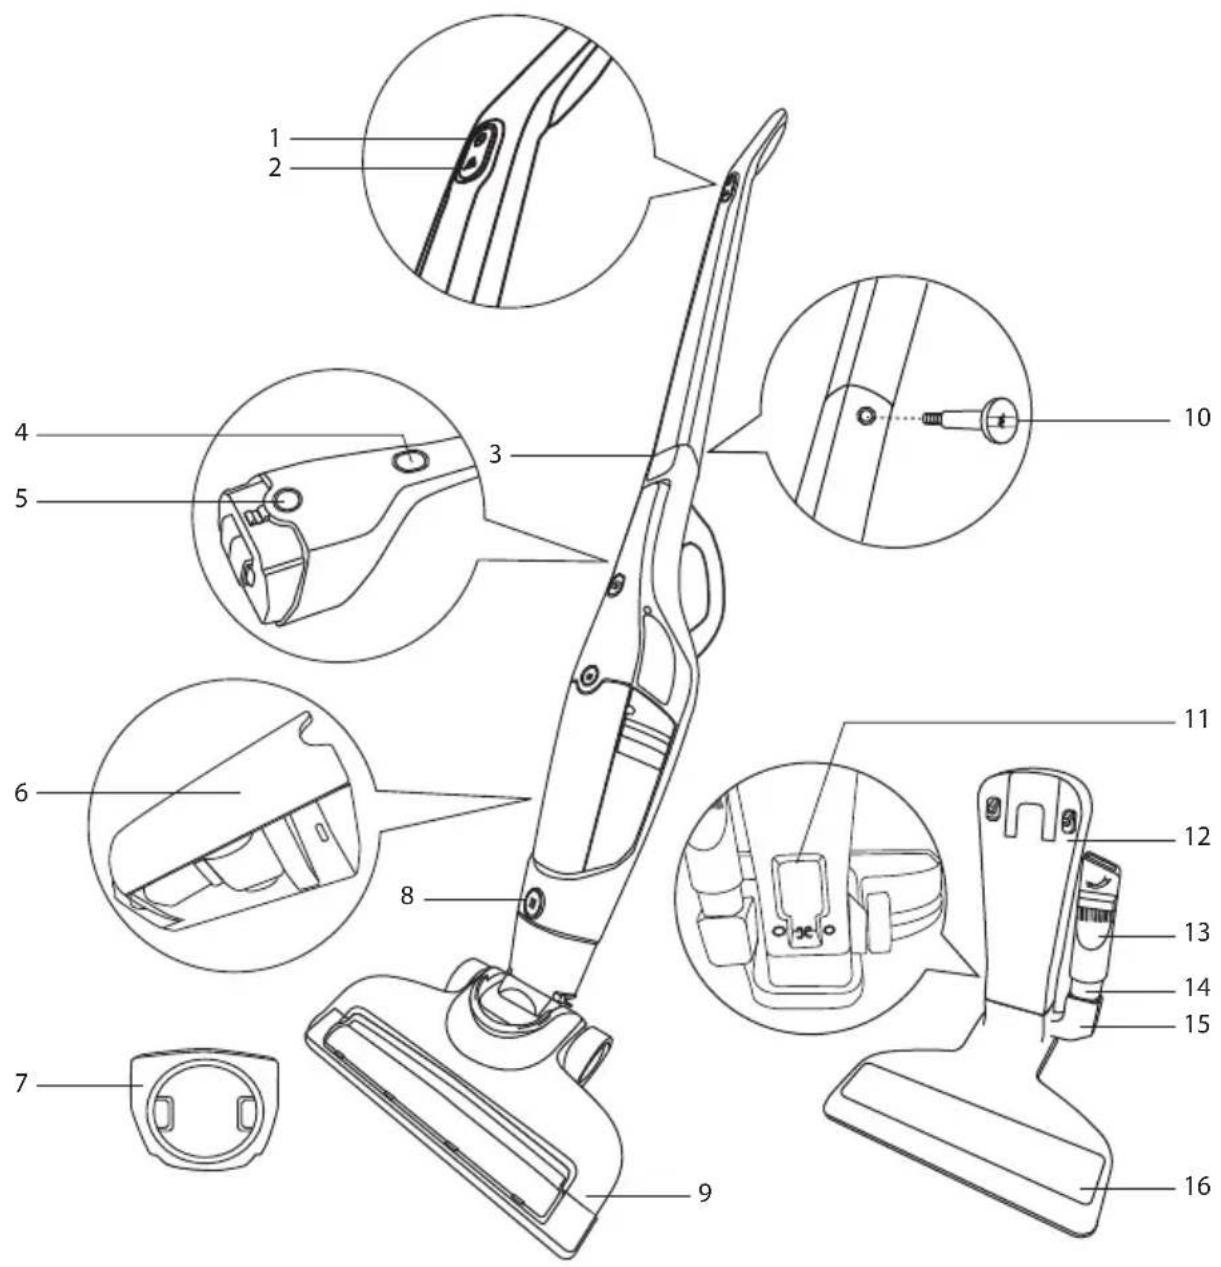
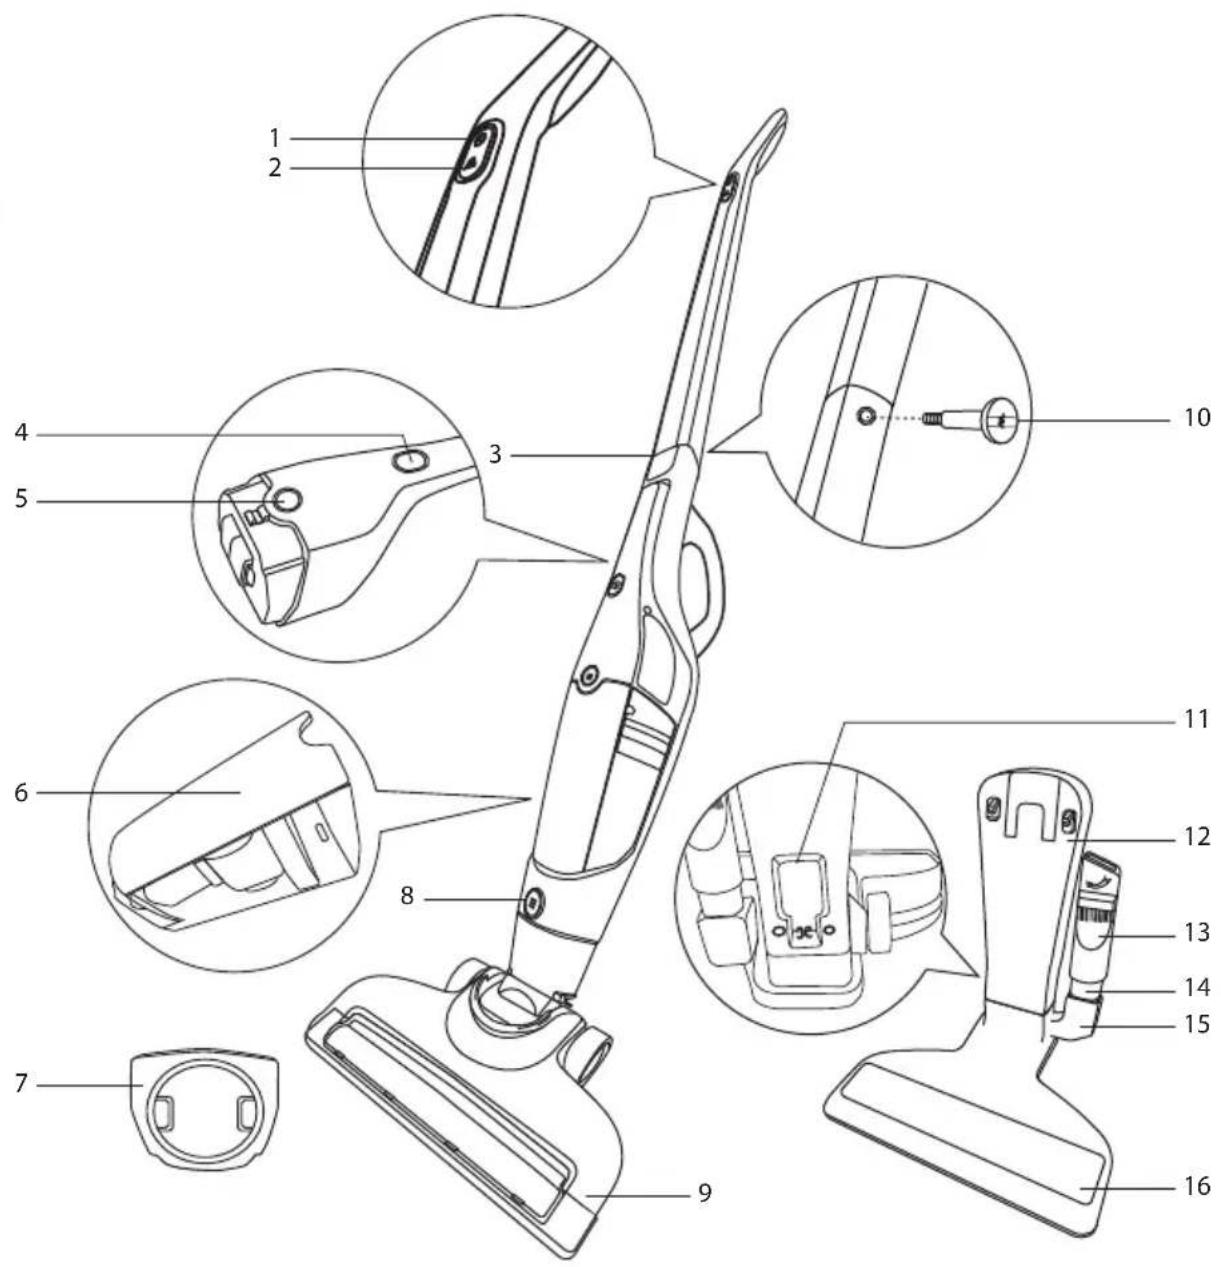
- Handle Power Button
- Speed Control Buton
- Main Unit Release Button
- Main Unit Power Button (LED indicator)
-
Dust Tank Release Button
-
Dust Tank
- Filter
- Brush Release Button
- Brush
- Locking Screw
-
Power Socket
-
Power Socket Stand
- Nozzle
- Nozzle Tube
- Nozzle Holder
- Stand
Connecting Handle to Main Body
1.

natural_image
Line drawing of a mechanical device with a handle and lever mechanism (no text or symbols)2.
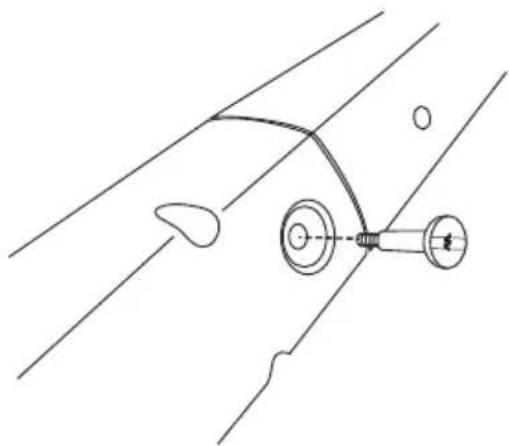
natural_image
Pure mechanical diagram showing a linkage mechanism with no text or symbolsInstalling the Unit Stand
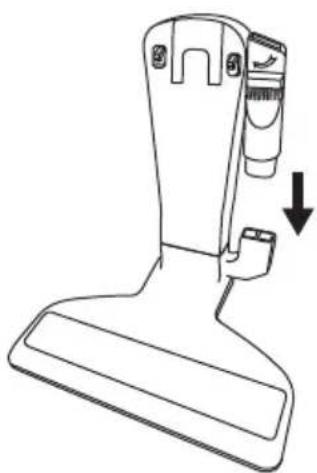
1.
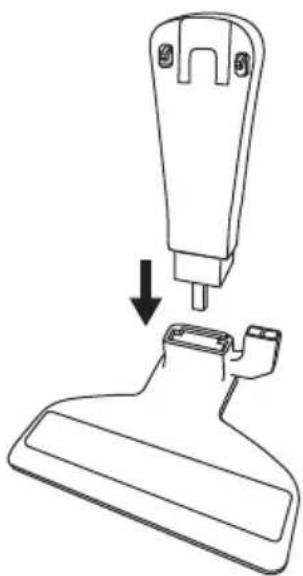
natural_image
Line drawing of a mechanical component with a downward arrow indicating a process or assembly (no text or symbols present)GB
2.

natural_image
Diagram showing a cylindrical object being cut into a conical shape, with an arrow indicating the process (no text or symbols present)3.

natural_image
Line drawing of a vacuum cleaner's handle and lever mechanism (no text or symbols)Connecting to the Brush

natural_image
Line drawing of a vacuum cleaner with a handle and base, showing the component being inserted (no text or symbols present)Charging the Vacuum Cleaner
GB
1.

natural_image
Line drawing of a mechanical assembly with a hand holding a spring and a valve, showing no text or symbols.2.

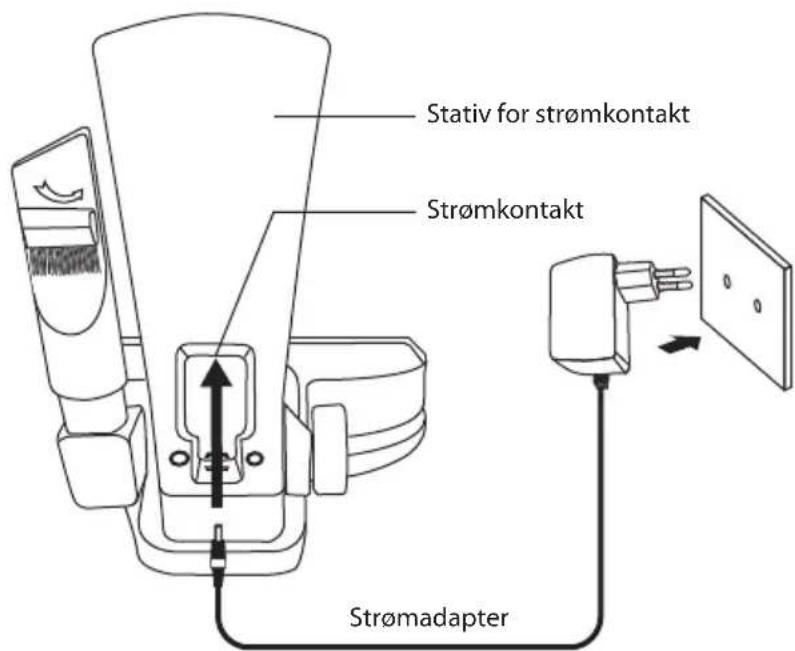
- When charging, the red light will illuminate.
- When charged, the green light will illuminate.

Always unplug from the mains socket when no vacuum cleaner is charging.

- Always unplug from the mains socket when the vacuum cleaner is in use. - Do not vacuum large objects as they may cause blockage to the brush and tube/nozzle.
Cleaning as Upright Cleaner
- Pull the cleaner off the stand. Hold down the stand while pulling the cleaner off the stand.
- Press the Handle Power Button to turn the vacuum cleaner on or off.
- Adjust the suction power by pressing the Speed Control Button. There are 2 speed levels.
Cleaning as Handheld Cleaner
- Press the Main Unit Release Button to release the handheld unit from the cradle.
- Insert the nozzle (together with the nozzle tube) into the opening of the handheld unit. You can adjust the nozzle head to use.

natural_image
Line drawing of a handheld device with ports and wiring, shown from two different angles (no text or symbols)- Press the Main Unit Power Button to turn the vacuum cleaner on or off. Only 1 speed level is available when using as handheld cleaner.
- After using, put back the handheld unit into the cradle until a click is heard.

• Steady green LED means the cleaner is operating in full power.
- Flashing green LED means the cleaner is operating in half (or less than half) power.

• Always ensure the unit is switched off and unplug from the mains before emptying or washing the dust tank.
- The dust tank must always be emptied when the dirt level reaches the "MAX" line on the dust tank to maintain optimum performance. You cannot empty the dust tank when the cleaner is fully assembled.
• Always make sure the dust tank is completely dry before installing back to the main unit. A damp dust tank will create electrical hazard.
• Filters should be cleaned regularly to maintain optimum performance.
• Always unplug from the mains socket before cleaning the filters.
• Always make sure the filters are completely dry before installing back. Damp filters will create electrical hazard.
- Press the Main Unit Release Button to remove the handheld from the cradle.

natural_image
Line drawing of a vacuum cleaner with an arrow indicating motion (no text or symbols)- Press the Dust Tank Release Button to remove the dust tank from the handheld unit.

natural_image
Technical line drawing of a handheld device with internal components (no text or symbols)- Take out the nozzle filter bracket and shroud assembly.
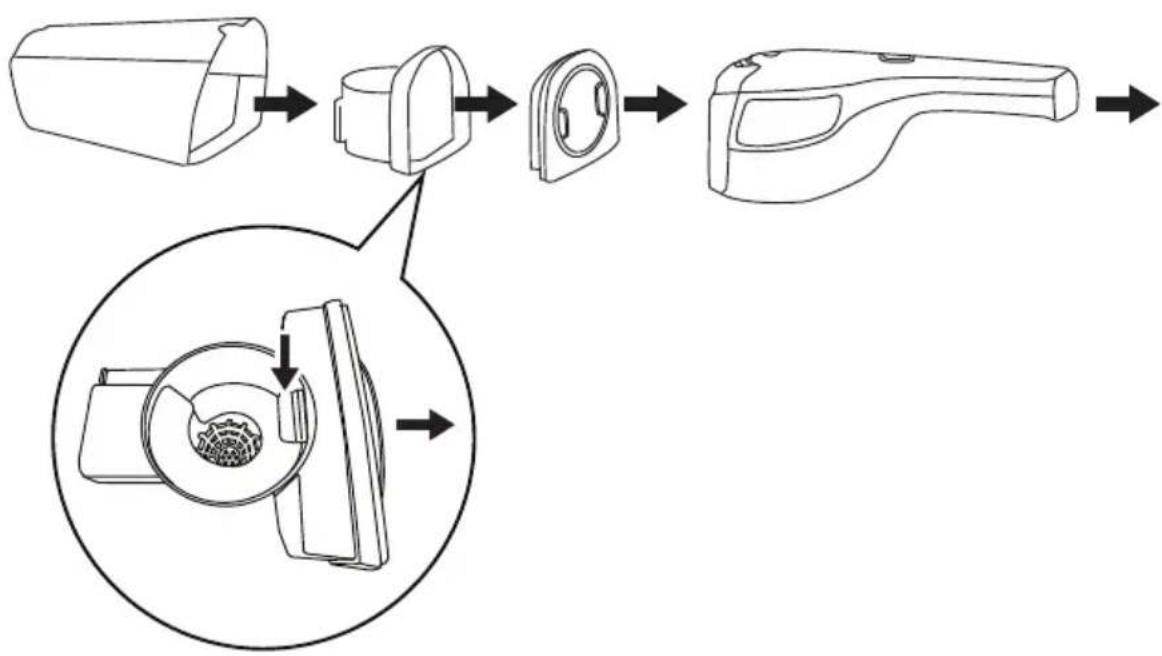
flowchart
graph TD
    A["Initial Device"] --> B["Internal Component 1"]
    B --> C["Internal Component 2"]
    C --> D["Internal Component 3"]
    D --> E["Final Device"]
    style A fill:#f9f,stroke:#333
    style E fill:#bbf,stroke:#333
    subgraph Internal Components
        F["Internal Component 1"] --> G["Internal Component 2"]
        G --> H["Internal Component 3"]
        H --> I["Internal Component 4"]
        I --> J["Internal Component 5"]
        J --> K["Internal Component 6"]
        K --> L["Internal Component 7"]
        L --> M["Internal Component 8"]
        M --> N["Internal Component 9"]
        N --> O["Internal Component 10"]
        O --> P["Internal Component 11"]
        P --> Q["Internal Component 12"]
        Q --> R["Internal Component 13"]
        R --> S["Internal Component 14"]
        S --> T["Internal Component 15"]
        T --> U["Internal Component 16"]
        U --> V["Internal Component 17"]
        V --> W["Internal Component 18"]
        W --> X["Internal Component 19"]
        X --> Y["Internal Component 20"]
        Y --> Z["Internal Component 21"]
        Z --> AA["Internal Component 22"]
        AA --> AB["Internal Component 23"]
        AB --> AC["Internal Component 24"]
        AC --> AD["Internal Component 25"]
        AD --> AE["Internal Component 26"]
        AE --> AF["Internal Component 27"]
        AF --> AG["Internal Component 28"]
        AG --> AH["Internal Component 29"]
        AH --> AI["Internal Component 30"]
        AI --> AJ["Internal Component 31"]
        AJ --> AK["Internal Component 32"]
        AK --> AL["Internal Component 33"]
        AL --> AM["Internal Component 34"]
        AM --> AN["Internal Component 35"]
        AN --> AO["Internal Component 36"]
        AO --> AP["Internal Component 37"]
        AP --> AQ["Internal Component 38"]
        AQ --> AR["Internal Component 39"]
        AR --> AS["Internal Component 40"]
        AS --> AT["Internal Component 41"]
        AT --> AU["Internal Component 42"]
        AU --> AV["Internal Component 43"]
        AV --> AW["Internal Component 44"]
        AW --> AX["Internal Component 45"]
        AX --> AY["Internal Component 46"]
        AY --> AZ["Internal Component 47"]
        AZ --> BA["Internal Component 48"]
        BA --> BB["Internal Component 49"]
        BB --> BC["Internal Component 50"]
        BC --> BD["Internal Component 51"]
        BD --> BE["Internal Component 52"]
        BE --> BF["Internal Component 53"]
        BF --> BG["Internal Component 54"]
        BG --> BH["Internal Component 55"]
        BH --> BI["Internal Component 56"]
        BI --> BJ["Internal Component 57"]
        BJ --> BK["Internal Component 58"]
        BK --> BL["Internal Component 59"]
        BL --> BM["Internal Component 60"]
        BM --> BN["Internal Component 61"]
        BN --> BO["Internal Component 62"]
        BO --> BP["Internal Component 63"]
        BP --> BQ["Internal Component 64"]
        BQ --> BR["Internal Component 65"]
        BR --> BS["Internal Component 66"]
        BS --> BT["Internal Component 67"]
        BT --> BU["Internal Component 68"]
        BU --> BV["Internal Component 69"]
        BV --> BW["Internal Component 70"]
        BW --> BX["Internal Component 71"]
        BX --> BY["Internal Component 72"]
        BY --> BZ["Internal Component 73"]
        BZ --> CA["Internal Component 74"]
        CA --> CB["Internal Component 75"]
        CB --> CC["Internal Component 76"]
        CC --> CD["Internal Component 77"]
        CD --> CE["Internal Component 78"]
        CE --> CF["Internal Component 79"]
        CF --> CG["Internal Component 80"]
- Remove the nozzle filter sponge.
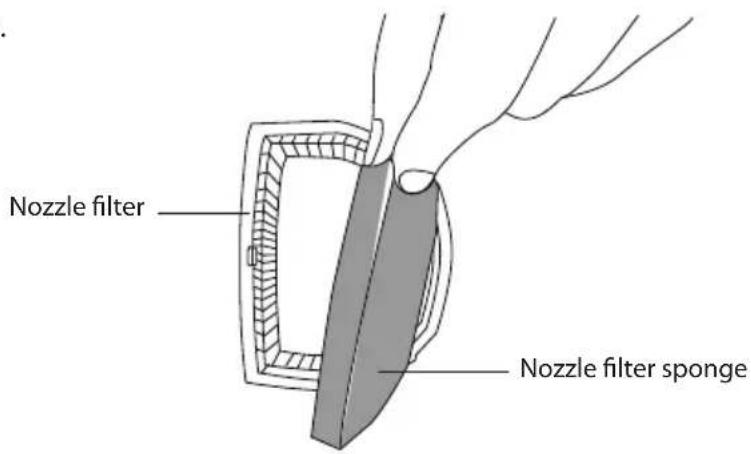
-
Throw away the dirt from the dust tank.
-
Wash all of them under water. For the shroud assembly, make sure that no dirt is hidden inside the valve.
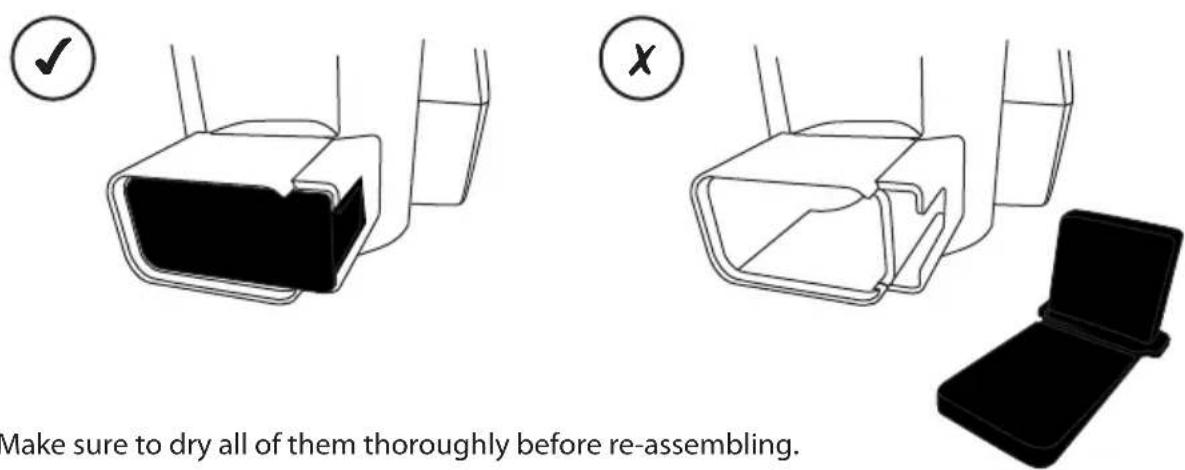

natural_image
Line drawing of a device component with four sequential steps: opening, close-up, close-up, and ending (no text or symbols)- Re-attach the dust tank to the handheld unit until a click is heard.
Cleaning the motor filter
-
Take out the motor filter from the motor body.
-
Wash it under water.
-
Replace only after drying thoroughly.


• The agitator should be replaced if worn out to maintain optimum performance.
• Always unplug from the mains socket before cleaning/changing the agitator.
- Only replace with the same type. Using a different type may cause damage or hazard.
- The agitator shaft collar should be kept clean to maintain proper agitator rotation.
Cleaning the Agitator
- Press the Brush Release Button to remove the brush from the main body.
- Use a coin to turn the lock to the unlock position.
- Remove the agitator cover.
- Take out the agitator. Pull off the agitator shaft collar. Remove any dust or hairs that are tangled. Push back the agitator shaft collar. Put back the agitator.

- Put back the agitator cover and turn the lock to the lock position.
Changing the Agitator
- Press the Brush Release Button to remove the brush from the main body.
- Use a coin to turn the lock to the unlock position.
- Remove the agitator cover.
- Replace the old agitator with the new one.
- Put back the agitator cover and turn the lock to the lock position.
| Problem Possible Causes Remedy | ||
| Green and red LEDs flash together around 3 times then switch off. | Battery failure. Recharge the unit. If still fails, consult technical support or your local dealer. | |
| Green and red LEDs flash alternately around 3 times then switch off. | Fault in the unit.Over-current during charging.The brush does not move normally and smoothly during operation.Overloading of the motor.Short circuit | Check if using the correct mains adapter model.Clean the agitator shaft collar.Empty and wash the dust tank.Consult technical support or your local dealer. |
| Brush stops rotating during operation. | Agitator shaft collar is dirty.Dirt level in the dust tank exceeds maximum capacity.Filters and shroud assembly are dirty. | Clean the agitator shaft collar.Empty and wash the dust tank.Clean the filters and shroud assembly. |
| Brush does not rotate while in parking position. | This is not a fault. | |

Specifications
| Model L185VC15E | |
| Voltage 220-240V ~ 50/60Hz | |
| Maximum Dust Tank Capacity 0.15L | |
| Power Adapter Model YLS0241A E222050 | |
| Battery Model 18650-5S1P | |
| Battery Rating 18V, 2150mAh, 18650 Li-on | |
| Brush Head Rated Voltage 18V DC | |
We continually strive to improve our products, specifications may change without prior notice.
natural_image
Simple line drawing of a mechanical component or bracket (no text or symbols)natural_image
Line drawing of a mechanical component with a handle and base (no text or symbols)Børste

Strømadapter

Instruksjonsmanual
natural_image
Line drawing of a mechanical device with a handle and lever mechanism (no text or symbols)2.

natural_image
Pure technical line drawing of a mechanical component with no text or symbolsnatural_image
Line drawing of a mechanical component with a downward arrow indicating a process or assembly (no text or symbols present)2.

natural_image
Diagram showing a cylindrical object being cut into a conical shape, with an arrow indicating the process (no text or symbols present)3.

natural_image
Line drawing of a vacuum cleaner's handle and base (no text or symbols)natural_image
Line drawing of a vacuum cleaner with a handle and base, showing the component being inserted (no text or symbols present)NO
natural_image
Line drawing of a mechanical assembly with a hand pressing a button (no text or symbols)2.
natural_image
Line drawing of a handheld device with ports and connectors, shown from two different angles (no text or symbols)natural_image
Line drawing of a vacuum cleaner with an arrow indicating the handle (no text or symbols present)natural_image
Technical line drawing of a handheld device with internal components (no text or symbols)- Ta ut munnstykkfilterbraketten og omhylningssammenstillingen.

flowchart
graph TD
    A["Plastic housing"] --> B["Internal component"]
    B --> C["Close-up part of door"]
    C --> D["Final handle"]
natural_image
Line drawing of a device component with three sequential steps: opening, holding, and exiting (no text or symbols)Bytte agitatoren
natural_image
Simple line drawing of a mechanical component or bracket (no text or symbols)natural_image
Line drawing of a mechanical component with a handle and base (no text or symbols)Borste
Nätadapter

Bruksanvisning
SE
natural_image
Line drawing of a mechanical tool or device with an arrow indicating direction (no text or symbols present)2.

natural_image
Pure technical line drawing of a mechanical component with no text or symbolsnatural_image
Line drawing of a mechanical component with a downward arrow indicating a process or assembly (no text or symbols present)
natural_image
Diagram showing a cylindrical object being cut into a conical shape, with an arrow indicating the process (no text or symbols present)SE
natural_image
Line drawing of a vacuum cleaner's handle and lever mechanism (no text or symbols)natural_image
Line drawing of a vacuum cleaner with a handle and base, showing the component being inserted (no text or symbols present)Ladda dammsugaren
1.

natural_image
Line drawing of a mechanical assembly with a hand holding a tool, showing no text or symbols.2.

natural_image
Line drawing of a medical device with two views: top shows internal components, bottom shows external connectors (no text or symbols)natural_image
Line drawing of a vacuum cleaner with an arrow indicating the handle (no text or symbols present)natural_image
Technical line drawing of a mechanical tool or bracket assembly (no text or symbols)natural_image
Simple line drawing of a container with a checkmark icon (no text or symbols)
natural_image
Simple line drawing of a device with a cross mark and a black case (no text or symbols)natural_image
Line drawing of a device with three sequential steps: opening, inserting into a housing, and finally closing (no text or symbols)natural_image
Simple line drawing of a mechanical clip or bracket (no text or symbols)natural_image
Line drawing of a mechanical component with a handle and base (no text or symbols)Harja

Verkkolaite

Käyttöopas

natural_image
Line drawing of a mechanical tool or connector with an arrow indicating direction (no text or symbols present)
natural_image
Pure technical line drawing of a mechanical component with no text or symbolsnatural_image
Line drawing of a mechanical device with a downward arrow indicating a process or assembly (no text or symbols present)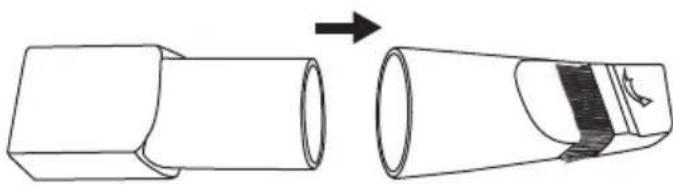
natural_image
Diagram showing a cylindrical object being cut into a conical shape, with an arrow indicating the process (no text or symbols present)
natural_image
Line drawing of a vacuum cleaner's handle and base (no text or symbols)natural_image
Line drawing of a vacuum cleaner with a handle and base, showing the process from top to bottom (no text or symbols)natural_image
Line drawing of a mechanical assembly with a hand holding a tool, showing no text or symbols.2.
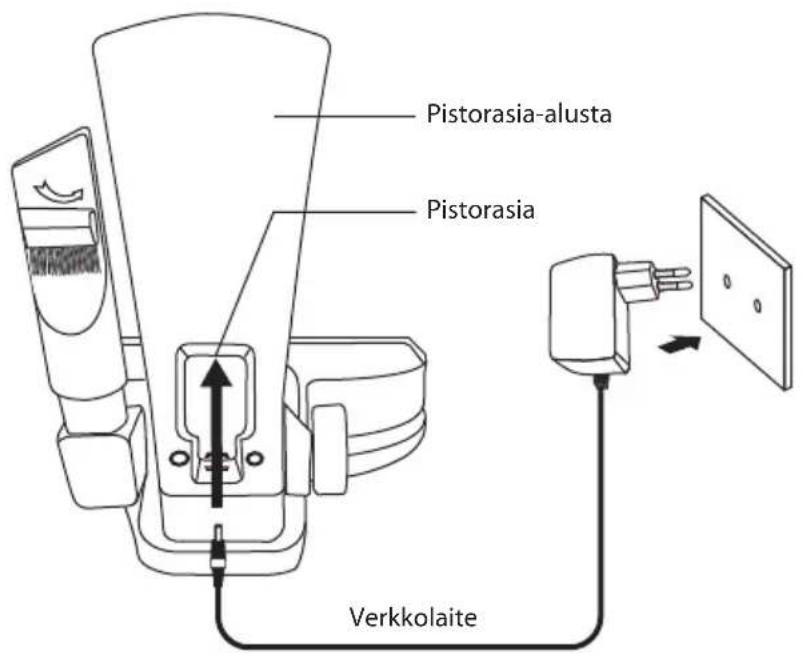
natural_image
Line drawings of a medical device with ports and connectors, shown from two different angles (no text or symbols)natural_image
Line drawing of a vacuum cleaner with an arrow indicating the handle (no text or symbols present)natural_image
Technical line drawing of a handheld device with internal components (no text or symbols)natural_image
Line drawing of a device component with four sequential steps: opening, close-up, holding case, and finally closing (no text or symbols)natural_image
Simple line drawing of a mechanical component or bracket (no text or symbols)natural_image
Line drawing of a mechanical component with a handle and base (no text or symbols)Børste

Strømadapter

Brugervejledning
DK

natural_image
Line drawing of a mechanical tool or device with an arrow indicating direction (no text or symbols present)2.

natural_image
Pure technical line drawing of a mechanical component with no text or symbolsnatural_image
Line drawing of a mechanical component with a downward arrow indicating a process or assembly (no text or symbols present)
natural_image
Diagram showing a cylindrical object being cut into a conical shape, with an arrow indicating the process (no text or symbols present)
natural_image
Line drawing of a vacuum cleaner's handle and base (no text or symbols)DK
natural_image
Line drawing of a vacuum cleaner with a handle and base, showing the process from top to bottom (no text or symbols)natural_image
Line drawing of a mechanical assembly with a hand holding a tool, showing no text or symbols.DK
2.
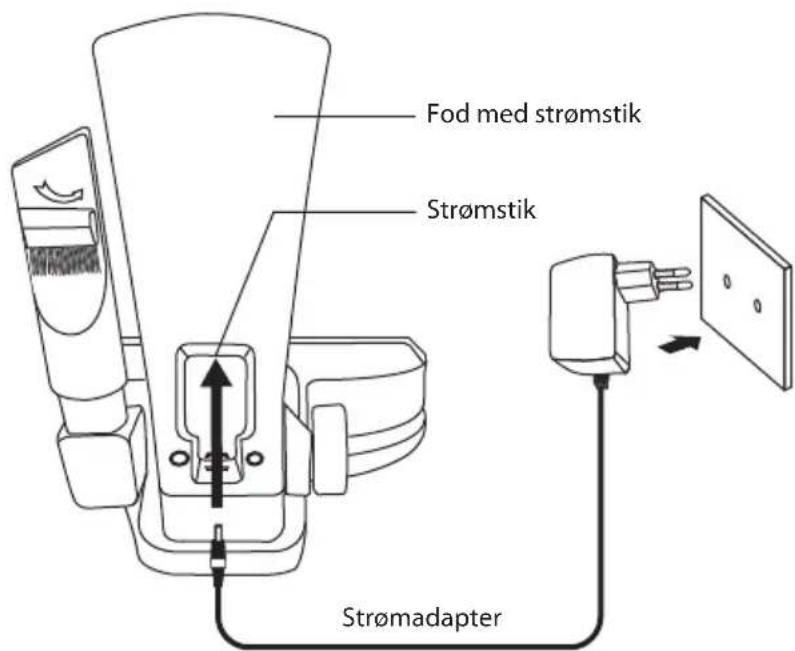
natural_image
Line drawing of a handheld device with ports and connectors, shown from two different angles (no text or symbols)natural_image
Line drawing of a vacuum cleaner with an arrow indicating motion (no text or symbols)natural_image
Technical line drawing of a handheld device with internal components (no text or symbols)flowchart
graph TD
    A["Initial Device"] --> B["Internal Component 1"]
    B --> C["Internal Component 2"]
    C --> D["Final Device"]
    D --> E["Final Device with Internal Component 3"]
natural_image
Line drawing of a device with three sequential steps: opening, closing, and ending (no text or symbols)The symbol on the product or its packaging indicates that this product must not be disposed of with your other household waste. Instead, it is your responsibility to dispose of your waste equipment by handing it over to a designated collection point for the recycling of waste electrical and electronic equipment. The separate collection and recycling of your waste equipment at the time of disposal will help conserve natural resources and ensure that it is recycled in a manner that protects human health and the environment.
For more information about where you can drop off your waste for recycling, please contact your local authority, or where you purchased your product.
Notes for battery disposal
The batteries used with this product contain chemicals that are harmful to the environment. To preserve our environment, dispose of used batteries according to your local laws or regulations. Do not dispose of batteries with normal household waste.
For more information, please contact the local authority or your retailer where you purchased the product.
NO
- Contents
- Innhold
- Thank you for purchasing your new Logik Vacuum Cleaner.
- Unpacking
- Connecting Handle to Main Body
- Installing the Unit Stand
- Charging the Vacuum Cleaner
- Cleaning as Upright Cleaner
- Cleaning as Handheld Cleaner
- Cleaning the motor filter
- Cleaning the Agitator
- Changing the Agitator
- Specifications
- Bytte agitatoren
- SE
- Ladda dammsugaren
- DK
- Notes for battery disposal
- NO
Brand : Logik
Model : L185VC15E
Category : Vacuum Cleaner