
WX80RS - Saw WORX - Free user manual and instructions
Find the device manual for free WX80RS WORX in PDF.
| Product Type | Sabre Saw |
| Brand | Worx |
| Model | WX80RS |
| Power Supply | 220-240 V ~ 50/60 Hz |
| Power Consumption | 800 W |
| No-load Speed | 0-2600 min⁻¹ |
| Stroke Length | 28 mm |
| Max. Cutting Capacity (wood) | 280 mm |
| Max. Cutting Capacity (steel) | 13 mm |
| Max. Cutting Capacity (PVC pipe) | 150 mm |
| Weight | 3.8 kg |
| Protection Class | II (double insulation) |
| Sound Pressure Level (LpA) | 84.4 dB(A) |
| Sound Power Level (LwA) | 95.4 dB(A) |
| Acoustic Uncertainty (KpA & KwA) | 3.0 dB(A) |
| Vibrations (wood cutting) | acw = 5.61 m/s², Kcw = 1.5 m/s² |
| Vibrations (metal cutting) | ahcm = 11.40 m/s², Kcm = 1.5 m/s² |
| Included Accessories | 3 blades (wood, metal, aluminium/plastic), hex key |
| Key Features | Variable speed, tool-free blade change, adjustable pivoting shoe, flush cutting, plunge cutting |
| Maintenance | Clean with a dry cloth, no user-serviceable parts, store in a dry place |
| Environmental Protection | WEEE must not be disposed of with household waste, recycle at a specialized center |
| Compliance Standards | EN 60745, EN 55014, directives 2006/42/EC and 2004/108/EC |
Frequently Asked Questions - WX80RS WORX
User questions about WX80RS WORX
0 question about this device. Answer the ones you know or ask your own.
Ask a new question about this device
Download the instructions for your Saw in PDF format for free! Find your manual WX80RS - WORX and take your electronic device back in hand. On this page are published all the documents necessary for the use of your device. WX80RS by WORX.
USER MANUAL WX80RS WORX
*Not all the accessories illustrated or described are included in standard delivery.
TECHNICAL DATA
Type WX80RS (RS-designation of machinery, representative of Reciprocating Saw)
| Voltages | 220-240V~50/60Hz |
| Power | |
| No load speed 0-2600/min | |
| Stroke length 28mm | |
| Cutting capacity max | |
| Wood (thickness) 280mm | |
| Thin pipe (diameter PVC pipe) | 150mm |
| Steel (thickness) 13mm | |
| Protection class | ☐/II |
| Weight | 3.8kg |
NOISE INFORMATION
| A weighted sound pressure | LpA: 84.4dB(A) |
| A weighted sound power | LwA: 95.4dB(A) |
| KpA&KwA | 3.0dB(A) |
| Wear ear protection when sound pressure is over | 80dB(A) |
VIBRATION INFORMATION
| Vibration total values (triax vector sum) determined according to EN 60745: | |
| Cutting into wood Vibration | ion emission value a hcw= 5.61m/s2 |
| Uncertainty Kcw= 1.5m/s2 | |
| Cutting into steel metal Vibration | vibration emission value a hcm= 11.40m/s2 |
| Uncertainty Kcm= 1.5m/s2 | |

WARNING: The vibration emission value during actual use of the power tool can differ from the declared value depending on the ways in which the tool is used dependant on the living examples and other variations on how the tool is used:
How the tool is used and the materials being cut or drilled.
The tool being in good condition and well maintained.
The use the correct accessory for the tool and ensuring it is sharp and in good condition.
The tightness of the grip on the handles and if any anti vibration accessories are used.
And the tool is being used as intended by its design and these instructions.
This tool may cause hand-arm vibration syndrome if its use is not adequately managed.

WARNING: To be accurate, an estimation of exposure level in the actual conditions of use should also take account of all parts of the operating cycle such as the times when the tool is tached off and when it is running idle but not actually doing the job. This may significantly increase the exposure level over the total working period.
Helping to minimise your vibration exposure risk.
ALWAYS use sharp chisels, drills and blades.
Maintain this tool in accordance with these instructions and keep well lubricated (where appropriate).
If the tool is to be used regularly then invest in anti vibration accessories.
Avoid using tools in temperatures of 10^ or less.
Plan your work schedule to spread any high vibration tool use across a number of days.
ACCESSIONS
Assorted blades (1pc for metal; 1pc for wood; 1pc for aluminium/plastic) 3 Hex key 1
We recommend that you purchase your accessories from the same store that sold you the tool. Use good quality accessories marked with a well-known brand name. Choose the type according to the work you intend to undertake. Refer to the accessory packaging for further details. Store personnel can assist you and offer advice.
RECIPIROCATING SAW SAFETY WARNINGS
- Hold reciprocating saw by insulated gripping surfaces, when performing an operation where the cutting accessory may contact hidden wiring. Cutting accessory contacting a "live" wire may make exposed metal parts of the power tool "live" and could give the operator an electric shock.
ADDITIONAL SAFETY RULES FOR RECIPROCATING SAW
- Always wear a dust mask.
SYMBOLS

To reduce the risk of injury, user must read instruction manual

Double insulation

Warning

Wear ear protection

Wear eye protection

Wear dust mask
Waste electrical products should not be disposed of with household waste. Please recycle where facilities exist. Check with your Local Authority or retailer for recycling advice.
OPERATING INSTRUCTIONS

NOTE: Before using the tool, read the instruction book carefully.
INTENDED USE:
The machine is intended for sawing wood, plastic, metal and building materials while resting firmly on the workpiece. It is suitable for straight and curved cuts.
1. ON/OFF SWITcH
Depress the button to start and release it to stop your tool.
2. VARIABLE SPEED cCONTROL
Your tool is equipped with a variable speed controlled trigger switch. The tool can be turned "ON" or "OFF" by squeezing or releasing the trigger. The blade plunger stroke rate can be adjusted from the minimum to maximum by the pressure you apply to the trigger. Apply more pressure to increase the speed and release pressure to decrease speed (See Fig. A)
3. HAND GRIP AREAS
Always hold your saw firmly with both hands when operating (See Fig. A).
4. TOOL-LESS BLADE FITTING
To install the blade (See Fig. B and Fig. C), disconnect the saw from power supply. If necessary, extend the pivoting blade foot away from the blade clamp for easier access. Pull the tool-less blade clamp lever (3) up with your thumb, as shown. Insert the blade into the saw's blade clamp and make sure that the blade attaches to the blade pin inside the clamp. Push down blade clamp lever (3) ensure the blade is locked securely in place. To remove Blade (See Fig. B and Fig. C) Disconnect saw from power supply. If necessary, extend the pivoting blade foot away from the blade clamp for easier access. First, pull the blade clamp lever (3) up with your thumb, and then pull the blade out of the blade clamp.
5. PIVOTING BLADE FOOT ADJUSTmENT
If you need to reduce the cutting capacity of your tool the pivoting blade foot (4) may be adjusted as follows: Using the hex key provided, loosen the two screws on the underside of the front housing (See Fig. D). Slide the pivoting blade foot to give the required distance from the end of the blade (See Fig. D) to the pivoting blade foot (This distance equals new cutting capacity). Then securely tighten both screws. The pivoting blade foot slide is now locked but the pivoting blade foot will continue to pivot, as it must follow your work surface.
6. PIVOTING BLADE FOOT
The pivoting blade foot must be held firmly against the material being cut to reduce saw vibration, blade jumping and blade breakage.
7. FLUSH cUTTING
It is possible to make cuts extremely close to floors, walls and other difficult areas. Insert the blade shank into the blade clamp with the blade teeth facing up (opposite to normal working position). This will make cuts closer to the work surface (See Fig. E). Using special flexible blades insert the blade into the blade clamp with the blade teeth facing down (normal working position). It will allow flush pipe cutting (See Fig. F).
8.WOOD cUTTING
Always ensure the work-piece is firmly clamped to prevent movement. For easier control use low speed to start cutting, then increase to the correct speed (See Fig. G).
9. METAL cUTTING
This saw has different metal cutting capacities depending upon the type of blade being used and metal being cut.
ALWAYs clamp the work down to prevent it from slipping.
Use a finer blade for ferrous metals and a coarse blade for non-ferrous metals.
When cutting thin gauge sheet metals,
ALWAYS clamp wood on both sides of the sheet. This will give you a clean cut without
excess vibration or tearing of the metal.
DO NOT force the cutting blade. Forcing the blade will reduce blade life and cause the blade to break.
NOTE: We recommend that you spread a thin film of oil or other coolant along the line of cut ahead of the saw. This will allow easier operation and help extend blade life. When cutting aluminum, use kerosene.
10. POCKET CUTTING (Soft materials only)
Mark the pocket or internal hole to be cut out. Insert the special cutting blade with blade teeth facing down and clamp securely. Angle the saw so that the back edge of the blade guard is resting on the work surface (See Fig. H.1 and Fig. H.2). Use a slow speed to start the cut to avoid breaking the blade but increase to correct speed once the cut has started. With the blade guard held firmly against the work surface, start a slow but controlled upward swing of the saw. The blade will cut into and through the material. Always ensure the blade is completely through the material before cutting the remainder of the pocket.
WORK HINTS FOR YOUR RECIPIROCATING SAW
If your power tool becomes too hot, set the speed to maximum and run a no load for 2-3 minutes to cool the motor.
Always ensure the work-piece is firmly held or clamped to prevent movement.
The blade guard must be held firmly against the material being cut to reduce saw vibration, blade jumping and blade breakage.
MAINTENANCE
Remove the plug from the socket before carrying out any adjustment, servicing or maintenance.
Your power tool requires no additional lubrication or maintenance. There are no user serviceable parts in your power tool.
Never use water or chemical cleaners to clean your power tool. Wipe clean with a dry cloth. Always store your power tool in a dry place. Keep the motor ventilation slots
clean. Keep all working controls free of dust. Occasionally you may see sparks through the ventilation slots. This is normal. If the supply cord is damaged, it must be replaced by the manufacturer, its service agent or similarly qualified persons in order to avoid a hazard.
ENVIRONMENTAL PROTECTION
Waste electrical products should not be disposed of with household waste. Please recycle where facilities exist.
Check with your local authorities or retailer for recycling advice.
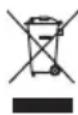
PLUG REPLACEMENT
If you need to replace the fitted plug then follow the instructions below.
IMPORTANT
The wires in the mains lead are colored in accordance with the following code:
BLUE =NEUTRAL
Brown = Live
As the colors of the wires in the mains lead of this appliance may not correspond with the colored markings identifying the terminals in your plug, proceed as follows. The wire which is colored blue must be connected to the terminal which is marked with N. The wire which is colored brown must be connected to the terminal which is marked with L.
WARNING: Never connect live or neutral wires to the earth terminal of the plug. Only fit an approved 13ABS1363/A plug and the correct rated fuse.
NOTE: If a moulded plug is fitted and has to be removed take great care in disposing of the plug and severed cable, it must be destroyed to prevent engaging into a socket.
EC DECLARATION OF CONFORMITY
Declare that the product, Description WORX Reciprocating saw Type WX80RS(RS -designation of machinery, representative of Reciprocating Saw) Function Cutting various material
Complies with the following Directives, EC Machinery Directive 2006/42/EC EC Electromagnetic Compatibility Directive 2004/108/EC
Standards conform to:
EN 55014-1
EN 55014-2
EN 61000-3-2
EN 61000-3-3
EN 60745-1
EN 60745-2-11
The person authorized to compile the technical file,
Name: Russell Nicholson
Address: Positec Power Tools (Europe)
Ltd, PO Box 152, Leeds, LS10 9DS, UK

2012/05/23
Leo Yue
POSITEC Quality Manager
INFORMATIONS RELATIVES AU BRUIT
INFORMATIONS RELATIVES AUX VIBRATIONS
Responsible qualite POSITEC
- IMPUGNATURE
- INTERRUTTORE D'ACCENSIONE/SPEGNIMENTO
- LEVA DI RILASCIO MORSETTO LAMA
- PIEDINO REGOLABILE
- LAMA*
- CHIAVE ESAGONALE
VEILIGHEIDSWAARSCHUWINGEN RECIPROZAAG
RECIPIROCATING SAW SAFETY WARNING
ARBEIDSTIPS FOR DIN PENDELSAG
Blandade klingor (1st. for tra, 1st. for metall, 1st. for aluminium/plast) 3 Sexkantnyckel 1
- Hold reciprocating saw by insulated gripping surfaces, when performing an operation where the cutting accessory may contact hidden wiring. Cutting accessory contacting a "live" wire may make exposed metal parts of the power tool "live" and could give the operator an electric shock.
YTTERLIGARE SÄKERHETSINSTRUKTIONER FÖR DIN STICKSÄG
IIAHPOΦOPIEΣ KPAΔAΣMΩN
To epyaaleio diaafoTe to BiBiao obnyiwv
TPOOETKIKA.
XPHSH SYMΦΩNA METON NPOOPIΣMO
H oukeun TpoopiZetai, akouptiopeyn ETTAVW Oe
mu ot aepn ETTIaVEA yia tnv KOITN SULWV,
TAAOTIKwv UIKWv, mTaALWv, PAAKwv aTTO
Kepaikau IAKA KAI EAAOTIKOU KAthetaKai YIA TNI
diEaywn EOWTEPIKWv AVOIyMATWv OTA UIAKA
auta.
1. DIAKONTH Σ ON/OFF
Piote tov biakottn yia va gekivnoeik aphiote Tov yia va otapatnoeI TO epyaio.
2. EAEFXOZ ENAANAAZOMENHZ TAXYHTTAZ
To epyaio oac evai eoianioevo diakottnn
elxyou tauxntac. To epyaio mtopei va
Eeknoei kai va otauatnoei tiocovtac kai
aipnvovtac tov diaokottn. H taxuteta kivnonc tnc
lambdaeopei va puthetai ato to elaxioto 0to
muio souawva nTv nieniou aokite 0to
diakottn. Iieote Tepioootepo yia va aujo
taxutna kai apnoTe yia va ueiwoei tauxntta (EIA)
3. έπεροχες ΑλΑΒΗς
NaVtva Kpatate yepa Tnv Otaooeya kai e Ta duo xepia kaTaNv xpnoN (Eik A).
4. AAAAAH AMA XOPIE EPRANEIA
Tia va aalete mla lapa (Eik B kai C),
aTOOuvdeote Tnv OToAooeya ato Tnv Ppica.
Av eivai aTAPAITnTo, aTOnapKpUeTe Tn Bao n
OTnpiCns aTIO TO TOOK Tng LApac yia TIO Eukoan
TPPOBaaon. TpaNcTe to Koupti aTLeuEpwoang
TNS LApac (3) TAVW ME TOV AVtXepa oac, OTWCS
Pavetai. BALTE Tnv LApac Evdiapeo aTIO Tnv
Bao nTnpicnc kai Meo aTIO TOV uXavioo
kEldomegaato cIiyoupeuovTac OTIO TEipoc OTOV
Unxavio KoEldomegaato civai OTNV tpuTa TNS
Lapac. NIEOTE TO KOUPTI aTLEuEpwoang TNS
Lapac TTPOC ta KATW KAI BeBaiwOeite OTI h Lapa
Eivai aQpaAlioEvn OTO TOOK.
Tia va y Tnv EIK B kai C), aTOOuvoETo epyaEO aTIO Tnv Tpica. Ia va aopaipoeTe Tnv LApa, TIEOT TO KOUPTI
aTLeUePwOngs TnS LApac (3) ME TOV aVTiXepa
oac kai TpaBnTe EeW Tnv Lapa aTO TO ook.
Av eivai aTAPAitnto, aToupakpuveTe Tn Bao n
OTnpEcn aTIO TO TOOK Tns LApac yia TIO Eukoan
TPOBaaon.
5. PYOMIEH NEPIETPOΦIKHZAeH
Av va Tn Xwpntikotnta KoiipatoC Tou epyaiaou oac, to ouotpepoEvo ndi
AeTioac (4) mTopei va puOIOTEI wG EInc:
XpnoiopoioWvTAC TO EgaywVIOK kEidi Tou
TAPExTai, xaapwoTE TIC duo BiEcs OTO KATW
peoc Tou mTPOOTIVOU TEPiBAnpoatoc (AEITE
Tnv EIK D). Metakivote To ouotpeoEvo
TIOI AETIDac yia va dwoTe TNV aTaitouuEvn
aTIOTAON aTIO TO akpo TNS LETIbAc (AEITE TNV
EIK D) ME TO ouotpeoEvo TNDIaLETIDac (Autn
n aTIOTAON onmaivei vEA xwpNTIKOTNTa KOTINc).
ETIEITA, ophiTE KAla TIG BIDc. H metakivnon
Tou ouotpeoEvou TIOIOU LEITIDac ExeiTwpa
kEldowei, aaaa to ouotpeoEvo TNDIaLEITIDac
0a ouveixoei va ouotpeFetai KaWc 0a TTpeTTe iva
akolouhoei Tnv EITIPaveia Epyaoiaoc.
OtauKoBETeAeTTaquAAa aTIO Kpapa eTAAWv,
NANTA va TIAVETe aTRO eva KoumuTI GULou OTIC DUO TLEUPEc Tou. Auto 0a 0ac 8woei mia KathetaKOTn Xwpi UTEPBoIikn Dovnon n KataotpoPh Tou eTALou.
MHN TIEZETNvApa. NIEcovTac Tnv Aa a
muwTei n Zwn Tns LApac kai Oa Kavei Tnv Apa va
OTAOE1.
SHMEIOH: Ipoteivoue va aaleiepeTe μia
you've got the power
Copyright © 2012, Positec. All Rights Reserved.
2PSR11BPK11009A4

- TECHNICAL DATA
- NOISE INFORMATION
- VIBRATION INFORMATION
- This tool may cause hand-arm vibration syndrome if its use is not adequately managed.
- ACCESSIONS
- Assorted blades (1pc for metal; 1pc for wood; 1pc for aluminium/plastic) 3 Hex key 1
- RECIPIROCATING SAW SAFETY WARNINGS
- ADDITIONAL SAFETY RULES FOR RECIPROCATING SAW
- SYMBOLS
- OPERATING INSTRUCTIONS
- INTENDED USE:
- ON/OFF SWITcH
- VARIABLE SPEED cCONTROL
- HAND GRIP AREAS
- TOOL-LESS BLADE FITTING
- PIVOTING BLADE FOOT ADJUSTmENT
- PIVOTING BLADE FOOT
- FLUSH cUTTING
- 8.WOOD cUTTING
- METAL cUTTING
- POCKET CUTTING (Soft materials only)
- WORK HINTS FOR YOUR RECIPIROCATING SAW
- MAINTENANCE
- Remove the plug from the socket before carrying out any adjustment, servicing or maintenance.
- ENVIRONMENTAL PROTECTION
- PLUG REPLACEMENT
- IMPORTANT
- BLUE =NEUTRAL
- Brown = Live
- EC DECLARATION OF CONFORMITY
- INFORMATIONS RELATIVES AU BRUIT
- INFORMATIONS RELATIVES AUX VIBRATIONS
- VEILIGHEIDSWAARSCHUWINGEN RECIPROZAAG
- RECIPIROCATING SAW SAFETY WARNING
- ARBEIDSTIPS FOR DIN PENDELSAG
- Blandade klingor (1st. for tra, 1st. for metall, 1st. for aluminium/plast) 3 Sexkantnyckel 1
- YTTERLIGARE SÄKERHETSINSTRUKTIONER FÖR DIN STICKSÄG
- IIAHPOΦOPIEΣ KPAΔAΣMΩN
- XPHSH SYMΦΩNA METON NPOOPIΣMO
- DIAKONTH Σ ON/OFF
- EAEFXOZ ENAANAAZOMENHZ TAXYHTTAZ
- έπεροχες ΑλΑΒΗς
- AAAAAH AMA XOPIE EPRANEIA
- PYOMIEH NEPIETPOΦIKHZAeH
- you've got the power
Brand : WORX
Model : WX80RS
Category : Saw