Traveller - Boat Vetus - Free user manual and instructions
Find the device manual for free Traveller Vetus in PDF.



User questions about Traveller Vetus
0 question about this device. Answer the ones you know or ask your own.
Ask a new question about this device
Download the instructions for your Boat in PDF format for free! Find your manual Traveller - Vetus and take your electronic device back in hand. On this page are published all the documents necessary for the use of your device. Traveller by Vetus.
USER MANUAL Traveller Vetus
1 Introduction. 13
1.1 Safety measures. 13
1.2 General 13
1.3 Builders plate 14
1.4Boat design categories 14
2 Identification of parts. 14
3 Using the boat 15
3.1 General 15
3.2 Using the boat outboard motor powered 15
3.3 Towing. 15
4Assembly. 16
4.1 How to operate the valve 16
4.2 Preparation before inflating 16
4.3 Inflation and floor installation 16
5 Outboard motor installation 17
6 Deflating and packing 17
7 Storage 17
8 Cleaning 17
9 Repair and maintenance. 17
10 Technical data. 18
Inhalt
Read the manual carefully before using the boat for the first time.
1 Introduction
1.1 Safety measures
Warning indications
The following warning indications are used in this manual in the context of safety:

DANGER
Indicates that great potential danger exists that can lead to serious injury or death.

WARNING
Indicates that a potential danger that can lead to injury exists.

CAUTION
Indicates that the usage procedures, actions etc. concerned can result in serious damage to property. Some CAUTION indications also advise that a potential danger exists that can lead to serious injury or death.

NOTE
Emphasises important procedures, circumstances etc.
Symbols
Indicates that the relevant procedure must be carried out.
Indicates that a particular action is forbidden.
Pass the safety precautions on to other people who will use the boat.
General rules and laws concerning safety and accident prevention must always be observed.
1.2 General
This manual has been compiled to help you to operate your craft with safety and pleasure. It contains details of the craft; the equipment supplied or fitted, its systems and information on their operation. Please read it carefully, and familiarize yourself with the craft before using it.
This owner's manual is not a course on boating safety or seamanship. If this is your first craft, or if you are changing to a type of craft you are not familiar with, for your own comfort and safety, please ensure that you obtain handling and operating experience before 'assuming command' of the craft. Your dealer or national sailing federation or yacht club will be pleased to advise you of local sea schools, or competent instructors.
All persons should wear a suitable buoyancy aid (life jacket/personal flotation device) when out on the water. Note that, in some countries, it is a legal requirement to wear a buoyancy aid that complies with their national regulations at all times.
Please keep this manual in a secure place and hand it over to the new owner when you sell the inflatable boat.
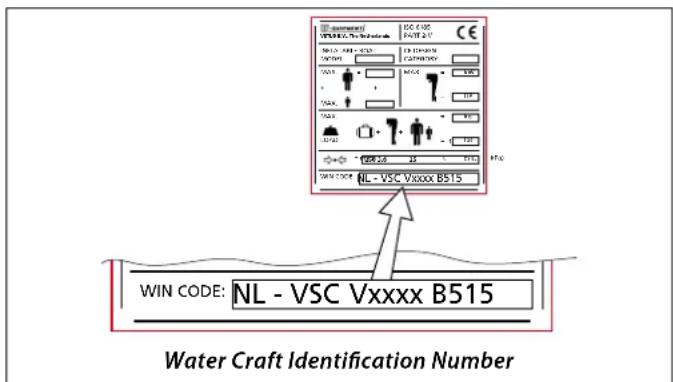
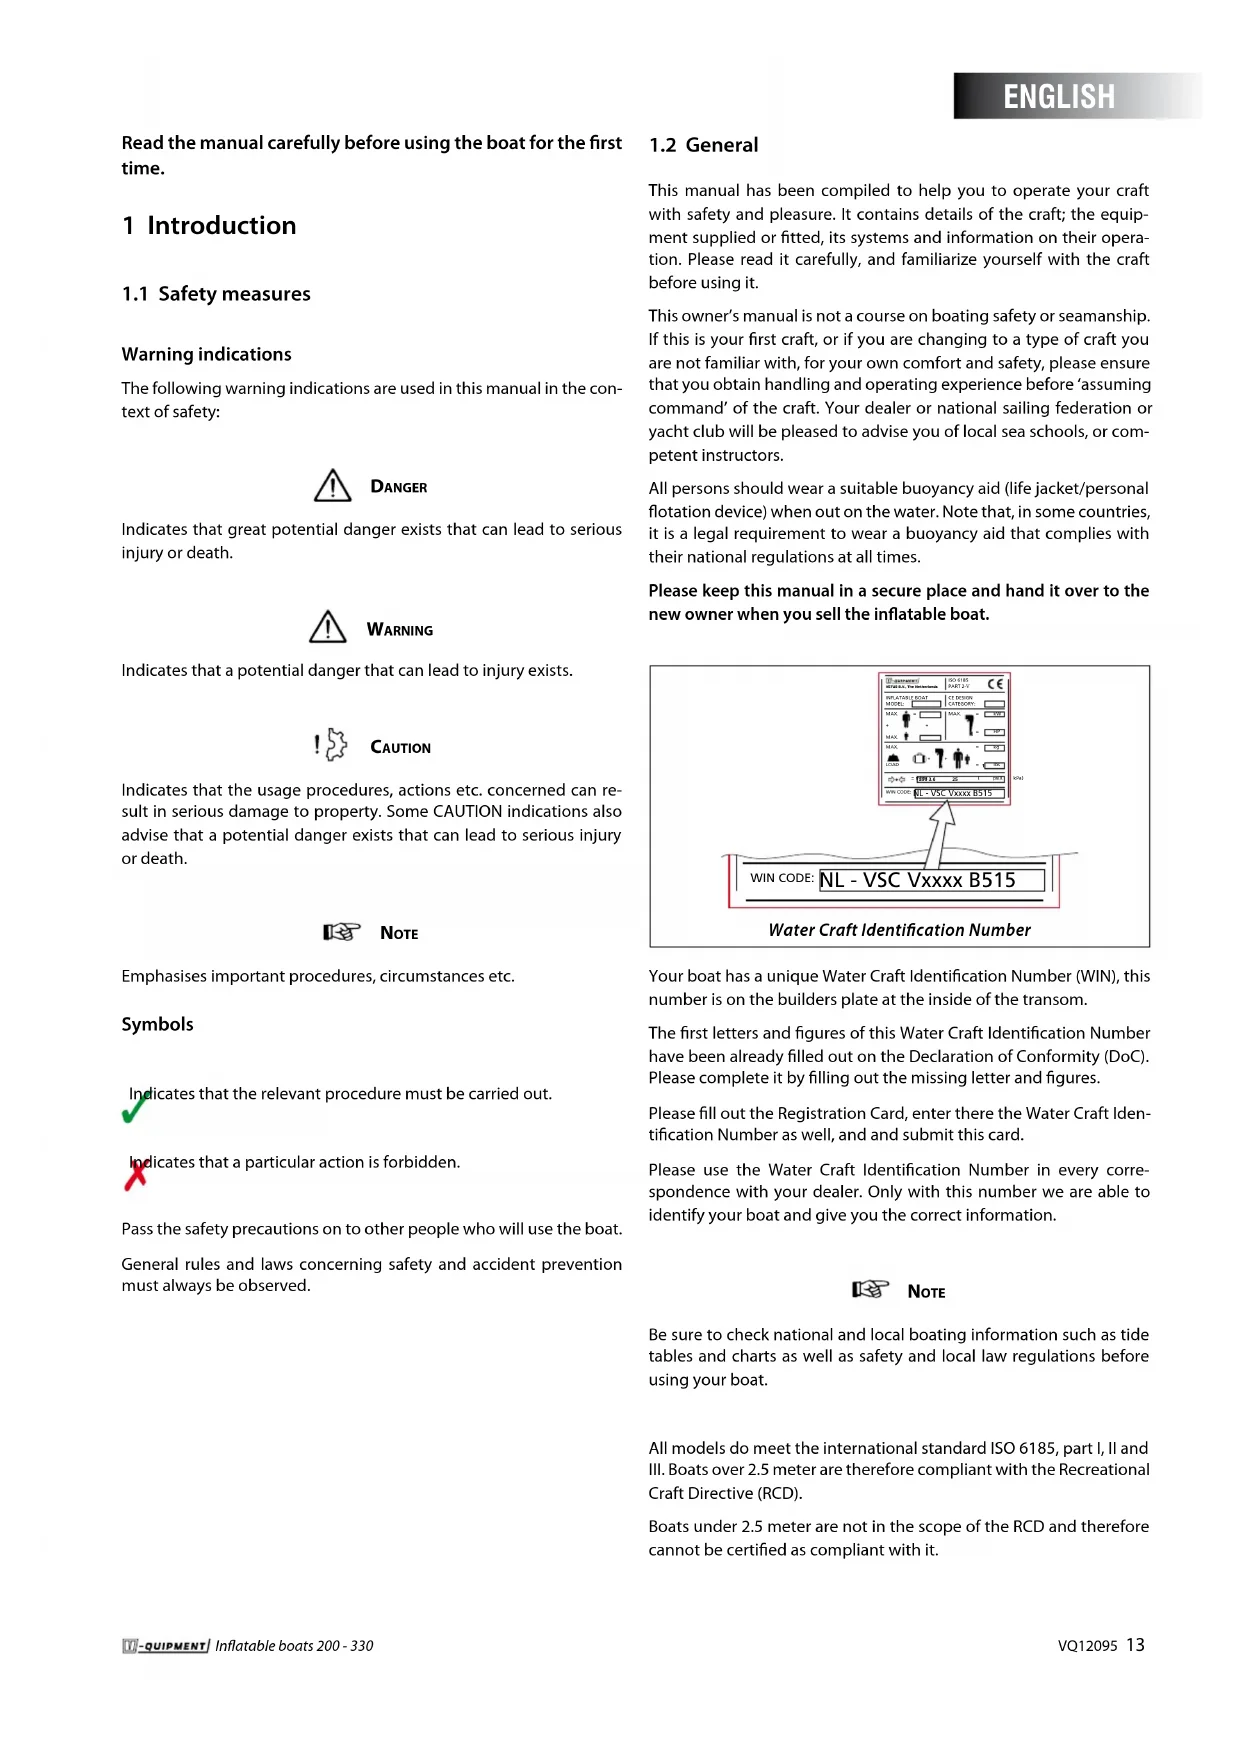
Your boat has a unique Water Craft Identification Number (WIN), this number is on the builders plate at the inside of the transom.
The first letters and figures of this Water Craft Identification Number have been already filled out on the Declaration of Conformity (DoC). Please complete it by filling out the missing letter and figures.
Please fill out the Registration Card, enter there the Water Craft Identification Number as well, and and submit this card.
Please use the Water Craft Identification Number in every correspondence with your dealer. Only with this number we are able to identify your boat and give you the correct information.

NOTE
Be sure to check national and local boating information such as tide tables and charts as well as safety and local law regulations before using your boat.
All models do meet the international standard ISO 6185, part I, II and III. Boats over 2.5 meter are therefore compliant with the Recreational Craft Directive (RCD).
Boats under 2.5 meter are not in the scope of the RCD and therefore cannot be certified as compliant with it.
1.3 Builders plate
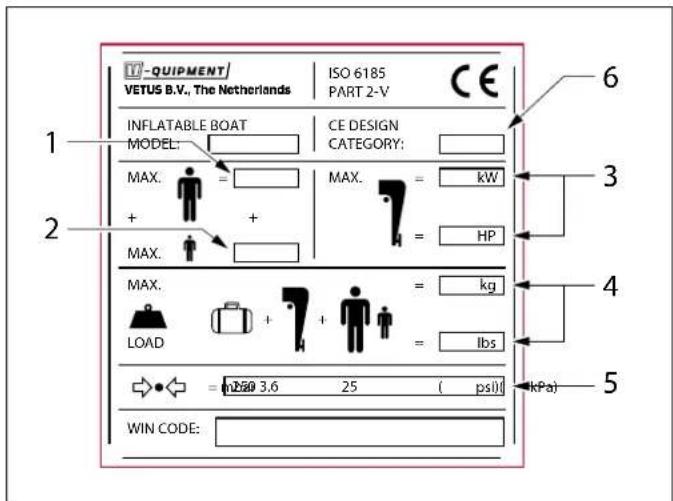
Always respect the maximum values on the builders plate.
| Maximum number of adults. | 1 |
| Maximum number of children. | 2 |
| Maximum outboard power. | 3 |
| Maximum total load - people + outboard + fuel tank + equipment. | 4 |
| Maximum pressure of air chambers. | 5 |
1.4 Boat design categories
See builders plate. 6
Definitions:
C. A watercraft given design category C is considered to be designed for a wind force up to, and including, 6 and significant wave height up to, and including, 2 m.
D. A watercraft given design category D is considered to be designed for a wind force up to, and including, 4 and significant wave height up to, and including, 0,3m with occasional waves of 0,5m maximum height.
Watercraft in each design category must be designed and constructed to withstand the parameters in respect of stability, buoyancy, and other relevant essential requirements listed in this Annex, and to have good handling characteristics.

NOTE
Use the boat only if the expected wind force and wave height are less than indicated in the above definitions. Make sure that you and your crew can keep the boat under control in the most unfavorable conditions.
2 Identification of parts
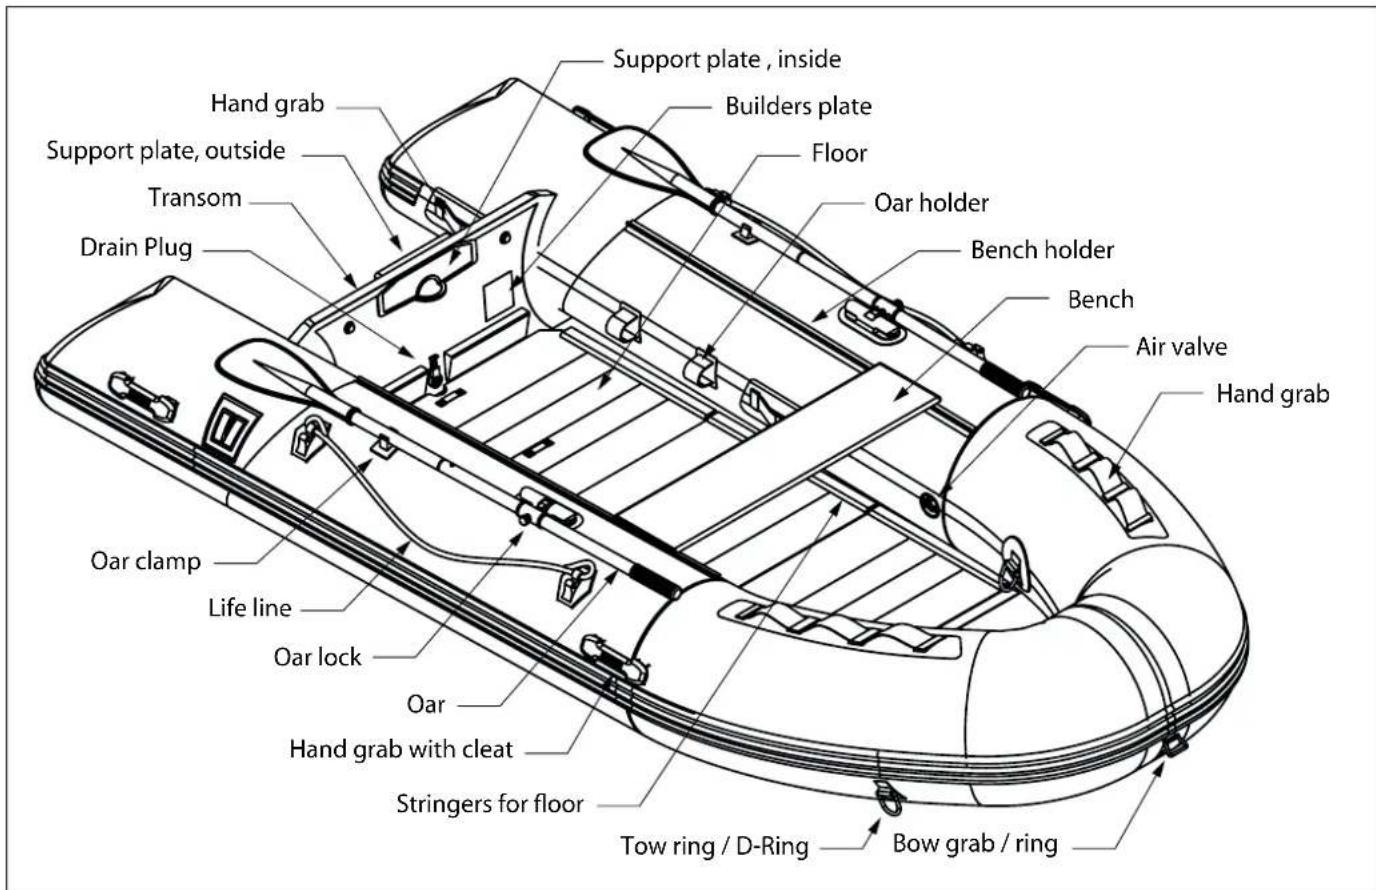
3 Using the boat
3.1 General
Inflate the boat one day prior to use and check if there is any air leakage.
Avoid the boat's exposure to the sun for any extended period of time. Otherwise, by the changing air pressure inside the tubes due to temperature variation, and physical reaction by ultra-violet rays, the aging of the materials will be accelerated.
Store it in cool and shaded area.
Prevent pollution of the water around your boat. Using the water for water sports also means taking care of a clean water sports environment.

WARNING
Do not exceed the maximum recommended number of persons. Regardless of the number of persons on board, the total weight of persons and equipment must never exceed the maximum recommended load. Always use the seating spaces provided.

WARNING
Never exceed the weight carrying capacity of the boat's builders plate.
All loads placed in the boat should be uniformly distributed to provide proper beat trim when under way.
Each person in the boat should ALWAYS wear a life jacket (Personal Flotation Device approved by local law agency).
Be very careful about shallows' or 'unknown reefs'. Always check local navigational maps where the boot will be operated.

CAUTION
In case more than two persons will get on the boat, it is important to decide the sitting position of each person in good consideration of the special features of the boat. When the boot is headed up prior to 'plain sailing', it is effective to keep boats bow down, by the weight of the persons sitting toward the bow side.
However, on excessive weight there might cause a dangerous head-down position when boat gets 'plain sailing'.
Nevertheless, the extreme sitting of two people on stern in the head up position will cause another risk of overturn, when wind is blowing toward you.
Bailing
It is the responsibility of the owner/operator to have at least one bailer/draw bucket on board, secured against accidental loss.
Securing of loose equipment
It is highly recommended to secure loose equipment safely when under way.
3.2 Using the boat outboard motor powered
Everyone should sit on the floor, not on inflation tubes or the row seat, to prevent falling over-board.
Make sure that the motor is in neutral before starting the engine.
Always accelerate very slowly.
Be cautious not to be a danger to anyone around the boat and not cause unnecessary noise.
Always be cautious when cruising at high speed. High speeds may cause considerable waves behind the boat.
Oars or paddles and a repair parts kit should always be carried with the boot for emergencies.
Whenever you are turning your boat, reduction in speed is required. Whenever the boat is turning it will tilt considerably inside towards the turning centre. Therefore, turning to lee-ward or when waves are high, might cause the boat flooded with water or its overturn.
Refrain from smoking when you are on the boot or refuelling.
Never go in or around any swimming areas with your boat, as there will be a serious danger for swimmers getting injured by your intrusions.
3.3 Towing

WARNING
If the inflatable boat is towed by another boat, the inflatable MUST BE EMPTY. So no accessories or persons.
The towing line should be secured to the 'D' rings on each side of the boat. The towed boat must be observed continuously.
Standard accessories (not shown)
- Repair kit
- Carrying bag
- Foot pump
4 Assembly
4.1 How to operate the valve
During inflation
Rotate the valve centre piece 1/4 turn to close the valve.
Make sure the valve in this position when installing the pump to inflate the boat.
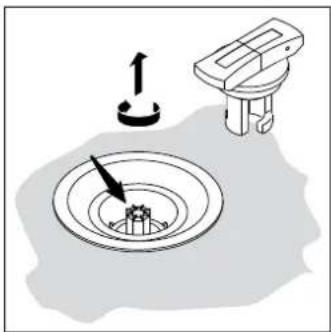
During deflation
Press and rotate the valve centre piece 1/4 turn to open the valve.
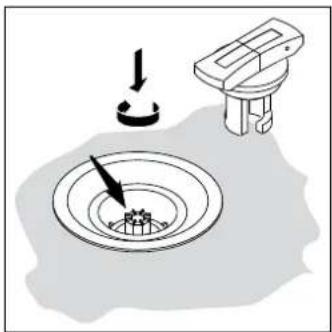
4.2 Preparation before inflating
Find flat surface where boat will be assembled.
- Remove any sharp objects from flat surface.
- Unfold and spread boat out flat.
- Verify the valve is in the correct position.
- Connect the pump to the valve and start inflating.

WARNING
Do not inflate any one chamber in full at a time as this causes unnecessary stress to the inside bulkhead.
Provide a uniform distribution of air in each chamber. By this method, the bulkheads that divide the main air chambers are maintained so that there is equal pressure and approximate inflated size on each side of the bulkhead.
During inflation, do not use a compressed air source (i.e. automotive tire air compressor) to inflate boats. Over inflation through the use of compressed air may result in ruptured seams and/or bulkheads.
Over inflation in the air chambers can cause structural damage to your boat. Do not allow your boat to stand in direct sunlight when out of the water as expansion of the air may lead to damage or bursting (maximum air pressure: 0.25 bar). For an inflatable air floor the maximum air pressure is 0,7 bar.
4.3 Inflation and floor installation
It is usual that the boat has at least 3 chambers.
- Begin inflation at bow ①, then starboard ② and port side ③.
Inflate chambers to around 40 - 50%
Air floor boat only:
- Put in the air floor and inflate it to around 70% .
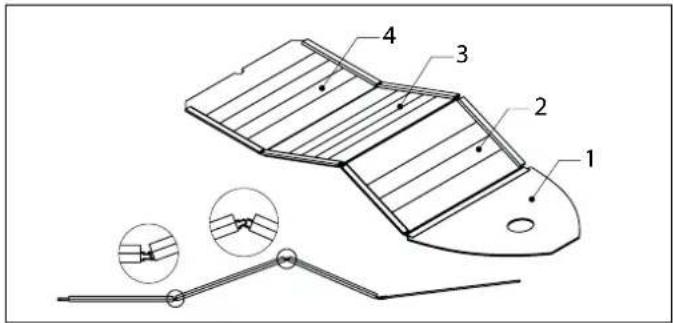
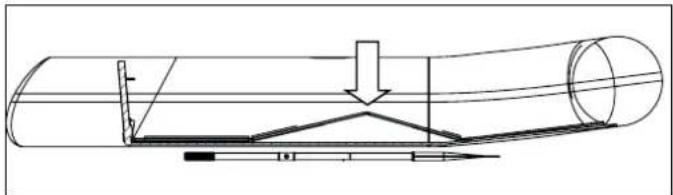
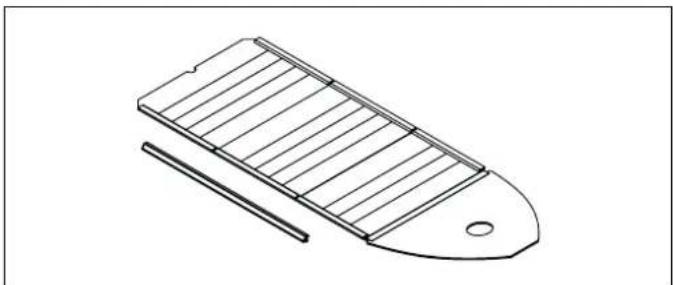
Aluminium floor boat only:
- Install no. 1 and no. 4 floor board first with the numbers facing up.
- Then install the floor boards no. 2 and 3.
- Make sure all floor boards are well seated in correct position then push down the joint slowly and firmly until in flat position.
- Put the aluminium stringers into the sides of floors. In order to put the aluminium stringer easier, put an oar under the boat.
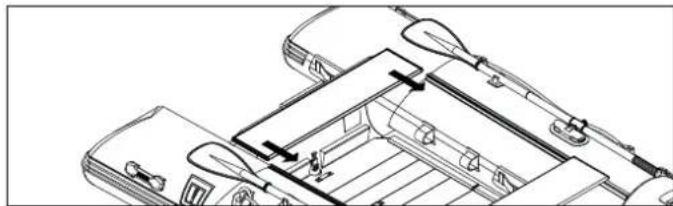
Install the seat board. Slide it onto the mounting rail.
Inflate the tubes to 100% to max. 0.25 bar.
- Inflate the air floor to 100% , to max. 0,7 bar (air floor boat only).
Inflate keel to 100%, to max. 0,25 bar.
Install the oars.
Install the drain plug.
5 Outboard motor installation
Selecting the optimum outboard motor is critical to the performance and long life of your boat.

WARNING
Never install an outboard motor with a higher power than indicated as maximum power on the builders plate.
- Unlock motor for tilting and mount the motor properly.
- The motor should be in the centre of the transom.
- It is important that the outboard motor is installed at the correct height. Secure the clamps and make sure that they are thoroughly tightened.
- Adjust the motor trim angle. With an incorrect trim angle of the motor the nose of the boat will go up or down during cruising.
- For detailed information, consult the manual of your motor or contact the supplier of your motor.
6 Deflating and packing
Before deflation, make sure the boat is clean and dry.
- Open valves and let the air out of each chamber. to deflate the boat.
- To avoid sudden pressure changes on the internal bulkheads try to let the air out as evenly as possible.
- Remove seat and oars.
Air floor boat only:
- Deflate the air floor.
Aluminium floor boat only:
- Remove the aluminium stringers.
- First remove no. 2 and no. 3 floor boards. Then, remove no. 1 and no. 4 floor boards.
- Place both side air chambers toward inside of the boat and roll slowly from both ends until all air is expelled.
- Store the boot inside the carrying bag.
7 Storage
Allow your boat to dry thoroughly in the shade before storing, never in glaring sunlight. Store your boot in a cool, flat and dry place with some air in the air chambers if at all possible. If not, deflate the boat completely and roll the boot up loosely, not tightly as this may damage the seams.
When storing the boat outside, for instance at the stern or on the fore deck, it is recommended to use a boat cover (Vetus art.code: VB-COV20, VBCOV23, VBCOV27, VBCOV30 and VBCOV33 Boat cover for respectively VB200, VB230, VB270, VB300, VB330, VR240B, VR270B, VR270, VR300 and VR330).
8 Cleaning
The surface of the boot should be cleaned with a solution of mild soap and fresh water after each use.
To avoid abrasion and wear, be sure that all the sand, small rocks, oil and dirt have been flushed away from the boot surfaces and particularly the inside floor next to the air chambers.
9 Repair and maintenance
Small tear, cut or puncture
Use the enclosed repair kit tor small punctures.
- Clean the fabric around the area to be repaired using M.E.K. or acetone thoroughly.
Be careful!
MEK and aceton are hazardous in case of skin contact, eye contact, ingestion and inhalation.
- Apply a coat of glue to the damage part and to the patch material, allow it to dry for 2 - 3 minutes.
- Repeat the process at least 3 times, allowing time to dry between each application.
It is highly recommended that all patchwork be allowed to cure at least 24 hours before re-inflating the boat.

WARNING
NEVER USE PETROL OR SOLVENT FOR CLEANING
Large repairs of skin, seams, bulkheads and transom
It is recommended to contact the dealer for all large repairs.
10 Technical data
Boat model Traveller en Explorer
| Item code | Air (Traveller) : VB200T VB230T VB270T VB300T VB330T | |||||
| Alu (Explorer) :- VB230E VB270E VB300E VB330E | ||||||
| Deck type | Air (Traveller) : Inflatable drop-stitch board deck | |||||
| Alu (Explorer) :- Folding aluminium deck | ||||||
| Length overall : | 200 cm(6 ft 7 in) | 230 cm(7 ft 7 in) | 270 cm(8 ft 10 in) | 300 cm(9 ft 10 in) | 330 cm(10 ft 10 in) | |
| Beam width overall : | 139 cm(4 ft 7 in) | 130 cm(4 ft 3 in) | 154 cm(5 ft 1 in) | |||
| Tube diameter | 41 cm (16 in) | 35 cm (14 in) | 42 cm (15.5 in) | |||
| Size, packed | 105 x 70 x 32 cm(41 x 28 x 13 in) | 105 x 70 x 35 cm(41 x 28 x 14 in) | 115 x 70 x 38 cm(45 x 28 x 15 in) | |||
| Maximum total load | 250 kg (551 lbs) | 360 kg (793 lbs) | 485 kg(1069 lbs) | 500 kg(1102 lbs) | 570 kg(1256 lbs) | |
| Max. capacity persons | 2 | 2 | 3 | 3+1 (child) | 4 | |
| Total boat weight | Air (Traveller) | 28 kg (62 lbs) | 31 kg (68 lbs) | 39 kg (86 lbs) | 41 kg (90 lbs) | 44 kg (97 lbs) |
| Alu (Explorer) | - | 36 kg (79 lbs) | 48 kg (106 lbs) | 53 kg (117 lbs) | 58 kg (128 lbs) | |
| Shipping weight | Air (Traveller) | 33 kg (73 lbs) | 38 kg (84 lbs) | 44 kg (97 lbs) | 48 kg (106 lbs) | 51 kg (112 lbs) |
| Alu (Explorer) | - | 44 kg (97 lbs) | 52 kg (115 lbs) | 59 kg (130 lbs) | 65 kg (143 lbs) | |
| Maximum outboard power | 3.7 kW (5 hp) | 3.7 kW (5 hp) | 7.5 kW (10 hp) | 7.5 kW (10 hp) | 11 kW (15 hp) | |
Boat model Frontier
| Item code | : | VR240B | VR270B | VR270 | VR300 | VR330 |
| Length overall : | 240 cm(7 ft 10 in) | 270 cm(8 ft 10 in) | 270 cm(8 ft 10 in) | 300 cm(9 ft 10 in) | 330 cm(10 ft 10 in) | |
| Length inside : | : | 160 cm(5 ft 3 in) | 190 cm(6 ft 3 in) | 190 cm(6 ft 3 in) | 220 cm(7 ft 3 in) | 250 cm(8 ft 2 in) |
| Beam width overall : | 164 cm (5 ft 4 in) | |||||
| Beam outside : | : | 80 cm (5 ft 7 in) | ||||
| Tube diameter : | : | 42 cm (15.5 in) | ||||
| Number of air chambers : | : | 3 | ||||
| Size, packed | : | 170 x 124 x 59cm(67 x 49 x 23 in) | 200 x 124 x 59cm(79 x 49 x 23 in) | 200 x 124 x 59cm(79 x 49 x 23 in) | 240 x 124 x 59cm(95 x 49 x 23 in) | 270 x 124 x 59cm(106 x 49 x 23 in) |
| Maximum total load | : | 350 kg(771 lbs) | 400 kg(881 lbs) | 400 kg(881 lbs) | 450 kg(992 lbs) | 500 kg(1102 lbs) |
| Max. capacity persons | : | 2 | 3 | 3 | 4 | 4+1 (child) |
| Total boat weight | : | 42 kg (92 lbs) | 47 kg (103 lbs) | 59 kg (130 lbs) | 67 kg (147 lbs) | 75 kg (165 lbs) |
| Shipping weight | : | 53 kg (117 lbs) | 60 kg (132 lbs) | 72 kg (158 lbs) | 81 kg (178 lbs) | 90 kg (198 lbs) |
| Maximum outboard power | : | 3.7 kW (5 hp) | 7.5 kW (10 hp) | 7.5 kW (10 hp) | 11,2 kW (15 hp) | 15 kW (20hp) |
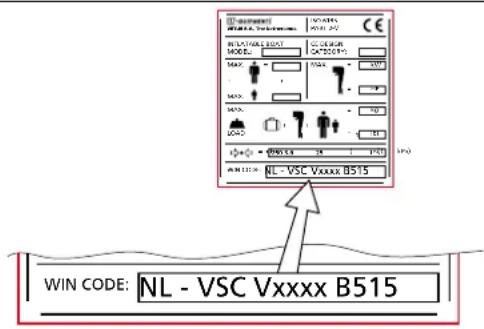
Water Craft Identification Number
4.1 Come governor la valvola
2 Identification of reservedele
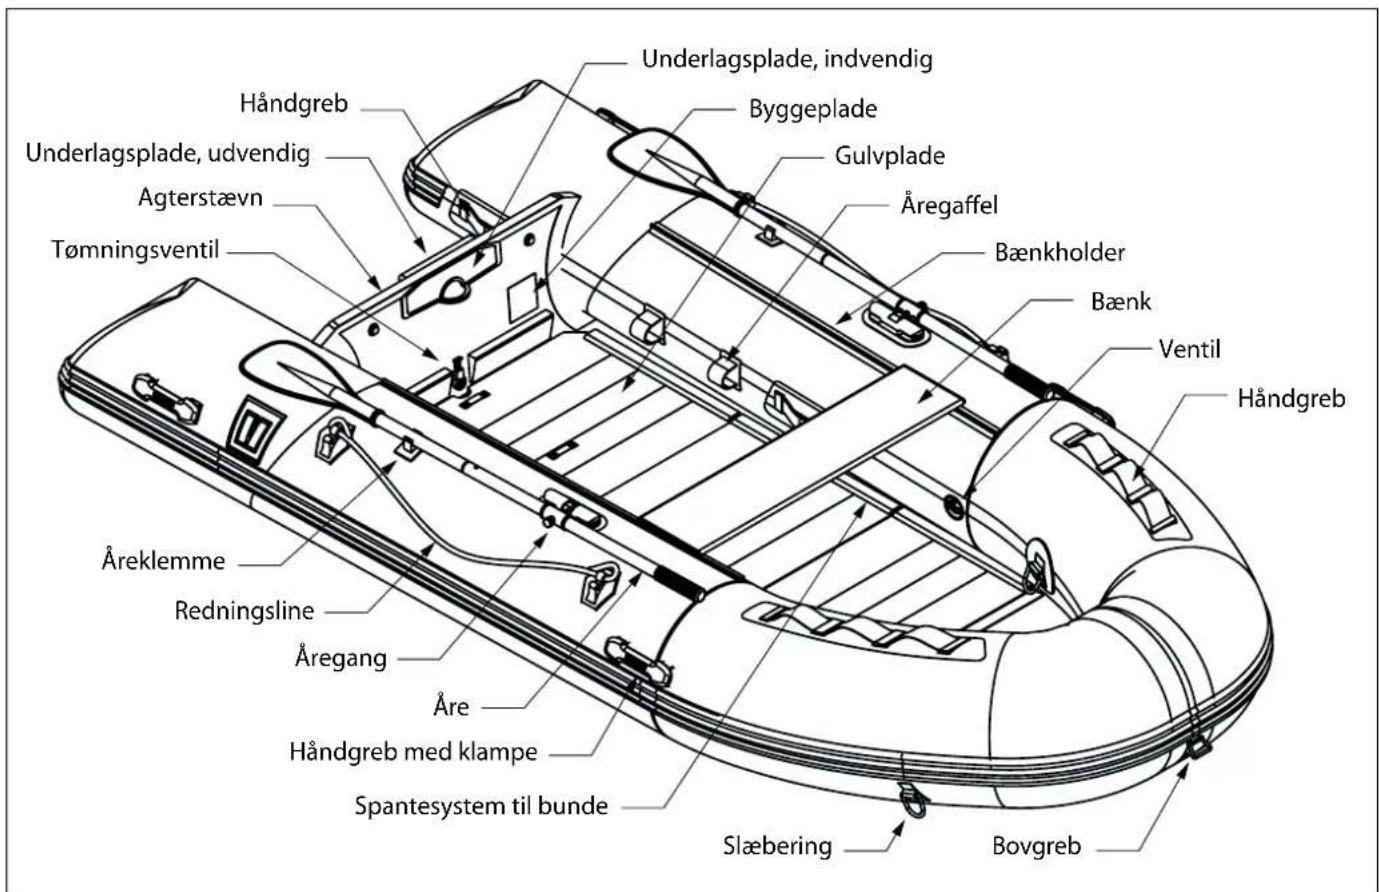
3 Brug af baden
3.1 Generelt
1.1. This warranty is provided by VETUS BV or its affiliates.
1.2. The warranty is only applicable to products supplied by VETUS BV or its affiliates.
Article 2
A claim on the warranty can only be made if the 'Owner Warranty Registration Card', which shall identify the product as registered by the WIN code, has been fully completed and returned to the Service Department of VETUS B.V. within 14 days after purchase.
Article 3
The warranty is granted to the first owner. The warranty can be transferred to a new owner and the remainder of the warranty period will be integrally transferred to the latter.
Article 4
4.1. The warranty period will commence at the time the VETUS product is delivered to the end user.
4.2. The warranty period is 36 months. This warranty period is only applicable to a retail end user, not a company or a professional user and strictly for recreational use.
4.3. The warranty period is 12 months for professional use. Prior to using the product for professional purposes, the user should obtain written approval from VETUS and/or its authorized dealers.
Article 5
5.1. VETUS BV guarantees that VETUS Equipment is warranted against product, material and manufacturing faults during the warranty period.
5.2. Faults occurring during the warranty period will be repaired by VETUS BV at no cost to the owner
5.3. VETUS BV reserves the right to substitute a new or replacement product in the event that repair of the faulty product is not possible.
5.4. Products replaced by VETUS under warranty will automatically become the property of VETUS BV.
Article 6
The final decision about warranty applicability is made by VETUS BV and not its authorized dealers. The decision will be forwarded to the supplying dealer/boatyard in writing. VETUS BV will not enter into correspondence or dialogue with the end user.
Article 7
The end user cannot claim under warranty directly with VETUS BV, but should make a claim under warranty with the supplier of the VETUS product.
Article 8
All claims for warranty will be rendered null and void in the following situations:
- That any periodical maintenance required has not been performed by an authorized VETUS dealer.
-Faulty installation or assembly of the product. - If modifications have been made to the product.
- Improper use of the product.
- The failure is caused by lack of care by the owner or user.
- In the case of external calamity.
- In the case of neglect of the instructions concerning use.
- The warranty period of 36 months has expired.
Article 9
Exclusions: situations not covered under this warranty:
- Normal wear and tear resulting from the use.
- Consequential costs such as (but not limited to) - transport costs, labour costs, cranage, lifting costs etc..
- Damage as a result of environmental influences.