
Junior Biolux - Microscope BRESSER - Free user manual and instructions
Find the device manual for free Junior Biolux BRESSER in PDF.
| Brand | Bresser |
| Model | Junior Biolux |
| Product type | Optical microscope for children |
| Power supply | Batteries (not included) or included power adapter |
| Maximum magnification | Up to 1280x (with Barlow lens) |
| Eyepieces | 10x WF and 16x WF |
| Objectives | 4x, 10x, 40x (rotating nosepiece) |
| Barlow lens | Built-in, allows doubling the magnification |
| Lighting | LED transmitted light (bottom lighting) |
| MicrOcular (camera) | Yes, for USB connection to a PC |
| Included software | Photomizer SE on CD-ROM |
| Included accessories | Pipette, slides, cover slips, permanent preparations, storage box, wax, scalpel (under supervision) |
| Housing material | Plastic |
| Lens maintenance | Clean with a soft microfiber cloth, no cleaning liquid |
| Safety | Contains sharp parts and batteries. Do not leave children under 8 unsupervised |
| Repairability | Do not disassemble. Contact the retailer or after-sales service |
| Certification | CE |
| Storage temperature | Max. 60°C |
| Dimensions | Not specified |
| Weight | Not specified |
Frequently Asked Questions - Junior Biolux BRESSER
User questions about Junior Biolux BRESSER
0 question about this device. Answer the ones you know or ask your own.
Ask a new question about this device
Download the instructions for your Microscope in PDF format for free! Find your manual Junior Biolux - BRESSER and take your electronic device back in hand. On this page are published all the documents necessary for the use of your device. Junior Biolux by BRESSER.
USER MANUAL Junior Biolux BRESSER
Aids with sharp edges and tips are sometimes used with this device. Please store the device and all of its accessories and aids out of the reach of children. There is a risk of INJURY.
This device contains electronic components that operate via a power source (batteries). Children should only use the device under adult supervision. Only use the device as described in the manual; otherwise, you run the risk of an electric shock.
Children should only use this device under supervision. Keep packaging materials (plastic bags, rubber bands, etc.) away from children. There is a risk of SUFFOCATION.
The chemicals and liquids provided should be kept out of reach of children. Do not drink the chemicals! Hands should be washed thoroughly under running water after use. In case of accidental contact with the eyes or mouth rinse with water. Seek medical treatment for ailments arising from contact with the chemical substances and take the chemicals with you to the doctor.
RISK OF CHEMICAL BURN!
Keep batteries out of the reach of children! Make sure you insert the batteries correctly. Empty or damaged batteries could cause burns if they come into contact with the skin. If necessary, wear adequate gloves for protection.
Leaking battery acid can lead to chemical burns. Avoid contact of battery acid with skin, eyes and mucous membranes. In the event of contact, rinse the affected region immediately with a plenty of water and seek medical attention.
Do not expose the device to high temperatures. Use only the recommended batteries. Do not short-circuit the device or batteries, or throw them into a fire. Excessive heat or improper handling could trigger a short-circuit, a fire or an explosion.
Use only the recommended batteries. Always replace weak or empty batteries with a new, complete set of batteries at full capacity. Do not use batteries from different brands or with different capacities. The batteries should be removed from the unit if it has not been used for a long time.
FIRE-/ DANGER OF EXPLOSION!
Do not expose the device to high temperatures. Use only the mains adapter supplied or those battery types recommended. Never short circuit the device or batteries or throw into a fire. Exposure to high temperatures or misuse of the device can lead to short circuits, fire or even explosion!
RISK of material damage
Never take the device apart. Please consult your dealer if there are any defects. The dealer will contact our service centre and send the device in for repair if needed.
Do not subject the device to temperatures exceeding 60^ .
TIPS on cleaning

Remove the device from its energy source before cleaning (remove plug from socket / remove batteries).
Clean the exterior of device with a dry cloth. Do not use cleaning fluids so as to avoid causing damage to electronic components.
Clean the lens (objective and eyepiece) only with the cloth supplied or some other soft lint-free cloth (e.g. micro-fi bre). Do not use excessive pressure - this may scratch the lens.

Dampen the cleaning cloth with a spectacle cleaning fluid and use it on very dirty lenses.
Protect the device from dust and moisture. Batteries should be removed from the device if it is not going to be used for a long period of time.
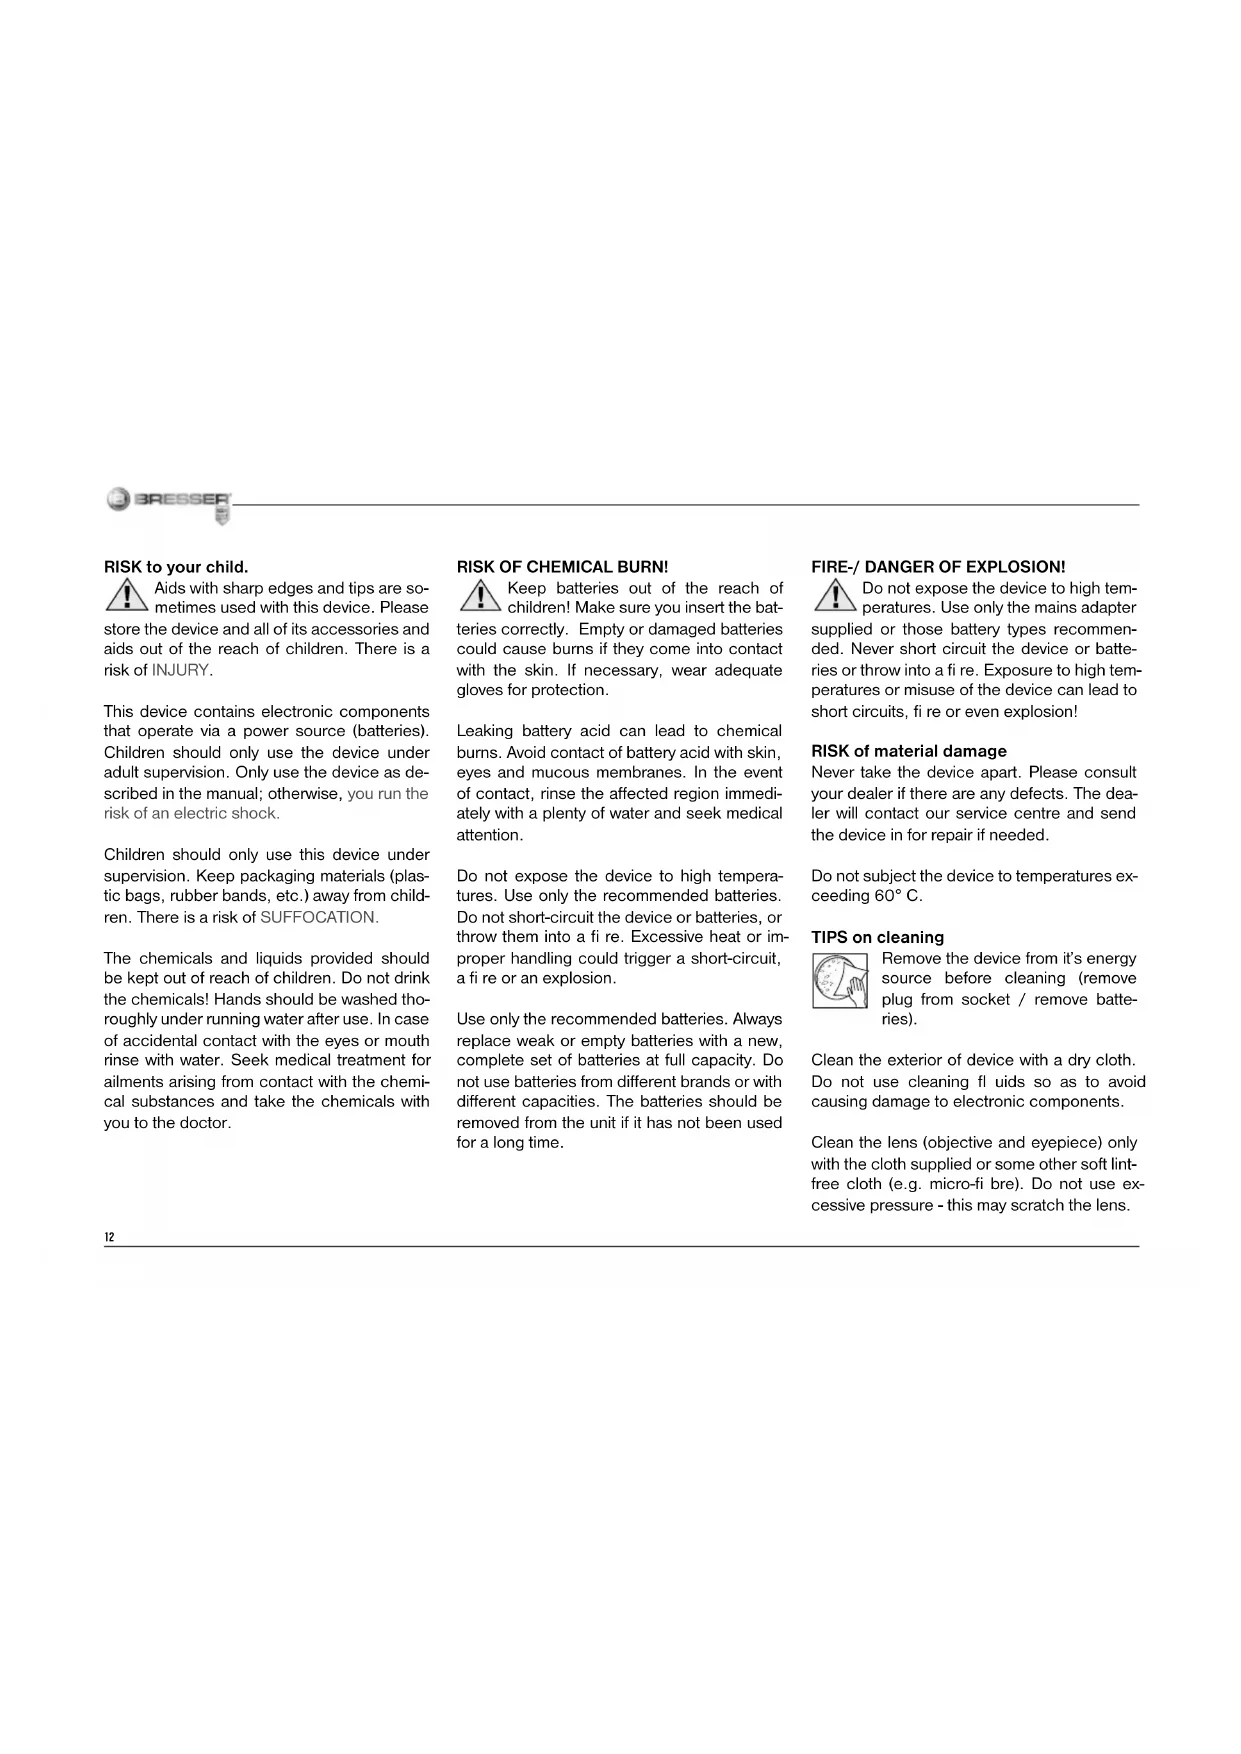
DISPOSAL
Dispose of the packaging material/s as legally required. Consult the local authority on the matter if necessary.
Do not dispose of electrical equipment in your ordinary refuse. The European guideline 2002/96/EU on Electronic and Electrical Equipment Waste and relevant laws applying to it require such used equipment to be separately collected and recycled in an environment-friendly manner. Empty batteries and accumulators must be disposed of separately. Information on disposing of all such equipment made after 01 June 2006 can be obtained from your local authority.
In accordance with the regulations concerning batteries and rechargeable batteries, disposing of them in the normal household waste is explicitly forbidden. Please make sure to dispose of your used batteries as required by law - at a local collection point or in the retail market. Disposal in dome
stic waste violates the Battery Directive. Batteries that contain toxins are marked with a sign and a chemical symbol. ^ = cadmium, ^ = mercury, ^ = lead.
1 battery contains cadmium
2 battery contains mercury
3 battery contains lead
EEC conformity explanation
Germany, explains the agreement with in the following specified EEC guidelines for this product:
EN55011/A2:2007
Product description: MicroSet
Model/Description:XSP
Rhede, 16-09-2008
Bresser GmbH

Helmut Ebbert
Managing director


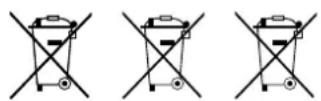
Here are the parts of your microscope
1 16x WF Eyepiece
2 10x WF Eyepiece
3 Barlow Lens
4 MicrOcular
5 Eyepiece supports
6 Microscope Head
7 Set Screw
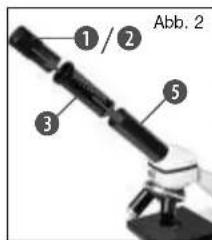
8 Objective Nosepiece
9 Objective
10 Clips
11 Microscope Stage
12 LED Illumination (transmitted light)
13 Microscope Base
14 Battery compartment
15 Focus knob
16 MicroOkular / Software
17 Slides, Cover Sips and Prepared Specimens plastic box
18 Specimens
19 Microscope utensils
20 Transmitted light switch on/off
21 Dimmer
How do I use my microscope?
Before you assemble your microscope, make sure that the table, desk or whatever surface that you want to place it on is stable, and does not wobble.
Electric LED illumination?
The microscope is equipped with modern LED lighting (a light-emitting diode) that illuminates the specimen from below. (By the way, the thing you want to observe with the microscope is known as the object or specimen.)
How do I adjust my microscope correctly?
First, loosen the screw (Fig. 1, 7) and turn the microscope head (Fig. 1, 6) into a comfortable viewing position.
Each observation starts with the lowest magnificatior.
Adjust the microscope stage (Fig. 1, 11) so that it goes all the way down to the lowest position. Then, turn the objective nosepiece (Fig. 1, 8) until it clicks into place at the lowest magnification (objective 4x ).
Note:
Before you change the objective setting, always move the microscope stage (Fig. 1, 11) to its lowest position. This way, you can avoid causing any damage!
Now, insert the 10x eyepiece (Fig. 1, 1) into the Barlow lens (Fig. 1, 3). Make sure that the Barlow lens is placed all the way into the eyepiece supports (Fig. 1, 5) and is not pulled out (Fig. 2).
How do I observe the specimen?
After you have assembled the microscope with the adequate illumination and adjusted it correctly, the following basic rules are to be observed:
Start with a simple observation at the lowest magnifi cation. This way, it is easier to position the object in the middle (centering) and make the image sharp (focusing).
The higher the magnifi cation, the more light you will require for a good image quality.

Now place the prepared specimen (Fig. 1, 19) directly under the objective on the microscope stage (Fig. 3). The object should be located
directly over the illumination (Fig. 1, 12).
In the next step, take a look through the eyepiece (Fig. 1, 1) and carefully turn the focus knob (Fig. 1, 16) until the image appears clear and sharp.
Now you can select a higher magnifi cation by slowly removing the Barlow lens (Fig. 1, 3) from the eyepiece support (Fig. 1, 5). When the Barlow lens is almost completely pulled out, the magnifi cation can be increased to -almost double. If you would like an even higher level of magnifi cation, insert the 16x eyepiece (Fig. 1, 2) and turn the objective nosepiece (Fig. 1, 8) to a higher setting (10x or 40x).
Important tip:
The highest magnifi cation is not always the best for every specimen!
Note:
Each time the magnific cation changes (eyepiece or objective change, pulling out the Barlow lens), the image sharpness must be
readjusted with the focus knob (Fig. 1, 16). When doing this, make sure to be careful. If you move the microscope stage too quickly, the objective and the slide could come into contact and become damaged!
For transparent objections (e.g. protozoa), on the other hand, the light shines from below, through the opening in the microscope stage and then through the object.
The light travels further through the objective and eyepiece, where it is also magnifi ed, and fi nally goes into the eye. This is transmittedlight microscopy.
Many microorganisms in water, many plan components and the smallest animal parts are already transparent in nature. Others have to be prepared. We may make them transparent through a treatment or penetration with the right materials (media), or by taking the thinnest slices from them (using our hand or a specimen slicer), and then examine them. You can read more about this in the following sections.
How do I make thin specimen slices?
Only do this with the supervision of your parents or another adult.
As I already pointed out, the thinnest slices possible are taken from an object. In order to get the best results, we need some wax or
paraffin. It is best if you get a candle. Place the wax in a pot and heat it carefully over a low burner. Now, dip the object in the liquid wax a few times. Then, let the wax get hard. Using the specimen slicer (Fig. 1,19) or a knife/scalpel, cut the smallest slices from the object that is covered with wax. These slices are to be laid on a slide and covered with a cover slip.
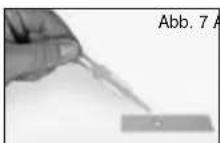
How do I make my own specimens?
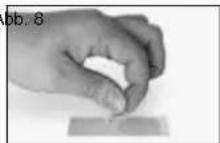
Take the object that you want to observe and place it on a glass slide. Then, add a few drops of distilled water on the object (Fig. 7) using a pipette (Fig. 1, 19). Now, place a cover slip vertically at the edge of the drop of water, so that the water runs along the edge of the cover slip. Then, slowly lower the cover slip over the water drops (Fig. 8).
Note:
The included glue "gum media" (Fig. 1, 18) is used to make permanent prepared specimens. Use this in place of the distilled water. If you want to keep the object in place on the slide permanently, use the gum media.

How do I install the MicrOcular?
Note:
The MicrOcular only works with the included Barlow lens! The magnifi cation setting is changed when the MicrOcular is used, and it must be readjusted with the focus knob.
First, remove the Barlow lens (Fig. 4, 3) with the current eyepiece from the eyepiece
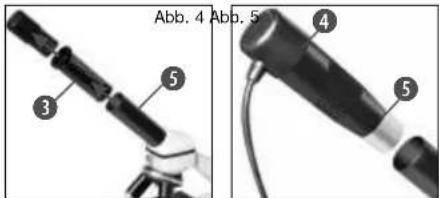
support (Fig. 4) and place the MicrOcular (Fig. 5, 4) in the eyepiece (Fig. 5).
How do I install the software?
1 Insert the CD-ROM supplied in your or DVD drive. The installation menu opens automatically. If it doesn't, please switch to Windows Explorer and select your CD drive. Start the fi le "setup.exe" by double-clicking it.
-
A choice of languages is shown. Choose your preference. Confirm it by clicking "OK". At the "Welcome" screen, click "Next".
-
In the next screen you will be asked for the "Destination Folder". Confirm your input with "Next".
- The setup status screen shows. This advises current operation status with a progress bar. This may take a few minutes.
- The Completed the Photomizer Setup Wizard" screen shows. Click here on "Finish".
MikrOkular driver installation
During Photomizer SE software installation the correct driver for your operating system will be installed automatically. No manual input is needed.
In rare cases the device may not be recognised by your computer. As a rule you need then only install the driver manually from the CD. If this fails please refer to the troubleshooting chapter that follows.
Troubleshooting: the device isn't
CDecognised by the computer (USB)
- This occurs in rare cases whith some OEM Windows Vista or XP versions. The device is not defective. Updating the notebook or PC USB driver usually suffices.
- If not, proceed as below. (The maker cannot accept any liability whatsoever in these cases).
Delete ghost devices. These are devices not actually currently connected to your
computer. The reason for this is that Windows generates a system settings entry for each USB device (e.g USB Stick) on each port. It then seeks that/those device/s each time it's started. This slows down USB device recognition and Windows booting and causes non-recognition of USB ports.
Cleaning up the system environment and deleting devices that are no longer in use helps here. To do so right click WORKPLACE (COMPUTER in Vista) and open the PROPERTIES menu. Then click the ADVANCED tab (ADVANCED SYSTEM SETTINGS in Vista) and then ENVIRONMENT VARIABLES. Choose the NEW option in ENVIRONMENT VARIABLES. Enter the following under VARIABLE NAME.
devmgr_show_nonpresent Devices
Under VARIABLE VALUE enter,1.
ConfirmyourinputwithOKand then reboot thecomputer.
Change to the device manager. In the VIEW menu activate the SHOW DEVICES OPTION. The ghost devices previously not shown will now be displayed in light grey. Check the various categories including USB, memory size, etc. Only delete entries for devices you no longer use.
Source: Microsoft Knowledge Base
http://support.microsoft.com/kb/315539/de
*Not included


**System requirements: Intel X86 processor with at least 2.0 GHz speed, 200 MB hard disc space, 512 MB RAM memory, Windows XP or Vista (32-bit) and a free USB port (not via a hub if possible).
Using the MicroOcular
Preparation
- Slide a specimen under your microscope and focus on it.
- Remove the eyepiece and Barlow lens from the eyepiece support and the dust cap from your MikrOkular and install same in the eyepiece supports instead of the Barlow lens.
- Start your PC if you haven't yet and connect your MikrOkular to the USB port of your computer.
Showing and saving MikrOkular images on your PC.
- Start the Photomizer SE Software.
- Click „Open camera“
-
If you have more one device connected up select the one you want from the choice offered. Click ,SoC PC-Camera" or "MikrOkular". Omit this step if you only have a single device connected up.
-
The camera image should now be visible on your screen. Focus the microscope image.
- Click "Capture" to record an image. It will then be shown on the right.
- Click on it to select it and then click "Transfer image".
- This takes you to the Photomizer SE software.
- File - Save as
The Photomizer SE software
If you need help in the „Photomizer SE“ programme click ,? and then „Open help“. If you need further assistance please visit the maker's home page at www.photomize
Make sure your microscope has a long service life.
Clean the lens (objective and eyepiece) only with the cloth supplied or some other soft lint-free cloth (e.g.microfi bre). Do not press hard as this might scratch the lens.
Ask your parents to help if your microscope is really very dirty. The cleaning cloth should be moistened with cleaning fluid and the lens wiped clean using little pressure.
Make sure your microscope is always protected against dust and dirt. After use leave it in a warm room to dry off. Then install the dust caps and keep it in the case provided.

Troubleshooting
| Error Solution | |
| No recognizable image | ·Turn on light ·Readjust focus |
| Image flickers (while observing with MicrOcular) = Monitor refresh rate not adequate | ·If necessary, increase resolution of graphics card |
Make sure your microscope has a long service life.
Clean the lens (objective and eyepiece) only with the cloth supplied or some other soft lint-free cloth (e.g.microfi bre). Do not press hard as this might scratch the lens.
Ask your parents to help if your microscope is really very dirty. The cleaning cloth should be moistened with cleaning fuid and the lens wiped clean using little pressure.
Make sure your microscope is always protected against dust and dirt. After use leave it in a warm room to dry off. Then install the dust caps and keep it in the case provided.

BRESSER


Source: Microsoft Knowledge Base
http://support.microsoft.com/kb/315539/de
EI software Photomizer SE

- RISK OF CHEMICAL BURN!
- FIRE-/ DANGER OF EXPLOSION!
- RISK of material damage
- TIPS on cleaning
- DISPOSAL
- EEC conformity explanation
- Here are the parts of your microscope
- How do I use my microscope?
- Electric LED illumination?
- How do I adjust my microscope correctly?
- Note:
- How do I observe the specimen?
- Important tip:
- How do I make thin specimen slices?
- How do I make my own specimens?
- How do I install the MicrOcular?
- How do I install the software?
- MikrOkular driver installation
- Troubleshooting: the device isn't
- CDecognised by the computer (USB)
- devmgr_show_nonpresent Devices
- Using the MicroOcular
- Preparation
- Showing and saving MikrOkular images on your PC.
- The Photomizer SE software
- Make sure your microscope has a long service life.
- EI software Photomizer SE
Brand : BRESSER
Model : Junior Biolux
Category : Microscope