
Biolux ICD Pro - Microscope BRESSER - Free user manual and instructions
Find the device manual for free Biolux ICD Pro BRESSER in PDF.

| Brand | Bresser |
| Model | Biolux ICD Pro |
| Product type | Stereo binocular microscope |
| Power supply | 2 AA batteries (1.5 V) |
| Lighting | Integrated LED (reflected and transmitted light) |
| Magnification | Not specified (estimated: up to 40x) |
| Eyepieces | 2 removable eyepieces |
| Stage | With specimen plate and tweezers |
| Focusing | Focusing knob |
| Material | Plastic and metal |
| Dimensions | Approximately 25 x 20 x 35 cm (estimated) |
| Weight | Approximately 1 kg (estimated) |
| Lens care | Soft microfiber cloth, possibly eyeglass cleaner |
| Exterior cleaning | Dry cloth, no liquid |
| Child safety | Choking hazard (small parts) |
| Recommended age | From 8 years (Bresser JUNIOR label) |
| Included accessories | Mineral samples, tweezers |
| Warranty | 2 years (extendable upon registration) |
| Approval | CE |
Frequently Asked Questions - Biolux ICD Pro BRESSER
User questions about Biolux ICD Pro BRESSER
0 question about this device. Answer the ones you know or ask your own.
Ask a new question about this device
Download the instructions for your Microscope in PDF format for free! Find your manual Biolux ICD Pro - BRESSER and take your electronic device back in hand. On this page are published all the documents necessary for the use of your device. Biolux ICD Pro by BRESSER.
USER MANUAL Biolux ICD Pro BRESSER
natural_image
White and black laboratory microscope with visible lens and base mount (no text or symbols on the device itself)DE Bedienungsanleitung
EN Operating Instructions
FR Mode d'emploi
NL Handleiding
IT Istruzioni per l'uso
ES Instrucciones de uso
PT Manual de utilização

BRESSER
JUNIOR

MANUAL DOWNLOAD:

WARNINGS! Not suitable for children under three years. CHOKING HAZARD - small parts. PUNCTURING HAZARD - functional sharp points or sharp edges. Keep instructions and packaging as they contain important information.

natural_image
Close-up of a camera lens component labeled Fig. 4, showing mechanical parts and a numbered annotation (no readable text or symbols beyond labels)B BRESSER JUNIOR
chemical
Chemical structure diagram of Cd¹Hg²Pb³ catalyst with three identical configurations shownNO. 818 Rongji Road,
Luotuo, Ningbo 315202 Zhejiang,
P.R. China.
www.mustangbattery.com

natural_image
Abstract geometric shapes with diagonal lines and small arrows, no text or symbols presentObjektplatte

Standort
- Choking hazard – This product contains small parts that could be swallowed by children. This poses a choking hazard.
- Risk of electric shock – This device contains electronic components that operate via a power source (power supply and/or batteries). Only use the device as described in the manual, otherwise you run the risk of an electric shock.
- Risk of fire/explosion – Do not expose the device to high temperatures. Use only the recommended batteries. Do not short-circuit the device or batteries, or throw them into a fire. Excessive heat or improper handling could trigger a short-circuit, a fire or an explosion.
- Risk of chemical burn — Make sure you insert the batteries correctly. Empty or damaged batteries could cause burns if they come into contact with the skin. If necessary, wear adequate gloves for protection.
- Leaking battery acid can lead to che-
mical burns. Avoid contact of battery acid with skin, eyes and mucous membranes. In the event of contact, rinse the affected region immediately with a plenty of water and seek medical attention.
- Use only the recommended batteries. Always replace weak or empty batteries with a new, complete set of batteries at full capacity. Do not use batteries from different brands or with different capacities. Remove the batteries from the unit if it has not been used for a long time.
- Never recharge normal, non-rechargeable batteries. This could lead to explosion during the charging process.
- Rechargeable batteries may only be charged under adult supervision.
- Rechargeable batteries must be removed from the toy before charging.
- Do not short-circuit the terminals.
- Do not disassemble the device. In the event of a defect, please contact your dealer. The dealer will contact the Ser-
vice Centre and can send the device in to be repaired, if necessary.
- Tools with sharp edges are often used when working with this device. Because there is a risk of injury from such tools, store this device and all tools and accessories in a location that is out of the reach of children.
- Keep instructions and packaging as they contain important information.

DISPOSAL
Dispose of the packaging materials properly, according to their type (paper, cardboard, etc). Contact your local waste disposal service or environmental authority for information on the proper disposal.

Do not dispose of electronic devices in the household garbage!
As per the Directive 2012/19/EC of the European Parliament on waste electrical and electronic equipment and its adaptation into German law, used electronic devices must be collected separately and recycled in an environmentally friendly manner.
Empty old batteries must be disposed of at battery collection points by the consumer. You can find out more information about the disposal of devices or batteries produced after 01.06.2006 from your local waste disposal service or environmental authority.
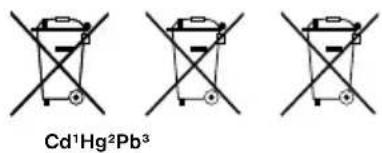
In accordance with the regulations concerning batteries and rechargeable batteries, disposing of them in the normal household waste is explicitly forbidden. Please pay attention to dispose of your used batteries as required by law - at a local collection point or in the retail market (a disposal in domestic waste violates the Battery Directive).
Batteries that contain toxins are marked with a sign and a chemical symbol. „Cd“ = cadmium, „Hg“ = mercury, „Pb“ = lead.
chemical
Chemical structure diagram of Cd¹Hg²Pb³ catalyst with cross-shaped electrodes and charge carriers^1 battery contains cadmium
^2 battery contains mercury
^3 battery contains lead
EC Declaration of Conformity
CE Bresser GmbH has issued a "Declaration of Conformity" in accordance with applicable guidelines and corresponding standards. The full text of the EU declaration of conformity is available at the following internet address: www.bresser.de/download/8852001/CE/8852001_CE.pdf
Manufacturer of the batteries:
NO. 818 Rongji Road, Luotuo, Ningbo 315202 Zhejiang, P.R. China. www.mustangbattery.com

Your microscope is made up of the following parts (Fig. 1-4):
1 Binocular view piece (with eye-piece supports)
2 Stereo objective
3 Eyepieces
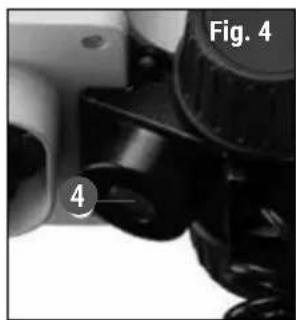
4 Illumination (LED)
5 Microscope stage (with object plate)
6 Stage clips
7 Focus knob
8 On/off switch
9 Battery compartment
10 Mounting screws
11 Battery contacts (flat sheets and spring terminals)
12 mineral samples Incident light microscopy

natural_image
Collection of irregularly shaped gray stone fragments on white background (no text or symbols)5 prepared slides Transmitted light microscopy

natural_image
Abstract geometric shapes with diagonal lines and small arrows, no text or symbols presentObject plate

Location
Before you start, choose an ideal location for using your microscope. It is important that you have enough light available (window, desk lamp).
Simple Observation
Place the object to be observed (for example, a rock) in the middle of the microscope stage (5). When the object is large enough, it is best to fix it in place with the stage clips (6).
Now, take a look through the binocular eye lens (1) and change the distance of the eyepiece (3), so that you have a circular, clear image.
The sharpness is adjusted by slowly turning the focus knob (7).

Illumination
Remove both eyepieces (3) from the eyepiece supports (1) and turn the entire microscope over. In the base of the microscopethereisabatterycompartment (9). Loosen the fixing screw (10) of the battery compartment cover and remove the cover.
Place the batteries (2x AA) in the compartment so that the flat minus poles (-) press against the spring terminal and the plus poles (+) are touching the flat contact sheets (11).
Put on the cover and fix it with the screw (10). Turn the microscope over again. Place the eyepieces back on. You can not turn on the light (4) with the on/off switch(8)onthebaseofthemicroscope.
Experiments
Use the following web link to find interesting experiments you can try out.
How do you hatch brine shrimp? How to make salt crystals and much more.
Remove the device from it's energy source before cleaning (remove batteries).
Clean the exterior of device with a dry cloth. Do not use cleaning fluids so as to avoid causing damage to electronic components.
Protect the device from dust and moisture. Store the device in the bag supplied or in its original packaging. Batteries should be removed from the device if it is not going to be used for a long period of time.
Clean the lens (objective and eye-piece) only with a soft lint-free cleaning cloth (e.g. micro-fibre). Do not use excessive pressure - this may scratch the lens.
Dampen the cleaning cloth with a spectacle cleaning fluid and use it on very dirty lenses.
B BRESSER JUNIOR
chemical
Chemical structure diagram of Cd¹Hg²Pb³ catalyst with three cross-shaped catalystsnatural_image
Collection of irregularly shaped gray stone fragments on white background (no text or symbols)5 lames préparées
natural_image
Abstract geometric shapes with no text or symbolsDisque d'objet

Lieu
NO. 818 Rongji Road,
Luotuo, Ningbo 315202 Zhejiang,
P.R. China.
www.mustangbattery.com

natural_image
Collection of irregularly shaped gray stone fragments on white background (no text or symbols)5 bereid slides Doorlichtmicroscopie

natural_image
Abstract geometric shapes with diagonal lines and small arrows, no text or symbols presentObjectplate

Locatie
natural_image
Three identical line drawings of a trash bin with no text or symbols, crossed by diagonal lines (no text or symbols present)Cd^1Hg^2Pb^3
^1 Batteria contiene cadmio
^2 Batteria contiene mercurio
^3 Batteria contiene piombo
NO. 818 Rongji Road,
Luotuo, Ningbo 315202 Zhejiang, P.R. China.
www.mustangbattery.com

I componenti del tuo microscopio (fig. 1-4):
natural_image
Collection of irregular gray stone fragments arranged in two rows (no text or symbols visible)5 vetrini preparati Microscopia in luce trasmessa
natural_image
Abstract geometric shapes with no text or symbolschemical
Chemical structures of Cd¹Hg²Pb³ catalysts with cross-sectional viewsNO. 818 Rongji Road,
Luotuo, Ningbo 315202 Zhejiang,
P.R. China.
www.mustangbattery.com

natural_image
Collection of irregularly shaped gray stone fragments on white background (no text or symbols)natural_image
Abstract geometric shapes with no text or symbolsPlatina de objeto
Lugar
chemical
Chemical structures of Cd¹Hg²Pb³ catalysts with cross-shaped and rectangular elementsnatural_image
Collection of irregular gray stone fragments arranged in two rows (no text or symbols visible)5 lâminas preparadas Microscopia de luz transmitida

natural_image
Abstract geometric shapes with no text or symbolsPlaca de objeto

Local de instalação
EN Warranty & Service
The regular warranty period is 2 years and begins on the day of purchase. To benefit from an extended voluntary warranty period as stated on the gift box, registration on our website is required.
You can consult the full warranty terms as well as information on extending the warranty period and details of our services at www.bresser.de/warranty_terms.

SERVICE AND WARRANTY:

www.bresser.de/warranty_terms

BRESSER®
-junior-
Bresser GmbH
Gutenbergstraße 2
46414 Rhede · Germany
www.bresser-junior.de


@BresserEurope
Bresser UK Ltd.
Suite 3G, Eden House
Enterprise Way, Edenbridge,
Kent TN8 6HF, Great Britain

- B BRESSER JUNIOR
- Standort
- DISPOSAL
- EC Declaration of Conformity
- Manufacturer of the batteries:
- Your microscope is made up of the following parts (Fig. 1-4):
- mineral samples Incident light microscopy
- prepared slides Transmitted light microscopy
- Object plate
- Location
- Simple Observation
- Illumination
- Experiments
- lames préparées
- Lieu
- bereid slides Doorlichtmicroscopie
- Objectplate
- Locatie
- I componenti del tuo microscopio (fig. 1-4):
- vetrini preparati Microscopia in luce trasmessa
- Lugar
- lâminas preparadas Microscopia de luz transmitida
- Placa de objeto
- Local de instalação
- EN Warranty & Service
- BRESSER®
- -junior-
- Bresser GmbH
- Bresser UK Ltd.
Brand : BRESSER
Model : Biolux ICD Pro
Category : Microscope