
D25303DH - Vacuum Cleaner DEWALT - Free user manual and instructions
Find the device manual for free D25303DH DEWALT in PDF.
| Product Type | Dust extraction system for rotary hammer |
| Brand | DeWalt |
| Model | D25303DH |
| Voltage | 18 V (cordless, compatible with DeWalt battery packs) |
| Maximum contact pressure | 60 N |
| Maximum stroke | 125 mm |
| Max. drilling diameter | 16 mm |
| Compatible materials | Masonry, concrete (with solid drill bits) |
| Compatible hammers | DeWalt DCH253, DCH254 (type 2), DCH273, DCH274 |
| Main features | Automatic start/stop, electronic shutdown delay, depth and length adjustment, telescopic sleeve |
| Collector type | Removable dust collector with filter |
| Collector capacity | Approx. 0.5 L (estimated) |
| Dust brush | Removable and replaceable |
| Weight (without battery) | Approx. 1.5 kg (estimated) |
| Dimensions (L × W × H) | Approx. 400 × 150 × 200 mm (estimated) |
| Maintenance and cleaning | Empty the collector regularly, clean the filter with compressed air, replace the brush and filter if worn |
| Safety | Approved safety glasses and dust mask mandatory during maintenance; do not vacuum flammable liquids |
| Spare parts | Filter, dust brush, dust collector (DeWalt original parts recommended) |
| General information | Professional accessory for use with DeWalt cordless SDS Plus rotary hammers; do not use for drilling wood, steel or plastic |
Frequently Asked Questions - D25303DH DEWALT
User questions about D25303DH DEWALT
0 question about this device. Answer the ones you know or ask your own.
Ask a new question about this device
Download the instructions for your Vacuum Cleaner in PDF format for free! Find your manual D25303DH - DEWALT and take your electronic device back in hand. On this page are published all the documents necessary for the use of your device. D25303DH by DEWALT.
USER MANUAL D25303DH DEWALT
English (original instructions) 15
Figure 3

natural_image
Technical diagram of a vehicle rear view showing internal components and structural lines (no text or labels)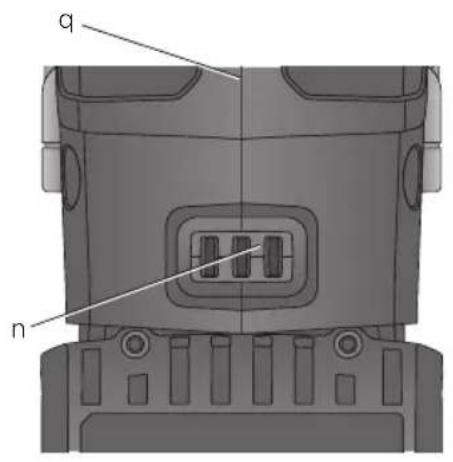
Figure 4
natural_image
Technical illustration of a DeWALT firearm with labeled parts (no text or symbols beyond branding)Figure 5
natural_image
3D mechanical assembly diagram showing a rectangular component with labeled dimensions (t, r) and directional arrows indicating assembly or assembly steps.Figure 6

natural_image
Illustration of a hand operating a DeWALT surveying instrument (no text or symbols visible)Figure 7
ST∅VOPSAMLINGSSYSTEM D25303DH
Tillykke!
Betylen risiko for brand.
ADVARSEL: For at reducere

ADVARSEL: For at reducere

You have chosen a DEWALT tool. Years of experience, thorough product development and innovation make DEWALT one of the most reliable partners for professional power tool users.
Technical Data
| D25303DH | ||
| Contact pressure N 60 | ||
| Max. stroke mm 125 | ||
| Max. drill diameter mm | 16 | |
| Voltage | V | 18 |
Definitions: Safety Guidelines
The definitions below describe the level of severity for each signal word. Please read the manual and pay attention to these symbols.

DANGER: Indicates an imminently hazardous situation which, if not avoided, will result in death or serious injury.

WARNING: Indicates a potentially hazardous situation which, if not avoided, could result in death or serious injury.

CAUTION: Indicates a potentially hazardous situation which, if not avoided, may result in minor or moderate injury.
NOTICE: Indicates a practice not related to personal injury which, if not avoided, may result in property damage.

Denotes risk of electric shock.

Denotes risk of fire.
Safety Instructions
WARNING! Always observe safety regulations applicable in your country to reduce the risk of fire, electric shock and personal injury.
Read all of this manual carefully before operating the attachment. Also refer to the manual of any power tool that will be used with this attachment.
SAVE THIS MANUAL FOR FUTURE REFERENCE
General Safety Rules
- Keep work area clear.
Cluttered areas and benches invite injuries.
- Keep children away.
Do not let children come into contact with the tool or extension cord. Supervision is required for those under 16 years of age.
- Use appropriate tool.
The intended use is described in this instruction manual. Do not force small tools or attachments to do the job of a heavy-duty tool. The tool will do the job better and safer at the rate for which it was intended.

G: The use of any accessory or attachment or performance of any operation with this tool, other than those recommended in this instruction manual may present a risk of personal injury.
EC-Declaration of Conformity
MACHINERY DIRECTIVE

DUST EXTRACTION SYSTEM D25303DH
DEWALT declares that these products described under Technical Data are in compliance with: 2006/42/EC, EN 60745-1.
These products also comply with Directive 2004/108/EC and 2011/65/EU. For more information, please contact DEWALT at the following address or refer to the back of the manual.
The undersigned is responsible for compilation of the technical file and makes this declaration on behalf of DEWALT.

Marcus Rompel
Vice President Engineering
DEWALT, Richard-Klinger-Strasse 11,
D-65510, Idstein, Germany
01.03.2015

IG: To reduce the risk of injury, read the instruction manual.
Additional Specific Safety Rules for Dust Extraction Systems
- Do not use the attachment for drilling applications in wood, steel or plastic.
- Do not use the attachment in core drilling applications.
- Do not use the attachment for chiselling applications.
- Use only power tools recommended by DEWALT with this attachment. For more information about DEWALT power tools compatible with this attachment, please contact your local dealer, refer to the addresses at the back of the manual or visit www.dewalt.com.
- Do not use the tool in damp or wet conditions.
- Do not allow to be used as a toy. Close attention is necessary when used by or near children.
- Use only as described in this manual. Use only manufacturer's recommended attachments.
- Do not put any object into openings. Do not use with any opening blocked; keep free of dust, lint, hair and anything that may reduce air flow.
- Keep hair, loose clothing, fingers and all parts of body away from openings and moving parts.
- Do not use to pick up flammable or combustible liquids, such as gasoline, or use in areas where they may be present.
Residual Risks
The following risks are inherent to the use of the dust extraction system:
- injuries caused by touching the rotating parts or hot parts of the tool
In spite of the application of the relevant safety regulations and the implementation of safety devices, certain residual risks cannot be avoided. These are:
- Impairment of hearing.
- Risk of squeezing fingers when changing the accessory.
- Health hazards caused by breathing dust developed when working in concrete and/or masonry.
Markings on Dust Extraction System
The following pictograms are shown on the tool:

Read instruction manual before use.
DATE CODE POSITION
The Date Code, which also includes year of manufacture, is printed into the housing surface that forms the mounting joint between tool and dust box.
Example:
2015 XX XX
Year of Manufacture
Package Contents
The package contains:
1 Dust extraction system
1 Side handle
1 Dust extraction head/dust brush
1 Instruction manual
- Check for damage to the tool, parts or accessories which may have occurred during transport.
- Take the time to thoroughly read and understand this manual prior to operation.
Description (fig. 1–3, 5, 7)

WARNING: Never modify the power tool or any part of it. Damage or personal injury could result.
a. Dust extraction system
b. Base release buttons
c. Dust collection box
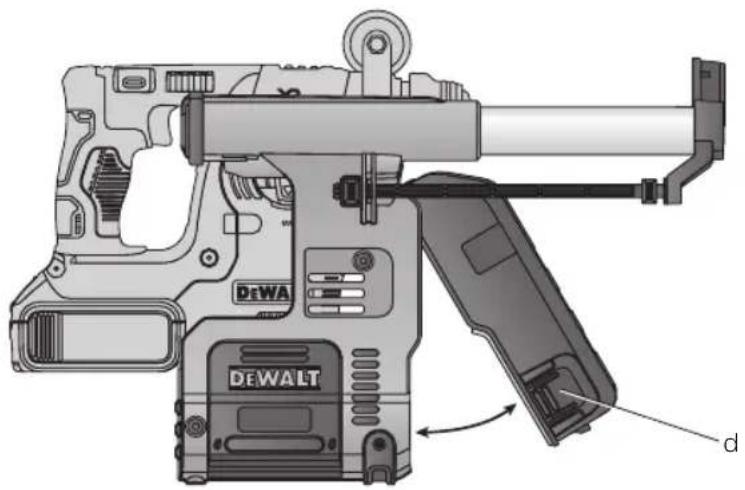
d. Dust collection box release buttons
e. Telescope
f. Depth adjustment button
g. Length adjustment button
h. Dust extraction head
i. Dust brush
j. Side handle
k. Side handle support groove
I. Side handle support locator
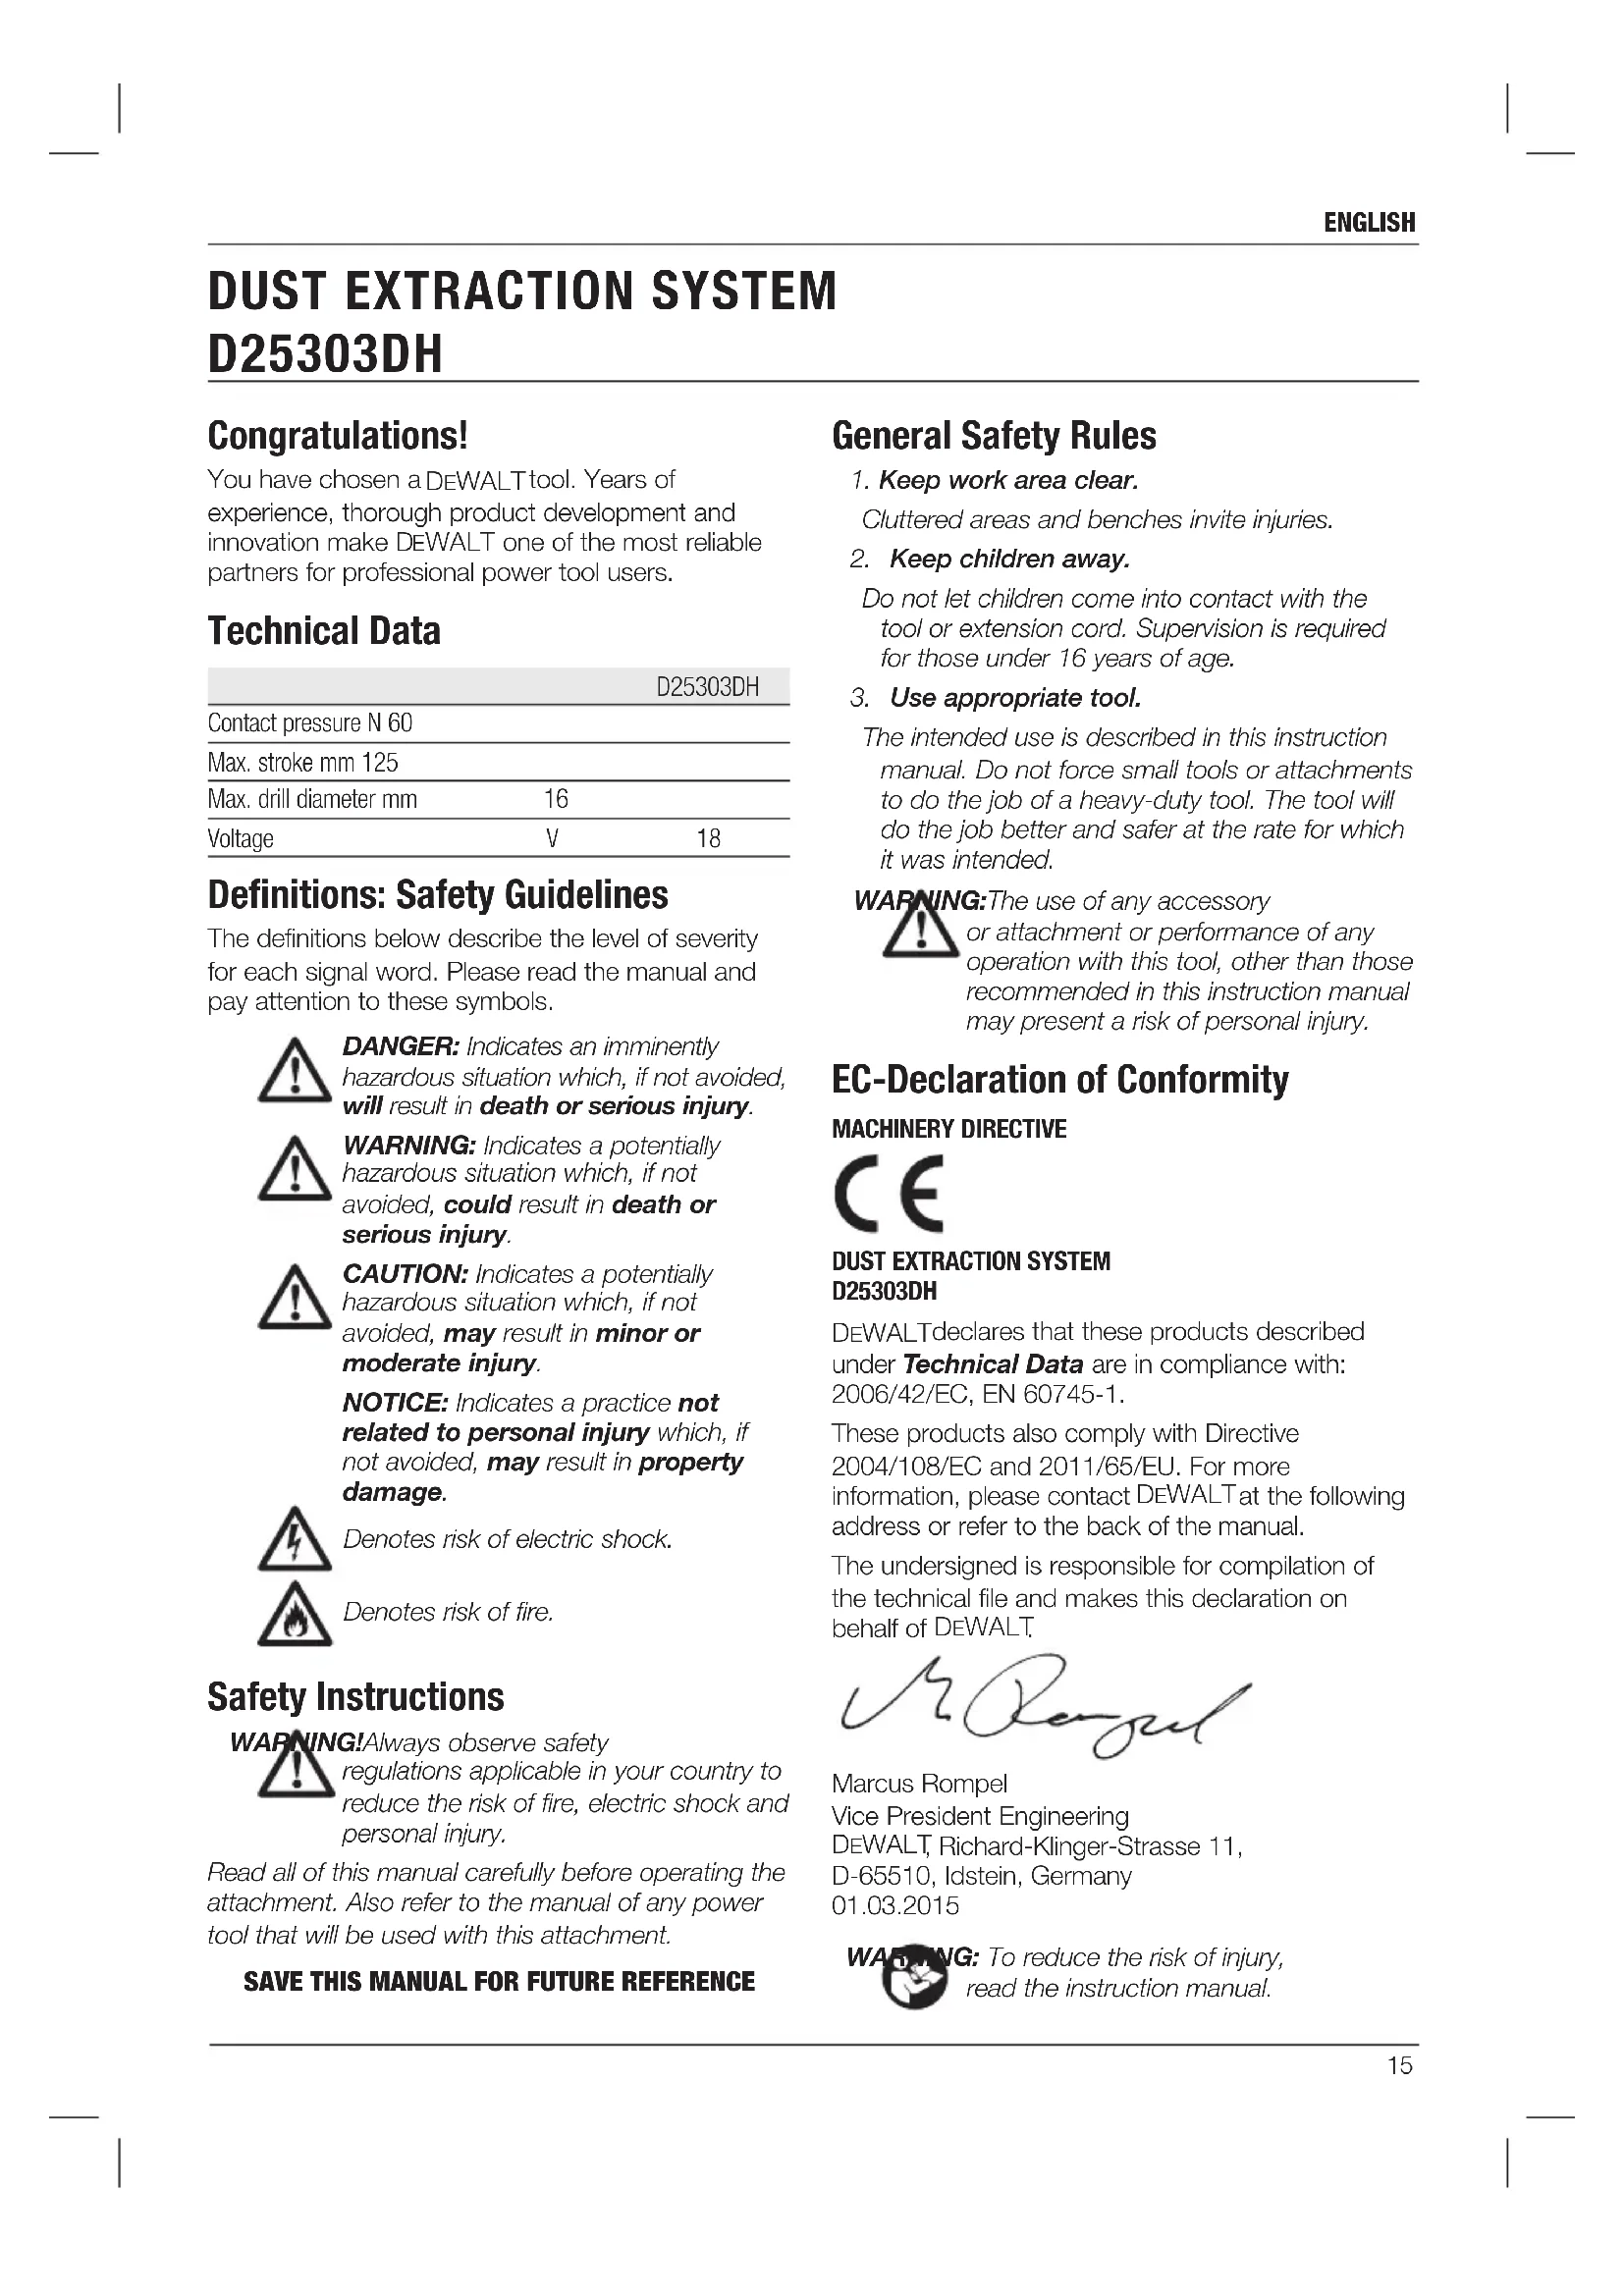
m. Dust extractor electrical connectors
n. Rotary hammer electrical connectors
o. Locking and release shoe
p. Dust collection box opening catch
q. Hammer foot
r. Filter
s. Snap-fit connector
t. Filter frame
INTENDED USE
Your dust extraction system D25303DH has been designed for the extraction of dust in professional hammerdrilling in masonry or concrete, and with solid drill bits mounted to the power tool. DO NOT use for drilling plastic, wood or metal.
This dust extraction system will fit DEWALT 18V cordless SDS Plus® hammers DCH253, DCH254 (TYPE 2 only), DCH273 and DCH274. For more information about DEWALT power tools compatible with this attachment, please contact your local dealer, refer to the addresses at the back of the manual or visit www.dewalt.com.
DO NOT use under wet conditions or in presence of flammable liquids or gases.
The dust extraction system is an attachment for use with professional power tools.
DO NOT let children come into contact with the tool. Supervision is required when inexperienced operators use this tool.
- Young children and the infirm. This appliance is not intended for use by young children or infirm persons without supervision.
- This product is not intended for use by persons (including children) suffering from diminished physical, sensory or mental abilities; lack of experience, knowledge or skills unless they are supervised by a person responsible for their safety. Children should never be left alone with this product.
Electrical Safety
The electric motor has been designed for one voltage only. Always check that the battery pack voltage corresponds to the voltage on the rating plate. Also make sure that the voltage of your charger corresponds to that of your mains.

Your DEWALT charger is double insulated in accordance with EN 60335; therefore no earth wire is required.
If the supply cord is damaged, it must be replaced by a specially prepared cord available through the DEWALT service organization.
ASSEMBLY AND ADJUSTMENTS
WARNING: To reduce the risk of serious personal injury, turn tool off and disconnect battery pack or power source before making any adjustments or removing/installing attachments or accessories. An accidental start-up can cause injury.
Attaching and Removing the Dust Extraction System

WARNING: To reduce the risk of personal injury, ALWAYS operate the tool with the side handle properly installed and securely tightened. Failure to do so may result in the side handle slipping during tool operation and subsequent loss of control.
TO ATTACH THE DUST EXTRACTION SYSTEM (FIG. 1, 3, 5)
- Remove the drill bit, side handle and the depth adjustment rod, if attached to the rotary hammer.
- Attach supplied side handle (j) to the rotary hammer.
- Ensure the base release buttons (b) are depressed and locked in the open position before attempting to fit the dust extraction system to the rotary hammer.
- Push the locking shoe (o) down with the rotary hammer foot (q). Make sure that the groove in the side handle collar fits to the locator element (l) on the extractor. The base release buttons (b) will lock into to the screw bosses of the rotary hammer foot (q). The electrical connectors (n) in the base of the rotary hammer will align with the electrical connectors (m) in the extractor base.
TO REMOVE THE SYSTEM
To remove the dust extraction system, press the two extractor base release buttons (b) and lift the rotary hammer off the duct extraction system (Fig. 2).
OPERATION
WARNING: To reduce the risk of serious personal injury, turn tool off and disconnect battery pack or power source before making any adjustments or removing/installing attachments or accessories. An accidental start-up can cause injury.
WARNING: Always observe the safety instructions and applicable regulations. WARNING: Always read and operate the tool as instructed in the tool instruction manual.
Switching On and Off
The extraction system automatically starts when the rotary hammer is turned on.
ELECTRONIC SWITCH-OFF DELAY
After turning the rotary hammer off, the extraction system will run for a few seconds longer to vacuum the remaining dust particles in the internal parts and collect the dust in the dust collection box.
Setting the Drilling Depth (fig. 1)
Press the depth adjustment button (f) on the front of the slider and move it to the desired drilling depth. Release the button.
Adjusting the Drill Length (fig. 1)
- Insert the appropriate drill bit.
- Hold the dust extraction head (h) against a wall.
- Push the tool to make the drill bit touch the surface wall.
- Press the length adjustment button (g) on top of the back slider and move it to the desired length. Release the button.
- Gently withdraw the tool assembly from the wall, taking care that the spring-loaded mechanism does not release.
Emptying the Dust Collector (fig. 1, 4, 5)
WARNING: Wear approved eye protection and approved dust mask when performing this procedure.
The dust collector (c) should be emptied as soon as the performance has noticeably decreased.
- Press the dust collection box release buttons (d) and pull the dust collection box away from the dust extraction system. Once the catch mechanism is clear of the dust extraction system the upper joint will also release allowing the dust collection box to be removed completely.
- To empty the dust collection box (c) position it over a suitable container to catch the dust contained within it. Lift up the release catch (p) to open the dust collection box, separating the canister from the lid. Gently tapping the dust collection box will encourage any dust trapped within the filter to also be removed. Once the filter lid and canister are empty reattach them, ensuring the release catch (p) is securely fastened. Refer to figure 5.
- To reattach the dust collection box to the dust extraction system first insert the rounded profile of the upper joint into the recess on the dust extraction system. Pivot the dust collection box down so that the release buttons click back into place. Refer to figure 4.
MAINTENANCE
Your DEWALT dust extraction system has been designed to operate over a long period of time with a minimum of maintenance. Continuous satisfactory operation depends upon proper care and regular cleaning.
WARNING: To reduce the risk of serious personal injury, turn tool off and disconnect battery pack or power source before making any adjustments or removing/installing attachments or accessories. An accidental start-up can cause injury.
WARNING: Use only replacement parts.
DEWALT
Replacing the Dust Collection Box Filter Element (fig. 4, 5)
WARNING: Wear approved eye protection and approved dust mask when performing this procedure.
- Press the dust collection box release buttons (d) and pull the dust collection box away from the dust extraction system. Once the catch mechanism is clear of the dust extraction system the upper joint will also release allowing the dust collection box to be removed completely.
- Lift up the release catch (p) to open the dust collection box, separating the box from the lid.
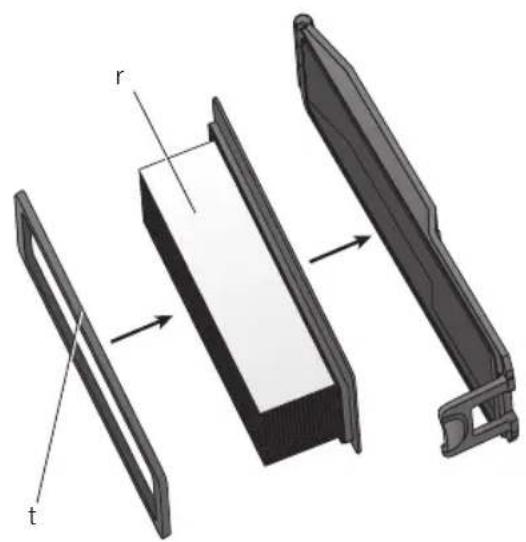
- Pull the filter element (r) off the lid.
- Use a screwdriver to remove the filter frame (t) from the lid.
- Place the new filter into the lid.
- Put the filter frame over the filter and push it into the lid until it locks in place.
- Reattach the lid to the canister and snap it closed.
- Reattach the dust collection box to the dust extraction system first insert the rounded profile of the upper joint into the recess on the dust extraction system. Pivot the dust collection box down so that the release buttons click back into place.
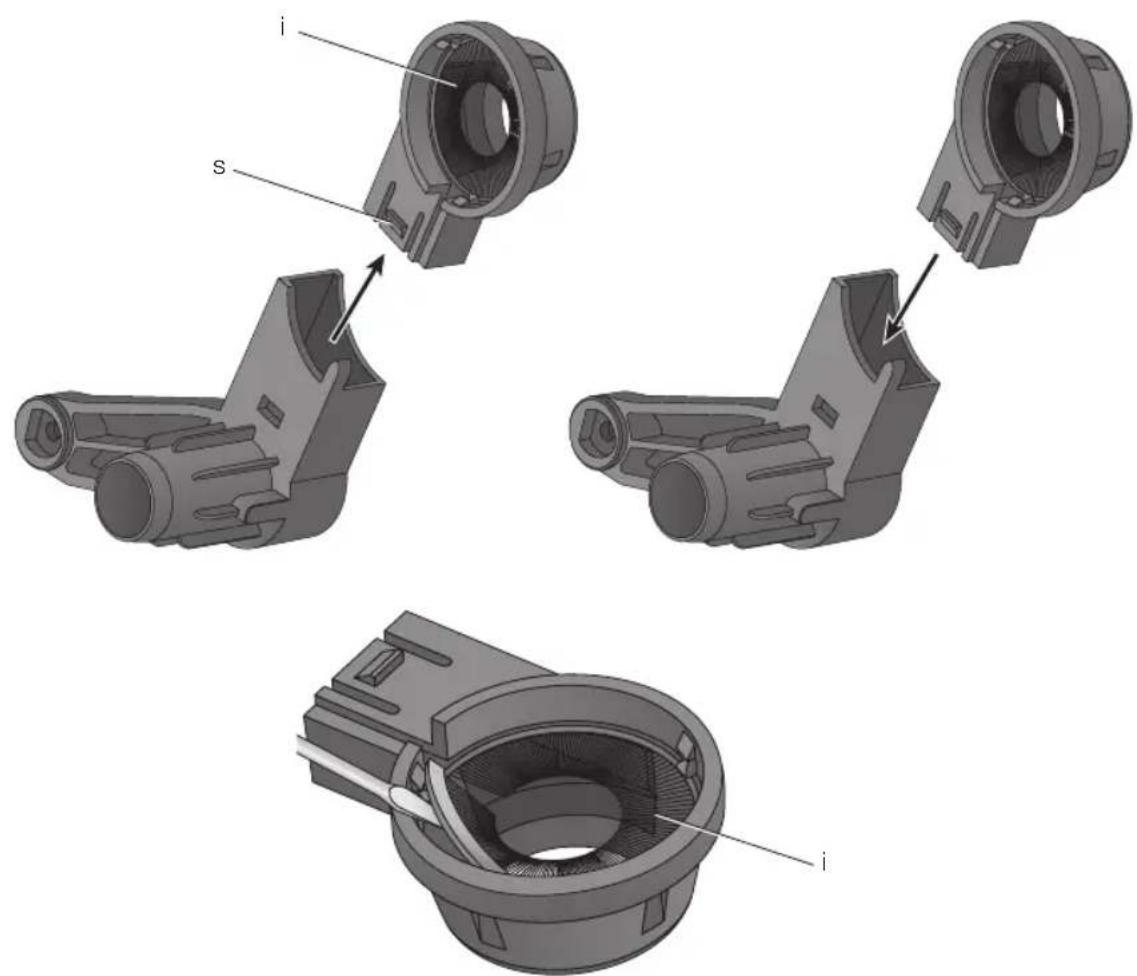
Replacing the Dust Brush (fig. 7)
WARNING: Wear approved eye protection and approved dust mask when performing this procedure.
The dust brush will wear during use and will need to be replaced.
- Push the snap-fit (s) at the back of the extraction head, and pull it out of the head holder.
- Use a screwdriver to remove the dust brush (i) out of the extraction head.
- Replace the dust brush with a new one.
- Make sure that the open end of the dust brush is positioned to the centering pocket at the extraction head.
- Push the extraction head back into the head holder. The centering pin will stick into the open end of the dust brush and secure it in place.

Cleaning

WARNING: Blow dirt and dust out of the main housing with dry air as often as dirt is seen collecting in and around the air vents. Wear approved eye protection and approved dust mask when performing this procedure.

WARNING: Never use solvents or other harsh chemicals for cleaning the non-metallic parts of the tool. These chemicals may weaken the materials used in these parts. Use a cloth dampened only with water and mild soap. Never let any liquid get inside the tool; never immerse any part of the tool into a liquid.
Cleaning the Dust Collector

G: Do not use a brush to clean the dust collector or filter.
During intensive use the dust collector becomes clogged with dust. Refer to Emptying the Dust Collector under Operation.
Optional Accessories

WARNING: Since accessories, other than those offered by DEWALT, have not been tested with this product, use of such accessories with this tool could be hazardous. To reduce the risk of injury, only DEWALT, recommended accessories should be used with this product.
Consult your dealer for further information on the appropriate accessories.
Protecting the Environment
Separate collection. This product must not be disposed of with normal household waste.

Should you find one day that your DEWALT product needs replacement, or if it is of no further use to you, do not dispose of it with household waste. Make this product available for separate collection.

Separate collection of used products and packaging allows materials to be recycled and used again. Re-use of recycled materials helps prevent environmental pollution and reduces the demand for raw materials.
Local regulations may provide for separate collection of electrical products from the household, at municipal waste sites or by the retailer when you purchase a new product.
DEWALT provides a facility for the collection and recycling of DEWALT products once they have reached the end of their working life. To take advantage of this service please return your product to any authorised repair agent who will collect them on our behalf.
You can check the location of your nearest authorised repair agent by contacting your local DEWALT office at the address indicated in this manual. Alternatively, a list of authorised DEWALT repair agents and full details of our after-sales service and contacts are available on the Internet at:
www.2helpU.com.
D-65510, Idstein, Germany
01.03.2015


- ST∅VOPSAMLINGSSYSTEM D25303DH
- Tillykke!
- Definitions: Safety Guidelines
- Safety Instructions
- General Safety Rules
- EC-Declaration of Conformity
- MACHINERY DIRECTIVE
- DUST EXTRACTION SYSTEM D25303DH
- Additional Specific Safety Rules for Dust Extraction Systems
- Residual Risks
- Markings on Dust Extraction System
- DATE CODE POSITION
- Package Contents
- Description (fig. 1–3, 5, 7)
- INTENDED USE
- Electrical Safety
- ASSEMBLY AND ADJUSTMENTS
- Attaching and Removing the Dust Extraction System
- TO ATTACH THE DUST EXTRACTION SYSTEM (FIG. 1, 3, 5)
- TO REMOVE THE SYSTEM
- OPERATION
- Switching On and Off
- ELECTRONIC SWITCH-OFF DELAY
- Setting the Drilling Depth (fig. 1)
- Adjusting the Drill Length (fig. 1)
- Emptying the Dust Collector (fig. 1, 4, 5)
- MAINTENANCE
- Replacing the Dust Collection Box Filter Element (fig. 4, 5)
- Replacing the Dust Brush (fig. 7)
- Cleaning
- Cleaning the Dust Collector
- Optional Accessories
- Protecting the Environment
Brand : DEWALT
Model : D25303DH
Category : Vacuum Cleaner