
WD 4 Premium - Vacuum Cleaner Kärcher - Free user manual and instructions
Find the device manual for free WD 4 Premium Kärcher in PDF.
User questions about WD 4 Premium Kärcher
0 question about this device. Answer the ones you know or ask your own.
Ask a new question about this device
Download the instructions for your Vacuum Cleaner in PDF format for free! Find your manual WD 4 Premium - Kärcher and take your electronic device back in hand. On this page are published all the documents necessary for the use of your device. WD 4 Premium by Kärcher.
USER MANUAL WD 4 Premium Kärcher
natural_image
Line drawing of a vacuum cleaner device with control panel and wheels (no text or symbols)Deutsch 5
English 11
Français 17
Italiano 24
Nederlands 30
Español 36
Português 42
Dansk 48
Norsk 54
Svenska 60
Suomi 66
Ελληνικά 72
Türkçe 79
Русский 85
Magyar 93
Čeština 99
Slovenščina 105
Polski 111
Românește 118
Slovenčina 124
Hrvatski 130
Srpski 136
Български 142
Eesti 149
Latviešu 155
Lietuviškai 161
Українська 167
Қазақша 175
العربية 214
Register and win! www.kaercher.com/register-and-win
EAC

59653160 03/14
text_image
1 2 3 4 5 6 7 8 910 | 11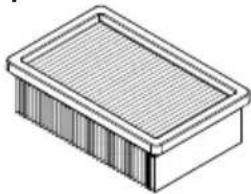 | 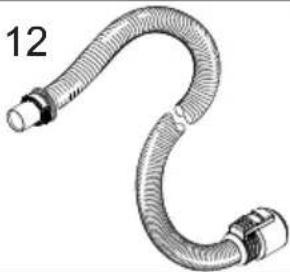 | 1^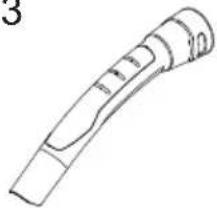 |
14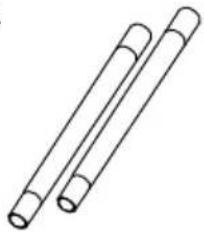 | 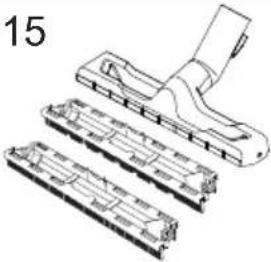 | 16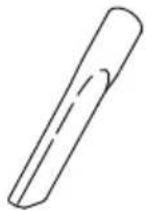 |
text_image
A 1 1. 2. 3.
text_image
A 2 1. 2. 1.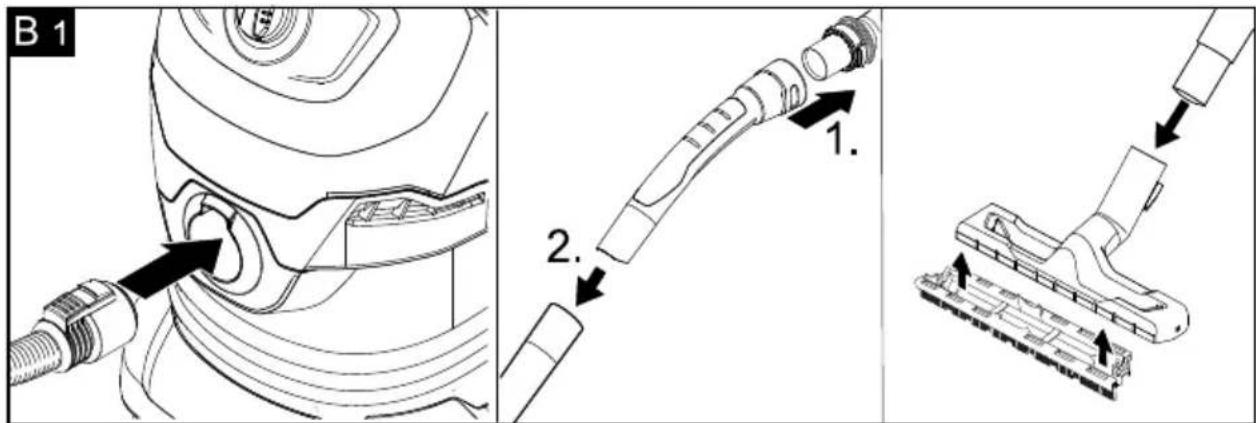
text_image
B 1 1. 2.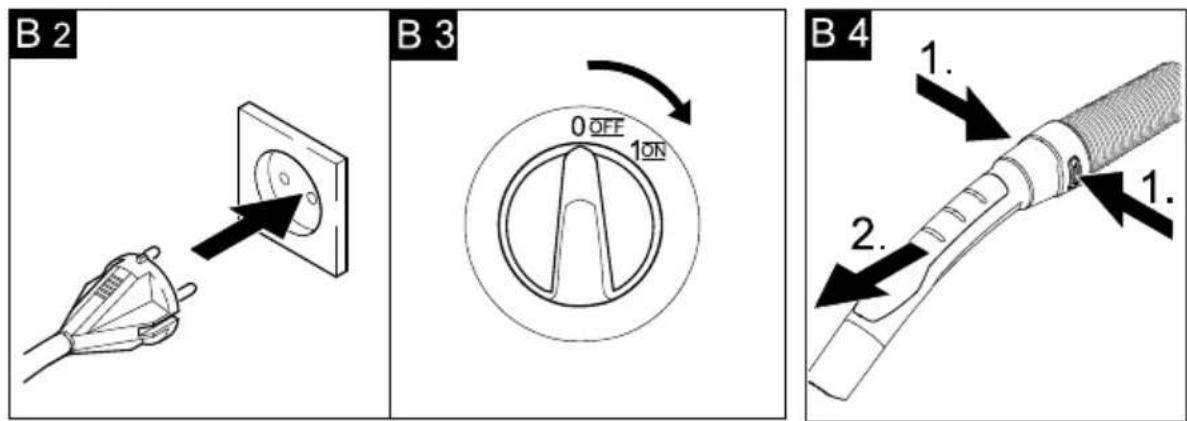
natural_image
Technical line drawing of a vacuum cleaner component with mounting bracket and valve (no text or symbols)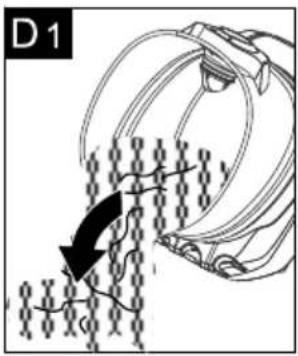
text_image
D 1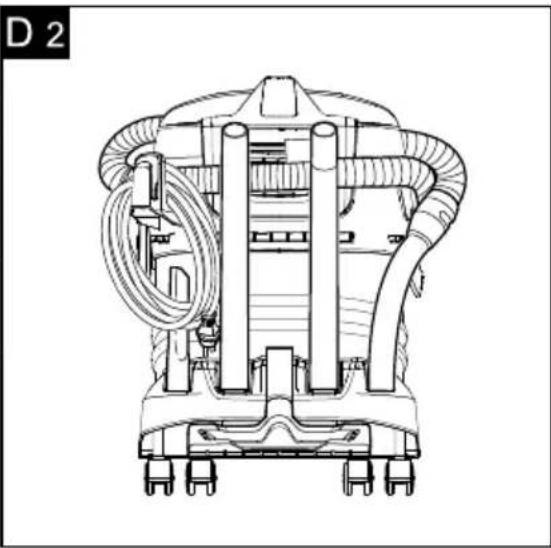
natural_image
Technical line drawing of a vacuum cleaner with coiled tubing and wheels (no text or symbols)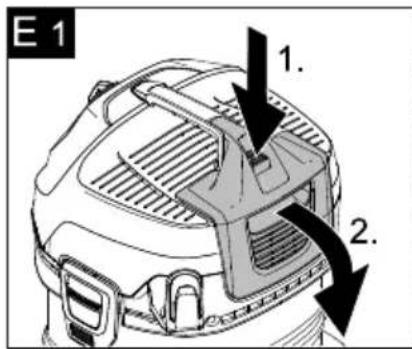
text_image
E 1 1. 2.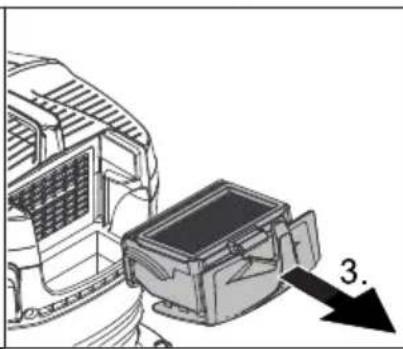
natural_image
Diagram of a vehicle interior with a rectangular device and a directional arrow labeled '3.' (no text or symbols on the device itself)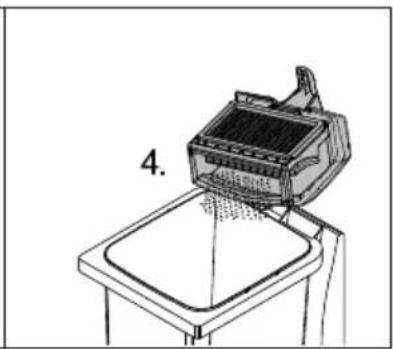
text_image
4.
text_image
E 2 2. 1.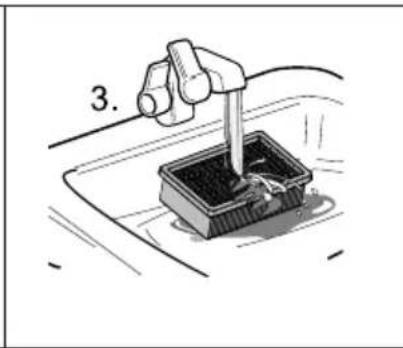
natural_image
Illustration of a hand holding a pipette over a small container with wires, labeled '3.' (no text or symbols on the diagram itself)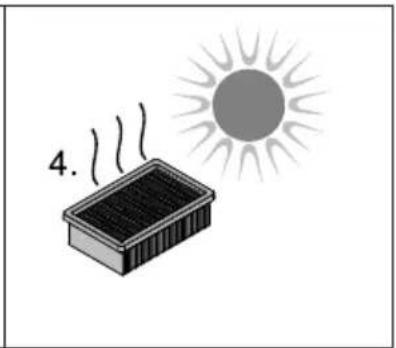
natural_image
Illustration of a solar panel emitting heat with a sun in the background (no text or symbols)Inhaltsverzeichnis
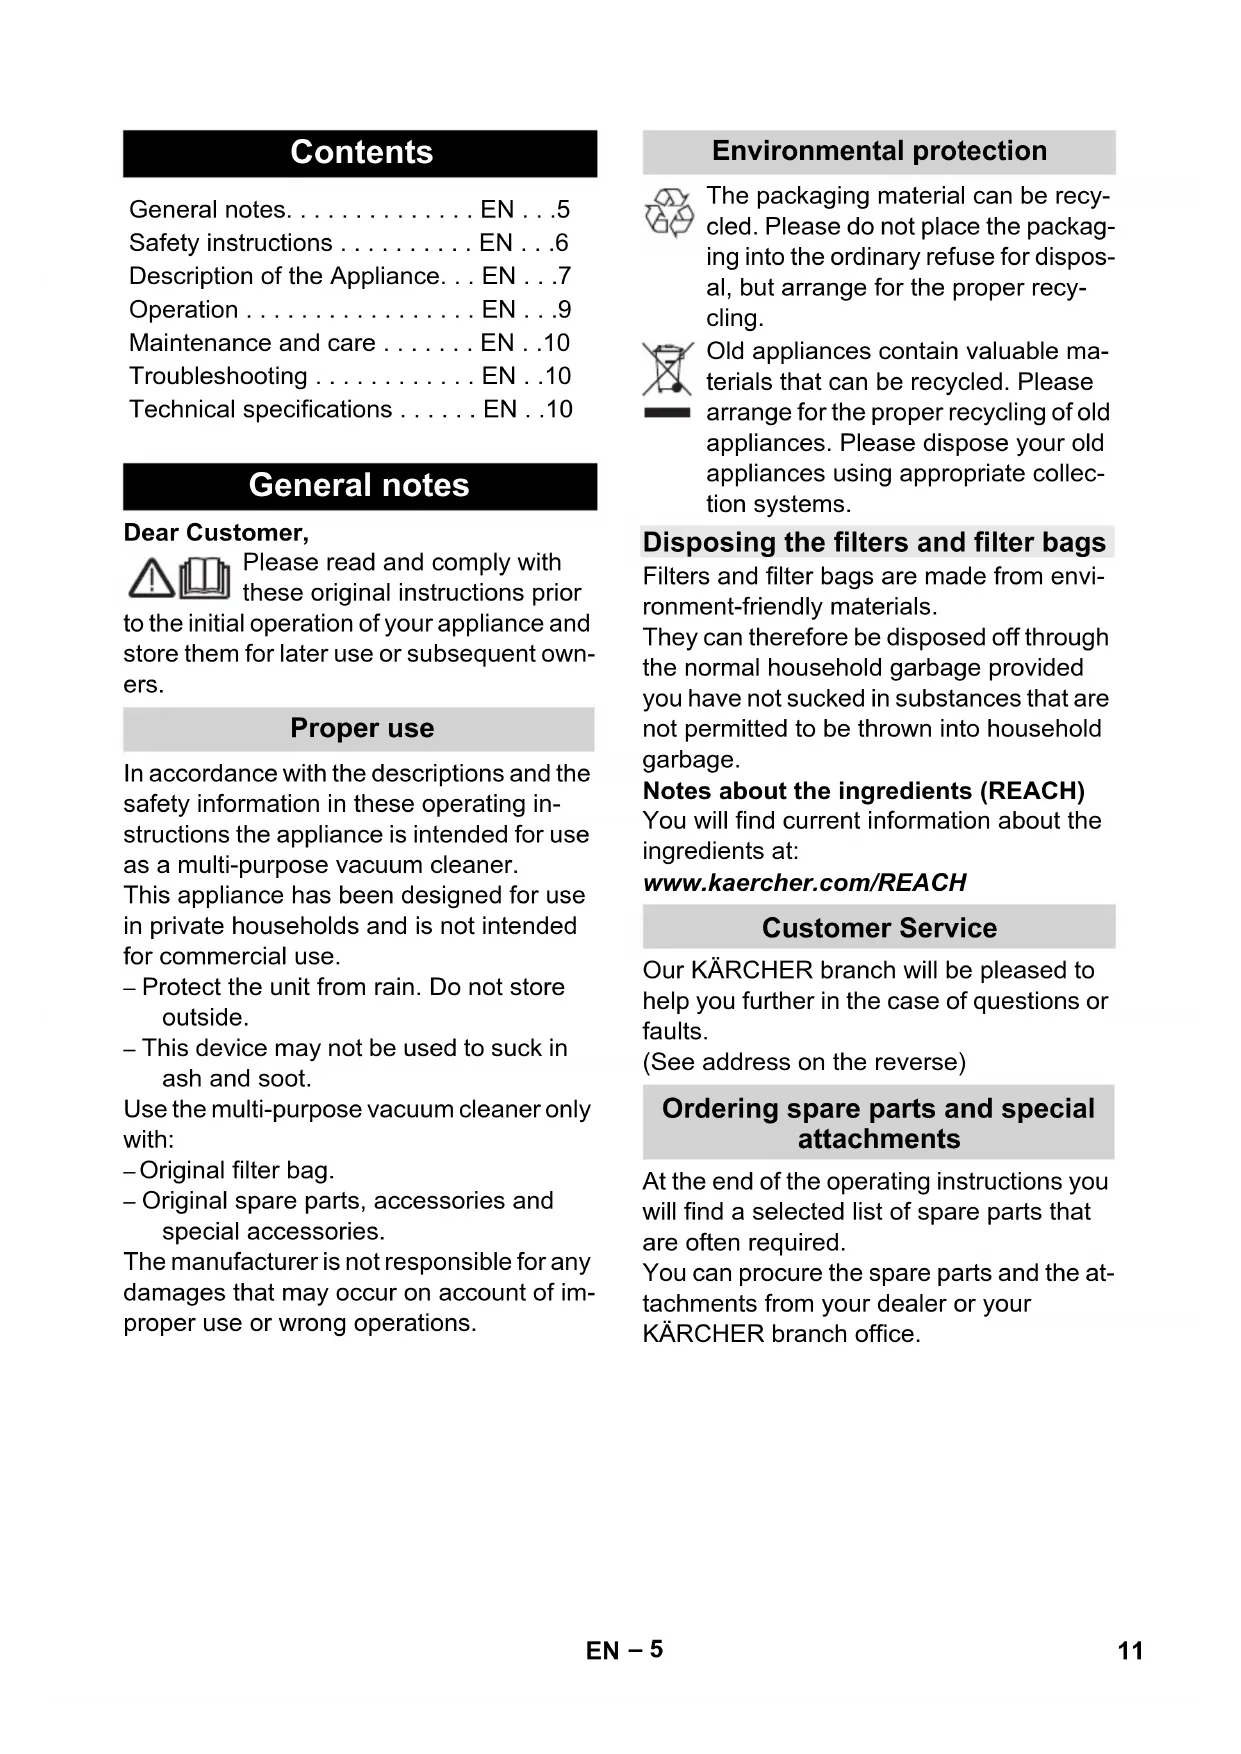
General notes.....EN...5
Safety instructions ..... EN ...6
Description of the Appliance...EN...7
Operation....EN...9
Maintenance and care ..... EN ..10
Troubleshooting ..... EN ..10
Technical specifications ..... EN ..10
General notes
Dear Customer,

Please read and comply with these original instructions prior to the initial operation of your appliance and store them for later use or subsequent owners.
Proper use
In accordance with the descriptions and the safety information in these operating instructions the appliance is intended for use as a multi-purpose vacuum cleaner.
This appliance has been designed for use in private households and is not intended for commercial use.
- Protect the unit from rain. Do not store outside.
- This device may not be used to suck in ash and soot.
Use the multi-purpose vacuum cleaner only with:
- Original filter bag.
- Original spare parts, accessories and special accessories.
The manufacturer is not responsible for any damages that may occur on account of improper use or wrong operations.
Environmental protection

The packaging material can be recycled. Please do not place the packaging into the ordinary refuse for disposal, but arrange for the proper recycling.

Old appliances contain valuable materials that can be recycled. Please arrange for the proper recycling of old appliances. Please dispose your old appliances using appropriate collection systems.
Disposing the filters and filter bags
Filters and filter bags are made from environment-friendly materials.
They can therefore be disposed off through the normal household garbage provided you have not sucked in substances that are not permitted to be thrown into household garbage.
Notes about the ingredients (REACH)
You will find current information about the ingredients at:
www.kaercher.com/REACH
Customer Service
Our KÄRCHER branch will be pleased to help you further in the case of questions or faults.
(See address on the reverse)
Ordering spare parts and special attachments
At the end of the operating instructions you will find a selected list of spare parts that are often required.
You can procure the spare parts and the attachments from your dealer or your KÄRCHER branch office.
Warranty
The terms of the guarantee applicable in each country have been published by our respective national distributors. We will repair possible faults on your unit free of charge within the warranty period, insofar as the faults are caused by material defects or defective workmanship. Guarantee claims should be addressed to your dealer or the nearest authorized customer service centre, and supported by documentary evidence of purchase.
Safety instructions
- This appliance is not intended for use by persons with limited physical, sensory or mental capacities or lacking experience and/or skills, unless such persons are accompanied and supervised by a person in charge of their safety or they have received precise instructions on the use of this appliance and have understood the resulting risks.
- Children may only use this appliance if they are over the age of 8 and supervised by a person in charge of their safety, or if they have received instructions on the use of this appliance and have understood the resulting risks.
- Children must not play with this appliance.
– Supervise children to prevent them from playing with the appliance. - Cleaning and user maintenance must not be performed
by children without supervision.
- Keep packaging film away from children - risk of suffocation!
- Switch the appliance off after every use and prior to every cleaning/maintenance procedure.
- Risk of fire. Do not vacuum up any burning or glowing objects.
- The appliance may not be used in areas where a risk of explosion is present.
⚠ Electrical connection
The appliance may only be connected to alternating current. The voltage must correspond with the type plate on the appliance.
⚠️ Risk of electric shock
Never touch the mains plug and the socket with wet hands.
Do not pull the plug from the socket by pulling on the connecting cable.
Check the power cord with mains plug for damage before every use. If the power cord is damaged, please arrange immediately for the exchange by an authorized customer service or a skilled electrician.
To avoid accidents due to electrical faults we recommend the use of sockets with a line-side current-limiting circuit breaker (max. 30 mA nominal tripping current).
⚠ Warning
Certain materials may produce explosive vapours or mixtures when agitated by the suction air! Never vacuum up the following materials:
- Explosive or combustible gases, liquids and dust particles (reactive dust particles)
- Reactive metal dust particles (such as aluminium, magnesium, zinc) in combination with highly alkaline or acidic detergents
- Undiluted, strong acids and alkalies
- Organic solvents (such as petrol, paint thinners, acetone, heating oil).
In addition, these substances may cause the appliance materials to corrode.
Symbols in the operating instructions
⚠ Danger
Immediate danger that can cause severe injury or even death.
⚠ Warning
Possible hazardous situation that could lead to severe injury or even death.
Caution
Possible hazardous situation that could lead to mild injury to persons or damage to property.
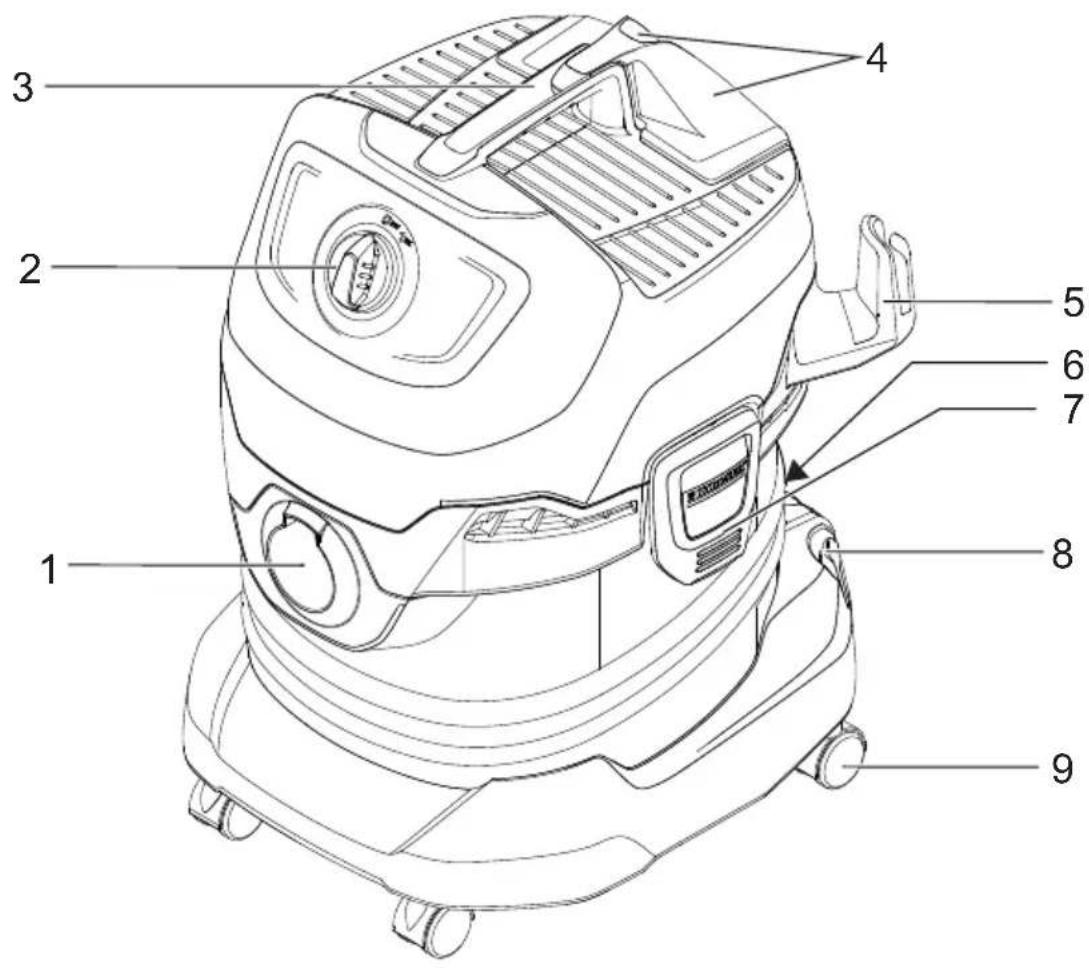
Description of the Appliance
Illustrations on fold-out page!
■ These operating instructions describe the multi-purpose vacuum cleaners listed on the front cover.
■ The illustrations show the maximum equipment; depending on the model, there are differences in equipment and supplied accessories.
When unpacking the product, make sure that no accessories are missing and that none of the package contents have been damaged. If you detect any transport damages please contact your dealer.
1 Suction hose connection
Illustration B1
→ To connect the suction hose during vacuuming.
2 ON/OFF switch for appliance
Illustration B3
→ Position I: Appliance is switched on. Position 0: Appliance is switched off
3 Carrying handle
→ To carry the appliance or to remove the appliance head after unlocking.
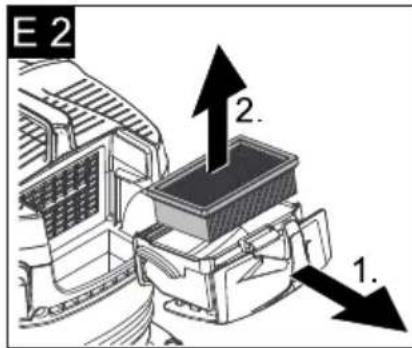
4 Filter box and release key
Illustration E1
Illustration E2
→ In order to clean the filter, press the release key, fold out and remove the filter box.
5 Accessory compartment, hook
This accessory compartment allows the storage of suction nozzles and the power cable.
6 Parking position
Illustration C1
→ To rest the floor nozzle during work interruptions.
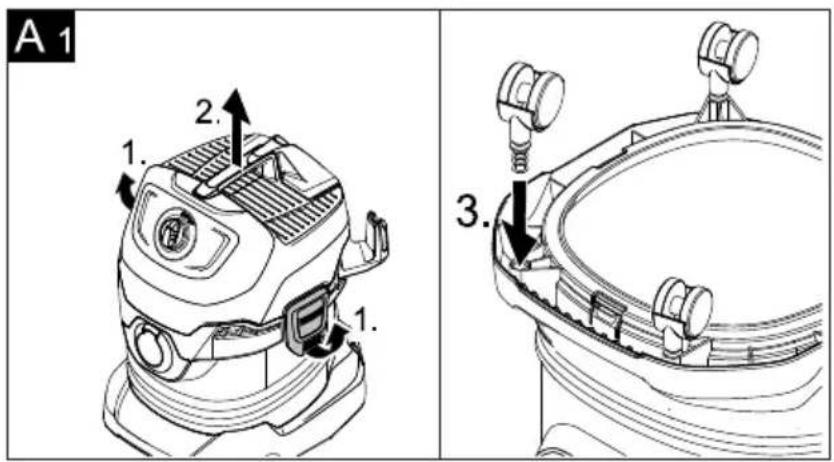
7 Container closure
Illustration A1
→ Pull out to open, push in to lock.
8 Accessory storage container
Illustration D2
→ This accessory compartment allows the storage of the suction pipes or other accessories.
9 Steering roller
Illustration A1
→ Turn the container, press in the steering roller in the openings at the base of the container till the end-point.
10 Filter bag
Note: Do not use a filter bag for wet vacuuming!
Illustration A2
→ Recommendation: To vacuum fine dust, use the filter bag.
11 Flat fold filter
(already installed in the appliance)
Caution
Always work with an inserted flat fold filter - during wet as well as dry vacuum cleaning!
12 Suction hose with connecting piece
Illustration B1
→ Push the suction hose into the connection on the appliance, it snaps in place.
→ In order to disconnect it, push down with your thumb and pull the suction hose out.
Note: Accessories, such as suction brushes (optional) can be directly attached to the connecting piece and thus connected to the suction hose.
For convenient working even in tight spaces.
The removable handle can be attached between the accessories and the suction hose if necessary.
See position 13.
Recommendation: In order to vacuum the floor, attach the handle to the suction hose.
13 Removable handle
Illustration B1
→ Connect the handle with the suction hose until it snaps in place.
Illustration B4
→ To remove the handle from the suction hose, press the notch using your thumb and pull off the handle.
Note: Due to removing the handle, accessories can be directly attached to the suction hose.
See position 12.
Recommendation: In order to vacuum the floor, attach the handle to the suction hose.
14 suction pipes 2 x 0.5 m
Illustration B1
→ Put both suction pipes together and connect them with the handle.
15 Floor nozzle (with inserts)
→ When vacuuming dry dirt off the floor, clip an insert with two brush strips into the floor nozzle.
→ When vacuuming water off the floor, clip an insert with two rubber lips into the floor nozzle.
16 Crevice nozzle
→ For edges, joints, heaters and hard to reach locations.
Operation
Caution
Always work with an inserted flat fold filter - during wet as well as dry vacuum cleaning!
Before Startup
Illustration A1
→ Release and remove the appliance head.
→ Turn the container, press in the steering roller in the openings at the base of the container till the end-point.
→ Insert and lock the appliance head.
Start up
Illustration B1
→ Connect accessories.
Illustration B2
→ Plug in the main plug.
Illustration B3
→ Turn on the machine.
Dry vacuum cleaning
Caution
Work with a dry flat fold filter only.
Check the filter for damage prior to installation and replace as necessary.
Illustration A2
→ Recommendation: To vacuum fine dust, use the filter bag.
Information filter bag
- The filling level of the filter bag depends on the dirt that is sucked in.
- The filter bag needs to be replaced more frequently while sucking in fine dust, sand, etc.
- Clogged filter bags can burst - therefore make sure to replace the filter bag in a timely manner!
Caution
Vacuum cold ashes only when using a pre-filter.
Order no. basic design: 2.863-139.0, premium design: 2.863-161.0.
Wet vacuum cleaning
→ For vacuuming up moisture or wetness pay attention to the correct floor nozzle insert and connect the corresponding accessories.
⚠ Warning
Immediately switch the appli- ance off or pull the power plug if foam forms or liquids escape! Do not use a filter bag!
Note: If the container is full, a float closes the suction opening, and the appliance works at a higher speed. Switch off the appliance immediately, and empty the container.
Interrupting operation
Illustration B3
→ Turn off the appliance.
Illustration C1
→ Hook the floor nozzle into the parking position.
Finish operation
→ Turn off the appliance and disconnect the mains plug.
Empty the container
Illustration D1
→ Remove the appliance head and empty the reservoir filled with wet or dry dirt.
Storing the appliance
Illustration D2
→ Store the accessories and the mains cable on the appliance and store the appliance in dry rooms.
Maintenance and care
⚠ Danger
Turn off the appliance and remove the mains plug prior to any care and maintenance work.
Repair works may only be performed by the authorised customer service.
⚠ Warning
Do not use abrasives, glass or universal cleaners! Never immerse the appliance in water.
→ Clean the appliance and accessory parts made of plastic with a commercial plastic cleaner.
→ If required, rinse the container and accessories with water properly and dry them before reuse.
Clean flat fold filter
Recommendation: Clean the filter box after every use.
Illustration E1
→ Unlock, fold out and remove the filter cartridge, empty dirt from the filter cartridge over a waste bin.
→ In order to clean the inserted flat fold filter, knock the filter box against the edge of the waste bin. It is not necessary to remove the flat fold filter from the filter box.
If necessary, clean the flat fold filter separately.
Illustration E1
→ Unlock, fold out and remove the filter cartridge.
Illustration E2
→ Remove the flat fold filter from the filter box and tab it out.
→ When necessary, clean under running water only, do not wipe or brush down. Allow to dry completely prior to use.
→ Finally, reinstall the dry flat fold filter into the appliance. Insert the filter cartridge into the appliance.
Troubleshooting
Decreasing cleaning power
If the suction power becomes less, check the following points:
→ Accessories, suction hose or suction pipes are clogged, please remove the obstruction using a stick.
Illustration A2
→ Filter bag is full: Insert new filter bag.
Illustration E2
→ Flat fold filter contaminated: Remove the filter box and clean filter (see Chapter "Cleaning the flat fold filter").
→ Replace damaged flat fold filter.
Technical specifications
| Voltage1~50/60 Hz | 220 - 240 | V |
| Output P_nom | 1000 | W |
| Mains fuse (slow-blow) 10 A | ||
| Container capacity 20 l | ||
| Water intake with handle | 12 l | |
| Water intake with floor nozzle | 10 | l |
| Power cord H05VV-F | 2x0,75 | |
| Sound pressure level(EN 60704-2-1) | 72 | dB(A) |
| Weight (without accessories)MV 4 | 7,0 | kg |
| Weight (without accessories)MV 4 Premium | 7,3 | kg |
Subject to technical modifications!
Table des matières
Consignes générales ..... FR ... 5
www.kaercher.com/REACH
Service après-vente
www.kaercher.com/REACH
Servizio assistenza
Bediening ....NL...9
www.kaercher.com/REACH
Klantenservice
www.kaercher.com/REACH
www.kaercher.com/REACH
www.kaercher.com/REACH
Kundeservice
Premium-model: 2.863-161.0.
Vådsugning
www.kaercher.com/REACH
Kundetjeneste
Premium-variant: 2.863-161.0.
Våtsuging
→ For suging ved fuktighet eller vann, pass på korrekt innsats i gulvdysen og koble til aktuelt tilbehør.
⚠ Advarsel
www.kaercher.com/REACH
Kundservice
www.kaercher.com/REACH
Asiakaspalvelu
www.kaercher.com/REACH
www.kaercher.com/REACH
Müşteri hizmeti
www.kaercher.com/REACH
Сервисная служба
www.kaercher.com/REACH
Szerviz
www.kaercher.com/REACH
www.kaercher.com/REACH
Uporabniški servis
V primeru vprašanj ali motenj se obrnite na našo KÄRCHER podružnico.
www.kaercher.com/REACH
Serwis firmy
Mult stimate client,

www.kaercher.com/REACH
www.kaercher.com/REACH
Servisna služba
www.kaercher.com/REACH
Servisna služba
www.kaercher.com/REACH
www.kaercher.com/REACH
Klienditeenindus
Küsimuste ja rikete korral aitab teid KÄRC-HER'i filiaal.
(Aadressi vt tagaküljelt)
www.kaercher.com/REACH
www.kaercher.com/REACH
www.kaercher.com/REACH
www.kaercher.com/REACH
natural_image
Icon showing a gear and wrench inside a square frame (no text or symbols)http://www.kaercher.com/dealersearch

text_image
QR code image with a central logo, likely linking to a digital resource or website.71364 Winnenden (Germany)
Tel.: +49 7195 14-0
Fax: +49 7195 14-2212


