
LSX300TEXT - Effect machine Monacor - Free user manual and instructions
Find the device manual for free LSX300TEXT Monacor in PDF.
| Product type | Laser effect machine for text and graphics projection |
| Brand | Monacor |
| Model | LSX300TEXT |
| Laser class | 3B |
| Power and wavelength | Red: 150 mW / 650 nm Green: 50 mW / 532 nm Blue: 100 mW / 450 nm |
| Power supply | 12 V DC via power adapter (230 V~/50 Hz) |
| Laser weight | 1.2 kg |
| Keyboard weight | 325 g |
| Remote control weight | 16 g |
| Keyboard dimensions | 300 × 12 × 150 mm |
| Operating temperature | 0 - 40 °C |
| Operating modes | Text, AUTO (themes), MUSIC, Clock, Countdown |
| Text memory | 10 slots (0-9) |
| Remote control | Included, CR2025 button cell |
| Included accessories | Power adapter, remote control, USB keyboard with PS2 adapter, 5 m extension cable, LOCK key |
| Safety | LOCK key switch, laser safety officer required, min. distance 20 cm from walls and 50 cm from projection surface |
| Maintenance and cleaning | Dry, soft cloth, avoid chemicals and water |
| Repairability | Repair exclusively by a specialist technician |
Frequently Asked Questions - LSX300TEXT Monacor
User questions about LSX300TEXT Monacor
0 question about this device. Answer the ones you know or ask your own.
Ask a new question about this device
Download the instructions for your Effect machine in PDF format for free! Find your manual LSX300TEXT - Monacor and take your electronic device back in hand. On this page are published all the documents necessary for the use of your device. LSX300TEXT by Monacor.
USER MANUAL LSX300TEXT Monacor
roter Laser: 150 mW/650 nm
gruner Laser: . . . . . . 50 mW/ 532 nm
blauer Laser: .100 mW/ 450 nm
Laser Unit for Text Projection
Please read these operating instructions carefully prior to operating the unit and keep them for later reference. All operating elements and connections described can be found on the fold-out page 3.
The laser unit is easy to use and is designed for event organisers of any type of event. However, a laser safety adviser must be present while the laser unit is being operated (13 chapter 2.1). Please contact your laser safety adviser in case of any questions.
Contents
1 Operating Elements and Connections 12
2 Safety Notes 13
2.1 Special notes for laser units 13
2.2 General safety notes 13
3 Applications 13
4 Installing/Setting into Operation . . 13
5 Operation 14
5.1 Entering text with the keyboard 14
5.2 Operating the unit with the keyboard 15
5.2.1 TEXT mode 15
5.2.2 AUTO mode 16
5.2.3 MUSIC mode 16
5.2.4 CLOCK mode 16
5.2.5 COUNTDOWN mode 16
5.3 Operation with the remote control . . . 17
5.3.1 Replacing the battery 17
5.3.2 Function options 17
5.4 Operation at the unit 18
5.5 Recharging the clock battery 18
6 Specifications 19
1 Operating Elements and Connections
1 Reset button, can be activated by means of an electrically non-conductive object (e. g. small plastic pin)
2 Button MODE:
To select the operating mode, briefly press the button:
- text mode
- show mode (all topics)
- show mode (one topic)
- music-controlled run
- time (and date)
The colour of the LED (7) indicates the mode selected.
To switch the unit off, keep the button pressed for 2 seconds; to switch it on again, briefly press the button.
3 Microphone for music-controlled change of graphics
4 Laser beam outlet
5 Setscrews for the mounting brackets
6 Brackets for setting up and mounting the laser unit
7 LED to indicate the operating mode
purple = text mode
red = show mode (all topics)
red, flashing = show mode (one topic)
blue = music-controlled run
purple-red, alternating = time
blue-purple, alternating = countdown
8 IR sensor for remote control
9 Remote control ( chapter 5.3)
10 Key switch LOCK to switch off the laser beams (to protect the unit against unauthorized operation)
11 Air vents for the cooling fan
12 Jack 12DC to connect the power supply unit provided
13 Jack PS2 to connect the keyboard by means of the adapter provided (16)
14 Control SFZ to adjust the size of the text projected (use a thin screwdriver)
15 USB plug of the keyboard
16 Adapter to connect the keyboard to the jack PS2
2 Safety Notes
The unit (including power supply unit, remote control and keyboard) corresponds to all relevant directives of the EU and is therefore marked with
2.1 Special notes for laser units
The unit corresponds to the laser class 3 B. The lasers have the following power and wavelengths:
| Power Wavelength | ||
| Red laser 150 mW 650 nm | ||
| Green laser 50 mW 532 nm | ||
| Blue laser 100 mW 450 nm | ||
WARNING 1. Install the unit in such a way
that nobody can look directly into the laser beam. Even a short exposure to a laser
beam may permanently damage the retina. Make sure to prevent any inadvertent beam reflections.
- The laser area must be clearly separated and marked while the laser unit is being operated.
- A laser safety adviser must be appointed in writing and must be present while the laser unit is being operated (regulation BGV B2 of the German employers' liability insurance association).
- The employers' liability insurance association and the health and safety executive must be notified of the operation of the laser unit.
2.2 General safety notes
WARNING The power supply unit uses dan
gerous mains voltage. Leaveservicing to skilled personnel! Inexpert handling or modification may result in electric shock.
-
The unit is suitable for indoor use only. Protect it against dripping water and splash water, high air humidity and heat (admissible ambient temperature range: 0 - 40^ ).
-
Do not place any vessel with liquid on the unit, e. g. a drinking glass.
-
Immediately disconnect the power supply unit from the socket
-
if the power supply unit or the laser unit is visibly damaged,
- if a defect might have occurred after the unit was dropped or suffered a similar accident,
- if malfunctions occur.
In any case the unit must be repaired by skilled personnel.
- For cleaning the housing, only use a dry, soft cloth; never use water or chemicals.
- No guarantee claims for the unit and no liability for any resulting personal damage or material damage will be accepted if the unit is used for other purposes than originally intended, if it is not safely installed, if it is not correctly connected or operated, or if it is not repaired in an expert way.
If the unit is to be put out of operation definitively, take it to a local recycling plant for a disposal which is not harmful to the environment.
3 Applications
The laser unit is designed to project any texts entered via a keyboard onto a suitable surface. As an alternative, specific graphics related to various topics (e.g. birthday, wedding, New Year) or the time and the date or a countdown can be projected. The unit can be used on stage, in discotheques or for sales events, for example.
4 Installing/ Setting into Operation
The laser unit must be installed safely and in an expert manner. The person who sets up the unit together with all additional components (e.g. mirrors, lenses, projection surface) to create a laser effect installation is the manufacturer of this installation from a legal point of view. Make absolutely sure to observe the warning notes in chapter 2.1.
WARNING 1. Since different safety regula

tions apply in each country, always make sure to observe the regulations of the country in which the unit is operated!
- When installing the unit at a place where people may walk or sit under it, additionally secure the unit (e.g. by means of a safety rope fastened to the mounting bracket; when fastening the safety rope, make sure that the maximum falling distance of the unit will not exceed 20~cm
- Mount the unit at a location where sufficient air circulation is ensured during operation. Never cover the air vents (11). The minimum distance between the unit and the adjoining walls must be 20~cm ; the minimum distance between the unit and the projection surface must be 50~cm .
- Please note that fast changes in lighting may trigger epileptic seizures with photosensitive persons or persons with epilepsy!
- Only operate the laser unit with a laser safety adviser being present. When leaving the unit, the laser safety adviser should use the key switch (10) to protect the unit against unauthorized operation.
1) Use the mounting brackets (6) to fasten the unit at a suitable location, e. g. by means of a stable mounting screw or a support for lighting units (C hook) on a crossbar.
To align the unit, loosen the two setscrews (5) on the mounting brackets. Tilt the unit as desired and then firmly retighten the setscrews.
2) As an alternative, the unit can be set up as desired: Spread the mounting brackets below the unit so that they serve as a support. Then retighten the setscrews.
3) For entering texts, connect the keyboard with its USB plug (15) to the jack PS2 (13) by means of the adapter (16). If required,
use the 5 m extension cable provided. (However, it is not necessary to connect the keyboard for projecting saved texts.)
4) For power supply, connect the power supply unit to the jack 12DC (12) and to a mains socket (230V /50Hz) . This switch on the unit; the LED (7) will light up in the colour of the operating mode most recently selected.
5) To switch on the laser beam, insert the key provided into the lock LOCK (10) and then turn the key to the position ON.
6) Using a thin screwdriver, adjust the projection size desired by means of the control SFZ (14).
7) If the unit fails to work as usual, it can be reset by means of the Reset button (1): Insert a thin, electrically non-conductive object (e.g. small plastic pin) into the drill hole of the housing to press the button.
5 Operation
Most functions are provided by the keyboard. With the remote control, many (but not all) functions can be controlled. At the unit, the button MODE only allows to select the operating mode and to switch the laser beam on and off.
5.1 Entering text with the keyboard
1) Press the key 1. TEXT" will be projected, i.e. the text mode is selected. (For selecting other modes, refer to chapter 5.2.)
2) Press the Enter key to confirm the text mode; the text most recently projected will appear.
3) Press the key Del to delete the text, and then enter the text desired.
4) Various effects are available; they can be combined, if required. Press the appropriate key repeatedly to switch an effect on,
to go to a different variant (character 13 in the following table) or to switch an effect off (excluding the wave effect):
| Key Text effect | |
| Esc | All effects switched off except mirroring (Key Mirror) |
| Flow | Text runs* through the projection area (character by character) |
| RGB Color | Select colour with ↑ or ↓/colour change*: entire text / character by character / within the characters |
| Draw | Text is constantly rewritten*; set text beginning with ← and → |
| Zoom | Zoom*: big → small / small → big / small ← big |
| X Move | Text moves* around the X axis forwards / backwards |
| Y Move | Text moves* around the Y axis upwards / downwards |
| Y Roll | Text rotates* around the Y axis to the right/ to the left |
| X Roll | Text rotates* around the X axis forwards / backwards |
| Z Roll | Text rotates* around the Z axis to the right/ to the left |
| Wave | Wave effect 1st press: set height of waves with the key ↑ or ↓ 2nd press: set number of waves with the key ↑ or ↓ 3rd press: set speed with the key ↑ or ↓ further presses: as 1st, 2nd, 3rd press |
| Text Qty | Number of characters projected: 12/10/8/6/4 |
| Play time | Duration of the projection of a text (in seconds) for the function Loop Play-back (key □, refer to chapter 5.2.1): Enter the duration with the numeric keys, and then press the Enter key to confirm. |
| Mirror | Mirroring: 1926/1926L / Laser |
| * Set the speed with the keys† and‡. | |
⑤ Text effects
5) Once the text has been created, save the text: Keep the key Save+No pressed and at the same time press a numeric key for the storage location number (0 - 9) . By using the storage location numbers 0 - 9 , it is possible to save 10 different texts.
6) To delete all texts saved, press the keys Save+No., and Del at the same time.
5.2 Operating the unit with the keyboard
1) Press the key to select the operating mode. "1. TEXT" will be projected.
2) Use the key for to select the mode:
- TEXT = to enter or retrieve texts
- AUTO = to run graphics of selectable topics
- MUSIC = to run graphics of selectable topics by music control
- CLOCK = to project time and date
- COUNTDOWN = to run a countdown
3) Press the Enter key to call up the mode selected.
5.2.1 TEXT mode
1) To project saved texts, keep the key Play +No pressed and at the same time press the numeric key (0 - 9) to which the text desired has been saved.
2) The text effects listed in table fig. 5 can be switched on / off by means of the corresponding keys. If there are effect variants, press the corresponding key again to select them.
3) To go to the text that has been saved to the following or previous number, press the key Pg UP or Pg DN. There will be no projection when a number is selected to which no text has been saved.
4) To project all saved texts one after the other, press the button Loop playback.
5.2.2 AUTO mode
To select a specific topic, press the corresponding numeric key:
| Key Topic | |
| 1 | New Year |
| 2 | Christmas |
| 3 | Love |
| 4 | Birthday |
| 5 | Party |
| 6 | Halloween |
| 7 | Music |
| 8 | Geometric shapes |
| 9 | Rectangle with waveform movements |
| 0 | All topics one after the other |
⑥ Topics for the AUTO mode
Additional functions:
II Pause= pause / continue
Mirror=mirror: f9261 19261 Laser
Esc = go to the beginning of the run
5.2.3 MUSIC mode
In this mode, music picked up by the microphone (3) or other sound events of sufficient volume will control the graphics run. The LED (7) will briefly light up in blue for each sound event controlling the graphics run. If no sound event is received within 10 seconds, the laser beam will be switched off and the LED will constantly light up in blue. The laser beam will be switched on again by the next sound event of sufficient volume.
Use the numeric keys to select the topics (as you do in the AUTO mode). The MUSIC mode provides the same additional functions as the AUTO MODE (R chapter 5.2.2).
Use the remote control to adjust the microphone sensitivity (refer to chapter 5.3.2, fig. 8, key MUSIC).
5.2.4 CLOCK mode
- The time can be indicated on its own or alternately with the year date and the month day. To go from one indication type to the other, briefly press the space bar.
- For a mirrored indication, press the key Mirror (repeatedly): 10:42 / 10:42 / 10:45 / 10:45
To set the date and time:
1) Press the Enter key. The units digit and the tens digit of the year date start flashing.
2) Use the numeric keys to enter the year date, or correct it by means of the arrow keys and .
3) Use the arrow key to go to the month date, and then enter or correct it.
4) Repeat this procedure to set the day, the hour and the minute. To return to a previous setting option, press the arrow key
5) Go to the indication 12R or 24R and then use the key for to select the 12-hour indication or the 24-hour indication.
6) To save the settings and to exit the setting mode, press the Enter key, or to cancel the setting process, press the key Esc.
5.2.5 COUNTDOWN mode
In this mode, seconds will be indicated, running backwards. When the countdown reaches zero, the laser beam will be switched off.
1) Press the Enter key to enter the countdown time. The current countdown time (in seconds) starts flashing.
2) If required, use the key Backspace to delete the current countdown time, and then use the numeric keys to enter the time desired (9999 seconds max.).
3) Use the Enter key to confirm. The countdown time stops flashing.
4) Use the space bar to start the countdown.
5) To pause or continue a countdown, use the space bar or the key II Pause.
6) Use the key Esc to retrieve the current countdown time at any time. To restart the countdown, press the space bar.
7) As with the other modes, the key Mirror can be used to mirror the projection.
5.3 Operation with the remote control
The remote control (fig. 2) is supplied with a battery. Prior to initial operation, remove the foil from the battery holder. When pressing a button, always direct the remote control to the sensor IR (8) so that the LED (7) starts flickering to confirm reception. There must be no obstacles between the sensor and the remote control.
If the unit is not used for a longer time, remove the battery from the remote control as a precaution so that it will not be damaged in case the battery should leak.
5.3.1 Replacing the battery
1) Push the latch of the battery holder to the right (first arrow in fig. 7) and remove the holder (second arrow).
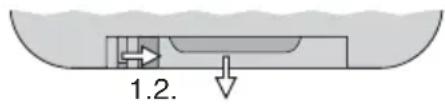
⑦ Replacing the battery
2) Remove the old battery and insert the new battery (3 V button cell, type CR 2025) into the holder with the positive pole facing upwards.
3) Push the holder back into the remote control.

Batteries must not be placed in the household waste. To protect the environment, always take them to a special waste disposal, e.g. collection container at your retailer.
5.3.2 Function options
All modes can be selected by means of the remote control (refer to chapters 5.2.1 to 5.2.5 for a description of the modes). In some cases, however, the operation is different from the operation with the keyboard; therefore, it is briefly explained in the following table.
| Button Function | |
| ON/OFF | Press briefly: to switch the laser beam on/off keep pressed for 3 sec.: standby mode |
| AUTO | AUTO Mode Select the different topics with the numeric buttons. |
| Button Function | |
| MUSIC | MUSIC Mode Select the different topics with the numeric buttons. To set the microphone sensitivity: keep the button pressed for 2 sec.; then set the sensitivity with the numeric buttons: 1 = lowest level of sensitivity 9 = highest level of sensitivity |
| A | CLOCK Mode Press this button again to change between the indication of the time and the alternating indication of the time and the date. To set the time and date: 1) Keep the button A pressed until the year date starts flashing. Enter the year with the numeric keys. 2) Go to the month date with the button B, and then enter the month. Repeat this procedure to set the day, the hour and the minute. 3) Go to the indication 12R or 24R with the button D Press the numeric button 1 for the 12-hour indication, or press the button 2 for the 24-hour indication. 4) Press the button A to save the settings. |
| B | COUNTDOWN Mode To change the countdown time, keep the button B pressed until the time starts flashing. Enter the time with the numeric buttons. To start the countdown, press the button B. Pause the countdown and continue it at any time with the button II. To restart the countdown, keep the button B pressed until the time starts flashing. Enter a new countdown time, or briefly press the button B to start the countdown. |
| C | TEXT Mode After pressing this button, select the saved text with the numeric buttons. |
| II | Pause / continue the run |
| Change the laser colour to return to the original colour: Press the button for the mode. | |
| Mirroring : 1000 Laser | |
5.4 Operation at the unit
WARNING
When actuating the button MODE (2), make sure that you stand next to the laser unit in such a way that you cannot look into the laser beam.
Press the button MODE (repeatedly) to switch on the following modes. The colour of the LED (7) will indicate the mode selected.
- Text mode (LED: purple)
- Show mode with all topics (LED: red)
Music-controlled run
(LED: lights up in blue when a sound event is received)
If no sound event is received within 10 seconds, the laser beam will be switched off and the LED will constantly light up in blue.
The laser beam will be switched on again by the next sound event of sufficient volume.
Use the remote control to set the microphone sensitivity, refer to chapter 5.3.2, fig.8, button MUSIC.
Projection of time (and date)
(LED: red and purple alternating)
The setting most recently made by means of the keyboard or the remote control defines if only the time is indicated or if it alternates with the date.
Keep the button MODE pressed for 2 seconds to switch off the laser beam; briefly press the button to switch the beam on again.
5.5 Recharging the clock battery
The laser unit includes a rechargeable battery so that the internal clock for the time indication will continue to work when the unit is switched off. The battery will be automatically recharged when the unit is connected to a mains socket via the power supply unit.
A fully charged battery will be able to keep the internal clock up to date for up to 2 months. If the battery is discharged, only the time and the date must be set during the next operation.
6 Specifications
Laser
Laser class: 3B
Power/wavelength
Red laser: 150 mW/650 nm
Green laser: 50 mW/ 532 nm
Blue laser: 100 mW/450 nm
Motor for the laser mirrors
Motor type: . . . . . . . . . . . . . . . . . . . . . . . . . . . . . . . . . . . . . . . . . . . . . . . . . . . . . . . . . . . . . . . . . . . . . . . . . . . . . .
Motor speed: 10 000 pps (points per second)
Power supply: 12 V via the
power supply unit provided, connected to 230V / 50Hz
Ambient temperature: . . 0 - 40 °C
Subject to technical modification.
Laser: 185 × 75 × 185 mm
rode laser: 150 mW/650 nm
groene laser: . . . . . . 50 mW/ 532 nm
blauwe laser: . . . . . 100 mW/ 450 nm
Laser: 185 × 75 × 185 mm
Rod laser: 150 mW/650 nm
Gron laser: . . . . . . . . . . . . . . . . . . . . . . . . . . . . . . . . . . . . . . . . . . . . . . . . . . . . . . . . . . . . . . . . . . . . . . . . . . . . . . . . .
Blå laser: 100 mW/450 nm
Motor for Laserspeglar
Typ av motor: . . . . . . scanner
Motorhastiget: 10 000 pps (punkter per sekund)