USER MANUAL IR360MBT HAMA
Controls and Displays
Front
- [MODE] button
- [PLAY/PAUSE] button
- [VOLUME] + / - buttons
- [MUTE] button
- [MEMORY] button
- Bluetooth® LED indicator
- Network LED indicator
- AUX-In LED indicator
- Presets LED indicator
Rear
- Slide switch for mono/L/R
- [SETUP/PRESET] button
- Mains power supply
- AUX-In socket
- LAN connection
- Line-out socket
- Optical-out socket
- Slide switch for backlight
- Update port
Remote Control
- [POWER] button
- [MUTE] button
- Internet Radio - Mode
- DAB Radio - Mode
- FM Radio - Mode
- AUX - Mode
- Backlight Level
- Media-Player - Mode
- [MODE] button
- [EQUALIZER] button
- [ALARM] button
- [SLEEP] button
- [SNOOZE] button
- [MENU] button
- [PREVIOUS] button
- [NEXT] button
- Navigation buttons
Up
Down
Back
Forward, okay
- [SELECT] (Enter/OK) button
- [REWIND] button
- [FAST-FORWARD] button
- [VOLUME] +/- buttons
- Presets Up/Down buttons
- [PLAY/PAUSE] button
- [BACK] button
- Presets buttons (1-10)
- [PRESETS/FAVORITES] Menu
- [INFO] button

Important note - Operating instructions:
- This is a quick guide to provide you with the most important basic information, such as safety warnings and how to get started using the product.
- For the sake of protecting the environment and saving resources, Hama dispenses with printed operating instructions and provides them only in the form of PDF files / eManuals on www.hama.com.
- Use the search function with the item number of your product to easily find the product documentation.
- Alternatively, scan the QR code below to be taken directly to the location of the operating instructions.
- Save the operating instructions to your computer's hard drive for future reference, or print it out if necessary.
1. Explanation of Warning Symbols and Notes

Warning
This symbol is used to indicate safety instructions or draw your attention to specific hazards and risks.

Note
This symbol is used to indicate additional information important notes.

Risk of electric shock
This symbol indicates product parts energized with a dangerous voltage of sufficient magnitude to constitute a risk of electric shock.
2. Package Contents
- Internet Radio IR360MBT
Remote control
- 2x AAA batteries
- AC/DC adapter
- Quick guide, brochure
3. Safety Notes
- The product is intended for private, non-commercial only.
- Protect the product from dirt, moisture and overheating and use it in dry rooms only. 4.
- As with all electrical devices, this device should be out of the reach of children.
- Do not drop the product and do not expose it to major shocks.
- Do not operate the product outside the power limits given in the specifications.
- Keep the packaging material out of the reach of due to the risk of suffocation.
- Dispose of packaging material immediately according locally applicable regulations.
- Do not modify the device in any way. Doing so warranty.

Risk of electric shock
- Do not open the device or continue to operate it if to becomes damaged.
- Do not use the product if the AC adapter, adapter cable or power cable is damaged.
- Do not attempt to service or repair the device yourself. Leave any service work to qualified experts.

Warning - Batteries:
- When inserting batteries, note the correct polarity (+ and - markings) and insert the batteries accordingly. Failure to do so could result in the batteries leaking or exploding.
- Do not allow children to change batteries without supervision.
- Do not mix old and new batteries or batteries of a different type or make.
- Remove the batteries from products that are not being used for an extended period
- Do not short-circuit batteries.
- Do not charge batteries.
- Do not throw batteries in a fire.
- Keep batteries out of the reach of children.
4. Before getting started

Notes on use
any
Before you can use the streaming radio, you need to set it up (see Chapter 6) by smartphone using the UNDOK app.
Getting started with the remote control
Open the battery compartment cover. It is located on the rear of the remote control and can be opened by sliding in the direction indicated.
avoids the batteries are included in the delivery, they should be inserted in the battery compartment of the remote control. Observe the correct polarity when inserting batteries. The polarity (+ / -) is indicated in the battery compartment.
5. Getting started
5.1 Turning on the product
- Connect the power cable to a properly installed socket

Warning
- Only connect the product to a socket that has been approved for the device. The electrical socket must always be easily accessible.
-
Disconnect the product from the power supply using the on/off switch - if this is not available, unplug the power cord from the socket.
-
Wait until the speaker initialisation procedure has finished.
- Press the [PLAY/PAUSE] button to turn on the speaker.

Note - Turning on for the first time
- When you turn on the device for the first time, the speaker starts in SETUP mode.
- The LEDs (6-8) begin to flash, the LEDs (9) are constantly lit and the speaker can be connected to your smartphone using the UNDOK app.
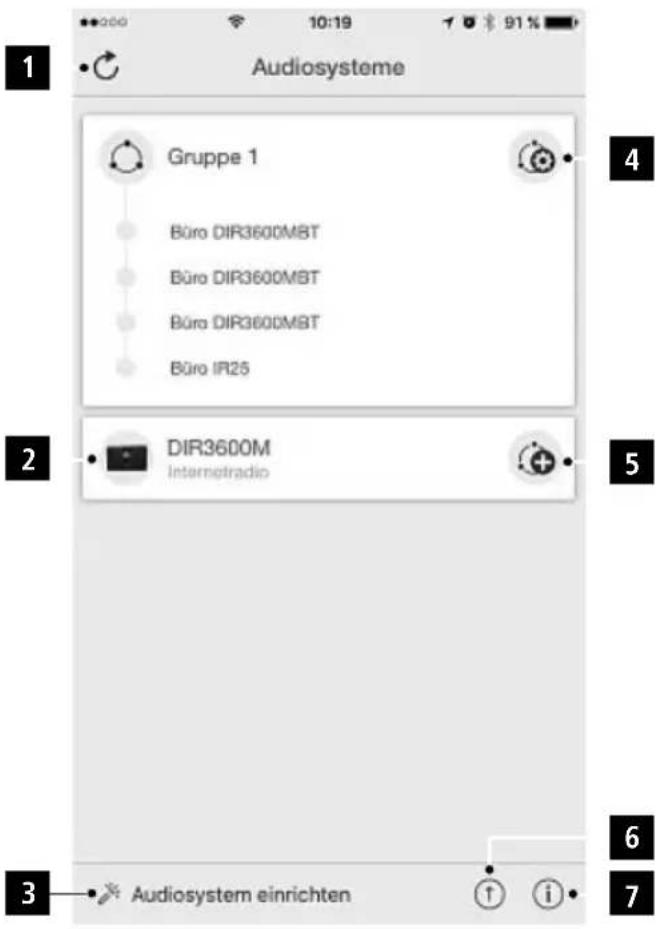
6.1 Interface/layout of the UNDOK home screen
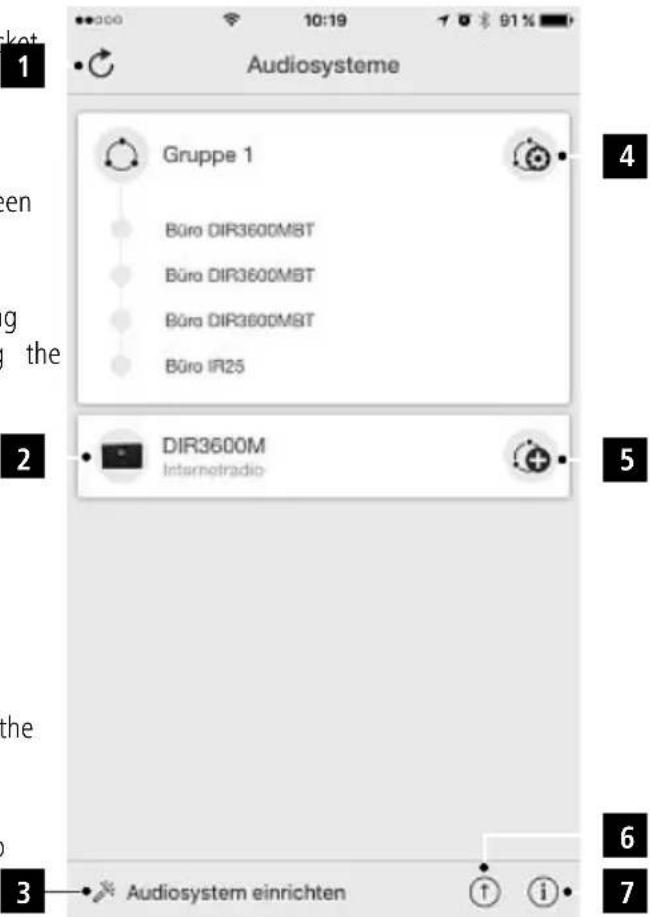
6. UNDOK - everything in the palm of your hand

Powered by
UNDOK
MULTIROOM
The UNDOK app, developed by Frontier Silicon, gives you full control of radios and speakers from your smartphone. Whether you are setting up the device for the first time specifying settings for the equaliser and multi-room, or managing your favourite stations - the UNDOK app lets you access all the features from your smartphone or thereby offering you greater convenience.
| 1 Update the audio system list |
| 2 Preview for ungrouped radios |
| 3 Set up new audio system |
| 4 | Icon for managing an existing multi-room group |
| 5 | Create a new multi-room group with this device |
| 6 Check for system update for all devices |
| 7 | Further information, such as app info, change app theme, and data logging |
6.2.1 First-time setup of the device with UNDOK
The first time you switch on an UNDOK-enabled product from Hama, or when you have set it to the factory setti it creates a micro access point - a separate WiFi network that you can connect to with your tablet or smartphone.

Note
- The UNDOK app uses the language selected in your smartphone's system.
6.2.1 Procedure for iOS users
- Open the UNDOK app on your iPhone or iPad.
- Tap the Set up audio system menu item.
- Make sure that the radio or speaker is in SETUP. Set the product to the factory settings, if necessary. Confirm the query with Next.
- The UNDOK app now prompts you to connect to a product's WiFi network using the iPhone/iPad settings - to do so, switch to the system settings on your device and select the WiFi network (for example, Setup Ha DIR3120LED). Then return to the UNDOK app and try Next.
- Now choose a name for the radio (for example, DIR3120) and confirm your entry with Next.
- The various network configuration options are then offered to you (where applicable, WiFi, WPS and Ethernet). Tap the desired method; the UNDOK app switches to the next window.
- Depending on the selected method, you can now and configure the desired WiFi network, set up a connection or set up the connection using a LAN
- Finally, the radio connects to the network; by tappingdevice in the UNDOK app.
pingdevice in the UNDOK app.
Start using my audio system, you will be able to device in the UNDOK app.
- The network connection LED indicator (7) is now constantly lit.
6.2.2 Procedure for Android users
- Open the UNDOK app on your tablet or smartphone.
- Tap the Set up audio system menu item.
- Make sure that the radio or speaker is in SETUP mode. The product to the factory settings, if necessary. Confirm the query with Next.
- On the following page, you will find a list of all available WiFi networks as well as the suggested audio systems; the Hama product (for example, Set up iPhone DIR3120LED) should be listed here. Tap the corresponding WiFi network.
tap Now choose a name for the radio (for example, Office DIR3120) and confirm your entry with Next.
Office the various network configuration options are then offered to you (where applicable, WiFi, WPS and Ethernet). Tap the desired method; the UNDOK app switches to the next window.
Depending on the selected method, you can now select and configure the desired WiFi network, set up a WPS connection or set up the connection using a LAN cable. Finally, the radio connects to the network; by tapping cable start using my audio system', you will be able to use
use The network connection LED indicator (7) is now constantly lit.
You can use the analogue audio input (AUX IN socket) to connect mobile devices (for example, smartphone, tablet PC, MP3 player, etc.) to the radio and play your audio using the radio.
- Repeatedly press [M] / [MODE] to activate the Auxiliary Input (Aux in) mode on the speaker:


Alternatively, press [AUX] on the remote control to switch directly to this operating mode.
The AUX-In connection LED indicator (8) begins to flash
- Connect your mobile device to the audio input (the AU IN socket) of the radio using a 3.5-mm audio cable (ja cable).
- The AUX-In connection LED indicator (8) is now constantly lit.
- Start and control audio playback using the controls of the connected terminal device.
8. Bluetooth
You can pair your terminal device with the radio using The Bluetoothconnection LED indicator (6) begins to Bluetooth® and use it as a playback device. You can flash. control playback directly on the terminal device. You can Open the Bluetooth settings on your terminal device adjust the volume on the radio, as well. and wait until IR360MBT appears in the list of

Note - Bluetooth
- Check whether your mobile device (smartphone, tablet, etc.) is Bluetooth.
Note that the maximum range for Bleeboot metres without obstacles such as walls, people,
- The Bluetooth connection may be disrupted by Bluetooth® devices/connections in the vicinity.
- It is only possible to connect the radio to one terminal device.
- Note that compatibility depends on the supported Bluetooth® profiles as well as the Bluetooth® being used. (See Technical specifications, operating instructions of the terminal device in use)
Repeatedly press [M]/[MODE] to activate the Bluetooth operating mode on the radio:

[M]
8.1 Bluetooth® first connection (pairing)
- Make sure that your Bluetooth terminal device is on and Bluetooth activated.
- Repeatedly press [M]/[MODE] to activate the Bluetooth® operating mode on the radio:

[M]
If necessary, start searching for Blue devices on your terminal device.
- Select IR360MBT and wait until the radio is shown as connected in the Bluetooth settings on your terminal device.
The Bluetooth connection LED indicator (6) is now constantly lit.
- Start and control audio playback using the controls of the terminal device.
![HAMA IR360MBT - [M] - 1](/content/2026/03/458142/images/cafa1e0e568f1c832ab188cf85c6b8f1a4456b71bb6ebaaf9ea8d8284f68c4c8.jpg)
Note - Bluetooth password
- Some terminal devices require a password in order to connect to another Bluetooth device.
If your terminal device requests a password for connection to the speaker, enter 0000.
6. Care and Maintenance
- Only clean this product with a slightly damp, lint-free cloth and do not use aggressive cleaning agents.
If you do not use the product for a long time, turn the device and disconnect it from the power supply. Store it in a clean, dry place out of direct sunlight.
7. Warranty Disclaimer
Hama GmbH & Co. KG assumes no liability and provides no warranty for damage resulting from improper installation/mounting, improper use of the product or from failure to observe the operating instructions and/or safety notes.
8. Service and Support
Please contact Hama Product Consulting if you have any questions about this product. Hotline: +49 9091 502-115 (German/English)
Further support information can be found here: www.hama.com
Note on environmental protection:

After the implementation of the European
Directive 2012/19/EU and 2006/66/EU in the
national legal system, the following applies:
Electric and electronic devices as well as batteries
must not be disposed of with household waste. Consumers are obliged by law to return electrical and electronic devices as well as batteries at the end of their service lives to the public collecting points set up for this purpose or point of sale. Details to this are defined by the national law of the respective country. This symbol on the product, the instruction manual or the package indicates that a product is subject to these regulations. By recycling, reusing the materials or other forms of utilising old devices/Batteries, you are making an important contribution to protecting our environment.

Hereby, Hama GmbH & Co KG declares that the
radio equipment type [00054837] is in compliance
with Directive 2014/53/EU. The full text of the EU
declaration of conformity is available at the following internet address:
www.hama.com >00054837->Downloads.
| Frequency band(s) | 2412 - 2472 MHz |
| Maximum radio-frequency power transmitted | 60 mW EIRP |

00054837
Powered by UNDOK MULTIROOM
BCTaBbTe BnIky Ka6eIy NITaHnB PO3eKy, yCTaHOBHeHHyU HoJNeXaUIM 06pa3OM.

PpeynpexkdeHne
-ПоdkночаусpoиCTBO TOLьК pO3eTKaM, KOTOpbIe pa3peSeH OcNoJIb30BaTb B TaKnx ZeJx. P03eTKa DoJXHa HaxOДNTbCBy B JERKOДОCTyINHom MecTe.
-Дя OTKNoueHЯ yCTpoIcTba NcNoIb3yIte KHOKNy nHTAHn. Pn ee OTCyTcTBn N3BNeKInTe BUNKy Ka6eY nHTAHn I3 po3eTK.
-Дохдntecb 3aBepseHn HnuaJn3aun nHaMka.
- HaXmnte KhONky [PLAY/PAU] yTO6bI BKHouNTb DnHaMnK.

PpIMeuaHne KacaTeIbHo nepBoro BKIOueHn
- Пи повом ВьночецниHamNK HaxODNTcB peЖIMe NaCTpoN (SETUP).
- INДиКаTOpbl (6—8) NaHnHaOT MngrTaB. INДиKaTOpbl (9) HENpepbIBHO CBETATc. INHAMNK MOxHO NOkJIIOHTb K CMapTFOHy TOnbKO C NOMOuBIO npInloXeHnA UNDOK.
6. UNDOK — BCE B Baunx pyKax

Powered by
UNDOK
MULTIROOM
PpnooxeHne UNDOK,pa3pa6oTaHHoe KOMnHaue Frontier Silicon,no3BOJraT BAM NOHOCbIO KOHTPOIpOBaTB pa6Oy paHNOpEmMHKOB uINHAMKOB CO CMapTfoHa. Byb To cOnpXeHne C yCTpoiCTBOM,HAcTPOJa KaKbAan3epa n CnCTembl《MyIbTIpyM》uIN ynpabJeHne IIO6MbIMn paNIOCTaHcIaMn — UNDOK no3BOJraT Bam NcNoJIb3OBaTb BCE 3TN fYHKUc CO CMapTfoHa uIN PnAnHeTa,TEM CaMbIM NOBbIaJyPOBeHb KOMΦopTa.
6.1 INHTeppeic. CtpyKtpa cTapTOBOrO 3KpHa npUloxKeHn UNDOK
HeckoJIbKIMn HaxaTnaMn KHOJKN [M] / [MODE] NaTbNpyuTe Ha DnHaMnke pexm Auxiliary Input (Aux In):


B KaueCTBe aIbTepeHaTnBbl MOxHO HaxaTb KhoNky [AUX] Ha Nylte Dv dJa HenocpeDCTBeHHoro nepeKJIoueHna Ha 3TOT peXIM.
- Haynet MrgaTb uHdkaTop BxOJa AUX IN (8).
-Подсоeннite потатиьhoe yctpoiCTBO K ayinOBxOdy B(pa3bemy AUX IN) paHnOpnemHnka c nOMoIbO aynokaBJ co wTekepom dHaMeTpOM 3,5 MM (mini-jack).
- CBeToIIOHbI INIINKaTOp BXOJa AUX IN (8) 6yJeT CBETNbC HEnpepbIBHO.
ДяЗауcka BOCPOn3BedeHn n ynpaBHeHn nM nCNoJb3yETcnoKJIuHcHHe noPTaTnBHOe yCTpOiCTBO
8. Bluetooth®
ItoTexHOrn BluteoMoxHo NOKIOuHaTb
nopTaNBhie yCTpoiCTBa K paDNOpnEmHnky
mNCNoJIb3OBA Tb erO B KaueCTBe yCTPOiCTBa
BOcPOn3BedeHn. IynpaBHeHn BOCpOn3BeDeHnEM
MCNoJIb3yeTcN nopTaNBHOe yCTpoiCTBO. POMKoCTb MOxHO
takKe peRynipOBaTb Ha paDNOpnEmHnke.

PpmeHne kacaTeJbHo - Bluetooth
- Y6eIntecb, yTO BaWe NOPTaTnBHOe yCTpoiCtBO (cMaprTfoH, nlaHwET n T d.) NOdIepXnBaET TexHoIorNIO Bluetooth.
- 06paTHe BHNMaHHe, YTO MaKcImaJIbHbI paDnyc DeiCTBnBluTeothCoCTaBJIeT MaKc.10M6e3 yeta npenrTCTBn (CTeH, JIODeN T.D.).
-Дугпу устюства с поденижковBluetooth®,
нховаяшиеса поллзости, могут содаразьномexи.
PaHIOnpMnK MoXHo OndHOBpeMeHHO nCNoIb3OBaTb TOJIbKO C OdHIM NOpTaTINBHyIM yCTPOJCTBOM.
- 06paTHTe BHIMaHHe, YTO COBMeCTHMOCt b 3aBcNTOT NOdEpxNbAembIX npoΦnIe N IncNoJIb3yEmbIX BepCNI Bluetooth® (CM. TexHnueckneXapakTePncTnK n INHCTpyKuIO No EKcnNyatauINnopTaTnBHO yCTpOJCTBa).
HeckoJIbKIMn HaxaTnaMn KHOKN [M]/[MODE] aKTHBupyTe Ha paIIOnpneMHKe pexm Bluetooth®:

8.1 Hactpoika coeHHeHn no TexHoJorHn Bluetooth® (conpJxHne)
- Y6eHntecb, yTO nopTaTnBHOe ycTpoiCTBO C noIepKoBluTooth BkIoueHo n cyHKcua BluTooth aKTHBupoBaHa.
- HeckonbKmHn HaxaTmM KHOKN [M]/[MODE] aKTHBnpyTe Ha paDnOpnpemHnke pekm Blueoth

- Haynet MiraTaB INDnKatop Bluetooth® (6).
- OtkpoTe HacrpoKn Bluetootha nopTaTINBHom yctpoNCTBe NdoXdntEc bnoBJIeHnB CnncKe 6hApyKeHHbIX yctpoNCTB C noDnepxKoB Bluetooth 3aNNCn IR360MBT.
- Ppi Heo6xOaHMoCTn 3anyCTnTe nonCK yCTpOJCTB C noDJIepKko Bluteoth Ha nopTaTINBHom yCTpOJCTBe.
BbI6epnte IR360MBT n noDoxnTe, noKa paAnOpnpemHnK He OTo6pa3ntc KaK NoIKNoUeHHbI B Hactpoikax Bluetooth nopTaTnHBoro yctpoiCTBa.
- После Зтого Инд Bluetooth® (6) 6удET CBetntbca
Неррьвно.
-ДяЗауcka BOCPOnu3BeDeHn n ynpaBHeHn nM nCNoJIb3yETcnoptaTnBHOe yCTpoNCTBO.

Powered by UNDOK MULTIROOM
->00054837->Downloads.
Frequency band(s)
2412-2472MHz
Maximum radio-frequency power transmitted
60 mW EIRP


6.2.2 Diakkaia yia xpiotc Android
Hotline: +49 9091 502-115 (Ger/Ang)
Alte informati de suport gasi aici:
www.hama.com
Powered by UNDOK MULTIROOM
Powered by UNDOK MULTIROOM
Powered by UNDOK MULTIROOM
86652 Monheim/ Germany
www.hama.com
The Spotify software is subject to third party licenses found here: www.spotify.com/connect/third-party-licenses
All listed brands are trademarks of the corresponding companies. Errors and omissions excepted, and subject to technical changes. Our general terms of delivery and payment are applied.