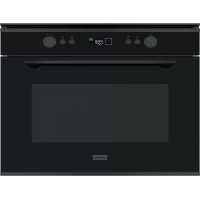
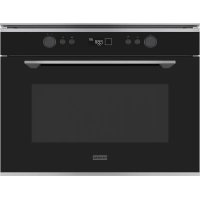
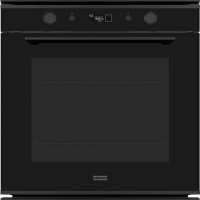
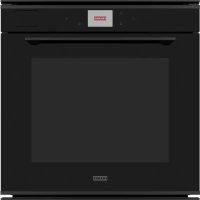
MA 82 M SRF - Oven FRANKE - Free user manual and instructions
Find the device manual for free MA 82 M SRF FRANKE in PDF.
User questions about MA 82 M SRF FRANKE
0 question about this device. Answer the ones you know or ask your own.
Ask a new question about this device
Download the instructions for your Oven in PDF format for free! Find your manual MA 82 M SRF - FRANKE and take your electronic device back in hand. On this page are published all the documents necessary for the use of your device. MA 82 M SRF by FRANKE.
USER MANUAL MA 82 M SRF FRANKE
EN Installation and user manual Multifunction Oven
Maintenance and cleaning 6
Repair 6
Taking out of service 6
Information for energy saving 7
Overview 7
Installation 8
Electrical connection 8
Operation 9
Cooking programs 9
Mechanical cooking programmer 10
Digital cooking programmer 11
Switching on the first time 12
Suggestions 13
Cooking table 13
Cleaning and care 15
General recommendations 15
Hydrolitic cleaning 15
Cleaning the oven chamber 15
Cleaning the oven door 15
Removing the oven door 16
Mounting the oven door 16
Cleaning the glass panels
of the oven door 16
Cleaning the side frames 17
Replacing the oven lamp 18
Technical data 19
Support 19
Disposal 20
Dishes tested 20
How to read the cooking table 20
ABOUT THIS MANUAL
This user manual applies to several models of the device. Thus it may be possible that some of the described features and functions are not available on your specific model.
The explanatory images and figures, described in the various sections, are available at the end of the manual.
Franke reserves the right to make modifications to the product without prior notice. All information is correct at time of issuance.
- Carefully read the user manual before using the device.
- Keep the user manual.
Use the device described in this user manual only according to the intended use.
Symbol Meaning

Warning symbol. Warning against risks of injury.
Actions in safety and warning notes to avoid injury or damage.
Action step. Specifies an action to be done.
Result. Result of one or more action steps.
Precondition that has to be fulfilled before performing the following action.
INTENDED USE
The oven was developed exclusively for nonprofessional, domestic use in the household.
The oven is designed to offer professional performance in the household. It is a highly versatile appliance enabling safe and easy selection of different cooking methods.
SAFETY INFORMATION
Read the user manual and the safety information carefully before using the oven.
Keep the manual for future reference.
The manufacturer can not be made liable for possible damage which may occur due to incorrect installation and incorrect, improper or unreasonable use of the device.
The electrical safety of the oven is guaranteed only when it is connected to an earthing system in compliance with the valid regulations.
To ensure safe and efficient operation of this electrical device:
Only contact authorised service centres.
Do not modify any features of the device.

This appliance can
be used by children aged from 8 years and above and persons with reduced physical,
sensory or mental capabilities or lack of experience and knowledge if they have been given supervision or instruction concerning use of the appliance in a safe way and understand the hazards involved. Children shall not play with the appliance. Cleaning and user maintenance shall not be made by children without supervision.
This device is not a toy.
Do not leave children near the device unattended.
Do not allow children to touch the device or its controls during and immediately after using it.
CAUTION: In order to avoid a hazard due to inadvertent resetting of the thermal cutout, this appliance must not be supplied through an external switching device, such as a timer, or connected to a circuit that is regularly switched on and off by the utility.
Ensure that the device is installed in a way that allows to disconnect it from the power supply, with a contact opening distance that ensures complete disconnection in category III overvoltage conditions. Means for disconnection must be incorporated in the fixed wiring in accordance with the wiring rules.
Only use the temperature probe recommended for this oven.
The appliance shall not be installed behind a decorative door in order to avoid overheating.

Risk of burns!
During use the appliance becomes hot. Care should be taken to avoid touching heating elements inside the oven. Children less than 8 years of age shall be kept away unless continuously supervised.

Risk of burns!
The end of the door handle may be hotter due to hot air being vented.
Always make sure that the control knobs are in the off position when the oven is not in use.
WARNING: Ensure that the appliance is switched off before replacing the lamp to avoid the possibility of electric shock.
Do not use harsh abrasive cleaners or sharp metal scrapers to clean the oven door glass/ the glass of hinged lids of the hob (as appropriate), since they can scratch the surface, which may result in shattering of the glass.
Do not use steam cleaners or direct jets of water.
If the supply cord is damaged, it must be replaced by the manufacturer, its service agent or similarly qualified persons in order to avoid a hazard.
Proper installation and placement
Keep children away from the device and the packaging material. If the oven is to be permanently connected to the power supply:
Ensure that the device is installed only by the customer service, an electrician or trained personnel with the appropriate knowledge/education.
Ensure that the device is connected directly to the mains socket.
Ensure that no adapters, no multi-sockets and no extension cables are used to connect the device.
Ensure that the device is not exposed to atmospheric agents (rain, sun).
Risk of death!
- Keep pets away from the device.
Packaging materials, e.g. plastic film and polystyrene, can be dangerous for children. - Keep packaging material away from children.
Proper use
Only use the device to prepare and cook food.
Use oven gloves when placing containers in the oven or when taking containers out of the oven.
Observe the manuals of the cooking devices that are used with the oven when using the device.
Do not place power cables of other electric appliances on hot parts of the oven.
Do not use flammable liquids near the oven.
Risk of overheating and
malfunction of the oven due to blocked ventilation!
Never cover the inside walls of the oven with aluminium foil.
Do not block the ventilation of the fan or the cooling openings above the oven door.
Risk of burns!
When opening or closing the door, always hold the door handle in the middle.

Risk of electric shock due to
damaged device!
Do not switch on a damaged device.
Switch off the fuse in the fuse box.
Contact the customer service.

Risk of electric shock!
Do not touch the device with wet parts of your body.
Do not use the device when barefoot.
Do not pull on the device or power cable to unplug it from the socket.
Maintenance and cleaning
Before maintenance or cleaning:
Disconnect the device from the power supply, e.g., switch off the fuse in the fuse box.
Risk of electric shock due to
entering liquid!
The device contains electrical components.
Make sure that no liquid enters the interior of the device.
Do not use pressurised steam to clean the device.
Do not use a wet cloth to clean the operating elements.
Repair
Do not allow anyone except qualified personnel to install or repair the appliance.
Contact a service centre authorised by the manufacturer or qualified personnel in the following cases:
- Immediately after unpacking, in the event of doubts regarding the integrity of the device
- During installation (according to the manufacturer's instructions)
- Doubts regarding the correct operation of the device
- Malfunction or poor operation
- Replacing the power socket if incompatible with the power plug of the device
Taking out of service
If the oven is no longer to be used, call the service centre or qualified personnel to disconnect it from the power supply.
INFORMATION FOR ENERGY SAVING
The operating mode FAN ASSISTED consume less energy than the other cooking functions available.
Avoid frequent door opening.
Preheat as rapidly as possible.
Preheat the oven chamber only if the baking results depend on this operation.
If a recipe for a gratin uses residual heat for longer than 30 minutes, turn the appliance off 5-10 minutes before the end of cooking.
OVERVIEW
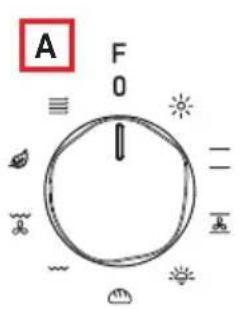
A. Programme selector knob
For selecting the oven mode according to the type of cooking required. When the knob is set to any programme, the oven light comes on indicating that the oven is switched on.
B. Programmer
Franke ovens have various cooking time management and control systems; refer to page 10 for specific detailed instructions. Just identify the type of control your oven is equipped with, to be guided in correct use of the function.
C. Thermostat indicator
Indicated by the symbol signals that the oven heating elements are on. It goes off when the set temperature has been reached, and comes on again whenever oven heating is reactivated. It is useful for checking if the temperature has been reached, before introducing the food.
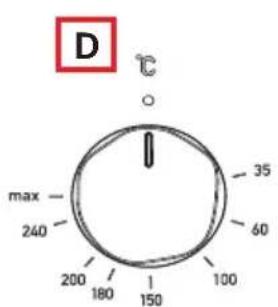
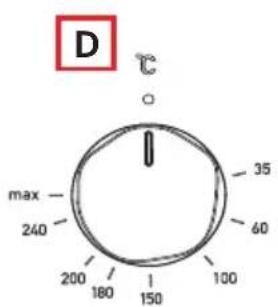
D. Temperature control knob (Thermostat)
Used to set the temperature required for the type of food being cooked, keeping it
constant during cooking. To select the required temperature, turn the knob clockwise, bringing the pointer to the corresponding number. Max. temperature is approx. 275^
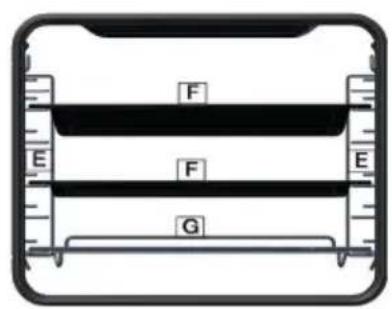
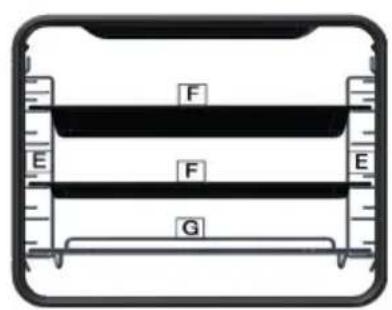
E. Rack and drip-tray runners
Used for correctly positioning the racks and drip-trays in 6 predetermined positions (1 to 6 starting from the bottom); the cooking table (page 13) indicates the best position for each type of cooking.
F. Drip-tray
Normally used for collecting juices from grilled food or for cooking food directly; the drip-tray must be removed from the oven if not used. The drip-tray is in "AA" food-grade enamelled steel.
G.Rack
Used for supporting pans, pastry moulds and any containers other than the drip-trays provided, or for cooking meat and fish mainly with the grill and turbo grill functions, toasting bread, etc. Direct contact of the rack with food is not recommended.


INSTALLATION
Installation must be carried out in compliance with current standards and regulations. Installation must only be carried out by specialised and licensed personnel.
Cabinet requirements
For fitted units, the components (plastic materials and veneered wood) must be assembled with heat-resistant adhesives (min. 100^ ):
unsuitable materials and adhesives can result in warping and detachment.
- The cabinet for the oven must allow sufficient room for the electrical connections of the oven.
The cabinet for the oven must be sturdy enough to withstand the weight of the oven.
The oven must be securely installed in the recess.
The oven can be installed in a column housing unit or below the countertop of a modular unit, provided sufficient ventilation is guaranteed.
Electrical connection
FRANKE ovens are supplied with a three-pole power cable with free terminals.
The connection polarities of the free terminals are respected: Brown = Line Blue = Neutral Yellow/Green = Earth

Make sure the characteristics of the household electrical system (voltage, maximum power and current) are compatible with those of your Franke oven. If the oven is permanently connected to the power supply:
Install a device that ensures disconnection from the power supply, with a contact opening distance (at least 3mm ) enabling complete disconnection in category III overvoltage conditions.
Ensure the following:
- The plug and socket are suitable for a 16 A current.
- The plug and the socket can be easily reached and are positioned so that no live part is accessible when inserting or removing the plug.
- The oven does not rest against the plug when installed in the cabinet.
A 3 × 1.5 ~mm^2 cable type H05VV-F is used when replacing the power cable.
OPERATION
This oven combines the advantages of "static" natural convection ovens with those of modern "fan" ovens. It is a very versatile appliance which enables safe and easy selection of 8 different cooking methods. Use knobs A and D on the control panel to select the required programmes and temperature. For best use of your Franke oven, consult the cooking table on page 13.
Cooling fan
In order to reduce the temperature at the door, control panel and sides, the Franke oven is equipped with a cooling fan which is automatically activated when the oven is hot. When the fan is on, air blows from the front of the oven between the front panel and oven door; special attention has been given to ensure that the exiting air does not disturb the kitchen environment and that noise is kept to a minimum.
To protect kitchen units, the fan keeps running after cooking until the oven has sufficiently cooled down.

Oven light
This symbol corresponds to switching on of the oven light without activation of any type of heating. This option is useful for cleaning the oven when it is switched off, to see the cooking compartment.
Defrosting
To defrost the food, the following procedure is recommended:
Set the programme selector knob (A) to the position „FAN GRILL".
Set the thermostat knob (D) to 0^ .
Cooking programs

TOP & BOTTOM HEAT
The heat source is from above (roof) heating element and below (floor) heating element. This is the conventional cooking function which ensures even cooking using a single shelf.
Set the thermostat knob (D) between 50^ and max. 275^ .

FAN-ASSISTED
The top (roof) heating element, bottom (floor) heating element and fan inside the oven are activated. The constant and uniform heat cooks and browns the food evenly. Various dishes can be cooked at the same time, using a maximum of 2 shelves.
Set the thermostat knob (D) between 50^ and max. 275^ .

GENTLE HEAT
The circular heating element is switched on and the fan starts. The constant and even heat cooks and browns the food evenly. Different foods can also be cooked at the same time, provided their cooking temperatures are similar. This is the gentlest type of fan cooking available with this Franke oven, and is ideal for preparing cakes and pastries, enabling three shelves to be used at the same time.
Set the thermostat knob (D) between 50^ and max. 275^ .
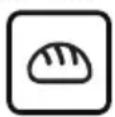
BREAD
The circular, upper and lower heating elements and the fan are activated. This is one of the most powerful cooking functions and the heat distribution is higher at the bottom, an ideal condition for cooking most types and sizes of bread. We recommend using levels 3-4-5. It can also be used to quickly reach the desired temperature, then selecting another program from the available ones.
Set the thermostat knob (D) between 50^ and max. 275^ .
| GRILL The grill heating element at the top of the oven switches on. In this case the fast radiant surface cooking keeps the meat tender on the inside; the grill can also be used to quickly toast up to 9 slices of bread. The Franke oven is designed to grill food with the oven door completely closed. Note: The grill heating element is very hot when in use; be careful not to touch it accidentally when handling food inside the oven. In any case, Franke has designed the oven opening to protect hands as much as possible. | The thermostat knob (D) should normally be set to max. 200°C, however a lower temperature can be set, in which case grilling will be slower. |
| FAN GRILL The grill heating element at the top of the oven and the fan are activated. It combines one-way heat radiation with forced air circulation inside the oven. This prevents the surface of the food from burning and allows the heat to penetrate deeper. Excellent results are obtained using the turbogrill for mixed meat and vegetable kebabs, sausages, spare-ribs and lamb chops, broiled chicken, quail with sage, pork fillets, etc. | The thermostat knob (D) should normally be set to max. 220°C, however a lower temperature can be set, in which case grilling will be slower. |
| ENERGY SAVING The circular and upper heating elements and the fan are activated. This is one of the most delicate cooking functions and the heat distribution is higher in the center and in the upper part of the oven; this makes it not suitable for all types of cooking, but ideal for delicate recipes based on small / medium format puff pastry / Brise. We recommend using level 3. This type of heating is used to define the energy efficiency class and the energy consumption in recirculated air mode. | Set the thermostat knob (D) between 50 °C and max. 275 °C. |
| MULTICOOKING This turns on the circular heating element, together with partial activation of the top (roof) and bottom (floor) heating elements and the fan. Compared with the previous function, it is a more powerful and faster way to reach the required temperature; this, in combination with even heat distribution, makes it ideal for roasting meat and fish and baking pasta, using up to 3 shelves. | Set the thermostat knob (D) between 50 °C and max. 275 °C. |
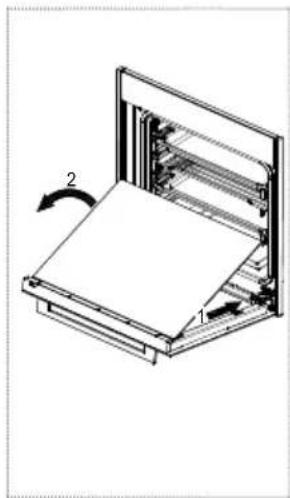
Mechanical cooking programmer
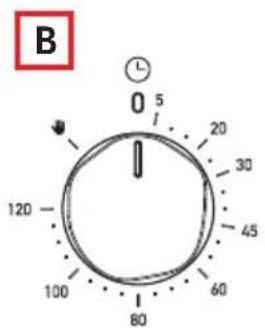
(Fig. 1a)
End of cooking timer knob (B)
The end of cooking timer is a practical device that turns the oven off automatically at a set time in an interval of 1 to 120 minutes.
To use the end of cooking timer, the ringer must be wound up by turning the knob (B) almost one full turn clockwise; then, turning back, set the required time by aligning the number corresponding to the minutes with the fixed reference on the front panel.
At the end of the set time, the ringer sounds and the oven is automatically switched off.
Note: The oven stays hot at around the set cooking temperature for a long time after it has been switched off; therefore to avoid overcooking or burning the food, it is advisable to remove it from the oven.
Note: To use the oven in manual mode, i.e. without using the end of cooking timer, align the knob (B) pointer with the fixed symbol on the front panel. When the oven is turned off, the end of cooking programmer can be used as a normal timer.
Digital cooking programmer
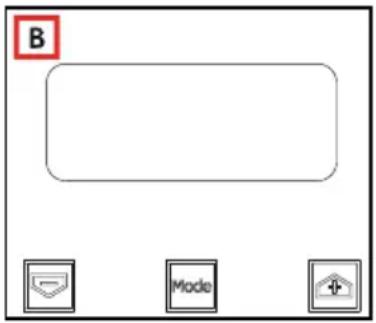
(Fig. 1b)
It enables oven programming in the following modes:
- delayed start of cooking with set duration,
- immediate start of cooking with set duration;
-timer.
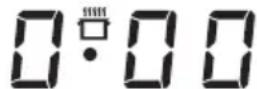
Setting the digital clock
When the appliance has been connected to the mains or after a power failure the display will flash on: 0.00^ .
Press the + and - buttons together for a few seconds. The time of day can be adjusted with the + and - buttons, while the dot between the hours and minutes flashes.
If the time setting mode is selected when an automatic programme is active, the automatic programme is cancelled.
Possible time adjustments can be made by repeating the steps described above.
Acoustic signal frequency modification
The frequency of the acoustic signal can be changed if a cooking cycle is not programmed (therefore the display shows the time of day).
Press the + and - buttons (from the time modification menu) together.
Press Mode or Set to select the menu for modifying the acoustic signal frequency.
The acoustic signal frequency can be modified by repeatedly pressing the Mode or Set button; ,ton1", ,ton2", ,ton3" will appear on the display.
Manual oven operation
Once the time has been set, the programmer automatically switches to manual mode.
Starting delayed cooking with set duration
When the time of the day is displayed, press the Mode or Set button twice to set a duration.
Then press it again to set the end of cooking time.
Set the required time with the + and - buttons.
During duration or end time adjustment mode selection, the Auto symbol remains lit.
Once a programme duration is set, the end time cannot be decreased.
- Likewise, the duration of a programme cannot be prolonged once the end time is set.
The end time and duration settings define programme start time as follows: start time = end time - duration.
After setting the duration and end time, the display still shows the end time.
The programme starts when the time of day coincides with the start time: the Auto symbol lights up steadily and the symbol 1starts flashing.
After the start of cooking, the display shows the countdown. If only the end of cooking time is selected (the duration is = 0 ), cooking starts and the display shows the countdown.
The Auto symbol remains lit during the wait for delayed start and for the entire duration of cooking.
The symbol flashes during the wait for delayed start and remains fixed when cooking starts.
An acoustic signal sounds at the end of cooking; to silence it, press Set or allow the signal to continue for its duration.
Semiautomatic programme with duration or end time
Programme time setting
To select the programme duration or end time press the Mode or Set button twice and set the required time with the + and - buttons.
During duration or end time adjustment mode selection, the corresponding Auto symbol flashes.
Once a programme duration is set, the end time cannot be decreased. Likewise, the duration of a programme cannot be prolonged once the end time is set.
Programme run
When the automatic programme is in progress (and therefore the cooking function is active), the Auto symbol remains lit and the remaining cooking time appears on the display in countdown form. The symbol also remains lit.
Automatic programme end
At the end of the programme duration or when the end time is reached, the corresponding symbol goes off.
At the end of the automatic programme, the Auto symbol flashes, the display shows "End" and an intermittent acoustic signal (which can be stopped by pressing Set) sounds.
Timer function
The timer allows the setting of a time from which a countdown begins. This function does not turn the oven on or off, but only sounds an audible alarm when the time has elapsed.
Press the Mode or Set button once; the display shows:
The bell symbol flashes, then the alarm duration can be set with the + and - buttons. When this function is active, the bell symbol remains lit and the display shows the remaining time (countdown).
At the end of the time an acoustic signal (which can be stopped by pressing Set) sounds.
Modifying/deleting data
The set data can be changed at any time by pressing the + and - buttons together.
Cancelling the cooking duration automatically ends the function, and vice versa.
In case of programmed operation, the appliance will not accept end of cooking times prior to those of start of cooking proposed by the appliance itself.
Note: The oven stays hot at around the set cooking temperature for a long time after it has been switched off; therefore to avoid overcooking or burning the food, it is advisable to remove it from the oven.
Switching on the first time
When using the oven for the first time, operate it empty with the temperature knob set to maximum for at least 40 minutes and airing the room.
The odour noticed during this operation is due to the evaporation of substances used to protect the oven during the period between manufacture and installation.
After the 40 minutes, the oven stops automatically and will be ready for use after cooling down the oven.
Suggestions
For successful cooking, never place your dishes in the oven when it is cold; wait until it has reached the set temperature.
During cooking, never place pots or containers directly on the oven floor; place them above the grills or drip-trays provided, on one of the 5 shelves available; failure to do so could damage the oven enamel.
Never cover the walls of the oven with aluminium foil, especially in the lower part of the cooking compartment.
Any repairs must be carried out by specialised, licensed personnel. Contact our nearest service centre and demand only original spare parts.
- Your Franke oven uses a special enamel which is easy to keep clean, however it is advisable to clean it frequently to avoid baking on grime and previous cooking residues.
Any self-cleaning panels (if provided) can be cleaned with soap and water (see cleaning instructions).
Note: Before switching the oven on, read the timer instructions (on page 12).
COOKING TABLE
| Function Recipe Weight/ | Quantity | Shelf Level (from the bottom) | Pre- heating | Tempe- rature(℃) | Time (min.) | |
| TOP & BOTTOM HEAT | Lasagna with meat or vegetables | 1 | 3 | yes | 200 | 25 - 40 |
| Lamb with potatoes | 1 | 3 | yes | 190 | 75 - 90 | |
| Veal noodles with olives | 1 | 3 | yes | 160 | 25 - 35 | |
| Arista with milk | 1 | 3 | yes | 170 for \( {30}^{\mathrm{t}} + {180} \) for \( {30}^{\mathrm{t}} \) | ||
| Stuffed chicken rolls | 0.4 | 3 | yes | 180 | 10 - 15 | |
| Whole baked fish | 1 | 2 - 3 | yes | 180 - 190 | 35 - 45 | |
| Fish in foil with citrus fruits | 0.6 | 3 | yes | 200 | 20 - 25 | |
| Thin pizza | 0.250 | 2 | yes | 200 | 15 | |
| Cookies | 0.4 | 3 | yes | 180 | 25 | |
| Meringues | 0.1 | 3 | yes | 75 | 120 | |
| Cheesecake | 0.250 | 3 | yes | 160 | 60 | |
| FAN- ASSISTED | Bocconcini of potatoes, cheese and bacon | pc 12 | 3 | yes | 180 | 30 |
| Stuffed crepes | pc 8 | 4 | yes | 190 | 5 - 7 | |
| Mozzarella in carrozza | 0.2 | 2 | yes | 190 | 15 - 20 | |
| Baked potatoes | 1 | 3 | yes | 200 | 50 - 60 | |
| Eggplant Parmesan | 1.5 | 3 | yes | 200 | 35 - 45 | |
| Ribs with white wine and fennel | 1 | 2 | yes | 160 | 25 - 30 | |
| English Roast Beef 1 3 yes 220 for \( {15}^{\mathrm{t}} + {180} \) for \( {10}^{\mathrm{t}} \) | ||||||
| Mustard chicken drumsticks bacon | 1 | 3 | yes | 180 | 40 | |
| Pizza focaccia | 0.5 | 3 | yes | 200 | 25 | |
| Focaccia | 1 | 2 | yes | 180 | 20 | |
| Frozen pizza/s | 0.750 | 2 (R)- 4 (F) | yes | 200 | 11 | |
| Frozen croissant | 0.6 | 3 | yes | 170-180 | 20 - 25 | |
| GENTLE HEAT | Rice croquettes | 0.5 | 3 | yes | 200 | 30-35 |
| Eggs in cocotte and salmon | pc 4 | 2 | yes | 180 | 16-20 | |
| Beer chicken | 1 | 1 | yes | 190 | 55-60 | |
| Vegetables and bacon quiche | 1 | 3 | yes | 180 | 50 | |
| Plum cake | 1.5 | 2 | yes | 160 | 60-70 | |
| Soft cakes | 0.4 | 2 | yes | 165 | 30 | |
| Fruit/jam tarts | 1 | 3 | yes | 160 | 15-25 | |
| BREAD | Rustic loaf | 1 | 4 | yes | 230 for 25' + 180 for 25' | |
| Tongue | 1 | 4 | yes | 230 for 10' + 180 for 10' | ||
| Ciabattone | 1 | 5 | yes | 230 for 15' + 180 for 15' | ||
| Swiss braid | 1 | 5 | yes | 180 | 30-35 | |
| Milk sandwiches | 1 | 5 | yes | 180 | 13 | |
| Chocolate bonet | pc 8-10 | 3 | no | 210 | 9-10 | |
| GRILL | Bacon omelette | 0.5 | 4 | yes | 170-180 | 15-17 |
| Scallops with butter and brandy | pc 12 | 4 | yes | 190 | 10 | |
| Gorgonzola and walnut gratin pasta | 0.350 | 5 | yes | 220 | 3-5 | |
| Gnocchi pasticciata alla romana | 0.250 | 5 | yes | 200 | 18-20 | |
| Baked king prawns | pc 32 | 4 | yes | 200 | 10-15 | |
| Stuffed gratin vegetables | 0.8 | 4 | yes | 180 | 60 | |
| Spicy chicken wings | 1 | 4 | yes | 180 | 45-47 | |
| Skewers of prawns | 0.5 | 4 | yes | 190 | 15-20 | |
| Skewers of meat | 0.5 | 3 | yes | 200 | 20 | |
| FAN GRILL | Bacon with citrus fruits 1 4 yes 200 for 45' + 150 for 60' | |||||
| Frozen calamari rings | 0.6 | 3 | yes | 170 | 10 | |
| Vegetable chips | 1 | 4 | yes | 170 | 20-25 | |
| Chicken in pieces with corn flakes | 1 | 2 | yes | 170 | 42-46 | |
| Stuffed bread boats | 0.4 | 4 | yes | 180 | 25-30 | |
| Sausages | 0.5 | 3 | yes | 180 | 25-30 | |
| Fish morsels | 0.6 | 4 | yes | 200 | 8-10 | |
| ENERGY SAVING | Rolled rustic breadsticks | 0.250 | 3 | yes | 180 | 12-14 |
| Mini strudel sweet or savory | pc 16 | 3 | yes | 180 | 18-21 | |
| Salted muffins | pc 16 | 3 | yes | 200 | 28-30 | |
| Apple puffs | 0.450 | 3 | yes | 190 | 16-18 | |
| Ricotta and spinach omelette | 0.7 | 3 | yes | 160 | 25-27 | |
| Quiche Lorraine | pc 1 | 3 | yes | 190 | 35 | |
| MULTI- COOKING | Baked vegetables | 1 | 2-3 | yes | 180 | 60 |
| Vegetable pie | 1 | 2-3 | yes | 170 | 35-45 | |
| Rabbit in pieces | 1 | 3 | yes | 180-185 | 40 | |
| Whole chicken | 1 | 2 | yes | 180 | 60 | |
| Pork fillet with oranges | 1 | 2 | yes | 200 | 60 | |
| Fish rolls | 0.2 | 2 | yes | 160 | 8-10 | |
| Meat rolls with lemon | 0.8 | 3 | yes | 160 - 170 | 10-12 | |
| Salt fish | 1 | 3 | yes | 170 | 40-45 | |
| Savoury pies | 0.5 | 3 | yes | 190 | 40-50 | |
| Cream puffs | 0.3 | 2 | yes | 180 | 20-25 | |
Note: The indications given in the table are the result of cooking tests carried out by a team of professional chefs. They are provided as a guide only, and can be changed according to personal tastes. Legend: R = Rack; F = Flat drip-tray
CLEANING AND CARE
Before performing any cleaning and care:
Read the general safety information about cleaning in the chapter „Safety information".
Turn the oven off.
Depending on how the oven is installed: Unplug the oven or disconnect the power at the main electrical system switch, e.g., switch off the fuse of the oven in the fuse box.
General recommendations
Stains on the base of the oven from various cooking products (saues, sugar, proteins and fat) are always caused by spills and splashes. Splashes occur during cooking and are usually the result of cooking at too high temperatures. Spills occur when using cooking dishes which are too small, or due to an incorrect estimate of increases in volume during cooking. These problems can be avoided by using deep cooking receptacles or by using the enamel tray supplied with the oven.
The stainless steel and enamelled parts of the oven will remain as good as new if cleaned regularly with water or special detergents.
Ensure that the oven is cold before you start cleaning.
Do not use steam cleaners or direct jets of water.
Do not use coarse abrasive materials or sharp metal scrapers to clean the glass parts of the oven door. They could scratch the surface and cause the glass to shatter.
Never use scouring pads, steel wool, muriatic acid or other products which could scratch or mark the surface.
Only use hot water and non-abrasive detergents when cleaning the enamelled surfaces and the oven chamber.
Use a branded glass cleaner for the glass panels.
Hydrolitic cleaning
For a deeper cleaning of your oven (after each use), the following procedure is recommended:
Rotate the operation mode selection knob to the position ,TOP & BOTTOM HEAT".
Set the temperature selection knob to 70^
Pour 0.3 liter of demineralized water directly onto the bottom of the oven cavity without baking tray.
After about twenty minutes, the food residues on the enamel will soften, allowing you to wipe them with a damp cloth.
Cleaning the oven chamber
It is easier to remove any stains while the oven is still warm and while the stains are still new.
Ensure the oven is cool to the touch, to avoid burns.
Clean the enamelled surfaces and the oven chamber with hot water and non-abrasive detergents.
Dry all parts of the oven thoroughly after cleaning.
Cleaning the oven door
Ensure that the oven is cold before you start cleaning.
To facilitate oven cleaning, the oven door can be removed (see chapter „Removing the oven door").
Use a branded glass cleaner for the glass.
Dry all parts of the oven thoroughly after cleaning.
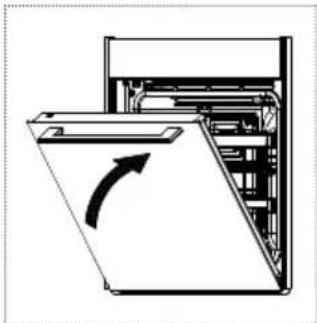
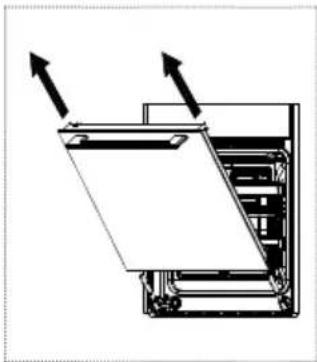
Removing the oven door
Open the oven door completely.
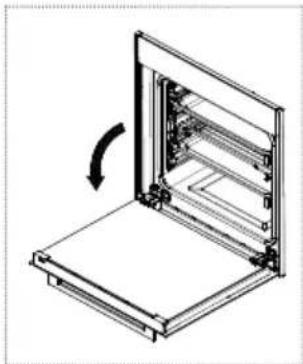
The hinges are equipped with two moveable locks.
To release the hinge lift the lock and hold the door at the sides near the hinges.
Turn the two block hooks down.
Ensure that the block hooks are turned down completely.
- Close the door halfway.
Pull the door outwards.
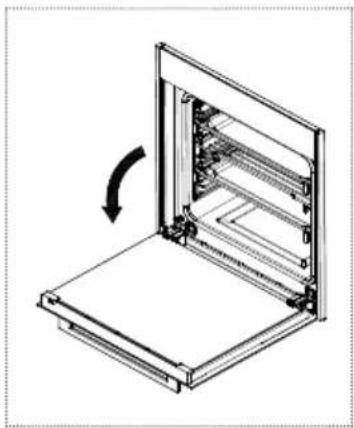
Mounting the oven door
After cleaning, the oven door has to be mounted again.
▶ Slide the hinges into their grooves.
Turn the two block hooks (used as hinge attachments) upwards.
CAUTION! Damage to the oven due to wrong handling!
Never try closing the door when one or both blocks are partially or completely open.
Close the oven door.
Cleaning the glass panels of the oven door
The oven door and the glass panels can be removed to enable thorough cleaning of the glass panel.
The oven door has 3 glass panels:
- internal glass panel (near the cavity)
- intermediate glass panel (inside the oven door)
external glass panel
The internal glass panel and the intermediate glass panel can be removed for cleaning purposes.
The inside of the external glass panel can be cleaned when the internal and the intermediate glass panel are removed.
Removing and cleaning the internal glass panel from the oven door
Ensure that the oven is cold before you start cleaning.
Open the oven door completely.
Turn the two black blocks (with the word CLEAN, at the bottom of the door) for 180^ so that they fit into the seats in the oven structure.
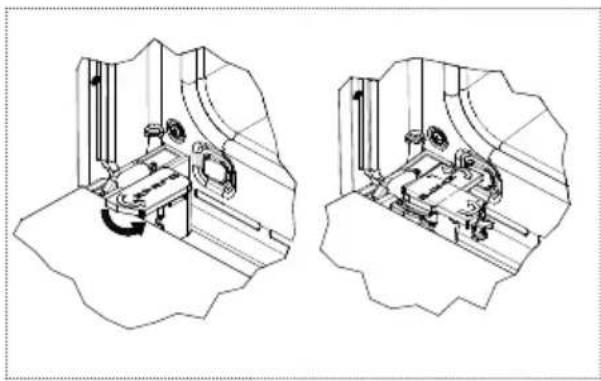
- Make sure to turn the black blocks completely.
The blocks click into their position.
CAUTION! Damage to the oven due to wrong handling!
If the blocks are not turned completely, removing the glass panel will cause the oven door to close immediately.
Never try closing the door when one or both blocks have partially or completely freed the glass panel.
Carefully push the internal glass panel (1) towards the oven. Then lift the internal glass panel (2).
The two black blocks will prevent the door from closing.
Clean the internal glass panel.
Removing and cleaning the intermediate glass panel of the oven door
After removing the internal glass panel, the intermediate glass panel can be removed.
Carefully lift the intermediate glass panel out of the rubbers on both sides.
Clean the intermediate glass panel.
Removing and cleaning the upper trims for glass panels
For more thorough cleaning, the upper trims on the oven door can be removed. The upper trims are fixed with two screws, one in the upper right, one in the upper left corner on the inside of the oven door. It is only possible, to remove the upper trims when the internal glass is removed.
Unscrew the fixing screws in the upper right and left corner of the oven door.
Remove the upper trim.
Clean the upper trim.
Mounting the glass panels
The correct position of the mounted glass panels is indicated by the wording TEMPERED GLASS which must be perfectly legible.
If unmounted, put the upper glass trim back in place.
If unmounted, put the intermediate glass panel back in place within the rubbers.
Put the internal glass panel back in place.
Turn the two glass retaining blocks back to their original position.
Close the oven door.
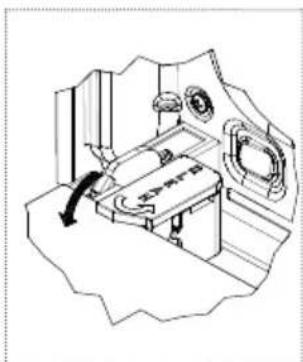
Cleaning the side frames
To clean the side frames thoroughly they can be removed from the oven.
Removing the side frames
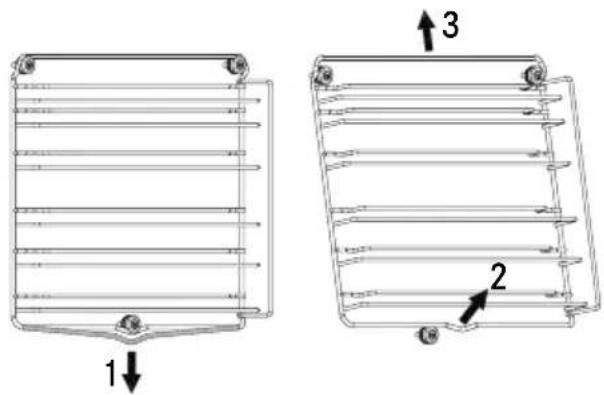
Bend the crosspiece which is engaged in the fixing bush downwards and remove it from the groove.
Push the side frame upwards and remove it from the two upper hooks.
Cleaning
Clean the side frames.
After cleaning, keep the side frame tilted and insert the side frames into the two respective guides on the top.
Bend the crosspiece which is engaged in the fixing bush upwards and insert it in the groove.
Insert the telescopic guides.
Replacing the oven lamp
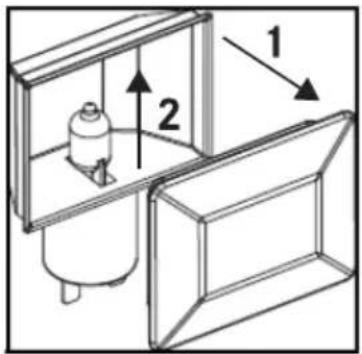
Franke ovens are equipped with two rectangular lamps. The replacement lamp must meet the following technical specifications:
- Temperature resistance: 300^
Voltage: 220-240 V, 50/60 Hz - Power: 2 × 25 W
-Connection:G9
CAUTION! Damage to the lamp due to wrong handling!
Avoid touching the lamps with bare hands.
Use a cloth or a sheet of kitchen paper.

WARNING! Possibility of electric
shock!
Ensure that the oven is switched off before replacing the lamp.
WARNING! Electric shock due to
wrong handling!
Switch the oven off.
Depending on how the oven is installed: Unplug the oven or disconnect the power at the main electrical system switch, e.g., switch off the fuse of the oven in the fuse box.
- Remove the glass cover by carefully prying it off with a flat-blade screwdriver.
Remove the lamp from its holder.
Replace the lamp.
Reattach the glass cover.
TECHNICAL DATA
Power supply 220-240 V, 50/60 Hz
Total power and fuse rating 2850W 16A
Power and heating elements
Radial motor 27 W
Light bulb 25 W (x2)
Tangential fan 17W
Heating element, roof 520 W / 124 V
Heating element, floor 1250 W
Heating element, grill 2100 W
Circular heating elements 2000 W
SUPPORT
In the event of any operation problems, contact a Franke Technical Service Centre (refer to the attached list).
Never use the services of unauthorised technicians.
Specify:
- the type of fault;
- the appliance model (Art./COD.).
- the serial number (S.N.).

This information is given on the appliance dataplate on the warranty certificate.
DISPOSAL
Information for users
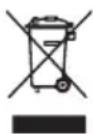
The symbol on the product or on the packaging indicates that the device must not be disposed of in the domestic waste.
By disposing of the device in a proper way you help to avoid harmful consequences to environment and health.
Further information about recycling the device is available from the competent authority, the local refuse disposal service or the vendor of the device.
Dispose of the device, which is to be discarded, via a specialised waste collection point for electronic and electrical devices.
In accordance with the Directive 2012/19/EU, regarding the reduction of the hazardous substances used in electrical and electronic appliances, and waste disposal.
The barred dustbin symbol on the appliance indicates that at the end of its working life the product must not be disposed of as household waste.
Consequently, when the appliance has reached the end of its working life the user must take it to a suitable recycling centre for electronic and electrotechnical waste, or return it to the dealer when purchasing a new appliance of equivalent type.
Proper separate waste collection of the scrapped appliance for subsequent recycling, treatment and environmentally-friendly disposal helps prevent a potentially negative impact on the environment and health and facilitates recycling of the materials used in appliance construction.
Information for test institutes
To calculate the volume, remove the internal wire side runners, if present (according to standards 2009/60350-50304/EN).
DISHES TESTED
In accordance with the Standard
EN/IEC60350
These tables have been created for the controlling authorities in order to facilitate the examination and testing of the various devices.
How to read the cooking table
The table suggests the ideal function to use for a particular food cooked on one or more shelves simultaneously.
The cooking times refer to the introduction of the food in the oven, excluding preheating (if required). Temperatures and cooking times are approximate values and depend on the quality of food and the type of accessory.
Initially use the recommended values and if the firing result is not as expected, increase or decrease the time. We recommend using the supplied accessories, cake tins and trays possibly dark metal. Follow the selection table which lists the supplied items to be placed on different shelves.
Cooking different foods at the same time
Using the recommended ventilated functions, it is possible to cook on different shelves simultaneously. When cooking on a single shelf you can also use the static function.
| Recipe Function Pre- | heating | Level (from below) | Temperature (°C) | Time (min) | Accessories and Notes | |
| Shortbread (max 1 level) | TOP / BOTTOM HEAT | YES | 3 | 150 | 30-40 | Lev. 3: flat drip-tray |
| FAN ASSISTED YES 3 140 | 34-40 | Lev. 3: flat drip-tray | ||||
| Small cakes | TOP / BOTTOM HEAT | YES | 2 | 160 | 25-30 | Lev. 2: deep drip-tray |
| FAN COOKING YES | 3 175 | 15-20 | Lev. 4: deep drip-tray | |||
| FAN ASSISTED | YES | 3-5 | 160 | 15-22 | Lev. 3: flat drip-tray | |
| Lev. 5: deep drip-tray | ||||||
| Fatless Sponge Cake | TOP / BOTTOM HEAT | YES | 2 | 170 | 23-30 | Lev. 2: baking tin on grill |
| FAN COOKING | YES | 2 | 170 | 25-30 | Lev. 2: baking tin on grill | |
| Apple Pie | TOP / BOTTOM HEAT | YES | 2 | 190 | 45-55 | Lev. 2: baking tin on grill |
| BREAD | YES | 1 | 180 | 58-65 | Lev. 1: baking tin on grill | |
| Two apple pies | BREAD | YES | 2 | 180 | 48-55 | Lev. 2: two baking tins on grill |
| Leavened cakes | TOP / BOTTOM HEAT | YES | 2 | 165 | 25-30 | Lev. 2: baking tin on grill |
| FAN COOKING | YES | 2 | 165 | 28-35 | Lev. 2: baking tin on grill | |
| Grill cooking | If you cook the food directly on the grill, also introduce the drip pan on the bottom shelf. In this way you can collect cooking residues and keep the oven clean. | |||||
| Toast* (preheating 5 min) | GRILL | YES | 5 | Lev. 4 | 2-3 | Lev. 5: Grill |
| Burgers ** (no preheating) | FAN GRILL | NO | 4 | Lev. 3 | 25-30 | Lev. 4: Grill Lev. 3: drip-tray |
| * keep the door closed for the duration of the cooking. ** once it reaches 15'min, turn it. | ||||||
INHALTSVERZEICHNIS
Use un limpiacristales de buena calidad para el cristal.
- Tras la limpieza,SEO,SEO,SEO,SEO,SEO,SEO,SEO,SEO,SEO,SEO,SEO,SEO,SEO,SEO,SEO,SEO,SEO,SEO,SEO,SEO,SEO,SEO,SEO,SEO,SEO,SEO,SEO,SEO,SEO,SEO,SEO,SEO,SEO,SEO,SEO,SEO,SEO,SEO,SEO,SEO,SEO,SEO,SEO,SEO,SEO,SEO,SEO,SEO,SEO,SEO, SEO
Limar as armacoes laterais
WAARSCHUWING! Risico op
elektrische schok!
Sigma npnKai KαθαρiαoC
Piv aio t n ouvtnpnon n tov kathetaipioo:
AIOOuvEOTEN OoKeun Ano TnV npoxn IOXUOC, P. KATEBcTe TnV aOaAeia Tou nAekTPIKOU IVaKa.

Kivduoc nAekptponAnxiac Eaia
TNC EIOAOwynC Uypou!
T. Taqi ouAoynC AInouc
UvHwC xPnaiPOnoiEitai yia Tn ouAloyn uypwv ano faynta nou vnvovta otn oxap a nyia to ayepmaayntou ane uthetaic meoa e auto. To taui ouAloync liouc npenei va aphipeitai ano to foupvo av dve xPnaiPOnoiEitai. To taui ouAloync liouc ivai kataokueaoevo ano emayie atoali yia faynto 3aOmuAA
Z. x
Xpnaiponoiieitai yia va otpiic taia,phiuec Zaxaponlaataiknc kai onoiaobntote aaaa okeun EKToc ano ta napexoeva taia oullayn CInouc n yi ta mayeipepa kpeato c npapiou Kupic otic aeitoupyiec ykpi Kaiou npoykpi,vi to dpuyavioqa wmuou, k.1t. 6v ouviotatai n aueon eiaoh tnc oxapac u to phaynto.

EΓΚΑΤΑΣΤΑΣH
H eKataoTao npEe va npayatoioi tai
oe oumuopphion poc ta Tpexovta npotunkai kavovouc. H eKataoTao npEe va npayatooieitai movo ano Eeiokeu evo
tpoowtiko kai aedioxto xviok.
Heshan, Guangdong, 529700
Hotline 400 882 9898
Hong Kong SAR
Franke Asia Hong Kong
Causeway Bay
Phone +852 3184 1900
Czech Republic
Franke s.r.o.
190 00 Praha 9
Phone +420 281 090 411
India
Franke Faber India Pvt Ltd.
Aurangabad-431136
Phone 1800 209 3484
Italy
Franke S.p.A.
37019 Peschiera del Garda
Numero Verde 800 359 359
Denmark
Franke KS Denmark
8520 Lystrup
Phone +45 8624 9024
Kazakhstan
Franke Kazakhstan Ltd.
040918 Almaty City
Phone +7 7272973812
Egypt
Franke Kitchen Systems
Egypt S.A.E.
6th of October City
Hotline 16828
Morocco
Franke Kitchen System SARL
21 000 Casablanca
Phone +212 522 674 200
Norway
Franke KS Norway
8520 Lystrup, Denmark
Phone +47 35 566 450
Poland
Franke Polska Sp. z o.o.
05-090 Raszyn
Phone +48 22 711 6700
Portugal
Franke Portugal S.A.
2735-531 Cacém
Phone +351 21 426 9670
Romania
Franke Romania SRL
Pantelimon 077145
Phone +40 21 350 1550
Russia
Franke Russia GmbH
199106 St. Petersburg
Phone +7 8127031540
Slovak Republic
Franke Slovakia s.r.o.
010 01 Zilina
Phone +421 41 733 6200
South Africa
Franke South Africa
Durban 4052
Phone +27 31 450 6300
Spain
Franke Espana S.A.U.
Phone +46 912 405 00
Switzerland
United Arab Emirates
Franke LLC
Ras Al Khaimah
Phone +971 7 203 4700
United Kingdom
Franke UK Ltd.
Manchester M22 5WB
Phone +44 161 436 6280
USA
Franke Kitchen Systems LLC
Smyrna, TN 37167
Phone 800 626 5771