USER MANUAL ELM4120 MAKITA
natural_image
Line drawing of a small robotic car with labeled parts and rotation arrows (no text or symbols beyond labels)
natural_image
Technical line drawing of a car interior showing steering wheel, dashboard, and steering wheel (no text or symbols)
natural_image
Line drawing of a lawn mower with hands operating it, labeled with number 1 (no text or symbols on the diagram itself)
natural_image
Technical diagram of a mechanical component with labeled parts and an arrow indicating a specific section (no text or symbols present)
natural_image
Illustration of a crossed-out circle with plants and leaves, no text or symbols present
natural_image
Illustration of hands connecting a cable to a support structure (no text or symbols)
natural_image
Line drawing of a person using a lawn mower on a lift (no text or symbols)
natural_image
Line drawing of a lawn mower with a no-smoking symbol (no text or labels)
natural_image
Diagram of a lawn mower with a prohibition symbol (no text or labels present)
natural_image
Top-down line drawing of a lawn mower with hands operating it, no text or symbols present
natural_image
Technical line drawing of a mechanical device with labeled parts, showing wiring and components (no text or symbols beyond label)

natural_image
Mechanical gear assembly diagram showing rotational motion with labeled component 1 (no text or symbols beyond label)
natural_image
Top-down schematic of a car interior with labeled parts, showing structural components and directional arrows (no text or symbols beyond labels)
natural_image
Technical line drawing of a mechanical device with labeled parts (no text or symbols beyond label)

natural_image
Line drawing of a car's electrical plug and valve assembly (no text or symbols)
natural_image
Technical line drawing of a mechanical clamp or bracket assembly with two labeled parts (1 and 2), no readable text or symbols present.
natural_image
Mechanical gear assembly diagram showing rotational motion with labeled component 1 (no text or symbols beyond label)
natural_image
Line drawing of a lawn mower with wheels and handle (no text or symbols)
natural_image
Mechanical assembly diagram showing two clamping clips interacting with a bracket (no text or symbols)
natural_image
Diagram of a lawn mower with mechanical components and a belt drive mechanism (no text or symbols)

SPECIFICATIONS
| Model: ELM3320 ELM3720 ELM4120 | | | |
| No load speed 3,400 min | -1 |
| Cutting height 20 mm - 55 mm 20 mm - 75 mm | | |
| Cutting width 330 mm 370 mm 410 mm | | | |
| Part number of replacement mower blade YA00000731 YA00000732 YA00000733 | | | |
| Dimensions(L x W x H) | During operation (with grass basket) | L: 1,040 mm to 1,230 mmW: 380 mmH: 870 mm to 1,110 mm | L: 1,140 mm to 1,330 mmW: 415 mmH: 890 mm to 1,120 mm | L: 1,255 mm to 1,470 mmW: 460 mmH: 955 mm to 1,230 mm |
| When stored (without grass basket) | 350 mm x 380 mm x 1,090 mm | 335 mm x 415 mm x 1,090 mm | 395 mm x 460 mm x 1,220 mm |
| Net weight 11.3 kg 13.7 kg 17.0 kg | | | |
| Safety class | ☐/II |
| Protection degree IPX4 | |
- Due to our continuing program of research and development, the specifications herein are subject to change without notice.
• Specifications may differ from country to country.
- The weight may differ depending on the attachment(s). The lightest and heaviest combinations, according to EPTA-Procedure 01/2014, are shown in the table.
Symbols
The followings show the symbols which may be used for the equipment. Be sure that you understand their meaning before use.
| Take particular care and attention. |
| Read instruction manual. |
| DOUBLE INSULATION |
| Danger; be aware of thrown objects. |
| The distance between the tool and bystanders must be at least 15 m. |
| Wait until all machine components have completely stopped before touching them. |
| Keep the supply flexible cord away from the cutting blades. |
 | Never put your hands and feet near the mower blade under the mower. Mower blades continue to rotate after the motor is switched off. Remove the plug from the machine before maintenance or if cord is damaged. |
| The noise of the machine is not more than 96 dB. |
| Keep hands and feet away. Do not operate mower unless the guards and attachments are in proper place. |
| Only for EU countriesDue to the presence of hazardous components in the equipment, used electrical and electronic equipment may have a negative impact on the environment and human health.Do not dispose of electrical and electronic appliances with household waste!In accordance with the European Directive on waste electrical and electronic equipment and its adaptation to national law, used electrical and electronic equipment should be collected separately and delivered to a separate collection point for municipal waste, operating in accordance with the environmental protection regulations.This is indicated by the symbol of the crossed-out wheeled bin placed on the equipment. |
The machine is intended for lawn mowing. Do not use the machine for other purposes. Use of the machine for operations other than the intended use could result in a hazardous situation.
Power supply
The tool should be connected only to a power supply of the same voltage as indicated on the nameplate, and can only be operated on single-phase AC supply. They are double-insulated and can, therefore, also be used from sockets without earth wire.
If the supply cord is damaged, it must be replaced by the manufacturer or its service agent in order to avoid a hazard.
For public low-voltage distribution systems of between 220 V and 250 V
Switching operations of electric apparatus cause voltage fluctuations. The operation of this device under unfavorable mains conditions can have adverse effects to the operation of other equipment. With a mains impedance equal or less than 0.425 Ohms (for ELM3720) or 0.427 Ohms (for ELM4120), it can be presumed that there will be no negative effects. The mains socket used for this device must be protected with a fuse or protective circuit breaker having slow tripping characteristics.
Noise
Applicable standard : EN IEC 62841-4-3
| Model Sound pressure level Sound power level | |
| L_PA(dB(A)) Uncertainty K (dB(A)) | L_WA(dB(A)) Uncertainty K (dB(A)) |
| ELM3320 83 3 91.9 0.7 | | | | |
| ELM3720 81 3 92.8 1.3 | | | | |
| ELM4120 84 3 94.2 1.4 | | | | |
NOTE: The declared noise emission value(s) has been measured in accordance with a standard test method and may be used for comparing one tool with another.
NOTE: The declared noise emission value(s) may also be used in a preliminary assessment of exposure.
WARNING: Wear ear protection.
WARNING: The noise emission during actual use of the power tool can differ from the declared value(s) depending on the ways in which the tool is used especially what kind of workpiece is processed.
WARNING: Be sure to identify safety measures to protect the operator that are based on an estimation of exposure in the actual conditions of use (taking account of all parts of the operating cycle such as the times when the tool is switched off and when it is running idle in addition to the trigger time).
Vibration
The vibration total value (tri-axial vector sum) determined according to EN IEC 62841-4-3:
Model ELM3320
Vibration emission (ah): 2.5 m/s² or less
Uncertainty (K) : 1.5 m/s ^2
Model ELM3720
Vibration emission (ah): 2.5 m/s² or less
Uncertainty (K) : 1.5 m/s ^2
Model ELM4120
Vibration emission (ah): 2.5 m/s² or less
Uncertainty (K) : 1.5 m/s ^2
NOTE: The declared vibration total value(s) has been measured in accordance with a standard test method and may be used for comparing one tool with another.
NOTE: The declared vibration total value(s) may also be used in a preliminary assessment of exposure.
⚠ WARNING: The vibration emission during actual use of the power tool can differ from the declared value(s) depending on the ways in which the tool is used especially what kind of workpiece is processed.
WARNING: Be sure to identify safety measures to protect the operator that are based on an estimation of exposure in the actual conditions of use (taking account of all parts of the operating cycle such as the times when the tool is switched off and when it is running idle in addition to the trigger time).
For European countries only
The Declarations of conformity are included in Annex A to this instruction manual.
SAFETY WARNINGS
⚠ WARNING Read all safety warnings, instructions, illustrations and specifications provided with this power tool. Failure to follow all instructions listed below may result in electric shock, fire and/or serious injury.
Save all warnings and instructions for future reference.
The term "power tool" in the warnings refers to your mains-operated (corded) power tool or battery-operated (cordless) power tool.
Work area safety
- Keep work area clean and well lit. Cluttered or dark areas invite accidents.
- Do not operate power tools in explosive atmospheres, such as in the presence of flammable liquids, gases or dust. Power tools create sparks which may ignite the dust or fumes.
- Keep children and bystanders away while operating a power tool. Distractions can cause you to lose control.
Electrical safety
- Power tool plugs must match the outlet. Never modify the plug in any way. Do not use any adapter plugs with earthed (grounded) power tools. Unmodified plugs and matching outlets will reduce risk of electric shock.
- Avoid body contact with earthed or grounded surfaces, such as pipes, radiators, ranges and refrigerators. There is an increased risk of electric shock if your body is earthed or grounded.
-
Do not expose power tools to rain or wet conditions. Water entering a power tool will increase the risk of electric shock.
-
Do not abuse the cord. Never use the cord for carrying, pulling or unplugging the power tool. Keep cord away from heat, oil, sharp edges or moving parts. Damaged or entangled cords increase the risk of electric shock.
-
When operating a power tool outdoors, use an extension cord suitable for outdoor use. Use of a cord suitable for outdoor use reduces the risk of electric shock.
-
If operating a power tool in a damp location is unavoidable, use a residual current device (RCD) protected supply. Use of an RCD reduces the risk of electric shock.
-
Use of power supply via an RCD with a rated residual current of 30 mA or less is always recommended.
-
Power tools can produce electromagnetic fields (EMF) that are not harmful to the user. However, users of pacemakers and other similar medical devices should contact the maker of their device and/or doctor for advice before operating this power tool.
-
Do not touch the power plug with wet hands.
- If the cord is damaged, have it replaced by the
manufacturer or his agent in order to avoid a safety hazard.
Personal safety
-
Stay alert, watch what you are doing and use common sense when operating a power tool. Do not use a power tool while you are tired or under the influence of drugs, alcohol or medication. A moment of inattention while operating power tools may result in serious personal injury.
-
Use personal protective equipment. Always wear eye protection. Protective equipment such as a dust mask, non-skid safety shoes, hard hat or hearing protection used for appropriate conditions will reduce personal injuries.
-
Prevent unintentional starting. Ensure the switch is in the off-position before connecting to power source and/or battery pack, picking up or carrying the tool. Carrying power tools with your finger on the switch or energising power tools that have the switch on invites accidents.
-
Remove any adjusting key or wrench before turning the power tool on. A wrench or a key left attached to a rotating part of the power tool may result in personal injury.
-
Do not overreach. Keep proper footing and balance at all times. This enables better control of the power tool in unexpected situations.
-
Dress properly. Do not wear loose clothing or jewellery. Keep your hair and clothing away from moving parts. Loose clothes, jewellery or long hair can be caught in moving parts.
-
If devices are provided for the connection of dust extraction and collection facilities, ensure these are connected and properly used. Use of dust collection can reduce dust-related hazards.
-
Do not let familiarity gained from frequent use of tools allow you to become complacent and ignore tool safety principles. A careless action can cause severe injury within a fraction of a second.
-
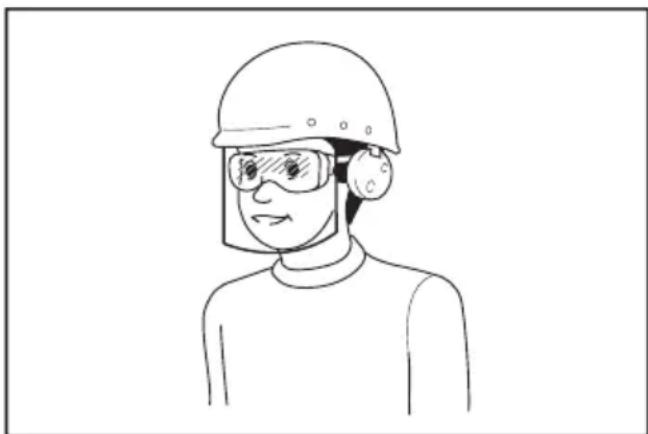
Always wear protective goggles to protect your eyes from injury when using power tools. The goggles must comply with ANSI Z87.1 in the USA, EN 166 in Europe, or AS/NZS 1336 in Australia/New Zealand. In Australia/New Zealand, it is legally required to wear a face shield to protect your face, too.
natural_image
Line drawing of a person wearing a helmet and safety goggles (no text or symbols)
It is an employer's responsibility to enforce the use of appropriate safety protective equipments by the tool operators and by other
persons in the immediate working area.
- Do not force the power tool. Use the correct power tool for your application. The correct power tool will do the job better and safer at the rate for which it was designed.
- Do not use the power tool if the switch does not turn it on and off. Any power tool that cannot be controlled with the switch is dangerous and must be repaired.
- Disconnect the plug from the power source and/or remove the battery pack, if detachable, from the power tool before making any adjustments, changing accessories, or storing power tools. Such preventive safety measures reduce the risk of starting the power tool accidentally.
- Store idle power tools out of the reach of children and do not allow persons unfamiliar with the power tool or these instructions to operate the power tool. Power tools are dangerous in the hands of untrained users.
- Maintain power tools and accessories. Check for misalignment or binding of moving parts, breakage of parts and any other condition that may affect the power tool's operation. If damaged, have the power tool repaired before use. Many accidents are caused by poorly maintained power tools.
- Keep cutting tools sharp and clean. Properly maintained cutting tools with sharp cutting edges are less likely to bind and are easier to control.
- Use the power tool, accessories and tool bits etc. in accordance with these instructions, taking into account the working conditions and the work to be performed. Use of the power tool for operations different from those intended could result in a hazardous situation.
- Keep handles and grasping surfaces dry, clean and free from oil and grease. Slippery handles and grasping surfaces do not allow for safe handling and control of the tool in unexpected situations.
- When using the tool, do not wear cloth work gloves which may be entangled. The entanglement of cloth work gloves in the moving parts may result in personal injury.
Service
- Have your power tool serviced by a qualified repair person using only identical replacement parts. This will ensure that the safety of the power tool is maintained.
- Follow instruction for lubricating and changing accessories.
Lawnmower safety warnings
- Do not use the lawnmower in bad weather conditions, especially when there is a risk of lightning. This decreases the risk of being struck by lightning.
- Thoroughly inspect the area for wildlife where the lawnmower is to be used. Wildlife may be injured by the lawnmower during operation.
- Thoroughly inspect the area where the lawn-mower is to be used and remove all stones,
sticks, wires, bones, and other foreign objects. Thrown objects can cause personal injury.
-
Before using the lawnmower, always visually inspect to see that the blade and the blade assembly are not worn or damaged. Worn or damaged parts increase the risk of injury.
-
Before use, check the supply cord and any extension cord for signs of damage or aging. Do not use the lawnmower if the cord is damaged or worn. If the cord is damaged or worn during use, switch off the lawnmower and do not touch the cord before disconnecting it from the supply. A damaged supply cord or extension cord may result in electric shock, fire and/or serious injury.
-
Check the grass catcher frequently for wear or deterioration. A worn or damaged grass catcher may increase the risk of personal injury.
-
Keep guards in place. Guards must be in working order and be properly mounted. A guard that is loose, damaged, or is not functioning correctly may result in personal injury.
-
Keep all cooling air inlets clear of debris.
Blocked air inlets and debris may result in overheating or risk of fire.
-
While operating the lawnmower, always wear non-slip and protective footwear. Do not operate the lawnmower when barefoot or wearing open sandals. This reduces the chance of injury to the feet from contact with the moving blade.
-
While operating the lawnmower, always wear long trousers. Exposed skin increases the likelihood of injury from thrown objects.
-
Do not operate the lawnmower in wet grass. Walk, never run. This reduces the risk of slipping and falling which may result in personal injury.
-
Do not operate the lawnmower on excessively steep slopes. This reduces the risk of loss of control, slipping and falling which may result in personal injury.
-
When working on slopes, always be sure of your footing, always work across the face of slopes, never up or down and exercise extreme caution when changing direction. This reduces the risk of loss of control, slipping and falling which may result in personal injury.
-
Use extreme caution when reversing or pulling the lawnmower towards you. Always be aware of your surroundings. This reduces the risk of tripping during operation.
-
Keep the supply cord away from the cutting blades. A damaged supply cord may result in electric shock, fire and/or serious injury.
-
Switch off and remove plug from mains if the cord is entangled or damaged. Entangled or damaged cords can increase the risk of electric shock.
-
Do not touch blades and other hazardous moving parts while they are still in motion. This reduces the risk of injury from moving parts.
-
When clearing jammed material or cleaning the lawnmower, make sure all power switches are off and the power cord is disconnected. Unexpected operation of the lawnmower may result in serious personal injury.
Additional safety warnings
Training
- Read the instructions carefully. Be familiar with the controls and the proper use of the mower.
- Never allow children or people unfamiliar with these instructions to use the mower. Local regulations can restrict the age of the operator.
- Never operate the mower while people, especially children, or pets are nearby.
- Keep in mind that the operator or user is responsible for accidents or hazards occurring to other people or their property.
Preparation
- Be sure the area is clear of other people before mowing. Stop mower if anyone enters the area.
- Do not insert the lock key into mower until it is ready to be used.
- Watch for holes, ruts, bumps, rocks, or other hidden objects. Uneven terrain could cause a slip and fall accident. Tall grass can hide obstacles.
- Do not insert or remove the lock key in the rain.
Operation
- Stop the mower and remove the lock key, and make sure that all moving parts have come to a complete stop
• whenever you leave the mower;
- before clearing blockages or unclogging chute;
-
before checking, cleaning or working on the mower.
-
If the mower strikes a foreign object, follow these steps:
-
Stop the mower, release the switch lever and wait until the blade comes to a complete stop.
- Thoroughly inspect the mower for any damage.
-
Replace the blade if it is damaged in any way. Repair any damage before restarting and continuing to operate the mower.
-
If the mower starts to vibrate abnormally or you notice anything unusual, follow these steps immediately:
-
Stop the mower, release the switch lever and wait until the blade comes to a complete stop.
- Inspect for damage and replace or repair any damaged parts.
-
Check for and tighten any loose parts.
-
Never operate the mower with defective guards or shields, or without safety devices, for example deflectors and/or grass basket, in place.
-
Operate the mower only in daylight or in good artificial light.
-
Switch on the mower carefully according to instructions and with feet well away from the blade(s).
-
Take care against injury to feet and hands from the mower blades.
-
Stop the blade(s) if the mower has to be tilted for transportation when crossing surfaces other than grass, and when transporting the mower to and from the area to be used.
-
Do not tilt the mower when switching on the motor, except if the mower has to be tilted for starting. In this case, do not tilt it more than absolutely necessary and lift only the part, which is away from the operator. Always ensure that both hands are in the operating position before returning the mower to the ground.
-
Do not put hands or feet near or under rotating parts. Keep clear of the discharge opening at all times.
-
Always keep a firm hold on the handle.
-
Don't grasp the exposed cutting blades or cutting edges when picking up or holding the mower.
-
Keep hands and feet away from rotating blades. Caution - Blades coast after the mower is switched off.
-
Never attempt to make cutting height adjustments while mower is running if the mower has cutting height adjustment feature.
-
Release switch lever and wait for blade rotation to stop before crossing driveways, walks, roads, and any gravel-covered areas. Also remove the lock key if you leave the mower, reach to pick up or remove something out of your way, or for any other reason that may distract you from what you are doing.
-
Do not start the mower when standing in front of the discharge opening.
-
Never direct discharged material toward anyone. Avoid discharging material against a wall or obstruction. Material may ricochet back toward the operator. Stop the blade when crossing gravel surfaces.
-
Do not pull the mower backwards unless absolutely necessary. When you are compelled to back the mower from a fence or other similar obstruction, look down and behind before and while moving backwards.
-
Shut the motor off and wait until the blade comes to a complete stop before removing the grass catcher. Beware that the blades coast after turn off.
-
When you use the machine on muddy ground, wet slope, or slippery place, pay attention to your footing.
-
Avoid working in poor environment where increased user fatigue is expected.
-
Do not use the machine in bad weather where visibility is limited. Failure to do so may cause fall or incorrect operation due to low visibility.
-
Do not submerge the machine into a puddle.
-
When wet leaves or dirt adhere to the suction mouth (ventilation window) due to rain, remove them.
-
Do not use the machine in the snow.
-
If the cut-off grass is wet, it is likely to be clogged inside of the machine. Check the condition of the machine regularly, and remove the
adhered grass as necessary.
- When operating the machine, pay attention to piping and wiring.
Maintenance and storage
- Inspect and maintain the mower regularly.
- Keep all nuts, bolts, and screws tight to be sure the equipment is in safe working condition.
- Check the grass basket frequently for wear or deterioration. For storage, always make sure the grass basket is empty. Replace a worn grass basket with a new factory replacement for safety.
- Use only the manufacturer genuine blades specified in this manual.
- Be careful during adjustment of the mower to prevent entrapment of the fingers between moving blades and fixed parts of the mower.
- Check the blade mounting bolt at frequent intervals for proper tightness.
- Always allow the mower to cool down before storing.
- When servicing the blades be aware that, even though the power source is switched off, the blades can still be moved.
- Never remove or tamper with safety devices. Check their proper operation regularly. Never do anything to interfere with the intended function of a safety device or to reduce the protection provided by a safety device.
- Do not leave the machine unattended outdoors in the rain.
- Do not wash the machine with high pressure water.
- When storing the machine, avoid direct sunlight and rain, and store it in a place where it does not get hot or humid.
- Perform inspection or maintenance in a place where rain can be avoided.
- After using the machine, remove the adhered dirt and dry the machine completely before storing. Depending on the season or the area, there is a risk of malfunction due to freezing.
Electrical safety
- Avoid dangerous environment. Don't use the machine in dump or wet locations or expose it to rain. Water entering the machine will increase the risk of electric shock.
SAVE THESE INSTRUCTIONS.
WARNING: DO NOT let comfort or familiarity with product (gained from repeated use) replace strict adherence to safety rules for the subject product. MISUSE or failure to follow the safety rules stated in this instruction manual may cause serious personal injury.
IMPORTANT SAFETY INSTRUCTIONS
WARNING: Read all safety warnings and all instructions. Failure to follow the warnings and instructions may result in electric shock, fire and/or serious injury.
Save all warnings and instructions for future reference.
- Children should be supervised to ensure that they do not play with the mower.
- Never allow children or people unfamiliar with these instructions to use the mower. Local regulations can restrict the age of the operator.
- Never operate the mower while people, especially children, or pets are nearby.
- Keep in mind that the operator or user is responsible for accidents or hazards occurring to other people or their property.
- While operating the mower, always wear substantial footwear and long trousers. Do not operate the mower when barefoot or wearing open sandals. Avoid wearing clothing or jewelry that is loose fitting or that has hanging cords or ties. They can be caught in moving parts.
- Always wear protective goggles to protect your eyes from injury when using power tools. The goggles must comply with ANSI Z87.1 in the USA, EN 166 in Europe, or AS/NZS 1336 in Australia/New Zealand. In Australia/New Zealand, it is legally required to wear a face shield to protect your face, too.

natural_image
Line drawing of a person wearing a hard hat and safety goggles (no text or symbols)
It is an employer's responsibility to enforce the use of appropriate safety protective equipments by the tool operators and by other persons in the immediate working area.
-
Before use, check the supply and power cord for signs of damage or aging. If the cord becomes damaged during use, disconnect the cord from the supply immediately. Do not touch the cord before disconnecting the supply. Do not use the mower if the cord is damaged or worn.
-
Operate the mower only in daylight or in good artificial light.
-
Avoid operating the mower in wet grass.
-
Never operate the mower in the rain.
- Always keep a firm hold on the handle.
- Always be sure of your footing on slopes.
- Walk, never run.
- Don't grasp the exposed cutting blades or cutting edges when picking up or holding the mower.
- Physical condition - Do not operate mower while under the influence of drugs, alcohol, or any medication.
- Keep hands and feet away from rotating blades. Caution - Blades coast after the mower is switched off.
- Use only the manufacturer genuine blades specified in this manual.
- Check the blades carefully for cracks or damage before operation. Replace cracked or damaged blades immediately.
- Be sure the area is clear of other people before mowing. Stop mower if anyone enters the area.
- Remove foreign matters such as rocks, wire, bottles, bones and large sticks from the work area before mowing to prevent personal injury or damage to the mower.
- Stop operation immediately if you notice anything unusual. Switch off the mower and unplug the power cord from the power supply. Then inspect the mower.
- Never attempt to make wheel height adjustments while mower is running.
- Release switch lever and wait for blade rotation to stop before crossing driveways, walks, roads, and any gravel-covered areas. Also unplug the power cord from the power supply if you leave the mower, reach to pick up or remove something out of your way, or for any other reason that may distract you from what you are doing.
- Objects struck by the mower blade can cause severe injuries to persons. The lawn should always be carefully examined and cleared of all objects prior to each mowing.
- If the mower strikes a foreign object, follow these steps:
- Stop the mower, release the switch lever and wait until the blade comes to a complete stop.
- Unplug the power cord from the power supply.
- Thoroughly inspect the mower for any damage.
- Replace the blade if it is damaged in any way. Repair any damage before restarting and continuing to operate the mower.
- Check the grass basket frequently for wear or deterioration. For storage, always make sure the grass basket is empty. Replace a worn grass basket with a new factory replacement for safety.
- Use extreme caution when reversing or pulling the mower towards you.
-
Stop the blade(s) if the mower has to be tilted for transportation when crossing surfaces other than grass, and when transporting the mower to and from the area to be used.
-
Never operate the mower with defective guards or shields, or without safety devices, for example deflectors and/or grass basket, in place.
- Switch on the mower carefully according to instructions and with feet well away from the blade(s).
- Do not tilt the mower when switching on the motor, except if the mower has to be tilted for starting. In this case, do not tilt it more than absolutely necessary and lift only the part, which is away from the operator. Always ensure that both hands are in the operating position before returning the appliance to the ground.
- Do not start the mower when standing in front of the discharge opening.
- Do not put hands or feet near or under rotating parts. Keep clear of the discharge opening at all times.
- Do not transport the mower while the mower is turned on.
- Stop the mower, and remove plug from the socket. Make sure that all moving parts have come to a complete stop
- whenever you leave the mower,
- before clearing blockages or unclogging chute,
- before checking, cleaning or working on the mower,
- after striking a foreign object. Inspect the mower for damage and make repairs before restarting and operating the mower.
- If the mower starts to vibrate abnormally (check immediately)
- inspect for damage,
- replace or repair any damaged parts,
- check for and tighten any loose parts.
- Be careful during adjustment of the mower to prevent entrapment of the fingers between moving blades and fixed parts of the mower.
- Mow across the face of slopes, never up and down. Exercise extreme caution when changing direction on slopes. Do not mow excessively steep slopes.
- Do not wash with a hose; avoid getting water in motor and electrical connections.
- Check the blade mounting bolt at frequent intervals for proper tightness.
- Keep all nuts, bolts, and screws tight to be sure the equipment is in safe working condition.
- Take care as rotating one blade can cause other blades to rotate.
- Always allow the mower to cool down before storing.
- When servicing the blades be aware that, even though the power source is switched off, the blades can still be moved.
- Replace worn or damaged parts for safety. Use only genuine replacement parts and accessories.
- Have your power tool serviced by a qualified repair person using only identical replacement
parts. This will ensure that the safety of the power tool is maintained.
- Follow instruction for lubricating and changing accessories.
- Keep handles dry, clean and free from oil and grease.
- Check to make sure that the voltage and frequency of the power supply correspond to the specifications given on the identification plate. We recommend the use of a residual-current-operated circuit breaker (ground-fault circuit interrupter) with a tripping current of 30 mA or less, or an earth leakage current protector.
- This machine can be used by children aged from 8 years and above and persons with reduced physical, sensory or mental capabilities or lack of experience and knowledge if they have been given supervision or instruction concerning use of the machine in a safe way and understand the hazards involved. Cleaning and user maintenance shall not be made by children without supervision.
Residual risks
Even if you are operating this product in accordance with all the safety requirements, potential risks of injury and damage remain. The following dangers can arise in connection with the structure and design of this product.
- Health defects resulting from vibration emission if the product is being used over long periods of time or not adequately managed and properly maintained.
- Injuries and damage to property due to broken application tools or the sudden impact of hidden objects during use.
- Danger of injury and property damage caused by flying objects.
WARNING: This product produces an electromagnetic field during operation. This field may under some circumstances interfere with active or passive medical implants. To reduce the risk of serious or fatal injury, we recommend persons with medical implants to consult their doctor and the medical implant manufacturer before operating this product.
SAVE THESE INSTRUCTIONS.
⚠ WARNING: DO NOT let comfort or familiarity with product (gained from repeated use) replace strict adherence to safety rules for the subject product.
MISUSE or failure to follow the safety rules stated in this instruction manual may cause serious personal injury.
ASSEMBLY
⚠️CAUTION: Always be sure that the tool is switched off and unplugged before carrying out any work on the tool.
Assembling the handle
- Unload the upper handle from the main unit of the machine.
▶ Fig.1: 1. Upper handle
- Loosen the thumb nuts.
▶ Fig.2: 1. Thumb nut
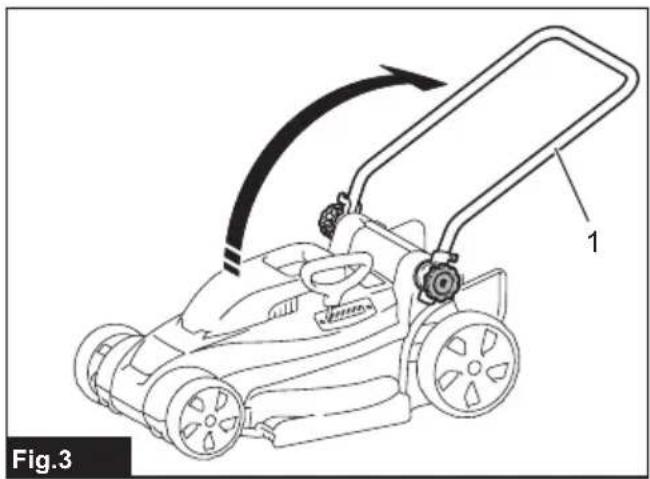
- Widen the handle outside a little, and then raise the handle.
▶ Fig.3: 1. Handle
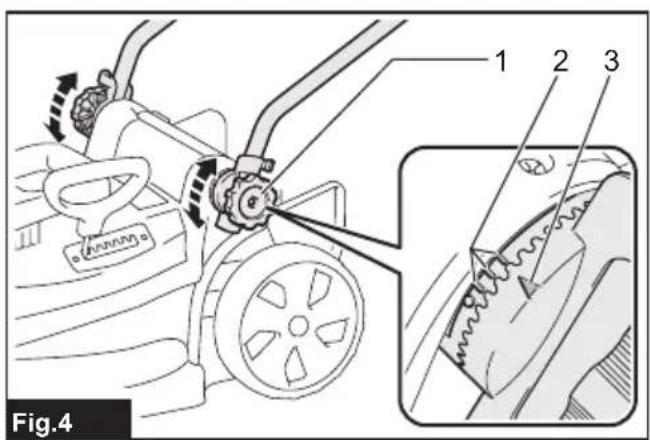
- Adjust the handle height by aligning the arrow with the mark.
▶ Fig.4: 1. Thumb nut 2. Mark 3. Arrow
- Tighten the thumb nuts.
▶ Fig.5: 1. Thumb nut
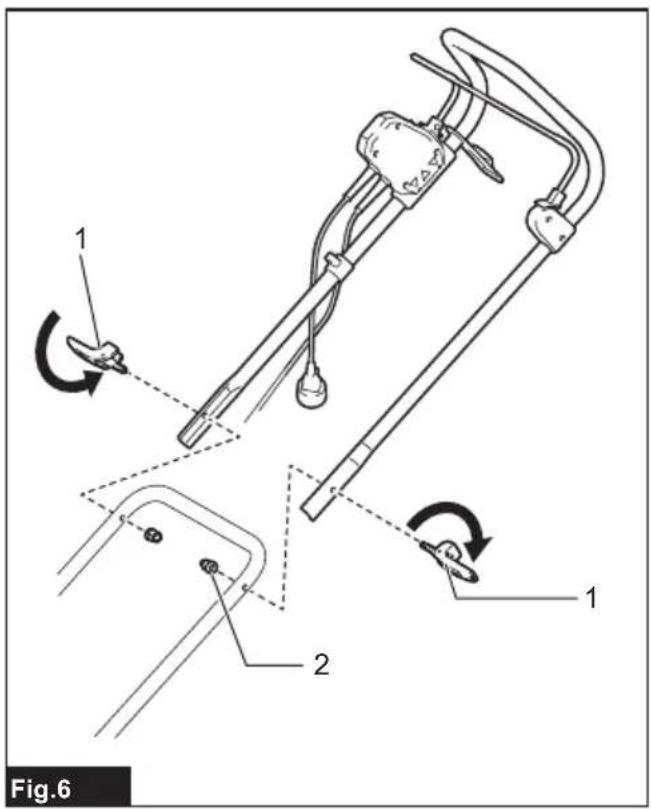
- Attach the upper handle by inserting the levers from the outside of the handle, and then tighten the nuts with the wrench to secure the handle.
▶ Fig.6: 1. Lever 2. Nut
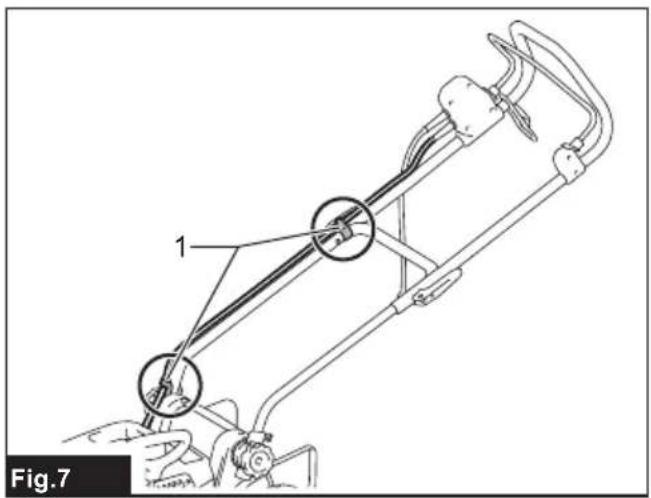
- Secure the cords with the clamps as shown in the figure.
▶ Fig.7: 1. Clamp
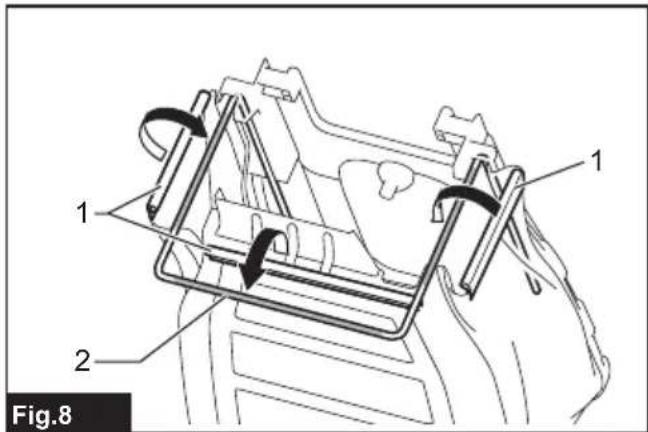
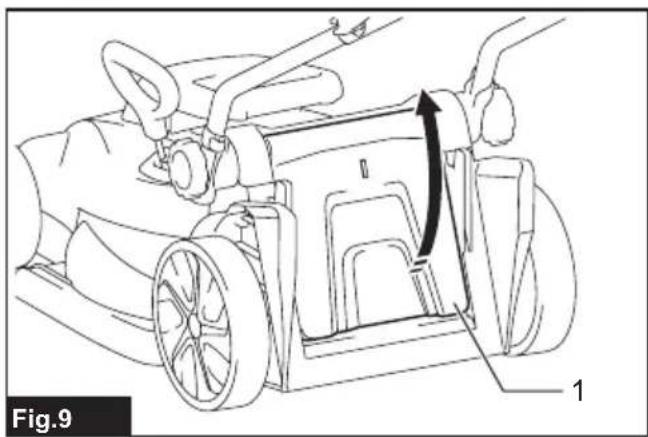
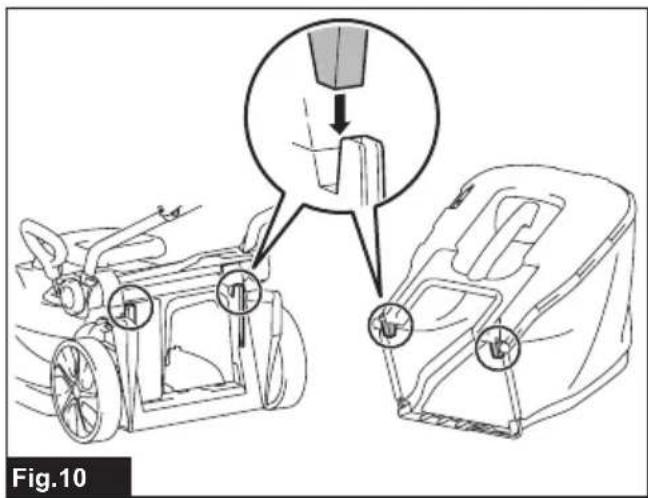
Installing the grass basket
- Attach the pipes of the grass basket to the frame.
▶ Fig.8: 1. Pipe 2. Frame
- Open the rear cover.
▶ Fig.9: 1. Rear cover
- Hook the grass basket onto the rear side of the machine.
▶ Fig.10
To remove the grass basket, perform the installation procedure in reverse.
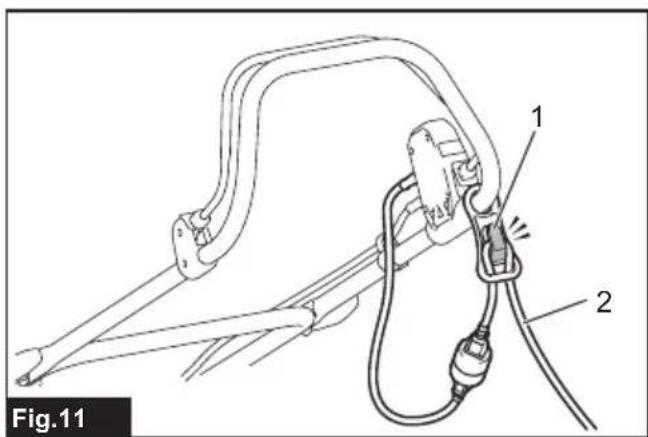
Connecting extension cord
⚠ WARNING: When connecting the extension cord to the power plug of the machine, make sure that the switch lever is released and the cord is unplugged from the power supply.
⚠ WARNING: Do not connect or disconnect the extension cord with wet hands.
NOTICE: When connecting the extension cord to the power plug of the machine, be sure to insert it fully into the socket.
When connecting the extension cord, hook it over the hook on the handle as shown in the figure to prevent inadvertent unplugging by excessive strain on the plug.
▶ Fig.11: 1. Hook 2. Extension cord
FUNCTIONAL DESCRIPTION
Adjusting the mowing height
WARNING: Before adjusting the mowing height, unplug the extension cord from the power supply, and check that the blades have come to a complete halt.
WARNING: Never put your hand or leg under the mower body when adjusting the mowing height.
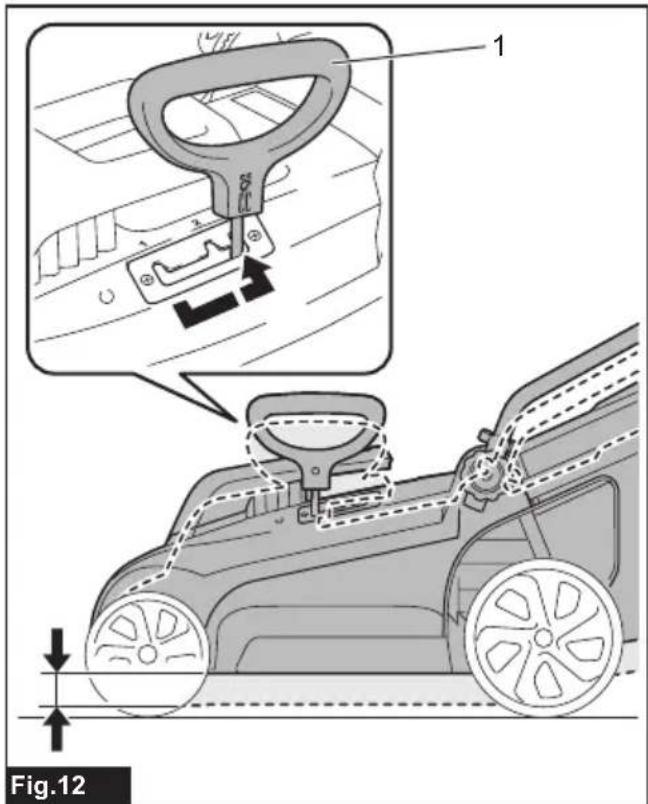
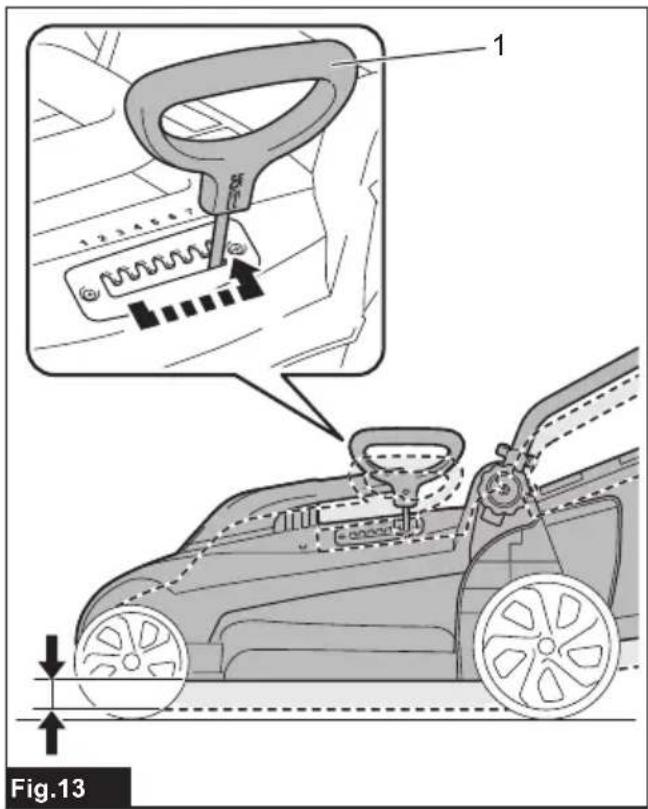
You can adjust the mowing height in the range of 20 mm to 55 mm (for ELM3320/ELM3720) or 20 mm to 75 mm (for ELM4120). The mowing height can be adjusted in 3 levels (for ELM3320/ELM3720) or 7 levels (for ELM4120).
For ELM3320/ELM3720
▶ Fig.12: 1. Adjusting lever
For ELM4120
▶ Fig.13: 1. Adjusting lever
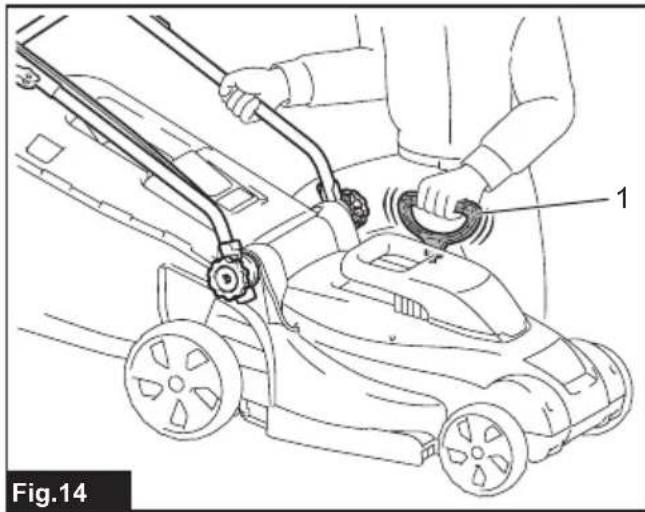
Hold the handle with one hand, and then move the adjusting lever with the other hand.
▶ Fig.14: 1. Adjusting lever
NOTE: Try a test mowing of grass in a less conspicuous place to get your desired height.
Switch action
⚠ WARNING: Before plugging in the tool, always check that the switch lever actuates properly and returns to the “OFF” position when released.
WARNING: For your safety, this machine is equipped with the lock-off button which prevents the tool from unintended starting. Never use the machine if it starts when you pull the switch lever without pressing the lock-off button. Ask your local Makita Service Center for repairs.
⚠ WARNING: Never disable the lock function or tape down the lock-off button.
NOTICE: Do not pull the switch lever forcibly without pressing the lock-off button. The switch may break.
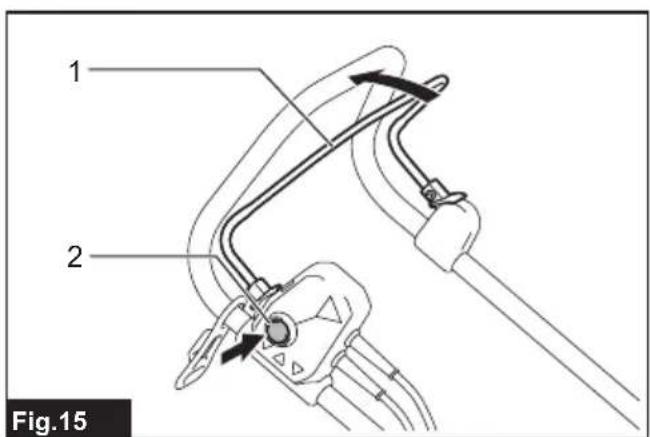
To start the machine, press the lock-off button, and then squeeze in the switch lever. To stop the machine, release the switch lever.
▶ Fig.15: 1. Switch lever 2. Lock-off button
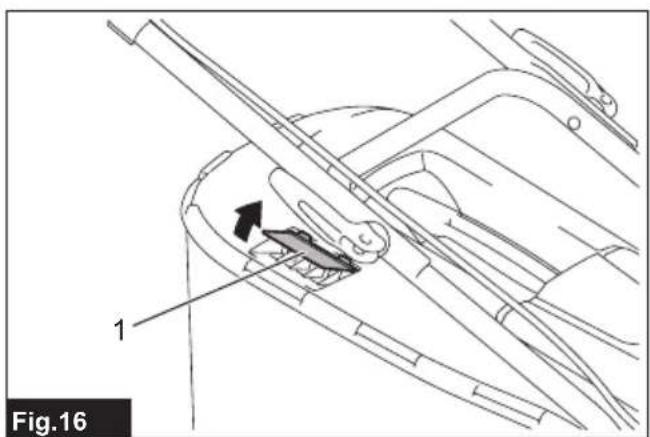
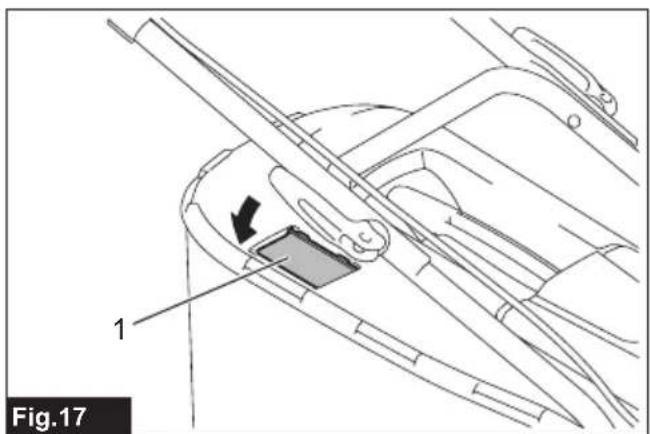
Level indicator of grass basket
The level indicator of the grass basket opens during mowing if the grass basket is not full. If the grass basket is full, the level indicator closes during mowing. If it's
full, empty the grass basket before starting mowing.
▶ Fig.16: 1. Level indicator
▶ Fig.17: 1. Level indicator
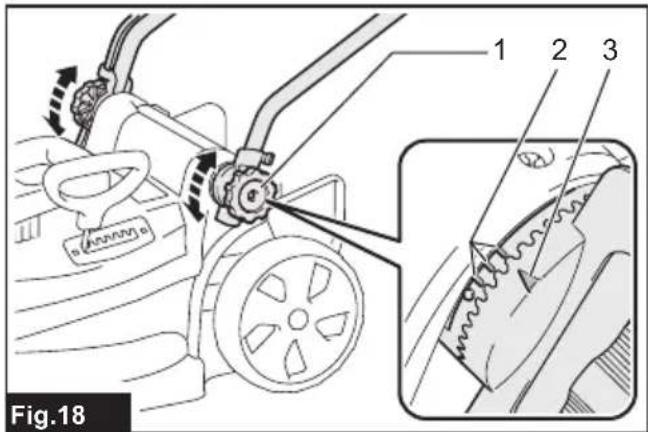
Adjusting the handle height
The handle height can be adjusted in three levels. Loosen the thumb nuts while holding the handle, then adjust the handle height by aligning the arrow with one of the marks, and then tighten the thumb nuts.
▶ Fig.18: 1. Thumb nut 2. Mark 3. Arrow
Motor protection system (Over current relay)
WARNING: If the machine suddenly stops while operating it, release the switch lever and unplug the extension cord. Otherwise, the machine may suddenly restart and cause an injury.
CAUTION: Before removing an object that is jamming the blade, be sure to wear gloves and unplug the extension cord from the power socket.
If the cut off grass or dirt is jamming inside of the main body, the machine stops automatically to protect the motor (over current relay). In this case, unplug the extension cord from the power socket, then remove the material causing the jam, and then let the machine cool down for a few minutes before turning on the machine.
NOTE: The over current relay may be activated when wet or long grass gets caught up inside of the main body.
OPERATION
Mowing
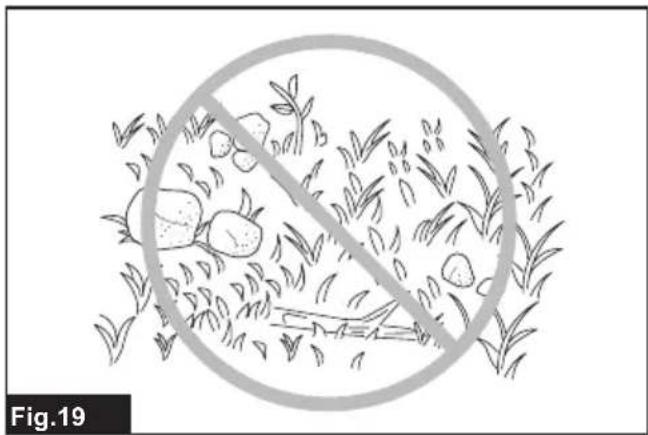
WARNING: Before mowing, clear away sticks and stones from the mowing area. Furthermore, clear away any weeds from the mowing area in advance.
▶ Fig.19
WARNING: Always wear the safety goggles or safety glasses with side shields when operating the mower.
CAUTION: If the cut grass or foreign object blocks up inside of the mower body, be sure to turn the power off, and then unplug the extension cord from the power socket. Before removing the grass or foreign object, be sure to wear gloves.
⚠️ CAUTION: Be sure to install the grass basket when operating the machine.
NOTICE: Use this machine for mowing lawn only. Do not mow weeds with this machine.
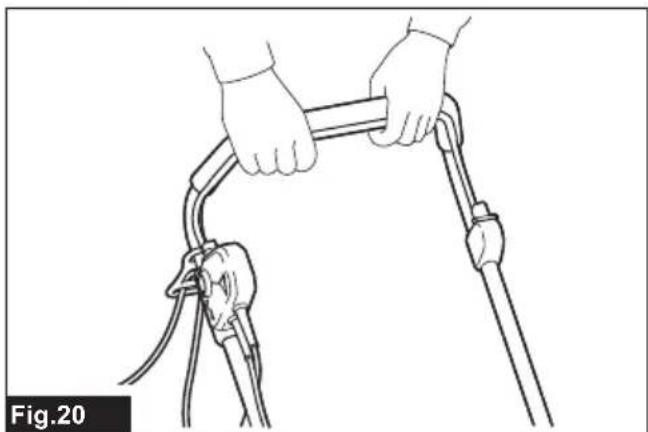
Firmly hold the handle with both hands when mowing.
▶ Fig.20
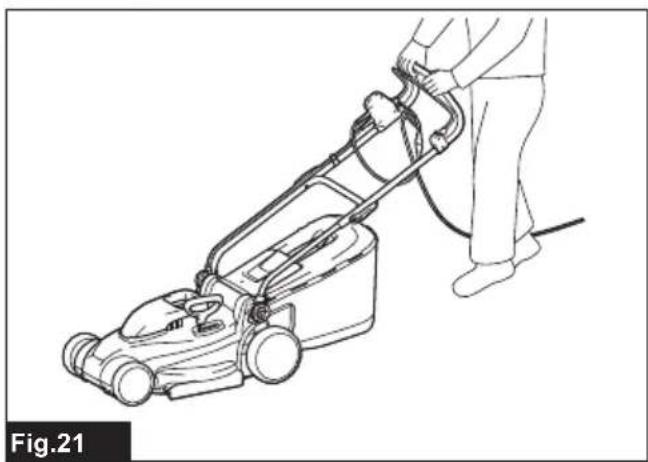
The mowing speed guideline is approximately one meter per four seconds.
▶ Fig.21
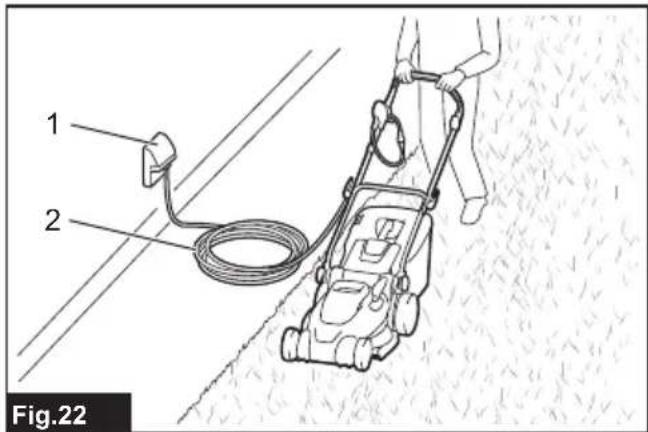
Start mowing near the power socket to ensure that the extension cord does not become an obstacle.
▶ Fig.22: 1. Power socket 2. Extension cord
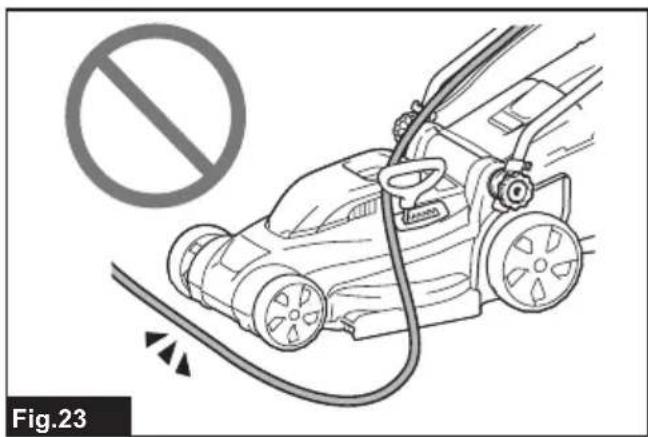
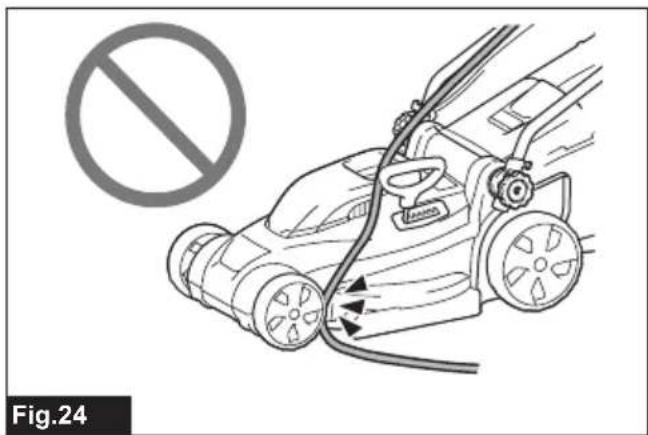
Do not allow the extension cord to pass under or become entangled beneath the machine.
▶ Fig.23
▶ Fig.24
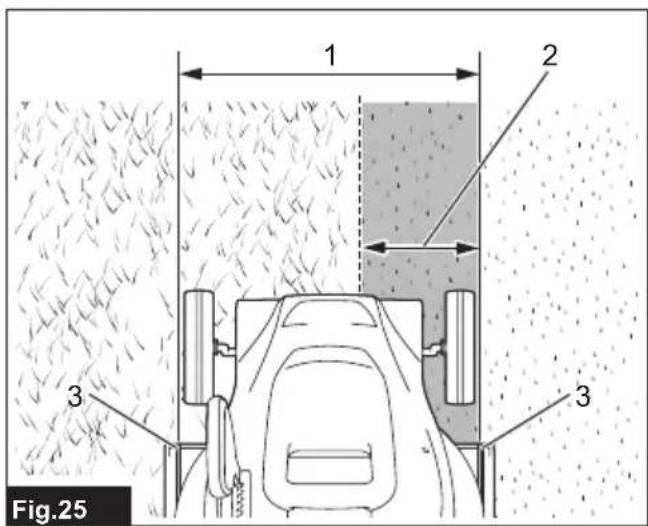
The lines on both sides of the main body are guidelines to mowing width. Using the lines as guidelines, mow in strips. Overlap by one half to one third the previous strip to mow the lawn evenly.
▶ Fig.25: 1. Mowing width 2. Overlapping area 3. Line
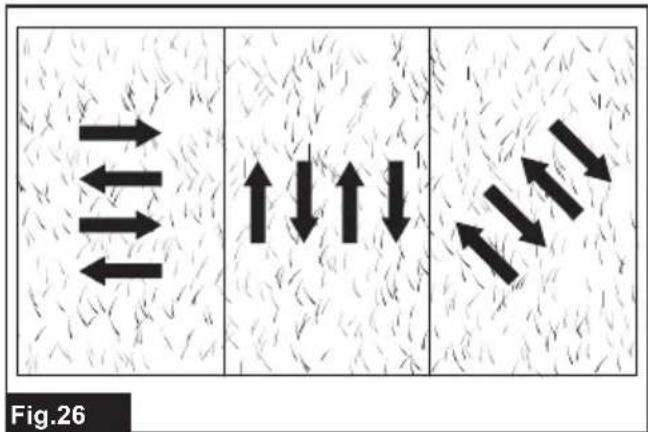
Change the mowing direction each time to prevent the grass grain pattern from forming in just one direction.
▶ Fig.26
Periodically check the grass basket for mowed grass. Empty the basket before it becomes full. Before every periodic check, be sure to stop the machine.
NOTE: Using the mower with the grass basket full prevents smooth blade rotation and places an extra load on the motor, which may cause a breakdown.
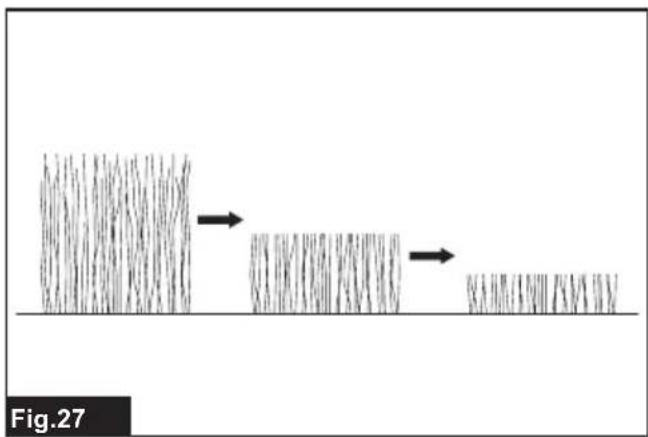
Mowing a long-grass lawn
Do not try to cut long grass all at once. Instead, mow the lawn in steps. Leave a day or two between mowings until the lawn becomes evenly short.
▶ Fig.27
NOTE: Mowing long grass to a short length all at once may cause the grass to die. The cut grass may also block up inside of the mower body.
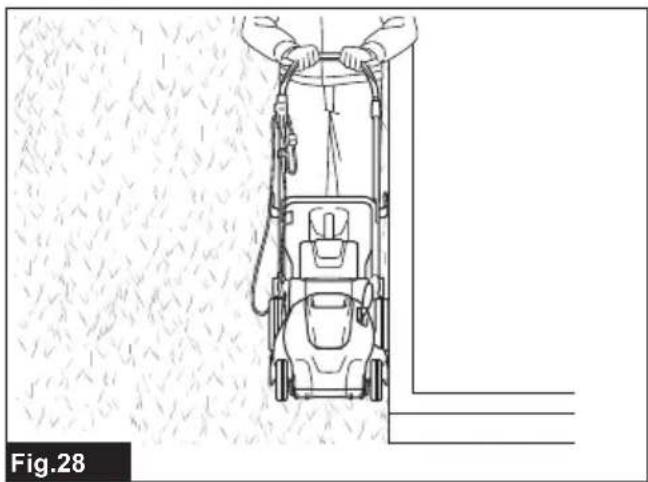
Edge mowing
When mowing at the edge, be sure to move the machine along the edge.
▶ Fig.28
MAINTENANCE
WARNING: Before performing the maintenance, unplug the extension cord from the power supply, and confirm that the blades have come to a complete halt.
⚠️CAUTION: When performing the maintenance, always wear gloves.
To maintain product SAFETY and RELIABILITY, repairs, any other maintenance or adjustment should be performed by Makita Authorized or Factory Service Centers, always using Makita replacement parts.
Maintenance after mowing
After mowing, wipe the machine with a dry cloth or a cloth dipped in soapy water. Also, use a soft brush to brush off grass cuttings and dirt from blades.
NOTICE: Never use gasoline, benzine, thinner, alcohol or the like. Discoloration, deformation or cracks may result.
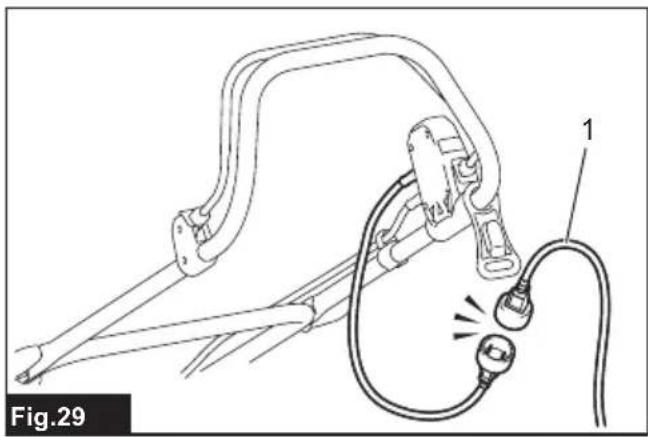
Storing
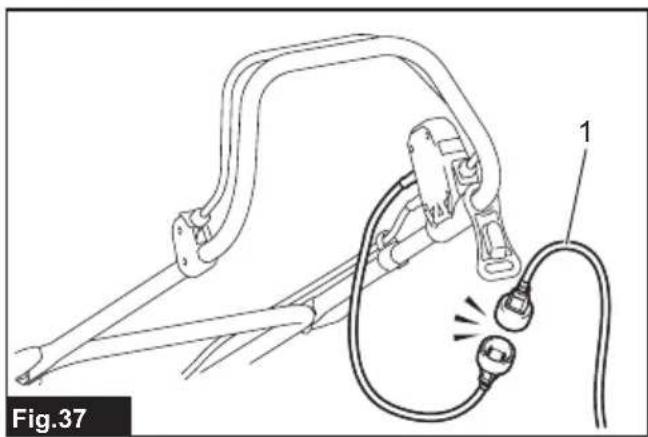
- Disconnect the extension cord.
▶ Fig.29: 1. Extension cord
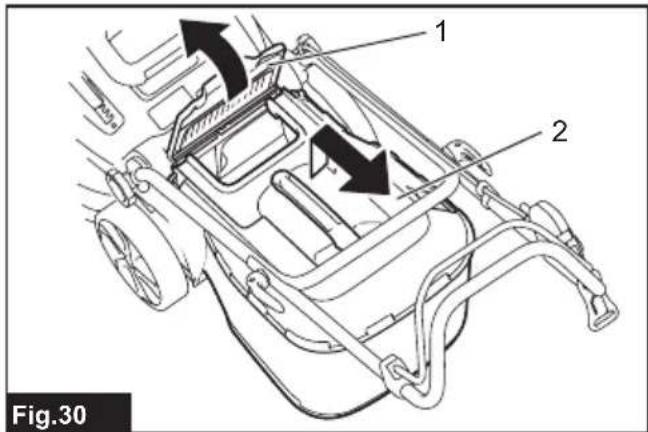
- Open the rear cover, and then remove the grass basket.
▶ Fig.30: 1. Rear cover 2. Grass basket
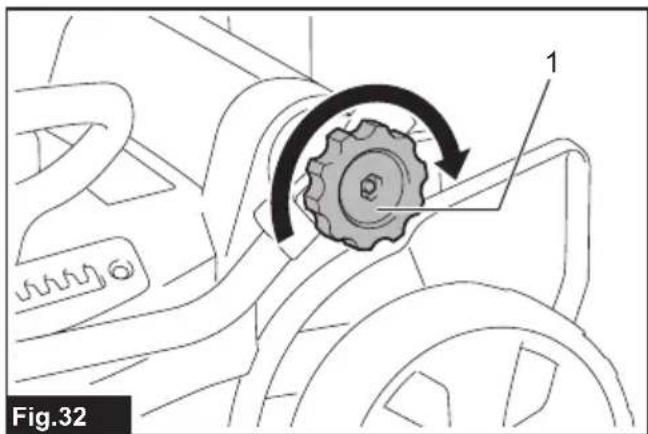
- Loosen the thumb nuts while holding the handle, then widen the handle outside a little, and then fold the handle.
▶ Fig.31: 1. Thumb nut 2. Handle 3. Mark 4. Arrow
CAUTION: When folding the handle, be careful not to pinch your hand or fingers.
NOTE: Make sure that the arrow indicates the mark at the most front position.
- Tighten the thumb nuts.
▶ Fig.32: 1. Thumb nut
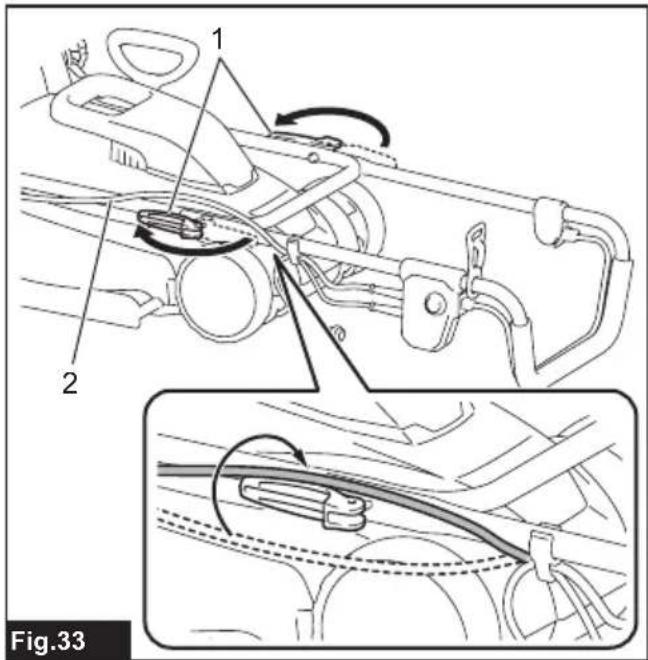
- Open the levers, and then place the cord over the lever.
▶ Fig.33: 1. Lever 2. Cord
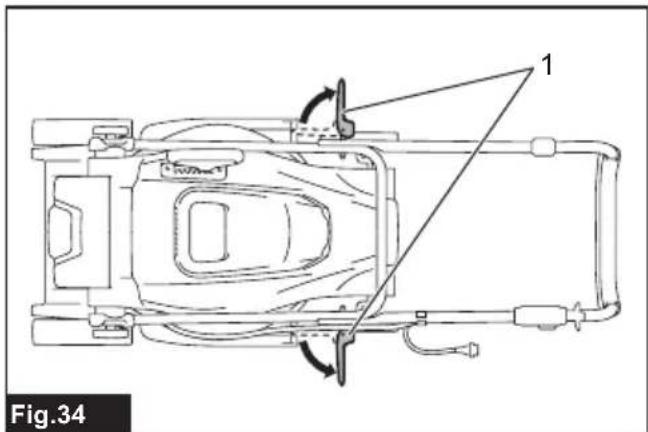
- Return the levers to the halfway position as shown in the figure.
▶ Fig.34: 1. Lever
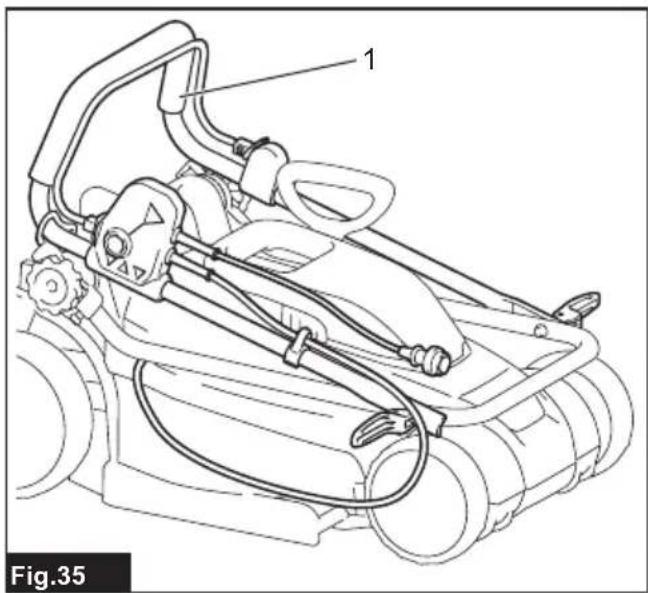
- Fold the handle.
▶ Fig.35: 1. Handle
- Place the machine as shown in the figure.
▶ Fig.36
CAUTION: Be sure to store this machine indoors and place it on a flat surface. Otherwise, the machine may fall and cause an injury.
You can also store the machine as follows.
- Disconnect the extension cord.
▶ Fig.37: 1. Extension cord
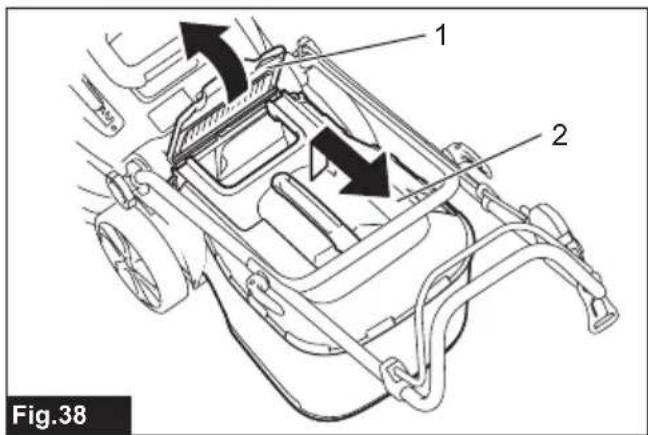
- Open the rear cover, and then remove the grass basket.
▶ Fig.38: 1. Rear cover 2. Grass basket
- Set the mowing height with the adjusting lever.
For ELM3320/ELM3720:
Set the mowing height to "1".
▶ Fig.39: 1. Adjusting lever
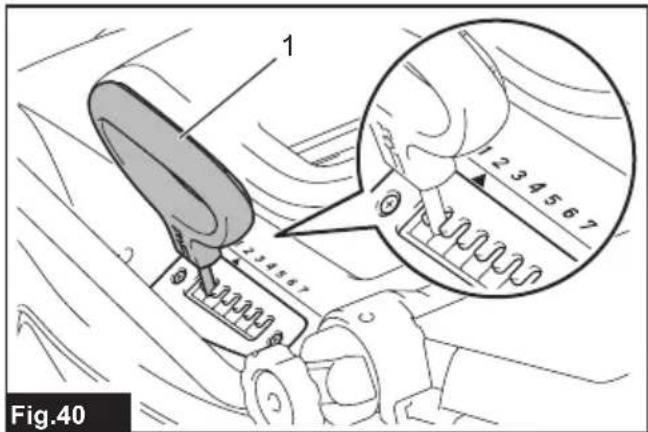
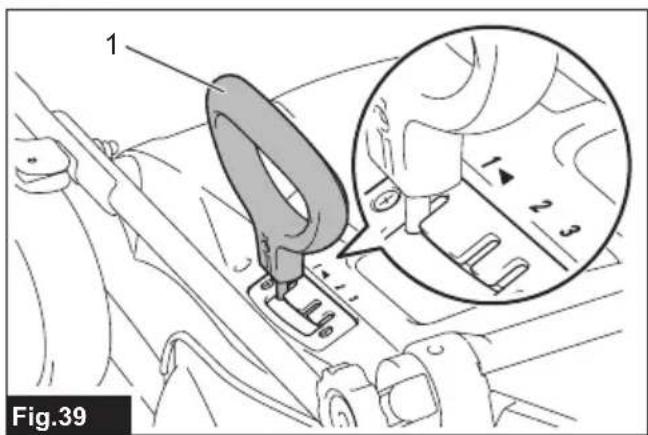
For ELM4120:
Set the mowing height to "2".
▶ Fig.40: 1. Adjusting lever
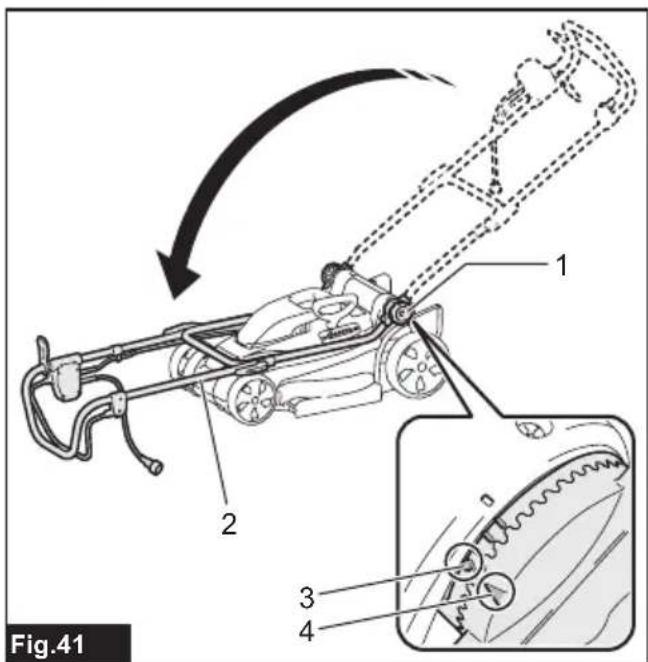
- Loosen the thumb nuts while holding the handle, then widen the handle outside a little, and then fold the handle.
▶ Fig.41: 1. Thumb nut 2. Handle 3. Mark 4. Arrow
⚠️CAUTION: When folding the handle, be careful not to pinch your hand or fingers.
NOTE: Make sure that the arrow indicates the mark at the most front position.
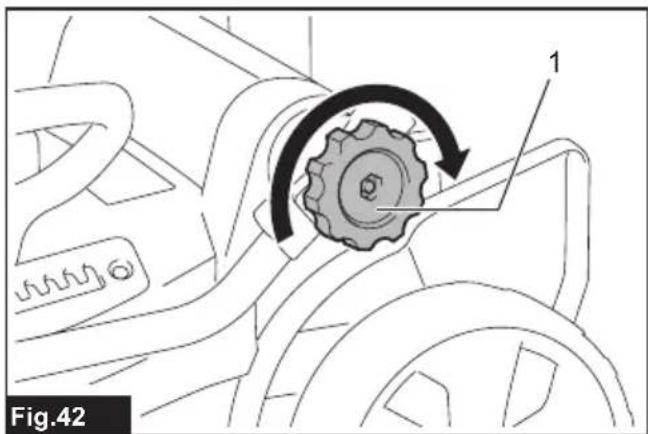
- Tighten the thumb nuts.
▶ Fig.42: 1. Thumb nut
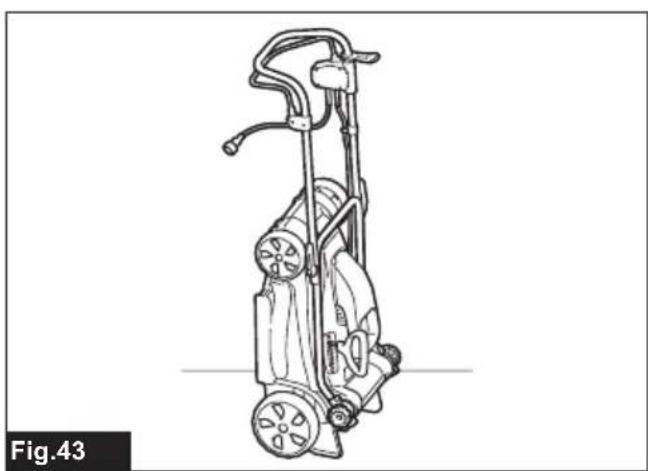
- Place the machine as shown in the figure.
▶ Fig.43
⚠️CAUTION: Be sure to store this machine indoors and place it on a flat surface. Otherwise, the machine may fall and cause an injury.
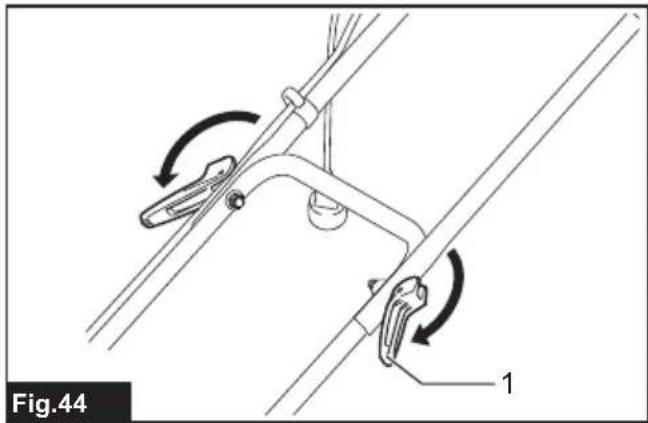
You can also store the machine by folding the handle.
⚠️CAUTION: Before opening the levers, hold the upper handle firmly. Otherwise, the handle may fall and cause an injury.
- Open the levers while holding the upper handle.
▶ Fig.44: 1. Lever
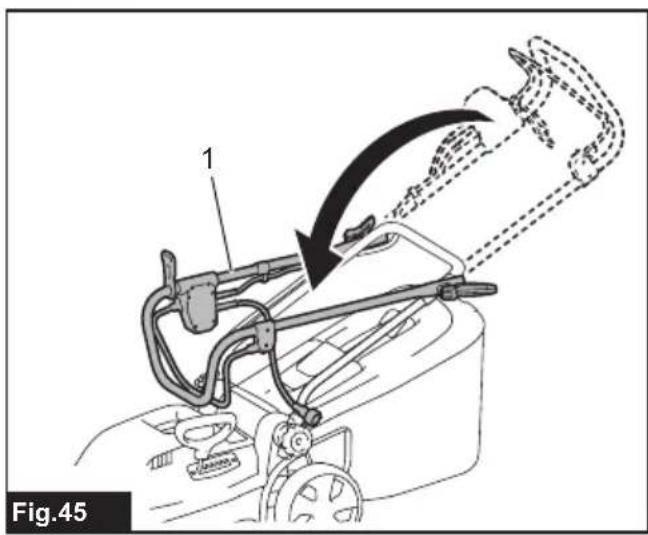
- Fold the upper handle.
▶ Fig.45: 1. Upper handle
Replacing the mower blade
⚠CAUTION: Do not use any wrench other than the standard hex wrench when replacing the mower blade. Using a different wrench may lead to over-tightening or looseness, which may cause injury.
- Unplug the extension cord and stand up the machine. (Refer to the instructions for storing.)
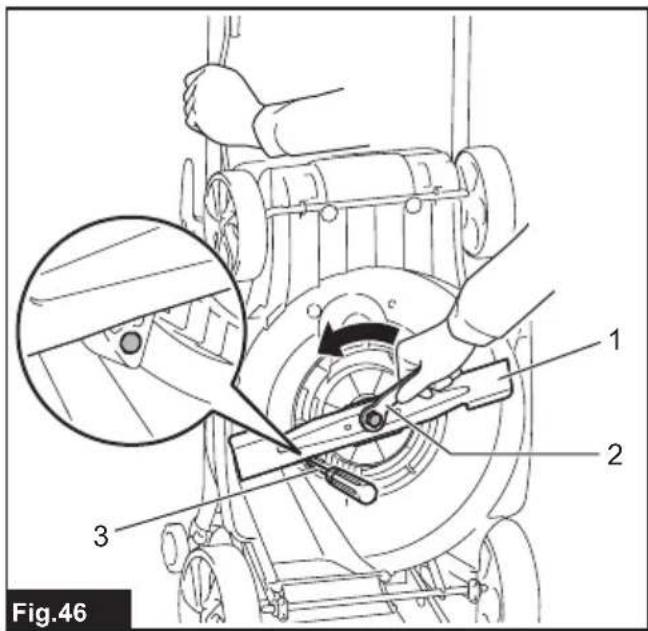
- Insert the pin into the hole, and then hold the handle with one hand and loosen the bolt with the wrench counterclockwise.
▶ Fig.46: 1. Blade 2. Wrench 3. Pin
- Remove the mower blade.
For ELM3320
Remove the bolt, washer, mower blade, and bracket in order.
▶ Fig.47: 1. Bracket 2. Mower blade 3. Washer 4. Bolt
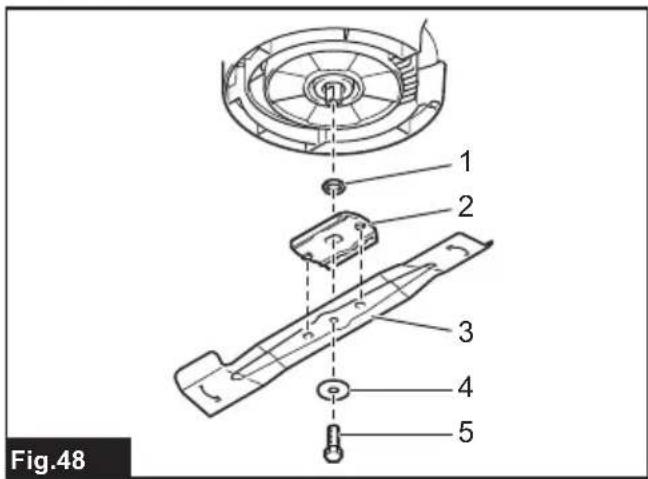
For ELM3720/ELM4120
Remove the bolt, washer, mower blade, bracket, and spacer in order.
▶ Fig.48: 1. Spacer 2. Bracket 3. Mower blade 4. Washer 5. Bolt
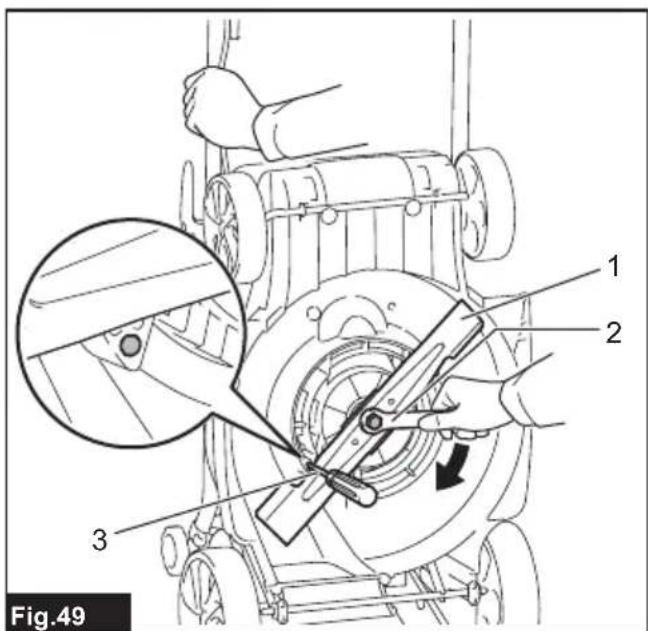
- Attach a new mower blade, then insert the pin into the hole, and then hold the handle with one hand and tighten the bolt with the wrench clockwise firmly.
▶ Fig.49: 1. Mower blade 2. Wrench 3. Pin
Extension cord
You should only use extension cords for outdoor use, PVC or rubber cord ordinary duty with a cross sectional area not less than 1.5 mm^2 .
Before and during use, check the supply and extension cords for damage. Do not use the appliance if the cord is damaged or worn. Keep extension cord away from cutting elements. If the cord is damaged during use, disconnect the cord from the supply immediately. Do not touch the cord before disconnecting the supply.
OPTIONAL ACCESSORIES
CAUTION: These accessories or attachments are recommended for use with your Makita tool specified in this manual. The use of any other accessories or attachments might present a risk of injury to persons. Only use accessory or attachment for its stated purpose.
If you need any assistance for more details regarding these accessories, ask your local Makita Service Center.
- Mower blade
NOTE: Some items in the list may be included in the tool package as standard accessories. They may differ from country to country.
SPÉCIFICATIONS
Norme applicable : EN IEC 62841-4-3
natural_image
Line drawing of a person wearing a helmet and safety goggles (no text or symbols)
natural_image
Line drawing of a person wearing a helmet and safety goggles (no text or symbols)
natural_image
Line drawing of a person wearing a helmet and safety goggles (no text or symbols)
natural_image
Line drawing of a person wearing a helmet and safety goggles (no text or symbols)
natural_image
Line drawing of a person wearing a helmet and safety goggles (no text or symbols)
natural_image
Line drawing of a person wearing a hard hat and safety goggles (no text or symbols)
⚠ WAARSCHUWING: Draag gehoorbescherming.
VEILIGHEIDSWAAR- SCHUWINGEN
natural_image
Line drawing of a person wearing a helmet and safety goggles (no text or symbols)
natural_image
Line drawing of a person wearing a hard hat and safety goggles (no text or symbols)
▶ Fig.22: 1. Stopcontact 2. Verlengsnoer
▶ Fig.25: 1. Maaibreedte 2. Overlapping 3. Lijn
▶ Fig.35: 1. Handgreep
OPTIONELE ACCESSOIRES
natural_image
Line drawing of a person wearing a helmet and safety goggles (no text or symbols)
natural_image
Line drawing of a person wearing a hard hat and safety goggles (no text or symbols)
natural_image
Line drawing of a person wearing a helmet and safety goggles (no text or symbols)
natural_image
Line drawing of a person wearing a hard hat and safety goggles (no text or symbols)
natural_image
Line drawing of a person wearing a helmet and safety goggles (no text or symbols)
natural_image
Line drawing of a person wearing a hard hat and safety goggles (no text or symbols)
natural_image
Line drawing of a person wearing a helmet and safety goggles (no text or symbols)
natural_image
Line drawing of a person wearing a helmet and safety goggles (no text or symbols)
natural_image
Line drawing of a person wearing a helmet and safety goggles (no text or symbols)
natural_image
Line drawing of a person wearing a helmet and safety goggles (no text or symbols)
natural_image
Line drawing of a person wearing a helmet and safety goggles (no text or symbols)
natural_image
Line drawing of a person wearing a helmet and safety goggles (no text or symbols)
natural_image
Line drawing of a person wearing a helmet and safety goggles (no text or symbols)
natural_image
Line drawing of a person wearing a helmet and safety goggles (no text or symbols)
▶ Fig.25: 1. Klippebredde 2. Overlapping 3. Linje
natural_image
Line drawing of a person wearing a helmet and safety goggles (no text or symbols)
natural_image
Line drawing of a person wearing a helmet and safety goggles (no text or symbols)
natural_image
Line drawing of a person wearing a helmet and safety goggles (no text or symbols)
natural_image
Line drawing of a person wearing a hard hat and safety goggles (no text or symbols)
natural_image
Line drawing of a person wearing a helmet and safety goggles (no text or symbols)
natural_image
Line drawing of a person wearing a hard hat and safety goggles (no text or symbols)
natural_image
Line drawing of a person wearing a hard hat and safety goggles (no text or symbols)
natural_image
Line drawing of a person wearing a hard hat and safety goggles (no text or symbols)
▶ Joon.6: 1. Hoob 2. Mutter
▶ Joon.7: 1. Klamber
Murukoguri paigaldamine
- Kinnitage murukoguri torud raami külge.
▶ Joon.8: 1. Toru 2. Raam
- Avage tagakaas.
▶ Joon.9: 1. Tagakaas
- Kinnitage murukogur masina tagaküljele.
▶ Joon.10
natural_image
Line drawing of a person wearing a helmet and safety goggles (no text or symbols)
natural_image
Line drawing of a person wearing a hard hat and safety goggles (no text or symbols)
natural_image
Line drawing of a person wearing a helmet and safety goggles (no text or symbols)
natural_image
Line drawing of a person wearing a hard hat and safety goggles (no text or symbols)
natural_image
Line drawing of a person wearing a helmet and safety goggles (no text or symbols)
TIETO POKYNY USCHOVAJTE.
DÔLEŽITÉ BEZPEČNOSTNÉ POKYNY
natural_image
Line drawing of a person wearing a helmet and safety goggles (no text or symbols)
TIETO POKYNY USCHOVAJTE.
Pre modely ELM3320/ELM3720
▶ Obr.12: 1. Nastavovacia páčka
Pre model ELM4120
▶ Obr.13: 1. Nastavovacia páčka
Jednou rukou podržte rukovát' a druhou rukou pohnite nastavovacou páčkou.
▶ Obr.14: 1. Nastavovacia páčka
Pre modely ELM3320/ELM3720:
Pre modely ELM3720/ELM4120
Odstráňte skrutku, podložku, čepel' kosačky, konzolu a rozperu v uvedenom poradí.
▶ Obr.48: 1. Rozpera 2. Držiak 3. Čepel' kosačky
4. Podložka 5. Skrutka
natural_image
Line drawing of a person wearing a hard hat and safety goggles (no text or symbols)
TYTO POKYNY USCHOVEJTE.
natural_image
Line drawing of a person wearing a hard hat and safety goggles (no text or symbols)
TYTO POKYNY USCHOVEJTE.
▶ Obr.46: 1. Čepel 2. Klíč 3. Kolík
- Vyjměte sekací nůž.
Pro model ELM3320
VOLITELNÉ PŘÍSLUŠENSTVÍ
natural_image
Line drawing of a person wearing a hard hat and safety goggles (no text or symbols)
natural_image
Line drawing of a person wearing a hard hat and safety goggles (no text or symbols)
natural_image
Line drawing of a person wearing a helmet and safety goggles (no text or symbols)
natural_image
Line drawing of a person wearing a helmet and safety goggles (no text or symbols)
natural_image
Line drawing of a person wearing a helmet and safety goggles (no text or symbols)
natural_image
Line drawing of a person wearing a helmet and safety goggles (no text or symbols)
natural_image
Line drawing of a person wearing a helmet and safety goggles (no text or symbols)
VAŽNE SIGURNOSNE UPUTE
⚠ UPOZORENJE: Pročitajte sva sigurnosna upozorenja i sve upute. Nepridržavanje upozorenja ili uputa može rezultirati strujnim udarom, požarom i/ili ozbiljnom ozljedom.
natural_image
Line drawing of a person wearing a helmet and safety goggles (no text or symbols)
Za model ELM3720/ELM4120
Uklonite vijak, podlošku i oštricu kosilice, nosač i razmačnik tim redoslijedom.
▶ SI.48: 1. Razmačnik 2. Nosač 3. Oštrica kosilice 4. Podloška 5. Vijak
4. Pričvrstite novu oštricu kosilice, umetnite zatik u rupu, držite ručicu jednom rukom i čvrsto zategnite vijak ključem u smjeru kazaljke na satu.
▶ SI.49: 1. Oštrica kosilice 2. Ključ 3. Zatik
Produžni kabel
Trebali biste upotrebljavati isključivo produžni kabel za upotrebu na otvorenom, PVC ili gumeni kabel za uobičajeni način rada s poprečnim presjekom koji nije manji od 1,5 mm ^2 .
natural_image
Line drawing of a person wearing a helmet and safety goggles (no text or symbols)
natural_image
Line drawing of a person wearing a hard hat and safety goggles (no text or symbols)
natural_image
Line drawing of a person wearing a helmet and safety goggles (no text or symbols)
natural_image
Line drawing of a person wearing a hard hat and safety goggles (no text or symbols)
natural_image
Line drawing of a person wearing a helmet and safety goggles (no text or symbols)
natural_image
Line drawing of a person wearing a helmet and safety goggles (no text or symbols)
▶ Fig.1: 1. Mâner superior
natural_image
Line drawing of a person wearing a hard hat and safety goggles (no text or symbols)
natural_image
Line drawing of a person wearing a helmet and glasses (no text or symbols)
natural_image
Line drawing of a person wearing a hard hat and safety goggles (no text or symbols)
natural_image
Line drawing of a person wearing a hard hat and safety goggles (no text or symbols)