
Imageview 118000 - Binoculars BUSHNELL - Free user manual and instructions
Find the device manual for free Imageview 118000 BUSHNELL in PDF.
| Product type | Digital monocular with built-in camera |
| Brand | Bushnell |
| Model | Image View 11-8000 |
| Magnification | 8x |
| Photo resolution | 640 x 480 pixels (high) / 320 x 240 pixels (low) |
| Internal memory | Built-in (capacity not specified) |
| Power supply | 2 AAA alkaline batteries |
| PC connection | USB 1.1 (cable included) |
| Software compatibility | Windows 98/ME/2000/XP |
| Special functions | Diopter correction, manual focus, self-timer (10 s), burst (3 shots), AVI video, erase |
| Dimensions (estimated) | 10 x 4 x 4 cm |
| Weight (estimated) | 170 g |
| Material | Plastic, glass optics |
| Maintenance and cleaning | Clean lenses with a soft microfiber cloth; avoid moisture |
| Safety | Never look at the sun; do not expose to water or liquids |
| Warranty | 2 years limited |
Frequently Asked Questions - Imageview 118000 BUSHNELL
User questions about Imageview 118000 BUSHNELL
0 question about this device. Answer the ones you know or ask your own.
Ask a new question about this device
Download the instructions for your Binoculars in PDF format for free! Find your manual Imageview 118000 - BUSHNELL and take your electronic device back in hand. On this page are published all the documents necessary for the use of your device. Imageview 118000 by BUSHNELL.
USER MANUAL Imageview 118000 BUSHNELL
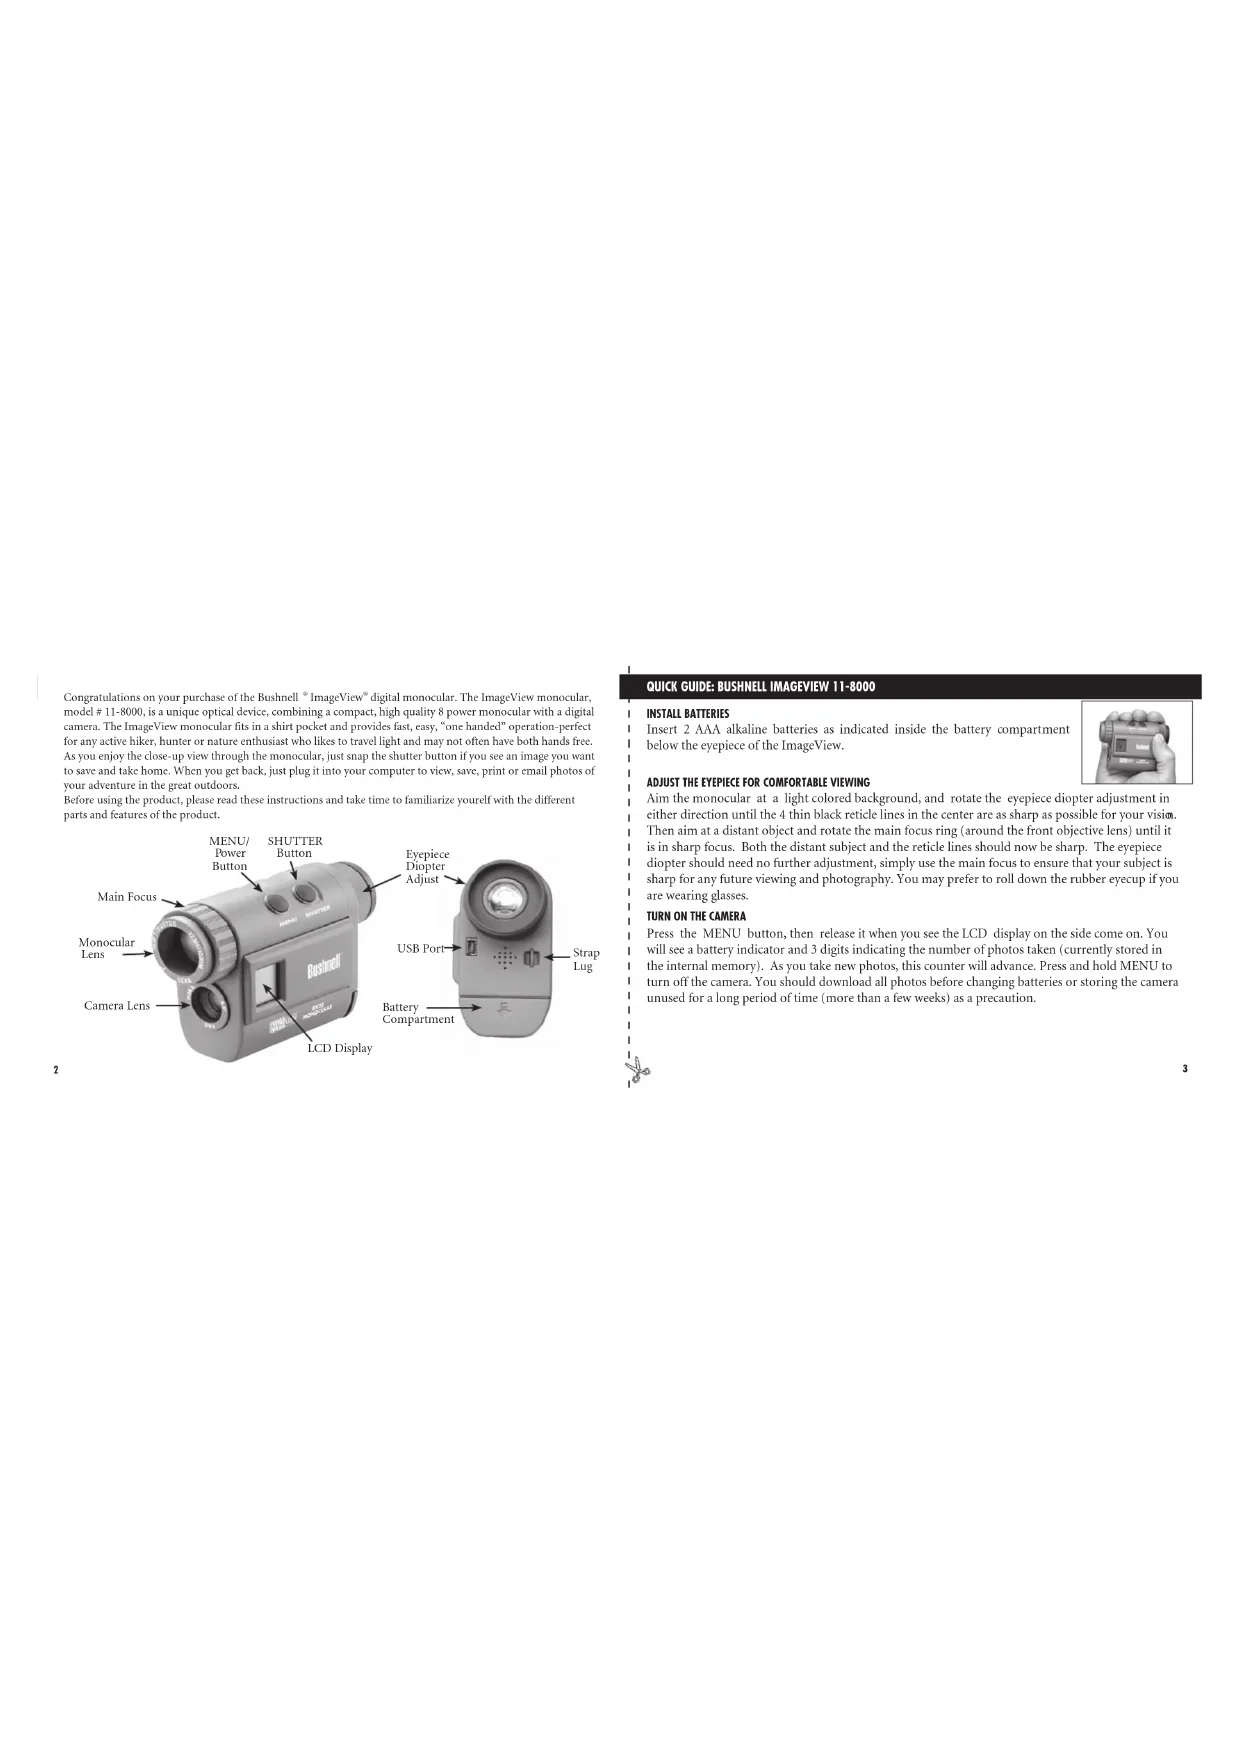
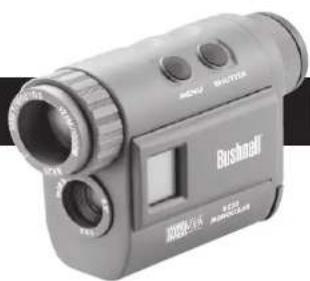
Congratulations on your purchase of the Bushnell® ImageView® digital monocular. The ImageView monocular, model # 11-8000, is a unique optical device, combining a compact, high quality 8 power monocular with a digital camera. The ImageView monocular fits in a shirt pocket and provides fast, easy, "one handed" operation-perfect for any active hiker, hunter or nature enthusiast who likes to travel light and may not often have both hands free. As you enjoy the close-up view through the monocular, just snap the shutter button if you see an image you want to save and take home. When you get back, just plug it into your computer to view, save, print or email photos of your adventure in the great outdoors.
Before using the product, please read these instructions and take time to familiarize yourself with the different parts and features of the product.
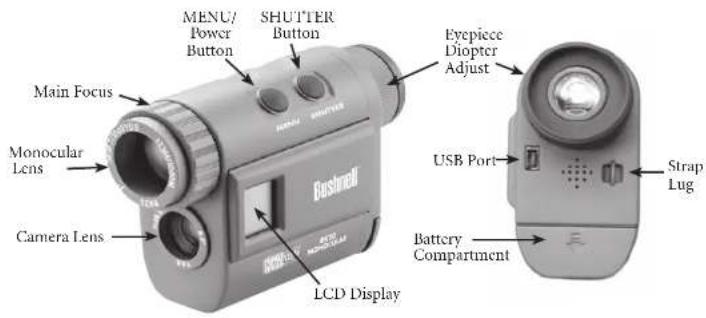
QUICKGUIDE:BUSHNELLIMAGEVIEW11-8000
INSTALL BATTERIES
Insert 2 AAA alkaline batteries as indicated inside the battery compartment below the eyepiece of the ImageView.
ADJUST THE EYEPIECE FOR COMFORTABLE VIEWING
Aim the monocular at a light colored background, and rotate the eyepiece diopter adjustment in either direction until the 4 thin black reticle lines in the center are as sharp as possible for your vision. Then aim at a distant object and rotate the main focus ring (around the front objective lens) until it is in sharp focus. Both the distant subject and the reticle lines should now be sharp. The eyepiece diopter should need no further adjustment, simply use the main focus to ensure that your subject is sharp for any future viewing and photography. You may prefer to roll down the rubber eyecup if you are wearing glasses.
TURN ON THE CAMERA
Press the MENU button, then release it when you see the LCD display on the side come on. You will see a battery indicator and 3 digits indicating the number of photos taken (currently stored in the internal memory). As you take new photos, this counter will advance. Press and hold MENU to turn off the camera. You should download all photos before changing batteries or storing the camera unused for a long period of time (more than a few weeks) as a precaution.
QUICKGUIDE:BUSHNELLIMAGEVIEW11-8000
CHECKCAMERA SETTINGS
Make sure the camera is set for high quality ("T.Q" does not show on the LCD display-see full instructions for selecting hi/lo quality) if you want the best results, especially if you will be printing the photos. See "Changing Operational Modes" for full instructions if you want to shoot movie clips (avi mode), a rapid sequence of photos, or delete a photo you have just taken.
TAKE A PHOTO (TIPS FOR BETTER QUALITY PHOTOS)
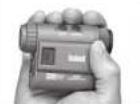
Holding the ImageView Monocular as steadily as possible with one or both hands, lightly press down the SHUTTERT button using the flat end of a finger. Leaning against a wall, tree, etc. to brace yourself can also help insure the camera does not move as you take the photo.
USING THE IMAGEVIEW WITH YOUR COMPUTER
If your computer OS is Windows 98/98SF, first install the driver from the CD-ROM as directed in "Software Installation", BEFORE CONNECTING THE IMAGEVIEW. For any Windows OS, install Roxio PhotoSuite 5, following the on-screen instructions (if you do not already have photo software you prefer to use). Connect the supplied USB cable between the ImageView and your computer, using a USB port on the computer itself (avoid USB "hubs"). Please read the section "Downloading Photos" found later in this manual for detailed instructions on transferring photos from the ImageView to a PC.
OPERATING INSTRUCTIONS
TURNING THE CAMERA ON AND OFF
Insert 2 AAA alkaline batteries as indicated on the inside of the battery compartment, located below the eyepiece on the rear of the monocular. Turn the camera on by pressing and holding the MENU button until the display comes on and the camera beeps. To turn the unit off, press and hold the MENU button until the display goes out. The camera will turn itself off automatically to save batteries if none of the buttons have been pressed for two minutes.
FOCUSING AND TAKING A PICTURE
You may prefer to roll down the rubber eyecup if you are wearing glasses. Aim the monocular at a light colored background, and adjust the diopter for your eye by rotating the eyepiece clockwise or counterclockwise until the 4 thin black reticle lines in the center are as sharp as possible for your vision. Then rotate the main focus ring (around the front objective lens) until your subject is also in sharp focus. Press the SHUTTER button to take a new photo. To take photos of subjects at different distances, leave the eyepiece diopter set where you have it, and simply focus with the main focus ring. For best results, hold the ImageView as steady as you can, and lightly press down the SHUTTER button using the flat end of your finger rather than "punching" it with a fingertip.
CHANGING OPERATIONAL MODES
Pressing the MODE button briefly will cycle through several special camera modes and settings. A corresponding icon or symbol (indicated in parentheses below) will be displayed on the LCD for each mode as you cycle through them by tapping the MENU button, and blink unless you select or confirm it with the SHUTTER button (icon will stop blinking). If no button is pressed for more than 5 seconds, the camera will return to normal operation. The modes/settings are shown as you cycle through them in the following order:
- Timer (O): selects the self-timer, which will take a photo after a 10 second delay when you press the SHUTTERT button. This is useful for avoiding blurry photos from bumping the camera when it is set down on a flat surface, especially in low light conditions. Once set, the camera will remain in self timer mode until you return to the timer mode setting and turn it off.
- Repeat Shot (□): Takes rapid series of 3 consecutive photos, approx. 1 second apart, when you press and hold the SHUTTERT button. As with the timer, the camera will remain in this mode until you change it, or until the camera's memory is full. This is indicated by the display showing "FUL" and a beep alarm.
- High/Low Quality (LQ): When "LQ" is displayed, pressing "OK" will set the camera to low resolution mode (320x240 pixels)-the "LQ" icon will stop blinking. LQ mode will allow you to fit more photos in the memory before you stop to download them, with the tradeoff of less quality per photo. To reset the camera to high resolution, return to the LQ mode, and press SHUTTER again ("LQ" will no longer be displayed). When the LQ icon is off, the camera is in high resolution mode (640x480 pixels) for best quality.
-
AVI Mode: (回) : This mode sets the camera to take short movie clips (.avi files) rather than still photos. After this mode has been activated (press SHUTTER when the movie icon blinks), holding down the SHUTTER button will film an avi movie until you release it (or the memory is full). When the SHUTTER button is released, the camera reverts back to normal still photo operation (assuming unused memory remains). Repeat the steps to set AVI mode again if you wish to shoot more movic clips.
-
Power Frequency Setting: (60 / 50Hz) : 'This sets the correct electrical frequency to avoid any flickering' in photos taken under fluorescent lighting. The normal default is "60"1Hz (cycle), as used in the United States. If you are using the camera in a country with 50Hz power frequency, press SHUTTERR when the "50" icon blinks to select it.
- Delete Last (): Pressing SHUTTER when the "Delete Last" icon is blinking will delete (erase) the last photo you took from the camera's memory.
- De delete All ( 冒 ): When this mode is selected, the word "ALL" appears next to the trash can icon, and the number of total photos in memory will blink in the display. Press and hold the SHUTTERT button to erase the entire memory contents. You will hear a tone that becomes higher as the photos are deleted. When the process is complete, the photo number display will reset to zero. If no button is pressed for 5 seconds, the camera returns to stand-by. "Delete All" is a quick way to clear the memory following a download of your photos to a computer, so that the camera is again ready to hold as many new photos as possible.
OTHER DISPLAY ICONS
- Battery Indicator ( 127): Shows the amount of battery life left. When only one third of the icon is filled in, you should plan to replace the batteries soon. B c sure to bring an extra set of batteries on a long trip or for important events.
WARNING:

Make sure you download all photos (see directions below) from the camera before removing or changing the batteries. The camera memory is battery dependant, and your photos will be lost if you take the batteries out, or if the batteries are allowed to become completely dead.
- PC Connection (PC): When the camera is connected to your PC via the supplicd USB cable, the "PC" icon is displayed. Note: when the camera is connected to a PC, the camera will power on automatically, and uses the USB connection for power to conserve battery life while downloading photos.
USING THE IMAGEVIEW WITH YOUR COMPUTER
System Requirements:
Pentium 166MMX or equivalent minimum
(Recommended Pentium II 266)
Windows 98/ME/2000/XP
Minimum 32MB of RAM
USB Port (do not connect the camera through a USB hub)
Minimum 200 MB of hard drive space, with additional 65MB for IE and Direct X
CD-ROM driver
Super VGA monitor and video card
SOFTWARE INSTALLATION
Important: DO NOT CONNECT THE IMAGEVIEW MONOCULAR TO THE COMPUTER BEFORE INSTALLING THE DRIVER SOFTWARE (This applies to Windows 98/98SE only)
Insert the supplied CD-ROM disc. It will startup automatically and display the driver and PhotoSuite installation screen.
Windows 98 users must install the driver (click "Install Driver") prior to connecting the camera for downloading. Windows 2000, ME, and XP do not require a driver.
Unless you already have photo editing software you plan to use, click the button to install PhotoSuite (compatible with Windows 98/98SE/2000/ME/XP).
DOWNSLOADING PHOTOS
Be sure you have first installed the driver if you use Windows 98/98SE.
Connect the camera is connected to your PC with the supplied USB cable. It will be recognized as a 'mass storage device', which will act just like an external hard drive. (If you are on Windows XP, you may then simply choose from the options window which will pop up when you connect the ImageView, and ignore the directions below.)
Open Windows Explorer or "My Computer," the camera will be shown as a new "Removable Disk" icon. Open this "Disk", and locate your photos (.jpg files) inside the folders.
Click on an individual photo file, or use "Iidi>Select All" if you want to download all the photos. Then choose "Move to Folder..." in the Windows "Iidi" menu. You may choose an existing folder (e.g., "My Pictures") or create a new folder located and named as you wish. Then click 'OK' and your photos will be transferred from the camera to that folder on your hard drive. Alternatively, if you prefer, you may simply copy and paste or drag and drop your photo files from the camera "Disk" to the hard drive location of your choice.
The camera may then be disconnected. Windows 2000 users should first click the "USB mass storage device" icon in your system tray (move the mouse cursor over icons in lower right corner of screen to find this) and follow your PC's directions to stop and remove the USB device.
In view and edit your photos, you may use PhotoSuite (included on the (.D).), or any other photo editing software. Select "File>Open" in the top menus and go to the folder containing your previously transferred camera files. Refer to the photo software's instruction manual or Help menu for specific details on editing, resaving and printing photos.
To view your movie files (.avi files), open Windows Media Player (free download from Microsoft.com if not supplied with your PC) and open the .avi file from the location where you previously saved it. With recent versions of Media Player, you may simply drag the movie file name from its location onto the Media Player window, and it will begin playing automatically. QuickTime, pre-installed on many computers (or available as a free download from Apple.com) can also be used to open and play the avi movie clips.
INSTRUCTIONS FOR CARE OF OPTICS
Your Bushnell monocular will provide years of trouble-free service if it receives the normal care you would give any fine optical instrument. The ImageView Monocular should not be exposed to excessive moisture.
- Store your monocular with the roll-down, flexible rubber eyecup fully "up". This avoids excessive stress and wear on the eyecup in the down position.
- Avoid hanging and dropping.
- Store in a cool, dry place.
- CAUTION: Looking directly at the sun with your monocular may be very harmful to your eyes.
- Never expose your ImageView monocular to any type of excessive of liquid or fluid, as the product is not water/fogproof.
- Take the batteries out of your ImageView if you are not going to use it for a long period of time. (Make sure you download any pictures from your camera before you remove the batteries from the camera.)
CLEANING
- Blow away any dust or debris on the lenses (or use a soft lens brush).
- To remove dirt or finger prints, clean with a soft cotton cloth rubbing in a circular motion. Use of a coarse cloth or unnecessary rubbing may scratch the lens surface and eventually cause permanent damage. A "microfiber" cleaning cloth (available at most photo dealers) is ideal for the routine cleaning of your optics.
- For a more thorough cleaning, photographic lens tissue and photographic-type lens cleaning fluid or isopropyl alcohol may be used. Always apply the fluid to the cleaning cloth - never directly on the lens.
TWO-Year LIMITED WARRANTY
Your Whitwell® product is warranted to be free of defects in material and workmanship for two years after the date of purchase. In the event of a defect under this warranty, we will, at our option, repair or replace the product, provided that you return the product postage paid. This warranty does not cover damages caused by moisture, improper handling, installation, or maintenance provided by someone other than a financial Authorized Service Department.
Any return made under this warranty must be accompanied by the items listed below: 1. A checkmark order in the amount of 10.00 to cover the cost of postage and handling; 2. A check mark order for a total value of10.00.
3. An application of the object
1. Proof of Date Purchased
- Product should be well packed in a study outside shipping carton, to prevent damage in transit with return postage prepaid to the address listed below.
IN U.S.A. Send To: IN CANADA Send To:
Bushnell Performance Optics Bushnell Performance Optics
A
8500 Marshall Drive 25A 1st Peace Street, U.S.L.
Lenexa, Kansas 662-14
Rochmond Hill, Ontario L4B 2M9
For products purchased outside the United States or Canada please contact your local dealer for applicable warranty information. In Europe you may also contact Burchell at BUSINESS.Performance Optics GmbH
European Service Centre
MORSESTRASS
D-50769 KOLN
GERMANY
194902217099583
12x-4910)2217099398
This warranty gives you specific legal rights.
You may have other rights which vary from country to country.
2005 Bushnell Performance Optics
FCC Note:
This equipment has been tested and found to comply with the limits for a Class B digital device, pursuant to Part 15 of the FCC Rules. These limits are designed to provide reasonable protection against harmful
interference in a residential installation. This equipment generates, uses and can radiate radio frequency energy and, if used installed and used in accordance with the instructions, may cause harmful interference to radio communications. However, there is no guarantee that the equipment will be able to detect or eliminate interference. If this equipment does cause harmful interference to radio or television reception, which can be determined by turning the equipment off and on, this user is encouraged to try to correct the interference by one or more of the following measures:
Reorient or relocate the receiving antenna.
- Increase the separation between the equipment and ECOPIX.
- Connect the equipment into an outlet on a circuit different from that to which the receiver is connected.
- Consult the dealer or an experienced radio/TV technician for help.
Shielded interface cable must be used with the equipment in order to comply with the limits for a digital device pursuant to Subpart 8 of Part 15 of FCC Rules.
Specifications and designs are subject to change without any notice or obligation on the part of the manufacturer.
C
FRANÇAIS
Atnn. Repairs Attn. Repairs
8500 Marshall Drive 25th East Parce Street, Unit 1
Lenexa, Kansas 66214 Richmond Hill, Ontario L4B 2M9
European Service Centre
MORSESTRASS
Dr. 10769 KOUN
19/06/89AALYACNE
AENNEONE Tel:+491012217099393
Tax: -49182217099398
67.1053 BUXOPEF PELIANCE VOLCS
Caleulier envoi que se haga bajo esta garantia de cetera it acompado por lo signe: la lawns ornate and noted in the lawns are which is to be used for the law
8.00 Marshall Drive 25A East Pearce Street, Unit 1
Lencxa, Kansas 66214 Richmond Hill, Ontario L4B 2M9
European Service Centre
NORSPSTRASSF
D-30769K:LN
ALEMANIA
Tel+49012217099393
Fax:49(0)2217099398
Fata garantia le direcchne tegales espicfions.
800Marshall Drive, 26A East Avenue Street, Unit
Lenexa, Kansas 68211, Richmond Iill, Ontario L1B 2M9
Attn: Repairs Attn: Repairs
8500 Marshall Drive 25A East Pearce Street, Unit 1
Tema, Kansas 66214 Richmond Hill, Ontario L4B 2M9
BUSINLL Performance Optics GmbH
European Service Centre
MORSESTR
D-50769KOLN
GERMANIA
N.telefonico:+49182212099393
N.46+49012217099398
8500 (Mortson) 476 - 230 (Fair Peace) Street, LLC, Kansas City, 66214 Richmond Hill Ontario L1B 2M9
Para produits adjuvérés lors des États-Unis ou Canada, entre em contrato com seu recendevocat local, para observer infractions de garantia aplicada ao produit adequário. Na Europa, conta a Bushandam:
IUSINIEL.Performance Optics Gmihh
European Service Centre [Centro de Servico na Europa] 1602075701604
MOERESTR4
ALEMANHA
Tel:(49)02217099393
142-1910]221
©2005 Bushnell Performance Optics

- QUICKGUIDE:BUSHNELLIMAGEVIEW11-8000
- INSTALL BATTERIES
- ADJUST THE EYEPIECE FOR COMFORTABLE VIEWING
- TURN ON THE CAMERA
- CHECKCAMERA SETTINGS
- TAKE A PHOTO (TIPS FOR BETTER QUALITY PHOTOS)
- USING THE IMAGEVIEW WITH YOUR COMPUTER
- OPERATING INSTRUCTIONS
- TURNING THE CAMERA ON AND OFF
- FOCUSING AND TAKING A PICTURE
- CHANGING OPERATIONAL MODES
- OTHER DISPLAY ICONS
- WARNING:
- System Requirements:
- SOFTWARE INSTALLATION
- DOWNSLOADING PHOTOS
- INSTRUCTIONS FOR CARE OF OPTICS
- CLEANING
- TWO-Year LIMITED WARRANTY
- IN U.S.A. Send To: IN CANADA Send To:
- FCC Note:
Brand : BUSHNELL
Model : Imageview 118000
Category : Binoculars