
Mastercook Digital 207352 - Deep fryer Hendi - Free user manual and instructions
Find the device manual for free Mastercook Digital 207352 Hendi in PDF.
| Product type | Commercial electric deep fryer |
| Brand | Hendi |
| Model | Mastercook Digital 207352 |
| Power supply | 230 V ~ 50 Hz |
| Power | 3500 W |
| Oil tank capacity | 8 L |
| Temperature range | 25 °C to 195 °C |
| Timer | 30 seconds to 20 minutes |
| Dimensions (W × D × H) | 300 × 455 × 345 mm |
| Protection class | Class I (grounding required) |
| Water protection rating | IPX3 |
| Materials | Stainless steel, rubber feet |
| Display | Digital, two screens (temperature and timer) |
| Control panel | ON/OFF buttons, temperature, timer, increase/decrease |
| Calibration function | Yes, adjustment of displayed temperature with external thermometer |
| Thermal protection device | Yes, RESET button under heating element |
| Cold zone | Yes, to prevent overheating of residues |
| Drain tap | No (model 207352) |
| Included accessories | Fry basket with handle, basket support bar, lid |
| Maintenance and cleaning | External cleaning with damp cloth; never immerse; not dishwasher safe |
| Use | Indoor only, professional use (restaurants, canteens) |
| Warranty | 12 months |
| Weight | Not specified in manual, estimated approx. 10-15 kg |
Frequently Asked Questions - Mastercook Digital 207352 Hendi
User questions about Mastercook Digital 207352 Hendi
0 question about this device. Answer the ones you know or ask your own.
Ask a new question about this device
Download the instructions for your Deep fryer in PDF format for free! Find your manual Mastercook Digital 207352 - Hendi and take your electronic device back in hand. On this page are published all the documents necessary for the use of your device. Mastercook Digital 207352 by Hendi.
USER MANUAL Mastercook Digital 207352 Hendi
You should read this user manual carefully before using the appliance.
BHHMaTeIbHO npOHTaTe pyKOBoIcTBO nIb3OBaTeJIpeepnCNoJIb3OBaHHeM np6opa.
Ppenei va diaBaoetae autec tic onyicxphonnc npooektu npiv xpoaiounoeTe tn ouokeun.
Item: 207345
207352
207369
207376

Keep these instructions with the appliance.
For indoor use only.
Thank you for purchasing this Hendi appliance. Before using the appliance for the first time, please read this manual carefully, paying particular attention to the safety regulations outlined below.
Safety Regulations
- Incorrect operation and improper use of the appliance can seriously damage the appliance and injure users.
- This appliance is intended to be used for commercial applications, for examples, in kitchens of restaurants, canteens, hospitals and in commercial enterprises such as bakeries, butcheries, etc., but not for mass production of food.
- This appliance is only intended for deep frying food only.
- Keep the appliance and electrical plug away from water and any other liquids. In the unlikely event that the appliance should fall into water, immediately pull the plug out of the socket and have the appliance checked by a certified technician. Not following these instructions could give rise to life-threatening situations.
- Never try to open the casing of the appliance yourself.
- Do not insert any objects in the casing of the appliance.
- Do not touch the plug with wet or damp hands.
- Regularly check the plug and cord for any damage. Should the plug or cord be damaged have it/them repaired by a certified repair company.
- Do not use the appliance after it has fallen or is damaged in any other way. Have it checked and repaired, if necessary, by a certified repair company.
- Do not try to repair the appliance yourself. This could give rise to life-threatening situations.
- Make sure the cord does not come in contact with sharp or hot objects and keep it away from open fire. To pull the plug out of the socket, always pull on the plug and not on the cord.
- Make sure that no one can accidentally pull the cord (or extension cord) loose or trip over the cord
- Always keep an eye on the appliance when in use.
- Children do not understand that incorrect use of electrical appliances can be dangerous. Therefore, never let children use electrical appliances.
- Always pull the plug out of the socket when the appliance is not being used and always before cleaning.
- Warning! As long as the plug is in the socket the appliance is connected to the power source.
- Turn off the appliance before pulling the plug out of the socket.
- Never carry the appliance by the cord.
- Do not use any extra devices that are not supplied along with the appliance.
-
Only connect the appliance to an electrical outlet with the Voltage and frequency mentioned on the appliance label.
-
Avoid overloading.
- Turn off the appliance after use by removing the plug from the socket.
- Always remove the plug from the socket when filling or cleaning the appliance.
- The electrical installation must comply with the applicable national and local regulations.
- This appliance is not intended for use by persons (including children) with reduced physical, sensory or mental capabilities, or lack of experience and knowledge.
Special safety precautions
- This appliance is intended only for deep frying appropriate food such as fries, etc in commercial use. Any other use may lead to damage of the appliance or personal injury.
-
This appliance is intended to be used for commercial applications, for example in kitchens of restaurants, canteens, hospitals and in commercial enterprises such as bakeries, butcheries, etc., but not for continuous mass production of food. And it should be operated by trained personnel.
-
Caution! Hot surface! The temperature of the accessible surface is very hot during use. Touch the icons on the control panel only.
- When this appliance is to be positioned in close proximity to a wall, partitions, kitchen furniture, decorative finishes, etc., it is recommended that they are made of non-combustible material; if not, they shall be cladded with a suitable non-combustible heat insulating material, and that the closest attention be paid to fire prevention regulations.
- Do not place the appliance on a heating object (gasoline, electric, charcoal cooker, etc.). Keep the appliance away from any hot surfaces and open flames. Always operate the appliance on a level, stable, clean, heat-resistant and dry surface.
- Do not use the appliance near explosive or flammable materials, credit cards, magnetic discs or radios.
- This appliance is not intended to be operated by means of an external timer or separate remote-control system.
- WARNING: Danger of fire exists if oil level below "L" (Min) marking or no oil in the oil container.
- WARNING: Do not fry too wet foodstuffs and too much food at each time to avoid excessive foaming and spill out of oil. Maximum batch load is approximately 1kg.
- Allow at least 20~cm spacing around the appliance for ventilation purpose during use.
- Only use suitable oil or fat for frying. Replace the oil or fat at regular intervals. Overcooked or dirty oil or fat can be ignited if it is overheated."
- Do not use plastic cutlery during operation.
- Danger! Never use old oil, old oil has a reduced flash point and is more prone to surge boiling which increases the risk of fire and dangerous situations.
- Always clean the appliance and other accessories after each use (--->Cleaning and maintenance).
-
Do not use water jet, flush directly with water or steam cleaner as the parts will get wet and electric shock might be resulted.
-
Caution! Securely route the power cord if necessary in order to prevent unintentional pulling or contact with the heating surface.
- Do not wash the appliance with water. Washing can cause leakages and increase the risk of electric shock.
- Do not clean or store the appliance unless it is completely cooled down.
- No part is dishwasher safe.
- Always remove the plug from the socket when filling or cleaning the deep fryer.
- The electrical installation must satisfy the applicable national and local regulations.
- The Fryer tank and element should be placed in a safe position in your kitchen before usage due to the hot contents when in use.
- To avoid the risk of fire, do not allow the oil level to drop below the L- mark (MIN level). Always use plenty of oil in the oil container.
Grounding installation
This appliance is classified as protection class I appliance and must be connected to a protective ground. Grounding reduces the risk of electric shock by providing an escape wire for the electric
current. This appliance is equipped with a cord having a grounding wire with a grounding plug. The plug must be plugged into an outlet that is properly installed and grounded.
Preparations before using for the first time
- Check to make sure the appliance is undamaged. In case of any damage, contact your supplier immediately and do NOT use the appliance.
- Remove all the packing material and protection film (if applicable).
-
Clean the appliance with luke-warm water and a soft cloth.
-
Place the appliance on a level and steady surface, unless mentioned otherwise.
- Make sure there is enough clearance around the appliance for ventilation purposes.
- Position the appliance in such a way that the plug is accessible at all times.
Installation
- Place the appliance on a level, stable, clean, heat-resistant and dry surface with its rubber feet.
- Carefully install the back support with heating element on the rear edge of the oil container.
Note:
- Make sure that the pin on the back support is in the correct position & properly mounted.
- The appliance should be placed in a safe position in your kitchen before use due to hot hazard when in use.
Main parts of the appliance
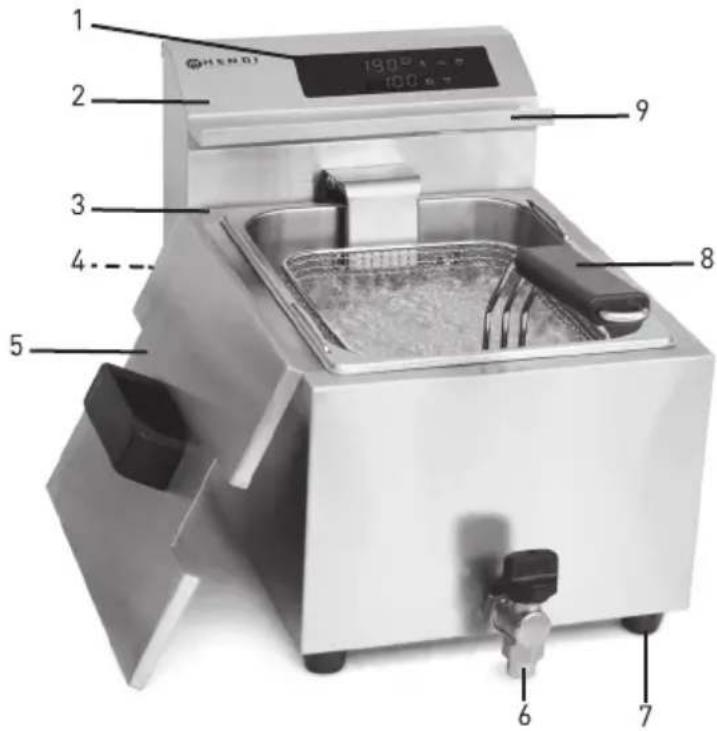
- Control panel
- Detachable back support with heating element
- Base unit with oil container
- RESET button (At the rear and bottom of the back support)
-
Lid cover
-
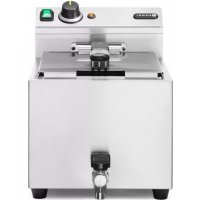
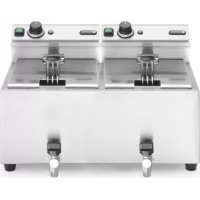
Oil drain tap (Supplied for item 207369 and 207376 only)
- Feet
- Frying basket with handle
- Frying basket holder
Function keys on the control panel
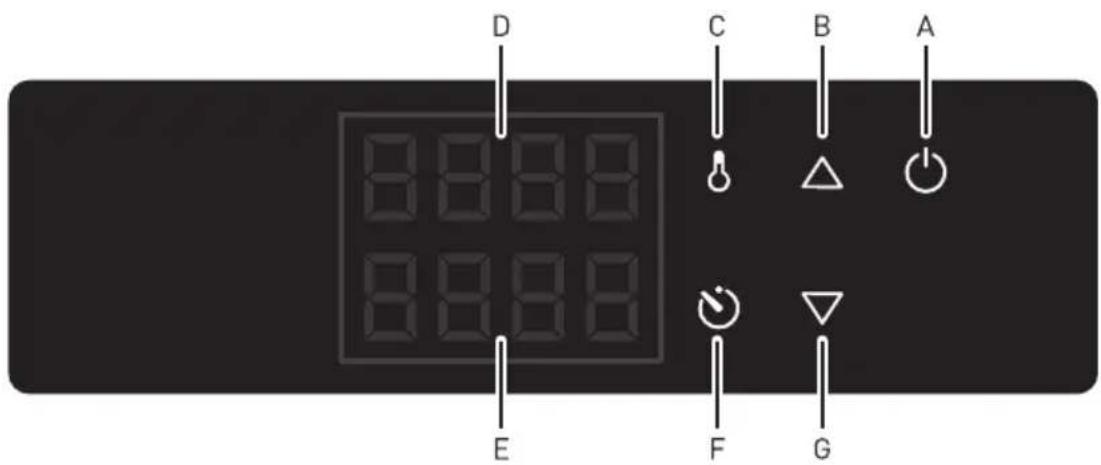
A) ON/OFF switch
B) Increase icon (To increase the temperature & timer setting)
C) TEMPERATURE icon
D) Upper display
E) Lower display
F) TIMER icon
G) Decrease icon (To decrease the temperature & timer setting)
Use
- Make sure the oil drain tap is closed.
- Remove the plug from the socket.
-
Make sure the oil container is clean and dry and no water inside.
-
Carefully fill the container with oil between the "L" marking (Min) and the "H" marking (Max).
- Plug the earthed plug into an earthed socket.
- You can now use the deep fryer.
Deep-frying
The deep fryer is designed with a unique cold zone to allow crumbs and residue to sink to the bottom this also enables the usable life of the fat/oil to extend considerably.
Regularly check if there is sufficient oil or fat in the container. The level should never be below the "L" marking (Min) line.
Operation
1. Setting the TEMPERATURE
1.1 Fill the container with oil and make sure that the oil level is between the "L" and "H" mark. Note: Remember that placing food in the oil will also raise the oil level. Do not put too wet foodstuffs or large amount of food at each time.
1.2 Connect the power plug to a suitable electrical power outlet.
1.3 Press the ON/OFF Icon & light up. The INCREASE / DECREASE icon will blink. The upper display will show the current SET TEMPERATURE. (TEMPERATURE range: 25^ 195^ ).
1.4 Press INCREASE or DECREASE icon to start heating operation. The upper display will show the ACTUAL TEMPERATURE of the oil. And the TEMPERATURE icon will blink constantly.
1.5 You can also press TEMPERATURE icon to see the last SET TEMPERATURE for 1 ~ 2 seconds. Within this period, press INCREASE or DECREASE icon to adjust the SET TEMPERATURE if need. Press INCREASE / DECREASE icon once for +1,0°C / -1,0°C. Press & hold for fast adjustment. After stop pressing for about 2 ~ 3 seconds, the new SET TEMPERATURE will be stored automatically.
1.6 Under heating operation, the TEMPERSTURE icon will blink constantly until the SET TEMPERATURE is reached. After reaching the SET TEMPERATURE, the TEMPERATURE icon light will go off and keep within a range of ± 2^ .
1.7 When switch off the appliance, "oFF" will be shown on the upper display and "Hot" will be shown on the lower display.
2. Setting the TIMER
2.1 During operation, you can activate the TIMER function.
2.2 Press and hold the TIMER button for 2 3 seconds to enter TIMER set mode. The INCREASE/ DECREASE icon will blink.
2.3 Then, within 1 - 2 seconds, press INCREASE or DECREASE icon to set the TIMER. Press once for +30 seconds / -30 seconds and lower display will show the set countdown time for TIMER. Press and hold the INCREASE or DECREASE icon for fast adjustment [TIMER Range: 30 seconds - 20 mins].
2.4 The newly set TIMER will be stored and start countdown within about 2~3 seconds.
2.5 When count down is finished, "End" will be blinked continuously on the lower display. Two
short beep sounds will be heard with about 10 seconds duration for over period of 1 minute.
2.6 Press the TIMER button once to return to the last preset time. Press again the TIMER button to enter TIMER set mode for changing the time. The INCREASE/DECREASE icon will blink. The newly set TIMER will be stored and start countdown again within about 2~3 seconds.
2.7 During counting down, press and hold the TIMER icon for 2 3 seconds to cancel counting mode. "oFF" will be shown on the lower display.
Attention: The frying basket holder is just for temporarily holding for excess oil discharge only. Do not hold too long time to prevent from fall down accidentally and spill out of heated oil.
Calibration function
This function allows the user to calibrate and adjust the "display temperature" align with the "actual temperature". A calibrated thermometer with probe is required (not included) for measurement.
- During operation, press and hold both the INCREASE and DECREASE buttons for 5~6 seconds to enter "calibration mode".
-
Then, the "display temperature" shown on the display will blink constantly.
-
Next, put the thermometer (not included) inside the oil tank for comparison. Be careful as the oil is hot.
- When under steady situation, press INCREASE or DECREASE button to align the "display temperature" with the reading in the thermometer (not included).
- After that, press TEMPERATURE icon to confirm it after finishing calibration.
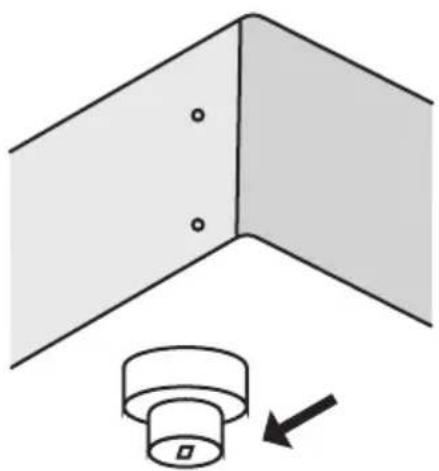
RESET the Hi-limiter (thermal cut-out)
Please note that the RESET button is located at the bottom of the detachable back support with a protective cap (See line drawing to avoid overheat.)
- Unplug the deep fryer from the electrical outlet first.
- Allow the deep fryer to completely cool down.
- Remove the detachable back support from the support.
- Unscrew the black protective cap of the RESET button.
- Press the RESET button of the Hi-limiter (thermal cut-out). You should hear a click sound.
-
Screw back the protective cap on the RESET button.
-
Reinstall the detachable back support on the support.
Deep frying tips
- Only use liquid frying oil (preferably) or fat.
- The recommended temperature for frying chips and snacks is 175^ max.
- Heat the oil slowly. Preferably in 3 steps for example first at 100^ , then from 100 - 140^ and later from 140^ to 175^ with 15 minute breaks between steps.
- Remove ice and crumbs from frozen foods.
- Do not deep-fry too much at one time. This can cause the oil or fat to cool down too much. Cooled down oil/fat does not properly sear the surface of
the food, so that more fat will be absorbed. The ideal proportion of frozen products to frying oil/ fat is 1:10 maximum.
- When used intensively, crumbs and other debris should be filtered out of the oil/fat.
- Replace oil or fat in time. Use test strips or test equipment regularly to track when oil/fat should be replaced.
- If oil or fat starts to foam, smoke or gets too viscous you should replace it. Also replace the oil/fat when it has a strong smell or taste.
After use
- Turn off the appliance by pressing the ON/OFF icon and removing the plug from the socket.
-
Remove the basket from the oil container. This avoids the basket becoming stuck in the solidified fat.
-
Put the lid on the deep fryer, so that the fat does not age.
Cleaning and maintenance
Always remove the plug from the socket cool down completely before cleaning the appliance.
-
Beware: Never immerse the appliance in water or any other liquid!
-
Clean the outside of the appliance with a damp cloth (water with mild detergent).
-
Never use aggressive cleaning agents or abrasives. Do not use any sharp or pointed objects. Do not use petrol or solvents! Clean with a damp cloth and detergent if necessary. Do not use abrasive materials.
-
Do not clean the appliance with steam cleaner or water jet.
-
Assemble the appliance after cleaning and make sure that the heating & control panel is mounted properly, otherwise the appliance will not function.
Technical Specification
| Item no 207345 207352 | 207369 207376 | |||
| Operating voltage & frequency | 230V~ 50Hz | |||
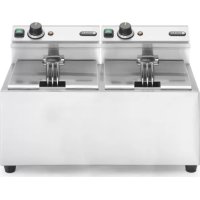
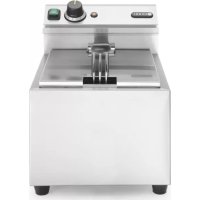
| Rated input power 350W 2 x 3500W 3500W | 2 x 3500W | |||
| Capacity 8L 2 x 8L | 8L (with tap) | 2 x 8L (with tap) | ||
| Protection class | Class I | |||
| Waterproof protection class | IPX3 | |||
| Timer range | 30 seconds ~ 20 minutes | |||
| Temperature range | 25°C ~ 195°C | |||
| Exterior dimension | 300x455x(H)345mm | 605x455x(H)345mm | 300x515x(H)345mm | 605x515x(H)345mm |
Remarks: Technical specification is subjected to change without prior notification.
Troubleshooting
If the appliance does not function properly, please check the below table for the solution. If you are still unable to solve the problem, please contact the supplier/service provider.
| Fault | Symptom | Possible cause Possible solution | |
| Appliance does not do anything | Orange light doesn't light | No mains voltage | Check the electrical installation. Switch light defective |
| Hi-limiter (thermal cut-out) tripped. | Reset the Hi-limiter (thermal cut-out) (See RESET on page 8) | ||
| Hi-limiter (thermal cut-out) defective | Contact your supplier | ||
| Thermostat defective | Contact your supplier | ||
| Appliance does not reach the set temperature. | Long frying time. | Thermostat defective | Contact your supplier |
| Element defective | Contact your supplier |
If after these controls, the malfunctioning continues, it is advisable to contact technical assistance. In case of any doubt, always contact your supplier!
Warranty
Any defect affecting the functionality of the appliance which becomes apparent within one year after purchase will be repaired by free repair or replacement provided the appliance has been used and maintained in accordance with the instructions and has not been abused or misused in any way. Your statutory rights are not affected. If the appliance is claimed under warranty, state where and
when it was purchased and include proof of purchase (e.g. receipt).
In line with our policy of continuous product development we reserve the right to change the product, packaging and documentation specifications without notice.
Discarding & Environment
At the end of the life of the appliance, please dispose of the appliance according to the regulations and guidelines applicable at the time.
Throw packing materials like plastic and boxes in the appropriate containers.
Specifications technicals
Remarks: Technical specification is subjected to change without prior notification.
Depanare
TbOpnte! PtoIpaTe BnaXHo TkaHbO nn XnKocTbIO nIaMbTbI nocybl. He nCnoJb3yIte a6pa3NBhIe MaTePnAJIb.
He yncntte ycIpoNCTBO npooocntTeJeem nn cTpyeB OdbI.
- Iocne uNCTKN yCTPOINCTBO HxHNO NOBTOPOHO co6paTb y6eINBwncb, YTO KOHTPONBnA NaHeIb (naHeIb OTONJIENHa) yCTaHOBNeHa npaBNbHO - B npOTnBHom clyuae yCTPOINCTBO He 6yDet pa6oTaTb DOJXHBIM 6pa3OM.
TexHuecka xapaKTepeNtika
Ecn yctpoiCTBO He pa6oTaETdoJXHbIM o6pa30M, 6paTntEcB K npNBedeHHoH Hxke Ta6nue, YTO6bl HaHTN npabnlbHoe peweHne. Ecn Bbl He moKeTe peuNTb npo6JeMy, 6paTntEcB K noCTaBnky.
B cnyan comHenn, Bcerda o6paaTecb k CBOemy noctabuKy!
TapaHTna
JIIO6a HeoJekKa nn noJomKa, KOtopa BJeUeT 3a cO6oH He npabnIbHyo pa60Tu yCTpoNCTBa, KO-Topa 6yDet BbIbIeHa B TeueHne nepBOro rOda OT DaTbI NOKynK, 6yDet YcTpaHena 6ecnIaTHo, nn JKe BCE yCTpOiCTBO 6yDet 3aMeHeHO HOBIM, eCNI OHO EKcNlyatnpoBaIocb n 06cnyXnBaIocb corlaCHO HnCTpyKnnn NO 6cnyXnBaHnIO n He nCNoIb3OBAIocb HenpaBnIbHo, nn B pa3pe3 C Ha3NaueHem. DAnHoe noJoxHne Hn KoE mpe He HapuShaet INhix npAB notpe6nteJIa, n3IoXeHHbIX B 3aKOHO
daTeIbCTBe. B cIyuae 3aIbIeHn ycTpoIcTba B peMoHT nIi Ha 3aMeHy B paMKax rapaHTn, cIeNyET yKa3aTb MeTo n DaTy NOKynKu ycTpoIcTba n npINO-XNtB CcET, nIi YekOBYIO KBNTaHciHIO.
Corgnacno HaWei noJNTKe COBepHcTBOBaHnaHaunx npOyKToB ocTabnem 3a co6oI npaBO HaBBOD n3MeHEn B KOHCTpyKciU, yNaKOBky N B TexHNueckne napameTpbl, yKa3bBaemble B TexHueckoJ Dokymentauu 6e3 npedynpejxdenra.
CnncanHe c 3Kcnnyataun. 3aunTa okpykaiouei cpebl
06opyoBaHne, n3HoWeHHoe n cncsHaHoe c 3KcNnyatau n CneDyET yTnIn3npoBaTb cornaCHO npaBnAm N yKa3aHnA M, DeiCTByIOUm Ha deHb ChrTnC 3KcnNyatau.
MaTePnAJIyynakOBKn,TaKneKaKnnactNK,KapToH HbIe Kopo6Kn,IpeBecnHa,CNeDyETCKlaInpoBaTb pa3dEInbHO B COOTBeTCTByIOUne KOHTeHepbl.
Euxapiotoue nou ayopaoate auto to npoiov Hendi. AiaBae TPOOeKTikto napov EYxepio npiv auvdoet tn ouakeun, npokieevou va npoalBete nIavn BaaBn nou mnpei va opeiael a e Iav- 0aouevn xpnon. AiaBaote iowc touc kavovioooc aoopaiaic nou npooektik.
Kavovioi aαφαλεια
- Σε πεπιπωπ εσφαλμένης λειουργίας ἡ/και μι κατάλληλός xρήος τής συοκεύς, ενδέχεταιν προληθείοβαρή βλάβη στη συοκεύή και τραματισός τών xροστών.
Autn n ouokεun npoopizεtal yla εμnpikxpnon, n.x. oε kouzivec eotatopiwv, kuikεiwv, vookoεiwv kal oε εμnpikεc επixεipnoεic, onwc aptonoia, kεonwλεia, kλn, aλa ovi yla μazikn npaokεun troφiμwv.
Autn ouokevun npoopizetai movo yia to tnyavlaqa tropipwv.
KpatnoTe Tn ouakeun kai to Buopa maekpiad ano vepo kai aaaa uypa. Ze nepintwn nou n ouakeun neoei ove vepo,tpaBnEte aeeowc to Buopa ano tnv npiza kai aneuovtheta iTe o e ntoonupevo texviko yia va eleyei tn ouakeun. H un tnpnon autow twv obnyiw npopevi va npokaloei kataotaoeic enikivovc yia tn zwn.
Mnv npoonaohoe note va avoiEe ovoiaac to nepiBna tnc ouokueuc.
Mnv tooTheTeiTe avtkeiEv aTo nepiBna TaC ouokevnC.
Mnv ayyizet to Buogua e Bpeyeva xepia. - Eλεγχετε τακτικά το Βύσμα καί το καλώδιο τροφόδοσιας για τυχόν ζημιές. ἀν το Βύσμα π το καλώδιο ἡχει unοστεί ζημί, πρέπειν α εἰπιοκευαστεί αὐ πιστονημένην εSTAIPΕIA επιοκεύων.
Mnv xnpouponoiote tn oukeun eav noei n exei unootei znmu a e onoiovdonote aAto npo. EeyTe kal eniokeuaote rv, av xpelaqetai, o e niatoonuuevntaepia eniokeuwv.
Mnv npoanaohoe va eniokeuaote ovoaac tn ouokeu. Autopnpvi va npokaole anlntikc yla tn zwn kataotaoic.
BεBaωθειε οι το καλώδιο δεν ερχειαι σε εηαφή με αixμρά n θερμά avτικειμενα καλ φαπησετο μακρία anò φωτιὰ. Για να Βγαλειετο Βύσμα anò tnv πρία, va τραΒάτε πάντa to Bύσμα και ὄχι το καλώδιο. - BéBaIωθειτε ὄτι δεν unàpxει περπιτωσην va tpaBnxtεi akouδια to kaλωδιο (n to kaλωδιο npoëktaoc) n va οκovτáψει kavείς σε autó.
- Na npooexe navta tn ouokekun kata tn xphon.
- Ta naiδla δev kataλaBaivouv ði n μn kataλλnλn xpnon tov nλεκτρικων σουκειν μnpειν εival επικινδυνn. Συεπώς, μνν Ta aφήνετε va xρομοιοιουν nλεκτρικές σουκεινές.
- Na Byázετé návta to Búσa anó tvn npiça òtav n ouokεun δev xρnoiŋoileitai kal npiv anotov kaθapiμó.
- Προειδόπoinon! Ooo to Bùσμa εival στnv πiça, n συοκεύν εival συνδεδεμένn στnv nnyntpóφοδoσiaç.
Anvepyonoiote n ouokun npiv tpaBnEeTo Buqa ano tvnpiza. - Ionte unv etapepeet en ouokevun ao to kaawio.
Mnv xpnoiunoiie tse oukeuec nou dev napexovtai jazi me tn ouokevun.
Hendi Food Service Equipment GmbH
Central Barn, Hornby Road
Lancaster, LA2 9JX, United Kingdom
Tel: +44 [0]333 0143200
Email: sales@hendi.co.uk
Hendi Food Service Equipment Romania Srl
PKS Hendi South East Europe SA
5 Metsovou Str.
18346 Moschato, Athens, Greece
Tel: +30 210 4839700
Email: office.greece@hendi.eu
Hendi HK Ltd.
1208, 12/F Exchange Tower
33 Wang Chiu Road, Kowloon Bay, Hong Kong
Tel: +852 2154 2618
Email: info-hk@hendi.eu
FindHendi on internet:
www.hendi.eu
www.facebook.com/HendiFoodServiceEquipment
www.linkedin.com/company/hendi-food-service-equipment-b.v.
www.youtube.com/HendiEquipment
- Changes, printing and typesetting errors reserved.
- Änderungen und Druckfehler vorbehalten.
Wijzigingen en drukfouten voorbehonden. - Producent zastrzega sobie prawo do zmian oraz będów drukarskich w instrukcji.
-
Variations et fautes d'impression réservés.
-
Errori di cambiamenti, di stampa e di impaginazione riservati.
- Drepturi rezervate cu privire la modificari si gresei de imprimare.
-ImMeHeHHn,neuTuN BepCTKN Oun6Kn 3aunHbI.
-Me enupaEn aaiayaw,aaBwEkrunwnoc koiotoxeiOeioq.

- Safety Regulations
- Special safety precautions
- Grounding installation
- Preparations before using for the first time
- Installation
- Main parts of the appliance
- Function keys on the control panel
- Use
- Deep-frying
- Operation
- Setting the TEMPERATURE
- Setting the TIMER
- Calibration function
- RESET the Hi-limiter (thermal cut-out)
- Deep frying tips
- After use
- Cleaning and maintenance
- Troubleshooting
- Warranty
- Discarding & Environment
- Depanare
- TapaHTna
- CnncanHe c 3Kcnnyataun. 3aunTa okpykaiouei cpebl
- Kavovioi aαφαλεια
- Hendi Food Service Equipment GmbH
- Hendi Food Service Equipment Romania Srl
- PKS Hendi South East Europe SA
- Hendi HK Ltd.
- FindHendi on internet:
Brand : Hendi
Model : Mastercook Digital 207352
Category : Deep fryer