
Video Assist 4K digital video recorder - Voice recorder Blackmagic Design - Free user manual and instructions
Find the device manual for free Video Assist 4K digital video recorder Blackmagic Design in PDF.

| Product Type | 4K Video Recorder/Monitor |
| Brand | Blackmagic Design |
| Model | Video Assist 4K |
| Dimensions (L x W x H) | 148 x 95 x 35 mm |
| Weight (without batteries) | 380 g |
| Power Supply | 12V DC adapter; two rechargeable Canon LP-E6 batteries |
| Screen | 7-inch touchscreen LCD |
| Video Inputs | 6G-SDI (mini BNC), HDMI |
| Video Outputs | SDI (BNC), HDMI |
| Max Recording Resolution | Ultra HD 2160p30 |
| Recording Formats | Apple ProRes, Avid DNxHD/DNxHR |
| Storage | Two UHS-II SD card slots |
| Audio | XLR inputs (2), headphone output, built-in speaker |
| Monitoring Functions | Zebra, focus peaking, guides, grid, false color, zoom, 3D LUT |
| Video Scopes | Waveform, RGB parade, vectorscope, histogram |
| Battery Life (with 2 LP-E6 batteries) | Approximately 80 minutes in Ultra HD |
| Care and Cleaning | Clean with a soft, dry cloth; avoid solvents |
| Safety | Use the supplied adapter; do not expose to moisture |
| Spare Parts and Repairability | Replaceable batteries; firmware update via USB; online technical support |
| Warranty | 12-month limited |
Frequently Asked Questions - Video Assist 4K digital video recorder Blackmagic Design
User questions about Video Assist 4K digital video recorder Blackmagic Design
0 question about this device. Answer the ones you know or ask your own.
Ask a new question about this device
Download the instructions for your Voice recorder in PDF format for free! Find your manual Video Assist 4K digital video recorder - Blackmagic Design and take your electronic device back in hand. On this page are published all the documents necessary for the use of your device. Video Assist 4K digital video recorder by Blackmagic Design.
USER MANUAL Video Assist 4K digital video recorder Blackmagic Design
Installation and Operation Manual
Blackmagic Video Assist
November 2017
English,日本語,Francais,Deutsch,Espanol 中文,法国,Pysckn,ItalianoandPortugues.
Languages
To go directly to your preferred language, simply click on the hyperlinks listed in the contents below.
English 3
日本語 60
Français 118
Deutsch 176
Espanol 234
中文 292
350
Pycckn 408.
Italiano 466
Portugués 524

Welcome!
Thank you for purchasing your Blackmagic Video Assist.
We are extremely excited to have designed the Blackmagic Video Assist family of products. We think they are the perfect solution to help you shoot better video on any type of camera. Your video assist combines the best of our monitoring and recording technologies for on set monitoring and professional recording into easy to use very compact products.
Blackmagic Video Assist models can be mounted on your camera, or with the underside fold out stand you can use them on a desk for general deck and monitoring use. That's perfect for use as a master recorder for a live production switcher.
Blackmagic Video Assist has a 6G-SDI input so it will monitor Ultra HD. Blackmagic Video Assist 4K records Ultra HD on two SD cards for continuous recording and is also a powerful audio recorder, so you can mix analog audio into the SDI or HDMI recording. Your video assist is a very versatile monitor and recorder that you can use with any camera and on any project.
This instruction manual contains all the information you need to start using your video assist.
Please check the support page on our website at www.blackmagicdesign.com for the latest version of this manual and for updates to your video assist's software. Keeping your software up to date will ensure you get all the latest features! When downloading software, please register with your information so we can keep you updated when new software is released. We are continually working on new features and improvements, so we would love to hear from you!

Grant Petty
CEO Blackmagic Design
Contents
Blackmagic Video Assist
Getting Started 5 Using DaVinci Resolve 36
Plugging in Power 5 Importing your Clips 37
Plugging in Video 6 Editing your Clips 37
Plugging in Audio 6 Trimming Clips 39
Inserting SD Cards 7 Mapping Keyboard Shortcuts 39
Recording Adding Transitions 8 40
Remote Control via the LANC Connector 8 Adding Titles 41
Continuous Recording 8 Color Correcting your Clips 42
Recording Clean HDMI Using Scopes 43
from DSLR Cameras 9 Secondary Color Correction 45
Playback Qualifying a Color 9 45
Settings Adding a Power Window 46
Changing Settings using the Tracking a Window 47
Touchscreen 10 Using Plugins 47
Volume and Analog Audio Levels 17 Mixing Your Audio 48
Storage, Monitor, Display, The Fairlight Page 49
Audio and Setup Settings 18 The Audio Timeline 49
Monitoring using on screen meters 23 What is a Bus? 50
Video Scopes 24 The Mixer 50
About SD Cards 29 Using the Equalizer to
Choosing a Fast SD Card 29 Enhance your Audio 51
formatting SD Cards Mastering your Edit 53
Post Production Workflow 54
Working with Files from SD Cards 32 Working with 3rd Party Software 54
Checking Disk Speed 33 Using Final Cut Pro X 54
Blackmagic Video Assist Setup 33 Using Avid Media Composer 55
Video Settings 34
About Settings 34
Changing the Language 34
Updating the Internal Software 35 Warranty 59
Getting Started
Plugging in Power
Getting started with your video assist is as simple as plugging in power, connecting your video source, plugging in your audio and inserting an SD card.
This section shows you how to get started including:
Plugging in Power
Plugging in Video
Plugging in Audio
Inserting SD cards
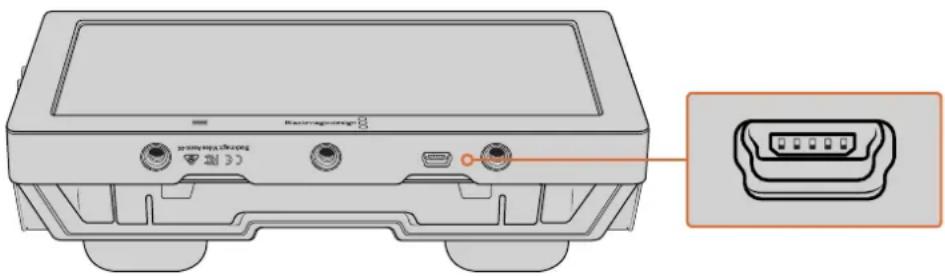
To supply power, plug in the supplied power adapter to your video assist's power input on the right side panel.
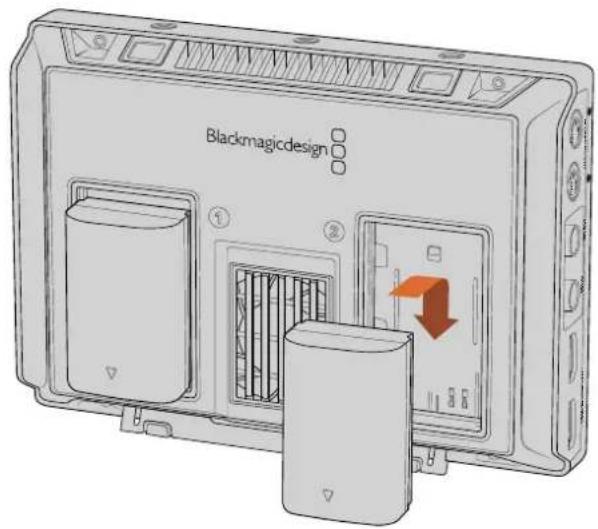
With external power connected, you can also charge two LP-E6 type Lithium-Ion batteries, which can be mounted to battery slots 1 and 2 on the back panel. To plug an LP-E6 type battery into your video assist, gently press the battery against the inside top edge of the battery slot, then slide the battery down against the back panel until you feel it click and lock into place. Press the battery release button on the top panel to remove a battery. For more information on battery use and how to monitor the battery power remaining, refer to the 'settings' section in this manual.
To power on the unit, press the power button on the right side panel. Press and hold to power off.
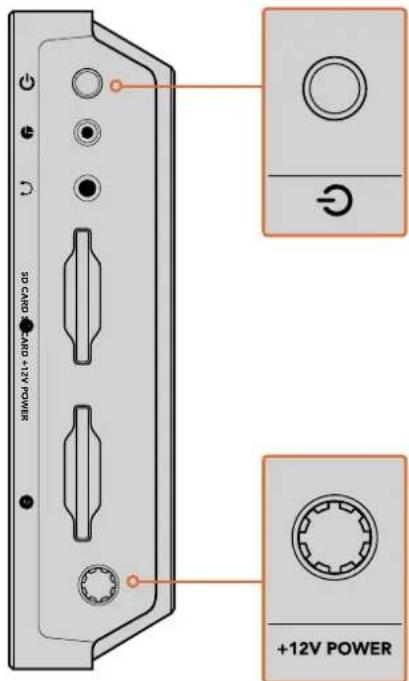
Connect external power to the +12V power input. Press the power button to turn the unit on.
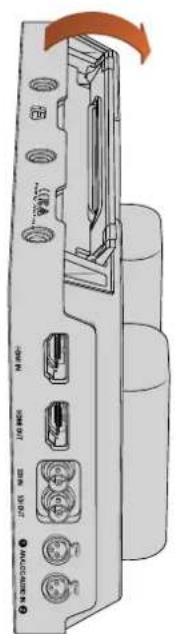
A kickstand is provided so you can mount the unit on your desk. Simply lift the edge of the stand and gently swing it into the open position.
Your video assist uses common LP-E6 type batteries.
Plugging in Video
The next step is to plug your SDI or HDMI source video into the Mini BNC, BNC or HDMI input. The unit will auto detect the SDI or HDMI input depending on what you connect first. Mini BNC to regular BNC cables can be purchased from your nearest professional video equipment stores. Mini BNC connectors are also commonly known as DIN 1.0/2.3 connectors.
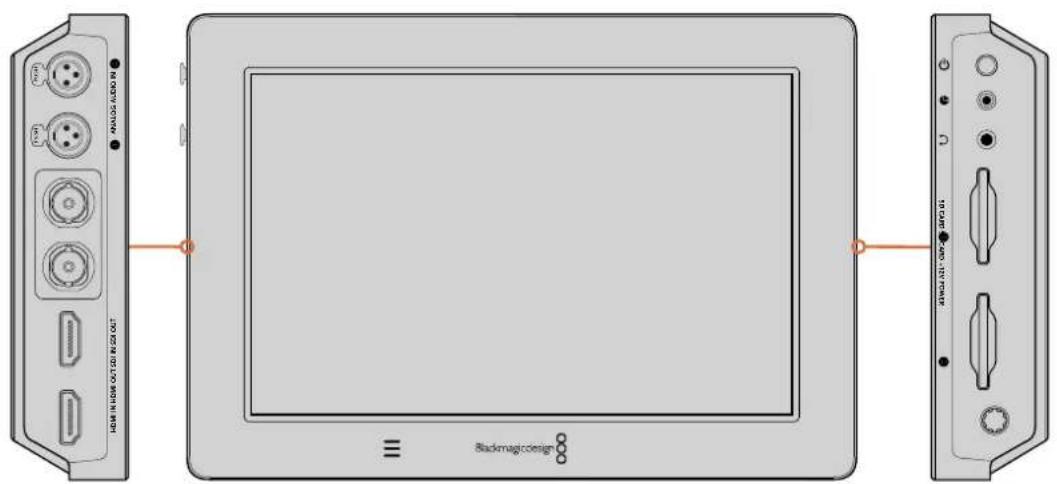
Connect your source video to the SDI or HDMI input on the left side. Connect an HDMI TV or SDI monitor by plugging into the HDMI or SDI output. You can listen to the audio on your clips during recording and playback by plugging a headset into the headset jack. On Blackmagic Video Assist 4K you can also listen to your audio during playback via the built in speaker below the LCD.
Plugging in Audio
When plugging in your video, audio is also connected as it's embedded in the SDI or HDMI video signal. However, Blackmagic Video Assist 4K also has built in mini XLR connectors so you can plug in external balanced analog audio as well.
NOTE On Blackmagic Video Assist 4K you can set the audio settings to record analog channels 1 and 2, or choose one channel analog audio and one channel SDI or HDMI audio, depending on your source video. For more information about analog audio and adjusting levels refer to 'Audio Settings' in the 'Settings' section.
Inserting SD Cards
To start recording clips, you need to insert a compatible SD card.
For high quality HD recording, we recommend high speed UHS-I SD cards. However, if you are recording standard definition or lower bit rate, lower quality compression you might be able to use slower cards. Generally the faster the cards, the better.
If you are recording Ultra HD on Blackmagic Video Assist 4K, then we recommend high speed UHS-II type SD cards. These cards need to be capable of write speeds above 110MB/s for recording up to Ultra HD 2160p30. Blackmagic Video Assist 4K also has two SD card slots. You can record to either one, or insert two SD cards for continuous recording or fast media change overs.
Before using your cards, you will need to format them to either HFS+ or exFAT formats. It's easy to format your media via the 'storage' settings. Refer to the 'settings' section for more information on storage settings.
If you want to, you can format your cards using a Mac OS or Windows computer. When using your media on Mac OS then you can use HFS+ which is the Mac disk format. If you are using Windows then you should use exFAT format, which is the Windows disk format and Mac OS computers can also read exFAT format.
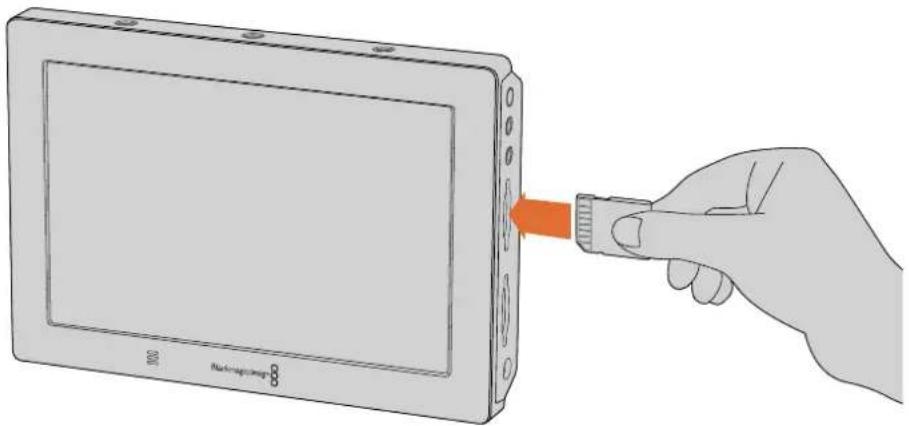
To plug in an SD card:
1 Hold the card with gold connectors facing the LCD and align it with the SD card slot.
Gently push the card into the slot until you feel it lock firmly into place.
To remove the card, gently push until you feel it click, then release. The card will eject a short distance, allowing you to hold the edge of the card and remove it from the slot.
To start recording you'll need to insert an HFS+ or exFAT formatted UHS-I or UHS-II SD card. You can easily format your SD card using the 'storage' settings in the touchscreen menu.
That's all there is to getting started. With power, video and a formatted SD card you can now start recording!
Recording
To start recording straight away, simply swipe the touchscreen up or down to reveal the on screen display, then tap the circular 'record' icon at the bottom of the LCD. The 'record' icon will become a square 'stop' icon during recording. Tap the stop icon to stop recording.
While recording, the timecode counter in the status strip will continuously update, showing you the duration of your clip. When the on screen display is hidden on your video assistant, a small record indicator will be displayed at the bottom of the LCD so you can easily confirm you're recording.
You can record your clips to QuickTime files using Apple ProRes and Avid DNx codecs.
You can also set your video assist to use 'timecode' or 'SDI/HDMI start/stop' trigger recording. This lets you start and stop recording triggered by information received via the HD-SDI or HDMI signal. For information on how to set your chosen codec, or to enable trigger recording, refer to the 'settings' section in this manual.

To start recording, simply swipe the touchscreen up or down to reveal the on screen meters, then tap the 'record' icon. Tap again to stop recording.
NOTE When recording from an HDMI or SDI camera, make sure the output is clean with overlays turned off as any overlays that are present in your camera's video output will be recorded with your image. Please refer to the section titled 'recording clean HDMI from DSLR cameras' for more information.
Remote Control via the LANC Connector
On Blackmagic Video Assist 4K you can start and stop recording remotely using an external LANC controller. Simply plug the LANC controller into the 2.5mm LANC input on the right side of the unit.
Continuous Recording
Blackmagic Video Assist 4K supports continuous recording using 2 SD card slots. If you are recording an important event and you don't want to stop recording, simply insert a formatted SD card in slot 2. When the first card is full, your video assist will automatically switch over to the second card. There will be no frames dropped in the process. For example, if the first segment on card 1 stopped at 00:40:01:00, the recording on the second card will start at 00:40:01:01.
When editing your clips on the timeline, simply place the second clip against the tail of the first and they will play through the recording as if it is one complete clip.
Having SD cards inserted in both slots also lets you quickly change media. If you want to stop recording at a defined moment, you can simply stop recording, choose 'card 2' in the storage settings, then tap record again.
TIP For continuous recording or fast slot change overs using Blackmagic Video Assist 4K, make sure your cards are formatted before you start your recording.
Recording Clean HDMI from DSLR Cameras
Some DSLR cameras record 8-bit video internally, and some can provide a clean video image via their HDMI output. By plugging the DSLR camera's HDMI output into your video assist, you can bypass the camera's internal compression and record using high quality 10-bit ProRes or Avid DNx CODEs. Some DSLR cameras can output 10-bit 4:2:2, which is higher quality video than their internally recorded 8-bit 4:2:0 compression.
Many DSLR cameras are also limited to short recording durations, so an added benefit of recording externally is bypassing these recording limitations. This is particularly helpful when recording live events or interviews for documentaries.
To make the most of this feature, you will need to set your camera to output a clean image with overlays turned off. This is normally done by changing your DSLR camera's HDMI output settings so it does not show any status information in the video signal. This is important because if there are any overlays visible in your image via the HDMI output they will be recorded in your video, which you probably don't want.
To check the DSLR camera overlays are not visible:
1 Swipe the touchscreen up or down to hide the on screen meters so you can monitor only your DSLR camera's image. On Blackmagic Video Assist 4K the status display at the top of the LCD is independent and separate from the image. This means you can monitor the entire image cleanly and still have the status display visible.
2 With the on screen meters hidden, carefully check the DSLR camera's output video does not show any information other than your clean video image. If you can see camera overlays on your video assist's LCD, change the HDMI output or display menu settings on your camera so HDMI overlays are turned off.
With a clean HDMI output from your camera you can now record better quality video!
Playback
Swipe the touchscreen up or down to reveal the on screen meters, then tap the playback transport control icons at the bottom of the LCD.

To play your clips, tap the 'play' icon.

During playback, tap the 'pause' icon to momentarily 'freeze' the playback on a frame of video. Tap again to resume playback.

You can skip backwards or forwards through your clips by repeatedly tapping the forward or reverse skip icons. Tapping reverse skip once will restart the current clip.
During playback you can scrub your clip forwards or backwards by dragging the scrubbing slider left or right. Tap the LCD to reveal or hide the slider.
Looping playback

Tap the loop icon once to set your video assist to play back the current clip on a continuous loop.

Tap again to play all your recorded clips on a continuous loop.

Tap a third time to turn loop off.
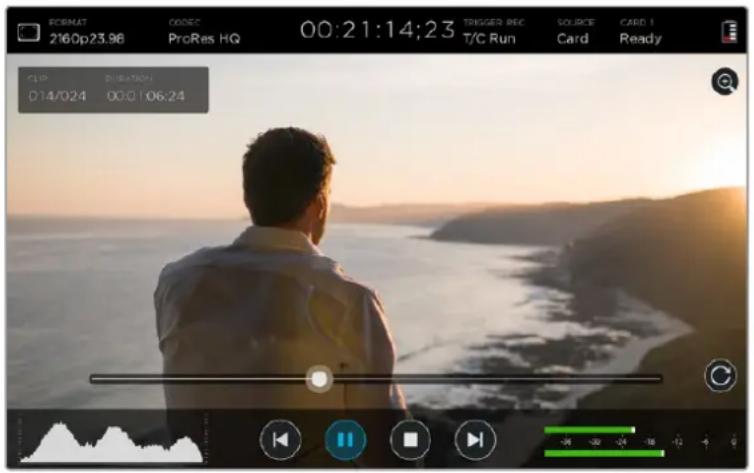
Shuttle through your clip by dragging the scrubbing slider forwards or backwards. During playback mode, a panel will appear near the top left corner of the screen. This panel displays the number of clips recorded on your SD card, the current clip being played and the duration of the clip.
Settings
Changing Settings using the Touchscreen
Your video assist features a built in touchscreen. The touchscreen is used to monitor your video and audio, plus change settings.
You can change most settings by tapping on the icons in the status strip at the top of the LCD. Audio settings, such as levels adjustment or headphone volume, can be adjusted by swiping the touchscreen up or down to reveal the on screen meters at the bottom of the LCD, then tapping the audio meters.
Tap outside of the settings to hide a settings window. Swipe left or right, or tap the 'back' icon to hide the storage settings.
To change settings:
1 Tap the setting you wish to change in the status strip or on screen meters.
For example, if you want to set the recording codec, tap the codec indicator in the status strip to open the codec settings. If you want to adjust audio levels, simply tap on the audio meters.
2 In your chosen settings window, tap the menu buttons, arrows or slider icons to choose from the available settings. Tap outside the window to close the settings.
Overlays

Tap the overlays icon to open the zebra, focus peaking, guides and grid settings.
These settings let you display overlays on the LCD to help with exposure, focus, composition and framing when connected to a camera.
Overlay features are not visible via the SDI or HDMI output.
Zebra
The zebra feature helps you achieve optimum exposure by displaying diagonal lines over areas of the video that exceed your set zebra level. For example, if you set the zebra level to 100% , you'll know that any area of the image displaying the zebra pattern will be clipped. If you set the zebra to 90% , you can feel confident that you have some extra exposure headroom to protect the highlights in your shot.
TIP You can also set the zebra to highlight areas of your image that represent specific video levels on a waveform, for example setting the zebra for 50% means you can visually identify which regions of your image will appear at approximately 50% on a waveform scope.
To turn the zebra feature on and change the zebra level, tap the left and right arrows or drag the slider in the 'zebra' setting.
Focus Peaking and Focus Assist
Focus peaking and focus assist settings give you powerful tools to help focus your images fast. Focus peaking displays edge lines on the sharpest areas of the image. Sensitivity settings let you change how strong the lines are.
To turn edge lines on and change the sensitivity settings, tap the left and right arrows or drag the slider left or right. Sensitivity levels include 'low', 'medium' or 'high'. In images with lots of detail and high contrast, the lines can be distracting, so in these conditions you can select 'low' or 'medium'. Alternatively, for low contrast shots with less detail, select 'high' so the lines are stronger and easier to see.
Changing the color of the edge lines can also make them easier to see in conditions where their color may match the image. To change the color, simply tap the left and right arrows in the 'focus line color' setting.
Edge lines are extremely effective. They can be so pronounced that you can even monitor the depth of your focal plane, plus watch it move closer or further into your shot as you adjust your camera's focus ring.
For more information on selecting focus assist tools, refer to the 'monitor settings' section in this manual.
Guides
The frame guides feature provides aspect ratio overlays for various cinema, television and online standards. Tap the 'guides' menu button, then tap the left or right arrows, or drag the slider icon left or right to choose a guide or to turn the guides off.
You can choose from the following frame guides:
HDTV
Displays action and title safe regions of your image within a 1.78:1 aspect ratio compatible with 16:9 HD television and computer screens.
4:3
Displays the 4:3 aspect ratio compatible with SD television screens, or to help frame shots when using 2 × anamorphic adapters.
2.40:1, 2.39:1 and 2.35:1
Displays the broad widescreen aspect ratio compatible with anamorphic or flat widenscreen cinema presentation. The three widenscreen settings differ slightly based on the changing cinema standards over time. 2.39:1 is one of the most prominent standards in use today.
1.85:1
Displays another common flat widescreen cinema aspect ratio. This ratio is slightly wider than HDTV, but not as wide as 2.39:1.
Grid
The grid feature displays a 'thirds' overlay with two vertical and horizontal lines placed in each third of the image. Tap 'on' or 'off' to view or hide the thirds overlay.
Thirds are an extremely powerful tool to help compose your shots. For example, the human eye typically looks for action near the points where the lines intersect, so it's helpful to frame key points of interest in these zones.
TIP An actor's eyeline is commonly framed along the top third of the screen, so you can use the top horizontal third to guide your framing. Thirds are also useful to maintain framing consistency between shots.
2.39:1 frame guides are useful for framing shots to suit a popular flat widenscreen cinema format.
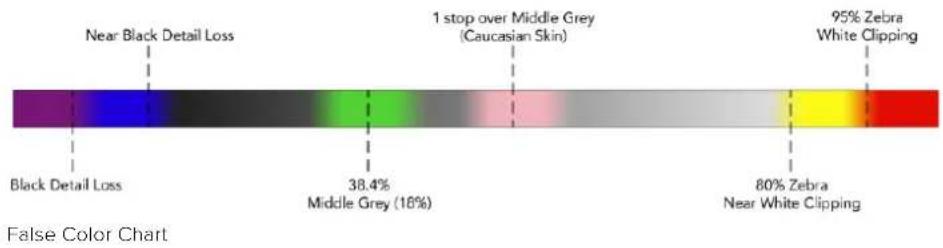
False Color
The false color feature displays color overlays on your image that represent exposure values. The color values correspond to optimum exposure settings, for example pink for Caucasian skin tones and green for 38.4% middle grey. False color is also helpful to know when shadows and highlights are near clipping or clipping.
With a range of tonal values on the LCD at once, this gives you a broader overview of your exposure which you can use to refine lighting on set, or make exposure changes to compensate.
We have included a chart in this section that shows how the colors correspond to specific tonal values.
Video Format and Frame Rate
Input video resolution and frame rate is displayed in the 'Format' section of the status strip. For example, 2160p29.97, 2160p25, 1080p59.94, etc.
The following video input and output formats are supported:
Supported Input and Output Formats
| 6G-SDI Input and Output |
| 525i59.94 NTSC, 625i50 PAL |
| 720p50, 720p59.94, 720p60 |
| 1080PsF23.98, 1080PsF24 |
| 1080i50, 1080i59.94, 1080i60 |
| 1080p23.98, 1080p24, 1080p25, 1080p29.97, 1080p30, 1080p50, 1080p59.94, 1080p60 |
| 2160p23.98, 2160p24, 2160p25, 2160p29.97, 2160p30 |
| HDMI Input and Output |
| 525i59.94 NTSC, 625i50 PAL |
| 720p50, 720p59.94, 720p60 |
| 1080i50, 1080i59.94, 1080i60 |
| 1080p23.98, 1080p24, 1080p25, 1080p29.97, 1080p30, 1080p50, 1080p60, 1080p60 |
| 2160p23.98, 2160p24, 2160p25, 2160p29.97, 2160p30 (Blackmagic Video Assist 4K) |
Codec
Tap the 'codec' indicator to open the relevant settings, then tap the arrow icons or slider to make your selection. The codecs available depend on the model you are using. For example, both models can record HD video to Apple ProRes and Avid DNxHD codecs with a range of bit rates. Blackmagic Video Assist 4K also lets you choose ProRes and DNxHR codecs for Ultra HD recording.
ProRes codecs are recorded as QuickTime files. DNx files can be recorded as QuickTime or native MXF files. Refer to the table in this section for more details regarding the codec options.
Supported Codes
Clips are recorded as QuickTime files except for DNx MXF files where MXF appears in the codec name.
| Blackmagic Video Assist Blackmagic Video Assist 4K | ||
| Codecis Bit Depth Codecis Bit Depth | ||
| ProRes 422 HQ 10 ProRes 422 HQ 10 | ||
| ProRes 422 10 ProRes 422 10 | ||
| ProRes 422 LT 10 ProRes 422 LT 10 | ||
| ProRes Proxy 10 ProRes Proxy 10 | ||
| DNxHD 220x 10 DNxHD 220x 10 | ||
| DNxHD 145 8 DNxHD 145 8 | ||
| DNxHD 45 8 DNxHD 45 8 | ||
| DNxHD 220x MXF 10 DNxHR HQX 10 | ||
| DNxHD 145 MXF 8 DNxHR SQ | ||
| DNxHD 45 MXF 8 DNxHR LB | ||
| - | - DNxHD 220x MXF 10 | |
| - | - DNxHD 145 MXF 8 | |
| - | - DNxHD 45 MXF 8 | |
| - | - DNxHR HQX MXF 10 | |
| - | - DNxHR SQ MXF 8 | |
| - | - DNxHR LB MXF 8 | |
Timecode
The timecode counter displays the duration of your clips in hours:minutes:seconds:frames.
Trigger Record
Tap the 'trigger record' indicator to select between timecode run or SDI/HDMI trigger recording. This lets you start and stop recording triggered by information received over the SDI or HDMI connection. To disable trigger recording, select 'never'.
T/C Run
When timecode run is selected, your video assist will start recording as soon as it detects running timecode from your SDI or HDMI source. Recording will stop when the timecode has ceased. This feature is useful when connecting cameras that don't support SDI start/stop trigger recording. You may need to set your camera's timecode setting to 'record run' to make sure timecode only runs while your camera is recording. If your camera's timecode is set differently, for example time of day timecode, the timecode is always running and will continuously trigger the recording on your video assistant.
SDI/HDMI
This setting will set your video assist to start and stop recording when you press the record start and stop button on your camera. For SDI/HDMI start/stop trigger recording you will need to use a camera that can trigger the record function via HD-SDI or HDMI. Cameras which support trigger recording may include menu options such as 'trigger rec', HD-SDI remote I/F' or 'SDI remote start/stop trigger'.

Source
Displays the connected SDI or HDMI input source. The unit will use the first source connected. If you have another source connected, your video assist will swap over to the other if the signal from the original source is lost for a brief period of time. This can be useful for redundancy if you need to run a back up signal.

Card
Displays the status of the SD card currently selected in the storage settings.
Blackmagic Video Assist 4K has 2 SD card slots. To choose a card to record to:
1 Tap the 'card' status or swipe the touchscreen left or right to open the 'storage' settings.
2 In the storage settings simply tap the 'card 1' or 'card 2' icon near the top left of the touchscreen.
You can also format your cards in the storage settings by tapping the 'format card' icon underneath the information for each card.
Below is a list of the different indicators that may appear in the card status. The status indicators are:
Loading
When inserting an SD card, the indicator will display 'loading' to let you know the unit is verifying your card.
Ready
When a formatted SD card is verified, the status will display 'ready' to indicate your card is ready to record.
Format
If your SD card needs to be initialized, the indicator will flash 'format' to prompt you to format the card. Tap the 'card' indicator or swipe the touchscreen left or right to open the 'storage' settings where you can format your card. For more information refer to the 'about SD cards' section.
No card
This indicator is displayed when there is no card inserted in the selected SD card slot.
Card full
The 'card full' indicator will flash for approximately three minutes prior to stopping record when an SD card has used its maximum recording space.
When your card is full, the indicator will turn solid red and the recording will stop. Your video assist will then save the last recorded file.
If you have a formatted card in slot 2 of Blackmagic Video Assist 4K, the unit will automatically switch over to slot 2 and continue recording to your second card.
Record Time Remaining
While in playback mode, the status indicator will display the record time remaining for your SD card.
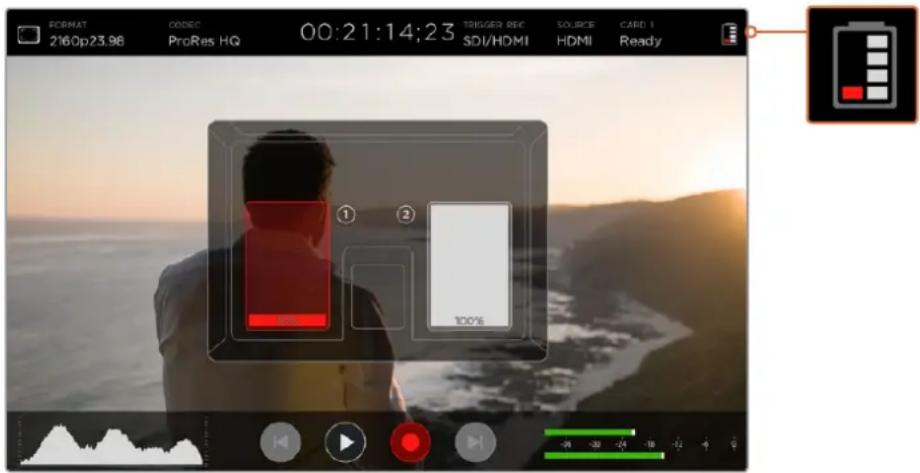
Battery Level Remaining
Displays the amount of power remaining in your batteries. Tap the battery icon to open a larger display with more precise information about your battery levels.
During operation, your video assist will use the battery with the lowest charge first, then swap over to the other when depleted without interruption. When recharging batteries, both will charge simultaneously. Batteries will take approximately 3 hours to fully charge when not in use depending on battery type and conditions.
On Blackmagic Video Assist, two fully charged Canon LP-E6 batteries will supply power for approximately 180 minutes of record time. Blackmagic Video Assist 4K will run on two fully charged batteries for approximately 80 minutes of record time.
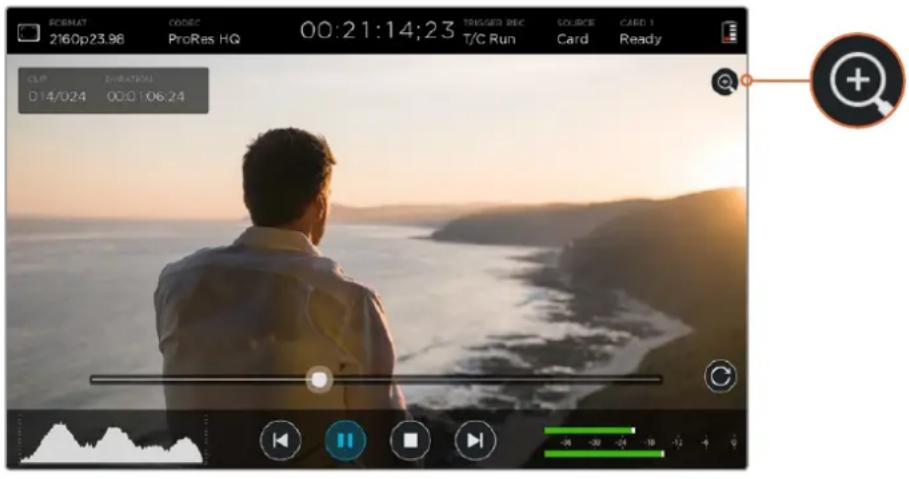
Zoom
The zoom feature lets you zoom into your image so you can carefully check your focus when connected to a camera, or study fine details in your video image. The zoom feature can be used when framing a shot before recording, or during playback, but is disabled while recording a clip.
To turn the zoom feature on, simply tap the zoom icon located underneath the battery level remaining indicator. To turn zoom off, tap the icon again. The zoom feature can be used when monitoring Ultra HD or HD video.
Volume and Analog Audio Levels
Speaker Volume
To adjust the volume for the built in speaker on Blackmagic Video Assist 4K, swipe the LCD up or down to reveal the on screen meters, then tap the audio meters to open the volume and analog audio level settings. Simply drag the volume slider to increase or decrease the volume.
TIP To avoid potential feedback when a microphone is connected, the speaker is enabled during playback, but is disabled while your Blackmagic Video Assist 4K is recording or monitoring the video input.
Headphone Volume
To adjust the headphone volume, simply tap on the audio meters at the bottom right of the on screen display. On Blackmagic Video Assist 4K, the speaker volume setting will change to 'headphone' as soon as you plug in a pair of headphones, then you can adjust the volume just as you would for the speaker volume.
Analog Audio levels
On Blackmagic Video Assist 4K, analog audio levels via the XLR inputs can be adjusted by dragging the sliders for each input. The level range you can adjust on each input is +10dB to +65dB.

To record optimum audio without clipping, adjust the sliders on each input until the levels are peaking between -20 and -12dBFS on the XLR input audio meters.
Refer to the 'monitoring using on screen meters' section for more information.
Storage, Monitor, Display, Audio and Setup Settings
Swipe the touchscreen left or right to open additional settings and information. Here you can monitor storage information for your SD card, format your card, adjust monitor and display settings, plus change the date and time. On Blackmagic Video Assist 4K, you can also adjust audio settings. To hide the settings and return to your video image, swipe left or right, or tap the 'back' icon at the bottom left corner on Blackmagic Video Assist 4K.
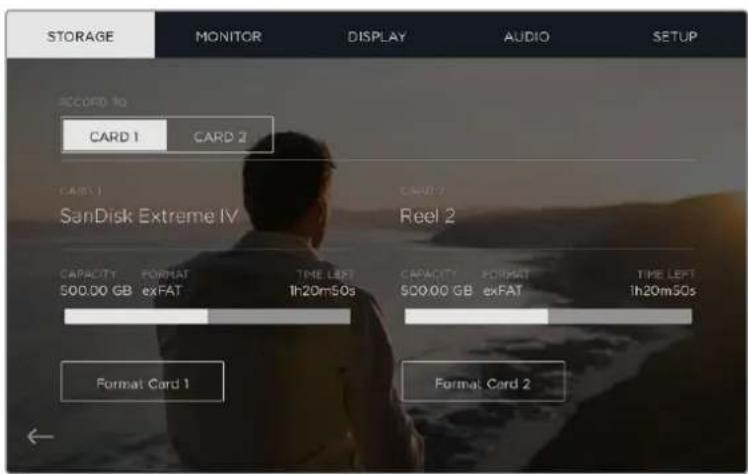
Storage Settings
The storage settings let you monitor the capacity of your inserted SD cards, format type, for example HFS+ or exFAT, and the amount of free space available. You can also format your cards directly using your video assist. For information on formatting SD cards, refer to the 'about SD cards' section.
Monitor Settings
In the monitor settings, you can choose from two different types of focus assist tools, enable anamorphic de-squeeze and blue only, plus change the rotation of the display based on the physical positioning of the unit.
Focus Assist
Select 'lines' to display colored outlines around sharp areas of the image, or 'peaking' to display exaggerated sharpening detail around the areas of the image that are in focus.
Focus Line Color
This setting lets you change the color of the focus assist lines to green, red, blue, or white. Changing the color of the focus assist lines can help make them easier to see against similar colors in your image.
Anamorphic De-squeeze
Blackmagic Video Assist 4K features an 'anamorphic de-squeeze' setting. This allows you to correctly display horizontally 'squeezed' images from a camera using an anamorphic lens. The de-squeeze amount required to correct your image will vary, as each anamorphic lens has a different squeeze factor. You can select the de-squeeze amount of 1.33x , 1.66x , 2x to correspond with the level of squeeze on different anamorphic lenses. Select 'off' to disable the setting.
Screen Rotation
If you want to disable the automatic display rotation, simply set this setting to 'none'. Now the display will stay locked to the current position even if you turn it upside down.
You can also set the display to flip 180^ . This will keep it locked to that position and is helpful when the unit is mounted to a camera rig in an upside down position.
To enable the automatic screen rotation, select 'auto'.
Blue Only
Blackmagic Video Assist 4K features a 'blue only' mode that displays only the blue channel, represented as a black and white image. If there is noise in a digital video signal, it is most visible within the blue channel, so you can easily check for noise by using this feature. The black and white image can also be used for assistance when checking camera focus. To enable 'blue only' mode, select 'on'.
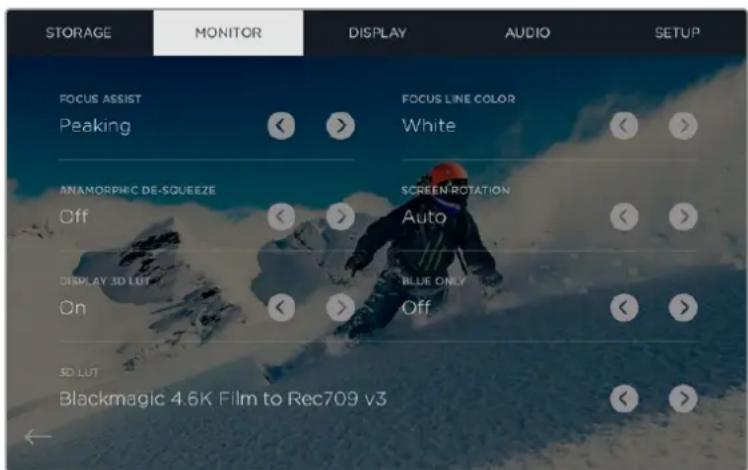
Set the 'Display 3D LUT' setting to 'on' and tap the left or right arrows in the '3D LUT' setting to select which 3D LUT to display when monitoring your input source or during playback
Display 3D LUT
Your video assist can display the input video with 3D LUTs applied to the image. A 3D LUT is only used on the display and not actually recorded into the video itself, so you don't need to worry that your recorded image will have the look permanently applied. However, if you want to apply the same LUT to your image in DaVinci Resolve, you can simply import the exact same LUT .cube file used in your video assist into DaVinci Resolve and apply it to your grade.
This gives you powerful options such as matching a look in post that you monitored on set, or conforming to a specific color profile. Refer to the DaVinci Resolve instruction manual for more information on how to use 3D LUTs in your color correction, including exporting LUTs as .cube files so you can import them into your video assist.
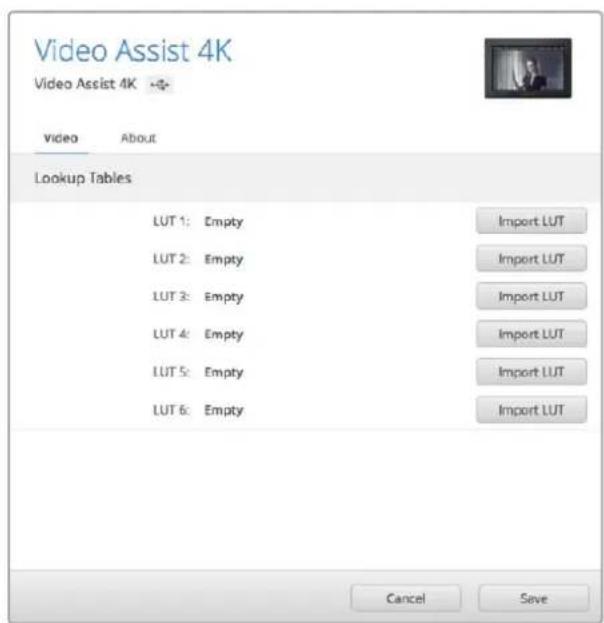
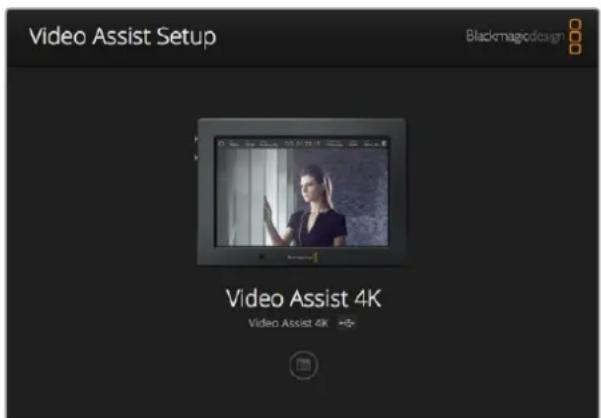
You can import up to six 3D LUTs using the Blackmagic Video Assist Setup software utility.
To import a 3D LUT:
1 Connect your video assist to a computer with Blackmagic Video Assist Setup installed.
2 Launch the setup software and open the settings for your video assist by clicking on the circular settings icon.
3 In the 'video' tab, you will see 6 empty slots you can use to import 3D LUTs. Simply click on the 'import LUT' button for an empty slot and choose a LUT .cube file from your computer. Click 'open' to confirm your selection.
4 Make sure you 'save' your new settings by clicking the 'save' button on the bottom right corner.
To monitor your video using LUTs:
1 Open the 'monitor' settings on your video assist by swiping left or right on the touchscreen, then tapping 'monitor' in the menu bar.
2 Turn the 'Display 3D LUT' setting to 'on' by tapping its left or right arrows. Tap again to disable the LUTs.
3 In the '3D LUT' setting, tap its left or right arrows to select the slot you imported the LUT into, or keep tapping to select a different one if you have other LUTs in different slots.
Swipe left or right, or tap the 'back' arrow at the bottom left of the touchscreen, to return to your source image. Now you can monitor your input video with the 3D LUT applied. You can even use 3D LUTs when monitoring playback.
Display Settings
Tap the 'display' setting icon to open the display settings. Here you can easily adjust the LCD brightness, contrast and saturation. Tap the setting you want to adjust, then drag the slider icon to the left or right.
Brightness
Adjusts the general brightness of the LCD. For example, if you are outside in bright conditions, increase the LCD brightness to make it easier to view.
Contrast
Increases or decreases the range between the bright and dark areas of the image. High contrast can reveal detail and depth in the image, and low contrast can make the image appear soft and flat.
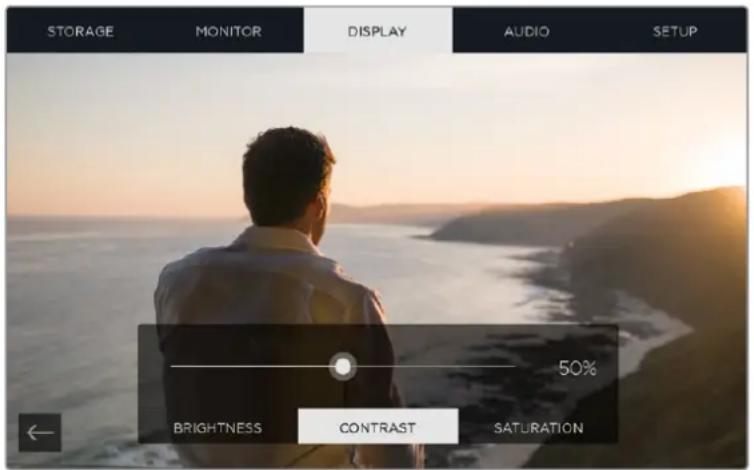
Saturation
Increases or decreases the amount of color in your displayed image.
All settings will be remembered when the unit is powered off. It's also worth mentioning that any changes to these particular settings will affect the image displayed on the LCD, but not your recorded video.
Audio Settings
Blackmagic Video Assist 4K is also a powerful audio recorder. Each XLR input has independent settings such as:
1 XLR Line, XLR Mic or Video
When connecting professional audio equipment other than microphones to the analog XLR inputs, make sure you set the recording level to 'XLR line'. Most professional audio equipment outputs 'line' level audio which is a stronger signal compared to 'mic' level.
Alternatively, when connecting microphones to the XLR inputs, set the respective input to 'XLR mic' level. This is because microphones typically output a signal that is slightly weaker in strength compared to equipment with line level output, so the signal is boosted slightly by your Blackmagic Video Assist 4K to optimize the recording level.
If you want to bypass the XLR analog inputs and maintain the embedded SDI or HDMI channels 1 and 2 from your source video, select 'video'.
NOTE Blackmagic Video Assist 4K remembers your settings even after power cycling. Make sure you reset your audio settings when changing your connections.
2 XLR Padding
If you are shooting in a noisy environment or near unpredictably loud sounds, you can set the XLR padding feature to 'on'. This will drop your audio levels down by a small amount and give you slightly more range in levels which may help you prevent clipping. If you are shooting in normal audio conditions, set this feature to 'off'.
3 Phantom Power
When connecting microphones that are not self powered, you can power them using phantom power via the XLR connector. Simply turn the setting to 'on'.
NOTE Make sure you have phantom power turned 'OFF' when using microphones that are battery powered as some battery powered microphones can be damaged when phantom power is supplied.
Setup Settings
Setup lets you set the language, set the date and time for your video assist's internal clock, plus displays the device name, and the internal software version currently installed on the unit. Video Assist also has a setting for HDMI range.
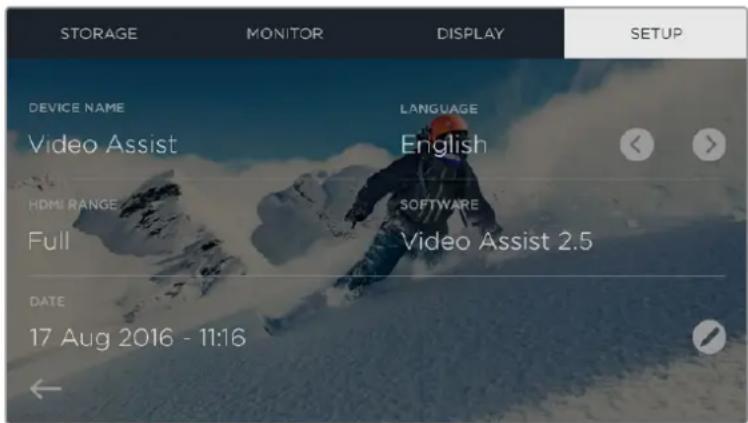
The setup settings page on Video Assist has an additional 'HDMI range' setting
Language
Tap the left or right arrows to switch between 'English' and a different language that you have loaded. Refer to 'Blackmagic Video Assist Setup' for more information.
HDMI Range
The Video Assist HD model has an HDMI range selector, which allows you to specify the type of signal being input to the unit. For an accurate display of your image, the input range you select on your Video Assist HD needs to match the output range for the signal being output from your source. For example, select 'full' when your source video is being output as full data range, or 'video' when your source video is being output as video range.
Select 'auto' if you are not sure which setting to choose, and the selection will be made automatically by the unit. Note that Blackmagic Video Assist 4K does not have this setting and selects the HDMI range automatically.
Setting the Date and time
When these settings are maintained and accurate, useful information is recorded in your clip files to inform you of the date and time each clip was recorded.
To adjust the date and time settings:
1 Tap the 'pen' icon to edit the settings.
2 Tap the day, month, year or time edit arrows to change a setting.
3 Tap 'save' to confirm the change.
Monitoring using on screen meters
Your video assist features useful on screen meters such as a histogram and audio levels meter so you can check your exposure and luminance range on cameras, plus monitor the level of your source audio.
Histogram
The left side of the on screen meters displays a histogram showing the distribution of the luminance in your video. Pure black is on the far left side of the display and pure white is on the far right of the display. When the video signal sharpens to a point at the bottom edges within these limits you'll know your shadows and highlights are not clipping, which means details in the tonal ranges of your video are preserved.
Audio Meters
The right side of the on screen meters displays audio meters showing audio levels for channels 1 and 2 of the input source. The display is calibrated to dBFS units and features peak hold indicators which stay visible for a short time so you can clearly see the maximum levels reached.
To achieve optimum audio quality, ensure your audio levels do not reach 0 dBFS. This is the maximum level, meaning that any audio that exceeds this level will be clipped, resulting in distortion. Ideally your peak audio levels should fall in the upper end of the green zone, between -20 and -12dBFS. If your peaks enter into the yellow or red zones, corresponding to -12 and -6dBFS your audio is in danger of clipping.
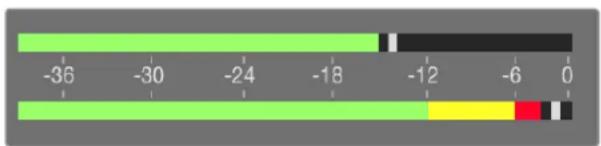
Channel 1 on top with the peak audio levels falling in the upper end of the green zone and levels in danger of clipping on channel 2

On Blackmagic Video Assist 4K, tap on the audio meters to reveal the analog audio level sliders. Drag the sliders left and right to decrease or increase the audio levels for each channel.
To adjust your analog audio levels on Blackmagic Video Assist 4K, simply tap the audio meter and then drag the sliders for each channel left or right.
NOTE To record audio plugged into the XLR connectors on Blackmagic Video Assist 4K, select 'XLR line' or 'XLR mic' in the audio settings.
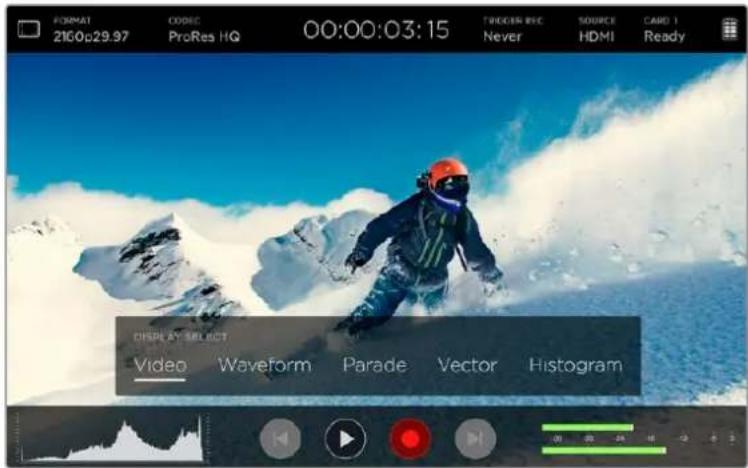
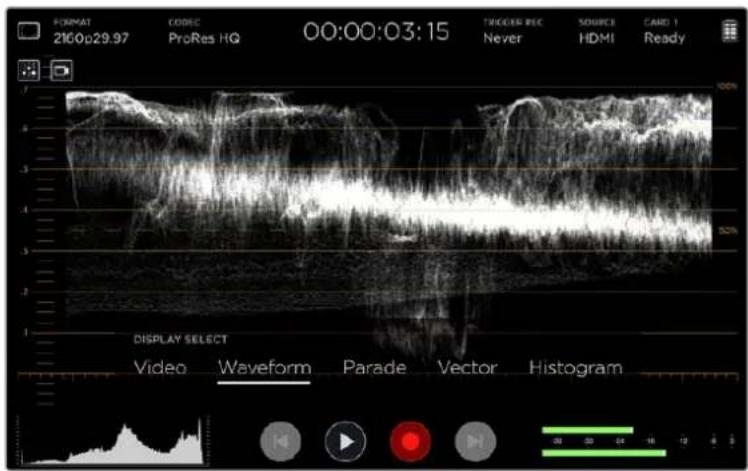
Video Scopes
Blackmagic Video Assist 4K has a set of four real time video scopes that you can use to monitor the internal data levels of your video signal. You can choose to display a waveform, parade, vectorscope or histogram. Using these scopes you can monitor your tonal balance and check the levels of your video to avoid crushing your blacks and clipping the highlights, plus monitor any potential color cast in your clips.
Each scope provides an accurate graphical analysis of the various characteristics of the video signal, showing you the relative strength and range of individual video components including luma, chroma, saturation, hue, and the red, green, and blue channels that together, comprise the color and contrast of your video signal.
The video scopes menu bar showing the scope display options
Enabling the scopes
To access the video scopes, tap the histogram in the lower left of the screen on your Video Assist 4K. This will open the 'display select' menu bar at the bottom of the screen. From here, you can choose the scope you want, for example, waveform, parade, vectorscope or histogram. To view the video image without a scope, select 'video'.
Tap outside of the 'display select' menu bar to close the menu.
Adjusting the scopes
With a scope selected, tap inside the image to open the adjustment sliders and video icon.

The adjustment sliders and video icons
Tapping the adjustment sliders icon opens the brightness and opacity sliders on the left of screen.
The two sliders let you refine the brightness and opacity of the scope against the underlying video image.
Brightness - Adjust the brightness to make fine details in the scope graph more or less defined.
Opacity - Adjust the opacity to set the amount of transparency for the scope.
Making adjustments to both settings lets you find the perfect combination so you can monitor the video and scopes at the same time.
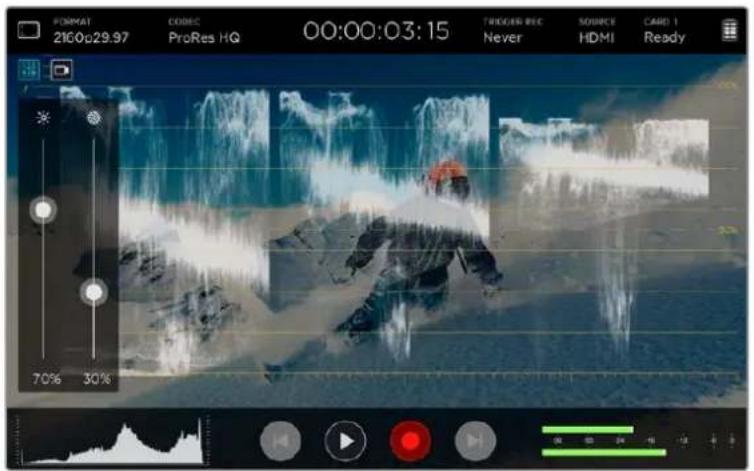
Lowering the opacity slider allows you to see the video image and the scope at the same time
Tapping the video icon displays the scopes full screen, while displaying the video image in the top right corner. This provides another option to view both scopes and the video image at the same time, but lets you study the scopes in greater detail.
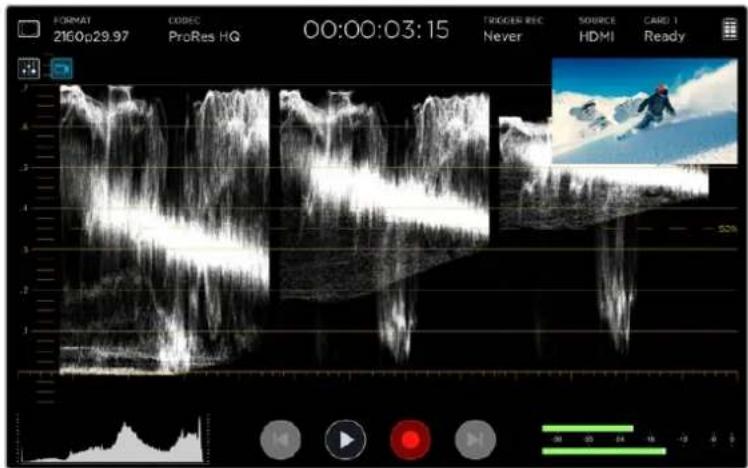
Tapping the video icon will display the scopes full screen with the video image in the top right corner of the screen
Waveform
The waveform display provides a digitally encoded waveform similar to traditional luminance waveform monitors, which is used to monitor the luma or brightness levels of your video signal.
The bottom of the graph indicates the black level, or shadows, of the image, while the top of the graph indicates the white level, or highlights. The range between the top and bottom of the graph indicates the overall contrast ratio of the image you're evaluating. Depending on your footage, your waveform will look different. If you are monitoring video which is high contrast, you might not see any values in the mid grays.
For perfect video levels without clipping, you will want to make sure the blacks in your waveform do not drop below 0% and the whites do not exceed 100% . If the levels exceed these boundaries, the video image will be clipping and you will see the results as lost detail in the shadows and highlights of your image.
The waveform monitor is a graphical representation of the image, showing luma values corresponding to the same horizontal position within the video image. For example, if filming an outdoor scene where the left side of your sky is overexposed, you will see the left side of the waveform graph above 100% .
The waveform display showing luminance values
RGB Parade
The RGB parade shows separate waveforms displaying the luminance of each red, green and blue color channel. By showing a comparison of each channel, the parade scope makes it possible to monitor the levels of each channel, plus spot color casts by comparing the highlights, midtones and shadows between each channel. For example, if the shadows are higher in the blue channel, your blacks will have a shade of blue to them.
Having the ability to see how the differences between all the tonal ranges compare within each channel gives you an extremely detailed overview of color in your image. You can immediately spot white balance issues and color casts, and because the parade scope shows a waveform for each channel, you can also see if one specific color channel is clipping, which you may not see if you are looking at a single combined waveform.
The three separate RGB waveforms follow the same principles displayed in the waveform scope, with the top, middle and bottom positions representing the highlights, mid tones and shadows along the horizontal axis of the video image.

The RGB parade displays separate waveforms displaying the luminance of the red, green and blue channels
Vectorscope
The vectorscope measures the overall range of color hue and saturation within an image. Blackmagic Video Assist 4K has a traditional vectorscope, emulating a trace drawn graph, with 100 percent color bar saturation targets positioned at the graticule markers surrounding the graph.
Heavily saturated colors in the frame stretch those parts of the graph closer to the edge, while less saturated colors remain closer to the center of the vectorscope, which represents 0 saturation. By judging how many parts of the vectorscope graph branch out at different angles, you can see how many hues there are in the image, with the specific angle of each part of the graph showing you which hues they are.
Additionally, by judging how well centered the middle of the vectorscope graph is relative to the center of the vectorscope, you can get an idea of whether there is a color imbalance in the image. For example, if the vectorscope graph is off centered, the direction in which it leans lets you know that there is a color cast or tint in your image.
While color balance can be monitored on both the RGB parade display and vectorscope display, color balance issues will often be easier to see in the vectorscope display.
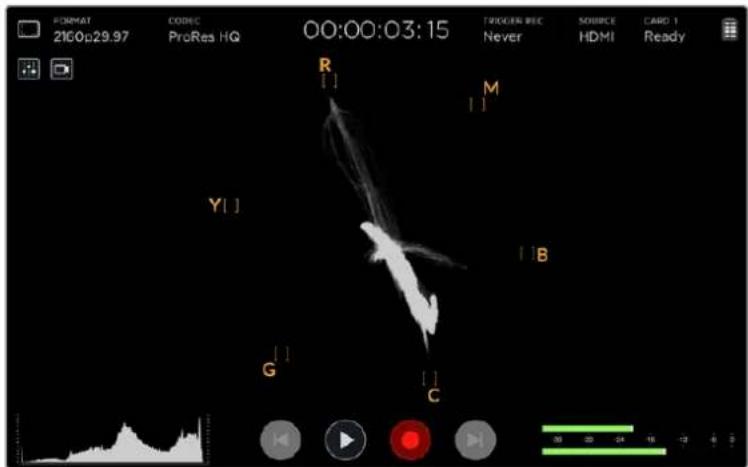
The vectorscope displays the overall range of color hue and saturation within the image
TIP When monitoring a video signal that contains skin tone, you will want to keep your warm color saturation along a line at approximately 10 o'clock on the vectorscope. This is known as the "fleshtone line" and is based on the color of blood beneath the skin's surface. The fleshtone line is therefore applicable to all skin pigmentations and is the best way to ensure the skin tones look natural.
Zooming into the Vectorscope Graph
The 'zoom' feature on the vectorscope display lets you magnify the graph so you can get a closer look at the color information in your image. This is helpful when monitoring images that are desaturated, as they can typically appear as a small cluster of data around the center of the chart.
To zoom into the vectorscope display:
1 Tap the screen to reveal the magnifying glass icon.
2 Tap the magnifying glass icon once for 2x magnification. Tap again for 4x magnification.
3 Tap a third time to return to standard viewing size.
If you want to hide the magnifying glass, simply tap outside of the icon.
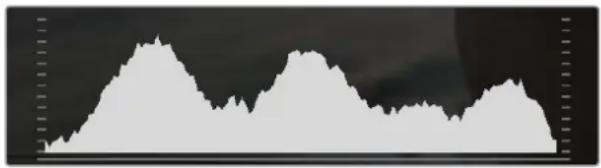
Histogram
The histogram shows the distribution of the luminance or the black to white information along a horizontal scale, and lets you monitor how close the detail is to being clipped in the blacks or whites of the video. The histogram also lets you see the effects of gamma changes in the video.
The left edge of the histogram displays shadows, or blacks, and the far right displays highlights, or whites. If monitoring the image from a camera, when you close or open the lens aperture you will notice the information in the histogram moves to the left or right accordingly. You can use this to check 'clipping' in your image shadows and highlights, and also for a quick overview of the amount of detail visible in the tonal ranges. For example, a tall and broad range of information around the middle section of the histogram corresponds to good exposure for details in the midtones of your image.
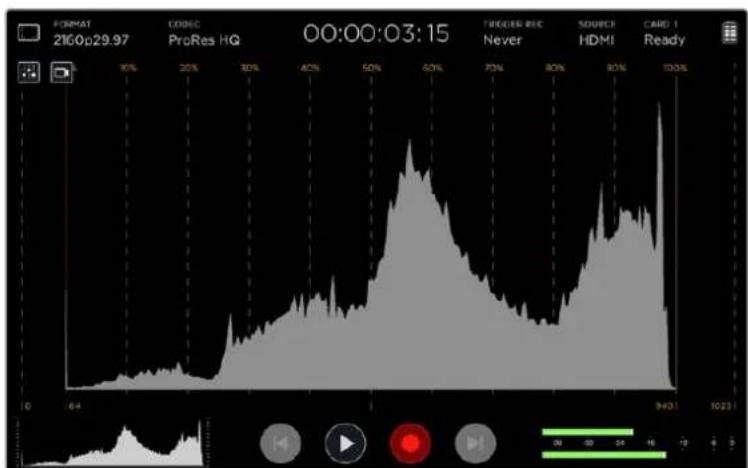
The histogram shows the distribution of the luminance, or the black to white information along a horizontal scale
Your video is likely being clipped if the information bunches to a hard edge at 0% or above 100% along the horizontal scale. Video clipping is undesirable when you are shooting, as detail in the blacks and whites must be preserved if you subsequently want to perform color correction in a controlled environment. When shooting, try to maintain your exposure so information falls off gradually at the edges of the histogram with most forming around the middle. This will give you more freedom later to adjust colors without whites and blacks appearing flat and lacking in detail.
About SD Cards
Choosing a Fast SD Card
It's important to use high speed UHS-II SD cards for Ultra HD and HD recording, or UHS-1 cards for HD recording. These cards are rated for fast data speeds and support larger storage sizes.
For Ultra HD recording on Blackmagic Video Assist 4K, you will need to use the fastest UHS-II cards available. We have included a table below that shows the latest compatible SD cards for recording Ultra HD, HD and SD video. It's worth regularly checking the latest version of this manual for more up to date information and can always be downloaded from the Blackmagic Design website at www.blackmagicdesign.com/support
The following table contains SD cards we have tested and are able to record video up to a given maximum format on Blackmagic Video Assist 4K.
Compatible SD Cards
| Maximum Supported Format Manufacturer / Model Size | ||
| Ultra HD 2160p30 Inc MXF Transcend SDXC UHS II 180MB/s 64GB | ||
| Ultra HD 2160p30 inc MXF Lexar SDXC UHSII 2000x 300MB/s 64GB | ||
| Ultra HD 2160p30 inc MXF Lexar SDHC UHSII 2000x 300MB/s 32GB | ||
| Ultra HD 2160p30 Inc MXF Toshiba Exceria Pro SDXC UHSII 64GB | ||
| Ultra HD 2160p30 Delkin Devices SD SDHC UHSII 250MB/s 32GB | ||
| Ultra HD 2160p30 SanDisk Extreme Pro SDXC UHSII 280MB/s 64GB | ||
| HD 1080p60 inc MXF SanDisk Extreme Pro UHS I 95MB/s 64GB | ||
| HD 1080p60 Lexar SDHC UHS II 1000x 150MB/s 32GB | ||
| HD 1080p60 Lexar SDXC UHS II 1000x 150MB/s 64GB | ||
| HD 1080p60 Lexar SDXC UHS II 1000x 150MB/s 128GB | ||
| HD 1080p60 Lexar SDXC UHS II 1000x 150MB/s 256GB | ||
| HD 1080p30 inc MXF Lexar SDHC UHS I 633x 95MB/s 32GB | ||
| HD 1080p30 Inc MXF Lexar SDXC UHS I 633x 95MB/s 64GB |
Most UHS-I and UHS-II SD cards should be fast enough to record compressed HD video up to 60 frames per second, however it's worth testing your card's record speed to be sure. You can do this using Blackmagic Disk Speed Test software which can be downloaded from the Blackmagic Design support center. For information on using Disk Speed Test, refer to 'checking disk speed' in this section of the manual.
Formatting SD Cards using your Video Assist
It's very easy to format your SD card using the storage settings. You can format your card using HFS+ or exFAT formats.
HFS+ is also known as Mac OS Extended. It is the recommended format as it supports "journaling". Data on journaled media is more recoverable and less likely to be corrupted. HFS+ is natively supported by Mac OS.
ExFAT is supported natively by Mac OS and Windows without needing to purchase any additional software. However, exFAT does not support journaling which means data is less protected against the rare event your media card is corrupted.
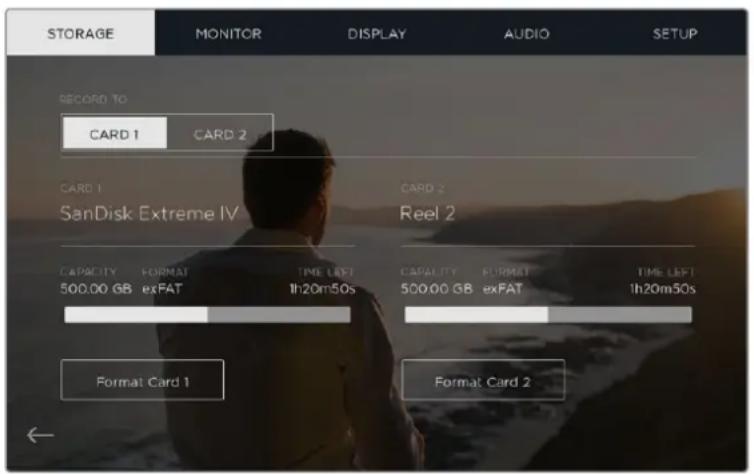
Your video assist can format your SD cards in HFS+ or exFAT formats using the 'storage' settings. Swipe the touchscreen left or right to open the 'storage' settings menu.
To format your SD card:
1 Swipe the touchscreen left or right, or tap the card status display to open the storage settings.
2 Tap the 'format card' icon. On Blackmagic Video Assist 4K, tap the icon that corresponds with your selected card. For example, 'format card 1' or 'format card 2'.
3 Tap the left and right arrows to select your desired HFS+ or exFAT format type, then tap the 'format card' icon again.
4 A warning will appear asking you to confirm the format. If your SD card contains data already recorded, make sure you back it up before formatting as this action cannot be undone. Tap 'format card' to continue, or 'cancel' to cancel the format.
5 A progress bar shows you the progress of the format. ' Formatting complete' will appear when the format is done.
6 Tap the 'ok' icon to return to the storage settings.
Formatting SD Cards using a Computer
SD cards can also be formatted using a Mac OS or Windows computer.
Preparing SD Cards on a Mac OS computer
Use the 'disk utility' application included with Mac OS to format or initialize your SD card in the HFS+ or exFAT formats. If your SD card already has files recorded on them, remember to back up your media as all data will be lost when it is formatted.
1 Plug an SD card into your computer's SD card slot or via an SD card reader.
2 Go to 'applications/utilities' and launch 'disk utility'.
3 Click on the disk icon of your SD card and then click the 'erase' tab.
4 Set the format to 'Mac OS extended (journaled)' or "exFAT".
5 Type a 'name' for the new volume and then click 'erase'. Your SD card will quickly be formatted and made ready for use.
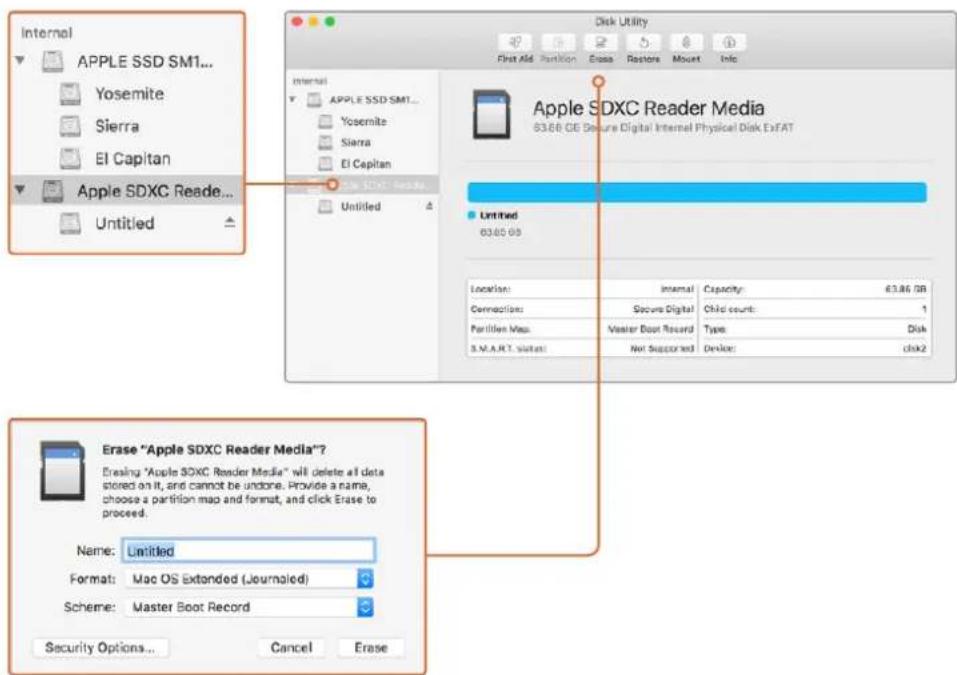
Use 'disk utility' on Mac OS to erase your SD card in the Mac OS extended (journale) or exFAT format.
Preparing SD Cards on a Windows computer
The 'format' dialog box can format an SD card in the exFAT format on a Windows PC. Remember to back up anything important from your media as all data will be lost when it is formatted.
1 Plug an SD card into your computer's SD card slot or via an SD card reader.
2 Open the 'start menu' or 'start screen' and choose 'computer'. Right-click on your SD card.
3 From the contextual menu, choose 'format'.
4 Set the file system to 'exFAT' and the allocation unit size to 128 kilobytes.
5 Type a volume label, select 'quick format' and click 'start'.
6 Your SD card will quickly be formatted and made ready for use.
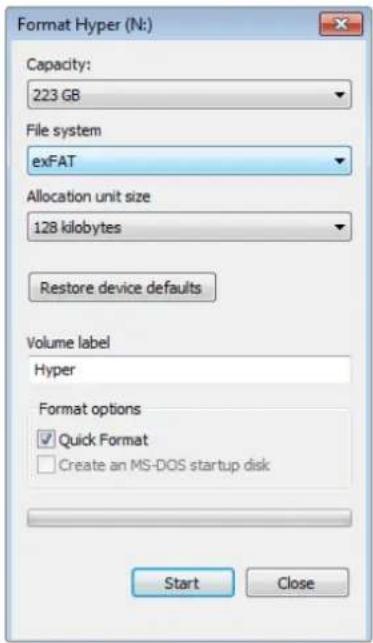
Use the 'format' dialog box feature in Windows to format your SD card in the exFAT format
Working with Files from SD Cards
You can access your ProRes or DNx files straight from your SD cards with any Mac OS or Windows computer that features an SD card slot or by using an SD card reader.
1 Remove the SD card from your video assist and insert it into the SD card slot of your computer, or SD card reader. The SD card can be accessed the same way as you would an external hard drive, USB drive or any other media storage device attached to your computer.
2 Double click on the SD card to open it and you should see a list of QuickTime or MXF movie files.
3 Now you can simply drag the files you want from the card onto your desktop or another hard drive, or you can access the files straight from the card using your NLE software.
4 Before you physically remove the SD card from the SD card slot, it's always a good idea to eject the card safely using either Mac OS or Windows first.
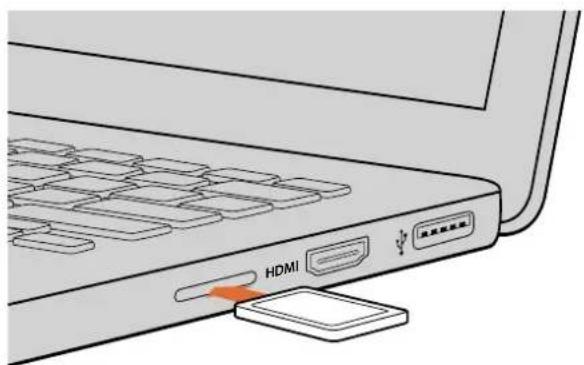
Insert your SD card into any computer with an SD card slot to access your clips immediately.
Checking Disk Speed
Blackmagic Disk Speed Test is a fun application that measures the read and write performance of storage media, then displays the results using video formats.
If you have ever wondered whether your storage media is suitable for recording ("write") or playback ("read") of a particular video format, you can use Disk Speed Test to find out. Test the performance of your media drives with a single click of the 'start' button! Disk Speed Test will even show you how many streams of video your storage is capable of handling.
Blackmagic Disk Speed Test software is available to download from the Blackmagic Design support center at www.blackmagicdesign.com/support.
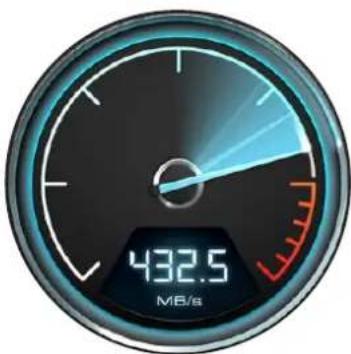
Use Blackmagic Disk Speed Test to find out the performance of your SD card.
Blackmagic Disk Speed Test interface.
Blackmagic Video Assist Setup
Blackmagic Video Assist Setup contains two configuration tabs labeled 'video' and 'about'. These tabs let you import 3D LUTs into your video assistant, change the name of the unit, and set the language of your video assistant's user interface.
The video settings let you import 3D LUTs into your video assistant
Video Settings
3D LUTs can be imported into your video assist so you can display the video with color corrected looks applied. 3D LUTs can be generated as .cube files in DaVinci Resolve and you can find more information in the DaVinci Resolve manual.
Refer to the 'storage, monitor, display, audio and setup settings' section in this manual for information on 3D LUTs and how to import them using Blackmagic Video Assist Setup.
About Settings
Use this tab to view information about your video assist such as the currently installed internal software, and the name of the unit.
To change the name, click inside the 'name' edit box and type in a new name using your computer keyboard.
Changing the Language
To change the language of your video assist's user interface, click on the current language drop down menu and select a new language you would like to use.
To confirm your selection, click 'load'. Your chosen language will now be displayed on your video assistant.
Choose a new language from the language settings drop down menu
Your video assistant's user Interface can be displayed in several different languages
Updating the Internal Software
Occasionally, updates for your video assist's internal software will be available on the Blackmagic Design website. We recommend downloading the software and updating your video assist so you can benefit from new features and improvements.
To update the internal software using Mac OS:
1 Download and unzip Blackmagic Video Assist Setup.
2 Open the resulting disk image and launch the Blackmagic Video Assist Setup Installer. Follow the onscreen instructions.
3 After installing the latest Blackmagic Video Assist Setup, connect a USB cable from your Video Assist to your computer.
4 Launch Blackmagic Video Assist Setup and follow any onscreen prompt to update the internal software. If no prompt appears, the internal software is up to date and there is nothing further you need to do.
To update the internal software using Windows:
1 Download and unzip Blackmagic Video Assist Setup.
2 You should see a Blackmagic Video Assist Setup folder containing this manual and the Blackmagic Video Assist Setup installer. Double-click the installer and follow the onscreen prompts to complete the installation.
3 After installing the latest Blackmagic Video Assist Setup, connect a USB cable from your video assist to your computer.
4 Launch Blackmagic Video Assist Setup and follow any onscreen prompt to update the internal software. If no prompt appears, the internal software is up to date and there is nothing further you need to do.
To update the internal software on your video assist, plug into your computer via the USB port, then download and launch the latest Blackmagic Video Assist Setup. Follow any on screen prompts. If no prompt appears, your internal software is already up to date.
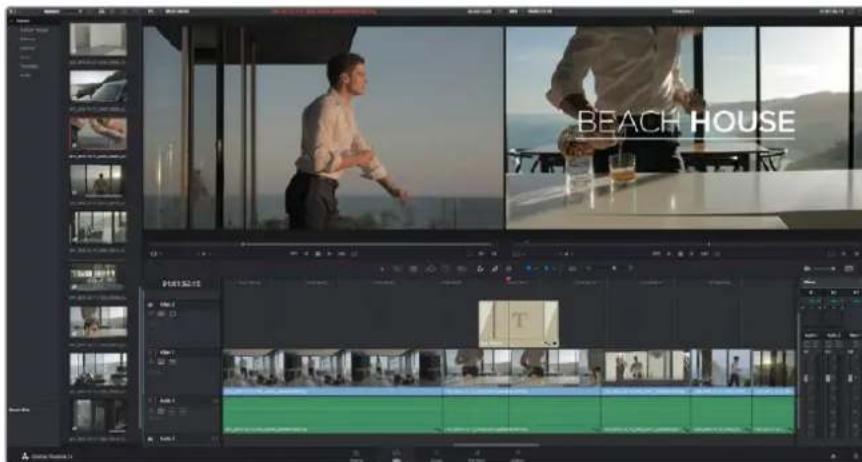
Using DaVinci Resolve
Recording clips with your video assist is only part of the process of creating film and television content, and just as important is the process of media backup and management as well as editing, color correction and encoding final master files. DaVinci Resolve for Mac OS and Windows is included with your video assist so you have a complete solution for recording and post production!

NOTE We recommend using the latest version of DaVinci Resolve for accurate color treatment of clips recorded with your Blackmagic Video Assist. For example, version 14 or later will ensure accurate color.
After connecting your SD card to your computer, you can use DaVinci Resolve's 'clone' tool, in the 'media' page, to create running backups as you shoot. This is recommended as any type of media is susceptible to becoming damaged or developing a fault so creating backups ensures your shots will be immune to loss. Once you have used DaVinci Resolve to back up your media, you can then add your clips to the DaVinci media pool, then edit, color correct, and finish your production without ever having to leave DaVinci Resolve.
DaVinci Resolve is the same tool used on most major blockbuster movies, so it's much more than a simple NLE software tool, as it has extremely advanced technology built in for high end digital film. You get the advantage of this technology when you use DaVinci Resolve to edit and color correct your work.
Included here is information on how to get started using DaVinci Resolve with your recorded clips. Of course, DaVinci Resolve is extremely advanced and includes a lot more features than you immediately see when first looking at its user interface. To learn more about how to use DaVinci Resolve, please check for the DaVinci Resolve instruction manual pdf file on the DaVinci Resolve software disk, or check online for the many training courses and tutorial videos available.
Importing your Clips
To start editing your clips, you'll first need to import them into the media pool:
Launch DaVinci Resolve. If this is the first time you've opened DaVinci Resolve, wait for the Project Manager to appear, and double click the 'untitled project' icon in the project manager window.
If you have enabled the multi-user environment in previous versions of DaVinci Resolve, then the log in window will appear. To login as one of the listed users, double click the user icon. To add a new user, click 'add new' at the bottom left of the log in window and create a new user by entering a user name and clicking 'setup new user'.
Then double-click the user icon to proceed to the Project Manager. Now click 'new project', enter a title for your project and click 'create'. This will add your new project to the project manager. Double click on your project to open it.
2 You'll now see the 'media' page with a 'media storage' browser at the top left.
The 'media storage' browser displays all your linked media folders from where you'll drag your clips and drop them into the media pool.
3 If your clip folder doesn't appear in the library, you'll need to add it. This is easily done by right clicking inside the 'media storage' browser area, selecting a drive or folder path and clicking 'open'.
4 In the 'media storage' browser, click on your newly added clip folder. Now simply drag your clips from your storage folder and drop them into the media pool. If the untitled project settings are different to your clip settings, you'll be prompted to either change the project settings to match your clips, or leave the settings as they are. To get started quickly, click 'change'. Now your project settings match your clips.
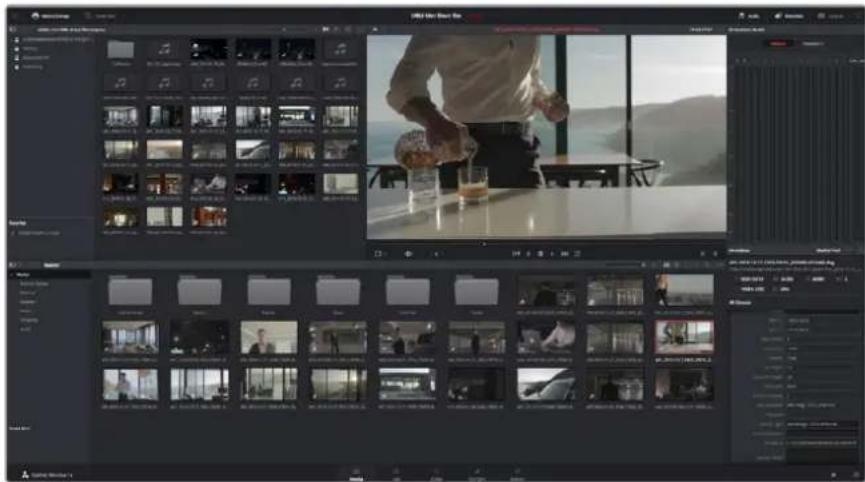
To import your clips, simply drag them from the 'media storage' browser and drop them into the media pool. You can also drag and drop files from your desktop
Editing your Clips
With your clips in the media pool, click on the 'edit' tab to open the edit page. Now you can start building your edit!
1 You'll first need to create a new timeline. Right click anywhere within the media pool and choose Timelines > New Timeline. When the dialog box appears, click the 'create' button.
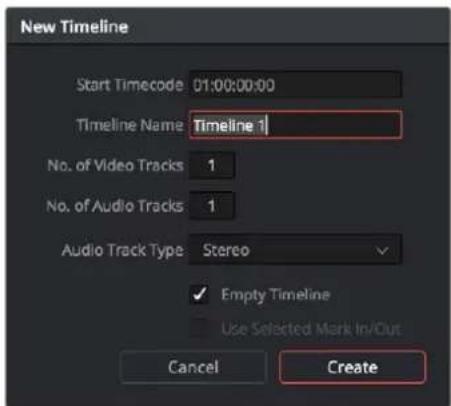
To start editing your clips, you'll need to create a new timeline. The timeline is the stage upon which all your editing will take place
2 Double click a clip in the media pool to open the clip in the source viewer. Use the mouse pointer to scrub the play head in the source viewer left and right until you find the start frame you want for the clip. Mark the in point with the 'I' shortcut. Do the same for the end frame using the 'O' shortcut.
3 Go to the timeline and position the timeline play head where you want your clip to be inserted.
4 To insert the clip onto the timeline, click inside the source viewer then drag the mouse pointer across to the timeline viewer. A list of edit options will appear. Select the type of edit you want.
Your clip will be placed onto the timeline using the edit type you selected. You'll find a description of each edit type and how to use them in the DaVinci Resolve manual.
A faster way to add clips to your edit is by dragging them from the media pool and dropping them directly onto the timeline where you can adjust your in and out points, position your clips, try different plug in effects, titles, and more. This particular workflow is like using the timeline as an artist's palette.

The 'edit' page. You can trim your clips, change their order, move them around and add transitions between them using the timeline editor
Trimming Clips
When editing clips you'll want to trim them to include only the specific actions you want in each shot. There are various ways, but the easiest is to adjust the clips' in and out points on the timeline:
After adding clips to your timeline, hover your mouse pointer over the start of a clip until the pointer becomes a 'trim' icon.
2 When the 'trim' icon appears, click on the start of your clip and drag it forwards or backwards to trim the in point. Watch the timeline monitor as you trim to find the edit point.
3 Now click and drag the end of your clip to adjust the out point.
The zoom slider is located above the timeline, to the right of the tools that are centered in the toolbar. By dragging the slider left and right you can zoom in and out of your timeline to make fine adjustments.
Trim your clips by dragging their start and end points left or right, and press the 'snapping' button in the toolbar to turn snapping on or off
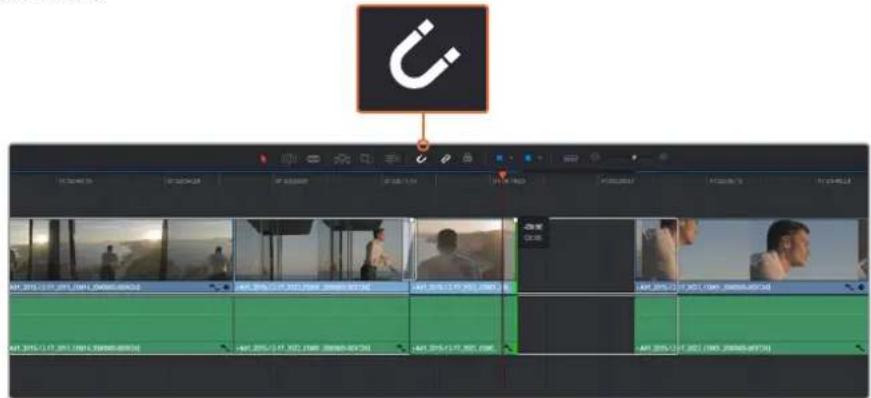
Snapping is a helpful feature to keep your clips held tightly against each other, but can be disabled for greater precision when fine tuning edits. Press the 'N' key to quickly turn snapping on or off.
Mapping Keyboard Shortcuts
If you are familiar with keyboard shortcuts used in other editing software, you can setup DaVinci Resolve to use the same shortcuts. You also have the ability to create your own custom sets of keyboard shortcuts to increase speed and optimize your workflow.
To map your own keyboard shortcuts:
1 Open DaVinci Resolve> Preferences and select the 'user' panel at the top, then select 'keyboard mapping' from the settings list.
2 Select the shortcut you want to change from the categories provided, for example timeline cut and paste shortcuts will be in the 'edit' category.
3 Click on the shortcut once to highlight the setting. Double click on the shortcut to enable the change.
4 Press your new shortcut keys on the keyboard. If you make a mistake you can easily undo the change by clicking the 'undo' icon next to the setting.
5 Click 'save' to confirm your new shortcut setting.
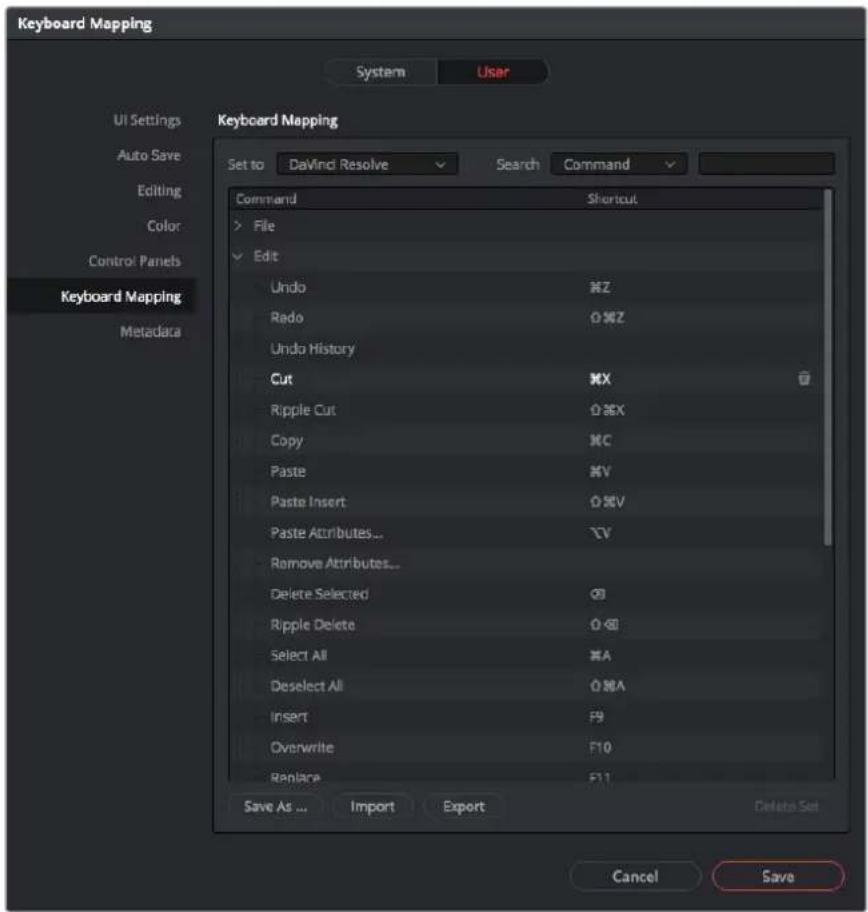
Use the 'set to' drop down menu to choose one of the keyboard shortcuts you may already be familiar with from other editing software.
Adding Transitions
A transition is a visual effect used to bridge one clip to another in a pleasing way, for example dissolves, wipes, dips to color, and more. These can add a layer of excitement to your edit. Transitions don't always have to be joining two clips, for example you can apply a dissolve transition to the end of one clip to create a quick and easy fade to black.
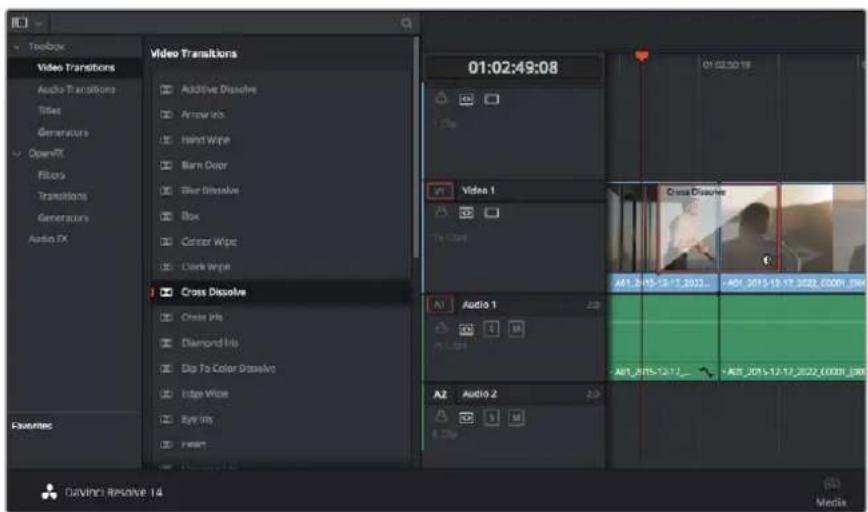
The transitions palette contains many types of transition effects
To add a dissolve transition between two clips:
1 Make sure there are two clips edited right next to one another on the timeline. Click the 'effects library' button in the UI toolbar at the top of the 'edit' page, and make sure the 'toolbar' panel is open.
2 Click on the 'cross dissolve' transition, drag it to your timeline and hover it over the edit point between two clips. You'll see the mouse pointer highlight both the end section of the first clip, and the start of the second. Drop the transition onto the clips. It's important both clips have enough length before and after their edit points to make room for the dissolve.
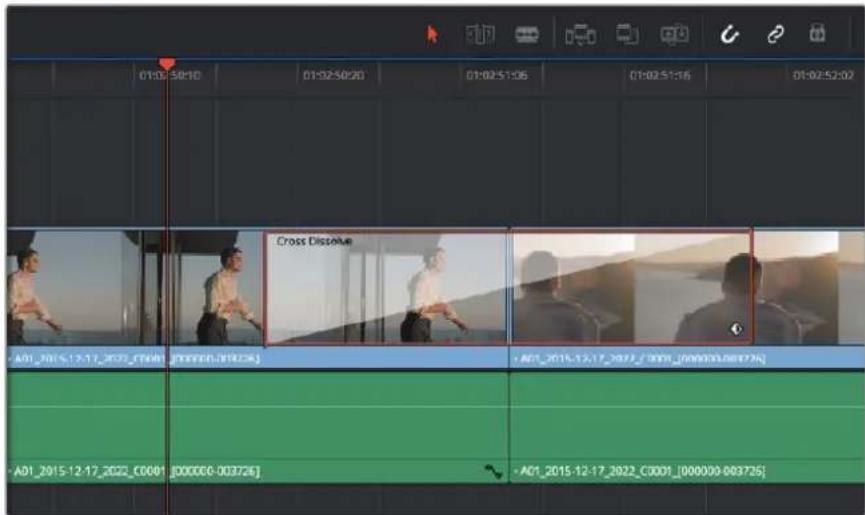
You now have a smooth transition mixing from one clip to the other. If you want to adjust the length of the transition you can lengthen or shorten its start and end point using a similar approach to trimming a clip. Hover your mouse pointer over the start or end of the transition until the transition 'trim' icon appears, then drag it left or right.
Simply drag and drop transitions between adjoining clips
Adding Titles
You can place a title on any video track just as you would a clip. If you run out of tracks you can easily add new ones by right clicking next to an existing track name and selecting 'add track'.
To create a title:
1 Scroll down towards the middle of the toolbox in the 'effects library' located underneath the media pool and you'll see the 'titles' generators. Use the scroll bar to reveal more 'titles' options.
2 Drag and drop a text title on the empty video track above the clip you want the title to appear. You can even drop your title next to a clip on Video 1 if you just want it to appear over black. To see the title, make sure the timeline playhead is on the title.
3 Double click on the title clip. The 'inspector' will appear showing you the settings for your title. Type your title into the 'text' field.
You can choose from a variety of fonts and adjust the appearance of your title by changing settings such as color, size, alignment, position, and more. Transitions can be added to titles, just like they can for clips
Drag a title type from the 'titles' palette and drop it on an empty track
Color Correcting your Clips
Once you have edited your sequence of clips, you can start color correcting. This is best begun after you have finished editing your sequence so you can maintain a consistent look, but part of the fun of DaVinci Resolve is being able to move between the edit and color page to make fine adjustments and discover new creative choices.
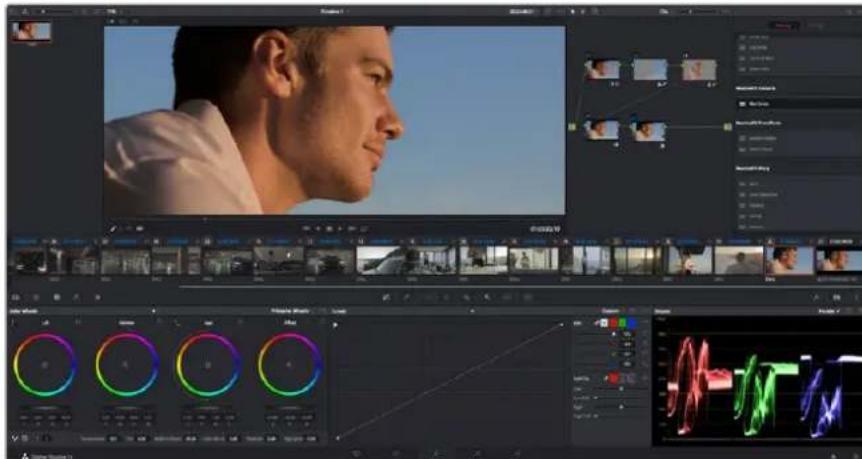
With the 'color' page you get absolute control over the look of your clips
First, click on the 'color' tab to open the 'color' page.
You'll see the color wheels, curves palettes and general color correction tools as well as the preview and nodes window. Don't feel overwhelmed by the vast array of features in front of you, they are all there to help you get the most amazing looking pictures. The DaVinci Resolve manual will show you exactly what the tools are for and how to use them in easy to follow steps. You'll learn the same techniques the professionals use in high end color correction facilities.
Generally, the first thing you'll want do is optimize the shadows, mid tones and highlights in your clips. In other words adjust the 'lift', 'gamma' and 'gain' settings. This will help get your pictures looking their brightest and best with a clean, uniform starting point from where you can begin grading the 'look' of your film.
Using Scopes
Most colorists make creative color choices by focusing on the emotion and the look they want their program to have and then simply work using the monitor to achieve that look. You can look at everyday objects and how different types of light interact with them to generate ideas on what you can do with your images and a little practice.
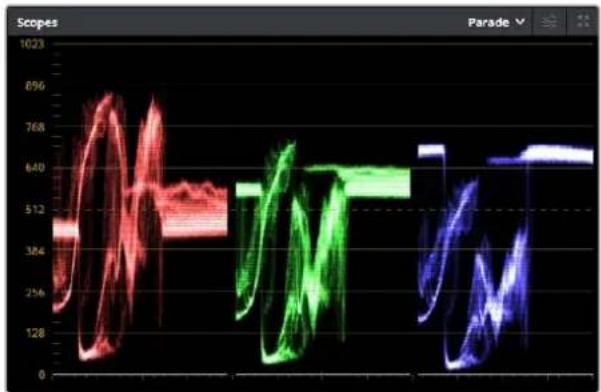
The parade scope helps you optimize highlights, mid tones and shadows
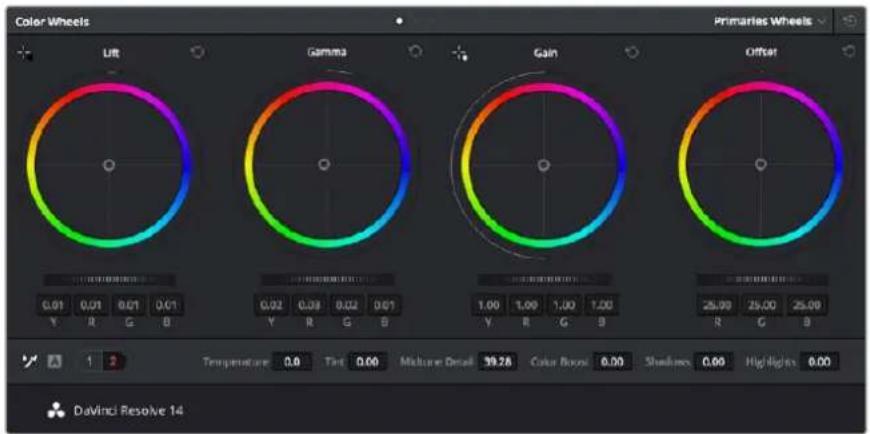
The 'lift, 'gamma', 'gain' and 'offset' color wheels give you total control over the color and tonal balance of your clips. To make a uniform adjustment to all colors for each tonal region, drag the dial underneath the color wheels back and forth.
Another way to color grade is to use the built in scopes to help you balance shots. You can open a single video scope by clicking the 'scope' button, which is the second from the right on the palette toolbar. You can choose to display a waveform, parade, vectorscope and histogram. Using these scopes you can monitor your tonal balance, check the levels of your video to avoid crushing your blacks and clipping the highlights, plus monitor any color cast in your clips.
The 'color wheels' palette contains the 'lift', 'gamma' and 'gain' controls which will generally constitute your first adjustment. These should resemble controls you've seen in other applications for doing color and contrast adjustments. For more accurate control of each color using a mouse, you can change the color wheels to 'primaries bars' which let you adjust each color and luminance channel for the lift, gamma and gain controls separately. Simply select 'primaries bars' from the drop down menu near the top right of the color wheels.
1 Adjusting the 'lift'
With your first clip selected on the color timeline, click on the 'lift' dial underneath the first color wheel. Slide it back and forth and watch how it affects your image. You'll see the brightness of the dark regions of your picture increase and decrease.
Set it to where you want the dark areas to look their best. If you decrease the lift too much, you'll lose details in the blacks and you can use the parade scope to help avoid this. The optimal position for blacks on the waveform is just above the bottom line of the parade scope.
2 Adjusting the 'gain'
Click on the 'gain' dial and slide it back and forth. This adjusts the highlights which are the brightest areas of your clip. The highlights are shown on the top section of the waveform on the parade scope. For a brightly lit shot, these are best positioned just below the top line of the waveform scope. If the highlights rise above the top line of the waveform scope, they will clip and you will lose details in the brightest regions of your image.
3 Adjusting the 'gamma'
Click on the 'gamma' dial underneath the color wheel and slide it back and forth. As you increase the gamma you'll see the brightness of the image increase. Notice the middle section of the waveform will also move as you adjust the gamma. This represents the mid tones of your clip. The optimal position for mid tones generally falls between 50 to 70% on the waveform scope. However, this can be subjective based on the look you are creating and the lighting conditions in the clip.
You can also use the curves palette to make primary color corrections. Simply click to create control points on the diagonal line inside the curve graph, and drag them up or down to adjust the master RGB contrast at different areas of image tonality. The optimum points to adjust are the bottom third, mid, and top third of the curve line.
There are many more ways of doing primary color correction in DaVinci Resolve. Check the DaVinci Resolve manual to learn how to use them all.
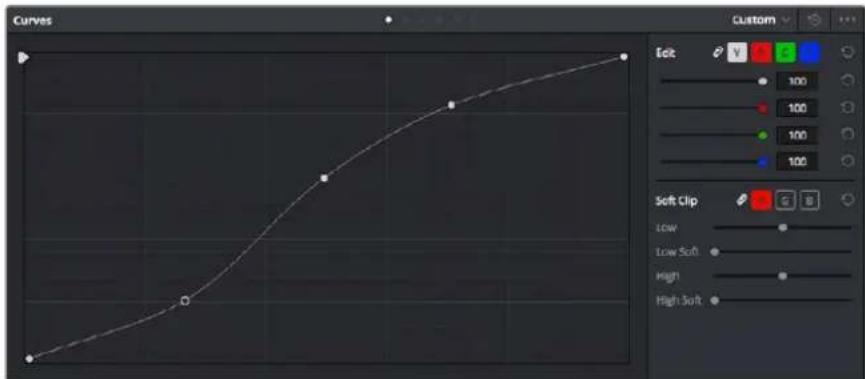
The curves palette is another tool you can use to make primary color corrections, or enhance specific areas of your clip when using a power window
Secondary Color Correction
If you want to adjust a specific part of your image then you need to use secondary corrections. The adjustments you have been doing up until now using the color wheels and lift, gamma and gain adjustments affect the whole image at the same time and so they are called primary color corrections.
However if you need to adjust specific parts of your image, say for example you wanted to improve the color in the grass in a scene, or you wanted to deepen the blue in a sky, then you can use secondary corrections. Secondary color corrections are where you select a part of the image and then adjust just that part. With nodes, you can stack multiple secondary corrections so you can keep working parts of your image until everything is just right! You can even use windows and tracking to allow the selections to follow movement in your images.
Qualifying a Color
Often you'll find a specific color in your clip can be enhanced, for example grass by the side of a road, or the blue in a sky, or you may need to adjust color on a specific object to focus the audience's attention on it. You can easily do this by using the HSL qualifier tool.

Using the HSL qualifier to select colors in your image is helpful when you want to make areas of your image 'pop', to add contrast, or to help draw the audience's attention to certain areas of your shot
To qualify a color:
1 Add a new serial node.
2 Open the 'qualifier' palette and make sure the 'color range' sample eyedropper tool is selected.
3 Click on the color in your clip you want to affect.
4 Usually you'll need to make some adjustments to soften the edges of your selection and limit the region to only the desired color. Click on the 'highlight' button to see your selection.
5 Adjust the 'width' control in the 'hue' window to broaden or narrow your selection.
Experiment with the high, low and softness controls to see how to refine your selection.
Now you can make corrections to your selected color using the color wheels or custom curves.
Sometimes your selection can spill into areas of the shot you don't want to affect. You can easily mask out the unwanted areas using a power window. Simply create a new window and shape it to select only the area of color you want. If your selected color moves in the shot, you can use the tracking feature to track your power window.
Adding a Power Window
Power windows are an extremely effective secondary color correction tool that can be used to isolate specific regions of your clips. These regions don't have to be static, but can be tracked to move with a camera pan, tilt or rotation, plus the movement of the region itself.
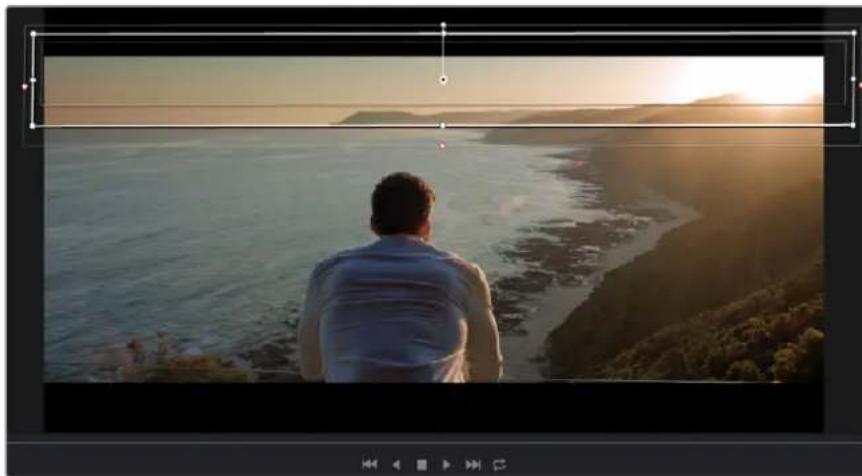
Use power windows to mask out areas you don't want to be affected by the HSL qualifier secondary adjustments
For example, you can track a window on a person in order to make color and contrast changes just to that person without affecting his or her surroundings. By making corrections like this you can influence the audience's attention on areas you want them to look at.
To add a power window to your clip:
1 Add a new serial node.
2 Open the 'window' palette and select a window shape by clicking on a shape icon. Your selected window shape will appear on the node.
3 Resize the shape by clicking and dragging the blue points around the shape. The pink points adjust the edge softness. You can position the shape by clicking the center point and moving it to the area you want to isolate. Rotate the window using the point connected to the center.
Now you can make color corrections to your image in just the area you want.
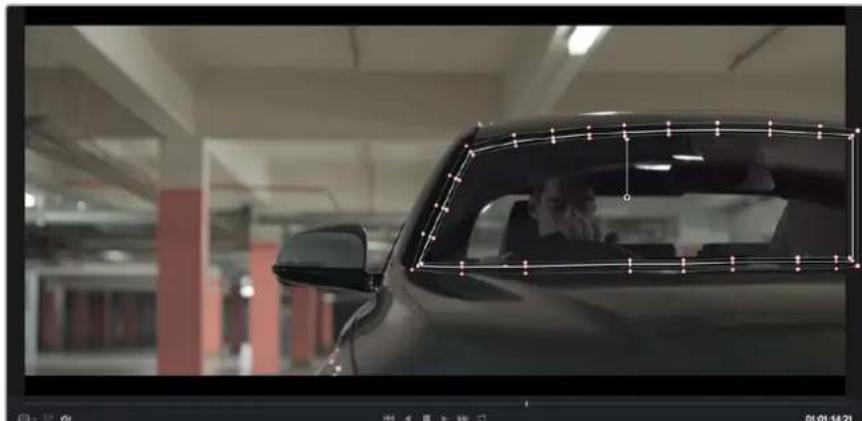
Power windows let you make secondary corrections to specific parts of your image
Tracking a Window
The camera, object or area in your shot may be moving, so to make sure your window stays on your selected object or area, you'll need to use DaVinci Resolve's powerful tracking feature. The tracker analyzes the pan, tilt, zoom and rotation of the camera or object in your clip so you can match your windows to that movement. If this isn't done, your correction can move off the selected target and call attention to itself, which you probably don't want.

You can track objects or areas in your clip using the tracker feature so power windows can follow the action
To track a window to a moving object:
1 Create a new serial node and add a power window.
2 Go to the start of your clip and position and size the window to highlight just the object or area you want.
3 Open the 'tracker' palette. Select the pan, tilt, zoom, rotate, and perspective 3D settings appropriate for the movement in your clip by checking or unchecking the relevant 'analyse' checkboxes.
4 Click on the 'forward' arrow to the left of the checkboxes. DaVinci Resolve will now apply a cluster of tracking points on your clip and then step through the frames to analyze the movement. When the tracking is done, your power window will follow the path of the movement in your clip.
Most of the time automatic tracking is successful, but scenes can be complex and sometimes an object can pass in front of your selected area, interrupting or affecting your track. This can be solved manually using the keyframe editor. Refer to the DaVinci Resolve manual to find out more.
Using Plugins
While making secondary color corrections you can also add OpenFX plugins to create fast, interesting looks and effects using the 'color' page, or imaginative transitions and effects on your clips on the 'edit' page. OFX plugins can be purchased and downloaded from third party suppliers.
After installing a set of plugins, you can access them on the color page by opening the OpenFX inspector to the right of the 'node editor' Simply click the 'OpenFX' button to open the OpenFX inspector, create a new serial node and drag and drop a plugin onto the new node. If the plugin has editable settings, you can adjust these in the adjoining 'settings' panel.
In the 'edit' page you can add plugin generators and transitions to clips by opening the 'OpenFX' panel in the 'effects library' and dragging your selected plugin onto the video track above your clip on the timeline.
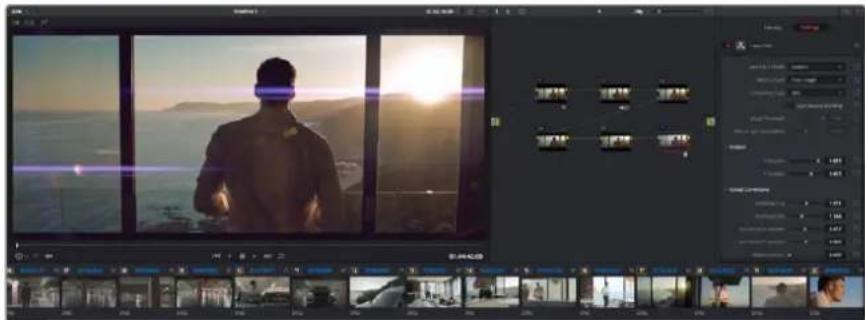
OFX plugins are a quick and easy way to create an imaginative and interesting look
Mixing Your Audio
Mixing Audio in the Edit Page
Once you have edited and color corrected your project, you can begin to mix your audio. DaVinci Resolve has a helpful set of features for editing, mixing and mastering audio for your project directly in the 'edit' page. For projects requiring more advanced audio tools, the Fairlight page provides you with a full audio post production environment, and if you are already familiar with the edit page and want to move straight to Fairlight, skip this section and move onto the next.
Adding Audio Tracks
If you are working in the edit page and want to mix a basic sound edit with lots of sound effects and music, you can easily add more audio tracks when you need them. This can be helpful when building your sound, and separating your audio elements into individual tracks, for example, dialogue, sound effects and music.
To Add an Audio Track to the Edit Page:
1 Right click next to the name of any audio track on your timeline and select 'add track'. This will add a track to the bottom of the track list. Alternatively select 'add tracks' and select the location you would like the new track placed.
2 Select the type of audio track you want, such as stereo, mono, 5.1 or adaptive.
Your new audio track will appear on the timeline.
Adjusting Audio Levels in the Timeline
Each clip of audio in the timeline has a volume overlay that lets you set that clip's level by simply dragging it up or down with the pointer. This overlay corresponds to the Volume parameter in the Inspector.
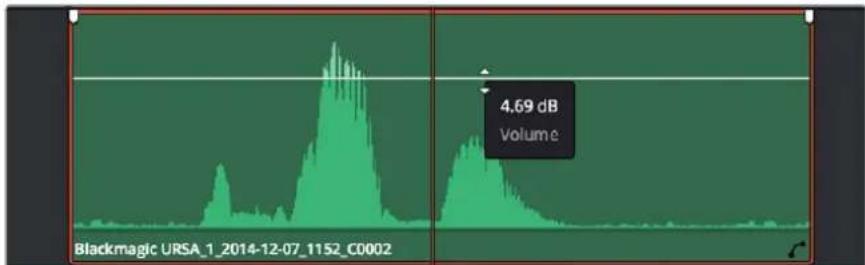
Dragging a volume overlay to adjust the clip level
For projects requiring more advanced audio tools, the Fairlight page provides you with a full audio post production environment.
The Fairlight Page
The 'Fairlight' page in DaVinci Resolve is where you adjust your project audio. In single monitor mode, this page gives you an optimized look at the audio tracks of your project, with an expanded mixer and custom monitoring controls that make it easy to evaluate and adjust levels in order to create a smooth and harmonious mix. Don't feel overwhelmed by the vast array of features in front of you, they are all there to help you deliver the best audio quality for your project.

This guide provides a basic overview of the features on the Fairlight page, but to learn more about all the details for each feature, refer to the DaVinci Resolve manual. The DaVinci Resolve manual provides details on the purpose of each tool and describes how to use them in easy to follow steps.
The Audio Timeline
Track Header
At the left of each track is a header area that displays the track number, track name, track color, audio channels, fader value and audio meters. The track header also contains different controls for locking and unlocking tracks, plus solo and muting controls. These controls can help to keep your tracks organized, and let you preview individual tracks one at a time.
Tracks
Each track on the Fairlight page is divided into lanes, which show each individual channel of clip audio for editing and mixing. The edit page hides these individual audio channels, displaying only a single clip in the timeline to make it easier to edit multi channel sources without needing to manage a huge number of tracks.
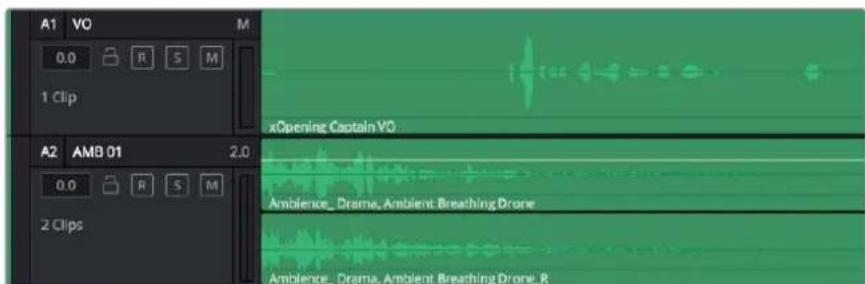
The track header on track A1 indicates a mono track with a single lane for mono audio, whilst track A2 indicates a stereo track with two lanes to accommodate stereo audio
What is a Bus?
A bus is essentially a destination channel to which you can route multiple audio tracks from the timeline, so that they are mixed together into a single signal that can be controlled via a single channel strip.
Main Bus
'Main busses' are typically the primary output of a program and each new project you create starts out with a single 'main bus', to which all tracks are routed by default. The 'main bus' combines all of the tracks in the timeline into one signal so that you can adjust the overall level of the audio mix once you have adjusted the level of each individual track.
Sub Bus
'Sub busses' allow you to combine multiple tracks of audio that belong to the same category such as dialogue, music or effects so that everything in that category can be mixed as a single audio signal. For example, if you have five dialogue tracks, you can route the output of all five dialogue tracks to a 'submix bus', and the level of all dialogue can then be mixed with a single set of controls. This submix can be rendered separately or sent to the main bus for render.
The Mixer
Each audio track in your timeline corresponds to an individual channel strip in the Mixer, and by default there's a single strip on the right for the 'main bus' labeled 'M1'. Additional channel strips will appear on the right hand side with a set of controls for each additional 'main' and 'submix bus' you create. A set of graphical controls allows you to assign track channels to output channels, adjust EQ and dynamics, set levels and record automation, pan stereo and surround audio, and mute and solo tracks.
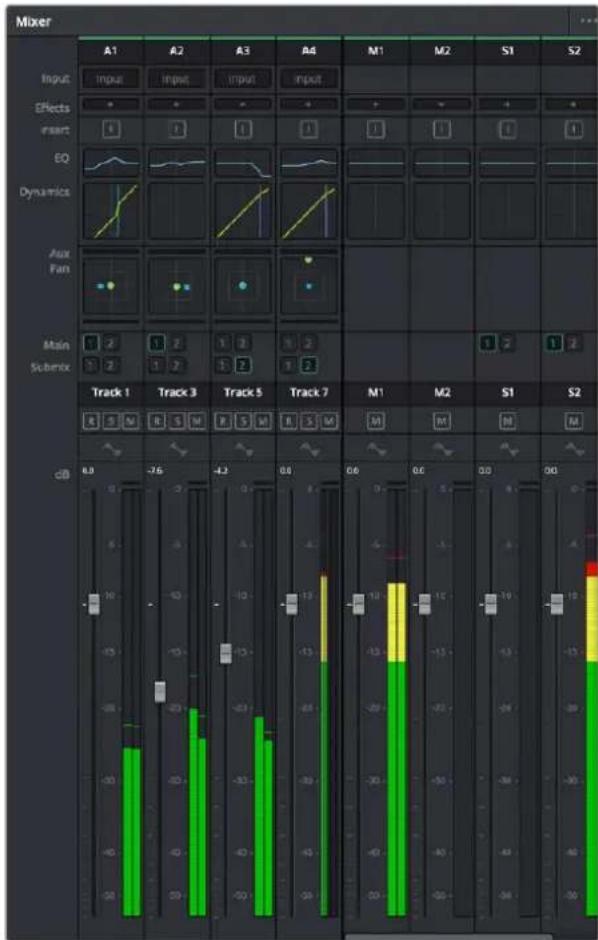
The audio mixer, with channel strips corresponding to the tracks in the timeline
Using the Equalizer to Enhance your Audio
After adjusting the audio levels of your audio clips in your project, you may find that the audio needs further finishing. In some cases you may find that the dialogue, music and sound effects are competing for the same frequency on the audio spectrum, making your audio too busy and unclear. This is where using EQ can help, as it allows you to specify the parts of the audio spectrum that each track occupies. You can also use an equalizer to help remove unwanted elements from your audio by isolating and reducing the level on particular frequencies that contain low rumbles, hums, wind noise and hiss, or simply to improve the overall quality of your sound so it is more pleasing to listen to.
DaVinci Resolve provides EQ filters that can be applied at a clip level to each individual clip or at the track level to affect entire tracks. Each audio clip in the timeline has a four band equalizer in the inspector panel, and each track has a 6 band parametric equalizer in the mixer panel. The graphical and numeric controls for boosting or attenuating different ranges of frequencies, and different filter types allow you to define the shape of the EQ curve.
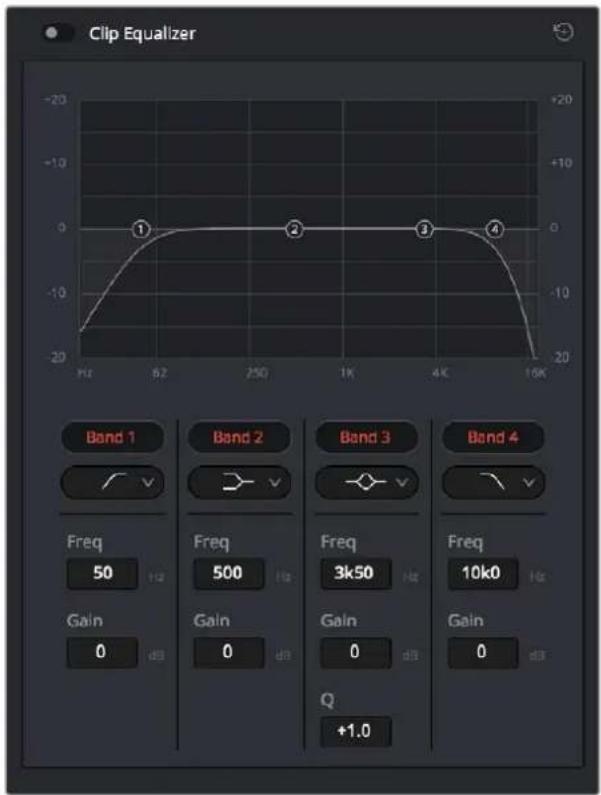
The four band equalizer can be applied to every clip in the timeline
Outer bands let you make band filter adjustments using hi-shelf, lo-shelf, hi-pass and lo-pass filters. A pass filter affects all the frequencies above or below a particular frequency, by removing those frequencies completely from the signal. For example, a high pass filter will allow the high frequencies to pass through the filter whilst cutting the low frequencies. Any frequencies outside the cutoff frequency are cut gradually in a downward sloping curve.
A shelf filter is less aggressive, and is useful when you want to shape the overall top end or low end of the signal without completely removing those frequencies. The shelf filter boosts or cuts the target frequency and every frequency either above or below it evenly, depending on whether you use a high shelf or low shelf.
The middle sets of band controls let you make a wide variety of equalization adjustments, and can be switched between lo-shelf, bell, notch, and hi-shelf filtering options.
Bell
Bell filters boost or cut frequencies around a given center point of the bell curve, and as the name suggests the shape of the curve is like a bell.
Notch
Notch filters allow you to specifically target a very narrow range of frequencies. For example, removing a mains hum at 50 or 60Hz
Lo-Shelf
Low shelf filters boost or cut the target frequency at the low end, and every frequency below it
Hi-Shelf
High shelf filters boost or cut the target frequency at the high end, and every frequency above it
To add EQ to an individual clip:
1 Select the clip in the timeline that you want to add the EQ filter to.
2 Click on the inspector and then click the 'clip equalizer' enable button.
To add EQ to a track:
1 Double-click in the EQ section for one of your tracks in the mixer to open the equalizer for that track.
2 Select the band filter type from the drop down menu for the band you want to adjust.

The EQ section in the mixer panel indicating an EQ curve has been applied to track one
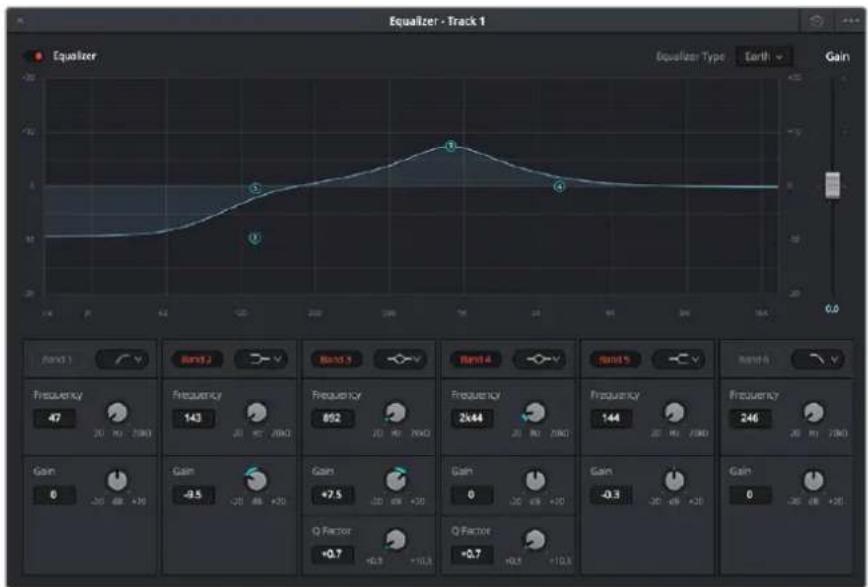
The 6 Band parametric equalizer that can be applied to every track
Once you have added EQ to your clip or track, you can adjust the EQ for each band. Note that controls may vary depending on which band filter type is selected.
To adjust the EQ for a band filter:
1 Select the band filter type from the drop down menu for the band you want to adjust.
2 Adjust the 'frequency' value to select the center frequency of the EQ adjustment.
3 Adjust the 'gain' value to boost or attenuate the frequencies governed by that band.
4 Use the 'Q factor' value to adjust the width of affected frequencies.
Use the reset button to reset all controls in the EQ window to their defaults.
Fairlight has many controls you can use to improve the quality of each audio track. You can add more tracks and arrange buses to organize them, plus add effects like delay or reverb, and generally perfect your audio mix.
Mastering your Edit
So now you have edited, graded your clips and mixed your audio, you'll want to export a render of your edit in the 'deliver' page. This page lets you select the range of clips you want to export, plus the format, codec and resolution you want. You can export in many types of formats such as QuickTime, AVI, MXF and DPX using codecs such as 8-bit or 10-bit uncompressed RGB/YUV, ProRes, DNxHD, H.264 and more.
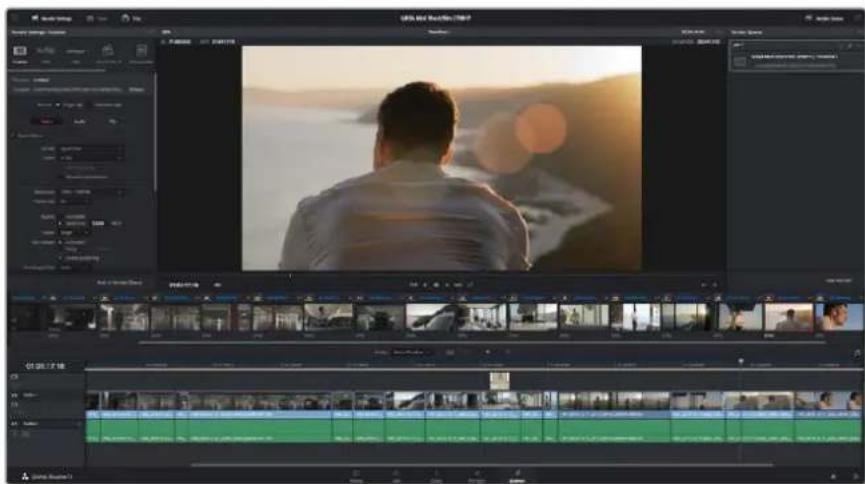
The 'deliver' page is where you export your edit. You can select from many different video formats and codeccs
To export a single clip of your edit:
1 Click on the 'deliver' tab to open the deliver page.
2 Go to the 'render settings' window on the top left of the page. In the 'format' settings, select 'single clip'. You can now choose from a number of export preset, for example YouTube, Vimeo and audio preset, or you can set your own export settings manually by leaving it set to the default 'custom' preset and entering your own parameters.
For this example, select YouTube, then click on the arrow next to the preset and select the 1080p video format.
The frame rate will be locked to your project frame rate setting.
3 Underneath the presets you will see the timeline filename and the target location for your exported video. Click the 'browse' button and choose the location where you want to save your exported file.
4 Immediately above the timeline, you'll see an options box with 'entire timeline' selected. This will export the entire timeline, however you can select a range of the timeline if you want to. Simply choose 'in/out range' and then use the 'i' and 'o' hot key shortcuts to choose the in and out points in your timeline.
5 Go to the bottom of the 'render settings' and click on the 'add to render queue' button.
Your render settings will be added to the render queue on the right side of the page. Now all you have to do is click 'start render' and monitor the progress of your render in the render queue.
When your render is complete you can open the folder location, double click on your new rendered clip and watch your finished edit.
Post Production Workflow
Working with 3rd Party Software
If you have your own favourite editing software you'd like to use, you can easily copy your clips to an internal/external drive or RAID and then import your clips into the software.
If you want to, you can even edit your clips directly from the SD card.
Using Final Cut Pro X
To edit Apple ProRes clips using Final Cut Pro X, you need to create a new project matching your clips' video format and frame rate. For this example, clips are set using ProRes 422 1080p25.
1 Launch Final Cut Pro X, go to the menu bar and select 'file/new project'. A window will open containing project settings.
2 Name your project and select the 'custom' checkbox.
3 Set the 'video properties' settings to 1080p HD, 1920x1080 and 25p.
4 Set your 'audio and render properties' settings to stereo, 48kHz, and Apple ProRes 422
5 Click 'ok'.
To import your clips into your project, go to the menu bar and select 'file/import/media'. Choose your clips from your SD Card. You can now drag your clips onto the timeline for editing.
Final Cut Pro X project settings.
Using Avid MediaComposer
To edit your clips using Avid MediaComposer 7, create a new project matching the clip's video format and frame rate. For this example, clips are set using 1080i59.94.
1 Launch MediaComposer and the 'select project' window will appear. Click the 'new project' button.
2 In the 'new project' window name your project.
3 Go to the 'format' dropdown menu and select 1080i/59.94.
4 Go to the 'color space' dropdown menu and select YCbCr 709.
5 Go to the 'raster dimension' dropdown menu and select 1920x1080. Click ok'.
6 Select 'tools>background services' and click the 'start' button if background services are not already running and then click 'ok'.
7 Select the media bin where you wish to import your files.
8 Select 'file>AMA link...' and select the files that you wish to import and then click 'ok'.
When the clips appear within the media bin you can drag your clips onto the timeline and begin editing.

Setting the project name and project options In Avid MediaComposer 7.
Using AdobePremierePro CC
To edit your clips using Adobe Premiere Pro CC, you need to create a new project matching your clips' video format and frame rate. For this example, clips are set using ProRes 422 HQ 1080p25.
1 Launch Adobe Premiere Pro CC. In the 'welcome' window select 'create new/new project'. A window will open containing project settings.
2 Name your project. Choose the location for your project by clicking 'browse' and selecting your desired folder. Once you've selected your location folder click 'ok' in the welcome' window.
3 Go to the Adobe Premiere Pro CC menu bar, select 'file/import' and choose the clips you want to edit. Your clips will appear in the 'project' window.
4 Drag the first clip you wish to edit onto the 'new item' icon at the bottom right of the 'project' window. A new sequence will be created matching your clip settings.
You can now drag your clips onto the sequence timeline for editing.
Setting the project name and project options in AdobePremiere Pro CC.
Using Autodesk Smoke 2013
To edit your clips using Autodesk Smoke 2013, create a new project matching the clips' video format, bit depth, frame type and frame rate. For this example, clips were recorded using ProRes 422 HQ 1080p25.
1 Launch Smoke and the project and user settings window will appear. Click on the 'new' button under the project heading.
2 The 'create new project' window will open. Name your project.
3 From the resolution dropdown menu, select 1920x1080 HD 1080.
4 Make sure bit depth is set to 10-bit and frame type is progressive.
5 From the config template dropdown menu select 1920x1080@25000p.cfg.
6 Leave the 'preferred format' set to ProRes 422 HQ and click 'create'.
7 Click on the 'new' button under the user heading.
8 When the 'create new user profile' window opens, type your user name and click 'create'.
9 When the project and user settings window reopens, click the start button.
10 From the menu bar, select 'file>import>file' and select your clips to import.
11 Once the clips appear in the media library you can drag your clips onto the timeline and begin editing.

Setting the project name and project options in Autodesk Smoke 2013.
Help
Getting Help
The fastest way to obtain help is to go to the Blackmagic Design online support pages and check the latest support material available for your video assist.
Blackmagic Design Online Support Pages
The latest manual, software and support notes can be found at the Blackmagic Design support center at www.blackmagicdesign.com/support.
Blackmagic Design Forum
The Blackmagic Design forum on our website is a helpful resource you can visit for more information and creative ideas. This can also be a faster way of getting help as there may already be answers you can find from other experienced users and Blackmagic Design staff which will keep you moving forward. You can visit the forum at https://forum.blackmagicdesign.com
Contacting Blackmagic Design Support
If you can't find the help you need in our support material or on the forum, please use the "Send us an email" button on the support page to email a support request. Alternatively, click on the "Find your local support team" button on the support page and call your nearest Blackmagic Design support office.
Checking the Software Version Currently Installed
To check which version of Blackmagic Video Assist software is installed on your computer, open the About Blackmagic Video Assist Setup window.
- On Mac OS, open Blackmagic Video Assist Setup from the Applications folder. Select About Blackmagic Video Assist Setup from the application menu to reveal the version number.
- On Windows 8, open Blackmagic Video Assist Setup from the Blackmagic Video Assist Setup tile on your Start page. Click on the Help menu and select About Blackmagic Video Assist Setup to reveal the version number.
- In Windows 8.1, select the down arrow icon from the 'start' screen, and scroll down to the Blackmagic Design folder. From here you can launch Blackmagic Video Assist Setup.
- In Windows 10, click the start button and select 'all apps'. Scroll down to the Blackmagic design folder. From here you can launch Blackmagic Video Assist Setup.
How to Get the Latest Software Updates
After checking the version of Blackmagic Video Assist Setup software installed on your computer, please visit the Blackmagic Design support center at www.blackmagicdesign.com/ support to check for the latest updates. While it is usually a good idea to run the latest updates, it is wise to avoid updating any software if you are in the middle of an important project.
Warranty
12 Month Limited Warranty
Blackmagic Design warrants that this product will be free from defects in materials and workmanship for a period of 12 months from the date of purchase. If a product proves to be defective during this warranty period, Blackmagic Design, at its option, either will repair the defective product without charge for parts and labor, or will provide a replacement in exchange for the defective product.
In order to obtain service under this warranty, you the Customer, must notify Blackmagic Design of the defect before the expiration of the warranty period and make suitable arrangements for the performance of service. The Customer shall be responsible for packaging and shipping the defective product to a designated service center nominated by Blackmagic Design, with shipping charges pre paid. Customer shall be responsible for paying all shipping charges, insurance, duties, taxes, and any other charges for products returned to us for any reason.
This warranty shall not apply to any defect, failure or damage caused by improper use or improper or inadequate maintenance and care. Blackmagic Design shall not be obligated to furnish service under this warranty: a) to repair damage resulting from attempts by personnel other than Blackmagic Design representatives to install, repair or service the product, b) to repair damage resulting from improper use or connection to incompatible equipment, c) to repair any damage or malfunction caused by the use of non Blackmagic Design parts or supplies, or d) to service a product that has been modified or integrated with other products when the effect of such a modification or integration increases the time or difficulty of servicing the product. THIS WARRANTY IS GIVEN BY BLACKMAGIC DESIGN IN LIEU OF ANY OTHER WARRANTY, EXPRESS OR IMPLIED. BLACKMAGIC DESIGN AND ITS VENDORS DISCLAIMER ANY IMPLIED WARRANTY OF MERCHANTABILITY OR FITNESS FOR A PARTICULAR PURPOSE. BLACKMAGIC DESIGN'S RESPONSIBILITY TO REPAIR OR REPLACE DEFECTIVE PRODUCTS IS THE WHOLE AND EXCLUSIVE REMEDY PROVIDED TO THE CUSTOMER FOR ANY INDIRECT, SPECIAL, INCIDENTAL OR CONSEQUENTIAL DAMAGES IRRESPECTIVE OF WHETHER BLACKMAGIC DESIGN OR THE VENDOR HAS ADVANCE NOTICE OF THE POSSIBILITY OF SUCH DAMAGES. BLACKMAGIC DESIGN IS NOT LIABLE FOR ANY ILLEGAL USE OF EQUIPMENT BY CUSTOMER. BLACKMAGIC IS NOT LIABLE FOR ANY DAMAGES RESULTING FROM USE OF THIS PRODUCT. USER OPERATES THIS PRODUCT AT OWN RISK.
Copyright 2017 Blackmagic Design. All rights reserved. 'Blackmagic Design', 'DeckLink', 'HDLink', 'Workgroup Videohub', 'Multibridge Pro', 'Multibridge Extreme', 'Intensity' and 'Leading the creative video revolution' are registered trademarks in the US and other countries. All other company and product names may be trade marks of their respective companies with which they are associated.

インズル/才レーニングマニュアル
Blackmagic Video Assist
2017年11月
日本語

xdz
This is a Blackmagic Video Assistant to assist you in your task.
Blackmagic Design CEO
G兰卜·个
目次
Blackmagic Video Assist
道路の側の芝生や空のPURUNOMINUNUNUNUNUNUNUNUNUNUNUNUNUNUNUNUNUNUNUNUNUNUNUNUNUNUNUNUNUNUNUNUNUNUNUNUNUNUNUNUNUNUNUNUNUNUNUNUNUNUNUNUNUNUNUNUNUNUNUNUNUNUNUNUNUNUNUNUNUNUNUNUNUNUNUNUNUNUNUNUNUNUNUNUNUNUNUNUNUNUNUNUNUNUNUNUNUNUNUNUN
Chers clients, cheres clientes
Utiliser DaVinci Resolve
Bus principal (Main bus)
CEO Blackmagic Design
Inhaltsverzeichnis
Blackmagic Video Assist
Erste Schritte 179
Director executivo de Blackmagic Design
Índice
Blackmagic Video Assist
Primeros pasos 237
1080PsF23.98, 1080PsF24
1080i50,1080i59.94,1080i60
1080p23.98, 1080p24, 1080p25, 1080p29.97, 1080p30, 1080p50, 1080p59.94, 1080p60
2160p23.98, 2160p24, 2160p25, 2160p29.97, 2160p30
HDMI输入和输出
525i59.94 NTSC, 625i50 PAL
720p50, 720p59.94, 720p60
1080150,1080159.94,1080160
1080p23.98, 1080p24, 1080p25, 1080p29.97, 1080p30, 1080p50, 1080p59.94, 1080p60
2160p23.98, 2160p24, 2160p25, 2160p29.97, 2160p30 (Blackmagic Video Assist 4K)
编解码器
HJ 1 HJ 1 HJ 1 HJ 1 HJ 1 HJ 1 HJ 1 HJ 1 HJ 1 HJ 1 HJ 1 HJ 1 HJ 1 HJ 1 HJ 1 HJ 1 HJ 1 HJ 1 HJ 1 HJ 1 HJ 1 HJ 1 HJ 1 HJ 1 HJ 1 HJ 1
Blackmagic Video Assist 4K戸 Ultra HD用乾化華國,主高歌UHS-ⅡTAJIM的SD kaTSA用青達H。IiHJHJHJHJHJHJHJHJHJHJHJHJHJHJHJHJHJHJHJHJHJHJHJHJHJHJHJHJHJHJHJHJHJHJHJHJHJHJHJHJHJHJHJHJHJHJHJHJHJHJH
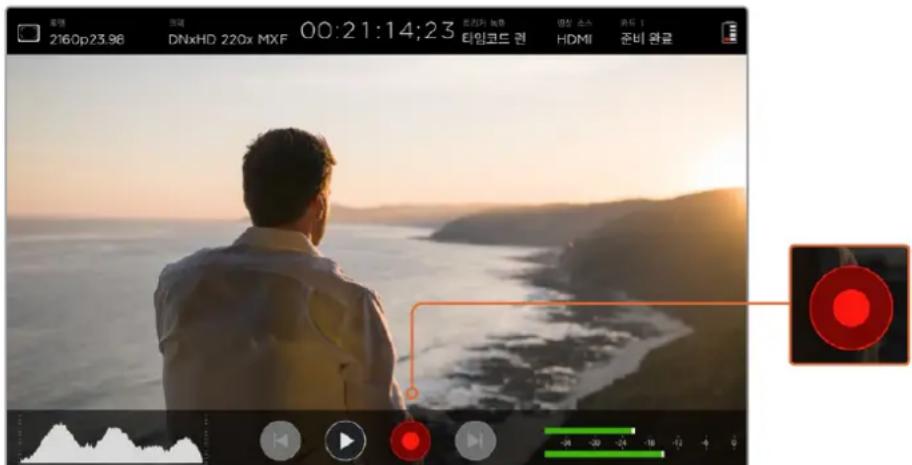
TtS3K1nLw/0AraLo 1nHnIeNmUoSsK1nMItgA nTaNaHnLiNc:KbBtBnEeNtBnEeNtBnG 5i#
16:9 HD TV 及 썸류터 툔명과 힘원해 1.78:1 週목비내에 옝상의 An전 Ediographic of the TAIYIINLIAN (TAIYIINLIAN) is a popularly used term in Chinese literature.
4:3
DaVinci Resolve icosohoge
Blackmagic Video Assist에서 썸严格落实 썸严格落实 썸严格落实 썸严格落实 썸严格落实 썸严格落实 썸严格落实 썸严格落实 썸严格落实 썸严格落实 썸严格落实 썸严格落实 썸严格落实 썸严格落实 썸严格落实 썸严格落实 썸严格落实 썸严格落实 썸严格落实 썸严格落实 썸严格落实 썸严格落实 썸严格落实 썸严格落实 썸严格落实 썸XXXXXXXXXXXXXXXXXXXXXXXXXXXXXXXXXXXXXXXXXXXXXXXXXXXXXXXXXXXXXXXXXXXXXXXXXXXXXXXXXXXXXXXXXXXXXXXXXXXXXXXXXXXXXXXXXXXXXXXXXXXXXXXXXXXXXXXXXXXXXXXXXXXXXXXXXXXXXXXXXXXXXXXXXXXXXXXXXXXXXXXXXXXXXXXXXXXXXXXXXXXXXXXXXXXXXXXXXXXXXXXXXXXXXXXXXXXXXXXXXXXXXXXXXXXXXXXXXXXXXXXXXXXXXXXXXXXXXXXXXXXXXXXXXXXXXXXXXXXXXXXXXXXXXXXXXXXXXXXXXXXXXXXXXXXXXXXXXXXXXXXXXXXXXXXXXXXXXXXXXXXXXXXXXXXXXXXXXXXXXXXXXXXXXXXXXXXXXXXXXXXXXXXXXXXXXXXXXXXXXXXXXXXXXXXXXXXXXXXXXXXXXXXXXXXXXXXXXXXXXXXXXXXXXXXXXXXXXXXXXXXXXXXXXXXXXXXXXXXXXXXXXXXXXXXXXXXXXXXXXXXXXXXXXXXXXXXXXXXXXXXXXXXXXXXXXXXXXXXXXXXXXXXXXXXXXXXXXXXXXXXXXXXXXXXXXXXXXXXXXXXXXXXXXXXXXXXXXXXXXXXXXXXXXXXXXXXXXXXXXXXXXXXXXXXXXXXXXXXXXXXXXXXXXXXXXXXXXXXXXXXXXXXXXXXXXXXXXXXXXXXXXXXXXXXXXXXXXXXXXXXXXXXXXXXXXXXXXXXXXXXXXXXXXXXXXXXXXXXXXXXXXXXXXXXXXXXXXXXXXXXXXXXXXXXXXXXXXXXXXXXX
IeJ New Project to CreateCreate
2 2
3raiIbrariee 100000000000000000000000000000000000000000000000000000000000000000000000000000000000000
4 Media Storage BrLaUwJepSer TaeLggeKsTgAeIeNtEeIeTJeTgAeIeTgAeIeTgAeIeTgAeIeTgAeIeTgAeIeTgAeIeTgAeIeTgAeIeTgAeIeTgAeIeTgAeIeTgAeIeTgAeIeTgAeIeTgAeIeTgAeIeTgAee
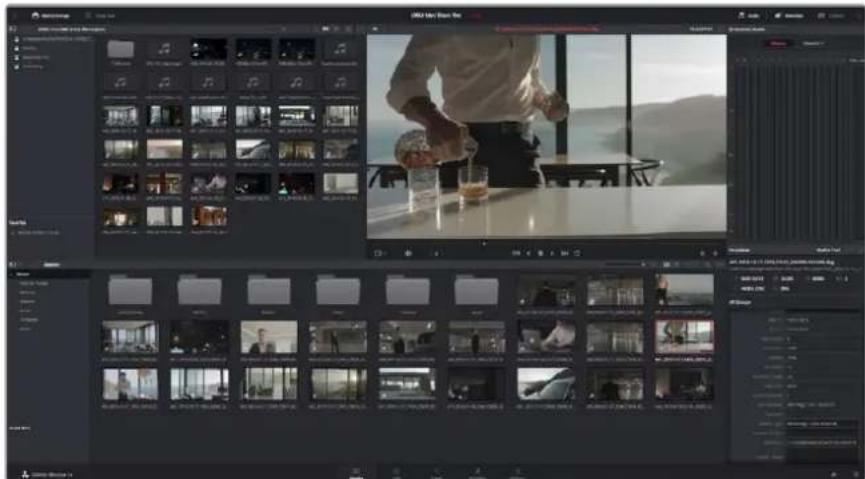
mD1rHpEeKlRiJrJrJrJrJrJrJrJrJrJrJrJrJrJrJrJrJrJrJrJrJrJrJrJrJrJrJrJrJrJrJrJrJrJrJrJrJrJrJrJrJrJrJrJrJrJrJrJrJrJrJ
1 1
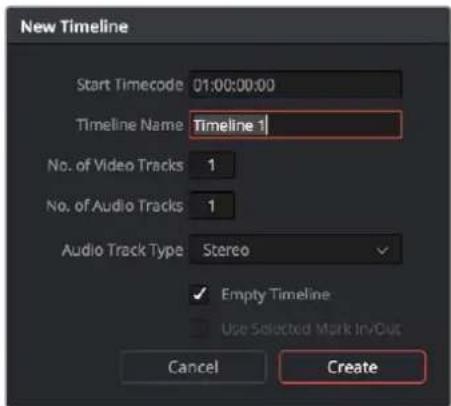
司的用
2MiD1HpEeIeNcLgRnIeBcKlRcHaeNsSbEeHaeHdGcRlmIaTaNnNi. MaUsF 10101010101010101010101010101010101010101010101010101010101010101010101010101010101010101010101010101
3 TaillalaiIeT 1
4taillrainleclilupnainhlaeonssbueoanlglklohagmausfoihtretaillrain bueorrodraegohni.
Davinci Resolve 00000000000000000000000000000000000000000000000000
MidiherpseepertwahhchnglupaHtAeHgHsHnDnOoHgHcHgHgHgHgHgHgHgHgHgHgHgHgHgHgHgHgHgHgHgHgHgHgHgHgHgHgHgHgHgHgHgHgHgHgHgHgHgHgHgHgHgHgHgHgHgHgHgHgHgHgH
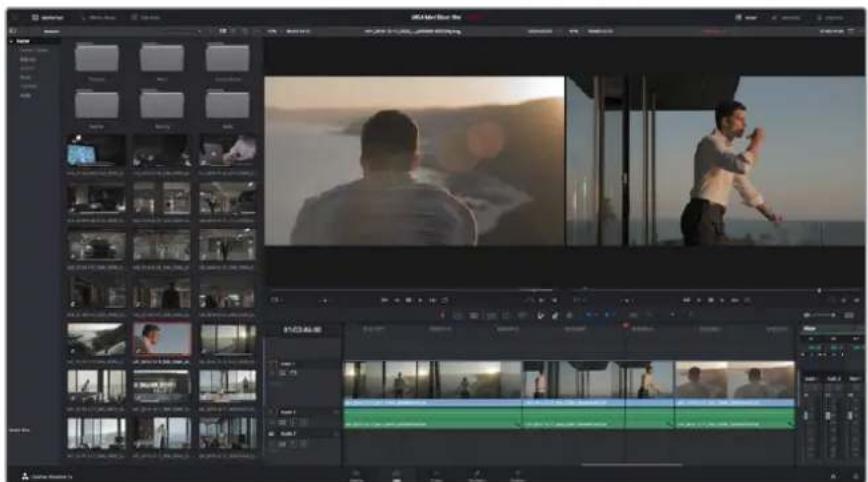
用
glcp 1
則認援,是國中,有之。
1 TaillraIne e kIeRiH 100000000000000000000000000000000000000000000000000000000000
2 2
3 鄭隸的马扎部本版于三二二二二二二二二二二二二二二二二二二二二二二二二二二二二二二二二二二二二二二二二二二二二二二二二二
JaMaiJiJiJiJiJiJiJiJiJiJiJiJiJiJiJiJiJiJiJiJiJiJiJiJiJiJiJiJiJiJiJiJiJiJiJiJiJiJiJiJiJiJiJiJiJiJiJiJiJiJiJ1
邦德贝斯贝斯贝斯贝斯贝斯贝斯贝斯贝斯贝斯贝斯贝斯贝斯贝斯贝斯贝斯贝斯贝斯贝斯贝斯贝斯贝斯贝斯贝斯贝斯贝斯贝斯贝斯贝斯贝斯贝斯贝斯贝斯贝斯贝斯贝斯贝斯贝斯贝斯贝斯贝斯贝斯贝斯贝斯贝斯贝斯贝斯贝斯贝斯贝斯贝斯贝
iMiJiJiJiJiJiJiJiJiJiJiJiJiJiJiJiJiJiJiJiJiJiJiJiJiJiJiJiJiJiJiJiJiJiJiJiJiJiJiJiJiJiJiJiJiJiJiJiJiJiJiJ1
iJr iJrJrJrJrJrJrJrJrJrJrJrJrJrJrJrJrJrJrJrJrJrJrJrJrJrJrJrJrJrJrJrJrJrJrJrJrJrJrJrJrJrJr
皂藻藥默默默默默默默默默默默默默默默默默默默默默默默默默默默默默默默默默默默默默默默默默默默默默默默默默默默默默默默默默默默默默默默默默默默默默默默默默默默默默默默默默默默默
MaeBbAeF [File/Import/Media] 1
Pa6ota c DaVinci Resolve 442
IMIOPT KINIOB 443
MoHTaX BnDeoKJInOg 443
IoproHa KInnoB 445
Ha3haueHne coeTaHH KnaBn445
Iobabnene nepexoob 446
CtpaHua Fairlight 455
3BykoBaMOHTaXHaI NHeiKa 455
HHTne HnHbI 456
Mixer 456
Pa60Ta c 3KbanaIepom 457
Co3dHHe MaCTep-KoIIN 459
3tan nocto6pa6otkn 460
Pa6ota c nporpaMMHbIM
obecneuehenemdpynX
PpOu3BovnteJe 460
Pa6ota c Final Cut Pro X 460
Pa6ota c Avid MediaComposer 461
Pa6ota c Adobe Premiere Pro CC 461
PaotcAutodesk Smoke 2013 462
Помоць 464
TapaHTna 465
Повтовka к paбote
IopdknloueHne nntaHna
YTo6bHaayTaPaboTyc Video Assist,doCTaTOUHO NOKNIouHTb NITAHHe, ICTOUYHK BnDEOCnHana n 3Byka, a TaKke yctAHOBNTb SD-KapTy.
B 3toI rnaBe onncaH npaDOK paOToC yctpoCTbOM:
NODKIOUeyHNE NITAHIN
NOdkNIOUeHHe NCTOCHNKOB BnDeo;
IPOKJIIOUeHHe NCTOUYHKOB ayDNO;
yctaHObKa SD-kapT.
IopknHouTe npnlaeraembi cetbeo aadantep Ko BXOy nTaNHa C npaBoi ctoPoHb Video Assist.
IpiuNCIOB3OBAHm BHeHcero NCTOUYHkA NITAHn MOxHO OJHOBpeMeHHo BbIIOHHTb 3apAky DByX IINTH-NOHBIX 6bapei LP-E6 BOTCEkax 12 Ha 3aHne NaHEn. UTO6bl yCTAOBnTb 6bapeo LP-E6Ha Video Assist, octopoxHo npKMMte ee K BepxHemy Kpaio oTEka nOnyCTe BnN3 do ueNyKa . UTO6bl INBHe b 6bapeo, HAKMTe KONKy Ha BepxHey NaHEn. POpO6Hee ob NCIOJIb3OBAHN 6bapei uypOBHe IH 3apraCa . pa3dE «HaCtpoKn» HnKe.
YTo6bl BKNIOUYntb MOHITOp-PEKOPep, HAXMNTe pacNoJIOKeHHyO CnpBa KHONKy NITaHn. JIOTKIOUHeHH yCTpOINCTBa HAXMTe N ydepXkBaIe KHOIIky NITaHn
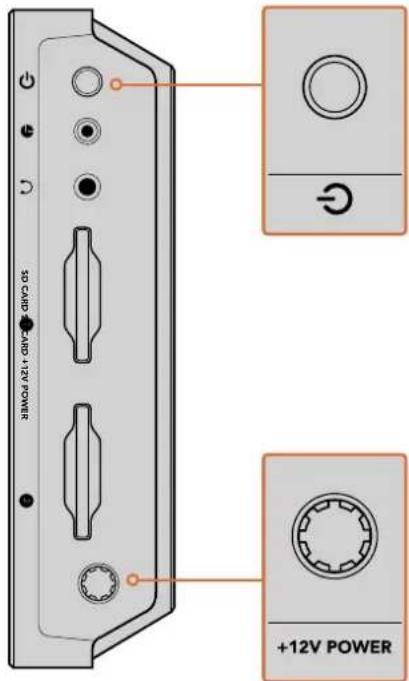
CoeHnHTe NCTOCHN BHeUHrero nTaHncoBxOdom +12V Power. HaxMHTe KhoNky nTaHn, YTObblkIOuHTb yCTPOIcTBO.
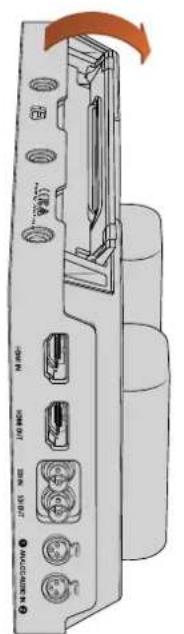
Ipa0oemctone. YoobpBb noCTABky, octopxho noHMMTE ee 3a kpa
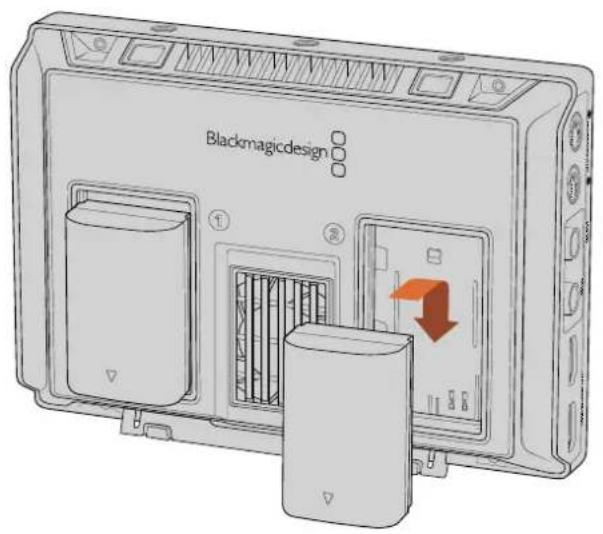
CMOHITOPOM-PEKOPDEPOm VideoAssistncnOJIbEyIOTc8 batape LP-E6
IopKJIIOUeHHe NCTOuHNKOB BnDeo
CoedHHTe SDI- HDMI-HCTOuyHK C Mini BNC/BNC- HNDHMI-BXoOM. YcTPOCTBO ABToMaTHueckn NaHT NcNoJIb3OBaTB HCTOuyHK, KOTOpB 6bl NOdKIOUeH NepBBM. NepexoHbN Ka6eNB Mini-BNC/BNC MoJHO npio6pctn B IIO60m Maar3HHe pOpeccnoHaBHorO BnDeoo6OpydoBaHnR MHH-pa3BeMb BNC TaKKe Ha3bBAKT pa3BeMaM Din 1.0/2.3.
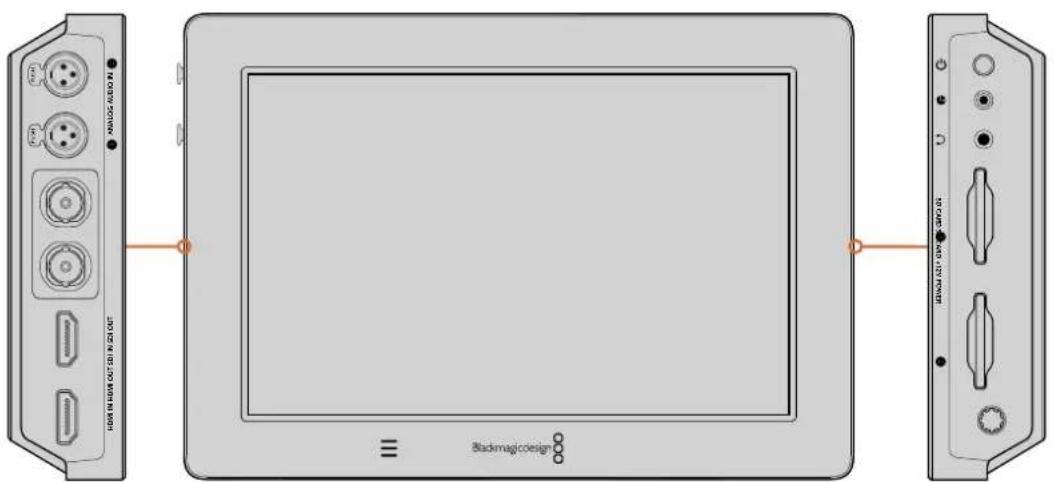
IopknHouyte hctOuyHK BIneO K SDI-nn HDMl-BxOdy C neBcBtPOhCy CoeHNHTe yctpoiCTBO c HDMI-ekpaHOM nN SDI-MoHITOpom uepe3 HDMI-nn SDI-BbXoD. YTO6blCnbluAt ayNDIOPOKky BO Bpemr 3aHncn n BocnpOn3BeDenHnKnna, npoknOHTe hayuHnKn K COOTBcTByQUeMy rHeaY. Ha Blackmagic Video Assist 4K BO Bpemr npocMToPa BIneO bYk TaKke MOxHO BBoDnTb uepe3 BcTpoEHnbl DnHaMK.
PoiKIOueHHe IcToUHKnOB aydno
Tak KaK 3Byk BCTpoeH B SDI- nHDMI-cnHa, npi NIOKJIQUeHm INCTOCHNka BInde TaKke NcIOJIb3yETcraero ayinodopoxka.Blackmagic Video Assist 4KIMeeTdoONHHTeBhble BXoDb mini XLR, KOToPbIE NO3BOJHO TNCIOJIb3OBaTB 6aJaHCbMy aHaJIOrOBoB h 3Byk INDpyrNX NCTOCHNkoB
PIMMEAHHE. Ha Blackmagic Video Assist 4K MoXHO Bectn 3aNcB DByx KaHANO aHaIorOBoro 3Byka IIno MCNoJIb3OBAb OIN H KaHAn aHaIorOBoro n OIN KaHAn UΦpoBoro 3Byka n3 SDI- nnn HDMI- nctouHnka. NpOboHee cm. pa3dEon o anAionorOBom ayDIO u n3MeHen en erO yPOBHe B rnaBe «HaCTpoKn
YctaHObKa SD-kapT
YTo6bBecTn 3aIINCb, Heo6xOaIMOn yCTaHOBnTB coBMeCTmMyIO SD-KapTy.
IINH-BDnEO BbICOKO KaueCTBa peKomeHdyETc HcNoJIb3oBaTb CKopoCTHbESD-KapTb KlaCCa UHS-I. Pn3aNcB CtAHdAPTHOM pa3peWeHN mC 60nee Hn3Km 6BHTpeTOM CO cKaTNEM MOXHO pa6oTaTb CDPYHMN HOCNTeJIIMN, ODAHKO CKoPoCTHbE HaKoINTeJI N O6bHIO ObecneuBAiOT HAnyUHNI pe3yIbTAT.
Blackmagic Video Assist 4K noDepknaBaet pa60y c Ultra HD Bnnot do 216Op/30.ДЯ Takoro Bndeo pekomehnyetc nCnoB3oBaTb SD-kapTb Knacca UHS-II co ckopocTb 3aIncn CbIwe 110 M6nt/c. MoIeNb Blackmagic Video Assist 4K IMeET DBA CIOTa DIA Kap TnAMrT .3aIncb MOxHOb BeCTn Ha IIO6yIO N3 HIX . EcnI Tpe6yctc oOecneuTb HEnpepbBnHoe coXpaHeHne, yCTaHOBtE Da HAKONITeJ.
Ipeep nolb0aHmE KapTbe Heo6xOIMo OTphiMaTHPOBaTb nof faHIOByo CnCTeMy HFS+nnexFAT. PpoSe Bcero aTO cDetaB c NOMOuBHO HAcTpoek CoXpAHene . NoDpo6He e paboTe C HmM cm,pa3dJI《HAcTpoKn》.
KapTb namTu MoXHO TaKke OToOpMaTHOpBaTb Ha KOMNBIOTEpe ConepaUHOHOnCnCTeMo MacOSnn Windows.BnepBOM cnyac nCOnb3yETc4 faIIOBA cnCTema HFS+, BO BTOPOm -exFAT, npn 30m nocEndHn foPMA TakKe noDpeKnaBaTeHa Mac OS.
PpOBepKa BbIbOda npaMeTppoB Ha DSLR
1 PpOBeIte NaIbIeM No CeHcOpHOMy AkaPHy BBePx IINBHN3 ,YTo6bl CkPbITb BBIOMbIe npaMeTpbl N BnTe ToJIbKO n3o6paKeHne c DSLR-KaMebpbl. Ha Blackmagic Video Assist 4K CTPOKa CoCToHnB B BePxHe YactN K -DinCnner He HauJaDbBaETcra Ha n3o6paKeHne, yTO no3BOJAE7e3 nomex npocMaTpNbAByBnDeo
2 Y6eINTEcB TOM ,TO BxOHOH CnHAN DSLR-KaMepb COeepKNT ToIbKO qNCToe N3O6paKeHne. Ecnn Ha KK-dncnnei Video Assist no- npexkHemy BbBOJTCa Cnyke6hle napameTpbl, n3MeHHTe HAcTpoKn HDMI-BbxOda nn MeHIO kpaHa KaMepbl .
HMDI-BbXOeKaMepbno3BONrTnOnyaTb60neeKaueCTBeHHyIO 3anCb
Bocnpon3VepeHne
YTo6blAaTbBnOaBt BnCnne, npoBeNTe NaIbIeM No aKpaHy BcPtnKaIbHOM HaPaBHeHH, 3aTeM Bb6epnte IIO60n 3HaKOB ynpabHeHH BoCpOn3BeHeHHm BnH3y KpaHa.

Длвьбпpon3beHЯКЛинаKоCHNTeCbCOOTBeTcTBHyOJIeTO3aUka

TTo6bIocTaHOBnTBBOCnpOn3BeHHeHaOppeJeHHOMKaPeKInna ,Bb6epnte 3NaOH Kny3bl. TTo6bI Bo3o6HOBnTBBOCnpOn3BeHne, KOCHNTcB3HaKa eue pa3 .

IJIpeXoJaK CJIeDyUOIM NINI PpeBdyUIM KINIaM NCIIOJIb3yIte COOTBeTCTBYIOUIM 3Haouk NepeMOTK UTo6b BOCpON3BecTN TeKyUIM KINI C Camoro HauJlA, KOCHNTEc 3HaUka OpaTHOI nepeMOTK ODNH pa3.
YnpabTb yckopeHHo NpeemtKo MoKHO TaKe C NOMOsbIO NpeMeueHn Cnaepa BnpaBO HnBleBO.KocHTecb KK-ekpana,HTobbOTKpbTb nnCKpbTcnaep.
Luknueckoe BocnpOn3BedeHne

Tc06bI BOCnpo3Becn TeKyui KINB CUNKNIueckom pexime , KOCHITcB OINH pa3 COOTBETCTBYUeO 3HaKa

ДлгИКИМЕСКОТВOCПОИЗБЕDEНЯ BCEX 3aINCAHHbIX KINIOB KOCHITcB 3TOFO Ke 3NaUka eIe pa3.

YTO6bOTKIOUHTBUNKNUueeCKOEBOCIPpon3BeDeHne ,KOCHTecb3HaKaB TpeTn pa3 .
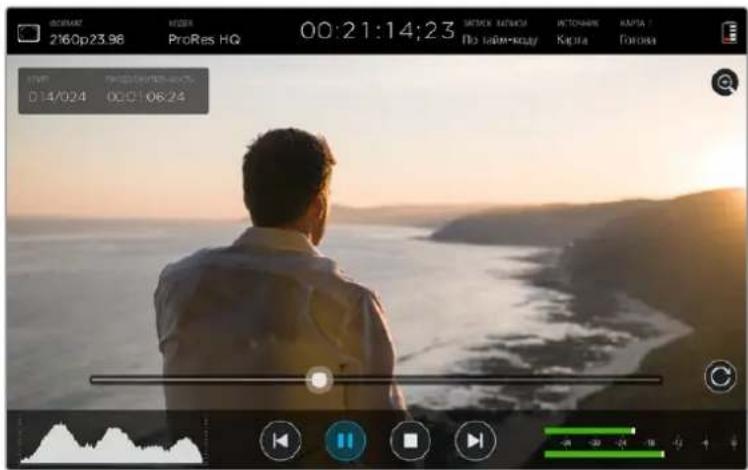
IyepexoKa HyxHMy fpaMeHTy KInna nepetaunite cnaep Bnepe nnHa3aB. B pexme Bocpno3BeDnna B cepxHem nebOM yRny kpaHa nBaNTc CieuaNbHa naHeB. OHa oTo6paKaet KOnuocTBo 3annCaHHbx Ha SD-kapTy paNob, Homcp Tekyucro KInna nero npOdoJNKTeNbHocTb.
Hac troponi
I3MeHeHHe HacTpoE K c NOMOuBcEHcOpHoTo 3KpaHa
Video Assist IMeET BCTpoEHbI CEHCOPHb I KpaH, PpeHa3HaueHHb I INBbOda BnDeo C ayINO INMCHENH HAcTPOck.
IINMHeHn60bnHnHCTBaHaCTpoeKIOCTaTOHO KCHyTbC COOTBeTCTByUcero 3HaCuBA CTPOKe COCTOHHBepxDnCnIe .TObblbOpTaBypOBeHb3ByKa IINDAHNAMKA HAYHNIKOB ,PPOBeNTe PAJIbEEM NO CeHCOPHOM 3KpaHbV B BePTNKaJIbHOM HaIpaJIeHNN,3aTEM B HIXKHeuactN 3KpaHa HAXMITE COOTBETCTBYIOUI 3HAUYOK
Kochntecb dncnner 3a npedema OKHa , qTo6bl 3akpbItb Hactpoyni PpoBeHte naIbem no ekpaHy B rOpnoHTaBHom HappaBHeHHnn Kochntecb 3Haayka «Ha3aД, qTo6bl cKpbItb Hactpoyni CoXpaHeHH
Iopraokn3meHennaHacTpoek
1 BCTPOKe COcToHnHa 3KpaHHbIX INHmKaTOpax KOCHNTecb HAcTPOIKI ,KOToPyHO HyXHO N3MEHHTb.
Hapnmep, nBbopa Ka 3aHnCn HAMMITE Ha COOTBETCTBYIOuN INHkAtoP . Iocne 2toro OTKPOIOTc HAcTpoN KoeKa. DnH N3MeHEN yPoBHe ayDnO KOCHNTecb 3HaKaNHNkAToPa 3Byka.
2 BOKHe HAcTpoE KcIIOJIb3yIe KHOJIKN MeHIO ,CTpeJIKN NIN CnaIepnBb6Opa DoCTynHbIX npametpoB, YTo6bl 3aKpbItb HAcTpoJKN,KoCHNTecb DcNJIeER 3a PpeJeMaMn OKHa .
BbIbO npaMeTpoB

YTo6bl OTKpbTb HAcTpOKn PaMKn, CeTkN, BbIeChHn KOHTypOB N3o6paXeHn NfynKcHn 3c6pbl KocHTecb 3HaVka BBIOBmBix Ha 3kpan NapaMeTPOB .Tn HAcTpOKn PpeHa3HauYebl Ira NOMOuC bIBOpom EKnO3uIN, FOKyca, KOMNo3uIN N KaDpnpoBaHn PnP NOKIIuHeHN yCTpoiCTBa K KaMepe
CnHn, nocrynaouuHa SDI-nHn HDMl-BbIXoH, He coepxnt Cnyxek6Hme npaMeTpbi
3e6pa
3a yHKUH NOMORAET YCTAHOBHT ONTMAMJIbHyIO EKcNO3uNIO OTObpaXaET dHaROHaJIbHbIe NINH BTEX 6bIacTAX, IpeOHA IIpeBbIaET YCTAHOBNEHHbIyPOBeHb. HApnpMeP, npn HAcTppoKe 100% nooCb 6ydyT COOTBEcTBBOBaT bYAcTkAM C n3bIbTOHOnE KcNo3uNne. PpHn HAcTppoKe 90% noABnReTcA DONHHTENbHb 3aNAC EKcNO3uN INdra aunTb KaDpa OT 3acBETK
COBET. 3TaФyHKnIaTakKeNo3BONJIeT BbIDeJIbOTdEJIbHIE30HbI3O6paKeHHa. HanpImep,ecnnncnbl3OBaTB HAcTpoNky50%,MOKHO Bu3yaJIbHO nJeHTnΦuPobAt yacTkN, KOTOpbie COOTBeCTByIOT yPOBHO 50% HaDCnIee fOpMbciCnHaHa.
YTO6bB KIOHHTb FHKUIO HIN N3MeHNTb yPOBeHg KOCHITcB IeBOI INI npAO BCTpeKNI6o nepeDBNHeTe CnAdep B HAcTpoKAX 3e6pbI
Pomoub npn fokucnpOBke
HCTpyMeHTb nOmoi npf oKcnpOBKe NO3BONIOT 6bCTPO yCTAHOBITb oKyc . PnBbIope BbIeENHn HAn6oene pe3kne eNemehTb N3O6paXeHn CoepKaTnnn. Wkana YyBCTBNTenbHOCTN NO3BOJrE 3aDaTb INHTHCNBHOCTb.
YTO6bBKNIOHTO6paXHHe KOHTpyOB HIN N3MeHNTb HaCTPOky IN YyBCTBnteNBHOCTN KCHNTecb JIO60n 13 CTpeNOK nnn nepeDHNbTe cnaep . Bo3MOxHbIe ypOBH yCBTBeNbHOCTN H3KNI, CpeHNn BbICOKNI. IIN KAHTpACTHO rIO6paXeHn CBIOKOJ DeTAN3aUneJ DOCTaTOHO Bb6paTB H3KNI INCpeHNy yPOBEh. INI KaPBO C H3KoIK KOHTpACTHO bIOu PA3MbITbIMN DETAHIMn CIEyET yCTAHOBtB BbICOKN yPOBEh. YTO6bYcNtB 3ΦΦeKT BIDENEHN KOHTpyOB
Ecnn Hnnn CnnaBaoTc n3o6paXeHneMa 3KpaHe, INCBeT MoXHO N3MeHNTb. DnA ETOrO NcnoNb3ynte npaByIO n neByIO CTpeKNB H NaCTpoKe ZBaTe IHHN
30000000000000000000000000000000000000000000000000000000000000000000000000
PpO6He o pa6ote c 3TMMn HnCTpyMeHTAMn CM . pa3JeI O NaCTpoKax MOHITOpHHra.
Pamkn
B 3aBcIMOCnT OHa3HauChnMaTePnAna (KINHO, TB nnn OHnaH -npocMOTp) MoXHO OTo6pa3ntb pa3HbIe nponopun KaJa. YTo6bY Bb6paTaPamKy nnckpbIt b ee , HaxMTte COOTBeTCTByIOUyIO KhoNky, 3aTEM KOCHNTecb neBOI INI npaBO CTpeKNI N6o npeDBInhTe cnaep
IOCTyHbHECKOJIbKO BINOOBpaMKN
HDTV
3a onu nnoBnHET OTo6paKaTb rpaHnCt b TeKCTa Hn3o6paKeHH C npOnOpunm KaDpa 1,78:1, KOTOpblc COOTBeTCTByeT COOTHOseHHIO 16:9dIa TB-3kpaHOB BbICOKOy eTKOCTN KOMNbIOTePbIX MOHHTOPOB.
4:3
OTo6paKeHHe B opMaTe 4:3, KOToBn NoDxOoNIT DnT TeneBn3OpOB CTaHdApTHoY cTeKocTN nIe KaIpnpoBaHHc NOMOJIbIO DByX aHaMOpPbIX aIaNTepOB
2,40:1; 2,39:1 n 2,35:1
OTo6paKeHnE C npOnOpuIMn KaIpa, KOTOpBcNcNb3yOTcB WpPOKoKpaHHOM nAHaMOpDnPoBaHHOM oPmTaX 3Tn TpN HAcTpoKn NMeiOt He60nbUne OTnVpy O pYra Bpe3yNbTaTe N3MeHHeNCTaHapTOB KINHO 3a NoCNeHHe DecrTIneTna . B HAcToRuee Bpemr COOTHOWeHnC CTopoH 2,39:1 ABnREcOdHM N3 HaNoBoee NOnyIaRbIX fOpMaTOB .
1,85:1
Eue OHO COOTHOWeHne CToPOH KaPp , HAcTo NcNoJIb3yEmoe B WInPoKoOpMaTHOM KINHEMATORpaFe. IIO CBOIM npOnOpUmaD aHHbI FOpmHaXoOITc Mekdy HDTV N 2,39:1
Cetka
3TOTNHCtpyMeHTnpedCTabIeTcoBcETKy CDByMA BepTuKaJIbHbIMN INDyMa TOpIN3OHTaJIbHbIMN noLoCaMn. 4To6bl OTO6pa3ntb NINCKpbITb cETky, Bbl6epuTe BkN. INN INBikN. COOTBTCTBEHO.
Cee nomoo kapd 6yed t pa3deneH Ha TpeTn no BepTKaHn ropnOHTaN . CunTaetc , yTo lyuwe pacnoIarabBaxhble qactn N3o6paKeHHBdoNb 3Tnx LNHNn Hn X nepeceehn ,notomy yTO TaK ynyuwaecr 3pntelbHoe BocnpnTne.
COBET. YpOBeHb B3rIJa aKTepa ObUHObBbPabHBaIOT no rOpN3oHTaJIbHOJINHH, ORpAHnUBAIOe BepXHIO TpeTb KaIpa NO HIXKeI rpaHnue. DaHHaIyHKuIraTakke OecneuBaet NocJeOBaTeNbHOCTb KaIrpObaHnMaekdyDy6IaMNI.
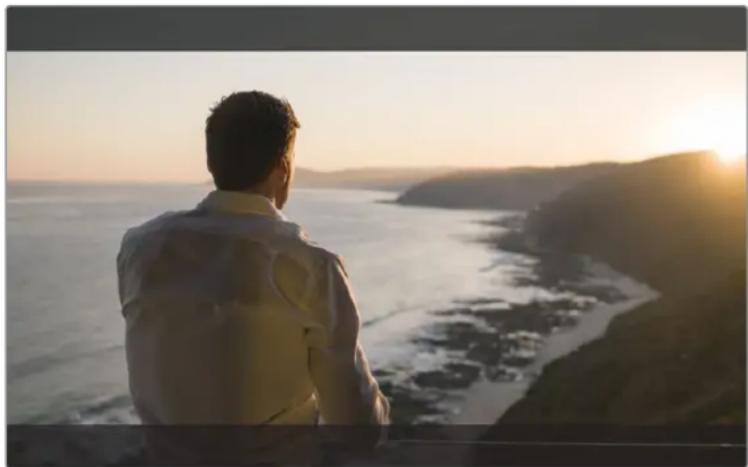
Co0THoHHeNc CTOpON 2,39:1uacto nCnOJbEyTCnI KApnpOBaHn np pa6oTe C MaTePnALOM, KOToPb IpeHa3HaueH DnI NOKa3a Ha WpOKHX 3KpaHax
YcNoBbIyCBET
3a yHKUINIO6ABnIeK NIO6paKeHNO pa3NmHbIe UBeTa , KOtOpBIE NOKa3bIBaOT yPoBEHb 3KcNo3nUIN IInr erO OTenbHbIX 3IeMeNTOB. UBeTA NOMaIOT Bb6paTb ONTMaJIbHyIO 3KcNo3nUIN HAnpIMep, PO3OBBI COOTBeCTByET DOCTOBepHOI nepeDAue KOxHOrO pOKoBa CBpOneUeB 3eNeHbI - 60neE TEMHOI KOs (rpdaLna ceporo 38,4%), YcNOBbIuCBetakXe NOMaER TpeDToBpaHTb yTpAty DeTaneB CCBTbIX IN TEMHbIX O6NaCTax ,
BbOIMbHa KK-dnCne dnaa3OH ToHaIbHOCT No3BOJRE yCTpaHNT NorpeWHOCTN OCEeHn Ha CbeMOHNOLOUdKe NNN KOMNeHCnPOBaTB IN C NOMOsbIO HAcTPOKn 3KcNo3uIN
COOTBeTCTBmE MxJy LBeTaMn 3HaueHnM ToHaNbHoCTn NOKa3aHO HnKe B VnIe ShKaJIbI
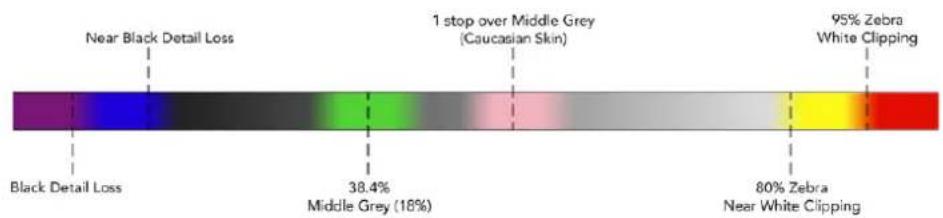
Kana ycnobhoro zbeta
ΦopMaT BnIeO n YacToTa KaIpoB
PazpeeHne nOlyuHaemoro BnIeocnHaHa n KaIPOBaY cactota oTo6paKaIOTcB noJIe FOpMaT (HaNPImep. 2160p/29,97; 2160p/25;1080p/59,94).
Ta6nua Hnke coepkntnepeueh fopmatOB, nDnepknaBaembix Ha BxOe N BxOJe.
IopdepknBaemble opMaTbHa BxOe N BixOe
| Ввои Вьов черз 6G-SDI |
| 525i/59,94 NTSC; 625i/50 PAL |
| 720p/50/59,94/60 |
| 1080PsF/23,98/24 |
| 1080i/50/59,94/60 |
| 1080p/23,98/24/25/29,97/30/50/59,94/60 |
| 2160p/23,98/24/25/29,97/30 |
| Ввори вьов черз HDMI |
| 525i/59,94 NTSC; 625i/50 PAL |
| 720p/50/59,94/60 |
| 1080i/50/59,94/60 |
| 1080p/23,98/24/25/29,97/30/50/59,94/60 |
2160p/23,98/24/25/29,97/30 (Blackmagic Video Assist 4K)
Koidek
HTo6bOtKpbTbHaCTpOaKn KoTeKa, HaxMMte Ha COOTBeCTByUOni 3HaQoK, 3aTeM KcCHNTecb OndHO n3 cTpeNOKn60 cnaepa. IocTyNbIe KoTeKn 3aBncrT OT NcNoJIb3yEmoM MoEIN. HApPImep, 3aNcB HD-Matepna B Apple ProRes u Avid DNxHD C pa3HbIM 6ntpeITOM Bo3MoXHa Ha o6eNX MoJeIAX a Blackmagic Video Assist 4KtaKke no3BONeT bblpaTb KoTeKn ProRes u DNxHR dIcoxpanHeHn B Ultra HD.
IpiHcnoB3oBHHKOeKOB ProRes coXpaHeHHe BeetC B BnE qAioNob QuickTime,a DNxMOxHO 3aNaCatb KaB QuickTime, TaN B MXF. PnpO6Hee O BbOpe KoekOB CM .Ta6nUy Hnke.
PondepxnbaeBkoDekn
Klntb coxpaHOTcB QuickTime,3a nckIoueHnem faHOB DNx MXF,B KOToPbIX HaBaHHe KoDEKa codepXIT o603HaueHne MXF.
Blackmagic Video Assist Blackmagic Video Assist 4K
| КODEК | Глубинацета | КODEК | Глубинацета |
| ProRes 422 HQ 10 ProRes | 422 HQ 10 | ||
| ProRes 422 10 ProRes 422 10 | |||
| ProRes 422 LT 10 ProRes | 422 LT 10 | ||
| ProRes Proxy 10 ProRes Proxy 10 | |||
| DNxHD 220x 10 DNxHD | 220x 10 | ||
| DNxHD 145 8 DNxHD 145 8 | |||
| DNxHD 45 | 8 | DNxHD 45 | 8 |
| DNxHD 220x MXF | 10 | DNxHR HQX | 10 |
| DNxHD 145 MXF | 8 DNxHR SQ | 8 | |
| DNxHD 45 MXF 8 DNxHR LB | 8 | ||
| - | - DNxHD 220x MXF | 10 | |
| - | - DNxHD 145 MXF | 8 | |
| - | - DNxHD 45 MXF | 8 | |
| - | - DNxHR HQX MXF | 10 | |
| - | - DNxHR SQ MXF | 8 | |
| - | - DNxHR LB MXF | 8 |
TaAM-KoA
CuetnK TaM-KoJa NOKa3BaBaet npOdoJnxTeJIbHOCTb KInna (aCsb: MHyTbCeKyHdbl KaDpbl).
3anyck 3annncn
KoCHNTecb 3TOI 3HaUaN Bb6epnte 3anyck /octaHOBky IIO TaM-KOy NnHpez INHTeppec SDI/HDMI. 3TO IO3BOJraT haHnHaTb N OCTaHABINBaTb 3AnCb Ha OCHOBe INHΦOpMauN, NOlyaemOn BMece cSDI- nHDMl-CnHAnom. JnA OTKJIouHeHHFyHKUIn BB6epnte COOTBETCTBYIOYIO ONUIO
TOM-KoMy
PnBbIbOpE daHHoH hAcTPOKn MOHITop -peKOpdep HaHHeT 3aNcB cpa3y nocne o6hApyeHnra TaM-KoJa B NcTOUHKe SDI-nuH HDMl-CnHana. KoJa TaM-KoJ 3aKOHHTC8,3aNcB npekpntc.3To yO6Ho npn paBoTe C kamepaM 6e3 noDepxKn FyHKm "SDI start/stop". 4To6bTaHm-KoJ 6OBnAeT TObKO Bo BPema 3aNcN ,Ha KaMepe Heo6xoImo AKTNBpuBaTb HAcTPOky"Record Run".Ecnn KAmcpa NcNoJIb3yEt dpyTuHO hAcTPOky TaM -KaDa (HaNPmEp, Ha OCHObe BpeMeHn cyTok),OHa 6yDet NoCTOAnH Ho 3aNyckaTb 3aNcB Ha Video Assist.
SDI/HDMI
3aHaCTPOIkaNo3BOJnEeT 3aNcKaTb N OCTaHABINBaTb 3aNcB npn HaKaTn COOTBeCTByIOuei KNKnHa KaMepe . IJIe ee nCnObl3oBAHnA KaMepa DOnkHa NODepKnBaTb 3aNcKn OCTaHOBky 3aNcCu Hepe3 HD-SDI-nHDMl-cnHaN. MeHIO TaNX KaMep o6bHu NMeET ONDy IN cJeDyUOx onu: "Trigger REC", "HD-SDI Remote I/F" nn "SDI Remote Start/Stop Trigger".
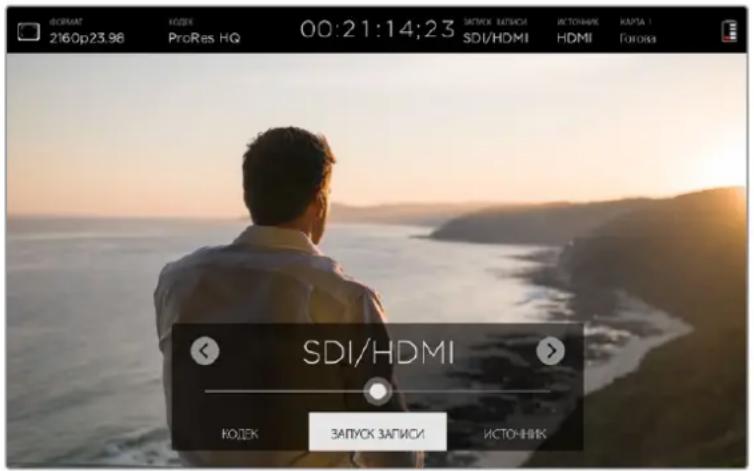
NCTOUYHK
OTo6paXaETNtOuHnK BxOJaIero SDI- nHn HDMI-CnHana, noctynaioJero Ha Blackmagic Video Assist. MoHTOp-peKOpdep nCnOlb3yeT ToT n3 HNX , KOTopbI 6bl nOdkIIOeH nepBbM . EcII NOBITc HOBBI NCTOuyHK, yCTPOiCTBO nepeJeT Ha pa60rty C Hm TOLko B TOM Cnyae , KOrDa NotepaH npdeBdyuui CNHAn. 3To No3BOJIaRt npImeHbTy6bnipoBaHne.
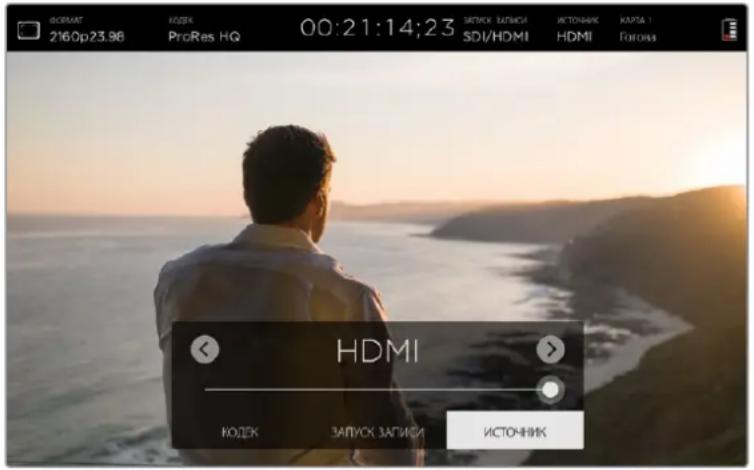
Kapra
Ioka3bBaetcoToHHeNCnObn3yeMoKapTbI nAMrTb, Bb6paHHoB HAcTpOuKaX COxpaHeHnA.
Modelb Blackmagic Video Assist 4K IMeET DBA CIOA DN RSD-KapT. TRObbl Bb6paTb KapTy dNtBannC, BbnoHHTe DeIcTBnB B ONCAHHOM HNKe NopdKe.
1 KocHTecb 3NaUka KapTa nn npOBeIte nabueM no 3KpaHy B rOpN3OHTaNbHOM HappaBHeHH, T06bl OTkpblb HAcTpoKn CoXpaHcHn
2KocHTecb3aKa KapTa 1NnKapTa 2BneBOM BepxHem yIy DCnPJIe.
C NOMOIOHO COOTBETCTBYUOe KHOJIKN MOXHO TAKKe BbIIOJIHNb OOpMaTIPOBAHne KapTbi
HdkaTop KapTbI NOKa3bIaBaeT OAnHO INepeuNCHeHHbIX HNXe COCTOAHN HOCITeA
PpOBePk
NocIe yctAHOBKn SD-KapTbHa kKpaHe NnBnEeTc coo6ueHne «PpOBepKa».B 3to BpeM BInONHHeTc npOBepKa KapTb NaMRTN.
TOTOBA
Iocne npOBepKn OTOpMaTnpOBaHHoN KaTbHa 3KpaH NoABnAETc COO6eHHe «ToBa », 3To O3Haayet RotOBHOCTb KaTb K 3aNNCn .
ΦopMaTHuPOBaTb
Ecnn SD-kapTa HykdaTcB BOpMaTnpoBaHn,Ha 3KpaHe NoRbTcMrraQuee coO6ueHne OpMaTnpoBaTb.KocHTecb HnNkAtopapKaTpbl nI npOBeJnte NaIbceM IO ceHCOPHomy 3KpaHy B rOpNtOHaNbHom HnPaBHeHn, YTO6bl OTkpbl HacTPOuKN CoXPaHEnn OToOpMaTnpoBaTb HocnteJIb NpOp6Hee cm. pa3dE aTa c SD-kaptamn}.
Her Kaptbi
TO COO6eHHe NOBnErc,ecnKapTa naMnTHe yCTaHOBHeBA B BBbpaHHb CNOT
Kapta 3anonHeHa
EcHn Ha SD-KapTe 3aKaHnBaetc CbO6oHoe MeTc npMepHO 3a TpN MHyTbI Do OCTaHOBKn 3aNNC NOBITc MRtaioue coo6uHe He «3aONJIHeHa».
Korda HocnteNb NnHocTbO 3aONHe, TeKCT COo6eHn8 6yET NOcTOHNO OTo6paKaTbc KpaCHbIM CBeTOM, a 3aNNCb PpeKpATITcra . Nocne 3TOrO Video Assist coXpaHNT NocNeHn 3aNNCaHHb foai.
Ecnn BO BTOPOM Cnote ecTb OTOpMaTHPOBAHHa KaPa nAmrINBlackmagicVideo Assist 4K ABToMaTneCKn nepeJeT Ha pa6Oty c Hei .
OctabWeecBpemr
BpeKIMBEoPON3BedeHn HnKAtOp COCTOHN NOKa3bBaET OCTABueec Bpem 3aINcN Ha SD-KapTy.
UpoBHeb 3apra 6atapeu
Ioka3bIbaeT ypoBeHb octaBweroCraapdaakKymyIaTOPOB TTo6bl noLyuHTb noDpO6HyIOHOpMaunKoCHNTecb COOTBEcTBYIOUero 3HaKa
Video Assist chayana nCnoB3yeT 6aTapeo C 6Oonee Hn3Km ypOBHe m 3apJa , a 3aTeM nepeKIOuAcTcRa BTOpyo, TTO IO3BOJAREN 36EkaTB c6oEB B pabo . 3apJa obox aKKyMyIaTOPOB BblIOJIHReTCOHOBpeMeHHo. B 3abNCIMOCTH OT Tnna N COCTOHNH6aTape n Dn NOHON 3apJKn (6e3 INCNOJIb3OBAHHB TeueHne 3tOro BpeMeHH) Tpe6yETc npimepHo Tpr Yaca .
Ha Blackmagic Video Assist DBe NOHOCbIO 3apXeHHbIX aKKyMJIaTOpHbIX 6aTapei CanonLP-E6 No3BOJnIOT BeCTN 3aNcB npIMepHO B TeueHne Tpx YacOB , Ha Blackmagic Video Assist 4K — B TeueHne 80 MNHyT.
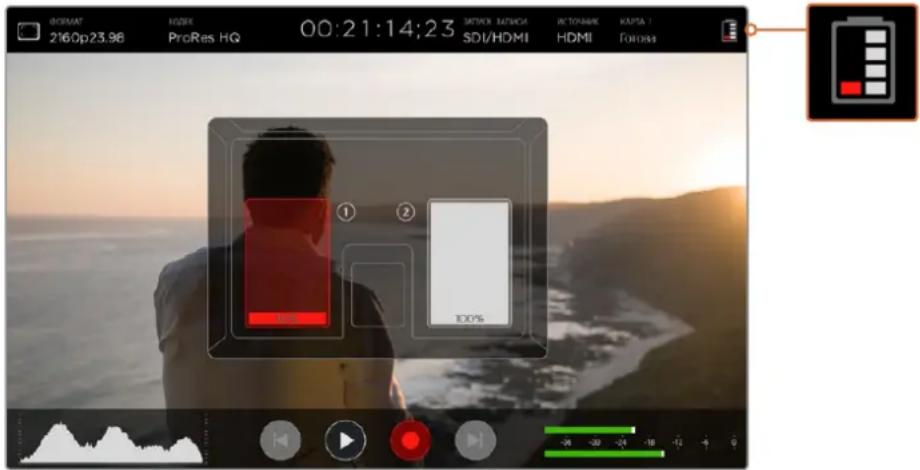
3ym
3ymno3B0nreT ybcnnHbTaMacuTaKorda Hyxho npOBepntb fokyc npn noKnOCHN K kAmpe nPi paccMOrTeT bOTdJIbHbIe DeTaN IN3o6paKeHN. 3Ty fynKIO MOXHO NcNoJb3OBaTb npn KaipnpoBaHN I BO BpEMBOCpONU3BcDEHNA,ODHaKO BO BpEMa3AINCS OHA OTKlOHeHa.
YTO6bI AKTNBnPOBaTb FyHKUHIO 3yma, KOCHNTecb 3HaKa + NOI INNKAToPOM 3apra da 6aTapeu IINOTKIOueHnRA KOCHNTecb 3HaKa eIe pa3 . 3ym MOxHO NcNOJb3OBaTb BO BpeMa npocmotpa Ultra HDHNH- BDco.
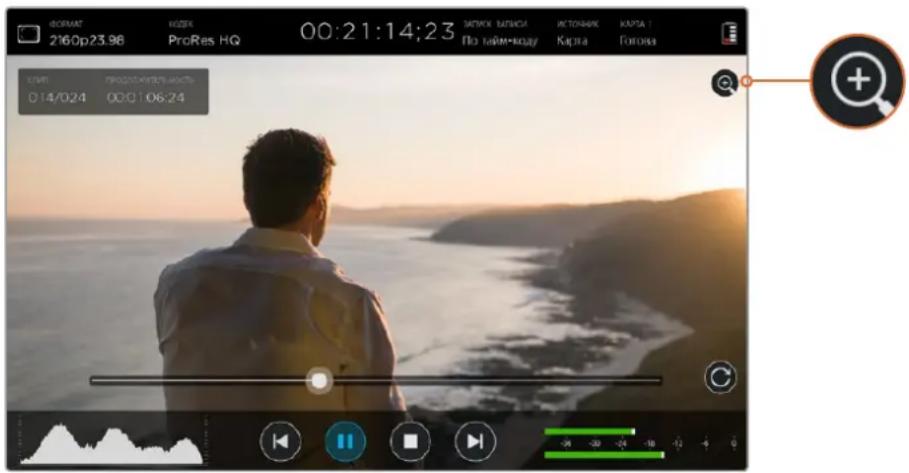
3aHaTPOIkaNo3BONJIeT Bb6paTb CBETINHIMnIHCTpyMeHTaOOKYCUPOBKn .Bo3MOXHbIe BapnaHTb:3eNEHbIKpachNt, CnHmN 6bbl. LCBETINHIMN, nCNOJb3yEmbIXnIIBdEHeHHa HanboJe pe3KNx yAcTkoB N3o6paKeHH, MoKHO N3MeHHTb.
PactaBahne aHaMOpΦHOro n3o6paKeHHa
Ha Blackmagic Video Assist 4K ecTB hacpoika, no3Bolnaua paTARBaTb aHAmOpphi H3O6paKeHHe. Cee nMOUIO MOXHO OTo6paKaTaCkAte IIO TOpN3OHTaJI KApBt , KOrJa CbeMka BeTeCTe Ha KaEmpy c aHAmOpPbIM ObBeKTHOBm . KoΦnIeNT KoppeKUN 3aBNCIT OT yCTaHOBIIeHHo ONTIKN. DcTyINbI TpN OIIuN:1,33x;1,66x 2x.EcIm pactraRbHne He Tpe6yETc, oTKIOHTe erO.
Nobopor 3kpaHa
TtobotKIOHTb ATOmatueckn NOBOPOT kpaHa, Bb6epntoIIOIO «HeT. B 3ToM cnyae nO6paJHHe 6yTeBCrDa BBIOHTbCByTEkyuem NIOJOKeHN, daJe npi NOnHom nobopote dncnne.
Takke MoKHO Bb6paTB HAcTpoKy c NOBopoTom Ha 180°. OHa nO3BOJnEeT 3aФuKcnpoBaTb opEnHTaIIO I3O6paKeHnI npu yCTaHOBKe MOHITopa-peKOpDepa Ha oBec KaMepbl B NepeBepHyToM NOLOXKeHHN.
YTo6bl BKNIOUYNTb aBOMaTnueckn IOBOPOT kKaPaHa, BbIePnte COOTBeTCTByIOUyIO ONIO
Tolbko CnHn
Ha Blackmagic Video Assist 4K ectb Hactpoika «ToJIbKO cHINN», npn nCIOJIb3OBAHN KOTOPo COOTBeTCTByUoiu nIeTOBOJ KaHAn IpeDCTaBHeN B VIne UepHO-6enrO n3OpaKeHn. EcIn B uHPOBOM CHTHane eCTb NOMEXN, OHN HAN6Oee ZAMeTHb IMeHNO B KaHane CINHero UCBeta . UepHO-6eNoE n3OpaKeHne TaKke MoKET CnyKNTd PnOBepKn fOKyCa KaMepbl . YTo6bl AKTNIBPObaTB 3OT pexIM, Bbl6epITE onCNUIO BKN.
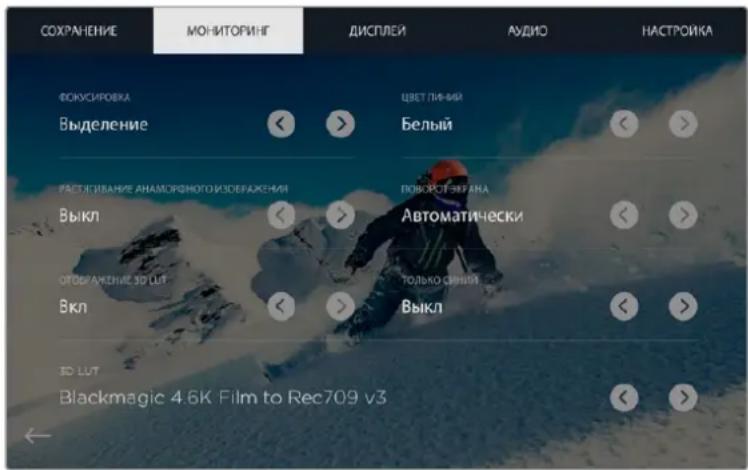
Bb6epnte Bk. nI naHctpoKn OTo6paXeHne 3D LUT nncnoJIyTe cTpeKn dI npexOda K TabNue, KOtopyu HxKHO npImeHTb BO BpeM MoHNTOpINrBa BXoJauEro CnHaIa nn npn BbIOBe BIDeo
Отобрахени 3D LUT
VideoAssistnoBonaTeobpa6aTbBaTb noCtynaouee BnDco C nmoou 3D LUT-ta6nui.
OHa npimHeTc TOnbKO K BbBODIMOMy Ha nCnIe N3o6paKeHIO H He BnIeHT Ha 3aIncb MaTePnana EcnHa 3Tane NoCTnpON3BOCDTa Hc06XoDmO BocCO3dTa TaKyo Je CBETOBYIO CXEMY , 3Ty TaBNIUY B VInDe paJna .cube MoKHO MMIOPTNPOBaTb N3 Video Assist B DaVinci Resolve.
Bo Bpemnoctobpa6bKn TpxmepHbE LUT-tabnuiNo3BONaHT noNpyaTb NcNoB3oBaHHyIO npMOnHTOpINHRe CBTOBYIO CXMY INI DpyrIHO HCOxOAnMyrAMMy .PiopboHcc 66 nx npImeHCHInn EKcnpTe faHOB .cube Ha Video Assist cm. pykoBOCTBO no DaVinci Resolve.
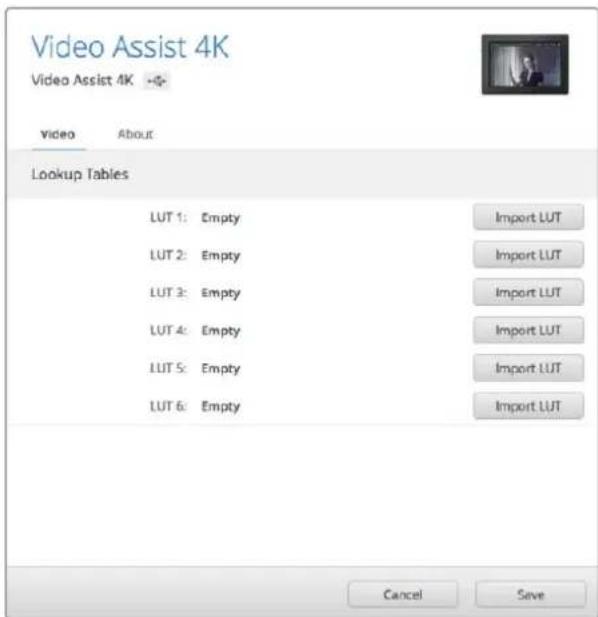
C nomoubkytntbl Blackmagic Video Assist Setup Ha MoHIToppekopdep moKHO 3aRpy3nT do wectn 3D LUT-ta6niu
Pnpaok mnpoTa 3D LUT-ta6nuc
1 POnKIOUHTe MOHITOp peKOpIep Video Assist K KOMNbOTpy C yCTaHOBnCHHOYTNINTOIN Blackmagic Video Assist Setup.
2 3anyctnte yttniTy nOTkpOte HacTPOjKn Video Assist, HaxaB Ha COOTBeCTByoJn 3HaOK
3BknaJa Video coepKNT Weetb NoJe, npedHa3HaueHHbx DnHMMoTa 3D LUT-tabu. HxMITE KONky Import LUT B ncyTOM NOe N Bb6epnte HyxHbI qan .cube Ha KomnbioTepe. HxMITE Open, yTo6bl noTBeepnTb DeiCTBne.
4 DnA COxpaHeHr HObIx HAcTpoE K HxMITE KONKy Save B npabOM HxKHeM yRy OkHa
PpIMHeHHe LUT-taBnUcI K BbIBOUMOMy n3o6paXeHHIO
1TO6bOtKpbItbHAcTpoKINMOHITOpHHra,npoBeIte naIbIeMIOaKpaHyBTopn30HTaIbHOM HapBaJIeHNIMKOCHTECbCOOTBETCTBYIOE3HaYKaBCTPOKEMeHIO
2 C nmoBn npaBo nn neBcBn cTpeKn Bb6epnte onuHn Bk .Dna oTo6paKeHn 3DLUT. T06bl OTKnOHTb LUT-tabNt, KOCHNTecb cTpeKn eue pa3
3 Uto6b Bb6paTb nonc nnnnnpa LUT-tabnnc, KOCHNTecb npabO nn neBOn CTpeKIN B HactpoKe 3D LUT oIN INI HeCKoJIbKO pa3 nnepeXODA K HyKHOMY nIO
IpoBcHTE NaIbUeM NO 3KpaHy B TropnOHTaIbHOM HAnpAbeHm INN KocHITec 3Haayka «Ha3aD, YTo6bI BepHybcra K I3o6paJxehIO. Tenepb K NoctynaoEmy BIndeo 6ydt npImeHrtbcg 3D LUT-Tabuua C NOMOUIIO TabNIU MOXHO BECTMOHOTOPINr HE ToIbKO JIBORO , HO N U Xe 3aIncAHHoro I3o6paJxehn.
Ducnnei
YTo6bOtKpbTb HAcTpOKn DnCnIe, KOChNTecb COoTBcTcByUcero 3HaKa 3Ta fHyKmN no3BOnrE MeHAtb npKocTb, KOHTpAcTHOCt b HaCbIeHHOCt b KK-dncIe. Bb6epnte Heo6xOIMbl npaMeTp npeDInhTe cAanep BnEO BO uIN BnpBO.
RpkocTb
N3meHReT o6yU npKocb KK-dncnner. HanpImep, BO BpeMa pabo npu conHeHom CBete MoXHO yBCNIuHT bpKocb KK-dncnner dnn LyuweBnIMOCTN
KoHTpACT
C NOMOJIbIO 3TOrO INHCTpyMeHTa yBENUHBAOT UIN yMeHbUAOT pa3HNUY MeXy JApKIMN nTeMHbIMN O6IaCTHM. PnB BICOKOM KOHTpacte detaNN OTOpaxaIOTc 60Jee OTeTTNBO aPn HN3KOM N3OpaKeHne BblrAIT MArue .
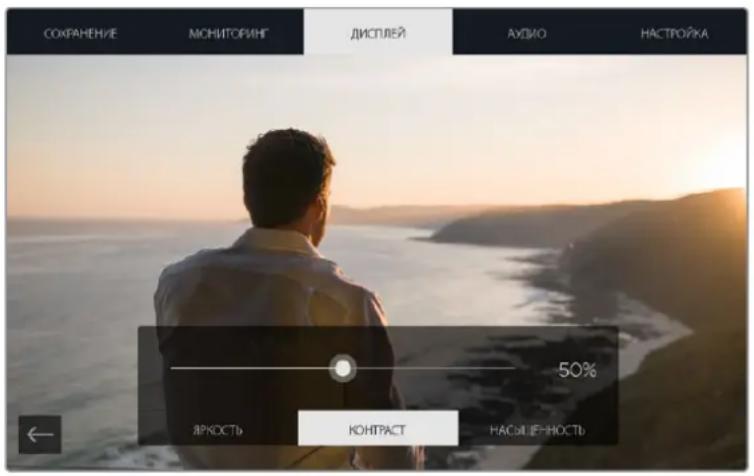
HacbIeHHoCTb
YBENuBaETNIMYMeHbWaetCTeEnbHaCbIeHHeHOCTN3O6paKeHnA.
PnO TKNIOUeHN yCTPOIcTBa OTe N Bce HAcTPOKn COXpAHOTcra . IIO6bE N3MeHEnr 3TNx HAcTPOEK 3aTparnBaKoT ToIbKO n3o6paKeHHe Ha dncnnee He BnHOT Ha 3aNnCsbAemoe BNdeO.
Aydno
Blackmagic Video Assist 4K TAKKE NO3B0JAEET 3aINcBbA Tb KaueCTBeHHyIO 3ByKOByIO DopoKky.ДяKaKdIoro XLR-BXoDA MoXHO INcNoJIb3OBA Tb HeCKOnbKO pa3HbIX HAcTpoE .
1 XLR nHeHbX, XLR mKpOfoH nn Bndeo
Ecnn KaHaNoBbIM XLR-BxOaAM NoKIOueHO npoepcnoHbHoe aynnoobopyoBaHne (3a NCKIOueHHeM MKNpOfoHOB), Heo6xoIIMO nCNOIb3ObaTb OIINHO XLR IInHeHb. B 6OnbHnCTBe CnyaEB Ha TAKOM o6OpdyOBaHN IInHeHbCnIHan CnJIbHee no CpabHeHIO cMKpOfoHHbIM.
Ecn KaHaNoRoBbIM XLR-BxOaAM NoKIOUeHbMIKpOfoHb, Heo6xoMIMO NcNoIb3OBaTb ONuIO XLR MKNPOoOH. BixOHOH CNrHaN MIKpOfoHa Cnabee no CpabHeHIO C NHeHbIM , nToTMy dIg ONtMaHbHO 3aInc 3ByKOBoI DopoxkN Blackmagic Video Assist 4K BblOnnHre Tero yCunHeHne.
Ecnn BmecTo aHaIorOBoro aymo c XLR-BxoOob Heo6xOIMOn nCnONb3ObaT bByXKaHaBbHb 3ByK, BCTpoeHHb B BVneocirHan n Noctynaoiuepe3 SDI- nn HDMI-nHTepfeic, bby6epnte onuio Bndoe.
PIMMEAHNE. Blackmagic Video Assist 4K coxpaHreT nocJeHne IcnoIb3yeMbIe HactpoKn DaKe npi OTknIOUeHN NITaHnB. B cnyae CMeHbI nCTOuHnKa CnHaJI Heo6XoDmO 3aHOBO yCTaHOBnTB HAcTPOKn 3Byka.
2 XLR noHnHexHe
PnCbEMKeB uMHOcpeEINB yCNOBnx pe3KOrO n3MeHHeNr pOMKocTN MOKHOAKTBNPOBaTB 3Ty onuio. B 3ToM cnyae ypoBeH 3Byka 6ydt HEMHO yMeHBWeH ,TONo3BOJNT N36eKaTcNbHbX nepepy30k ayDIOCNHana . Pn CbEMKeB O6bUHbIX yCNOBHXHACPoKy peKOMEHdyETCBKIOCHITb .
3ΦaHTOMHoe NTaHHe
PnnoNkIIOeHmMkpofoHOB,He NMeIOUx xfHyHKUN ABTOHOMHOro NITAHNO MOKHO nOdaBaTbcpe3 XLR-pa3bem. DnA ETORO BKNIOHTe COOTBeCTByIOUHO HAcTpOyKy
PIMMEAHNE. Pn nCnOJIb3OBaHHm MInKpOFOHOB C aBOTHOMHbIM NITaHHeM OT 6aTapeek Heo6xOJMoO OTKIOUHTb faHTOMHoe NITaHHe.EcNI 3TOr He cIeNaTb, MInKpOFOHbMOXHO NOBpeINtB.
Hactpoika
Ha 30T BknaKe MoKHO yCTaHOBnTB DaTy N BPem , a TAKKe yBnDcTeb MMy yCtpoYCTBa , BB6paHHbI R3blK nTEkyuBepcnIO BHTpeHrero IporpaMMHOrO oecneChn .
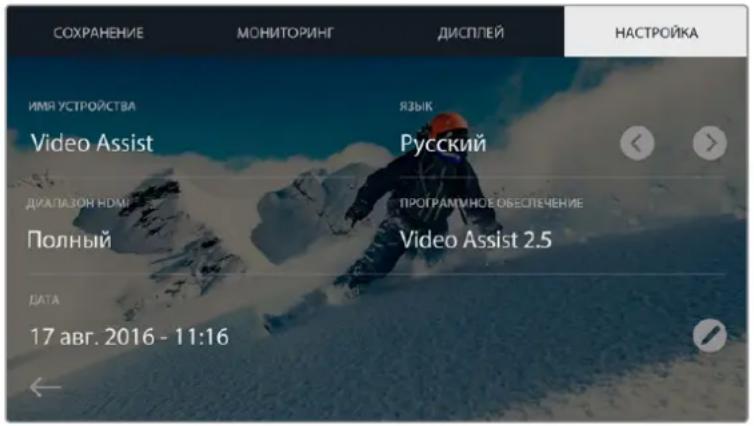
Ha ctpaHnue HAcTpoE KMOXHO BbIbpaTb OOnm DnIy Napametpa《DnanaonHDMi
3bIK
Дяп repeknioeHЯ МExу aHnncKmИ npyHM 3aIpyKeHHbIM A3bIkom NcNoIb3yTe CTrpenKII Pndpo6He cM. pa3en «Blackmagic Video Assist Setup»
Dnana3OHHDMI
Ha moen Video Assist HD ectb hactpoka «Диana3OH HDMI», kotopar no3Bolraet Bb6paTb TIN NOCTynaIOUeO CnHana.ДЯ KOPpeKTHorO OTO6paKeHnДиana3OHbI CBETOB Ha BXode IN BbIXOe DoJXHBcOBnAaTb.MoKHO nCnOlb3OaTb OdHy n3 Tpex onuN : «ПonHbI», «Виdeo» nnn «ABToMaTnUcCKn
B nocneHem cnyae npaMeTpby 6ydyyt cTaHOBneHb camm yCTpoCTBOM .Ha Video Assist 4K TAKOHacptponKeHt , INdana3OH HDMI bBbpaetcBA BAtomauyeckom pexkme
YcTaHOBKa DaTbI IN BpeMeHn
Pn npabInbHoy yctahOBke 3Tnx Hactpoek faIb C KINpAm6ydyr cOepKatb
HOpMaUIO O Date
N BpeMeHN IX 3aNNC
PoprOk yctaHOBKn DaTbI N BpeMeHn
1Kochntecb3HaKaaBtOpyKn
2Yto6bI 3MeHnTb DaTy WIn BpEmKoCHNTecB 3HaKa DnepexOda K HyyKHOmy npaMeTp
3 HaxMITE KHOKky COxpaHHeHH
MOnHTOpINr c nOMOuBIO 3KpaHHbIX INdNKaTOPOB
Video Assist nMeet kpaHbIe HnDkaTOpbl, KOtOpbl eNo3BOnaIOT BbIOBnITb rNCTOrpamMy, OTo6paKaioyUO yPoCbH bKcno3uun npacnpedeneHne apKocTN a TaKKe pOBeprbyoPObCh 3Byka
ΓνικτοραμΜα
B neBoy qactn 3kpaHa oTo6pkaaEeTcIcTOrpaMa , KOToPAI NOKa3bIAeT paCnpedeHHe IRPKoCTN. CcpHOMy UBeTy COOTBCETCTByET KpaHra JcBAr ToKa , 6cIOMy — KpaHra npBaA KorJa KpVBa HaxOHTCR B PpeJExax 3tIX TpaHnU C O6Enx CTopoH 3aKaHnHbAeTCB D aHHbIX TOckAX , MOXHO N36ExaTb 3acBETKn NIN 3aTeMHeHnR C CoXpaHeHm ETeTaleB B CpEdHX TOhAX .
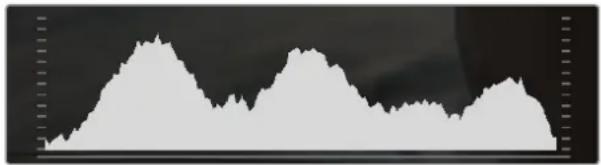
HdkaTopb3Byka
B npabOy qacn 3kpaHa HaxoatcH INdkKaTOpbl 3Byka dna KaHaoB 1n2. Ha nCnnee ypoBeHb OTo6paKaetcB dBFS, pni ATOM MaKcImaJIbHbIe 3NaueHna ΦIKCnpYIOCTc Ha KopoTKe Bpemr nn 06JeHCHN IN 3pntelbHOrO BOCnPnATn.
YTO6bI NOUYuHT bKaueCTBeHHyO 3ByKOByIO DOpoxKy 3HaueHnCnHnA JOnJXHb6bITb HnKe O dBFS. B CNYae npeBbWeHn ETO rpoBnBa03HnKae Tneperpy3Ka , N ayDnOCnHn IckKaaetcN .OTnMaJIbHbM 6yEt yPOBeH, pRn KOTOpOM 3HaueHn HaxoTcB B rpaHuaX NocJeHero 3eHeHOro CeMeHT a , T.e. MeKdy -20 n-12 dBFS. Ecnn NIKOBaB BeNUnHa nonaet B XeJIb nn KpaCHb cerMeHT, T.e. npeBbIaet-12 n-6 dBFS, 3Byk 6byd TmEe Tn NorpeWHOctn .
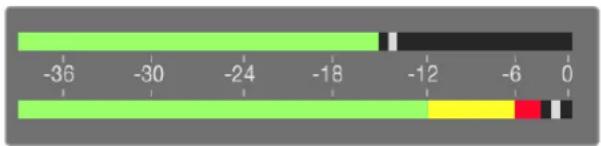
Ia KaHana 1nIKOBbIe 3HaueHnna HaxoJrTaB rpaHnua XeHoi 30HbI,Ha KaHane 2 Bo3MOxHbI nepepykni no 3Byky
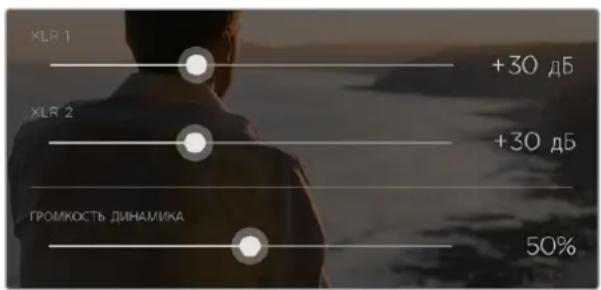
TObbI NmEHHb yPoBcH bAnorOBoro ayDnOcnHnHa Ha Blackmagic Video Assist 4K, KocHTecb HnDKaTOpOB 3Byka.ДЯ yMeHbIeHnI INyYBeINuYeHnTEkyUeero 3NaueHn IpeEbnHbTe cnaIep KaJdOro KaHana BneBO INN BnpBO.
Yro6bI N3MeHHTypoBeHb aHaNoRoBOrO ayDnOcRHaHa Ha Blackmagic Video Assist 4K, KocHTecb INHdkaTopa 3Byka I nepeDbHbTe cnaep KaJDoR O KaHaJa BNeBO nnBnpaBO
PIMMEAHNE. 306bI zanncat b3yK, nocTynaioHn Ha Blackmagic Video Assist 4K uepe3 XLR-pa3bembl, Bb6epnte HacptpoKy XLR nHeHHn nn XLR mKpOoH.
Video Scopes
Blackmagic Video Assist 4K ΜeMeT ΚeTbpe ΚkpaHbIx INHnKaTopa Dn moHnTopuHra KauecBa BndeB pealbHom BpemHe NToΦopMa CnHana, DnCnIe NapaMeTPOB, BEKTOPOCKON I nCTORpAMMA. CnxNOMOuB MOxHO KOHTponPiPoBaT b aHaC ToHOB, pOpEepaTb ypoBHn BndeO, YTObI He DoNyckaTb3aTEMHeHH NIN 3acBeTKN 3o6paKeHHa, a TaKke BByBnTb PpeoBlaJaHne OTenbHbX OTENKOB.
KaJbHnDnKATOp npedctabnEeB rpaueckom Bnde pa3nHbIe napameTpbcuHana,Takne KaKApKoCTb,UBcTHOCbT,HaCbIeHHOCbNOTCHOK,aTaKke KpaChb,NcHbN cHNN KaHaNb,KOTOpbcB CBOKyIHOCHTΦopMpyOT CBETBCero n3obpaxHeHn eER KOHTpactHOCTb
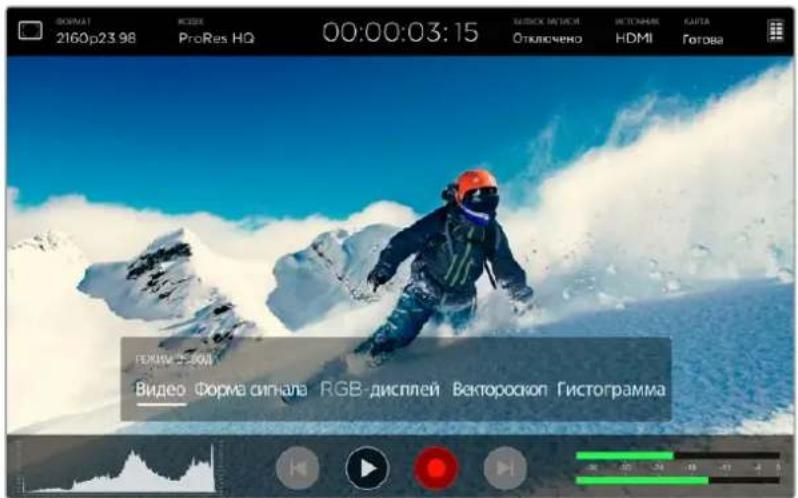
MeHIO 3KpaHHbIX INIikKaTOpOB C BO3MOXKhBIMI OIIICINIM
Pa6oTa C 3KpaHHbIMn INHdkaTopamN
ДуdoctункИндКаTOpAMHaMoIeVid eoAssist 4K KocHNTecb TuctorpamMbI B IeBOM HxHHeM yIyN ekpaHa.OTkpoETcMeHIO «PexmBbOda》,cNoMOuHIO KOTopOro MoXHO nepeHTN KΦopme CnHana,RGB-ДиCnIeO,BeKToPocKony nIINrCTorpamMe.IJn npocmotpa N36paKeHnB6eNnDnKaTOpOB Bb6epnte «Budoe
YTo6bI 3aKpbTb MeHIO, KOCHINTeCB MOHITOpa 3a PpeJeMaMn OKHa
Hactpokka HndkKatopob
Pocne Bb6opa HnIkaTopa KocHTecb MOHITopa BHyTpN 3O6paJxHn, yTo6blOTKpbTb cnaIepbHacTpoKn 3HaOH KBDeo.

CnaidepbHacTpoKm3NaOeB
EcnKoCHybcnAepeOB.BneBouactNekpaHa6dyTOTKpbItbHAcTPOKnRpKocTN InpO3paHcHcTn.
CnxnMOOIO MOKHO NOO6paTb NapaMeTpbl OTO6paKeHHINHdkAToPOB HaΦOHE BnDeo
Rpkocb- nCnOlb3yETcA DnI KOppeKTHIpOBKn COOTBeCTbYIOe HAcTpoKn INHdkaTopa
PpO3paHocb- nCnOJIb3yEeTcA DnK KoppeKTHnpOBKn COOTBeTCTByUoSe HAcTpOaKN INHdkaTopa.
KOMnHaIaIg 3Tnx DByx npametpoB no3BoJareT noO6paTb ONImalhBi peKIM OTo6paKeHIN BUNEO INHINKaTOPOB.
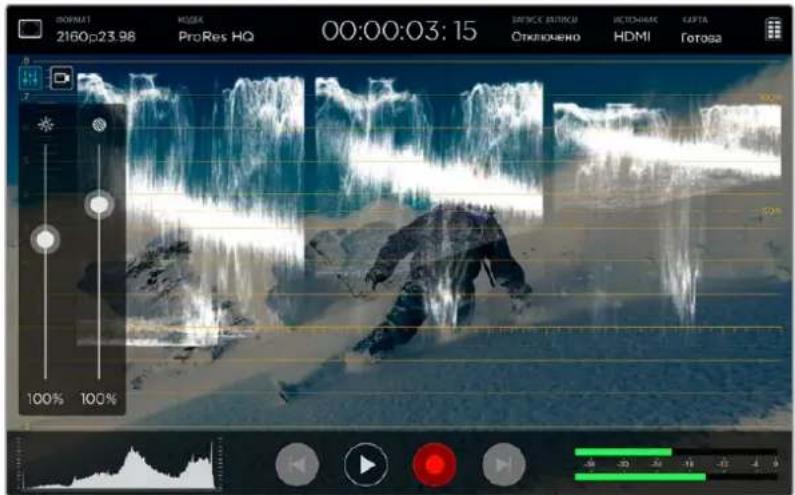
Ipyem HactpoiKn npo3paHocn MOxHO OndOBpeMeHHO 0To6paxKaTB BnDeo NekpaHHb INHdkatop
EcnKocHybc3HaUkaBnDeo ,HnDnKaTOpb6ydyT BbIOuTbcNHa BeCb 3kpaH , a CamO n06paKeHHe - B npabOM BepxHem yrny . Tako peXMM Oco6cHHO ydo6ch Dnra ToHoro KOHTPOJI napaMeTPOB CnHana,
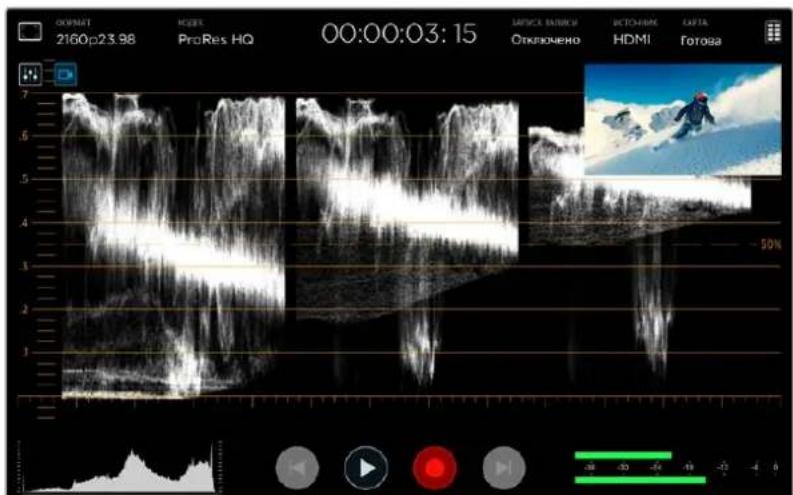
PnKacAHN 3HaUcKa BInDeO INHnKAToPbI BBIOaTcRa Ha BeCb AkaH, a cAmO N3oBpaKeHHe -B npabOM BepxHem yTny
ΦopMa cnHana
3TOT INHINKATOP CNYKNT DnO OTO6paXCHN HOpMbI CNTHA B LIOΦPOBOM BIDE N ICNONbEyETCA DnA MOHHTOPUNHRA yPOBH RAKOCTN BIDEQ
HxHHra rpaHnca COOBETCTByeT ypOBHIO UePHORo HIN TMHbM 3OHAM N3O6paKeHN , BepxHRA -yPOBHO 6eIOno HIN CBeTbIM yAcTkAM . Duaa3OH Mekdy HMM NOKa3bBaet O6yIO CTeNEHB KOHTpactHOCTN BIDeo. BuD fOpMb CuHa a3AaCIT OT cBemOuHOro MaTePnAna . Pn MOHtOpnHRe KaJPOB C BbICOKoKOHpactHOCTbIO NOyToHa MoryT OTCYCTBOBaTb.
TTO6bI NOJYUHTb KaueCTBeHHb MaTePnA , yPOBHe b CnHana He DOnJIeH ONyCKaTBc HNKe 0% N noDnHMaTbC Bblc 100%. Ecn cro 3HaueHnB BixOaT 3a 3Tu paMKn , HEKOToPbC dTaIi B TcMhbIX nCBETlbx 3OHAx 6dyr TypaheHbI .
Φopma ciHana -3to rpaqueckoe npedctablenHe n3o6paxehn, noka3bBaioe ypoBN npkoCTn c pacnpedeJeHnem no ropu3oHTaII. Hanpimep, ecln neba CTopoHa He6a npBHeCTyDmHOH cbemKe 3acBeueHa, to rpaqHK BTOI qactn 3o6paxehn 6ydt BIIe 100%.
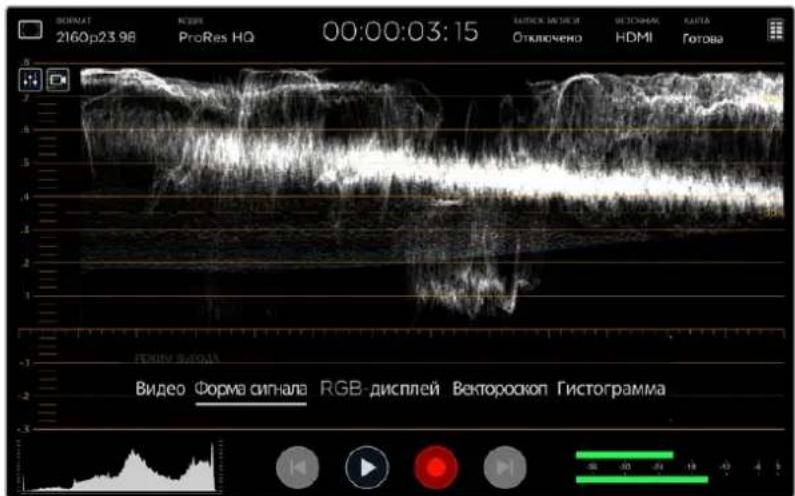
DcnnneFopmbi CNHana noka3bBaet ypoBHN npKoCTn
RGB-dncnn
RGB-ДИСПЛЕМ NOKAБBAEТ RPKOCb OTДENBHOДЯ Kpachoro,ЗELHORN CnHero .C NOMOuBIO 3TOROHCTPymeHTA MOXHO CPaBHmBaTb yPOBHN KaHaOB , a TAKKe BByBnTb npeoBnaDAHne KaKOrO -Nl6o UBeTaIyTEM COIOCTABJIeH N Oblacte CBeta , NOLYTOHA N TeH . HApPIMep,ecNI yPoBHe b TEMbIX yAcTkoBBlWe B KaHale CnHero , TO TEH N CodepKaT 3HaHTeNbHoE KOINcHcTeBO 3TORO Ubeta
Bo3MOXHOCTb yBnDcTb paCnpceIeHHe TOHO B KaKdOM N3 KaHAnOB DaCT NCKNIOHTcNb HO NOpO6Hy0 HOpMaUIO O CBete B I3o6paXeHN . 3TO No3BOJAEYCTpaHNTb PpO6IeMbICaNAHCOM BEnoro N BbAIBTb PpeO6IaJaHne OTenbHorO cBETA. TaK KRG-BINcPNei NOKa3bBaET npaMeTpbl KaJDOrKaHaIa, MoXHO ZAMeITb YtpATy Detanei DnO ppeJeHHOrO cBETA , KOtopyH HeNB3R OTCJIeINb IIpi BBBODe oBeEiHNHeHHo fOpMb ciHaIa.
TpnoTneBbHx npametpa RGB-dncnner OTo6pakaHTcno TAKOMy KepnHunny ,Kak fOpma CnHana . BepxHn,cpedn HnHKn CEmENTb COOTBeCTbYIO T O6naCTM CBeTa,NOJTOHa NTeHn .
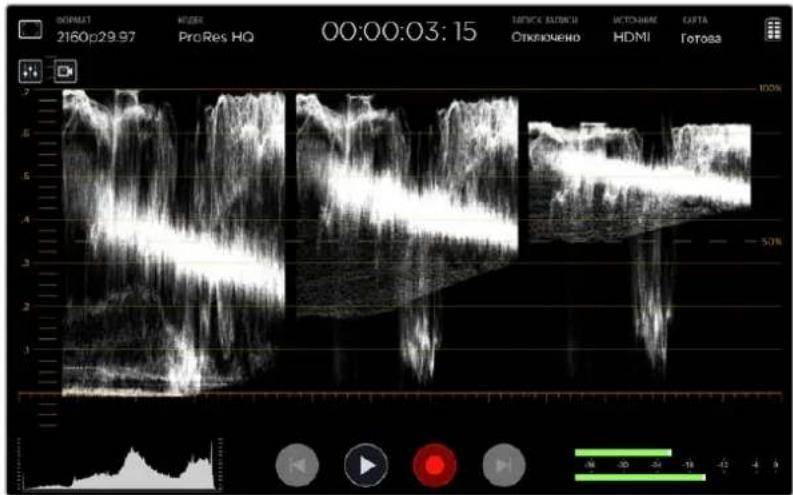
Ha RGB-dinncnneBbVbOaTcnaPametpbKpaCHoro,eneHoro nCnHero kaHanoB
BekTopockon
BekTopoocn no3BONReT oueHHTb dHaNa3OH OTeKOB 乙BaTa H hAcbIeHHocTh N3O6paKeHn. Ha Blackmagic Video Assist 4K 3OT INCTpyMeHT IMeET BIN TpaDInuHOHOrO rpaФnKa , B KOTOpOM KpaHne TOOKN COOTBeTCTByOT 100%-N HaCbIeHHOCTH DnA KaJDO UcBaTa .
CnIbHO HacbiueHHe IeBaTe OTo6paKaIOCTc 6NIke K KpaAM , a MeHee HaCbIeHHBe OCTaIOCTc 6NIke K cHTpy, KOtOpBIOO3HaaueT HyNeByIO HAcBiEHHoCTb . 3TOr TpaΦNK N03BOJReT OCeHNTb KOJIueCTBO OTHEKOB INIO6paKeHIn INx INpINHApIeXHooCTb K TOMY INN NHOMY LIBETy
Kpome Toro, conoctabnene cpehne qactn rpaNkac eHTpom Bektopockona no3BONHcT cyNTb O cbeTOBOM dnc6baHnce B n3obpaXeHH . HapnPmep, ee CMEeHne B TOM ININ HHom HAnPabHeHH yka3bIaBcT Ha npco6bnaHnC oTcNbHorO icta NIN OTtHeKa.
XOTaBaIaHcUBeTaMOKHO KOHTpOINPOBaTb KaK Ha BkIaNKe RGB-dIcPnEe,Tak nC NOMOJIbB EKTOPOCKONA, npo6nembl C3TNMnapaMeTpomnpoieOTCneDITb BO BTOPOM Cnyae
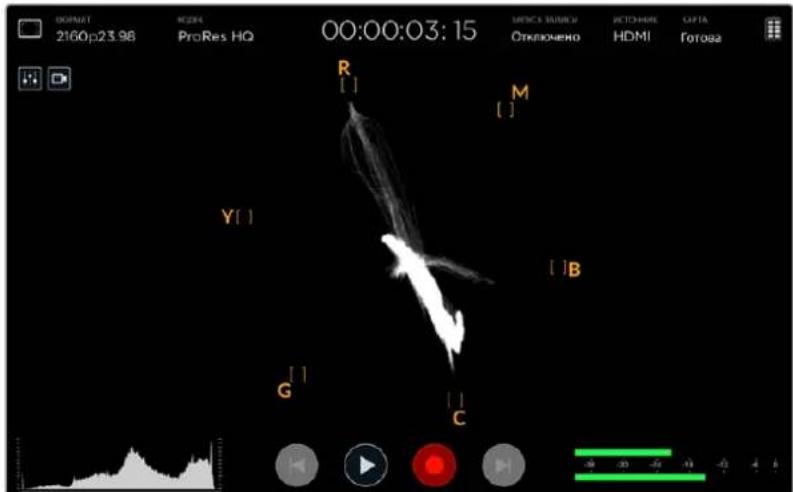
BektopoKON no8BOJnRE OueHb Dmna3OH OTHeKOB Ubeta HacbiuHooCTb NIO6paXeHH
COBET. Pn MOHITOpHNRE Bnideo, CoepXaIero ToHa KoxHoro NOKPOBa, COxpaHnTe HacbIeHHOCt b Tnblx CBeTob B IIOJoxEHN 10 YacOB, OHO Ha3bIbaeTc IINHei eTENECHORO TOHa] INIO3BOJAEET DOBHTCB TaKOTO CBeta KOxN, KOTOpB IIyDeT BByIJeDte b ECTeCTBEHbIM He3aBNCIMO OT paCOBoI pInHaADLeXHOCTN YeNoBeka.
YBeInuHHe rpaΦnKa BEKTopoCkona
IaTeTn3aun daHbIX O 306paXeHH MoXHO yBENuHTb 3KpAH BcKTopoCkOJa.3To yDooH npmOHITOpHRe BnDeo C HeBbICOKOHaCbIeHHOCbIO, NocKONbky ObbHOr PaΦNK BblrNt KaK HeBolBoMaccNB HOpMaun BOKpy TcHPTa WkaJIb
YBENHHe rpaФИKa Ha BeKToPocKone
1Kochntecb3kpaHa ,YTO6bl NOBINCH3HaOHyBEINHHTeBHOCTEKla
2 Haxmte Ha 3aok oinn pa3 nla DBykpaTHoro nn DbaXdbn yetbpexxpaTHoro yBeneHH
3 TTo6bI BepHyTbcK O6bHOMy BNDy , HaxMITE Ha 3HaOKe ue pa3 .
HtObblckpbl3Haayok yBeneHntelhoro CTekna , KOCHNTecb NIO60I6NaCTn 3a ero npedeJaM .
Γνctorpamma
IrcTOrpMaMnIOKa3BaBaeTpacPipeJeHHe RPKOCTN,NO3BOJRAOTCJIeINbPcCKyTPaTbTeaJIeB B o6NaCTx CBeta N TeHN . Cee NMOUBo MOXHO TaKKe KOHTPOIpOBaTb N3MeHHe BInDeo npi KoppeKTIpOBKe rMMbl
CJIeBOI CTOpOHy OTo6paKaIOCT TeMHbTe ToHa , CIIpaBOI CBeTIIbe .Ipi MOHITOpHRe BIneo C KAmepbl MoKHO 3aMeHTB CMeUeHHe IcTOrPaMMbI BNeBO NIN BnPaBO Ipi 3aKpBTIN NIN OTKpBTIN DnaΦpaMbl O6bekTnBa.3OT INCHTpymEt MOKHO INCNOJb3OBaTB JIN COxPAHENH DEtAlN3aUNB OblaCTHX CBeta I TEnH, a TaXKe IeIe npOBepKN B DnAna3oHAX ToHaJIbHOCTN. HanpIMep. UIpOKN DnAna3OH B CpeHne Obnactn TnCTORpaMMbI O3Naayet XopoWyIO EKnO3uIO B 3OHe NOnyTOHOB
EcnBTOUKe 0% nIN 100% rpaqHKI MeET pe3Kne rpaHnCbl, BIneo MoKet coepKaTb yacTk CytpaehHHBMn DeTalAMn. Bo BPemcBcEMKn BaxHO He donyckaTb HeKOppeKTHbIX ypoBHn BIndeocnHaTa KaK DnA KaueCTBeHHOn UBeToYCTaHOBKn Tpe6yTeCB BicOkaN DeTALn3aUNB O6NaCTx CBeta N TeHN PnpobnyTe CoXPaHb YpOBeHb EKnO3uNn TaKIM Obpa3OM , To6bI KPNBaY KpaEB ICTORpaMMb IMema NnABHyo fOpMy, a 60nbunHCTBO DaHHbx OCTaBAnOCB B CepeDInHe . 2TO No3BONIT HAcTpOHTb CBeTbe 6e3 IOTepn DeTAln3aUNI IO6NtBCX XopoWero COCTOHH CNBTLX N TEMHbX 3OH
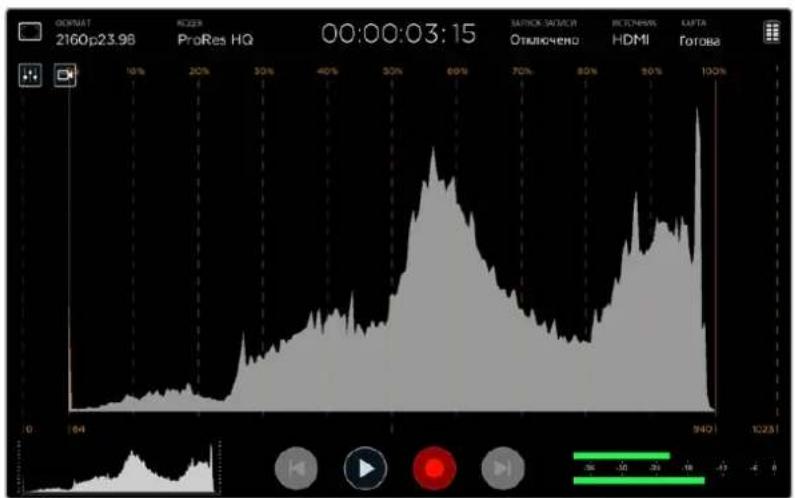
TicrpaMa nokaBaaet paCpeDeneHne npKoCTn OYaCTKO BTeH N 3OHaM CBeta
Pa6ota c SD-kaptaMn
BbI6op ckopoCTHOI SD-kaPTbI
ДлгдзпсВUltraHDиHD Heo6xOmoIcnoIb3OBaTbSD-kapTb KlaCCa UHS-II,Днг coхpaHEnHnToJIbKO B HDIOdOyT KapTb UHS-I.3TN HAKONITeN OBeCneuBaIOT BICOKyO CkopoCTb NepeDaHnXpaHEnHe 60nbOro O6bema daHHbx
Длг Здпсн Ultra HD-Bndeо Ha Blackmagic Video Assist 4K noTpce6yToTc caMbIe ckopocThIbe KapTbUHS-II. Tabица Нже соржп.TpeueHb noCleDnHx MoeJIe, KOtOpBie MoXHO nCNoIb3OBA TbДЯ coхраhenmaMATEPINA B Ultra HD, HDnSD.3a INΦopMaunperyIaRho O6HOBJAErC ,noTOMyMbI peKoMeHnyem o6paAaTbC K CamOII noCleDHeB BerCn DaHHoro pyKOBoDCTBa , KOTOpYIO MoXHO 3aRpy3HTb Ha caTe Blackmagic Design no appecy www.blackmagicdesign.com/ru/support.
Tabnua coepknt HauMeHOaHnI npoteTnpoBaHHbIX HAMSD-kapt c yka3Haem MaKcMaJIbHO BbCOKOrO fOpMaTa 3aNNiN NoDpeKKBaEMoHa Blackmagic Video Assist 4K.
CoBMeCTNMBle SD-KapTbi
| Мakсималький подерхиваемы Формат | Проблемы и мody "... | Емкость |
| Ultra HD 2160p/30, вkl. MXF Transcend SDXC UHS II 180MB/s 64 Г... | ||
| Ultra HD 2160p/30, вkl. MXF Lexar SDXC UHSII 2000x 300MB/s 64 Г... | ||
| Ultra HD 2160p/30, вkl. MXF Lexar SDHC UHSII 2000x 300MB/s 32 Г... | ||
| Ultra HD 2160p/30, вkl. MXF Toshiba Exceria Pro SDXC UHSII 64 Г... | ||
| Ultra HD 2160p/30 Delkin Devices SD SDHC UHSII 250MB/s 32 Г... | ||
| Ultra HD 2160p/30 SanDisk Extreme Pro SDXC UHSII 280MB/s 64 Г... | ||
| HD 1080p/60, вkl. MXF SanDisk Extreme Pro UHS I 95MB/s 64 Г... | ||
| HD 1080p/60 | Lexar SDHC UHS II 1000x 150MB/s | 32 Г... |
| HD 1080p/60 | Lexar SDXC UHS II 1000x 150MB/s | 64 Г... |
| HD 1080p/60 | Lexar SDXC UHS II 1000x 150MB/s | 128 Г... |
| HD 1080p/60 | Lexar SDXC UHS II 1000x 150MB/s | 256 Г... |
| HD 1080p/30, вkl. MXF Lexar SDHC UHS I 633x 95MB/s 32 Г... | ||
| HD 1080p/30, вkl. MXF Lexar SDXC UHS I 633x 95MB/s 64 Г... |
BoIbIuHCTBO SD-Kapr UHS-I uH5-II nopeKmbaot 3anCb CkaToro HD-BVJeO co ckopocBIOdo 60 kaipob/c, oHaKaO npedBaPteNbHO peKOMeHnyETCA IpOBepntb INx PpOn3BODTeNbHOCTb. 2TO MOKHO cEnaTc nOMoUbYtUNbI Blackmagic Disk Speed Test, KOTOPaDocTyHnA DnA 3arpy3Kn BueHTpe nopeKk BlaMigic Design.bone noPpO6Ho 6yTuNITe Disk Speed TestcM.pazden «IpoBepka ckopocTn DnCKa>.
Форматурова中华文化 SD-kapт ha Video Assist
ДлформатураьнгSD-Kapтлперейдгкнactpoикam coхpaehн .Форматураьнe BO3MOxH0 ндфайюву сnteMy HFS+ mExFAT.
PekomEnyETcNcIb3OBAbTbOpMaTHHS+,TaKkeHBeCTHbKaMacOS Extended,NOTOMyTO OH NDoepKnBaET npOTOKoINPOBaHne. DaHHbe Ha HocNTeLaX C npOTOKoINPOBaHNem NyUe 3aunueHb OT NOBpeKJeHn, INxPiOSe BOCCTaHOBHTb .OpMaT HFS+NoDepKnBaETc ONepaUNOHOn CNCTEmoM Mac OS.
Opmat ExFAT MOKHO NcIIOBbTaHa IaTfopMax Mac OS n Windows 6e3doIaHHTeJIbHOrnporpaMMHoro oOecneueHH. Heo6xoJMo NOMHTb, YTO exFAT He noDpeKnBaET npOTOKoNPOBaHHe, NO3OMy B cIyueae NobpeKdEHHa KaPTb ee daHHbe 6yET TpydHe BOCCTaHOBtB

Video Assist no3B0n8et otfopmatnpoBaTB SD-kapTy noD paIIOByoCnCTemy HFS+ nI exFAT. IpoBeIte naIbceM NO ekpaHy B rOpN3OHTaBHOMHaPpAbeHH, qTO6bI OTKpbTb HAcTpOKN CoXpaHeHH.
Порадok Форматураьни SD-kapтbl
1 PpOBeIte NaIbIeM No ceHcOpHOMy 3KpaHy B Tropn3OHTaJIbHOM HaIpaBHeHH NIN KOCHTecb 3HaUka C OTO6paKeHMe COCToHnA KapTb , YTO6bl OTKpbITb HAcTpOJN CoXpaHeHH
2 KocnHTeCb KhoNKn fOpMaTnpoBaHnHa Blackmagic Video Assist 4K KoCHnTeCb KhoNKn, KOToPaa CoOBeTCTByeT HxHoi KapTe (ΦopMaTnpoBaTb KapTy 1) nn (ΦopMaTnpoBaTb KapTy 2)).
3 VcnoIb3y npabyo n nebyo cTpekn , Bb6epnte faaiNobyocnTeMy HFS+ nn exFAT 1 KocHTecb KOnKn «Opmatnpobat KapTy eue pa3.
4 NoBHTc coo6eHne , npednaaroiuee noTBePnHTb fOpMaTHPOBAHHe 3a6yDbTe BbnoHNtpe3epBHOe KOnIPoBaHHe BCEX BaKHBIX daHHbIX, NOTOMY TTO TEIeCTBNE HeJIb3r OTMeHNTB. Bb6epnte 巧 OpMaTHPOBaTB KapTy, TTObI pOdoJIKHTb IIN 巧 OTMeHNTB, TTObl npeBaTb opMaTHPOBAHHe
5 INHikKaTOp BbINONHeHn 3aauN OTo6paKaET COCTOHNe FOpMaTIpOBaHn .IocJIe 3aBepWeHn 3aauN NORBtCra Coo6ueHne FOpMaTIpOBaHn 3aKOHueHO.
6 BbIepeTe OK,HTobbBcHpyTbcKa HAcTpOaKAM CoXpaHeHnA
ΦopMaTnpoBaHne SD-kapT c NOMOuI KOMNbIOTepa
OpMaTnOpaBHaHne SD-Kapr MoXHo TaKxE BbIOnHITb C NmOuBIO KOMNbIePa Ha nlaTfOpMe Mac OS HNI Windows.
Ioprotobka SD-kapt Ha komnbioTepe c Mac OS
Длгформатиpoьанн(инциалиизаун)SD-kapтюнсчсtemуHFS+ин exFATBOCNOLb3yntecblNCKOBOуTNIToN Disk Utility,КOTOPA BXOДNT BnakET Mac OS.Ecni HOCHTeB yXe coepKNT KaKne -JIN6 DaHHbie,ВынIHNTe IN pe3epBHOe KONIPOBaHne,NotOMY UTO pRnФрматиpoьанн OH bdyt ydaJIeHbI
1 YctaHOBNTe KapTy B CNOT KOMNbIePa UNY UCTpoIcTb DnA UTeHIN
2 Bb6epuTe Applications/Utilities (PpnoxehnryyTtnrbl) n3anyctteDisk Utility.
3 UeKHTe KHOHKO Mbln no 3HaKy SD- KapTb N Bbl6epnte BknaKy Erase (OuCTnb).
4 BbIepnTe fOpMaT Mac OS Extended (Journaled) nn exFAT.
5 YkaHnTe Ha3BaHnne HOBOro TOMa B nOJe Name N BB6CpntE Erase. No OKOHuaHHN OopMaTnPOBaHHN SD-KapTa 6yET rOToBA K NCIOJIb3OBAHHN .

Ha natafopme Mac OS nla fopmatipobanra SD-kapb noa cmtmy Mac OS Extended (Journaled) nn exFAT nnonbayetc Disk Utility
Ioprotobka SD-kaprHa kOmnbIope noy npabJIeHnEM Windows
Ha PIK noynpaBHeHem Windows fOpMaTnPOBaHne SD-KapTb noD faIIOByo CnCTemy exFAT BblonHHOT cNoMoUeOnmFormat.BblonHte pe3epBHOe KOnPobAHne BCex BaXhIX daHHbIX, nOTOMy TTO npf oopMaTnPOBaHn HocuTeN OHn bdyT ydaJIeHbI.
1 YctaHOBNTe KapTy B CNOT KOMNbIepea INN yCTpoIcTBO IINIy UTeHIN
2 OTKpoTe MeHIO HIN EKpaH Start (Ilyck) N BbIepeHTe Computer (KOMNbIOTeP).LJIeKNHITe npaBOH KHOIIKO Mblu Nn 3HaKy SD-KapTbi.
3 B KOHTEKTHOM MEHIO BbBepnte Format(ΦopMaTUpoBaTb).
4 Bb6epnte faHOByIO CNTcEmy exFAT N yCTaHOBInTe pa3MeK knaCTepa ,paHBi 128 K6.
5 YkaKHTe Metky Toma , Bb6epnte Quick Format (BbCTpeo fOpMaTHPOBaHnD n Start (Haatb).
6 NOKOHAHIN OOPMaTIpOBAHIN SD-KapTa 6yDcTe RoToBa KNCNoJIb3OBAHIN.
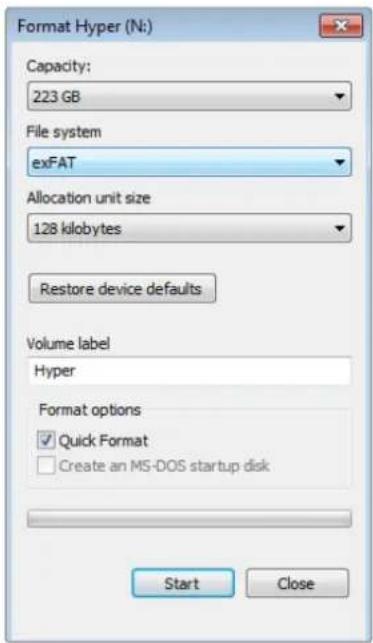
Ha natafopme Windows nla fopmatnpobanr SD-kaptn non cnctemy exFAT nconnbetycra danaorobooe okho Format
Pa6ota c φaɪnʌmɪ, 3aɪncaHbɪmɪ Na SD-kaPty
IocTyKΦaHnAm ProRes u DNx Ha SD-kapTe BO3MOXeH npu yCTaHOBKe HAKONITeH HeNOCpeDCTBeHHO B CNOT KOMbIbOTepaC ONEpaUHOHOnHcNCTeMoH Mac OS NIN Windows JIN6o C NOMOJIbO yCTpOJCTBA UTEHIN
I N3BneKeNTe SD-kapTy n3 Video Assist n yctaHObITE ee B COOTBeTCTBYIOUIN CNOT KOMNBIOTEpa nn yCTpOInCTBO YTEHn. DocTyN K KapTe OcyuECTBJIETCR TAK Ke , KaK K BHeUNHEMy JecTKOMy DNCKy, HAKONITEnIO USB nn npDpyROMy yCTpOInCTBy xpaHENr daHHbx , NOkKnIOueHHOMY K KOMNBIOTEpy.
2 Daxkbl eKHTe KHONKO Mbln no 3HaKy SD-KapTbI, TTObI OTKpbITcNcoK aaiIOB QuickTime nn MXF.
3 Tenepb faIbI c Hocnten IerKO nOmeCTnB Ha pa6oH CTOn IIN npyro JckTkn DnCK npocTbIM NpcctackBaHnem. O6pa6Otky BnDeco MoXHO TaKke BblONHrTB HeNOCpCCTBCHHo HA KapTe C IIMOUbIO pnpIoXeHn IJI HEnHHeHOro MOHTaKa
4IpeTeKAKBHyTb SD-KapTy n3Cnota,peKOMeHnyETcBbINONHTbe 6e3OnacHOe N3BHeHHeB O npaunOHn CNTeMe Mac OS nn Windows.
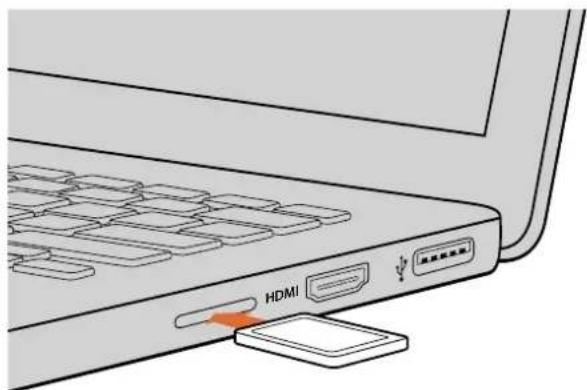
YcTaHOBnTe KApTy nAMrTn SD B CNOT KOMbIOpTePa DnA MHOBeHHOrO DoCTyNa K BnDeoPaaNam
Поверка ckорoctи дисka
Ytuna Blackmagic Disk Speed Test no3Bolaret npoepntb Hocitelen HHopmaun Ha ckopoctb CnTBaHn n 3annc daHHbx npn pa6ote c Bndeo
3a yTINNTAMOKeT 6bTb NIOE3H0N, eCN HxKHO BByCHNTB, NOXoNDIT NIN Het NCNoJIb3yEmb HaKoIHTeB
IIN3AINCS IN BOCnPOUN3BcDEHNN B ONpeJEnEHOM fOpMaTe. IIN3aNyCKa IPOBepKN IOCTaTOHHO HaxKaTb
OHy KHOJky. Disk Speed Test TaKke IOKa3bBAet, CKOBKO IOTOKOB BInEO MOKe
O6pa6aTBaTB HOCHTeB.
Yto6b3aarpy3ntb npinojxne Blackmagic Disk Speed Test, nepeinyte B ceHTp noDepkKn Blackmagic Design ha ctpanue www.blackmagicdesign.com/ru/support.

Disk Speed Test nCnoBaeTcAД npOBePk cnKopocn SD-KapT
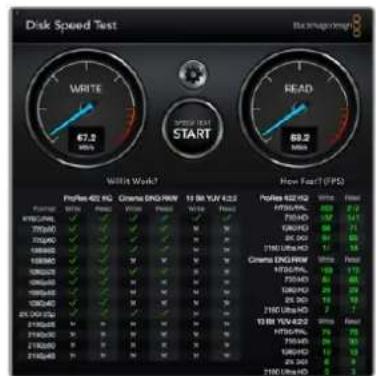
HHTeppeic Blackmagic Disk Speed Test
Blackmagic Video Assist Setup
YtIIna Blackmagic Video Assist SetupcoepKNT DBe BknaJKn: Video n About, KOTopbIe no3BOJIHOT HmnpTpoBaTB 3D LUT-tabnucbHa Video Assist, m3MeHbT bMRA yCTpOcTBa n A3bIK nHTcpFeCa .
BknaKa Video
Video Assist no3B0nHET MMnopTnpoBaTB 3D LUT-tabnB B nge faIa .cube nO6pa6oTKn Bnde O np6hee cm. pykoBOcTBO no DaVinci Resolve.
IopnoBHeo 3D LUT-ta6nuax n HmnpTe c nmoaB yTuNTbbl Blackmagic Video Assist Setup cm. pa3en «CoxpaheneHne, MOHTOpHr, dncnnie aydno HaCTpoKa »
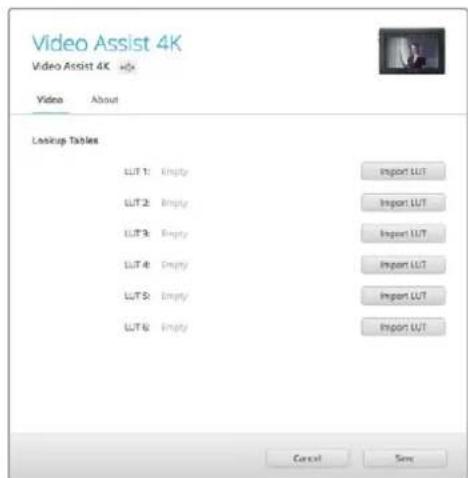
3D LUT-TabnmbiMoKHOIMnopTPOBaTB B Video Assist Ha BknaKe Video
BknaKa About
Ha 30T BknaKe OTo6paKaTe TckyuAaBepCnBbYTpEHHero npoPamMHOro oecneHnNIMnpNCBOeHHoe MOHtOpy-peKOpDey Video Assist.
YTO6bH3MeHHTbIMRAyCTpOcTBA,JIeIKHITe KHOKNOMBILINB NOIeName INBBEInTe C NOMOUIKJIABNAtypb HOBOE IM
N3MeHeHne 3bika
HTo6bI N3MeHnTB RaBik INHeTppeiCa , ⅢeKNHTe Ha packpblBaIOUcEMc MEHIO TeKUeJ RaBkoBOn HAcTpoKnN Bb6pcnte HOBbI RaBik .
HaxmTe Open, yTo6bI noTbpntb DeiCTBne. Raik HHTepeica Video Assist n3MeHITcB COOTBETCTBn C BbipahHOHaCTpoKOI
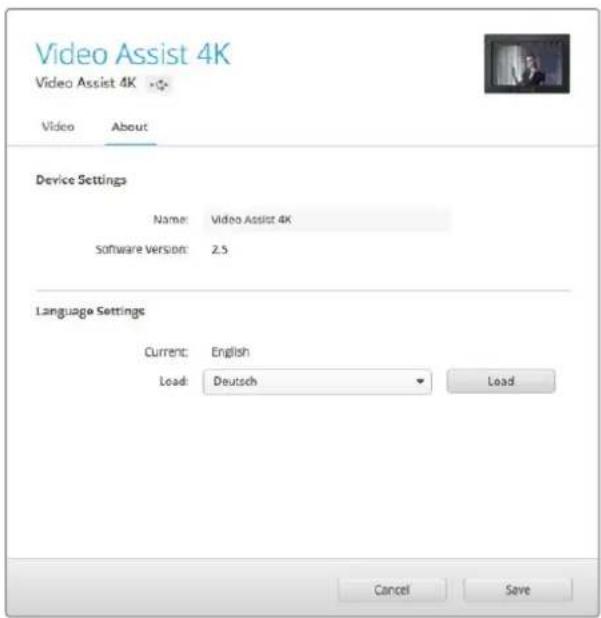
Bb6epTe HOBBI R3bIK INHTeppeica BpackpBaIOUeMcRA MeHO
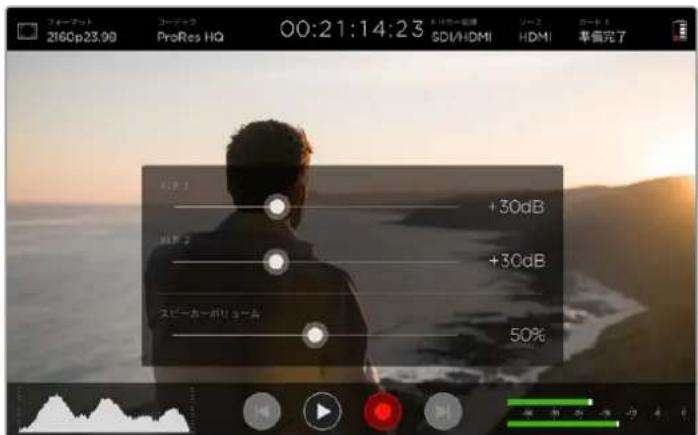
HHTeppecMoHTopa-pekOpepa Video Assist noDdepxKaet HeckoJIko RaikOB
OboBHeHnBHyTpeHHeRo npoRpaMMHOrO oecneueHn
KomnaHn BblnycKaet nepnoDnueckne 6OBnEHH npoWbKn dna Video Assist, KOTOpBte DocTyNHHa caTBe Blackmagic Design. Mby peKOMeHdyem yCTaHOBNTb NocJeHNIO BepCNO BHYTppeHrero I0 ,Tak Ka OHa No3BOJNeT ONtHMn3NpOBA Tb pa6ToY yCTpoiCTBa HcNoNb3oBA Tb HeDaBHO DoabAeHhIe FyHKU
Popraok o6HOBHeHn npoWNbKn npa6Ote Ha Mac OS
1 3arpy3nte n pacnaknyte Blackmagic Video Assist Setup.
2 BbIepeTe COOTBETCTByUHn DnK nnn npocmoTpa ero coepKIMoro n 3anyCTne Blackmagic Video Assist Setup Installer. Cnedynt HNCTpyKmHa kpaHe.
3 Tocne yctaHOBKn nocnEHeBercn Blackmagic Video Assist Setup nocknHTe MoHtOppeKopdep K KomnbIoTepy uepe3 USB-nopt
4Длгобнгеленпрогамногообсесчениз苹уctnte Blackmagic Video Assist Setup n cIeJyTe INHCTpyKUIM Ha ekpaHe .EcIn INHCTpyKUIN He noBAtc , nCnoJIb3yEmaR Bepcnia ABIACTcraAkTyajlbHOH.
Popraok o6HOBlenn npoWbKn npa pa6oTe Ha Windows
1 3arpyuTe n pacnakyTe Blackmagic Video Assist Setup.
2 Hannte nanky Blackmagic Video Assist Setup, B KOTOPO copejkat daHoe pykoBOCTBO n yctahOBuK Blackmagic Video Assist Setup. DbaKDbI uenKHnTe KHONKO MbluNo 3HaKy yctahOBuNka N cneyuTE HnCTpykUaM Ha ekpaHe .
3 Iocne yctaHOBKn nocnEHeBepCn Blackmagic Video Assist Setup nodknUHTe MOHToPpeKOpdep K KomnbTepey cepes USB-nopt.
4ДЯOBHNeHnIporpaMmHoroOeCneueHn3aNcTnTe Blackmagic Video Assist Setup nCJeYte INCTpyKuYMaHa 3kpaHe .Ecn INCTpyKuYn He noBAtcra ,ncNoJb3yEmaBepCna RBAIEETCAkTyAJIbHOH.
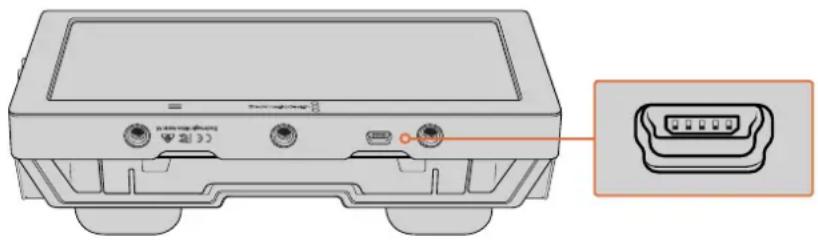
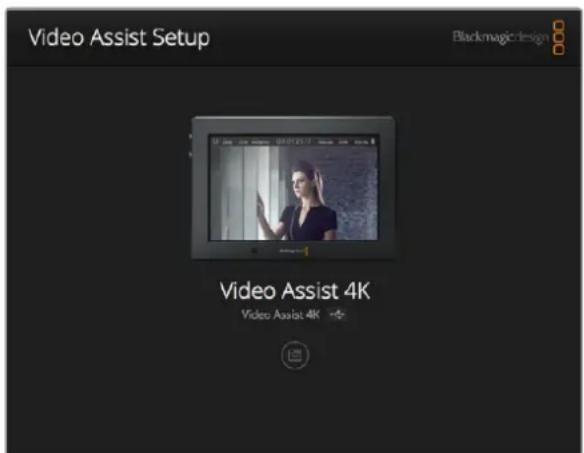
Ytob6bnoBt npwnBky, noKnIOuHTe Video Assist K KomNbiTepyeepa nopT USB, 3atem 3arpy3nte n 3anyCTne noCnEHNIO Bepcuio Blackmagic Video Assist Setup. CnEyIte NHCtpyKmH Ma 3kpaH. Ecn INHCTpyKmH He NOBATcR, yCTpoINCTBO IMeET aKTyaJIbHyIO Bepcuio npwnBkn.
Pa6ota c DaVinci Resolve
3aHnscb c nOmoBIO Video Assist - 3TO TOnbKO OIN H3 3TaONOB Co3DaHnTeJeBn3HOHnI nporpaMMblnn KInHOHnblMa. He MeHee BaxKhBiE cyHKuN - COxpaHeHne MaTePnAra N erO CnCTeMaTn3aUra , B TOMcne MONTax, ZBeTOKOppeKunu NKoDnPoBka KOHeuBix MaCTep -KoNn. B KOMnIeKT NoCTaBKn BXoIITnpINOxKeHn DaVinci Resolve IaanFopM Mac OS n Windows, 70 deaet Video AssistNOJHOeHHBM peWeHem IIN 3aNNCn IN o6p6OTKN KONTHTa,
PIMMEAHNE. Ia noluyehnKoppeKTHOZBeTOBOrO pIa B KInnaX,3aNNcaHHbIX C nOMoUb Video Assist, peKomeHnyetc HcNoIb3OBaTb camyIO nocJeHIOBepCIO npIoJKeHn DaVinci Resolve (HaHHa c 14-).
IIOKIIIOUH SD-KAPTy K KOMNbIepy, B DaVinci Resolve Ierko Co3daTb pe3epBHe KONN C NOMOUIIO INCTpymeHTa Clone Ha cTpaHnue Media. Dy6nnpoBaHne peKomeHdyetc dny IO6bIX HAKONITeNei, TaK Ka HN ODNH N3 HNX He 3aunueH OT NobpeKJdeHNI , N3-3a KOtOpbIX IerKO yTpAITb OTCHRTb MaTePnAJI MEm pe3epBHe Ie KOnN, KINMb MOXHO Do6abNTb BOKHO Media Pool, UTO6bl 3aTEM BIIINHNTb MOHTax , CBTOKOPpeKUHIO n CO3daTb KOHeuHBI PPoYKT Be3 NCNOB3OBAHn Dpynx npINOKeHN.
bnaorapn HauuHpyukppeaktpobAHn DaVinciResolve ABnreTcHe TOnbKO CHTeMoH HeHHHO MOHTaKa, HO COBpeMeHHbIM pnploKeHem DnOcbApKn cIphpOBO KINHO .Teepb IIObONb3OBaTeNb DaVinci ResolVE IMeET DOCTyn K INHCTpyMeHTAm, C NOMoCbIO KOtOpbIX CO3dAOT camBeN3BecTHbIe rJInyBvDcKne fInhMbbl
Hnke onncan npaok ncoNb3oBaHn DaVinciResolve npu moTaxe 3anncahHoro MaTePnana. Yo6bl yHaTB 60Ibue O fynKcnoHane 3TO rnpnoKeHH, 6paTntecb K pykoBocCTBy no DaVinci Resolve B pdf-phiJle, KOtOpB coepKNTC H a NsCKe C nporpaMMbM oecneHem. B INHTepHete MoKHO HaTIN HΦopMaUIO 6O6pa3oBaTeBbX KypcaX I BInDeoOnlbMbI o paOte B DaVinci Resolve.
IMNOPTKINIOB
Yto6bHaayab06pa6oTyKINIOB,Heo6xoJIMO MMnOpTIpObaTbN Media Pool.
3aynctte npnoxehne DaVinci Resolve. EcnBb otKpbBaTe npnoxehne B nepBb pa3,doXntecb noBleHn OKHa Project Manager n DbaXdbuEKNHTe KHOIKo Mbln Ha 3HaKe Untitled Project.
Ecn CnpnloKeHem DaVinci Resolve pa6oTaet HeckOJIbKO cheIOBek, NOBITcIaIaIorOBoe OKHO DnB BBOda napona. TTo6bI BOITN B CNTEmy KAc CyUeCTByIOUIN NOIb3OBATEJI, DBaXDbI UENKHTe IIO COOTBETCTBYIOUeMy 3NaUky. TTo6bI DO6ABiTb HOBOI NOJIb3OBATEJI, BbIbepnte Add New B NebOM HIXKHeM yrIy, yKaJInTe erO IMN HauKMITE Setup New User.
Давждbl ueKNHITc KONKoM Mblu nO 3HaUky nOb3BaTeTaN ,YTo6bl npeCnTkoKHyProject Manager. Bbl6epnte New Project, BBeNTe Ha3BaHne npoeKTA n HaxmITE Create.Hobbl npocKt 6ydt Do6aBHeN BOKHe Project Manager. YTo6bl OTKpbItb erO,DbaxdbI uenKHITe KONKoM Mblu nO Ha3BaHIO npoeKTA .
2 OTKpoETcCTpAHnla Media,B JEBOM BepxHem yIy KOTOpOH AxOHTcR OKHO Media Storage. Tam coepkataBce nankn npoeKTA ,OKyda IN MOXHO nepaunTb B 6n6nnotky MylbTMmeHa
3 EcnB OKHe He OTo6paKaeta HxHnA nanka ,doabbte ee. Jna 3TOrO uENKHnTe npaBoi KhoNkoMblu B OKHe Media Storage, Bbl6epntc HxHhblncknnn nAnky HaKMNTc Open (OTKpbTb).
4 BokHe Media Storage Bb6epnte doabEnHyo npky C KInnam. Tenepb Knnb MoKHO nepetaunB nanKn B 6bnnoTeky Media Pool. Ecn HactpoKN pOeKaT OtnuayotcOT HAcTPOE KINNA, NOBITCA COO6eHne C PpCIOXeHEm N3MeHNTb NapaMeTpbl pOeKTAB COOTBeCTBn CnapaETPAMN KINNA INN OCTaBtNx PpeKNHM . DnBbCTporo HaHaJAPa60tBu Bb6epnte Change.Tenepb HactpoKN pOeKTa COOTBeCTByOT HAcTPOBkAM KINNA
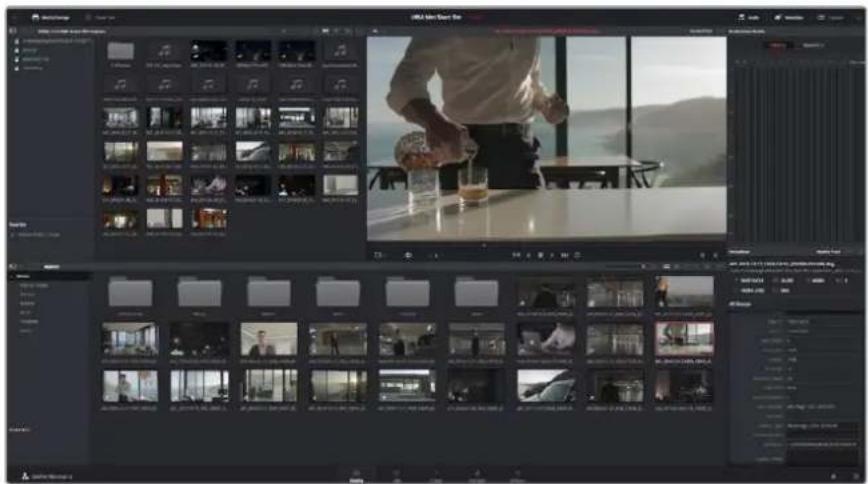
IINMnopta KInnoB nepetaune Hx nOxHa Media Storage B 6nnoteky Media Pool.HxHbE
paJIbMoXHO TAKKe nepetaunbcpaOhero cTona.
MOHTaX BnDeokJInIOB
MOnTaKa KInnoB, HaxoRaXnxC8 6n6bnoteKe MybTmEa, oKpOte BknaKy Edit.
TenepbMOxHOHaaybpeJaKTHOpOBaHne
1 Chaana co3daIte HOByIO MOHTaKHyIO JINHeiKy . HaxMnte npabOIN KHOKNOM MbUIN B IIOBOM MeCTe 6n6nntekr Media Pool N Bb6epuTe Timelines >New Timeline. BOTKpbIBWEMcra dnaJorOBOM OKHC HaxMnte Create.
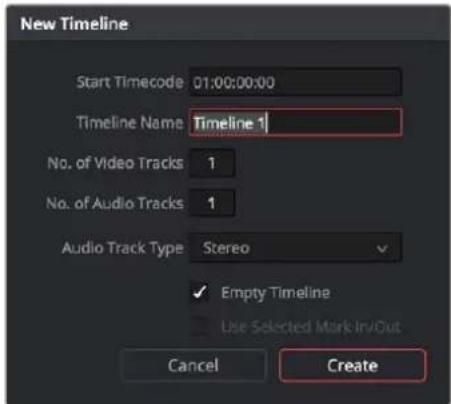
YTObHauTbpeaKTHpOBAHnueKnna,co3aIte HOByMO MONTAKHyIOINHeKy,KO1OPaNO3BOJnEe BInONHTB BCE Heo6XODMbIe DeCTBn
2 DaaKbIe IeKKnHcKHOKNoMbIINo KInyB6n6nToKe Media Pool, OTo6bOtKpbTbero BOKHe NxCODHOIIO6paKeHH .NcNoJIb3yMaMbIbDnYypaBHeHH KypCopOMMOHTaXHOI INHeKN,HaNDITE npBbIKappeaKTnpyEmoROKnNA BOKHe NxCODHOIIO6paKeHH .DNBaBopaTOckBNxOJaNCnONb3yIeKNaBnU 1. DnBaBopa nocneHero KaPa NcNoB3yITe KnaBnU O.
3IpeeINTEKMOHTaXHOJINHEKeN C NOMOUsBIO ee Kypcopa BbIcpeNTe MeCTO INBACTABKN KJIINA.
4 DnBCTaBKn KInna Ha MoHTaXHyIINHeKy IeKHNtC KHOKNo MbUHBYTpN OKHa INCXOHDoro 1306paJxCHNA,3aTeM npToAHTE KypCop Ha OKHO MOHTaXHO JINHCNI .PONBNTcCnICOK peKIMOB pEDAkTNPOBaHNA. BbIEpeNTe HxHHb peKIM
KInn 6ydt NomeeH H MoHTaXHyO LInHeNky C NMOUb Ky BbIbpaHHoro pexmpeaKTIPOBaHn OIncaHne pexmOB peaKTIPOBaHn INopJOK paObTc HMM MOxHO HaHTB pyKOBoCTBe No DaVinci Resolve.
Длгболпсьбуltрогдбангьнгькллгьнгьпгьпгьпгьпгьпгьпгьпгьпгьпгьпгьпгьпгьпгьпгьпгьпгьпгьпгьпгьпгьпгьпгьпгьпгьпгьпгьпгьпгьпгьпгьпгьпгьпгьпgнннннннннннннннннннннннннннннннннннннннннннннннннннннннннннннннннннннннннннннннннннннннннnngnngnngnngnngnngnngnngnngnngnngnngnngnngnngnngnngnngnngnngnngnngnngnngnngnngnngnngnngnngnngnngnngnngnngnngnngnngnngnngnngnngnngnngnngnngnngnngnngnngnog nngnngnngnngnngnngnngnngnngnngnngnngnngnngnngnngnngnngnngnngnngnngnngnngnngnngnngnngnngnngnng

Ha ctpaHnue Edit c nOmoIIO MOHTaxHOI INHeKMOXHO BInONHITb NOrOHky KInNOB, N3MeHnTb nopAOK IN CNEIOBAHN IIO6ABNTB NEpEXoBI MEkdy HmN
IodrOHHKa KInnoB
Bo Bpem MOHTaKa Heo6xOJMo BbIOnHrTb NOrHOK KInIOB ,TO6bl OTpeAaTnpOBaHHbMATEpna CoepkaTolbKO HyXHbIe PpaIMeHbI.Cambl npocToI cNoROHK — 3daTb TOKn BXOJa N BVIXOHa MOHTaXHOJIINHeJeK
1DobabN B KnHn Ha MoHTaXKy IINHeiKy , HabeNTe KypCop MbluHa Ha HauAo KNPi , YTO6bl
2Iocne noBcHnHaNa KaNoTROHn HaKmTe Ha Hauano KIna NpeTaunte erO BnepednnHa3ad nnBbOpa ToKn BXoJa .ToKn peaKtnpoBaHn MOxHO OnpedeNtC NOMOuMoHTOPa MOHTaXHO JINHeKN.
3 Haxmte Ha KHeuHbI palfmeNT n Iepetaune ero nn Bb6opa ToKn BixOda
HaMOHTaKHOJINHeIKo,cnpabaOHT Ha6opa HnCTpyMeHToB.HaxoNTcIaIep.ipepeBnraero BnEBO nN BnpABO.MoXHO yBeHNuTb NUNyMeHbWntb MOHTaKHyIO NInHeKy
ДяболгоToHOrpeKaTIpOBaHnpeKoMeHdyetyeTcOТКIOHTbФyHKU Snapping,ODHaKO 3aTeM ee HxHO BHOBb BKIOHTb,Tak KaK OHa NOMORAET COXpAHrTB ChkOBky MeKny KInnamN .ДЯБICTporo OTKIOCHNIN BKNIOCHNpyHKUNSnapping Haxmte KnaBnuy N.
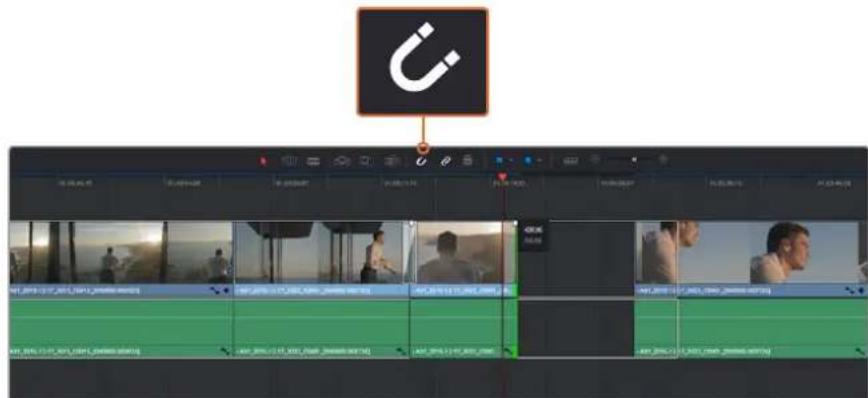
Ia noTROHK KInna nepeTaunTe ero HauJIbHyIO KOHeuHyIO ToKu BnPaBO uNn BnEBO, a dIa BKNIOUeHIN NIN OTKIOUeHIN FyHKcnn Snapping HaxMITE COOTBETCTByOUsN 3HaOK Ha NaHEn INHCTpyMeHTOB
FyHKLIMSnapping nomoraet coxpaHbCTbKOBky MExdy KINAMO,ODHaKO pnp BblIOHeHH 60Jee TOCHOROMOTaKa ee MOXHO OTKIOHTb .IJa 6bICTPO BOBopa fYHKUIN Snapping HaxMnte KnaBnuy N.
Ha3naueHne coueTaHn KnaBnJ
YTo6bl ONTUMN3IPOBaTb pa6OuHn IpoueccIgBbINONHReMbIX DeIcTBn B DaVinci Resolve MoXHO Ha3HaunTb TaKne Jce coUeTaHn KJIaBnI, KOtOpBie NcIOJIb3yIOTCB IpyrNX pInIOKeHHx dIIMoHTaKa , Ni6o Co3daTb Co6CTBeHHbE KOM6uHaCn.
Hactpoika coyetahn KnaBn
1 Bb6epnte DaVinci Resolve > Preferences, 3aTeM BknaKy User BBepxu n Keyboard mapping B CNNCKC HAcTPOCK.
2 Bb6epTe coetaHn KlaBnB npeIraeMbIX rpynnax . Hapmep, coetaHn dHa yHKu Cin n Paste haxoatac b rpynnne Edit.
3ДЯБыбopaHAcTpoKnHaKMNTeHaCOyETAHNEKJIaBNI..ДВaBXbIeJKNHTeKHONKOIMbIINHa BbIbpaHHOMcoYetAHNKnABNIIdNPOITBepXDeHNACTPOIKN.
4 Haxmte Ha KnaBnatype ToIbko YTO Bb6paHoe coyehne KnaBn . Ecn npHa3HaueHH COyehnHa 6bna DOnyupeHa Oun6Ka, Haxmte Ha 3Haouk Undo pAnom C HactpOko
5 Haxmte Save,TO6bIOITBCPNTB Bb60 HOBOO COyTaHn KnaBn
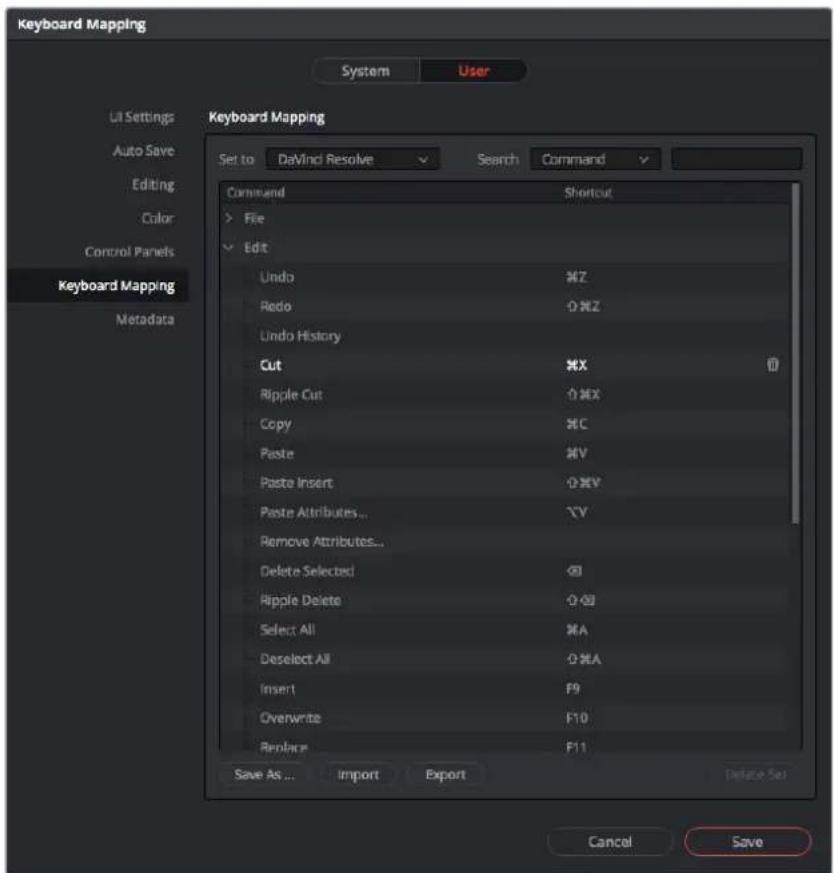
BpackpbBaiooemcMeHo Set lo BbIepneOOnoHa coetaHn KnaBnKOTOpBHe NcNoIb3yIOTcB DpyrNx PnIIOXeHNx DN MaHTaKa BnDeo
Добавлиейпереков
NepexoBb -3TO B3yAaBbHbte 300eKbM MeKJy KInnam .PactBopeHne, BbTEcHeHne, nOpyKeHne B CBeT npnEMbNoBnIOT pa3HOo6pa3ntb B3yAaBbHb pRd nCenatB erO 6one HTepeChbIM . NepexoBb He o6BaTeJIbHO CB3BaBAKT Dba KInna .HaNPmEp, Pn 3abepueHHn CceHb Bee KOHe MoxHo do6aBHT e0fKnHO TnHOrO 3aTeMHHeHn.
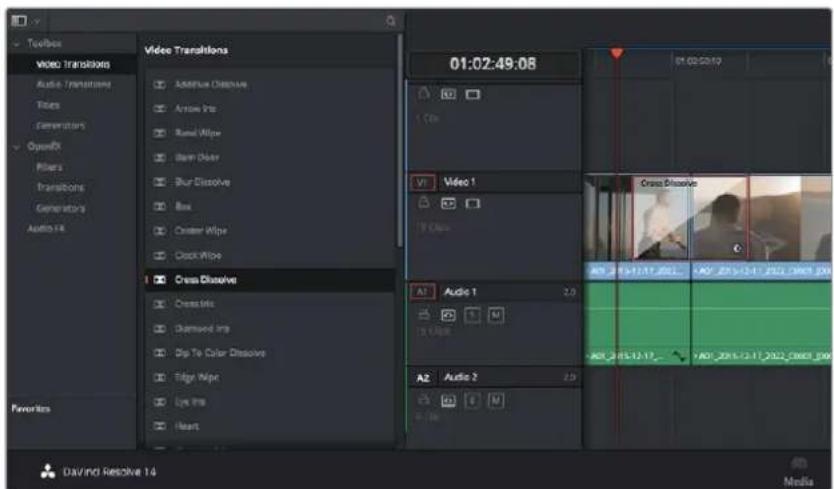
Pahenbpexoobno3BolraetncnObBaBpa3nHbEe0fcktbnpu cmHe n06paxhen
DobabHeHne npexoanda c pactBopeHnem
1 Y6eHNTecb B TOM ,YTO DBA KINna pacnoNoXeHb Ha MOHTaXHOJnHeNe HeNOCpeCTBeHHo pAOM dpyc npyrom . HAKMITE KONky Effects Library BBepx cy tpaHnBu Edit n y6eHNTecb B TOM, YTO OTKpTaTaNHeNb Toolbox.
2 Bb6epnte npexoD Cross Dissolve, nepeTaunTe erO Ha MOHTaXHyIOHeNky HabeTe KypCopMbHnHa ToKy MExdy DByMa KNnAmn . ByyT BvIeEnbIO KOHNaHne NepBOrO Knna n HauAo BtporO. OTNyCTte KHOKnCy MbHn. 4To6bl Do6abNTb npMeHnTB 0fkeT pactBopeHnA.0n IocNe MOHTaXHbIX ToeK oOOnKnINOBdoJKNHO 6bTb IOCTaTOHcMoCTa.
Tenepb MeKdy KInnAmN eCt bnnBnHn nepexoJ . HactpoKy npdoJnKnteBnOCTn nepexoJa cokpaueHne nn yBeiueHne erO dInTeBnOCTn BblonHnOT Tak Jc, KaN noDroHky KInna . HabeIte KycpOpMbUn Ha HauJo NIN OOKOHnne nepexoJa , 4TO6b IOnBnCR 3HaOH KIOIgOHKn, 3aTEM nepetauHnte erO BlbeBO nn BNpaBO.
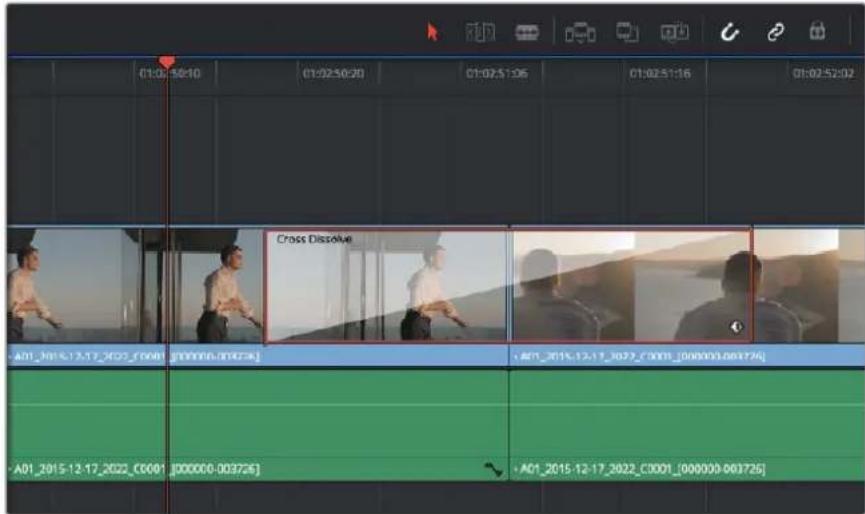
Tto6bI doabnB nepexo, npepaunTe n BCTaBte erO MeXdy cmExhblm KINNA
DobabneHnTnTPOB
PnMOHTaKe KInna Ha IIO6oBn BnDEoOpOxKc MOxHO Do6aBnTb TITpbI. Ecn HcCBO6oHbIX BnDeoOpOxK, HyXHO Do6aBnTb HOBIE. DnA 3TOrO 5eJIKNHtE PpABOn KHONKO Mblu PrdOM C IMHeM CyueCTByIOUeJdoopOKN IN Bb6epnteAdd Track
PnpaOK co3dHnTtpoB
1 Ha naheI Toolbox OKHa Effects Library, KOTOPaHaxoITcnoDOKHom Media Pool, c nOmoIbIO npokpyTKn nepeiNITE K cekuIN Titles B cepeINHe cnIcKa .IcnoJIb3yra npokpyTKy, Bb6epInTe HxKbI BN TITPOB.
2 NepetaNTe Bb6paHHb HnHa Nyctyio BnDeoOpOxy Ha TcEM KINOM ,B KOTOPOMdoJHKHb NOBHTCBaTTPbl. Ira NoRBeHnTtPOB Ha cepHOM fOHe NmecCTte INx prdom CHyKbIM KINOM BNoJe Video 1. Yo6bl npocMOTpeb Tttpbl, NmecCTte KypCpO MoHTaKHO JINHCNI HA Tttpbl.
3 DBaKbIeKNHtE KHOIKoM MbuN NO KNHy C THTpAMN .OTKpoETcOKHO Inspector C HAcTPOKaMn DnA Do6aBHeHn THTpOB BcDNTe THTpbB None Text
Moxho nCnoB3oBaTb pa3nHbIe WpHtbl, MeHb TcBET n pa3MeP TeKCTa, cnocob BbpaBnBaHn, pacnoJIOKeHHe TEKCTa npytnepapamtpb. TaK ke KaK KKnunam, K THTpam MoxHO no6abntb nepexOdb
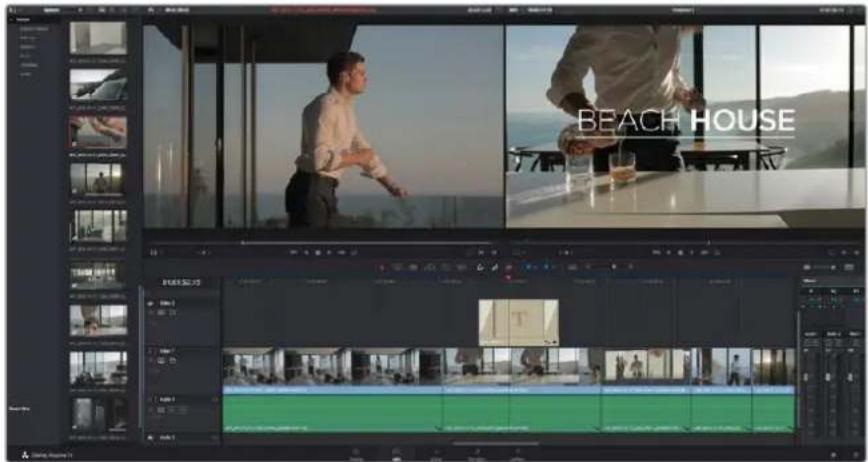
IpeetaTne TnTtpa c nanei Titles n nomecnte ero Ha nyctoi Tpek
LBeTOKOppeKzna KInnoB
NocIe TOro KaK NocJIeIOBaTeJIbHOCt b KInIOB CMOHTIpOBAHa, MoXHO IpNCTyNaT b K ZBeTOKOppeKuINrpeHNHnTae HAnNyUWepe3yNBtABy,ecn erO BbINOHNaTb NoCne pedaTnpOBaHn,notOMy UTo B 20TMcLyue ae Ierko nOlyuHTb OndopOaNbHn Bu3yAJIbHbPi d. Bmecte c Tem, DaVinci Resolve no3BOJnEnerpeKIOuATbcMexdy CTpaHnCaAMMOHTaxa NCBetOKOppeKuIN ,ecn Heo6xOIMO BheCTn OTdEnbHbIEIMMeHeHHa.
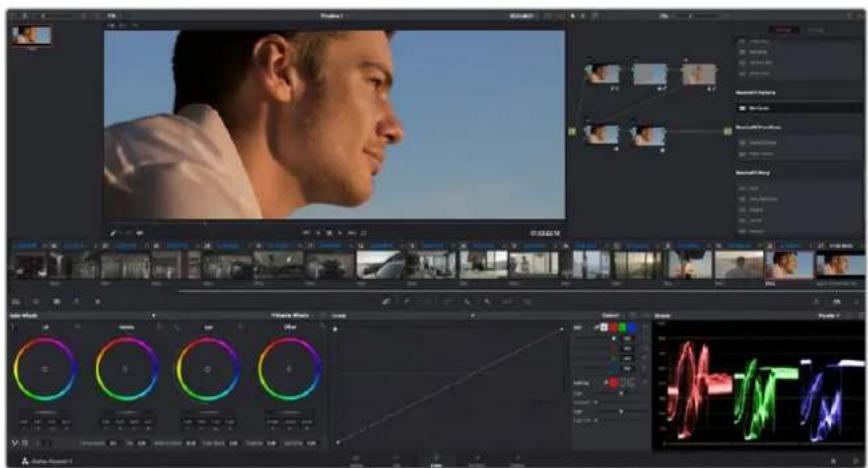
CtpaHnca Color nncnoIb3yETcI dN TcBtokoppeKuINKnIOB
Yro6bl OTkpblctpaHnuy paobtbcuBETOM, BbIbePHTe BklaKy Color.
OHa coepknt cBeTObIe Kpyr, nAHeN KpNBbIX INHCTpyMeHTb rpeiINHra, a TAKke OKHa Preview N Nodes. Bce 3TN FyHKUIN IOBOLJIOT COZdABaTB CaMbIE CIOXHbIe IOpINHANbHbIe CBeTObIe peWEnH BOoe noDpo6HyIO INΦOpMaUIO MOHO HAITN B pyKOBoCTBe NO paBoTe C DaVinci Resolve. Cero NOMOUIBO Bbl OBlaJeete TaKIMN JKe PnE MaMNI , KOToPbIE NCNoJIb3yIOT npOpeCCNOHaJIb Ha CTyJnx rpeiINHra.
Ha nepbom 3Tane o6bHNO BbIOnHnKoT o6pa6Oky TeMHbIX , cpeHnx n CBETbIX ToHOB , TO eCTb KoppeKtpyotnapaMeTpbl Lift, Gamma n Gain. 3TO NO3BOHRe TnlyuHTb CBeTIoe OJHOpOHOe N3O6paKeHne, KOTOpoe CnyKIn OTnpabHOH ToKoON DnA Co3aHn HnB3yAlbHOrO prJa B Heo6xOdIMoN UBeTOBOI rAMMe.
Papota cnHdkatopamn npaMetpoB
bONbHnCTBO KOIopncTob CO3aOT CBetOBble peeHn OToaKINBaCbO CTBeHHORo PpeCTabHeHn oTom, KaKne 3MOuN DOJKeH nepeDaTaB B3yAaNbHbI pAn. BDOxHOBeHne IJa TaKOn pa60tMoXHo UepNaTb N3 NOBcEDHeHNO Xn3Hc, ecn H6NoTaB 3a npEpmTaMn npi pa3NIuHOM OCBeueHN.
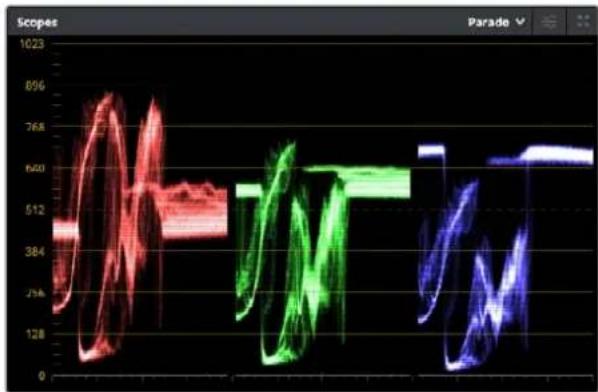
Icnne npametpoB nomoraet Bb6paTb ONIMaHbHbE HactpoKn 0bnacte CBeta, NOyTOHa N TeHN
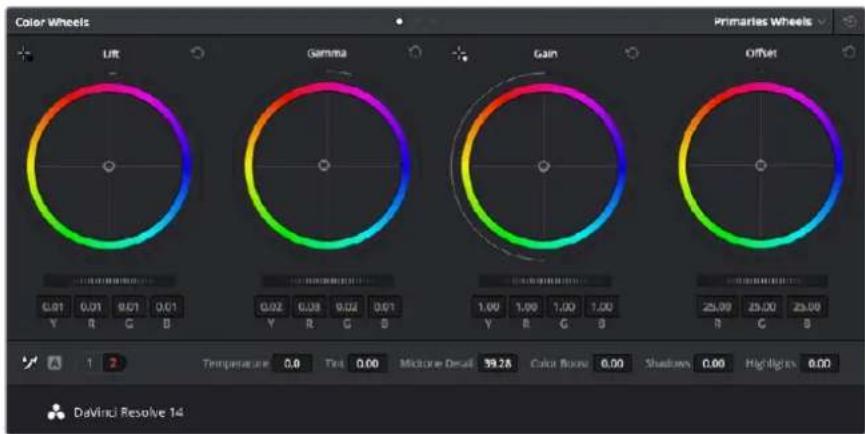
KpyrLift,Gamma,Gain N Offset npedhaaHaeheblnnaMeHeHnnapaMetpoB 1beta n balaHca ToHO.BTO6bblnoHNHT rnoBaIHy KOPpeKuIO BCEx UBeT0 Dnna KaJdoOnactn, nepaunite cnaepu KaJIb Bnpep nnHa3d
Dpyro cnocob rpeiHnra pa6oTa CO BCTPOeHHbIMN INHdkaTOpamn , KOTOpBc NOMORAHT yCTaHOBtB He6xOIMbI balaHc Zeta KHONKa Scope (BTOpaC npaba Ha NaHeJIN INCTpyMeHToB) NO3BOJIHET OTKpbITb OIN H3 CneYIOuX INHdkaTOpOB : fOpMa CUNHana, DNCIIe NapaMeTPOB, BEKTOpOckON I NTCTORPAMMa. C NOMOuBIO 3TNX INHdkaTOpOB MOHX KOHTPOIpOBAb TB balaHC TOHOB ,npOBeprTB yPoBN BVIEO, YTObl He DOnyCKaTB 3aTEMHeHn NIN 3ACBETKN I3O6paKeHn , a TaKke BBIBLrtb npoe6naadHne OTDeNbHbIX OTTEHKOB.
LBeTobaa naHEnb coepKNT nHCTpyMeHTb dna pa6oTb c npametpamn Lift, Gamma n Gain, KOtOpbe 06bHuHO nCNOJb3yIOc TdI neBnUHO uTeKOppeKuIN - 3Tm OHa NoXOka Ha cpeCTBa yCTaHOBKn UBeTa n perynpoBKN KOHTpactHOCTN B Dpynx npINOKeHNx .Dnla 6Oone ToOH NaCTPOk NnapAMeTOB KaKDO rCBETABOTdJIbHOCTN nCNOJb3yIte KOMbIbTePHy IO Mblb JIMBO mMeHIne UBeTOByo naHeIb Ha Primaries Bars dNk KopkeTKIOBKn IpKOcTn OnCuIO Primaries Bars MoKHO BblpaTb n3 packpbiaoiEroOcMHeIO B BePxHem IpabOM yTJy LBeTOBbx KpyTOB
1 KoppeKTnpOBka napaMeTa Lift
Bb6pnte nepbkn Ha mONTaxho nnHcKe HnKaMTE Ha cnaep KkabLi Lift no npbpmbuBeTobbIMKpyOM.IpeetaNTe cnaep BnepednnHa3adnNOCMOPTne ,Kak N3MeHHTCnO6paXHe. JpkocTB obnacte TEn 6ydet YbeNnUbaTBCaNNmEhbuaTbcA.YCTaHOBtce Cnaindep B NOIOXHe, pni KOtOpom 3TN Oblactn IMeOT ONImalbHbBnD .Ppi CNIKOMHN3KOM 3NaueHHLift OTdEBHbIe DeTaN B obnactx TeH CTaHT Hepa3NIUMbIMn.HanNywnpe3ybltaTOCTnraetCB TOM cnuyae ,KOrda ypoBHe CNrHana Ha dncnnee napametpoh HaxoNTcHnOpcdeCTBeHHo Hnd HNXHe nnHne.
2 Koppektipobka napametpa Gain
HaKMTHe Ha cnaep Gain n nepetaTe ero BnepeHnHa3aD .To deIcTBne no3BONnet H3MCHNTb bND obNaCTe CBeTa , KOtOpBle RAJIHOrC HAn6OJeE rPKMN yAcTkAMN 3o6paKeHn. Ha IINcIIee npametpoB 3TNM oBIACTm COOTBETCTByET CHTAH B BepxHn qactn kpaH . To6bl NOUYHTb APOKe H3O6paKeHnE, yPOBeH CNHana DOJKeH HAXODITbCR HeNoCpeCTBeHHo ND BepxHn NHNHe. EcnN yPOBeHb NOHMAeTC HAD BepxHn NHNHe, ObNACTn CBeta 6ydyT IMeTb 900eKT 3acBcTKn, IN OTDeNbHbIe DeTaN CTaHyT Hepa3NIuHMbl.
3 KoppeKtnpOBka npametpa Gamma
HaKMTHe Ha cnaep ippaB Gama nOuCBETOBM Kpyrom n NpeTaunTe erO Bnpeednn Ha3ad. Po Mepe yBcHneHn 3TOr npaMeTpa aPKoCTb N3O6paXeHn 6ydt Bo3pactaB . OndOBpeMeHHo C IepemeueHnem CnaIepa 6ydt MeHTbcN fOpMa CNHnA B CpeHn qactn DcPnner, KOtopa COOTBeTCTByeT oblActn NOnyToHOB . N3O6paXeHne HmeeT ONTMaJIbHbN BnD , KOrda 3NaueHne 3TOr npaMeTpRa HaxoNTcB rpaHnuaX mExny 50 n70%. B 3ABNCIMoCTn OT co3DaBaEMOn ZEBTOBOI rAMMbI yCNOBNI OCBEeHNoCTN 3TN pAMKn MOrY 6bIT paSInpeHb
IINBbONHHeHnepBnHHOIBeTOKOppeKmIOMOHO TaKKe IcNOJb3OBAbKpNBbIE .TO6bI N3MeHHTb 06yIO KOHTpaCTHoCTb N3o6paKeHn IINB CEx Tpex KaHAnOB (RGB),Co3aIte TOck H a DnaRHOHaBHO JINHH,JIeKNHy B KOnIKo Mblu B HxkbIX MeCTax, INpeTaUHTe IX BBepx INN BHN3 .IIaONTMaJIbHOr pe3yNbTaI Lyue Be b6paToK B ToCK B cepXHe n HxKnHe TpeTAX , a TaKke NocepeDInHe .
IepBvHHyu zuBeTOKoppeKIO MOxHO BbINONHt bMHormM npyRMM cnoCobMaBonee noDpo6Ha HOpmaUcOePckTcB pykoBDCTBe No DaVinci Resolve.

PAnenbKpmbix-eue OINHnCTpyMeHTI BInoJIHeHn NepBunHOuCBetokoppeKuINN BldeneHnOeNbblxOBaacteynnncnoB3OBAHm 30hBi Power Window
BtopnuaHna ZbETOKoppeKzna
BtopuHnA UBETOKOPPEKUNN NcNoIb3yTc IaN O6pabOToN OTeNbIbX yAcTkoN 13o6paKeHH. PpeDbyuN 3tan Ha3bBaTeCn nepBnuHOn UBETOKOPPEKUnne, Notomy TTO BCE N3MeHeHH, KOTOpBle BbINONHIO T c NOMouBIO UBETOBIX KpyroB dNapametpoB Lift, Gamma n Gain, 3atparnBAOT ueoe 13o6paKeHHe.
Ecnn n3MeHeHn Heo6xOIMO npmehntb TOnbKO K OTdIeHbIM yactkam 306paKeHHn (Haepmep, cenaTb 6oneecTeCTBeHHbIM CBeT TaBb B KaDpe Nn 6one HacblueHHbIM CBeT He6a ), NCNoJIb3yIOBTOpNHyIO UCBetOKoppeKuio. Jnra 3TOrBO BbIpaIOT OTdJIbHbIM ppaMHTn306paKeHHn pa6OtaIOTONbKO C Hm . BnaOrDaapy3noBoi CTpykType MoXHO BInONHbT IIO6OE KOINcEeTB DoIeCTBn IN NOyauTb IMEHHO TOT OoFekT , KOTOpB HyXeH . C NOMoiBIO 30HbI Power Window n TpeKHHra n3MeHeHHn neKo npmchNTb K BbiopaHHbIM ObckTam DaXe B Tom Cnyae , eCNI OHN DBIRaOTcR .
O6pa6oTka UBeTa
HOrda KOnOpNCTy HxHNO yBENHTb INTeHCNBHOCTb OTeNbHOro UBeTa (HaNPmep, CEnaTb 6Oonec coHOn TpaBy n 6Oone npKIM He6o ) nnckoppeKTHPOBaTb erO ,YTObl npBnueh BHNMaHne 3pnten KaKOMy -H6ydb PpEMcTe. 3To MoXHO CEnaTb C NOMOuBIO HNCTpyMeHTa HSL.

HnctpymEn HSL BOKHe Qualifier nomoraet bIeJeTb cBeTa B n3o6paKeHN, ecnn HyxHo yBENHTb KOHTpact Nn noOpEepKHyt otJeNbHbe Detan
Iopraok o6pa6oTkn zBeta
1 Do6aBbTe HOBbI NocJeDoBaTeJIbHbIy3eI
2 OTkpoTe naneb Qualifier n y6eNTecb B Tom, TTO Bb6paH nHCTpyMeHT Color Range.
3 ΚΕΚΗΝΙΤΕ ΚΗΚΟύ Μβιή Ματό Μβεῖν,ΚΟτόρβι ḌυχΗΟ σθραδος
4 O6bHIO Tpe6yETcI DOnONHITeNbHO N3MeHHTb OTdeNbHbIe NapaMeTpbl , UTo6bI cDnA Tb 6oJIe PoBbIMKpaO6NaCTN C Bbl6paHHbIM UBeTOM .HaXmTe KhoNkY Highlight, UTo6bl yBnDeTb Bbl6paHHyO6NaCTb.
5 BokHe Hue HacPoTe npaMeTp Width,HTo6bI paCUnpntb INN cy3NTb rpaHnCbBb6paHHoN o6NaCTn.
H3MCHNAPaMCTpbi High, Low N Softness, co3daTc 6nbactb c ONTMaNbHbIMn rpaHncaMn . Tenepb MOKHO BblIOJIHNITb KoppeKLIO Bbl6paHHO O CBeta C NOMOuIIO UBeTOBbIX KpyTOB INI NOJB3OBATEbCKNX KpNBbIX.
HOrda Bb6paHHB CEB MoKET PnCytCTBOBaTb B ObNactx KaDpa , KOTOpBle HxKHO NCKIOHTb IN 0bp6tKn . Dn MaKInPobAHn TAKnx ObIaCTe NpIMeHnO TcHy PowerWindow. Co3dAte HOByo 3ohy nncNoB3yIte e cna Bb6op a TOnbKO Heo6xoDMoro yAcTka CBeta . Ecn npEpmet AToR OCBeta 6ydet DBuRaTbcra, fHKUIN TpeKNHra NOMoxET COXpaHnTb N3MeHeHn Dn 3OhB Power Window.
Добavenne 30нbl Power Window
Power Window - MoUHb HNCTpyMeHT BToPHyOH UBeTOKOppeKuIN, C NOMOUsko KOTOPoR JERKO HIOIPOBaTB OTeJIbHbE yAcTKn KInna. 3Tu yAcTkn Heo6aTeBHO DoJXHb 6bITcTAuHbIMN - NOLOXHeNE PpeDMetOB B KaDpe MOKeT MeHaTbCBAABCUMOCTN OYrNa CbEMKn , N CaMn PpeDMetBI ToKe MOyT DBrTaTbcra.
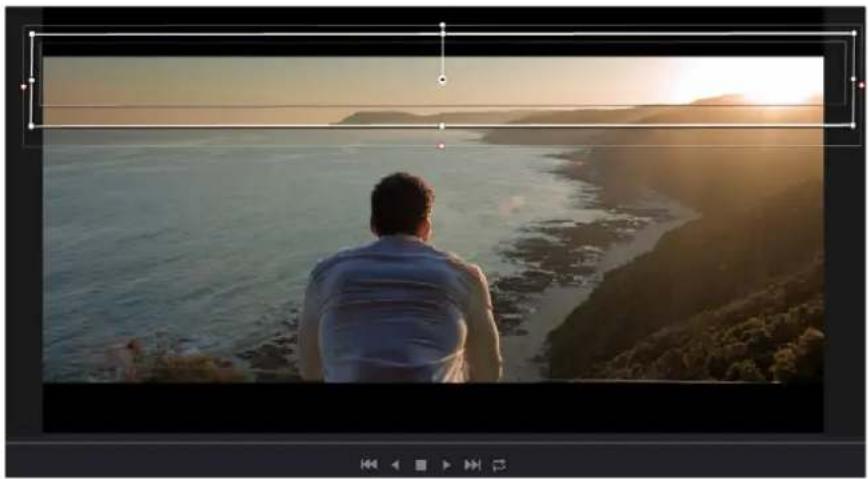
30a Power Window nCnOJIb3yETcIgNckIOUeHINyAcTkoB, KOtOpBIE He JIOJHKHI 6bIT bATPOHyTI ObpA6OTKoC NOMOUIIOHCTpyMeHa HSL
Hanpimep,ecnBbIeNtBfIpyyEnoBeKa,HOBIe npaMetpyCBeta KOHTpactHOCTN6ydyT npIMHeHbToIbKOdAHHOoblaCTnHe3aTPOHYOTcAaTHyUOacTbN3o6paKeHNBnaRopaAeTOI ΦHKUNKOpNCbIakCHTnpYIOBHUMAHNE3PNTeHaHyKbIXTeTALX
Popraokdo6abHeHn30hBiPowerWindow
1 Do6aBbTe HObI NocJeOBaTeIbHbI y3eI
2 OTKpoTe NaHcB Window N Bb6epTe HyKHyO fNpyu, ZENKHy KHOKNKo MBiHN Ha COOTBcTCTByUcM 3HaueKc By3e 6ydt Do6aBnHa 30Ha Bb6paHHo FOPMbl
3IINMHeHnI rpaHn 30HbNcNoJIb3yTe CnHHe TOnK No KOHTpy fHyptb .Po3OBte TOOK N03BOJNAOT CKOPPeKTHPOBaTpe3KoCTb KpaC HaxMeTHe Na CEHTpAlbHyIO TOky fHyptb IN NOMeCTnTe ee B Ty ObIaTb ,KOToPyo HyXHO N3OJIuPoBaTb,ДЯ NOBOpota fHyptb INCNOJIb3yOT TOky,CocDInHcHHyIO C UcHTpOM.
Teneb CBETOKOPKekua 6ydt npmehnToBko K BbdeHHO oBnaCTn I3o6paKeHHa.
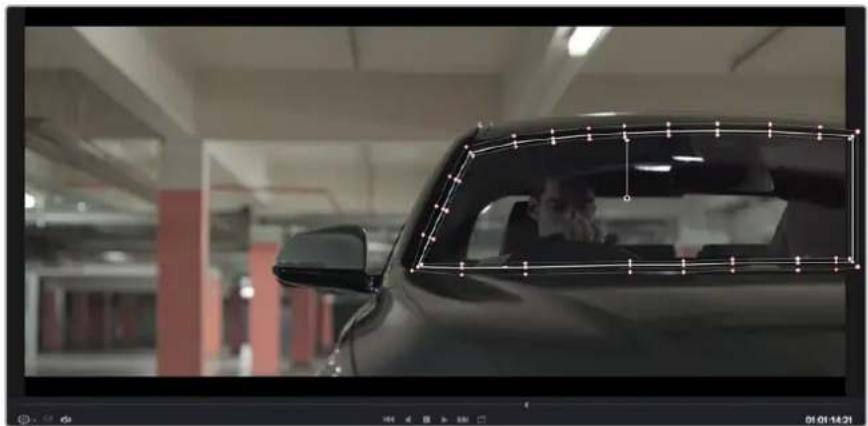
30Ha Power Window noBbIeR BInIOINHbT BTOpNHyU CBETOKOppeKuIO OTdJIbHbIX yAcTKOB I3O6paXeHH
TpeknHr 3OH
Tak KaK Kamepa n npEMeTb B KaDpe MOrTy DnRatbCra , nI npBra3Kn 3OHb K Bb6paHHomy yacTkY nCnoB3yOt fynkUoOTcneXnBaHn. OHa aHaJIIN3pyET noLoKeHne KaMepb I nepeMeueHne npEaMeTOB, no3BOJRA coxpaHtB 3aDaHhBte 30Hb. EcnI 3ToIr He CdenaTb , UBeTOKopkeKuHa MoKet 3aTpOHyTb Te oBlaCTn, KOtopbIe N3HaauNbHO He 6blN Bb6paHbI .
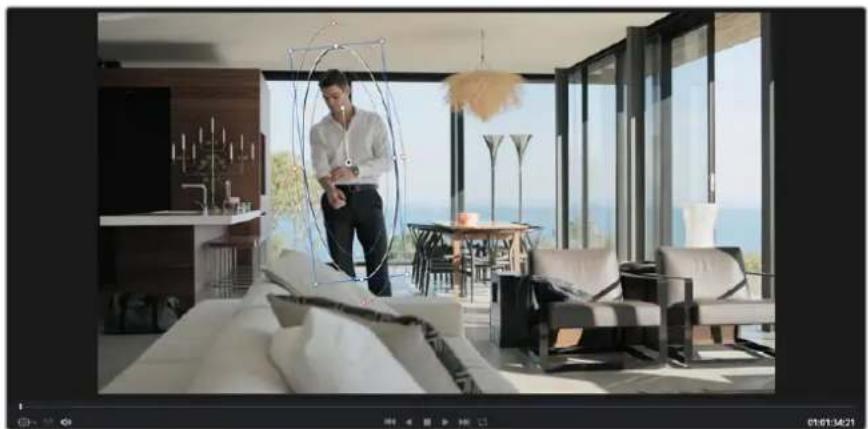
C NOMOUIO FyHKUINOTcNeKUNBAHNO MOKHO pNBU3aTb 3OHy Power Window K DnKyuEmycnypeMety
OTcIeXnBaHHe 30HbI Ha DnBxUyEmcra ObekTe
1 Co3aIte HOBb nocneobatbHb y3en n do6abBe 30Hy Power Window.
2IpeynteBHaJNOKnna 3aTeM Bb6epnTe nOKeHne npa3MeP 3OHb ,HTo6b OHa OxBaTbBaa TOIbKO HyKbYuactOK N3OpaeHH.
3 OTKpOte naHEnb Tracker.B 3aBcIMocTOn OT xapakTepa DnHexHn Bb6epNTe aHaHn3 npametpoB Pan, Tilt, Zoom, Rotate n Perspective 3D, noctabn Hn CHnB fnaKoB COOTBeCTByIOeM none ceknn Analyse.
4 Haxmte Ha KhoKy Forward cBea ot HacTpaNbaembX npamcTpoB.DaVinci Resolve 6ydtncn030BaTb HECKoNbKO TOeK OTcneKnBaHnI dna aHaJIIN3a DnKHeHN B nOcneObaTeNBHOCTKaDPOB, no3ToMg 30Ha Power Window octaHcTc npBraHHo K bIbpaHHo 6nactn306paJxehn.
B 60bnHCTBe cnyae ABOTMaTneckn TpeKNr 6bIaer YcneuHbIM, ODAHO Ie HekOTopbIX CNOXHBIX CcEH MoKet Ntpe6oBaTbcry pyHra 6pa6oTKa KIOueBbIX KaIPOBBoJe e NoIpO6Ho 3Ta FyHKUIN Onncana B pykoBOJCTBE no DaVinci Resolve.
IcnoJb3ObaHne nlaHnOB
PnBbINONHeHHBtOpHcHOBcETOKoppeKmOxHOHCNOB30BaTbnnarHb OpenFX, KOTOpBie nO3BOJHOTco3DaBaTbOpHnHaHbHbIe cBeTOBIEpeWeHnHa CTpaHnCe Color n do6abTb nepeXoHa HC tpaHnCe Edit.3TNnAaHbNpEJaAOT npOn3bOInTeJI nporpaMMHO o6ecneHn
Iocne yctaHOBKn KOMnNeKTA nnarHOB OHn 6dyT DocTyHb B OKHe OpenFX. Hto6bl Haatb pa6Oty C HmN, HAKMITE KONIKy OpenFX cnpaba OT nHCTpyMeHTa Node Editor Ha ctpaHnue Color, co3daTe HOBbI NOcNEoBaTeNbHbY3en N nepeTaunite nnarHn Ha 3OT y3en . Ecnn HAcTpOKn nnarHnMoXHO n3MeHtB, INCNoB3yJte naHb Settings.
Ha ctpaHnue Edit c nOmoBIO nnarHOB KKnIaM MoXHO npImeHTb 3oFekTb N nepeXoDb .ДЯ TOrO OTKpoIte naHEnb OpenFX B Effects Library n nepetauNTe Bbl6paHHN Ha BIneo HAD MOHTaXHO nnHeKoN Klnua.
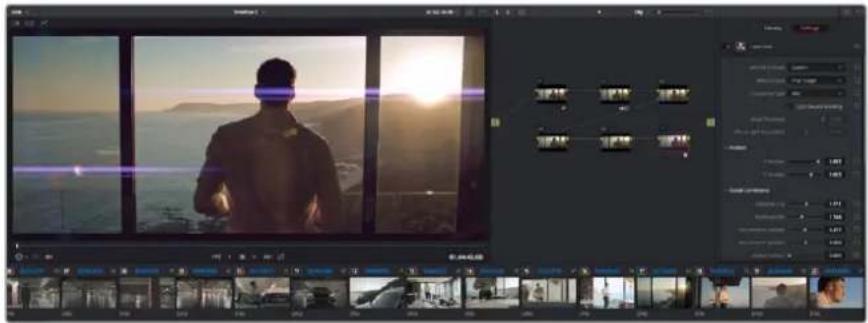
PnarnbOFX-ydo6hmynpoctocnoc6coaHaOpunHahbHoroB3yabHoro pda
MnKshnpoBaHne 3Byka
MnKunpoBaHne 3Byka Ha cTpaHnue Edit
Iocne peaKTHPOBaHn nUBeToKOppeKuBnEo MoXHo npNCTynTb Ko6pa60Ke 3Byka B DaVinci Resolve ecb prn HcTpymeHOB dna MOHTaKa u CO3dHaMa MaCTep-KoNN aYdnOdoPoxKn HeocpeDCTBEHNO Ha cTpaHnce Edit. KomnkeChoe MKNHPOBaHne DoctynHO Ha cNeuaNBHO CTpaHnce Fairlight, KOTOPa NMeET cEnb HAp6p CpeCTB dna nonHoceHHo NoCTobpa60TK 3Byka . Xx onncahne coepkntCB n Cnedyioe p4dene.
OobBHeHne 3ByKObBix DopoXeK
Дянаноженгьукobыхфскги My3bIKHастанцe Edit moKHO do6abntb HOBHe Tpekn.Тakoi cnoc6 obpa6otkn nomoraet co3daTb ueNoCThoe 3BykoBOe cOnpoBoxdHnE, coCToaUee n3 dHaNOrOB, My3bIkaJIbHOrO foHa n DononHHTeNbHbX 3f0ekTOB.
PopdoKdo6ablenn3BkyoBoi dopoxKnHa cTpaHne Edit
1 ⅢeKHTe npaBOH KHOIKO MBIHN PADOM C Ha3BaHHeM IIO6O 3BkyOBn DOPOXKn HA MoTHaXHO HINHeKe N Bb6epnte Add Track. HoBaJdoP0xKa 6yET Do6aBHeHa BnH3y CnUcKa. TaKke MoXHo Bb6paTb Add Tracks yKa3aTb MeCTo, Kyda HyxHO NOMECTNb HOByIO DOpOXKy.
2Bb6epntHeo6xOIMMbTIN3ByKOoBdoDopoknn - Stereo, Mono, 5.1nAdaptive.
HaMOHTaXHOIINHeIKeNoBUTcHOBa3ByKOBaDopoxKa
HactpoKa ypOBHeN 3ByKa Ha MOHTaXHOI NHeKe
KaJbHnHa MoTAtXHOI HHeKe IMcET OTdEhHyO HAcTpOky ypoBHA 3Byka , M3MCHTb KOtOpbl MOxHO IpocTbM IpeTackBaHnEM yKa3aTeJIa CnOMoUbIOMbIu, 3Ta HAcTpOka COOTBeCTByet 3NaueHIO Volme BOKHe Inspector.
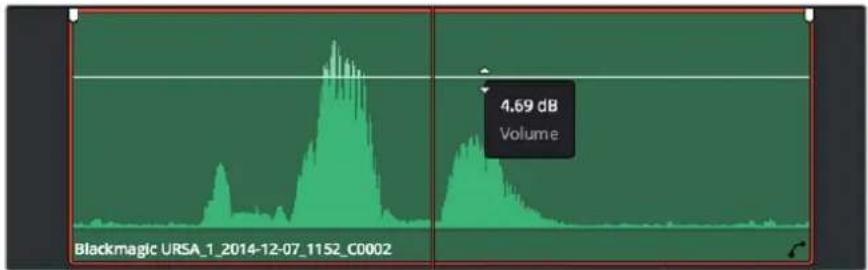
YpOBeHb3ByKaMeHsIeTcNepetackKnBaHmEyKaaTeIeH
Дя KMнгсног MKNHIMOBAHIN NcnoJIb3yeTcA CtpaHua Fairlight, KOTopaa coepKNT noHbI Ha6Op HHTpyMeHToB dЯ nocto6pa6OToK 3Byka.
Ctpanuca Fairlight
CtpaHuaFairlight npinoxchen DaVinci Resolve cnyKITnIg o6pa60TK 3bYka. IIOBONy yBnTeB BCC ayNDOpOxKn IpoeKTA BpeKIMe OndHO AekpHa , OHa IMeET cIbI Ha6Op INCTpyMeHTOB nIpaunpeHHoro MKNWupOBaHn I NOJIb3OBAteNcKne CpeCDTa MOHITOpINrA .To ynpouaeT npOBepKy kauecTBa 3BykoBO r COIpOBQdEHNr HAcTpOy UPOBHe CNHala dIra Co3DaHn ORTTMAnbHO mactep-BepCnn.
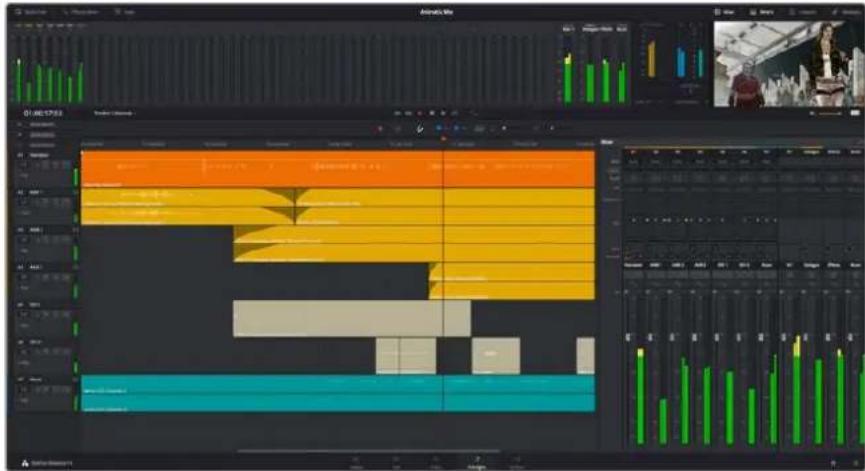
3TOT pa3den coepknt 063op oCHOBHbix fHKn ,doCTyNbIX Ha cTpaHnue Fairlight. Iopnpheo KaKdoH Nx CM . pyKOBOcTBo no DaVinci Resolve, rDe onncabH noIwArOBe neiCtBn dnn KaKdOro OTdeIbHoro 3Tana.
3BykoBa MoTaXHa NHeKa
3aoronoBokdoopokn
CJIeBOI CTOpOBH B 3aRIOBKe KaXoD IopOxKu Yka3aHbI ee HOMep , HaBaHne NcBET, a TAKKe OTo6paKaIOCTa ayDNOKaHaNbI , ypoBeH fEiDepeA IN HnDKaTOpBi 3ByKa. TaM Xe MoXHO yCTaHOBTb IN CHRTb 6IbOKInPOBky IopOxKek, Bb6paTB BbBOd OTdEhBOrTOpeKa IN OTKIOHTb ayDO. 3TN opraHbYnpabHeHH NO3BOJIAOT CNTeMaTHN3INPOBaTb DOpOxKn IN PocMaTpNaBaTb KaXyIO IN HIX NO OTdEhBOcTNI
Dopokk
IpeaKTHPOBAHIN MIKHNPOBAHIN KAKdA DOpoxKaHa CTpaHnCe Fairlight pa3eneHa HnnocB, KOtOpBc COOTBeCTByIO ININIBNdyAaHBIM KaHaJAM ayDnOCnHana. Ha MoHTaKHO nnHeKe CtpAHuCb Edit 3TN KaHaJI BCKpBTb, a IyO6CTBa Opb6OTKn OTobpaKaETCBc KJIIT C eJOCTHbIM 3BYKOBBM COPOBXXDEHnEM.

A1-MOHODOPOKKa cOHOH NOOCo, A2-CTepeoDopOKKa C DByMaNoLOCaMn
NoHrTne uHHbI
HHa 3To KaHaI DnA CBeDcHn HeckKOBbKO 3ByKOBbIX DOpOKeC MOHTaXHO JINHeKN B ODNH CUNHaN, KOTOpBIM MOXHO YPiPaBnTb KaEiHbIM 3JIeMeHtOM
UHaMain
O6bHNO 3TO OCHOBHn HA npoPpAMMHO BbIOda ,Kya nO yMOJauHH CBOIDTCByK CO BCEx DOpoxek TeKyuero npoekta. Oha o6beHNReT BCE TpeKn Ha MOHTaKHO JINHeKe B eINHb cUHTHa I NO3BOJAre YCTaHaBnBaTb erO 6uH yPOeHb NocLe KoppeKTHPOBKn NapaMeTpOB KaJDOrO OTdJIbHORO KOMNoHEHTA.
Usha Submix
3TaIINHACNYKNTDnCBeENHBOeHNHOHeCKONbKxTpeKOB OHDHO KATEOPN (HaNPIMep, DnAIONr, My3bKa n 3ByKOBBe eΦeKtB),HTo6b bIIO yOboHO BblNOHHTb IN NaKeTHyIO oBoaOTkyTak, Hn Hee MOXHO HApBaNTb BCE DOpoxknc DnAIONAMn, a 3aTeM BblOpTaB dNn HIX OOnHaKObte NapaMeTpbl C NOMOIO OOnHO HaOpa HAcToeK PpeYCMOTpeh peHepnH KAK OTdEhBO DnBcNOMOratEnbHO WInHb,Tak n DnBA BCero MaTePnana Ha OCHOBHO WInHE.
Mixer
KaJbI TpeK Ha MOHTaXHON JINHeNke COOTBeTCTByeT OTdJIbHOMy KaHaNy Ha naHeNl Mixer. 3ByKOBoe cOnpObxDeHne IJnHb Main OTo6paXaETcB BInde OHOH NOnOCbI No yMOuHaHIO Hmec063NaueHne M1.Ecn Co3daT bdoonHntelbHbIe uHNb Main n Submix, B npabOu qactn EkpHa dna Hnx NOBATCB CBOU NOnCbI C HApOpom rpaHueckx opraHOB ynpaBHeHry. OHnNo3BOJIOT Ha3Haayb KaHaBIL DnBbOda, HAcTpaNBaT npaMeTpE EQnDynamics,yctaHabNBAbTypoBHeCnHaJa n ABtOMaTHINPOBaT 3aDaun,3aDaBaT npocTaPcHCTBeHHbIe XapakTepcNTKn O6bEMHOro NCTepeO3ByKa, OKIIHOaTb INI PocCyuNBaT TObKO OINH TpeK
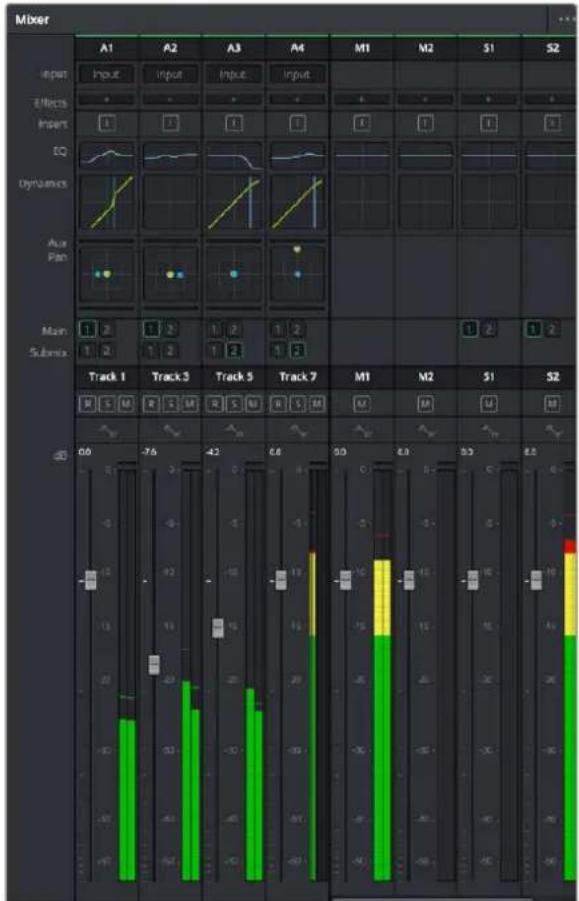
Aynomukep c kahanamn, KOTOpbie COOTBetCTBYOT TpeKaH Ma MOHTaXHOI nHeKe
Pa60Ta c 3KbAlaI3epom
Iocne TOro KaK HAcTPOChbI yPoBHN 3Byka ,HOrTa Tpe6yctcero DoonHnTeBnHa O6pa6OtKa . KOrda IaIaONr,My3bKa n 3eEeKbI NMeEOI OINHaKOBbIe HaCTOTHbIe XapakTePrcNTKN ,3ByKOBoe cOpBOxJeHne KInna CTAHOBITcCNIuKOM HAcBIIeHHbIM IN TpydHbIM dNBAOCnPnATNA . B ATOM CUYae MOXHO NCIOJIb3OBAbI bKBaJIaI3ep ,YTObI 3aDaIbY uCAkTIcN CNEKTPa DnK KaJdoDopoxKn . TaKke OH N03BOnJIET YdAnITb HeKeJIaTeBbHbIe 3JeMeHTb NytEm H2OIInpOBaHry cAcrTo, CoDEPKaUx pa3NIuHbIe NOMEXN B BVNe UyMa , NymeHbIeHHN COOTBeTCTBYIOUero yPoBH.
DaVinci Resolve ImeET fInbtpb EQ, KOtOpBie MOKHO pImeHnB kAk KO Bcemy KINy , TAKN K OTdeHbHOI Dopokke.ДЯ NIOBOrO KINa Ha MONTAKHOI INHeKe DOCTynHa Opba6OTKa C NOMOuBo QteBpexIONoCHOrO 3KBaIIaIIepa BOKHe Inspector, a IIN TpeKOB Ha NaHEni Mixer -C NOMOuBo WecTIPONoCHOrO npAmeTpncECKoR O KBaIIaIIepa. Ppi COZdAHNI KpIBOHN HyKHOI FOpmMbI NCNOJIb3YOT rpaQneOPraHBu YnpabNeHnI uNCNoBle 3NaueHnI, KOtOpBie NO3BOJIoT yCNlNTb NNIOCA6HT b OTdeHbHe YaCTOTbIe DnIaIIaONbI, a TaKke fNbTPb pa3HbIX BNIO8 .
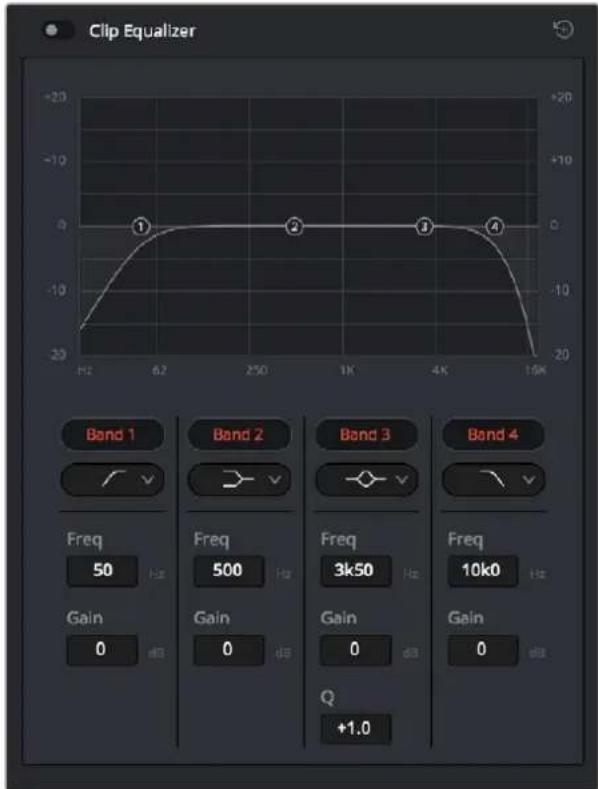
KINbHaMOHTaXHOIINHeKeMOXHO6pa6aTHBaTbC NOMOuBIOYcTbpexnOCHOrO3KBaIaN3epa
IINKpaHnX NONOCMOKHO BbINONHbTb HAcTPOkY C INCNOJIb3OBAHmEΦNlBTPOB BcOKNX Hn3KNX
HaCTOT, BbICOKOr OHN3KOro 7eBba .HaCTOTbIe FInlbTpbl NNHOCTbO ydaJIaOT n3 CNrHaJa BCE HaCTOTbI
BbIe IIN HnKe ONpeJeNEHHOrO 3HaueHnra. TaK, BbcOKoCACTOnbHmFInlbTp pOnyckaET BbcOKne HaCTOTbI
n 3aepxNBacT Hn3KnCe. Te n3 HnX, KOtOpbIe He nonaiaot B 3aDaHHb dHaNa3OH, NOCTeNCHo 06pe3aIOTCa
No HnCXoJDAIe KpIBoB.
Фиьтphиьфапрннанчehнлдб6оeМгкоOBpa6OTKNI NCNOLb3yIOrKa,КогДHyxHO CΦOPMnpoBaTbOfpyCnHanaBBepxHEnHnxHReTOUKe6eNtHOrOуdAnEHHaCTOT .OH NcHnBAiOTnNOCnA6JIOTUeNeByIOYAcTOTyPabHOMepHOBO3dEChBTyIOTHaBCEaCTOTbBbIeNN Hxke3aDaHHoI rpaHnCb.
IINPcEHNX NONOCMOKHO BbINNHTB 3KBaJIH3aUIO C NcNOb3OBAHnEM Hn3KOrO INBbCOKOrO WENbΦOB, NOLOCHO-3aRpaKaJauoero n KOnokonoo6pa3HOro ΦnTPOB.
Kolokonoo6pa3HbIΦnIbTp
Kolokoloo6pa3HbIΦnIbTp yCunBaet nIN Ocna6nEeT Mnana3OH YacTOT B 3aHaHHoTouke KpmbO.
Pnlocho-3arpaKaDaIOuIyΦnIbTp
Noiocho-3arpaqdououn fnoBtp no3BOHnet o6pa6aTbBaTb ouHb y3kn dnaIa3OH qactOT Hapumep, cero nOMOUBo MOKHO ydaNTb NOMEXHa qactote 50nn 60 T.
Φnltp Hn3Koro wenbpa
TOTfynbtpycnnaeTnnocla6nreTcHnIeNBoyactOTbHaHnxKHeIpaHnue H3KNEaCTOTbl
ΦnIbTp BbICOKOro WenIbpa
3TOTfHnBtpycnnaBaETnnnocna6nreTcHnHaeneBOuacToTBHaBepxneIpaHnue 60one BbICOKNEyactOTbl.
O6pa6oTKa KInna c NOMOu bNo 3KbalaHepa
1To6bI Do6abTb əkbaanai3ep , Bb6epNTe KInn Ha MOHTaXHOI NHeKe .
2 ⅡeKHTe KHOIKO Mbln Ha OKHe Inspector N BkIOHTe pcKIMm Clip Equalizer.
PopdoKdo6abHenn3KBaIaN3epaKdoPoxke
1 To6bl OTKpbTb 3Kbana3ep dna onpeedeHHoDopoxKn ,BaXdbI eJKNHTe KHONKO Mbln B Cekunn EQ 3toi Dopoxkn.
BpackpbbaIOeMCMeHO Bb6epntTnΦNtpa

BceKn EQ Ha nHaenMixer oTo6paKaactc KpYBaB B COOTBeTCTBN C BBbPaHHbM pNlTpOM
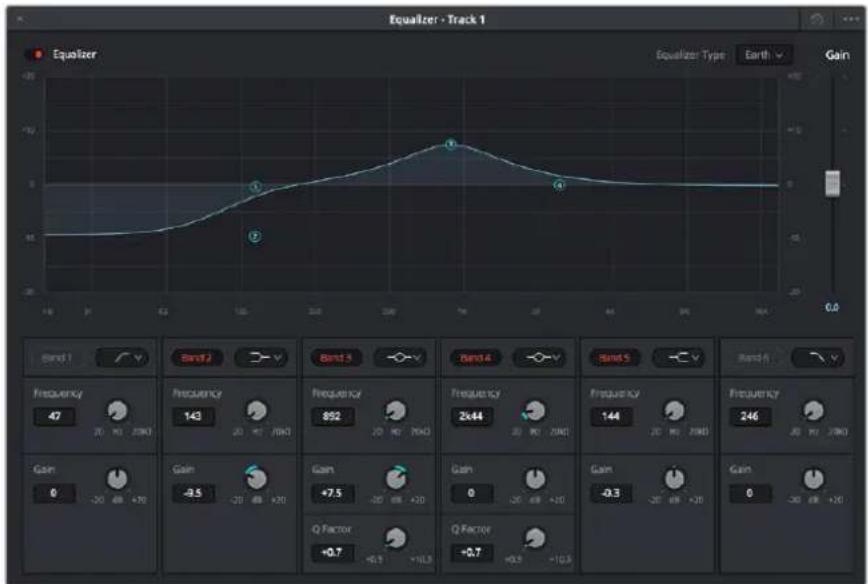
KaKdyio npoxkky Moxno o6pa6oTaB c nmooub uocunonocnOrO kBaanieepa
Korda nla Klnna nn TpeKa OTkpBt EKbaan3ep , MOXHO BbINOHHTb Opba60Ky Ha KaJdoN noOce .
Habopdoctynhix HAcTpoek 3aBcntOT Bb6paHHOro TnnaΦnIbTp a
Hactpoika napametpoB cnIbItpa
1BpackpbBaKUeMcMeHIO BbIepuTe TnΦnIbTp a
2 YctahOBInTe 3HaueHHe NcHTpaIbHOu NaCTOTbB nOte Frequency.
3 ycnne Hn nocnae Hn aactoB daHHOM danaa3OHe hactpoTe 3NaueHne Gain.
4Bb6epnte3naehne QFactor yka3aHnI npinHpa6ooy nonoCb
ДяВОЗВРаТКНACTPOIKAIMNoYMONUHANHOHAKMITEHa3HauOKc6pOcABOKHe EQ.
Ha6op nHCTpyMeHToB Fairlight no3B0n8eT ynyuHTb KaueCTBO 3Byka Ha KaKdo ayDIOPOJKe Cnx NOMOsbIO MOKHO Do6aBnTb TpeKN NCNCTMaTH3pOBaTb NX No WnHAM, a TaKke Co3DaBaTb TaKne 3ΦΦeKtbl, KAK 3aepKKa nn 3Xo.
Co3dHHe MacTepe-KoHn
Iocne 3aBepseHnMoHTaKa TpcnHrHa O6pa6tKn 3Byka Heo6xOIMO BblnoHnHb peHcpeHn HIOyHeHOr MaTePmaJa Ha CtpaHnue Deliver. OHa No3BOJnEe Bbl6paTb KInnBdNkCnOpTa, INx fOpMaT, KOdek n pa3peSeHHe. Co3daTb KoHeHyKOnnMOKHO B fOpMaTax QuickTime, AVI, MXF n DPX C NOMOuio8-6ntbIXm10-6ntbIXKOKeOB,Taknx KaR RGB/YUV,ProRes,DNxHD,H.264npytne.

Длэ кснорота поетдпerte Ha CTpaHmUy Deliver, rde moxho BbipapbTфopMaN KoDEK
PopdoK akcnopta otdehoro klnna
1 OTKpoTe BklaKy Deliver.
2 Npcnntc K OKny Render Settings B neBOM BCpxHem yrny ctpaHnU . Dn npapMeTpa Format yctahOBNTe HactpoKy Single Clp.MoxHO BocnoIb3ObaTbCz 3aHaHHbIMn OIuHMn dnnknpota B YouTube nVimeo IIn6o co3daTb co6CTBeHHyIO KOHpyraCuIO HaPmep, nocie bblbopa YouTube moxHO uJIKHyTb Ha CTrpeJIke BO3Je OIuIN dNn EKnOpTa n 3aDaTb opMar108Op.
KaIPOBaYaCToTa 6yIDT npBb3Ha K HacTpOyKam IpoeKa
3Iop onuHaxoJrTcHnBaHHe paHa nMOHTaKHO nnHeKo n naKa dn CoXpaHeHH 3KOpTpyEmoro Bnco.HxMMTe KOnKyBrowse n Bb6epnte MecTo dna CoXpaHeHH 3KOpTpyEmoro paHa.
4 HcnocpeCTBcHNO HA MOnTaXHOJIINHeKoCecbpackpbBaIOeecrMeHIO Render CDByMn OUZmO.0HO cIyKIT IIN BbOpa NIOHO BPemEHHO WkAn (Entire Timeline)N6o onpeJeHnEe dnaHa.Bo Btropom clyae BbEpnte In/Out Range,3atEm c nOMou KNaBnI IN O3adaTe TOOK BxOda N BixOda Ha BpMcHHO Wkane
5 Bn3y OKHa Render Settings HaxMITE KHONky Add to Render Queue.
Hactpoikn peHepinra 6byT do6abHeNk Rendr Queue Ha npaBoi cToPoHe cTpaHnCb. Bb6epnte Start Render, yTo6bl Hauatb peHepnB Rendr Queue.
Pocne 3aBepseHnpeHepnHra otKpoTe naKy,Dbaxbl ueKNHTe KHONKO mbuHa co3daHHOM KInne npocMOTpnte OKOHatEnbHyU Bepcno CMOHTnpoBaHHO MaTepnna
этан посторотки
Pa6ota c nporpaMMhbIM oecneueHnem dpyrnx npo3BODnteien
HTo6bBbIOJIHNbMOHTaK BnIeO BIO6OMpyOM npINOKeHH ,CKONIPyTe KINbHa BHyTpEHnn/ BHWeHnDnCK NnRAID-MaccuB, a 3aTEM MMNOPTyPe IN B nporpamMy .
KInnbl MoXHO TaKke peJaKTIpOBAbHeNoCpeCTBeHNO Ha SD-KapTe.
Pa6ota c Final Cut Pro X
Hrobl OtpedaKtnpoBaB Knbl Apple ProRes B Final Cut Pro X,co3aIte HOBII npoeKT c TAKMMJ HeCTPOiKaMn fopMaTaNacToBkAipOB , KaY NMeIOUeOra BIndeo . B npimepe Hnke HcNoIb3yETCfOpMaT ProRes 422 1080p/25.
1 3anyctnte Final Cut Pro X, npeuHte Ha naHenb Menu u Bb6epTe File/New Project. OTKpoecTc OKHO C HAcToPouKaMn PpOeKTA
2YkaxnTEIMNpOeKaTNBKNIOUHTHeHAcTPOky Custom.
3 YctaHOBHTe npametpbBndeo :1080p HD,1920x1080 n 25p.
4 DnA Audio and Render Properties bI6cpiTc Stereo, 48kHz Apple ProRes 422.
5 Haxmte OK.
HtO6bl MMIOPTnpoBaTb KINIb B Inpoekt , npeiNITE Ha NaHEnb Menu N Bb6epnte File/Import/Media. Ykaxnte KINIbHa KapTe NaMAtn SD.Tenepb KInIb MoXHO nOmeCTNb Ha MOHTaXHyIO NInHeKy nepetacknBAHHem.
Hactpoikn npoekta B Final Cut Pro X
Pa6ota c Avid Media Composer
HTo6bl OtpedakTnpoBaTb KInnbl B Avid Media Composer 7, co3aJTe HOBn npoeK T taKIMn JHeCTpoiKaMn FOpMaTa H KaDpoBoi YacToTb , KaK y IMeKUeROC BIndeO . B npImpe HIXke IcNoIb3yETcAopMaT DNxHD 10801/59,94.
3aryctne Media Composer.OTkpoetcokHo Select Project.HaMKnte KhoNky New Project.
2 BokHe New Project kKaKnTe HaBaHne npoekTa.
3IpeepiTeBpackpbBaiooeeecMeH0 Formatn Bb6epTe 1080i/59,94.
4IpcenDInTEBpackpbBAIOUCCMAHCOIe Spce n Bb6epTe YCbCr709.
5IpeepuBte BpackpbBaIOueecMeHIO RasterDimensonN BB6epTe1920x1080.HaKMnTe OK.
6 BbIepeTe Tools>BackgroundServices HauKMTe KHOITky Start,ecn foHObBc cepBc eue He 3anyueH,3aTeM HaKMTe OK.
7YkaKIne nanky , B KOTopyHO Heo6xOIMMO IMNIOPTnpoBaTb aJIbl
8 Bb6epuTe File>AMALink....ykaxnte faa nbl dna mnpTa hakmte OK.
Korda KINbI OTo6paKaIOCTcB NAnKe ,IX MoXHO NOMeCTNTb Ha MOHTaXHyIO NInHeKy NepeTaCKBaHNEM HauTb MOHTaX.
Co3aHHe HOBOro npoeKra N Bb6Op HAcTpoeB Avid Media Composer 7
Pa6ota c Adobe Premiere Pro CC
HTo6bOtpaB KInbB Adobe Premiere Pro CC,co3aIte HOBn npoeK T TaKIMN JHeCTPOkAMN FOpMaTn KaIPOBOu CACTOTb ,KaK y IMeIOUeROCH BnJeO .B nPImpe HIXKe NcONlb3yETcHOFmAT ProRes 422 HQ1080p/25.
3anyctnte Adobe Premiere Pro CC. BokHeWelcomc Bb6epnTe"Create New/New Project". OTKpoetca OKHO c Hactpoukam npoeKta
2 YkaKNTe HMa npocKa .HaKMnTe Browsse N BBbepnte nAnky dna XpaHeHn npoeKta .Nocne yka3aHn nnKn HaKMnTe OKBOKHe Welcomc.
3 Ipeennte Ha naneb Adobe Premiere Pro CC Menu, Bb6epnte File/Import N ykxtne Knnn b, KOtOpBle Heo6xOaIMo OtpedakTnpOBaTb Pocne 3ToRr KInnb6yDyT OTo6paKaTbcB BOKHe Project.
4 TomcTe nepBb KnHn Ha 3HaOck New Item B npabom HxKcm yrny Okha Project. Bydet COzdaH HOBa MONTaXHn JInHeKa B COOTBeTCTBN C HAcTpoiKaM KInIa
Tenepb KINbMOXHO NOMECTNb HaJIHeKypepeTacNBAHnEM
Co3aHHe HOBOro npoeKra N BbIbOp HacIpoeK B AdobePremiere Pro CC
Pa6ota c Autodesk Smoke 2013
Yro6bOtpaBtKnBbAutodesk Smoke 2013,co3aTe HOBbI npoekCTaKIMn JHeCTPOiKaMnΦopMaTAty6HbIcBeTa,BnDa pa3BepTKN uactoTB KaPob,Kak y NMeIOeRocBnDeo Bnpimepe Hxke DnBaHncnNCIOJIb3yerChΦopMat ProRes 422 HQ 1080p/25.
1 3anyctnte Smoke. NoBtck Okho Project and User Settings. HAnMe KOnky New noHa3BaHnEM npoeKta.
2 OTkpoEeOkHO Create New Project. yKaXnTE mMa npoeKta
3BpackpbbAioeMCA MeHIO BbI6epnTe 1920x1080HD1080.
4ДглгубнblcBerta yctahOBHTe "10-bil",дгla Bnda pa3BepTKI - "Progressive".
5 N3packpbbaiooerocMeHIO Config Template BB6epnte "1920x1080@25000p.cfg".
6ДяnapaMeTpap PreferredFormatoctabTeHactpoiKy"ProRes422HQ"нраMnteCreate.
7 HaxmTE KhoNky New noJ3arONoBkOMUser.
8 NocTe TOrO KAK OTKpoETcA OKHO Create New User Profile, yKaKHTe NMa NOIb3OBaTeN HAnKMITE Create.
Korda noBToPHO oTKpoEeTcOkHo Project and User Settings, HaxMMTe KOnKy Start.
10 B nAeHm MHeo Bb6epnte File>Import>File nykXnTe faaiIpnMnpTa
11 Tocne TOro KaK KInnblb6dyT OTo6paKaTaBcB 6b6nOteKe , NOMeCTNTe INx Ha MOHTaXHyO nHeKy nepetackNaHem HauHHTe MOHTaK .
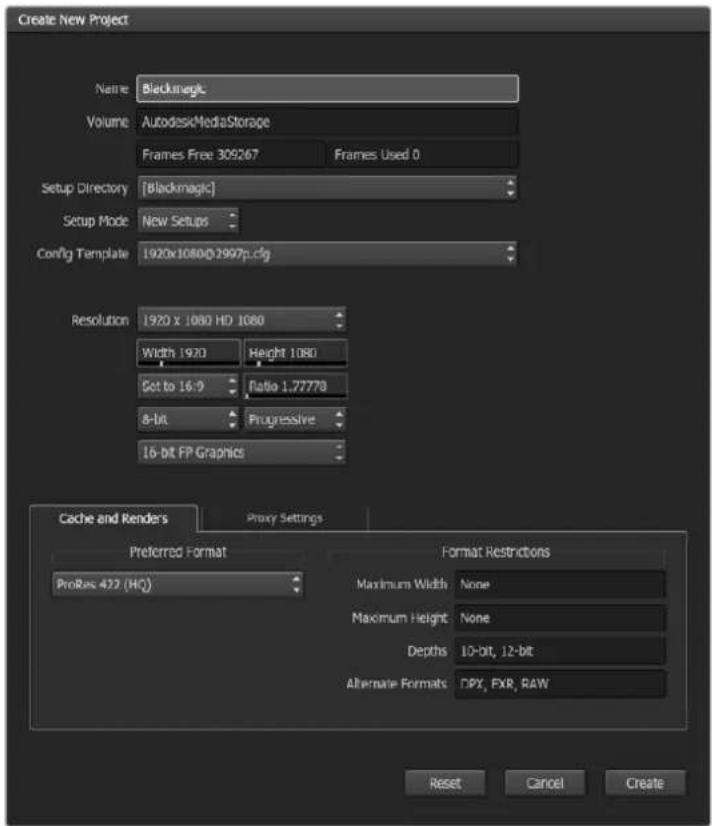
Co3aHHe HOBOr npoeKra N Bb6Op HAcIpoeB Autodesk Smokc 2013
Pomoucb
Kak nojutyntb nOmoosb
Cmbl 6bIcTpbl cnocob noJyntb nmoa - o6paTntbca K cTpaHnca m nopeKkn Ha caTe Blackmagic Design n npOBepntb Hauuue nocneHnx cnpabOuyhix MaepuaIOB NO Video Assist.
CtpaHnua noDpeKKn Ha caTe Blackmagic Design
IocneHHe BepnnypkoBcTaBa no 3Knpyatauun ,nporpaMMHoro o6ecneueHn IdoonHnTehhyu HnΦopMaUIO MoXHO HaTn B paZene NoDepKKn Blackmagic Design Ha cTpaHnCe www.blackmagicdesign.com/ru/support.
Φopym coo6eCTBa Blackmagic Design
NocTeTne fOpym coo6eCTBaBlackmagic Design Ha Haaem Be6-caIte, TTo6bI NOnyUHTb IOnIOHNHeJIbHyIO INHOpMaIIuio y3HaTb 06 INTEpeChbIX TBOpuecknx IJEx . Tam Takke MoXHO HaHTN OTBeTb ONbTHbIX NOnb3OBAteJeI n CoTpudHkoB Blackmagic Design Ha cacto 3aDaBaEMbIe BONpocBt Adpec fOpym http://forum.blackmagicdesign.com.
06paueHnE B Cnyk6y noDpeKKn Blackmagic Design
Ecn n oomoubIOocTyNbIX cnpaBOuHbIX MaTePnAnOB n fOpyma peWntb npObnemy He ydaNoCb, BOCnoB3yNTecb opmoIcTnpaBHTb HAM COo6eHHe Na CTpaHne NOdepKKn. MoXHO TAKKe N03BOHNTB 6blNkaiwcc PpeDCTaBNTcBCTBO Blackmagic Design, TenefoH KOtopoR Obl HaJeTe Ha Hauem Be6-caYte.
PpOBepKa nCnoB3yEmoB Bercn nporpamMHO o6ecneueHna
Yro6b y3HaBb Bepcno Blackmagic Video Assist, yCTaHOBHeHHyIO Ha BaIeM KOMNBIOTpe, oTKpoIte OKHO About Blackmagic Video Assist Setup.
Ha komnbiope c onepaunonHno ciTe mo Mac OS oKpOte Blackmagic Video Assist Setup b nane «PnploKeHnra. B MeHIO bIepePe About Blackmagic Video Assist Setup, yTo6bI y3HaTb Homep Bepcnn.
- Пи рабо te сонетационн сстемо Windows 8 Ha Экpane «Пуск» Вьберпte Blackmagic Video Assist Setup. B MeHIO «Помошь» пердnte K About Blackmagic Video Assist Setup, yTO6bI y3HaTb Homep BepcIN.
Ha nataopme Windows 8.1 nepeiDnte k nanke Blackmagic Design c ekpaHa «Pyck》,ncnoIb3yra3a4ok co cTeplkO Bn3.3anyCTne yTInity Blackmagic Video Assist Setup.
- Ha nlatopme Windows 10 Bb6epnte Nyck > Bce npiloxenna. Ipeennte Knanke Blackmagic Design. 3anyctnte ytnnity Blackmagic Video Assist Setup.
3arpyka noclendnx Bercn nporpaMMHoro oecneueHna
Y3nab yctahOBnEHyIO BepcHIO Blackmagic Video Assist Setup, nepeDnte B cHTp noDpeKKn Blackmagic Ha cTpaHnue www.blackmagicdesign.com/ru/support, TTo6bl npOBePrtb HnUne oHOBHeH. PekomeHnyETcBcerda nCNoIb3oBaTb NocJeHIO BepcHIO npOrpAMMHorO oBeceNeHnA OHaKo oHOBHeHne lyuWe BCero BblOnHrTb NocTe 3aBepSeHnRA TeKyUeRpoEKTa.
Гаранта
OrpaHnueHHa rapaHTnA cPOKom 12 MecaeB
KomnaHnBlackmagic Design rapaHTpyeT OTCyCTBNE B daHHOM n3dennn deefekTOB MaTePnala 1npoN3BODCTBeHHoro 6paka B TeueHne 12 MecaueB c DaTb npdaKn. Ecn BO BpeMa rapaHTnHoro cpoKa 6dyT BvIaBHeHb DeefekTb, Blackmagic Design no CBOemy yCMOTpeHHIO BblONHT peMOHT HeNCnPabHoro 13dEHN 6eonnTa CTOnMOCTn 3aunactei N Tpydo3atpat Nnn 3aMeHH TakoE 3dEJIe HOBBM
YTo6bBOcNoB3OBAbCnHCToAHTne,Notpe6nteOB8a3aYByEDOMNTbKOMnAHIO Blackmagic Design OdeΦeKeTe Do OKOHuaHra rapaHTnHorO cpoKa n ObecneuHTyCNOBIA dI pyepocTabHeHn Heo6xOIMbIX yclr. NTope6nteH HeCET OTBETCTBEHOCTb 3a yNakOBky N DOCTABKY HeNCnPABHO I3DeINBA B COOTBeTCTByUOn CepBnCHbI CEHTP Blackmagic Design C ONlAToI NOHTOBix paXoDB Notpe6nteNB o83aH ONaTtB BCE paXoDbI NO DOCTABKE I CTpaxOBaHHIO ,NOUINHbI, HAnOrn INHbIE C6OpBb CCB3n C Bo3BpaTOM IN3dJIINB HBe 3aBNCMOCTN OT pInuHNb BO3BpTa
Hactoiaa rapaHTn He pacnpocpaHaeTc H a deeKbI,OTka3bI NOBpeXdeHnB03NKuue 13-3a
Hcndncjauero nCnoB3OBAHn,HenpaBnBHOr yXoDa nIn o6CnykBaHn. KomnaHra Blackmagic Design He ob3aHa npEOCTABYb yCyTN no HactoJe rapaHTn; a) IIN yCTpAHeHHN NOBpeXdeHn,
BO3HKuix B peybTaTe DeCTBn No yCTaHOBKe , pemHTy nnn O6CnykBaHIO n3DeHNn IuAMn,
KOTOpBle He RnIHO Tc NEcoHAnOM Blackmagic Design; 6) IIN yCTpAHeHHN NOBpeXdeHn, BO3HKuix
B pe3yblate HeHaJnxEeNoB3OBAHn nn NODKNIOeHHKecBMcTmOMy O6OpUOBaHIO;
B) IIN yCTpaHEHHN NOBpeXdeHn nn DEeKTOB, Bb3BaHHx NCNOB3OBAHnEM 3aNaCTe nn
MaTePnAIOB dpyrnx npOn3BoDnteneF) ecn n3dennne 6bIIO MOINuPBOHO nIN INTEpnpoBaHO
C DPYIM O6OpUOBaHnEM, KOr Da TaKaM MoINuKcaUNn INNHTepaUNyBEJIuYNBaET BPEMn IN
NoBlaaet CNOxHocTB O6CnykBaHn IN3dennn . HACTOIAAR FAPAHTR NPEOCTABNLRTCA
KOMPAHNEI BLACKMAGIC DESIGN BMECTO IIOBX DpyNX PPRMO BIPAXEHHBIX INN
IIOIPA3YMEBAEMbIX TAPAHNI KOMPAHNAI BLACKMAGIC DESIGN N E E INIEPbI OTKA3bIBAOCTCR OT
IIOBX IIOPA3YMEBAEMbIX TAPAHNI KOMMEPUECKO LEEHHOCTH ININ INPIROJHOCTN IN
KAKOI-JINBO ONPEDEJEHHOUIEN. OTBETCTBEHHOCb BLACKMAGIC DESIGN NPOPEMOHTY INN
3AMEHE HENCIPABHbIX IN3DEINN YBLRETCN IOINbIM INCKLIQUHTEBHbIM CPEICTBOM
BO3MEUHEN, PPEOCTABLREMbIM NOTPEBNTELIO B CB83N C KOCBEHHBIIM, DAKTIVCEKIMN,
CONYTCTBYIOUM ININ NOCLEUYIOUMN YbITKAMN , BHE 3ABINCIMOCTN OT TOFO , BJIJA INN HET
KOMPAHNAI BLACKMAGIC DESIGN (IN50 EE INIEP) PPEDBAPNTELHO IN3BEUHEA O BO3MOXHOCTN
TAKNX YbBITKOBBLACKMAGIC DESIGN HE HECET OTBETCTBEHHOCTN 3A IINTBOIPABHOE
NCIOJB3OBAHNE OBOPUOBAHN CO CTOPOHBI NTPEBNTELI BLACKMAGIC DESIGN HE HECET
OTBETCTBEHHOCTN 3A YbBTKIN, BO3HKAIOLUINE BCIECDTBE INCNOJb3OBAHN 3TOFO IN3DEINN.
PICKN,CBRAAHBIE CE ERO KCNPLAYATAUINE BO3NJAGTOTCR HA NOTPEBNTEL
Copyright 2017 Blackmagic Design. Bce npaba aauueneb. Blackmagic Design, DeckLink, HDLink, Workgroup Videohub, Multibridge Pro, Multibridge Extreme, Intensity n "Leading the creative video revolution" apernctppoaHbKaK ToBapHbE 3nAaB CUSA n Dpyrnx cTpaHax. HaaBaHn Apyrnx KOMNaHn HaMaHcHOBaHn npOdyKTob Mory TABnTcToBAPHMn 3hakmcoorbetctByoux npaboo6naatanei.
Blackmagic Video Assist 4K offers a registration scheme utilizing the register to register in the Black Magic Video Assistant. This is an optional service that provides the possibility of registering with Black Magic Media. The Black Magic Video Assistant offers a registration system that allows users to register for a new Black Magic Video Assistant (BDA) and can be used to register for a new Black Magic Video Assistant (BDA).
Peaking e Focus Assist
Supporto online Blackmagic Design
Monitor, Display, Audio e
Usar o DaVinci Resolve 558
sobre as opçoes de codec.
Codes Suportados
Usar o DaVinci Resolve
Corrigir as Cores dos Seus Clipes
Corresponding to: Secundária de Cores
Usar Final Cut Pro X
- Installation and Operation Manual
- Blackmagic Video Assist
- Languages
- Welcome!
- Grant Petty
- Contents
- Getting Started 5 Using DaVinci Resolve 36
- Recording Adding Transitions 8 40
- Playback Qualifying a Color 9 45
- Settings Adding a Power Window 46
- About SD Cards 29 Using the Equalizer to
- Post Production Workflow 54
- Blackmagic Video Assist Setup 33 Using Avid Media Composer 55
- Changing the Language 34
- Getting Started
- Plugging in Power
- Plugging in Video
- Plugging in Audio
- Inserting SD Cards
- To plug in an SD card:
- Recording
- Remote Control via the LANC Connector
- Continuous Recording
- Recording Clean HDMI from DSLR Cameras
- To check the DSLR camera overlays are not visible:
- Playback
- Looping playback
- Settings
- Changing Settings using the Touchscreen
- To change settings:
- Overlays
- Zebra
- Focus Peaking and Focus Assist
- Guides
- HDTV
- 4:3
- 2.40:1, 2.39:1 and 2.35:1
- 1.85:1
- Grid
- False Color
- Video Format and Frame Rate
- Supported Input and Output Formats
- Codec
- Supported Codes
- Timecode
- Trigger Record
- T/C Run
- SDI/HDMI
- Source
- Card
- Loading
- Ready
- Format
- No card
- Card full
- Record Time Remaining
- Battery Level Remaining
- Zoom
- Volume and Analog Audio Levels
- Speaker Volume
- Headphone Volume
- Analog Audio levels
- Storage, Monitor, Display, Audio and Setup Settings
- Storage Settings
- Monitor Settings
- Focus Assist
- Focus Line Color
- Anamorphic De-squeeze
- Screen Rotation
- Blue Only
- Display 3D LUT
- To import a 3D LUT:
- To monitor your video using LUTs:
- Display Settings
- Brightness
- Contrast
- Saturation
- Audio Settings
- XLR Line, XLR Mic or Video
- XLR Padding
- Phantom Power
- Setup Settings
- Language
- HDMI Range
- Setting the Date and time
- To adjust the date and time settings:
- Monitoring using on screen meters
- Histogram
- Audio Meters
- Video Scopes
- Enabling the scopes
- Adjusting the scopes
- Waveform
- RGB Parade
- Vectorscope
- Zooming into the Vectorscope Graph
- About SD Cards
- Choosing a Fast SD Card
- Formatting SD Cards using your Video Assist
- To format your SD card:
- Formatting SD Cards using a Computer
- Preparing SD Cards on a Mac OS computer
- Preparing SD Cards on a Windows computer
- Working with Files from SD Cards
- Checking Disk Speed
- Blackmagic Video Assist Setup
- Video Settings
- About Settings
- Changing the Language
- Updating the Internal Software
- To update the internal software using Mac OS:
- To update the internal software using Windows:
- Using DaVinci Resolve
- Importing your Clips
- Editing your Clips
- Trimming Clips
- Mapping Keyboard Shortcuts
- Adding Transitions
- To add a dissolve transition between two clips:
- Adding Titles
- To create a title:
- Color Correcting your Clips
- Using Scopes
- Adjusting the 'lift'
- Adjusting the 'gain'
- Adjusting the 'gamma'
- Secondary Color Correction
- Qualifying a Color
- To qualify a color:
- Adding a Power Window
- To add a power window to your clip:
- Tracking a Window
- To track a window to a moving object:
- Using Plugins
- Mixing Your Audio
- Mixing Audio in the Edit Page
- Adding Audio Tracks
- To Add an Audio Track to the Edit Page:
- Adjusting Audio Levels in the Timeline
- The Fairlight Page
- The Audio Timeline
- Track Header
- Tracks
- What is a Bus?
- Main Bus
- Sub Bus
- The Mixer
- Using the Equalizer to Enhance your Audio
- Bell
- Notch
- Lo-Shelf
- Hi-Shelf
- To add EQ to an individual clip:
- To add EQ to a track:
- To adjust the EQ for a band filter:
- Mastering your Edit
- To export a single clip of your edit:
- Post Production Workflow
- Working with 3rd Party Software
- Using Final Cut Pro X
- Using Avid MediaComposer
- Using AdobePremierePro CC
- Using Autodesk Smoke 2013
- Help
- Getting Help
- Blackmagic Design Online Support Pages
- Blackmagic Design Forum
- Contacting Blackmagic Design Support
- Checking the Software Version Currently Installed
- How to Get the Latest Software Updates
- Warranty
- Month Limited Warranty
- インズル/才レーニングマニュアル
- xdz
- Blackmagic Design CEO
- 目次
- Chers clients, cheres clientes
- Utiliser DaVinci Resolve
- Bus principal (Main bus)
- Inhaltsverzeichnis
- Erste Schritte 179
- Índice
- Primeros pasos 237
- HDMI输入和输出
- 编解码器
- DaVinci Resolve icosohoge
- glcp 1
- Pa6ota c DaVinci Resolve 442
- 3tan nocto6pa6otkn 460
- Помоць 464
- Повтовka к paбote
- IopdknloueHne nntaHna
- IopKJIIOUeHHe NCTOuHNKOB BnDeo
- PoiKIOueHHe IcToUHKnOB aydno
- YctaHObKa SD-kapT
- PpOBepKa BbIbOda npaMeTppoB Ha DSLR
- Bocnpon3VepeHne
- Luknueckoe BocnpOn3BedeHne
- Hac troponi
- I3MeHeHHe HacTpoE K c NOMOuBcEHcOpHoTo 3KpaHa
- Iopraokn3meHennaHacTpoek
- BbIbO npaMeTpoB
- 3e6pa
- Pomoub npn fokucnpOBke
- Pamkn
- 2,40:1; 2,39:1 n 2,35:1
- 1,85:1
- Cetka
- YcNoBbIyCBET
- ΦopMaT BnIeO n YacToTa KaIpoB
- IopdepknBaemble opMaTbHa BxOe N BixOe
- Koidek
- PondepxnbaeBkoDekn
- TaAM-KoA
- 3anyck 3annncn
- TOM-KoMy
- NCTOUYHK
- Kapra
- PpOBePk
- TOTOBA
- ΦopMaTHuPOBaTb
- Her Kaptbi
- Kapta 3anonHeHa
- OctabWeecBpemr
- UpoBHeb 3apra 6atapeu
- 3ym
- PactaBahne aHaMOpΦHOro n3o6paKeHHa
- Nobopor 3kpaHa
- Tolbko CnHn
- Отобрахени 3D LUT
- Pnpaok mnpoTa 3D LUT-ta6nuc
- PpIMHeHHe LUT-taBnUcI K BbIBOUMOMy n3o6paXeHHIO
- Ducnnei
- RpkocTb
- KoHTpACT
- HacbIeHHoCTb
- Aydno
- XLR nHeHbX, XLR mKpOfoH nn Bndeo
- XLR noHnHexHe
- 3ΦaHTOMHoe NTaHHe
- Hactpoika
- 3bIK
- Dnana3OHHDMI
- YcTaHOBKa DaTbI IN BpeMeHn
- PoprOk yctaHOBKn DaTbI N BpeMeHn
- MOnHTOpINr c nOMOuBIO 3KpaHHbIX INdNKaTOPOB
- ΓνικτοραμΜα
- HdkaTopb3Byka
- Pa6oTa C 3KpaHHbIMn INHdkaTopamN
- Hactpokka HndkKatopob
- ΦopMa cnHana
- RGB-dncnn
- BekTopockon
- YBeInuHHe rpaΦnKa BEKTopoCkona
- Γνctorpamma
- Pa6ota c SD-kaptaMn
- BbI6op ckopoCTHOI SD-kaPTbI
- Форматурова中华文化 SD-kapт ha Video Assist
- Порадok Форматураьни SD-kapтbl
- ΦopMaTnpoBaHne SD-kapT c NOMOuI KOMNbIOTepa
- Ioprotobka SD-kapt Ha komnbioTepe c Mac OS
- Ioprotobka SD-kaprHa kOmnbIope noy npabJIeHnEM Windows
- Pa6ota c φaɪnʌmɪ, 3aɪncaHbɪmɪ Na SD-kaPty
- Поверка ckорoctи дисka
- BknaKa Video
- BknaKa About
- N3MeHeHne 3bika
- OboBHeHnBHyTpeHHeRo npoRpaMMHOrO oecneueHn
- Popraok o6HOBHeHn npoWNbKn npa6Ote Ha Mac OS
- Popraok o6HOBlenn npoWbKn npa pa6oTe Ha Windows
- Pa6ota c DaVinci Resolve
- IMNOPTKINIOB
- MOHTaX BnDeokJInIOB
- IodrOHHKa KInnoB
- Ha3naueHne coueTaHn KnaBnJ
- Hactpoika coyetahn KnaBn
- Добавлиейпереков
- DobabHeHne npexoanda c pactBopeHnem
- DobabneHnTnTPOB
- PnpaOK co3dHnTtpoB
- LBeTOKOppeKzna KInnoB
- Papota cnHdkatopamn npaMetpoB
- KoppeKTnpOBka napaMeTa Lift
- Koppektipobka napametpa Gain
- KoppeKtnpOBka npametpa Gamma
- BtopnuaHna ZbETOKoppeKzna
- O6pa6oTka UBeTa
- Iopraok o6pa6oTkn zBeta
- Добavenne 30нbl Power Window
- Popraokdo6abHeHn30hBiPowerWindow
- TpeknHr 3OH
- OTcIeXnBaHHe 30HbI Ha DnBxUyEmcra ObekTe
- IcnoJb3ObaHne nlaHnOB
- MnKshnpoBaHne 3Byka
- MnKunpoBaHne 3Byka Ha cTpaHnue Edit
- OobBHeHne 3ByKObBix DopoXeK
- PopdoKdo6ablenn3BkyoBoi dopoxKnHa cTpaHne Edit
- HactpoKa ypOBHeN 3ByKa Ha MOHTaXHOI NHeKe
- Ctpanuca Fairlight
- 3BykoBa MoTaXHa NHeKa
- 3aoronoBokdoopokn
- Dopokk
- NoHrTne uHHbI
- UHaMain
- Usha Submix
- Mixer
- Pa60Ta c 3KbAlaI3epom
- Kolokonoo6pa3HbIΦnIbTp
- Pnlocho-3arpaKaDaIOuIyΦnIbTp
- Φnltp Hn3Koro wenbpa
- ΦnIbTp BbICOKOro WenIbpa
- O6pa6oTKa KInna c NOMOu bNo 3KbalaHepa
- PopdoKdo6abHenn3KBaIaN3epaKdoPoxke
- Hactpoika napametpoB cnIbItpa
- Co3dHHe MacTepe-KoHn
- PopdoK akcnopta otdehoro klnna
- этан посторотки
- Pa6ota c nporpaMMhbIM oecneueHnem dpyrnx npo3BODnteien
- Pa6ota c Final Cut Pro X
- Pa6ota c Avid Media Composer
- Pa6ota c Adobe Premiere Pro CC
- Pa6ota c Autodesk Smoke 2013
- Pomoucb
- Kak nojutyntb nOmoosb
- CtpaHnua noDpeKKn Ha caTe Blackmagic Design
- Φopym coo6eCTBa Blackmagic Design
- 06paueHnE B Cnyk6y noDpeKKn Blackmagic Design
- PpOBepKa nCnoB3yEmoB Bercn nporpamMHO o6ecneueHna
- 3arpyka noclendnx Bercn nporpaMMHoro oecneueHna
- Гаранта
- OrpaHnueHHa rapaHTnA cPOKom 12 MecaeB
- Peaking e Focus Assist
- Supporto online Blackmagic Design
- Usar o DaVinci Resolve 558
- Codes Suportados
- Usar o DaVinci Resolve
- Corrigir as Cores dos Seus Clipes
- Corresponding to: Secundária de Cores
- Usar Final Cut Pro X
Brand : Blackmagic Design
Model : Video Assist 4K digital video recorder
Category : Voice recorder