
Web Presenter - Video broadcasting equipment Blackmagic Design - Free user manual and instructions
Find the device manual for free Web Presenter Blackmagic Design in PDF.

| Product Type | Video converter / streaming interface |
| Brand | Blackmagic Design |
| Model | Web Presenter |
| Power supply | Mains via IEC cable (100-240V AC) |
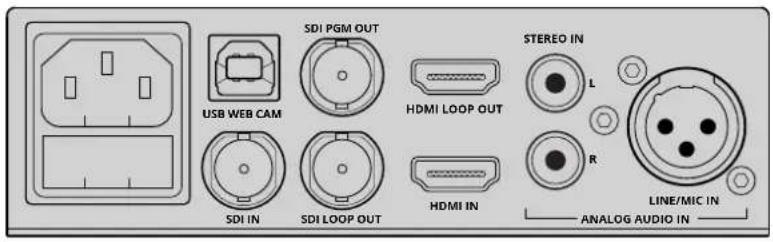
| Video inputs | 1 x SDI (12G), 1 x HDMI |
| Video outputs | 1 x SDI loop, 1 x HDMI loop, 1 x SDI program, 1 x USB (webcam 720p) |
| Audio inputs | 1 x XLR (mic/line), 1 x RCA (HiFi), embedded SDI/HDMI audio |
| Audio mixing | Internal stereo with level control (Master, SDI, HDMI, XLR, RCA) |
| Maximum input resolution | Up to 2160p60 |
| USB output resolution | 720p (auto downscaling) |
| USB frame rates | 20, 15, 10, 5 fps (depending on software) |
| Switcher function | Built-in 2 inputs (requires optional Teranex Mini Smart Panel) |
| Transition types | Cut, Mix, Dip (adjustable duration) |
| Smart Panel | Optional with LCD screen and control buttons |
| Tally | Compatible with Blackmagic cameras (Studio Camera, URSA Mini) |
| Firmware update | Via Blackmagic Web Presenter Setup utility (USB) |
| Operating temperature | Max 40°C (tropical climate) |
| Maximum altitude | 2000 meters |
| Warranty | 36 months limited (connectors, cables, etc.: 12 months) |
| Maintenance and cleaning | Clean with a dry cloth; avoid any liquid |
| Safety | Use with grounded outlet; do not open; ensure adequate ventilation |
| Spare parts and repairability | No user-serviceable parts; contact an authorized service center |
Frequently Asked Questions - Web Presenter Blackmagic Design
User questions about Web Presenter Blackmagic Design
0 question about this device. Answer the ones you know or ask your own.
Ask a new question about this device
Download the instructions for your Video broadcasting equipment in PDF format for free! Find your manual Web Presenter - Blackmagic Design and take your electronic device back in hand. On this page are published all the documents necessary for the use of your device. Web Presenter by Blackmagic Design.
USER MANUAL Web Presenter Blackmagic Design
Installation and Operation Manual
Blackmagic Web Presenter
April 2017
English, 日本語, Français, Deutsch, Espanol, 中文, français, Yüççın, Türkıce, Italiano and Português.
Languages
To go directly to your preferred language, simply click on the hyperlinks listed in the contents below.
English 3.
日本語 27
Français 52
Deutsch 77.
Espanol 102
中文 97
121
Pycckn 146
Türkce 171
Italiano 195
Portugues 220

Welcome!
Thank you for purchasing your Blackmagic Web Presenter!
With Blackmagic Web Presenter, our design goal was to make Internet based broadcasting and even calling using video for presentations dramatically easier. Unlike our traditional capture cards, which are designed for post production, Blackmagic Web Presenter is quite different because it transforms the SDI and HDMI video inputs into USB video that uses the webcam driver that's built into your computer.
What this means is that any SDI or HDMI video source now looks the same as a regular webcam and any software that works with a webcam will now work with professional broadcast quality products. With webcam support built into all video streaming and calling software, it means that you have a very large choice of what streaming platform you can use.
Unlike capture cards that send all the pixels in the video source to the computer, Blackmagic Web Presenter actually reduces the video resolution down to 720p and can even reduce the video frame rate down to 20, 15, 10 or 5 frames per second when directed to by the software. This means you get very high quality HD video in 16:9 aspect ratio, but you also get the lowest data rate to ensure you can stream video reliably and with regular internet connections.
But Blackmagic Web Presenter is way more than a USB webcam source for SDI and HDMI video sources, as it also includes a 2 input live switcher so you can do simple multi camera broadcasts or presentations. All you need to do is add the optional Teranex Mini Smart Panel and you can then press the 1 and 2 buttons to live switch between sources. But the Teranex Mini Smart Panel also includes video preview, audio meters, input video standard and USB frame rate information too!
Please check the support page on our website at www.blackmagicdesign.com for the latest version of this manual and for updates to your Blackmagic Web Presenter's internal software. Also when downloading software, please register with your information so we can keep you updated when new software is released. We are continually working on new features and improvements, so we would love to hear from you!

Grant Petty
CEO Blackmagic Design
Contents
Blackmagic Web Presenter
Getting Started 5
Plugging in Power 5
Plugging in Video 5
Plugging in Audio 6
Connecting to your Computer 6
Setting Blackmagic Web Presenter as your Webcam 6
Using Blackmagic Web Presenter with Third Party Software 7
Using Blackmagic Web Presenter with Skype 7
Using Blackmagic Web Presenter to Stream with YouTube Live 8
To set your Web Presenter as a new device 8
Setting up a YouTube Live streaming channel 10
Using Teranex Mini Smart Panel
12
Smart Panel Features 13
Settings 13
Video Input 13
Transition 14
Audio Mixer 15
Setup 17
Changing the Video Input using Switches 17
Teranex Mini Rack Shelf 18
Using the Built in Switcher 18
Using Camera Tally 19
Blackmagic Web Presenter Setup Utility 20
Appendix 22
Help 24
Regulatory Notices and Safety Information 25
Warranty 26
Getting Started
Plugging in Power
Getting started with your Blackmagic Web Presenter is quick and easy! All you need to do is connect power, connect your video and audio, then connect the unit to your computer.
To supply power, plug a standard IEC power cable into your Blackmagic Web Presenter's power input on the rear panel. When powered, the status indicator at the bottom right corner of your Web Presenter's front panel will illuminate.

Blackmagic Web Presenter supports 12G-SDI and will automatically switch between SD, HD and Ultra HD all the way up to 2160p60
Connect power to your Blackmagic Web Presenter's rear panel using a standard IEC power cable
Plugging in Video
Next, plug your source video into the Blackmagic Web Presenter's SDI or HDMI video inputs. You might notice there are both loop SDI and loop HDMI outputs and you can use these outputs if you want to connect Web Presenter in line with a video connection to other equipment. For example, you could loop the SDI output to a deck or monitor or you could connect Web Presenter in between a computer's HDMI output and the HDMI input of a video projector.
There is also a program SDI output and this will output video after the SDI and HDMI switch, but before the down conversion to 720p video. This SDI program output is the same resolution as the video inputs, so is perfect for connecting to a deck for master recording.
Blackmagic Web Presenter supports 12G-SDI and will automatically switch between SD, HD and Ultra HD all the way up to 2160p60 when the video input changes. This means you can input virtually any video signal and it will convert the signal to 720p video for the USB video, which is both high quality but also very low data rate for streaming video. What this means is you can do your production in higher resolution 1080 HD or Ultra HD but the web presenter will take care of lowering the resolution and frame rate for you, all within the single unit.
Plugging in Audio
The SDI and HDMI inputs include audio, however there are also 2 additional analog audio inputs. The XLR audio input is a mono input that lets you plug in microphones. It's a single channel mono input because microphones are mono and when you connect to this balanced XLR audio input the audio will be sent to both left and right audio channels internally. The second analog audio input is a HiFi input using RCA connectors. This input is good for computer audio or audio from a music source such as smartphone, music player, audio mixer or even a CD player.
All audio sources will be connected to an internal stereo audio mixer and all blended together. If you don't want audio to be included from any specific audio source, then please ensure you disconnect the analog audio sources, or turn down audio from HDMI sources such as computers. Otherwise any audio on any of the inputs will be blended together and sent to the USB audio output.
Connecting to your Computer
Now that you have plugged in your video and audio sources, connect your Blackmagic Web Presenter to your computer via its USB port. Your computer will instantly recognise the unit as a USB webcam source.
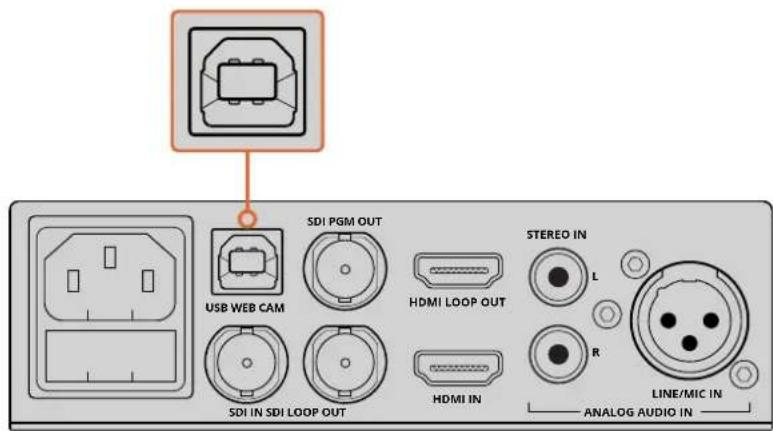
Connect your Blackmagic Web Presenter to your computer via the USB port on the rear panel
Setting Blackmagic Web Presenter as your Webcam
Finally, choose your Blackmagic Web Presenter as your webcam using your desired video conferencing or third party streaming software, such as Skype, Open Broadcaster, XSplit Broadcaster or Periscope.
For information on using Blackmagic Web Presenter with Skype and YouTube Live, refer to the 'Using Blackmagic Web Presenter with Skype' and 'Using Blackmagic Web Presenter to Stream with YouTube Live' sections in this manual.
That's all there is to getting started! You are now ready to start broadcasting amazing high quality video with mixed audio online! Please keep reading this manual for more information such as tally features, changing settings and installing an optional Teranex Mini Smart Panel.
Using Blackmagic Web Presenter with Third Party Software
Using Blackmagic Web Presenter with Skype
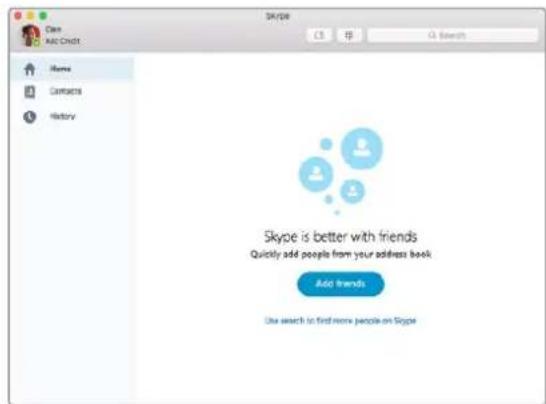
To use Blackmagic Web Presenter with Skype, first download the Skype software and install it on your computer. The Skype software is free and can be downloaded from www.skype.com
1 Once installed on your computer, launch Skype.
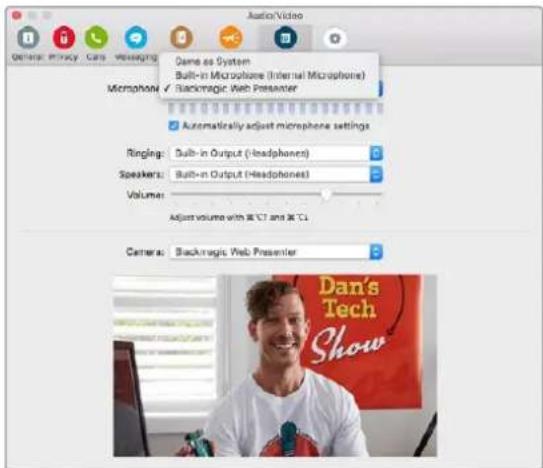
2 Open the preferences under Skype>Preferences and select 'audio/video'.
3 If your computer has a webcam it will be selected by default, and the Skype preview window will show the image from the webcam. By clicking on the 'Camera' drop down menu, you can select Blackmagic Web Presenter from the list. Once selected, you will see the source video connected to your Web Presenter appear in the Skype preview window.
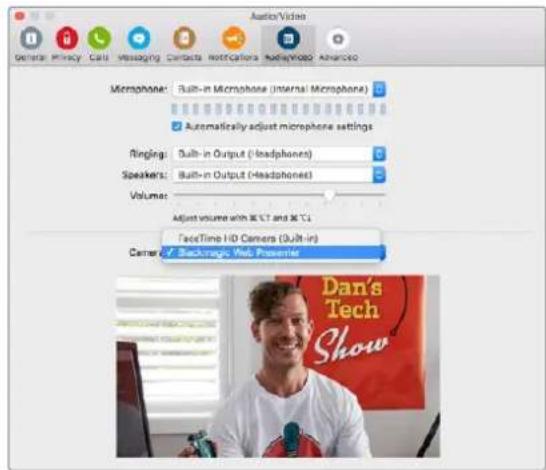
Select Blackmagic Web Presenter from the 'Camera' drop down menu
NOTE In Skype's preferences window, you may noticed that your image is reversed from left to right. This is normal as Skype presents users with a mirror image of themselves for preview purposes. Your video calls themselves will not be reversed.
4 In the 'Microphone' drop down menu, select Blackmagic Web Presenter as your audio source.
That's all you need to do, and if you make a Skype call you will be using the source video that you have connected to Blackmagic Web Presenter.
NOTE The process of setting up Skype to work with Blackmagic Web Presenter is the same on both a Mac OS and Windows computer. For more information refer to the Skype website: www.skype.com
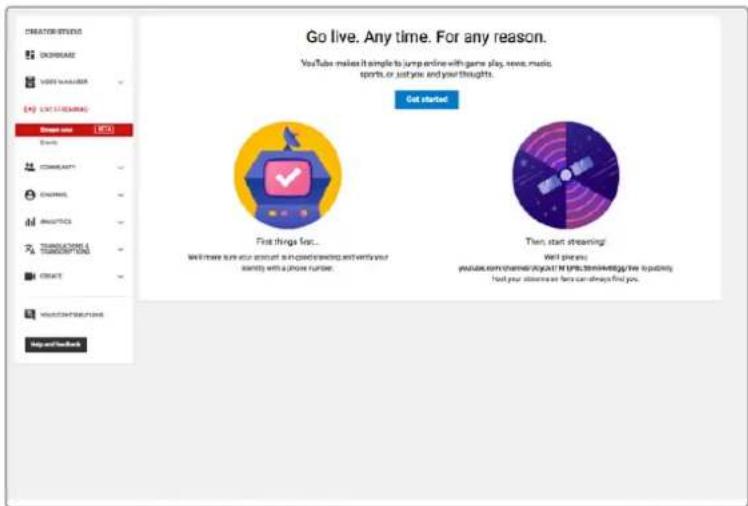
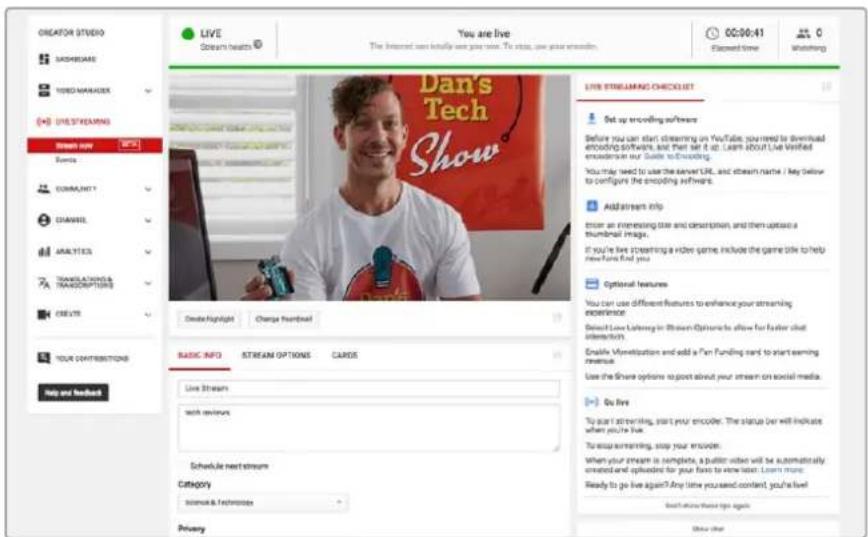
Using Blackmagic Web Presenter to Stream with YouTube Live
Open Broadcaster is free software that works very well for streaming to YouTube Live and can be downloaded from: https://obsproject.com.
To set your Web Presenter as a new device
Once installed on your computer, launch the software.
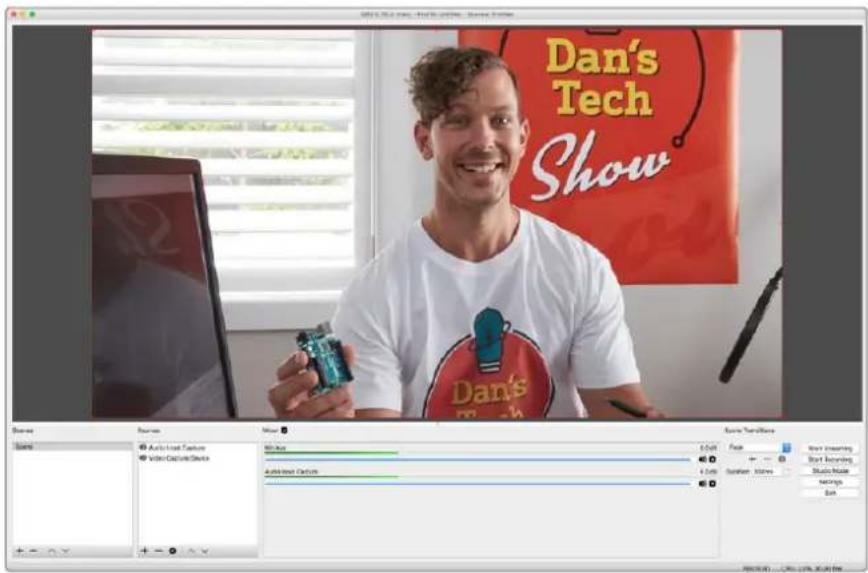
1 Click on the + button in the 'sources' box to add a source and select 'video capture device'. A pop up dialog box will give you the option to create a new source.
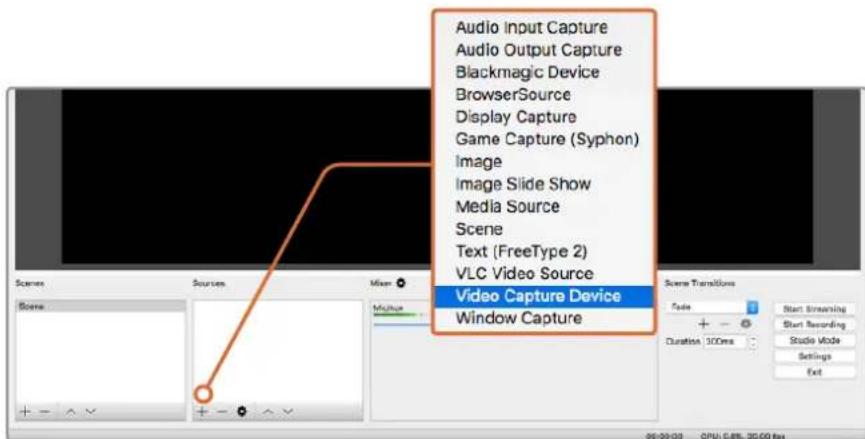
Select 'video capture device' from the list of sources and create a new source for your Blackmagic Web Presenter
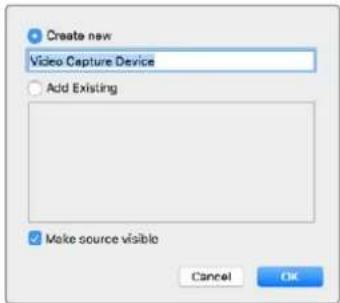
2 Select 'create new' in the pop up dialog box and click 'ok'.
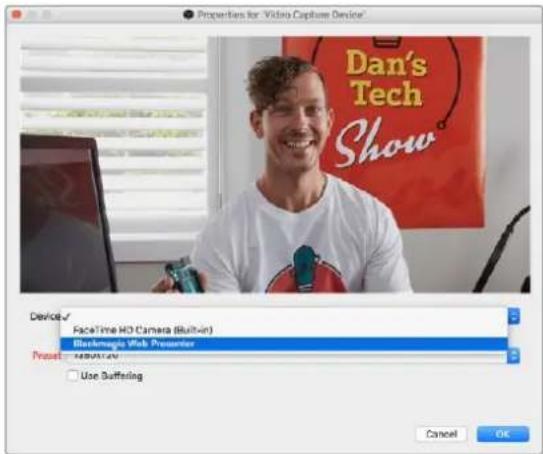
3 In the properties window for the new device, select your Blackmagic Web Presenter from the 'device' drop down menu and click 'ok'.
4 Follow the same process for audio. Click on the + button in the 'sources' box to add a source and select 'audio input capture'. Select 'create new' in the pop up dialog box and click ok. In the properties window for the new device, select 'Blackmagic Web Presenter' from the device drop down menu and click ok.
5 Now open the preferences located under OBS>Preferences and click on the 'video' tab.
6 Set your base 'canvas' resolution to 1280 × 720 and your output 'scaled' resolution to 1280 × 720 , and click 'ok'. This will allow you to see the input video full screen.
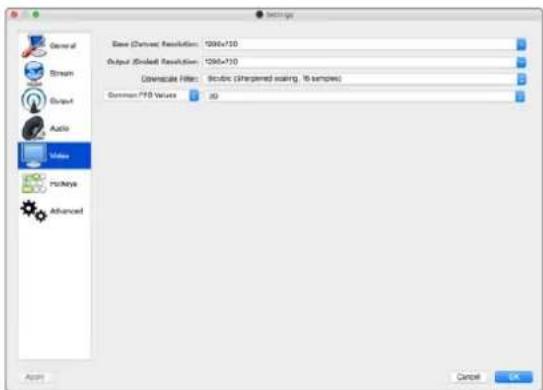

Setting the base 'canvas' and 'scaled' resolution to 1280 x 720 lets you view the input video full screen
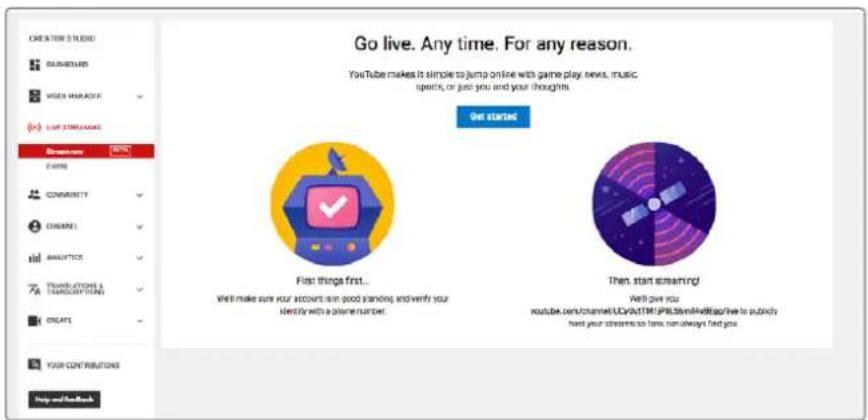
Setting up a YouTube Live streaming channel
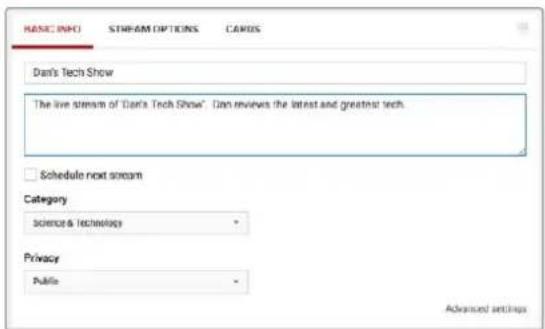
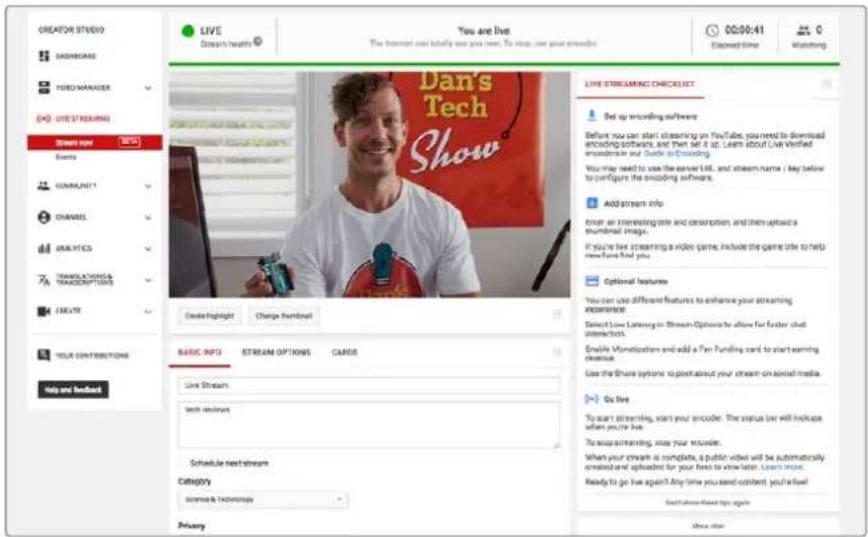
Now you need to create a YouTube live streaming channel. In your browser, go to www.youtube.com/livedashboard and sign in or create a new Google account.
1 Select live streaming on the left hand side, and then click 'get started'.
2 Type in the details about your stream and choose if you would like to make it a public or a private stream.
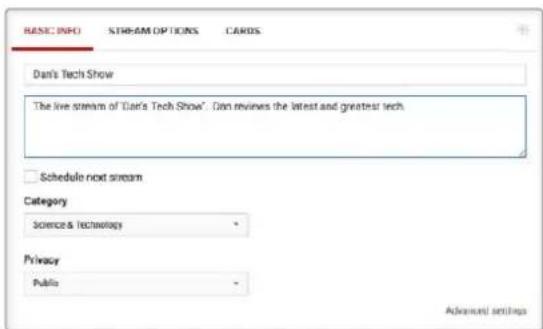
3 Click 'reveal' at the bottom of the page. Highlight the stream key, right click and select copy. It's important to copy this information because in the next step we will paste this key into the Open Broadcaster software.

4 In the Open Broadcaster software, go to preferences and select the stream tab. Select YouTube as your service and paste the stream key into the 'stream key' text field.

5 Click the start stream button in the main window of the Open Broadcaster software and you should now be broadcasting your stream.
Back in your web browser, your stream's status will change to 'online' and you can now see your live stream.
NOTE The process of setting up the Open Broadcaster software to work with Blackmagic Web Presenter is the same on both a Mac OS and Windows computer. For more information refer to https://obsproject.com.
Using Teranex Mini Smart Panel
An optional Teranex Mini Smart Panel can be mounted to the front of your Web Presenter, replacing the original front panel. The Smart Panel buttons allow you to switch sources, together with a built in LCD so you can monitor the input video and status information, such as the input video source, video format, plus the USB output frame rate.
Installing Teranex Mini Smart Panel
Installing your optional Smart Panel is easy and because the panels are hot swappable, you don't even need to turn off your Blackmagic Web Presenter when installing it.
1 Remove the two M3 screws on each side of your Web Presenter's basic front panel using a Pozidriv 2 screwdriver and gently pull the panel away from the front of your Web Presenter.
2 On the inside of the basic panel, you'll notice a small clear plastic tube attached to the bottom corner. This tube directs light from the LED inside the Web Presenter to illuminate the status indicator on the basic panel. This tube should stay attached to the basic front panel.
Tip If reattaching the basic front panel, make sure the light tube is aligned with the slot in the front of the unit.
3 Align the connector on the rear of the Smart Panel with the adjoining connector on the face of your Blackmagic Web Presenter and gently push the Smart Panel towards the unit until the connectors are firmly seated. The Smart Panel should make a firm connection and fit neatly inside the face of your Web Presenter.
4 Re-insert the M3 screws from the original panel.
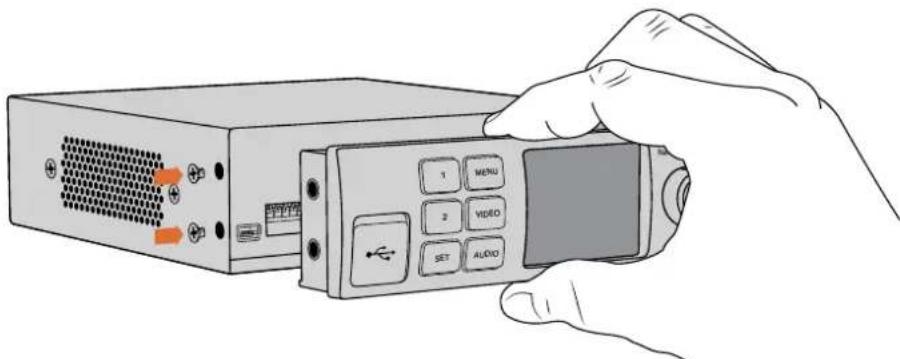
When installing the Teranex Mini Smart Panel to your Blackmagic Web Presenter, holding the panel with your fingers and thumb positioned above and below the connector will help guide it into place
If your Blackmagic Web Presenter is installed in a Teranex Mini Rack Shelf, you will need to remove the Web Presenter from the rack shelf to access the front panel screws. See the 'Teranex Mini Rack Shelf' section for more information. Your Web Presenter's USB port is still accessible with the Smart Panel attached. To access the port, simply open the rubber USB dust cover.
Smart Panel Features
Control Buttons
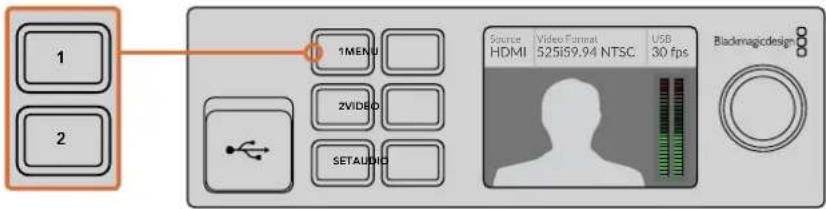
1 and 2 buttons
When the smart panel is attached, the switching feature is enabled on your Blackmagic Web Presenter. This means when you are broadcasting, you can press buttons 1 and 2 to switch between the SDI and HDMI input sources. Pressing '1' will select the SDI input, and pressing '2' will select the HDMI input.
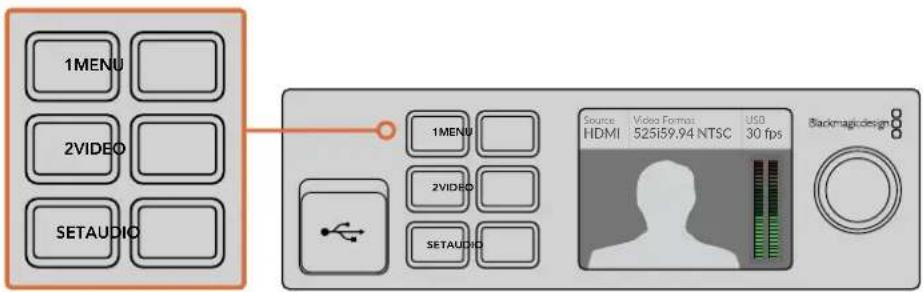
The Teranex Mini Smart Panel enables the switcher feature on your Web Presenter, so you can press buttons 1 and 2 to live switch between the SDI and HDMI input sources
Settings
When a Teranex Mini Smart Panel is attached to your Web Presenter, you can change settings such as transition durations, audio mix settings and more. Simply press the 'menu' button to open the settings menu, then use the rotary knob and set button to navigate through the menu and change a setting.
To move back to the previous menu item, simply press the menu button again. Keep pressing the menu button to return to the home screen.
Video Input
Your Blackmagic Web Presenter can be set to automatically detect when an input is plugged in and will set the program output accordingly. You can also set your Web Presenter to use only the SDI or HDMI input. These settings can also be changed using the built in switches when the original basic front panel is attached. Refer to the 'changing the video input using switches' section for more information.
TIP If you want to change a video setting, you can bypass the main menu and go straight to the video settings by pressing the 'video' button on the front control panel.
Auto
Choose this setting if you want your Web Presenter to automatically select the SDI or HDMI input when a video source is connected. If both SDI and HDMI video sources are connected, your Web Presenter will automatically select the SDI input.
SDI
Choose this setting if you want to set your Web Presenter to use only the SDI input.
HDMI
Choose this setting if you want to set your Web Presenter to use only the HDMI input.
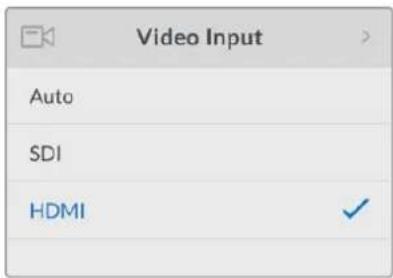
Use the video input settings to choose which input you want to use, or select auto for Blackmagic Web Presenter to automatically detect the video source
TIP If a video signal is received via the video input other than what you have selected, a black screen will be displayed. Simply select the appropriate input, or set your Web Presenter to auto.
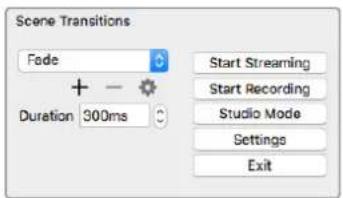
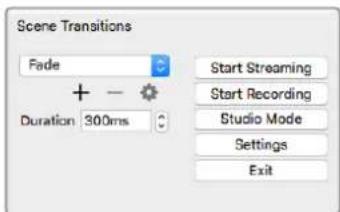
Transition
When switching a live broadcast using the switcher feature in your Blackmagic Web Presenter, the default transition is a half second cross dissolve, but you can change the duration of the transition if you want to. You can even set your Web Presenter to use a dip or cut transition!
The transition settings let you choose which transition type and duration you want to use
Cut
To use a straight cut when switching between video sources, select the cut transition type.
Mix
The mix transition is a cross dissolve. This means one video source will smoothly transition to the other over a set duration. Change the duration by selecting one of the mix presets.
Dip
The dip transition is similar to a mix, however, the transition will first smoothly dip to black, then to the other video source. Choose one of the dip duration presets in the menu list.
Audio Mixer
The audio mixer settings let you control the mix of your audio. For example, turning the audio for each input on or off, changing the level of the audio for each input, or setting the XLR input level to mic or line level audio. Turn the rotary knob clockwise or counterclockwise to adjust a setting.
TIP If you want to change an audio setting, you can bypass the main menu and go straight to the audio settings by pressing the 'audio' button on the front control panel.
Master Level
Turn the rotary knob to increase or decrease the audio level for the program output. This setting affects the overall volume for the entire master sound mix being broadcasted.
SDI Input Level
Use this setting to adjust the strength of the audio level for the SDI video input.
SDI Input
Turn the rotary knob to set the SDI input audio to on, off, or audio follows video.
ON
When set to 'on', audio for the SDI input will always be present in the program audio. Use the SDI input level setting to increase or decrease the audio level.
OFF
Set the SDI input to 'off' if you don't want audio from the SDI input to be included in the program audio.
AFV
When set to audio follows video, the audio for the SDI input will only be present in the master program audio when the SDI video input is switched to the program output.
HDMI Input Level
Lets you adjust the strength of the audio level for the HDMI video input.
HDMI Input
Turn the rotary knob to set the HDMI input audio to on, off, or audio follows video.
ON
When set to 'on', audio for the HDMI input will always be present in the program audio. Use the HDMI input level setting to increase or decrease the audio level.
OFF
Set the HDMI input to 'off' if you don't want audio from the HDMI input to be included in the program audio.
AFV
When set to audio follows video, the audio for the HDMI input will only be present in the master program audio when the HDMI video input is switched to the program output.
XLR Input Level
Lets you adjust the strength of the audio level for the XLR audio input source.
XLR Input
Turns the XLR input audio on or off.
XLR Input Source
Use this setting to set the input source level to mic or line level audio.
The signal strength from a microphone is typically at a lower level compared to levels from audio playback equipment. To compensate for the lower signal strength, Blackmagic Web Presenter can be set to 'mic' level audio which boosts the input signal. For audio equipment other than a microphone, set the XLR input level to 'line'.
RCA Input Level
Adjusts the strength of the audio level for the RCA audio input source.
RCA Input
Turns the RCA input audio on or off.
Turn audio for each input on or off, and adjust levels using the audio mixer settings
Setup
Use the setup settings to check the software version currently installed on your Web Presenter. You can also restore your Web Presenter to its default settings.
Software
The software setting lets you check the software version currently installed on your Blackmagic Web Presenter.
Factory Default
The factory default setting is helpful if you want to start a new project with all the settings on your Web Presenter set to their original default state.
To reset your Web Presenter:
1 Press the menu button and navigate to the 'setup' settings using the rotary knob. Press 'set' to enter the menu.
2 Select 'factory default' and press the 'set' button.
3 Cancel or confirm the reset.
If you confirm the reset, your Web Presenter will now display a 'resetting' indicator. When the reset is complete, the LCD will return to the home screen and all the settings will now be set to their original default state.
The setup settings can be used to check the software version currently installed on your Blackmagic Web Presenter, or resetting your Web Presenter to its original default state
Changing the Video Input using Switches
Your Blackmagic Web Presenter has small switches accessible via the basic front panel that lets you set the video input to SDI, HDMI or auto. When a Teranex Mini Smart Panel is attached, the switches are overridden by the smart panel LCD menu settings.
Changing a setting using switches is easy! Simply move the relevant switches up or down to the on or off position using the tip of a pen. Refer to the switch legend printed on the base of your Web Presenter to see the correct switch positions for your desired input.
AUTO
Set switches 1 and 2 to 'OFF'. Choose this setting if you want your Web Presenter to automatically select the SDI or HDMI input when a video source is connected. If both SDI and HDMI video sources are connected, your Web Presenter will automatically select the SDI input.
SDI
Set switch 2 to 'OFF' and 1 to 'ON'. Choose this setting if you want to set your Web Presenter to use only the SDI input.
HDMI
Set switch 2 to 'ON' and 1 to 'OFF'. Choose this setting if you want to set your Web Presenter to use only the HDMI input.
Teranex Mini Rack Shelf
Teranex Mini Rack Shelf is a 1 RU shelf that lets you install your Blackmagic Web Presenter into a broadcast rack or road case. Your Web Presenter is so small, you can install it next to other Blackmagic Design equipment that shares a similar form factor, such as Teranex Mini converters, Blackmagic MultiView 4 and HyperDeck Studio Mini. For example, installing a Blackmagic Web Presenter together with two HyperDeck Studio Minis gives you one unit to play back your video sources, and provides another unit for recording the program output from your Web Presenter. This modular design lets you build your own custom video solutions that are portable and easy to use!
Installing your Blackmagic Web Presenter into a Teranex Mini Rack Shelf is as easy as removing the unit's rubber feet, if installed, and fastening the unit to the base of the shelf using the supplied screws. The Teranex Mini Rack Shelf ships with two original blank panels which you can use to cover gaps if you don't need to install additional Blackmagic Design equipment.
For more information check the Blackmagic Design website at www.blackmagicdesign.com.

Teranex Mini Rack Shelf lets you rack mount your Blackmagic Web Presenter with other Blackmagic Design equipment that shares the same form factor, such as Teranex Mini Converters and HyperDeck Studio Mini
Using the Built in Switcher
Blackmagic Web Presenter features a built in 2 input live switcher. However, to take advantage of this feature you need to install the Teranex Mini Smart Panel. This panel adds an LCD screen and pushbutton controls that you can use to control the built in switcher. Once the Teranex Mini Smart Panel is installed, the switcher feature will be enabled.
When both SDI and HDMI video sources are connected, the HDMI input will be resynchronized so that both inputs can be transitioned without glitches. This is what makes the Web Presenter able to do live switching.
To operate the built in switcher, simply press the 1 on the front panel to select SDI as the video source or the button marked 2 to select the HDMI video source. Once selected, the Web Presenter will perform a transition. You could connect a computer with a slide show to the HDMI
input and a camera to the SDI source and do very professional live presentation shows for your audience, simply by switching using the 1 and 2 buttons. You can also confirm the current input, the video preview and audio levels on the LCD screen.
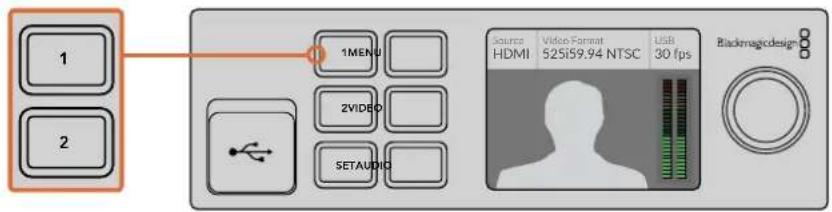
When switching a live broadcast using Blackmagic Web Presenter with a Teranex Mini Smart Panel attached, press the 1 and 2 buttons to switch between the SDI and HDMI inputs
NOTE The default transition is a half second mix, however, if you have a Teranex Mini Smart Panel attached, you can choose a different duration or transition type in the LCD menu Transition settings. For more information, refer to the 'Settings' section in this manual.
Using Camera Tally
Blackmagic Design studio cameras and ATEM switchers include a tally feature where the tally information is sent from the switcher to the camera via the program return feed from the switcher to the camera. Your Blackmagic Web Presenter also includes this tally feature so you can see which camera is "on air" when you are using the switcher feature on the web presenter.
Using tally is quite simple and all you need to do is connect the SDI output of a Blackmagic Design Studio Camera to your web presenter as an SDI video source and then connect the program output of the web presenter back to the camera program SDI input. Now when you select the program button on the camera you can see the web presenter's program video on the camera. But what's even more exciting is the tally information is now being sent to the camera.
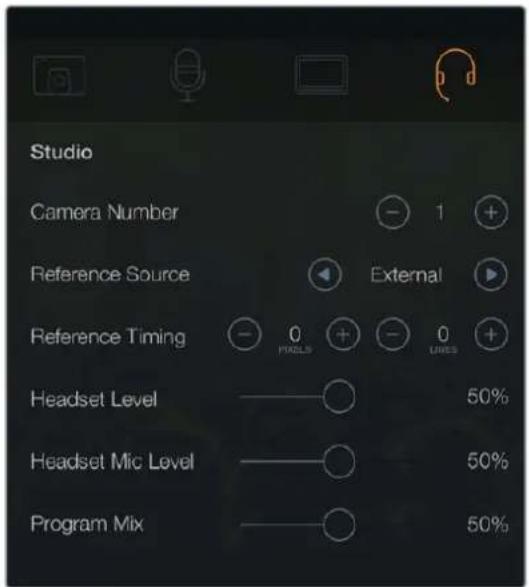
The SDI video input is tally "camera 1" and the HDMI input is tagged as "camera 2". So what this means is that in your camera's settings, you will need to set the camera number. In this case we are using the SDI input for the camera, then the camera should be set to camera 1. Once this has been set, and you press the 1 button on the front panel of the web presenter, you should see the tally illuminate on the camera.
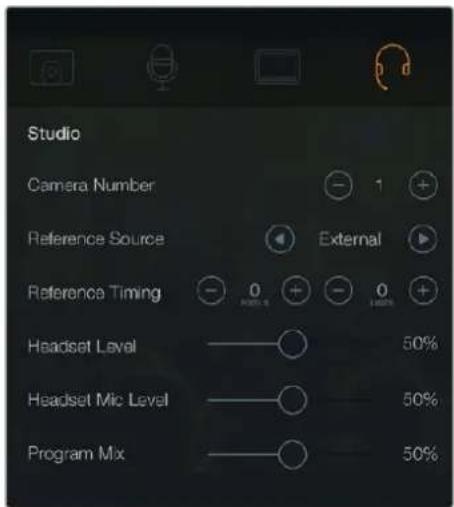
Set the camera number to '1' for Blackmagic Studio Camera connected via SDI in the 'studio' tab of the LCD menu
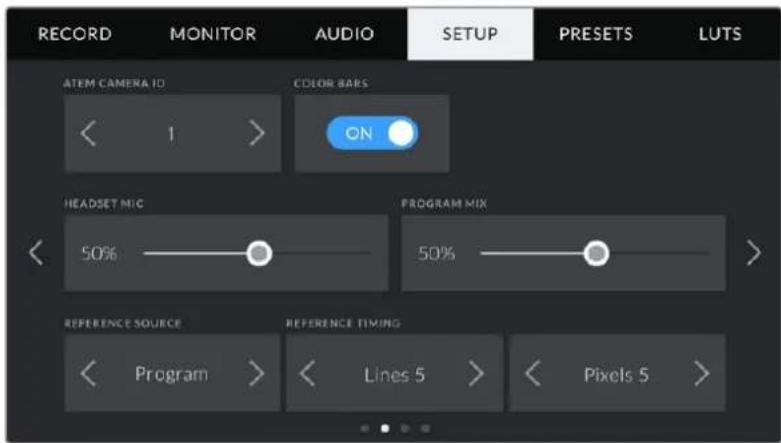
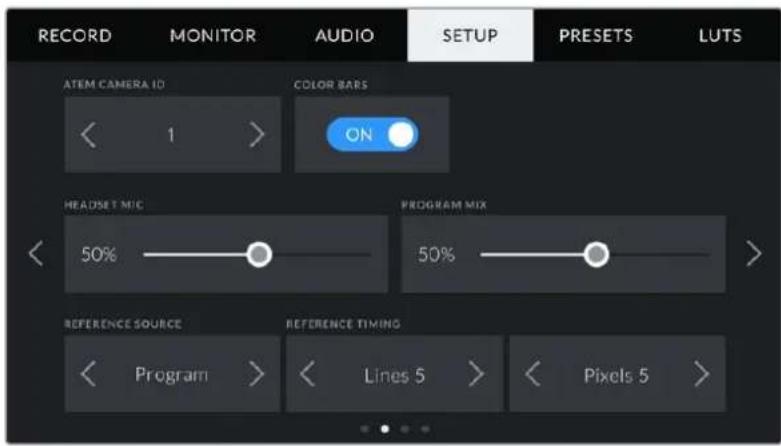
Set the camera number to '1' for Blackmagic URSA Mini connected via SDI in the 'setup' tab of the LCD menu
If you are doing a presentation, it can be extremely helpful for the presenter to see a nice clear red tally indicator on the camera they are using when they are on air. This makes it easy for them to know when they are live. Imagine having a Blackmagic URSA Mini with Blackmagic URSA Studio Viewfinder combination and the presenter can see that big red tally indicator when they are on air. It's a very powerful combination!
The tally feature is supported on Blackmagic Studio Camera, Blackmagic Micro Studio Camera and Blackmagic URSA Mini models of cameras. For more details on setting up tally, refer to the 'Backmagic URSA and URSA Mini' and 'Blackmagic Studio Camera' manuals which can be downloaded from www.blackmagicdesign.com/support
Blackmagic Web Presenter Setup Utility
Occasionally, updates for your Blackmagic Web Presenter's internal software will be available on the Blackmagic Design website. Updates are installed on your Web Presenter via the Blackmagic Web Presenter Setup utility. We recommend downloading the setup utility and updating your Web Presenter so you can benefit from new features and improvements.
To update the internal software using Mac OS:
1 Download and unzip Blackmagic Web Presenter Setup.
2 Open the resulting disk image and launch the Blackmagic Web Presenter Setup Installer.
Follow the onscreen instructions.
3 After installation, connect your Web Presenter to the computer via the USB connector on the front panel. Lift open the plastic dust cover to access the USB connector.
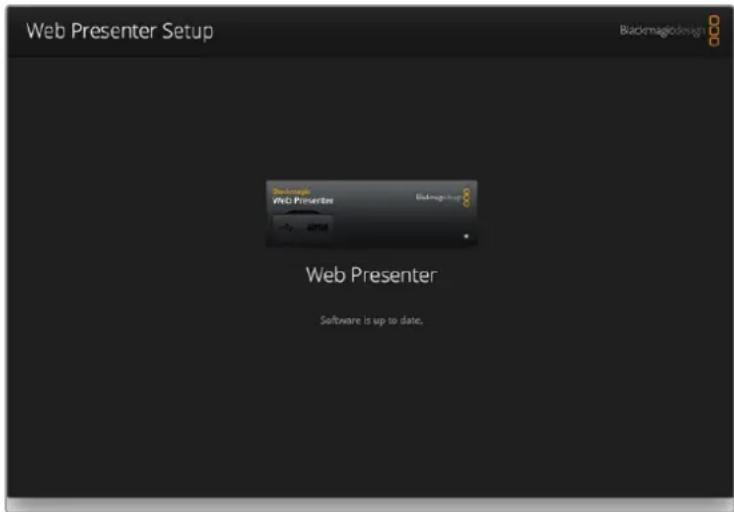
4 Launch Blackmagic Web Presenter Setup and follow any onscreen prompt to update the internal software. If no prompt appears, the internal software is up to date and there is nothing further you need to do.
To update the internal software using Windows:
1 Download and unzip Blackmagic Web Presenter Setup.
2 You should see a Blackmagic Web Presenter Setup folder containing this manual and the Blackmagic Web Presenter Setup installer. Double click the installer and follow the onscreen prompts to complete the installation.
3 After installation, connect your Web Presenter to the computer via the USB connector on the front panel. Lift open the plastic dust cover to access the USB connector.
4 Launch Blackmagic Web Presenter Setup and follow any onscreen prompt to update the internal software. If no prompt appears, the internal software is up to date and there is nothing further you need to do.
Download the latest setup utility for your Blackmagic Web Presenter from the Blackmagic Design support center at www.blackmagicdesign.com/support
Appendix
Blackmagic Embedded Tally Control Protocol
Version 1.0 (30/04/14)
This section is for third party developers or users who may wish to add support for the Blackmagic Embedded Tally Control Protocol to their products or system. It describes the protocol for sending tally information embedded in the non active picture region of a digital video stream.
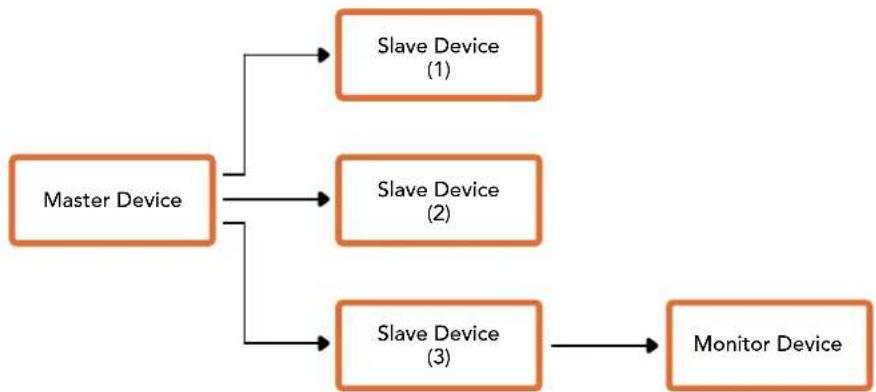
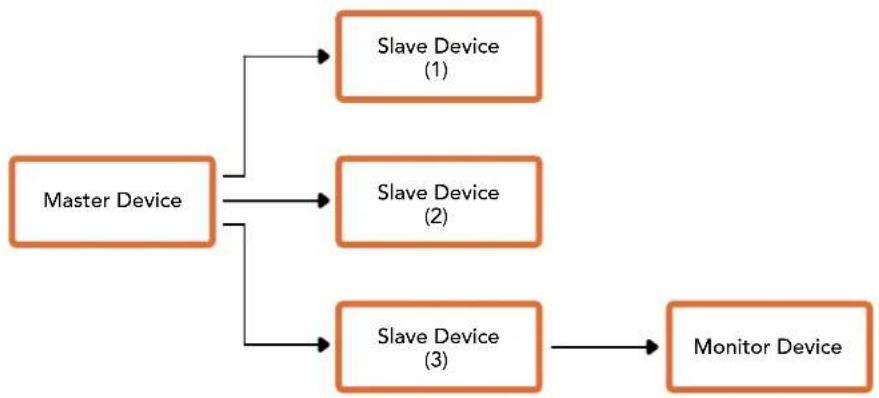
Data Flow
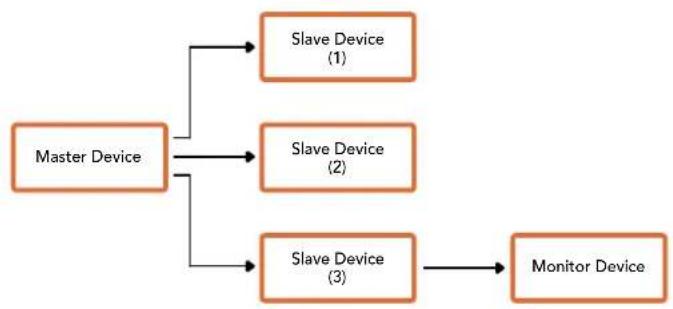
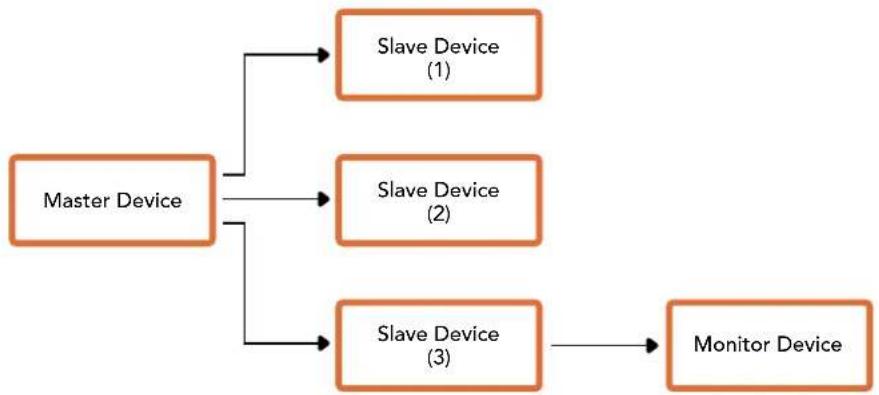
A master device such as a broadcast switcher embeds tally information into its program feed which is broadcast to a number of slave devices such as cameras or camera controllers. The output from the slave devices is typically fed back to the master device, but may also be sent to a video monitor.
The primary flow of tally information is from the master device to the slaves. Each slave device may use its device id to extract and display the relevant tally information.
Slave devices pass through the tally packet on their output and update the monitor tally status, so that monitor devices connected to that individual output may display tally status without knowledge of the device id they are monitoring.
Assumptions
Any data alignment / padding is explicit in the protocol. Bit fields are packed from LSB first.
Blanking Encoding
One tally control packet may be sent per video frame. Packets are encoded as a SMPTE 291M packet with DID/SDID x51/x52 in the active region of VANC line 15. A tally control packet may contain up to 256 bytes of tally information.
Packet Format
Each tally status consists of 4 bits of information:
uint4
bit 0: program tally status (0=off, 1=on)
bit 1: preview tally status (0=off, 1=on)
bit 2-3: reserved (0x0)
The first byte of the tally packet contains the monitor device tally status and a version number.
Subsequent bytes of the tally packet contain tally status for pairs of slave devices. The master device sends tally status for the number of devices configured/supported, up to a maximum of 510.
struct tally
uint8
bit 0: monitor device program tally status (0=off, 1=on)
bit 1: monitor device preview tally status (0=off, 1=on)
bit 2-3: reserved (0b00)
bit 4-7: protocol version (0b0000)
uint8[0]
bit 0: slave device 1 program tally status (0=off, 1=on)
bit 1: slave device 1 device preview tally status (0=off, 1=on)
bit 2-3: reserved (0b00)
bit 4: slave device 2 program tally status (0=off, 1=on)
bit 5: slave device 2 preview tally status (0=off, 1=on)
bit 6-7: reserved (0b00)
uint8[1]
bit 0: slave device 3 program tally status (0=off, 1=on)
bit 1: slave device 3 device preview tally status (0=off, 1=on)
bit 2-3: reserved (0b00)
bit 4: slave device 4 program tally status (0=off, 1=on)
bit 5: slave device 4 preview tally status (0=off, 1=on)
bit 6-7: reserved (0b00)

| Byte 7 MSB 6 5 4 3 2 10 LSB | ||||||||
| 0 | Version (0b0) | Version (0b0) | Version (0b0) | Version (0b0) | Reserved (0b0) | Reserved (0b0) | Monitor Preview | Monitor Program |
| 1 Reserved (0b0) | Reserved (0b0) | Reserved (0b0) | Slave 1 Preview | Slave 1 Program | Reserved (0b0) | Reserved (0b0) | Slave 0 Preview | Slave 0 Program |
| 2 | Reserved (0b0) | Reserved (0b0) | Slave 3 Preview | Slave 3 Program | Reserved (0b0) | Reserved (0b0) | Slave 2 Preview | Slave 2 Program |
| 3 | ... | |||||||
Help
Getting Help
The fastest way to obtain help is to go to the Blackmagic Design online support pages and check the latest support material available for your Blackmagic Web Presenter.
Blackmagic Design Online Support Pages
The latest manual can be found at the Blackmagic Design support center at www.blackmagicdesign.com/support.
Blackmagic Design Forum
The Blackmagic Design forum on our website is a helpful resource you can visit for more information and creative ideas. This can also be a faster way of getting help as there may already be answers you can find from other experienced users and Blackmagic Design staff which will keep you moving forward. You can visit the forum at https://forum.blackmagicdesign.com
Contacting Blackmagic Design Support
If you can't find the help you need in our support material or on the forum, please use the "Send us an email" button on the support page to email a support request. Alternatively, click on the "Find your local support team" button on the support page and call your nearest Blackmagic Design support office.
Regulatory Notices and Safety Information
Regulatory Notices

Disposal of waste of electrical and electronic equipment within the European union.
The symbol on the product indicates that this equipment must not be disposed of with other waste materials. In order to dispose of your waste equipment, it must be handed over to a designated collection point for recycling. The separate collection and recycling of your waste equipment at the time of disposal will help conserve natural resources and ensure that it is recycled in a manner that protects human health and the environment. For more information about where you can drop off your waste equipment for recycling, please contact your local city recycling office or the dealer from whom you purchased the product.

This equipment has been tested and found to comply with the limits for a Class A digital device, pursuant to Part 15 of the FCC rules. These limits are designed to provide reasonable protection against harmful interference when the equipment is operated in a commercial environment. This equipment generates, uses, and can radiate radio frequency energy and, if not installed and used in accordance with the instructions, may cause harmful interference to radio communications. Operation of this product in a residential area is likely to cause harmful interference, in which case the user will be required to correct the interference at personal expense.
Operation is subject to the following two conditions:
1 This device may not cause harmful interference.
2 This device must accept any interference received, including interference that may cause undesired operation.
Connection to HDMI interfaces must be made with high quality shielded HDMI cables.
Safety Information
This equipment must be connected to a mains socket outlet with a protective earth connection.
To reduce the risk of electric shock, do not expose this equipment to dripping or splashing.
This equipment is suitable for use in tropical locations with an ambient temperature of up to 40^ .
Ensure that adequate ventilation is provided around the product and is not restricted.
When rack mounting, ensure the ventilation is not restricted by adjacent equipment.
No operator serviceable parts inside. Refer servicing to your local Blackmagic Design service centre.

Use only at altitudes not more than 2000m above sea level.
Warranty
36 Month Limited Warranty
Blackmagic Design warrants that Blackmagic Web Presenter will be free from defects in materials and workmanship for a period of 36 months from the date of purchase excluding connectors, cables, fiber optic modules, fuses and batteries which will be free from defects in materials and workmanship for a period of 12 months from the date of purchase. If the product proves to be defective during this warranty period, Blackmagic Design, at its option, either will repair the defective product without charge for parts and labor, or will provide a replacement in exchange for the defective product.
In order to obtain service under this warranty, you the Customer, must notify Blackmagic Design of the defect before the expiration of the warranty period and make suitable arrangements for the performance of service. The Customer shall be responsible for packaging and shipping the defective product to a designated service center nominated by Blackmagic Design, with shipping charges pre paid. Customer shall be responsible for paying all shipping charges, insurance, duties, taxes, and any other charges for products returned to us for any reason.
This warranty shall not apply to any defect, failure or damage caused by improper use or improper or inadequate maintenance and care. Blackmagic Design shall not be obligated to furnish service under this warranty: a) to repair damage resulting from attempts by personnel other than Blackmagic Design representatives to install, repair or service the product, b) to repair damage resulting from improper use or connection to incompatible equipment, c) to repair any damage or malfunction caused by the use of non Blackmagic Design parts or supplies, or d) to service a product that has been modified or integrated with other products when the effect of such a modification or integration increases the time or difficulty of servicing the product. THIS WARRANTY IS GIVEN BY BLACKMAGIC DESIGN IN LIEU OF ANY OTHER WARRANTYES, EXPRESS OR IMPLIED. BLACKMAGIC DESIGN AND ITS VENDORS DISCLAIMER ANY IMPLIED WARRANTYES OF MERCHANTABILITY OR FITNESS FOR A PARTICULAR PURPOSE. BLACKMAGIC DESIGN'S RESPONSIBILITY TO REPAIR OR REPLACE DEFECTIVE PRODUCTS IS THE WHOLE AND EXCLUSIVE REMEDY PROVIDED TO THE CUSTOMER FOR ANY INDIRECT, SPECIAL, INCIDENTAL OR CONSEQUENTIAL DAMAGES IRRESPECTIVE OF WHETHER BLACKMAGIC DESIGN OR THE VENDOR HAS ADVANCE NOTICE OF THE POSSIBILITY OF SUCH DAMAGES. BLACKMAGIC DESIGN IS NOT LIABLE FOR ANY ILLEGAL USE OF EQUIPMENT BY CUSTOMER. BLACKMAGIC IS NOT LIABLE FOR ANY DAMAGES RESULTING FROM USE OF THIS PRODUCT. USER OPERATES THIS PRODUCT AT OWN RISK.
Copyright 2017 Blackmagic Design. All rights reserved. 'Blackmagic Design', 'DeckLink', 'HDLink', 'Workgroup Videohub', 'Multibridge Pro', 'Multibridge Extreme', 'Intensity' and 'Leading the creative video revolution' are registered trademarks in the US and other countries. All other company and product names may be trade marks of their respective companies with which they are associated.
Thunderbolt and the Thunderbolt logo are trademarks of Intel Corporation in the U.S. and/or other countries.

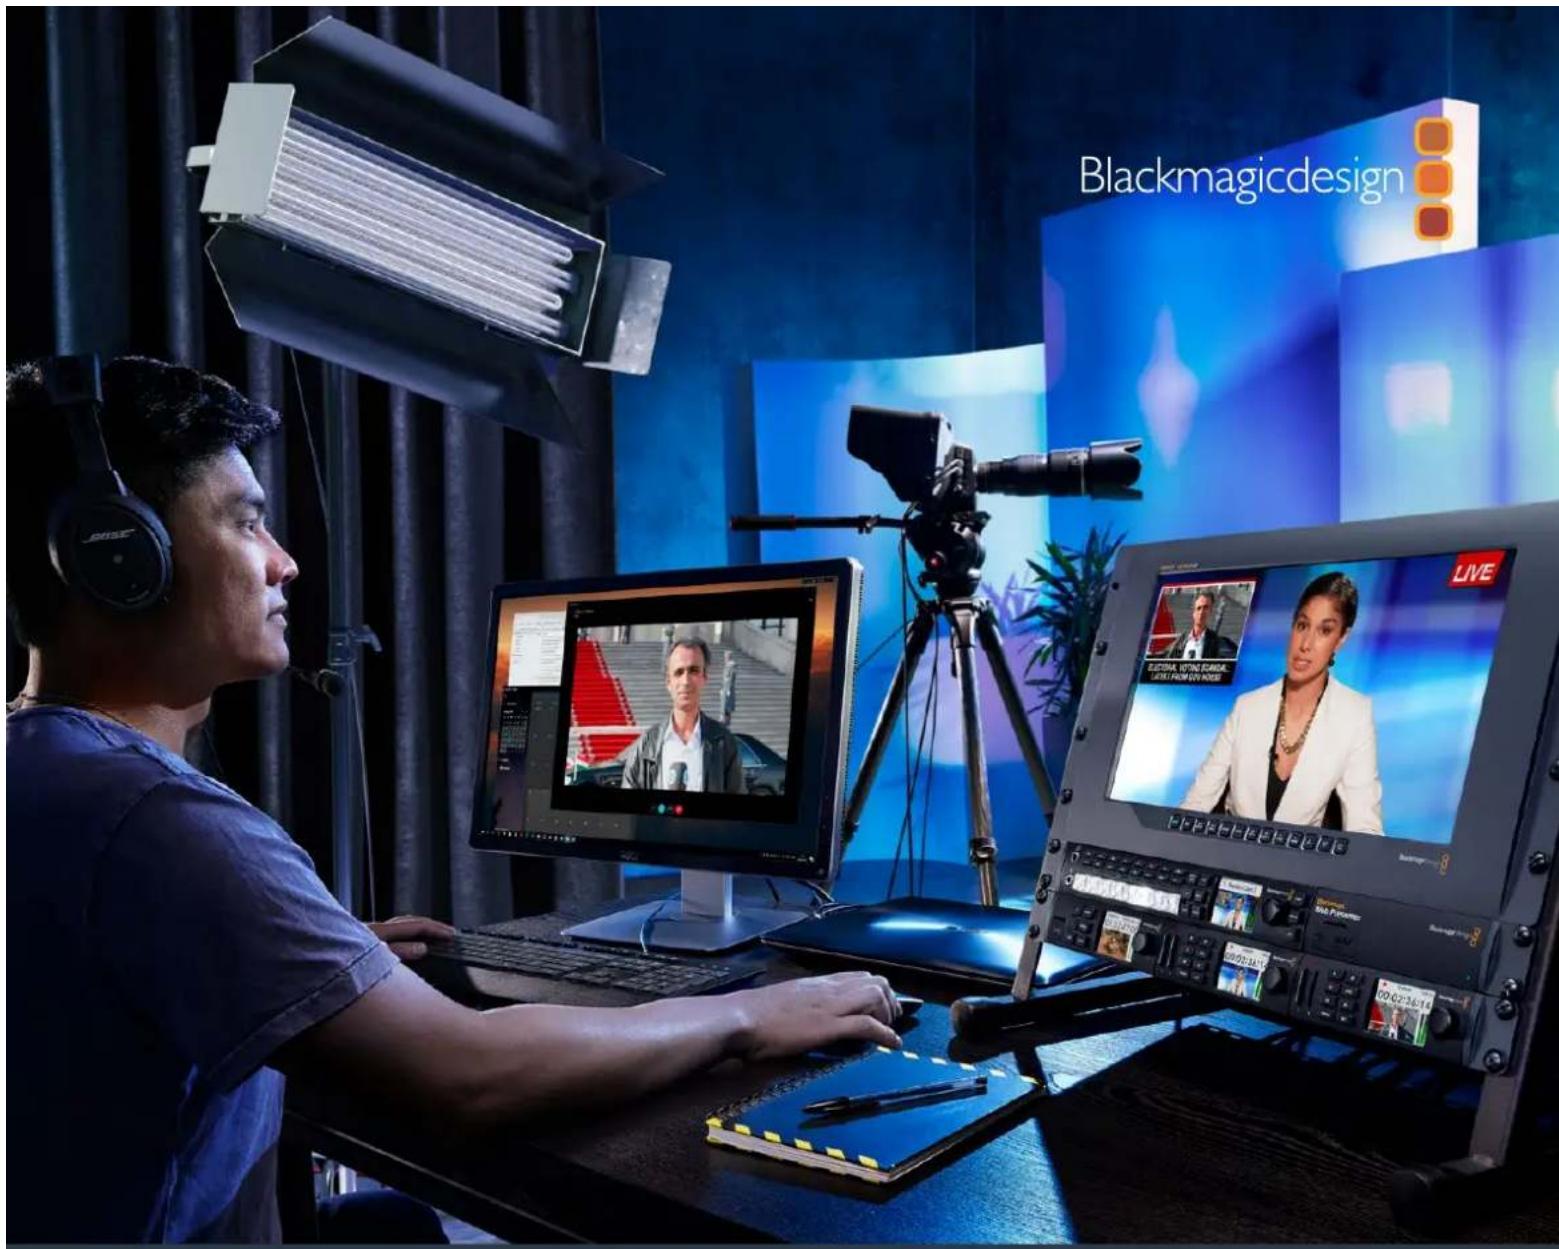
This is Blackmagic Web Presenter.
Blackmagic Design CEO
目次
Blackmagic Web Presenter
はしだに 30
電源の接続 30
30
才一德才の接続 31
CONBPU-0TJ 31
Blackmagic Embedded Tally Control Protocol
Version 1.0 (30/04/14)
bit 0: program tally status (0=off, 1=on)
bit 1: preview tally status (0=off, 1=on)
bit 2-3: reserved (0x0)
bit 0: monitor device program tally status (0=off, 1=on)
bit 1: monitor device preview tally status (0=off, 1=on)
bit 2-3: reserved (0b00)
bit 4-7: protocol version (Ob0000)
uint8[0]
bit 0: slave device 1 program tally status (0=off, 1=on)
bit 1: slave device 1 device preview tally status (0=off, 1=on)
bit 2-3: reserved (0b00)
bit 4: slave device 2 program tally status (0=off, 1=on)
bit 5: slave device 2 preview tally status (0=off, 1=on)
bit 6-7: reserved (0b00)
uint8[1]
bit 0: slave device 3 program tally status (0=off, 1=on)
bit 1: slave device 3 device preview tally status (0=off, 1=on)
bit 2-3: reserved (0b00)
bit 4: slave device 4 program tally status (0=off, 1=on)
bit 5: slave device 4 preview tally status (0-off, 1=on)
bit 6-7: reserved (0b00)

| Byte 7 | MSB 6 5 4 | 3 2 1 0 LSB | ||||||
| 0 | Version (0b0) | Version (0b0) | Version (0b0) | Version (0b0) | Reserved (0b0) | Reserved (0b0) | Monitor Preview | Monitor Program |
| 1 | Reserved (0b0) | Reserved (0b0) | Slave 1 Preview | Slave 1 Program | Reserved (0b0) | Reserved (0b0) | Slave 0 Preview | Slave 0 Program |
| 2 | Reserved (0b0) | Reserved (0b0) | Slave 3 Preview | Slave 3 Program | Reserved (0b0) | Reserved (0b0) | Slave 2 Preview | Slave 2 Program |
| 3 | ... |
Assistance
Obtenir de l'aide
CEO Blackmagic Design
Inhaltsverzeichnis
Blackmagic Web Presenter
Erste Schritte 80
Blackmagic Embedded Tally Control Protocol
Version 1.0 (30/04/14)
bit 0: program tally status (0=off, 1=on)
bit 1: preview tally status (0=off, 1=on)
bit 2-3: reserved (0x0)
bit 0: monitor device program tally status (0=off, 1=on)
bit 1: monitor device preview tally status (0=off, 1=on)
bit 2-3: reserved (0b00)
bit 4-7: protocol version (Ob0000)
uint8[0]
bit 0: slave device 1 program tally status (0=off, 1=on)
bit 1: slave device 1 device preview tally status (0=off, 1=on)
bit 2-3: reserved (0b00)
bit 4: slave device 2 program tally status (0=off, 1=on)
bit 5: slave device 2 preview tally status (0=off, 1=on)
bit 6-7: reserved (0b00)
uint8[1]
bit 0: slave device 3 program tally status (0=off, 1=on)
bit 1: slave device 3 device preview tally status (0=off, 1=on)
bit 2-3: reserved (Ob00)
bit 4: slave device 4 program tally status (0=off, 1=on)
bit 5: slave device 4 preview tally status (0-off, 1-on)
bit 6-7: reserved (0b00)
。
| Byte 7 | MSB 6 5 4 | 3 2 1 0 LSB | ||||||
| 0 | Version (0b0) | Version (0b0) | Version (0b0) | Version (0b0) | Reserved (0b0) | Reserved (0b0) | Monitor Preview | Monitor Program |
| 1 | Reserved (0b0) | Reserved (0b0) | Slave 1 Preview | Slave 1 Program | Reserved (0b0) | Reserved (0b0) | Slave 0 Preview | Slave 0 Program |
| 2 | Reserved (0b0) | Reserved (0b0) | Slave 3 Preview | Slave 3 Program | Reserved (0b0) | Reserved (0b0) | Slave 2 Preview | Slave 2 Program |
| 3 | ... |
Hilfe
Hilfestellung
Director executivo de Blackmagic Design
Indice
Blackmagic Web Presenter
Primeros pasos 105
Tran (Transition) 133
Ooio Audio Mixer) 134
Setup) 136
Swoihtuuehui 136
Teranex Mini Rack Shelf 137
137
138
Blackmagic Web Presenter Setup uylrlr1 139
141
143
国期社及中
145
人
前詞
['kəme] 'D. 100000000000000000000000000000000000000000000000000000
4 Oukiodo iJiJiJiJiJiJiJiJiJiJiJiJiJiJiJiJiJiJiJiJiJiJiJiJiJiJiJiJiJiJiJiJiJiJiJiJiJiJiJiJiJiJiJiJiJiJiJiJiJiJiJ1'OukiO IJIeRcHtIe RIKHIO JIe HAIaHgAeHr TnAeHnAeHnAeHnAeHnAeHnAeHnAeHnAeHnAeHnAeHnAeHnAeHnAeHnAeHnAeHnAeHnAeHnAeHnAeHnAeHnAeHnAeHnAeHnAeHnAeHnAe HAIaHgAe HAIaHgAe HAIaHgAe HAIaHgAe HAIaHgAe HAIaHgAe HAIaHgAe HAIaHgAe HAIaHgAe HAIaHgAe HAIaHgAe HAIaHgAe HAIaHgAe HAIaHgAe HAIaHgAae HAIaHgAe HAIaHgAe HAIaHgAe HAIaHgAe HAIaHgAe HAIaHgAe HAIaHgAe HAIaHgAe HAIaHgAe HAIaHgAe HAIaHgAe HAIaHgAe HAIaHgAe HAIaHgAe HAHGAAE HAIaHaHaHaHaHaHaHaHaHaHaHaHaHaHaHaHaHaHaHaHaHaHaHaHaHaHaHaHaHaHaHaHaHaHaHaHaHaHaHaHaHaHaHaHaHaHaHaHaHaHaHaHaHaHaHaHaHaHaHaHaHaHaHaHaHaHaHaHaHaHaHaHaHaHaHaHaHaHaHaHaHaHaHaHaHaHaHaHaHaHaHaHaHaHaHaHaHaHaHaHa HaHA
5 Ie OBs>PreferencesroIeO
6 基本(KanBnS)藻愿多D与曾(主定则)藻愿多D1280×720二或整定海愿[OK]将

連態士達龍藥國則國國國國國國國國國國國國國國國國國國國國國國國國國國國國國國國國國國國國國國國國國國國國國國國國國國國國國國國國國國國國國國國國國國國國國國國國國國國國國國國國國國國國國國國國國國國國國國國國國國國國国
( Cut)
ViDIOoSsKcKcTJHAIiIuOHTIDoLdOohraeNtEaRzTsiYxUyHgIeX
Mix
MAsTeReBel(Master Level)
賫前予不布則載,法則以法則。法則之法則,法則之法則,法則之法則,法則之法則,法則之法則,法則之法則,法則之法則,法則之法則,法則之法則,法則之法則,法則之法則,法則之法則,法則之法則,法則之法則,法則之法則,法則之法則,法則之法則,法則之
SDI 1
Swoi120FF, Swoi1ON, 1000 Web Psenter
HDMI
Stwoi 2OONoR,Stwoi1OFFro selgehseoyihachmepwHbPrn Web Prrer HDMI lllrnnnns
Teranex Mini Rack Shelf
Teranex Mini Rack Shelf是1RU克尼的喜B行骤以Blakmigic Web Presenter为RoTcIisn
当B行额,海电击数有如。WebPementer是立程之,以口的K其的TeranexMini
Knbrte及BlackmagixMultiView4,HyperDeckStudioMini各是DBlackmagixDesign
当B与海进,海电击数有如。WebPementer将大DHyperDeck
StudioMini与海进,海电击数有如。N的当B里,海电击数有,以的,自的,H
Presenter的F和,海电击数有如。WebPementer的F和,海电击数有,以的,自的,H
SA用已
Teranex Mini Rack Shelf
Teranex Mini Rack Shelf
Teranex Mini Rack Shelf
Teranex Mini Rack Shelf
Teranex Mini Rack Shelf
Teranex Mini Rack Shelf
Teranex Mini Rack Shelf
Teranex Mini Rack Shelf
Teranex Mini Rack Shelf
Teranex Mini Rack Shelf
Blackmagic Web Presenter将页的页,将页的页,将页的页,将页的页,将页的页,将页的页,将页的页,将页的页,将页的页,将页的页,将页的页,将页的页,将页的页,将页的页,将页的页,将页的页,将页的页,将页的页,将页的页,将页的页,将页的页
徳자種種の最基礎のBlackmagic Design website www.blackmagicdesign.com/krあ表書 <|im_start|>assistant 書の上ごは尽に
中普Blackmagic Design 电SaiTepHxRnAeNtBcMgic Web Pssenter的内
sFroTtoeToeToeToeToeToeToeToeToeToeToeToeToeToeToeToeToeToeToeToeToeToeToeToeToeToeToeToeToeToeToeToeToeToeToeToeToeToeToeToeToeToeToeToeToeToeToeToeToeToeToe To
Mac OS® 服务器
1 Blackmagic Web Presenter Setup将二云云上,
2. 2. 2. 2. 2. 2. 2. 2. 2. 2. 2. 2. 2. 2. 2. 2. 2. 2. 2. 2. 2. 2. 2. 2. 2. 2. 2. 2. 2. 2. 2. 2. 2. 2. 3
1
3
3
3
3
3
3
3
3
3
3
3
3
3
3
3
3
3
3
3
3
3
3
3
3
3
3
3
3
3
3
3
3
3
3
3
3
3
3
3
3
3
3
3
3
3
3
3
3
3
3
4
3 3. 3. 3. 3. 3. 3. 3. 3. 3. 3. 3. 3. 3. 3. 3. 3. 3. 3. 3. 3. 3. 3. 3. 3. 3. 3. 3. 3. 3. 3. 3. 3. 3. 3.
4. Blackmagic Web Presenter Setup 将在完成之后,将从“主站”到“次站”进行切换。
内部部署的WebServer将自动连接到“主站”和“次站”,并将其连接到“主站”和“次站”。
4. Blackmagic Web Presenter Setup 将在完成之后,将从“主站”到“次站”进行切换。
Windows表从内部S光片器代码
bit 0: program tally status (0=off, 1=on)
bit 1: preview tally status (0=off, 1=on)
bit 2-3: reserved (0x0)
bit 0: monitor device program tally status (0=off, 1=on)
bit 1: monitor device preview tally status (0=off, 1=on)
bit 2-3: reserved (0b00)
bit 4-7: protocol version (0b0000)
uint8[0]
bit 0: slave device 1 program tally status (0=off, 1=on)
bit 1: slave device 1 device preview tally status (0=off, 1=on)
bit 2-3: reserved (0b00)
bit 4: slave device 2 program tally status (0=off, 1=on)
bit 5: slave device 2 preview tally status (0=off, 1=on)
bit 6-7: reserved (0b00)
uint8[
bit 0: slave device 3 program tally status (0=off, 1=on)
bit 1: slave device 3 device preview tally status (0=off, 1=on)
bit 2-3: reserved (0b00)
bit 4: slave device 4 program tally status (0=off, 1=on)
bit 5: slave device 4 preview tally status (0=off, 1=on)
bit 6-7: reserved (0b00)
| Byte 7 | MSB 6 5 | 4 3 2 10 | LSB | |||||
| 0 Version(0b0) | Version(0b0) | Version(0b0) | Version(0b0) | Reserved(0b0) | Reserved(0b0) | MonitorPreview | MonitorProgram | |
| 1 Reserved(0b0) | Reserved(0b0) | Slave 1Preview | Slave 1Program | Reserved(0b0) | Reserved(0b0) | Slave 0Preview | Slave 0Program | |
| 2 Reserved(0b0) | Reserved(0b0) | Slave 3Preview | Slave 3Program | Reserved(0b0) | Reserved(0b0) | Slave 2Preview | Slave 2Program | |
| 3 ... | ||||||||
Ji
지원발기
Ja 1
Yro6b aneoo BvboDnocb Ha BecekpaH 3aJate Base (Canvas) Resolution (Ba3oOoe pa3peuHne) n Output (Scaled) Resolution (MacwtaBpyEmoe pa3peuHne) Ha1280 x720
HactpoKa notOKoBOrKaHaJa YouTube Live
Длг coэднг снлгс -кнгс Ha cepBce YouTube Live nepeiHte Ha Be6 -aPec
www.youtube.com/livedashboardнбпс coэднг снлгс HOBьи ИИN INCNoIb3yIte cyuEcTBHyOuIN aKKayHT cnxK6bl Google.
1 CnBa Bb6epuTe Live Streaming (PpAmbte TpaHcnauN) n HaxmTe Get started (Haatb).
23anonHnTe fopmy u kaxnTe ,kakim dyedT KaHaI - COTKpbItbIM INI ORpaHnueHHbIM DOCTynom
3 3aem Haxmte Reveal nckonnpyTe KIOU NOTOKOBOr BeaHn . OueHb BaxHo He nponyctntb 3Tu INphiopMauiu. KIOU NoHaOobntc DaIbwe DnA BBOa B pInnoXeHN Open Broadcaster.

4 B Open Broadcaster npeiHc H Preferences(HacTpoKn) n Bb6epnte Bkndky Stream (Tpahcnlaun).YkaxnteYouTube kak OHnaH-PlaTfOpMy n BCTaBbTe KIOU NOTOKOBOro BeuaHnB cootBeTCTayuue none Stream key.

5 Haxmte KhoNky Start Streaming (Ctapt) B TnaHOM OKHe npInoxeHn Open Broadcaster. Nocne 3TOrHOaHETcNOtOKOBaTpaHCJIuH
6 CoCTOHNHe TpaHcHnB B Be6 -6pay3epe N3MeHHTC H Na Onlin n KOHTeHT MOxHO 6yET BVdTeB B peaNbHOM BpeMeHn
ПРИМЕЧАЕ. Пюцених Насторд Open Broadcaster Дд рабс Blackmagic Web Presenter OДинавов Дд пафор Mac OS Windows. Плрбпсс М. Be6-caThttps://obsproject.com.
Audio Mixer (3BykoBoi 6Iok)
3NYK, MeHbYpOBeHb Ha KaXdOM BxOe Nn BbIpaTaB NHeHb N6o MKnpoOHHO CTHaN H XLR-BxOe. PerynpobKa BmIoHHetcnoBopotom pyKNIOaCobOn NIn IpOTNB aCobOn CTpeJIKA
COBET,Дяизмeнeнэнэнса КСоТВeTCTByIQUIMHacTpOyKam.Дял STOrOHapeDHe NaHEn ynpaBnE HaxMnte KhoNkY AUDIO.
Master Level
YpOBeHb 3ByKa Ha nporpaMMHom BbIXOe MOXHO INMehNTc NMOoubio pyKn npokpyTKN . 3Ta HactpoKaBnREt Ha 6uH yPOCbHb 3ByKa BcCFO CnHaHa , BbBOIMoR O EΦnp .
SDI Input Level
3aHaCTpoiKaNo3B0JIeHpeRyIINPOBaTbypOBeHbCnHnAHa SDI-BxoJe.
SDI Input
C NOMOJIbIpyKIN PpOKpyTKN MOXHO BKNIOHTb INI OTKIOHTb 3ByK Ha SDI-BxOe, a TAKKe ero npuB3Ky K BnDeo.
ON
3Byk Ha SDI-BxOe 6yEeT BcERda BBbOaNTbCBA BVnpe nporpaMMHOr aayinocnHa.Ⅱn3MeHeHraero ypOBHn cnoNb3yTe HAcTpoKy SDl InputLevel.
OFF
OTKIOUeHHe BbBOda 3ByKa, NoCTyNaIOJIero Ha SDI-BxO,I B nporpaMMHom ayDIOcHHaJe.
AFV
3Byk c SDI-BxOda 6yTeB bIBoMDtBCa BnDe OCHOBHO npOrpaMMHO ayIOcHnHa TOnbKO TOM Cnyae, KOrHa HpOrpaMMHbBbXoN NoCTyNae BnDeO C ETORSDI-BxoJa.
HDMI Input Level
3a Hactpoika no3Bolaret perynipobat ypobeh 3BykoBOro cHana Ha BnDcoBXode HDMI.
HDMI Input
C NOMOJIbIpyKINpOKpyTKMOJHO BKIOUHTb INNOTKIOUHTb 3ByKHa HDMI-BXoJe, a TaKke erO npuB3Ky K BnDeo
ON
3Byk Ha HDMI-BxOe 6ydt BcERda BBIOBnTbC B BIne nporpaMMHOro ayDnOCrHana.ДЯ n3MeHeHraero ypoBHa cnoNb3yTe HAcTpoKy HDMl Input Level.
OFF
OTknueHne BbBoda 3Byka, noctynaoeHa HDMI-8xO, b nporpaMMHom aynocHane.
AFV
3Byk C HDMI-BXoJa 6yTeB BbOaNTBC B BuDe OCHOBHO nporpaMMHOro ayDnOCnHaTOnbKO TOM CInyae, KOrJa Ha nporpaMMHb BbXoJ NoCTyNaeBTuDeo CToTO HDMI-BXoJa.
XLR Input Level
3Ta HactpoiKa I03B0JareTp epyInpoBaTb ypoBeHb 3ByKOBOrO CnIHaIa NOnyHaEMORO INCTOCHNka ayIO Ha XLR-BxoJe.
XLR Input
Bknnoaetn otknnoaet nonyche 3Byka ype3 XLR-BXoJ.
XLR Input Source
Hactponka ypoBnI MKNpOoHnHO nIN NHeHOrCnHaJia
YpOBeHcRHaC MmKpOoHa O6bUHO HnKe ,yem 3Byk, noluaeMn n3 o6OpyDobAHn DnBocPon3BeHnA yauNo. Iner erO ycnIeHN MoXHo Bbl6paTb onuMIC. Pnp paBoTe c npymO6OpyDobAHnEM nCnoB3yTe onuIO LINE.
RCA Input Level
3Ta HacTpoiKa No3B0JaE T peryI npoBaTb ypoBeHb 3ByKOBOrO CnHaJa, NOnyHaEMORO n3 NCTOuHnKa aydno Ha RCA-BxoJe.
RCA Input
BkIIOHaET NOTKIOHaeT IIOyHeHne 3ByKa Uepe3 RCA-BxOJ.
| Audio Mixer | |
| Master Level | +2.00db |
| Source Inputs | |
| SDI Input Level | +2.00db |
| SDI Input | On |
| HDMI Input Level | +2.00db |
| HDMI Input | On |
| XLR Input Level | +2.00db |
| XLR Input | On |
| XLR Input Source | Mic |
| RCA Input Level | +2.00db |
| RCA Input | On |
BknKHeHn nOtkJUeHHe 3ByKa Ha KaJdOM BxOJe, a TaKKe peRynpoBa KApOBHe npaBoTe Co 3ByKOBbIM 6NOKOM
Setup
3TN HAcTpoK N03BOLaIOT npOBepuTB nCnONb3yEmy BepcNIO nporpaMMHOrO oecneueHnra TaKxE OH N03BOLaIOT BepHyTb Web Presenter K 3aBODcKIM HAcTpoKaM.
Software
Iopobhe cM. Be6-caiT KOMnHnn BlackmagicDesign www.blackmagicdesign.com.

IOnonHnTeBna nonKa Teranex Mini Rack Shelf no3Bonaet yctaHOBt bYCTpoCTBO Blackmagic Web Presenter B cTOnKy C npyHM o6pOyBaHem Blackmagic Design Takoro Jke fOpM -fakTopa, Hapmep CTeranexMini Converter n HyperDeck Studio Mini
Pa6ota co BcTpoeHHbIM BnDeoMnKsepOM
Blackmagic Web Presenter nMeet yHKnIO nepeKIOeHm Meky DByMg NCTOHNKaMn B peaHbOM BpemH. YTo6bI pa6oTaB c 3TtMM HCTpyMeHOTm , Heo6xOIMMo IcNoJb30BaT naHeB TeranexMini Smart Panel. Cee nomouhbo 6byd T doabNeHb KhoNk ynpabneHn nnKK -DncnE dR BCTpoEHoro BIDCOMNKepa. OHn Doctynb Cpazy Noce yCTaHOBKn NaHeN
PnnoNDKIOHueHN 6oONx SDI-HMDI-NCToHKnOB Ha HDMI-BXOe BbINOJIHReTcNOBTOpHaCINHXPOHN3aUIN, YTO OBeCneYBaET PnABHbI nepeXoD MeKdy HMM . IMeHHO 3TO DaET BO3MOXHOCTB BbIOJINrTB 3OpHoe MKNWIOPOBaHHe C NOMOuBIO Web Presenter.
Дяьбopa SDI-нctочнka BndeocrHana HaxmTe KhoNky 1Ha nepeHne nAHeIn yCTpoNCTBa.Прн Haxatni KhoNkN2 6byeTncNoB3OaTbCra HDMI-ntOChNK. Пocne 3ToRr Web Presenter bblonHnT порхod.КoMnbiOTep co cnaJd-woy moKHO noDknIOuHTb K HDMI-BxOdy,a KaMepy — K SDI-nHtepfeCy, Чтобу орraHn3OaTb 3ФиРН bnoK3 ppe3eHTaUN Ha npOpeccnOHaNbHom yPobHe npocTbM пореклічehem KhoNOK 1n 2.Ηж-K-dicnnee takke moXHo npOBepaTb TekUIM cnHAI n UpOBHN 3Byka Пибо npocMaTpnbT bVideq
IJIpeKIOHmMekSy SDI-HDMI-ICTOHnKaMn npNcNOs3OaHn TeranexMini SmartPanel HAKMTeKHONky 1nn2
PIMMEAHHE. IpoJOnKInTeBHOCTb nepeXoJa NO yMonuHaHIO COCTABnRETo5CEK, ODAKO pRn
NCONb3OBAHN Teranex Mini SmartPanel MoXHo N3MeHHTb KaK npOOnKInTeBHOCTb nepeXoJa,
TAKI ERO TIN. INI 3TOI PepeJInTe Ha KK -INCnJIeE K MeHIO Transition. IopPo6Hee cm. pa3dien
Pa6ota c tally-инданkaцnei kamepbi
BeuataIbHbIe Kaepb N BIneOMNkWepeb ATEM npOn3BOcTBA Blackmagic Design noDepKnBaOt tallyHnDKaUHO, npeHa3NaHeHHyO dJa oMeHa HΦopMaueNe MeJdy yCTpoiCTBaMn No npOrpaMMHO My KaHany DByCTOpOHne CB3N. BlackmagicWeb Presenter TaXke HeMeet DaHHyO fYHKUIO, YTO npNcNoB3OBAHINHCTpyMeHTa BIneOMNkWepe pNo3BOJare TBnTeB CnHAn KaOK Kaepb B daHHb MowCHT NOCTynAcT BΦnp
Htobnolb0aBt tally-HnDnKauHIO,doCTaTOHNO NOKIOHTb SDI-BbXoD Blackmagic DesignStudio Camera K Web Presenter KaNCTOUYKSy DI-CINHana, a 3aTeM COeINHTb ero nporpaMMbI BxOc n porpaMMbIM SDI-BxODOM KamepbI, Pocne EToR Opi BB6ope KHOIIK Progarm Ha KaMepe Bbl yBnITe nporpaMMHoe BInDeo ycTpoiCTBa Web Presenter B AToT MoCHT tally-HnDnKaUaN6 ByCT HappaTbCnHa KaMepy.
SDI-BxO onpeJeTcKaK Camera1, aHDMI - KaK Camera 2. DaHHBe Homepa Heo6xoJMo yka3aTb B NaCTpoiKk KamepbI. NocokBky DnHee Mbl NcNob3yEm SDI-BxO, OHa dOJIKNa 6bTb 3aJaHa KaK CamaRr A Tocne BblOnHcHn HaCTpoE K HAKeTcK HONK 1 Ha nepdHn NaHEn ycTpoiCTBa Web Presenter AKTNBpye tally-nHdkauio.
Ha Bkndke Studio ykainrte 1kak Hcmep kamepbi (Camera Number) nia Blackmagic Studio Camera, noKnueHHo uee3 SDI-Hntepefie
HaBknaKe Selup yKaKnTe 1b KaueCTBe Homepa Kamepe (ATEM CAMERA ID) da Blackmagic URSA Mini, noKnquHnoeep3 SDI-nntepneic
Bo Bpem npesentauon ouheb yno6ho, kora aCHO bueH KpaChb tally-nnKapot eepn Kaepb Hanpmepe npi pa6oTe c Blackmagic URSA Mini ee JERko chabntb BuOnckatenem Blackmagic URSA Studio Viewfinder, n TOrda Beyuun MoKeT CneuTb 3a TpaHcnaue no BoIbIoMy KpaCHOMy daTHky
Tally- INHnkaaia naoepxmbaetc H a cnyuux moenkamep :Blackmagic Studio Camera, Blackmagic Micro Studio Camera n Blackmagic URSA Mini. Npno6he o hactpoKe tally-nHnkaun cm.pykoBocBa no ekcnlyatau n Backmagic URSA, URSA Mini n Blackmagic Studio Cama, kotopbe doctynbHa Be6 -caTe www.blackmagicdesign.com/ru/support.
Раобota с утúnито Blackmagic Web Presenter Setup
KomnHnBbInyckAeNepnoDnueckne 06HOBnEHH nporpaMMHO o6ecneHn nIa Blackmagic Web Presenter, kToOpBie DocTynHa caiTe Blackmagic Design.ObHOBnEHH BbIOHnHOT C NOMOuBytB Blackmagic Web Presenter Setup.ДЯ onTmAbHoi npoIN3BOIDTeHBOCHT peKOMeHnyetcRncnbl308aBt noCneHIOB cepcuio PO.
PopdoK 6HOBHeHnIO npu pa6ote Ha Mac OS X
1 3arpyuTe npacnkyuTe Blackmagic Web PresenterSetup.
2 Bb6epTe COOTBeTCTBvUoN nnck nI npocMoTa erO coedePkmoro n3anyCTnTe Blackmagic Web Presenter SetupInstaller.
CneyuTe INHCTpyKUINAM Ha 3KpaHe
3 Nocne yctaHOBKn noKkUOHTe Web Presenter K KOMNbTepy cep3 nopT USB ha nepeDHe naHenn. Dna doCTyna K npTy USB oTKpoTe nlaactNKOByIO 3auTHyIO KpbIky
3anyctnte Blackmagic Web Presenter Setup n cneyte HnCTpykmaHa kpahe .EcnnHnCTpyKmHe IIOHBATc, INoNb3yeMaB BepCnAIBHReTc AkyaIbHo.
Iopraok 6OBHeHn IIO npnpa6oTe Ha Windows
1 3arpynte npacnyte Blackmagic Web Presenter Setup.
2 HainiTe nanky Blackmagic Web Presenter Setup, B KoTopoi codepXaTc daHHe pyKOBOCTBO n yctaHOBnK Blackmagic Web Presenter Setup Installer.ДвaxdI uenKHnTe KhoNkoMbUn No 3NaKy yCTaHOBnKa n CneDyIte NHCtpyKmHa NaKpaHe
3 NocIe yctaHOBKn IIOKIIIOUHTe Web Presenter K KOMNbIOTepy Upe3 npT USB Ha nepeJHne naHenn.ДЯdoCTyna KnopTy USB OTKpoTe nlaCTIKOByIO 3auNTHyIO KpbIuKy
4 3anyctnte Blackmagic Web Presenter Setup n cneyute HnCTpykmaH Ha kpaHe .EcnnnHnCTpyKmH He NOBATcA,NCNOb3yEmaB BepCnRABnTcAkTyAnbHOi.

PocneHIOBepcnoyTnHTbI Blackmagic WebPresenter MoKHO HauN Bpa3eJe noDpeKKn Ha HaeM Be6-caiNe no apecy www.blackmaglcdesign.com/support
Приложения
Blackmagic Embedded Tally Control Protocol
Version 1.0 (30/04/14)
JaHHb pa3den npedHa3HaeH dIe cTOpHHx pa3pa6OHTKOB nONb3oBATEnei, KOtOpBe xOTAT doabntb Kncnolb3yemomy o6opdyobAHIO NOcpckky Blackmagic Embedded Tally Control Protocol. Hnke onncBaetc npotokon nepeaun HfOpMaun no tally- nHnkaun, HanpaBmEOM Bmectc C nphiobbM BndeONOTOKOM.
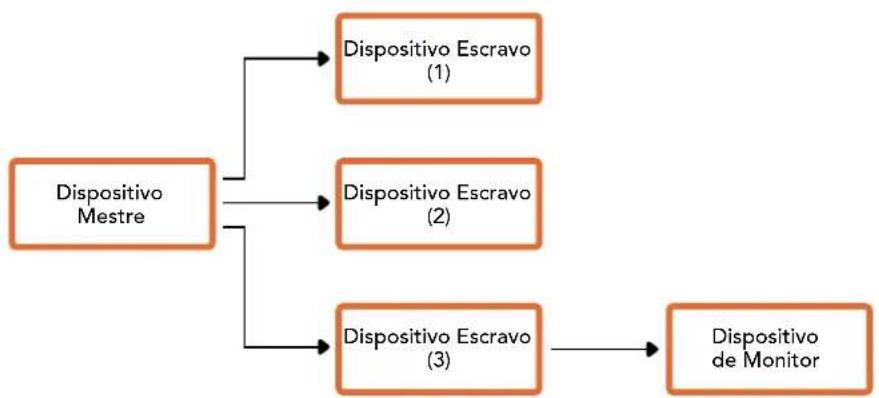
Ipeepa daHbix
BeyuueoopuydoaHne,taKoeKaBeeaTeNbHbBnEoMnKwep,BCTpaNaBaettally-HPOpMaCIO B nporpamMbHbnCnHn,KOTOpBnpePedaTcHnHeCKOBkoBeDombXyCTpoNCTB,TAKNXKaKamepblnn 6IOnkynpabNeHnKaMep.BbxOHOHcnHnN3BeDOMbXyCTpoNCTBobHyHO HAnpaBnReTcObaTHo Ha BeNyuee oopuydoaHne HO TaKke MoKeT nepeDaTaCbraHa MOHTOP
NepBnHnapepaunHOpMaunnpcxOHTOTBeDyueTexHKnKBeDMoKaKdoeBeDMoe yCTpoiCTBOMOKeTNCnObl3OBaTcBOIeHTnΦkATOpDNBAIDeEHNAIBIBOdaCOOTBETCTBYIOe tally- nHopMaun.
Bedombye yctpoiCTBa nepecblaiaot naketnpoBaHHbIe daHHbIe uee3 BxOHOH INTEppeCn OOBHJIOT COCTOHNIOHTopa.TaKIM o6pa3OM NOKIIoueHHbIe K OTdEhBOMy BixOxy DcINNeEN OTo6paKaOT cTAtyc tally-nHnkaaNN 6e3 NHphiOpMaauN O bJeHTnphiKaTOpe ToT texHNI , CnHaN KOtopoON OH N OTo6paKaOT.
DonyuueHnna
B npotoKone yka3aHbI orpaHueHn no onTMM3aun ynaKOBKn daHHbIX . YnaKOBKa 6ntobbIX nOe HauHaeTcC HauMehbJero 3Haayuero 6NaTa.
KoДировka
OaHn NaKet tally-daHHbX MoKeT nepeDaBaTbC C OAnHM BInDeOkApOM DaHHbIe KoDpyIOTc B NaKeT SMPTE 291M C DID/SDID x51/x52 B aKTINBHOJ qACTN 15- nCTpOKn VANC. OAnH KOHTpONbHbI NaKeT MoKeT cOpKaTaB Do 256 6nt INHΦopMaun.
ΦopMaT
CocToaHn cally coepknt 4 6nTa nHΦopMaun:
uint4
bit 0: cTatync nporpaMMHOrO cnHaJa (0=8bKn,1=8Kn)
bit 1: cTaTyc npocMToPa nporpamMb (0=bbkN,1=BKn)
bit 2-3: 3aNaacHoi (OxO)
NepBb6nC0ePKeNTCTaTcMOHHTopAnHOmep BepCN
Iocneyouue 6ntbcoepkataTcnapbixBedeombixycptpoCTB .BedyeeobopyoBaHne nepedaet coctoHHnHa pRCKOHfnpuOBaHHbIXnnnoepKnaBaembixycptpoCTB,Makcmymdo510.
struct tally
uint8
bit 0: cTATYC nCnne (O=BbIK,1=BKl)
bit 1: cTATYC npocmOTpa Ha nCnnee (O=BbIK,1=BKl)
bit 2-3: 3anacnoi (Ob00)
bit 4-7: Bercn npotoKoNa (Ob0000)
uint8[0]
bit O: cTaTc nporpaMmHa Beyuem yCtpoICTBe 1(0=BBKn,1=BKn)
bit 1: CTApyc npocmotpa Ha Beyuem yctponctbe 1(0=BBkN,1=BN)
bit 2-3: 3aNaCHOH (Ob00)
bit 4: cTatync nporpaMMb Ha benyuem yctpoaCTBe 2 (0=BBKJ,1=BKNJ)
bit 5: cTatyc npocmoTa Ha BeDyueM yCTpoiCtBe 2 (0=BykN,1=BKn)
bit 6-7: 3aNaHoi (Ob00)
uint8[1]
bit 0: cTaTc nporpaMmHa Beyuem yctpoiCTBe 3(0=BBK,1=BKn)
bit 1: cTaTyc npocMoTpa Ha BeDyUeM yCTpoiCtBe 3 (0=BykN,1=BkN)
bit 2-3: 3aachaH0 (Ob00)
bit 4: cTaTc nporpaMmHa BcDyUeM yCtpoICTBe 4 (O=BbIK,1=BKN)
bit 5: CTATYC nPOCMOTPA Ha Bedyuem yCTPOIcTBe 4 (0=BykN,1=BkN)
bit 6-7: 3aNaHoi (Ob00)
.
| Byte 7 | MSB 6 5 | 4 3 2 10 | LSB | |||||
| 0 Version(Ob0) | Version(Ob0) | Version(Ob0) | Version(Ob0) | Reserved(Ob0) | Reserved(Ob0) | MonitorPreview | MonitorProgram | |
| 1 Reserved(Ob0) | Reserved(Ob0) | Slave 1Preview | Slave 1Program | Reserved(Ob0) | Reserved(Ob0) | Slave 0Preview | Slave 0Program | |
| 2 Reserved(Ob0) | Reserved(Ob0) | Slave 3Preview | Slave 3Program | Reserved(Ob0) | Reserved(Ob0) | Slave 2Preview | Slave 2Program | |
| 3 ... | ||||||||
Pomoucb
Kak noyuHTb nOmoUb
Camb 6bCTpbn cnooc noJyntb nmoa - o6paTntbca K cTpaHuaam noDpeKna Ha caTe Blackmagic Design n npOBepntb Hauuue nocneHnx CnpabOuyhix Maepnaiob No Blackmagic Web Presenter.
CtpaHnua noDpeKKn Ha caTeBlackmagic Design
IocneHHe Bepn pykoBcTBa no 3KcnnyatauM MoxHo HauTb pa3dene noDepkKn Blackmagic Design Ha ctpanue www.blackmagicdesign.com/ru/support.
Φopym coo6uεctBa Blackmagic Design
IocTeTne fOpym coo6ueCTBaBlackmagic Design HaHaWeM Be6-caTte, YTo6bI NOyUHTb
DOnONHInTeBHyIO INΦOPMaUIO Uy3NaTb 06 INTEpeCbIX TBOpCeKINx INeAx . Tam TAKKe MOXHO HAIITN
OTBeTb ONbTHbIX NcIb3OBaTeJIeN cOTpydNkOB Blackmagic Design Ha cacto 3aDaBaEMbe BONpOcB
Adpec fOpym http://forum.blackmagicdesign.com.
06paueHne B Cnyk6y nopeckn Blackmagic Design
Ecn c nmoBIOOCTyHbIX CnpaBOHyMATEpnaIOB H opyma peuNTb npoBemy He ydaIOCB, BocnoIb3yTeCb oPmO«OTnpaBnTB Ham coo6eHne» Ha cTpaHnCe noDepkKn. MoKHO TAKKe NO3BOHnTB B 6nJxAaiye npedctabntbCTBO Blackmagic Design, Tenefoh KOTOPORo Bbl HaJeTe Ha HaewcEM Bc6-caTe.
CobJeHne HopMaTnBbIX Tpe6ObaHn I npaBnla 6e3OpacHOCTN
CobioeHHe HOpMaTINBbIX Tpe6ObaHn

Yttnn3aunna 3neKtpno6opyoDaHn n 3neKtpoHHo annapaTpyb B Ebponeckom Co103e
I3dennie cOePjNT MapKnipOBky, B COOTBETCTBm C KOTOpO er0 3aIIpeaaetcraYTNIN3npoBaTb
BMeTe C 6bITOBbIMN OTXODAMn . HEnpiroDHOe dna EKCNnyatauIN OOByOBAHne Heo6xOIMO
IpepaTb B NHT BTOPNUHOI nepepa6oTKn . Pa3dJIbHbN b6op OTXoOB INx NOBtOPHOe
NCONb3OBaHHe No3BOJHOT 6epeh npipoHbIe pecypcbI, OxpaHrTB OKpyKaIOU cypeDu
3aUHuaTb 3dOpOBBe cheNoBEka. YTo6bI nOnyTuBn oNpO6HyIO NHOpMaUHO o NOPaKe yTNIN3auIN ,
O6paTInTECB B MeCTHbIe MyHUnPaJIbHbIe opraHbI INK DInIepy , y KOTopoRO Bbl npio6peHN
3To I3dEInne.

JaHoe o6OpyOBAHHe npoTeCTnPoBaHO nToTre6oBHaM dIaNpOBox yCTpoiCTB KNaCCA (pa3en 15 cneuΦkaun FCC) n np3HaHO COOTBeCTbUOUM BCEM npedbRAEMbIM KpHTepnAM Co6IOeHne yOnmHytbX HopMaTHOB O6ecneuBaet DoCTaTOUYIO 3aunTy OT BpeHORO n3nyehn np npaboTe o6OpyOBAHn B HeKInbIX NOMeueHnx. TaK kT0 n3dne NreHepnpyeT, nCIOJIb3yET n 3NyaeT pAnOBJHb, npHnPaBnBJHo YcTAHOBKe OHO MOKe TcAHOBTbcN CTOUHkOM paIIOnomEx. Ecn o6OpyOBAHHe 3KnIyATnpyeTc B XINbIX NOMeueHnx, BBICOK BePOrTHOCtB Bo3HNKHOBeHn IOMex BIIraHHe KOToPbX B 3Tom CNYae PONb3OBaTeNb DOnXeH yCTpaHtB CaMOCToRteHBHO.
DOKIyatauIMOnlyckaiOTCHyCTPOINCTBA , COOTBETCTBYIOUneIDBymTpeBOHnM Tpe6oBaHHa
1O6opyoBaHHe HeJOnKHO 6bITb NCTOCHNKOM BpeHbIX NOMEX
2O6OpyoBaHHe OJnKHO 6bITb yCTOnuHBbIM K NOMexAM , BKNIOaY NOMEXN, KOToPbIE MOyT BB3BaTb C0B N Pa6oTe .
IopKnueHnK HDMI-nHTepcEcy dONXHO BbINONHrTbcC NOMOaBbICOKKaueCTBeHHoro 3KpaHnpoBaHnro Ka6eJ.
PpaBnla 6e3oNaChOCTn
3a3eMJIIOUJ KOHTAKT.
TTObMIMHMN3INPOBaTb ONaCHOCTb NopajaHnna 3JIeKTPuCCKm TOKOM, n3dEInc Heo6xOIMO 3aunuaTb OT nonadaHnna 6pb3r n KaneB BoDbl
DonyckaetcaKcnnyatauB yCNOBnX TpONueckoro KInMaTc TemnepaTypoN OkpyKaioeI cpebldo 40^
Ja pa60bI yCTpoNCTBa Heo6xOJIMo oEocneHTb DoCTaTOHyIO BENTINRAIO
PnYcTaHOBKe B cToiKy y6eIITecb TOM , 4TO He HApUeH PnTOK BO3dyxa .
BHytpn Kopnyca He coedcpkata TaIIN ,noDneXaunc o6cnyKbAHIO.ДЯ BblonHcHnpeMOHTbIX paBOT o6patntecb B MeCTh b cepBnCHb ueTp Blackmagic Design.

DonyckaetcKcnnyatauB MeCTax He Bblwe 2000 MHaI yPOBHeM MOp8.
Гаранту
OrpaHnueHHa rapaHTna cPokom 3 roda
KomnaHnB Blackmagic Design rapaHTpye TcYCTBne B npOdykTax Blackmagic Web Presenter dekeKTOB MaepnAIA n npo3BOcTBeHHoro 6paka B TeueHne 36 MeCaeB C DaTI npOdaKn. Ipa pa3bEmOB, KaBene, OxJaKaIOuXnB BeHTnIaTOpOB, ONTOBONOKHHbIX MoUyNe, npEdoXpaHITeNe, KlaBnATpyb n AkkyMnTOpHbix 6Batapei rapaHTN OTCyTCTBn DekeKTOB MaepnAIA n npo3BOcTBeHHoro 6paka CoCTaBnEET 12 MeCaeB C DaTI npOdaKn. EcnN BO BpeMa rapaHTnHoro cPoka 6yDyT BvRbHeBle DekeKtBi, Blackmagic Design no CBOeMy yCMOTpeHHIO BblONHPT pMoHT HeNCnPabHOrO INDEINBA63 ONnAaTb CTOnMOCTn 3aNCACTe N TpyDo3aTpaT INI 3AMCHNT Takoe INDEINHOBBIM
YTo6bI BOCNoB3OBAbC HAcTOnuei rapaHTne, Ntpe6nte bO83aH yBeOMNTb KOMNaHIO Blackmagic Design o DeΦeKTe Do OKOHuaHra rapaHTnHoro cPoka n ObecneuHTy cNOBnI dI npedocabHeHn HeoXoIMbIX ycIy. Ntpe6nte hceT OTBcTcBEHOCTb 3a yIaNKBky IIOCTABKY HeNCnPpABHO n3dEINB B COOTBeTCTByIOU nn cepBnCHb IeHTP Blackmagic Design c ONlAtoN NOTOBbIX paCXoOB NTope6nteNb O83aH ONNAITb BCE pACxObl No DOCTaBKe I CtpaxOBaHIO , NOUHNbl, HAIORN INHble c6Opbl B CB3N C BO3BpaOM N3dEINB BHE 3aBcImOCTN OT pnuHbl BO3BpTa
HaTcHbAraHpaHTnHe paCnpoctpaHReTcH a DeEeKtB,OTKa3bNIOOBpeXJDeHn,BO3HKUeN 3-3a HeaIeJEAero nCIOB3OBAHn,HenpabInbHoro yXoDa nn OcbNyJBnAHn. KOMnHnBaCKmigc Design He o63aHa npedocTabrB yCnyrno HacToae rapaHTtna) dnyuCTpaHene HOBpeXJdHn, BO3HKUx B pe3yIbTaTe DeCTBn NO yCTaHOBe , pemOnTy nn OcbNyJbAHnIO3dEHN NuaAMn, KOtOpBie He ABJIOTc nepcoHAnom Blackmagic Design;6)dy UcTpaHene HOBpeXJdeHn, BO3HKUx B pe3yIbTaTe HeaIeJEAero nCIOB3OBAHn nn NOkNIOeHHN K HeCOBMeCTUMomy o60pyoBaHnIO ;B) DnyUCPaHcHn IOBpeXJdCHn NN DEcKTOB, Bb3BaHHbx INCIOBJ3OBAHNCM 3aNCACTeNnn MaTcPnaNoB dpYrnx Ipon3BODInTeJe; r) eCIN N3dEInne 6blIO MOINPHIOPOBaHO nn INHTepnpoBaHO c dpyrIM O60pyoBaHnEM, KOrTa TAKaMOINKIAQn nn INTEpaqna YBEINHBAET Bpema nn Noblaaet CNOKHOCTb O6cLyJbAHn IN3dEInn . HACTOUIA RAPAHNTA PPEOCTABLRETC KOMPAHNEI BLACKMAGIC DESIGN BMECTO IIIOBEx IPyHX PPRAMO BbIPAXEHHBIX INN POIPA3yMEBAEMbIX TAPAHNI. KOMIIAHN BLACKMAGIC DESIGN IN EE INIEPbI OTKA3bIBAIOTCR OT IIO5bIX IOPDA3yMEBAEMBX TAPAHNTIKOMMEPUECKO LEEHHOCTH NIN INPNFOHOCTN DIA KAKOIINBO OPDEJEIEHHO LEEIN. OTBETCTBEHHOCTB BLACKMAGIC DESIGN IOPEMOHTY ININ 3AMEHE HEICNPABHBix IN3dEInN YBLRETCN ONHbIM IN NCKIOUHTeINhBIM CPEICTBOM BO3MEUHEIN, PEPDCABLIEMBIM NOTPEBNTELIO CB83N C KOCBEHHBM, FAKTNUCHECKMM, COYNCTBYIOUMN ININ NOCLENYIOUMN YbITKAMN , BHE 3ABCIMOCTN OT TORO , BbINA INN HET KOMNAHNR BLACKMAGIC DESIGN (JIINBO EEEINEP) PEPDBAPITEINHO IN3BEUHEA O BO3MOXHOCTTN TAKNX YbITKOB. BLACKMAGIC DESIGN HE HECET OTBETCTBEHHOCTN 3A INPTOBIPABHOE NCIOJI3OBAHNE OBOPUYOBAHN CO CTPOHObl NTPOEBTEJIAR BLACKMAGIC DESIGN HE HECET OTBETCTBEHHOCTN 3A YbBITKN BO3HKAIOLUINE BCIECDTBE NCIONIL3OBAHN 3TOGO IN3DEINI. PNCKN,CBRIAHBIE CE ETO KCNPIYATAUINE BO3JIATAOCTCAR HOITPBENTIE
Copyright 2017 BlackmagicDesign. Bc npaba 3auiuienb. BlackmagicDesign, DeckLink, HDLink, Workgroup Videohub, Multibridge Pro, Multibridge Extreme, Intensity "Leading the creative videorevolution" 3apermtpnpoBAHn KaK ToBapHhne 3AKN B CUA Hpynx cTpaHax .HaBaHHN dpYnx KOMIHN HAIMCHOAHN IPOyKTOA MOrYT HJIHTbcn TOBapHMN 3HaKaMn COOTETCTByoux npaboo6naqateen.
TexHONORa Thunderbolt Norotin Thunderbolt RnTcra TOpaHMM 3hakmKopnpauIn Intel B CUA ndpynx ctpahax .
Blackmagic Design CEO
icerik
Blackmagic Web Presenter
Iik Adimlar 174
GucKaynagina Takma 174
Videooyu Takma 174
Sesi Takma 175
bit 0: program tally durumu (0=off, 1=on)
bit 2-3:ayrilms (0x0)
bit 0: monitor cihaz program tally durumu (0=off, 1=on)
bit 1: monitor cihaz onizlemetally durumu (0-off, 1=on)
bit 2-3:aynlm (0b00)
bit 2-3:aynlms (Ob00)
bit 4: slave cihaz 2 program tally durumu (0=off, 1=on)
bit 6-7: ayrilmis (Ob00)
uint8[1]
bit 0: slave cihaz 3 program tally durumu (0=off, 1=on)
bit 1: slave cihaz 3 cihaz onizlemetally durumu (0=off, 1=on)
bit 2-3:aylmis (Ob00)
bit 4: slave cihaz 4 program tally durumu (0=off, 1=on)
bit 6-7:ayrilms (Ob00)
Blackmagic Embedded Tally Control Protocol
Version 1.0 (30/04/14)
bit 6-7: riservato (0b00)
uint8[1]
bit 6-7: riservato (0b00)
| Byte 7 MSB 6 5 4 | 3 2 1 0 LSB | ||||||
| 0 Version (0b0) | Version (0b0) | Version (0b0) | Version (0b0) | Riservato (0b0) | Riservato (0b0) | Monitor Anteprima | Monitor Programma |
| 1 Riservato (0b0) | Riservato (0b0) | Periferica 1 Anteprima | Periferica 1 Programma | Riservato (0b0) | Riservato (0b0) | Periferica 0 Anteprima | Periferica 0 Programma |
| 2 Riservato (0b0) | Riservato (0b0) | Periferica 3 Anteprima | Periferica 3 Programma | Riservato (0b0) | Riservato (0b0) | Periferica 2 Anteprima | Periferica 2 Programma |
| 3 ... |
Assistenza
Assistenza clienti
bit 2-3:reshedado (OxO)
bit 6-7:reshvado (0b00)
uint8[1]
bit 6-7:reshvado (Ob00)
.

- Blackmagic Web Presenter
- Languages
- Welcome!
- Contents
- Getting Started 5
- Using Blackmagic Web Presenter with Third Party Software 7
- Using Teranex Mini Smart Panel
- Settings 13
- Changing the Video Input using Switches 17
- Blackmagic Web Presenter Setup Utility 20
- Regulatory Notices and Safety Information 25
- Getting Started
- Plugging in Power
- Plugging in Video
- Plugging in Audio
- Connecting to your Computer
- Setting Blackmagic Web Presenter as your Webcam
- Using Blackmagic Web Presenter with Third Party Software
- Using Blackmagic Web Presenter with Skype
- Using Blackmagic Web Presenter to Stream with YouTube Live
- To set your Web Presenter as a new device
- Setting up a YouTube Live streaming channel
- Installing Teranex Mini Smart Panel
- Smart Panel Features
- Settings
- Video Input
- Auto
- SDI
- HDMI
- Transition
- Cut
- Mix
- Dip
- Audio Mixer
- Master Level
- SDI Input Level
- SDI Input
- ON
- OFF
- AFV
- HDMI Input Level
- HDMI Input
- XLR Input Level
- XLR Input
- XLR Input Source
- RCA Input Level
- RCA Input
- Setup
- Software
- Factory Default
- To reset your Web Presenter:
- Changing the Video Input using Switches
- Teranex Mini Rack Shelf
- Using the Built in Switcher
- Using Camera Tally
- Blackmagic Web Presenter Setup Utility
- To update the internal software using Mac OS:
- To update the internal software using Windows:
- Appendix
- Blackmagic Embedded Tally Control Protocol
- Version 1.0 (30/04/14)
- Data Flow
- Assumptions
- Blanking Encoding
- Packet Format
- Help
- Getting Help
- Blackmagic Design Online Support Pages
- Blackmagic Design Forum
- Contacting Blackmagic Design Support
- Regulatory Notices and Safety Information
- Regulatory Notices
- Disposal of waste of electrical and electronic equipment within the European union.
- Safety Information
- Warranty
- Month Limited Warranty
- 目次
- はしだに 30
- Assistance
- Obtenir de l'aide
- Inhaltsverzeichnis
- Erste Schritte 80
- Hilfe
- Hilfestellung
- Indice
- Primeros pasos 105
- 人
- 前詞
- ( Cut)
- MAsTeReBel(Master Level)
- SDI 1
- Mac OS® 服务器
- Windows表从内部S光片器代码
- Ji
- 지원발기
- HactpoKa notOKoBOrKaHaJa YouTube Live
- Audio Mixer (3BykoBoi 6Iok)
- Pa6ota co BcTpoeHHbIM BnDeoMnKsepOM
- Pa6ota c tally-инданkaцnei kamepbi
- Раобota с утúnито Blackmagic Web Presenter Setup
- PopdoK 6HOBHeHnIO npu pa6ote Ha Mac OS X
- Iopraok 6OBHeHn IIO npnpa6oTe Ha Windows
- Приложения
- Ipeepa daHbix
- DonyuueHnna
- KoДировka
- ΦopMaT
- Pomoucb
- Kak noyuHTb nOmoUb
- CtpaHnua noDpeKKn Ha caTeBlackmagic Design
- Φopym coo6uεctBa Blackmagic Design
- 06paueHne B Cnyk6y nopeckn Blackmagic Design
- CobJeHne HopMaTnBbIX Tpe6ObaHn I npaBnla 6e3OpacHOCTN
- CobioeHHe HOpMaTINBbIX Tpe6ObaHn
- Yttnn3aunna 3neKtpno6opyoDaHn n 3neKtpoHHo annapaTpyb B Ebponeckom Co103e
- PpaBnla 6e3oNaChOCTn
- Гаранту
- OrpaHnueHHa rapaHTna cPokom 3 roda
- icerik
- Assistenza
- Assistenza clienti
Brand : Blackmagic Design
Model : Web Presenter
Category : Video broadcasting equipment