EY6813 - Drill PANASONIC - Free user manual and instructions
Find the device manual for free EY6813 PANASONIC in PDF.
User questions about EY6813 PANASONIC
0 question about this device. Answer the ones you know or ask your own.
Ask a new question about this device
Download the instructions for your Drill in PDF format for free! Find your manual EY6813 - PANASONIC and take your electronic device back in hand. On this page are published all the documents necessary for the use of your device. EY6813 by PANASONIC.
USER MANUAL EY6813 PANASONIC
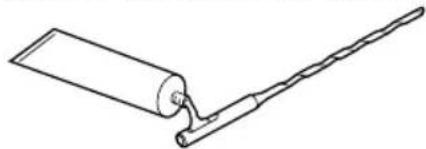
Cordless Rotary Hammer
Akku-Bohrhammer
Marteau rotatif [sur batterie]
Martello rotanteswana fili
Draadloze klopboormachine
Martillo rotatorio sin cables
Trädløs roterende hammer
Laddningsbar slagborr med variabel hastigkeit
Oppladbar slagdrill og skrutrekker med justerbar hastigkeit
1 Nopeudeltaan säädettävå/langaton/kiertovasara
Kom6HnHpOBaHHbI aKKyMylTOpHbI nepΦopatOp
Kom6HOBaHHaKymyJIaTOpHn nepΦopatOp
Model No: EY6813
Before operating this unit, please read these instructions completely and save this manual for future use. Vor Inbetriebnahme des Gerätes die Betriebsanleitungitte grundlich durchlen und dess Broschure zum spateren Nachschlagen sorgfátig aufbewahren. Lire entiement les instructions suivantes avant de faire fonctionner l'appareil et conserver ce mode d'emploi à des fins de consultation ultérieure. Prima di usare Anything appareccchio, leggere completamente queiste instruzioni e conservare il manuale per usi futuri. Lees deze gebruksaanwijing aandachtig door voor u het apparaat in gebruik neemt en bewaar de gebruksaanwijing voor eventuele naslag. Antes de usability por prima vez, lea todas las instructiones de este manual y guarde el manual para poderlo consultar en el futuro. Gennemlaes donne betjeningsvejledning fbr brugen og gem den til fremtidig drug. Lasigenom hela bruksanvisingen innan Produkten tas i bruk. Spara bruksanvisingen for senare använding. Forneheten tasi bruk, vennligst les disse alle anvisingene og oppbevar bruksanvisingen for senere bruk. Lue ohjeet huolella ennen laitteen käytöönottoja ja saïlytä tämä käytöohje tallessa tuleva taretta varten. Pedecknnyatau me daHHo UcTPOCTBA, noaIynta, noHocTbIO pOHTte daHHU INHCTpyKUHO INCOxPAnITE daHHoe pyKOBODTBO DnRA IcNOB30BAHMA B 6dyeEM. Pedeeknnyatau o daHHo pInCTPOHO, 6db NaCK, NobHicTIO pOnHITAE daHy IHCTpyKIO i 36peXtB daHH nOciBHK DnRA BIKOPCTAHN y MaMbyTHBOMy.
Index/Index/Index/Indice/Index/Indice/Indeks/Index/Indeks/Hakemisto
English: Page 4
Deutsch:Seite 14
Français: Page 22
Italiano:Pagina 30
YkpaIHcbKa CtopiHka 94
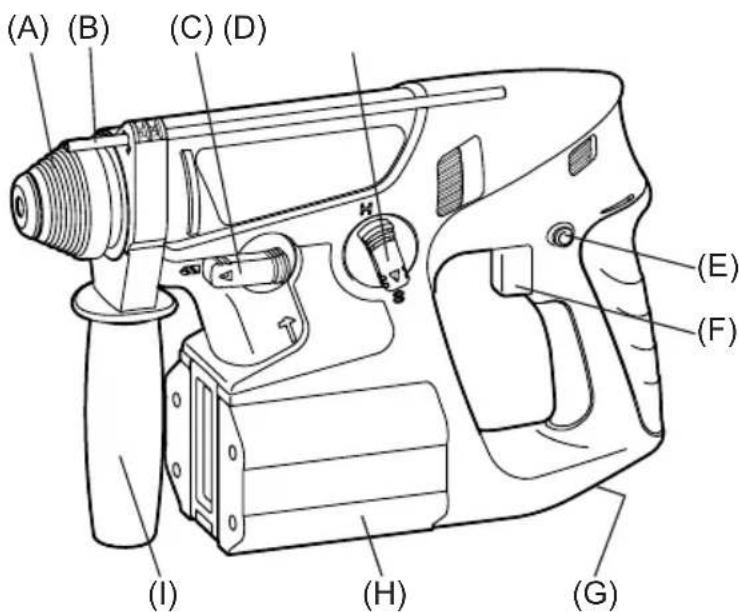
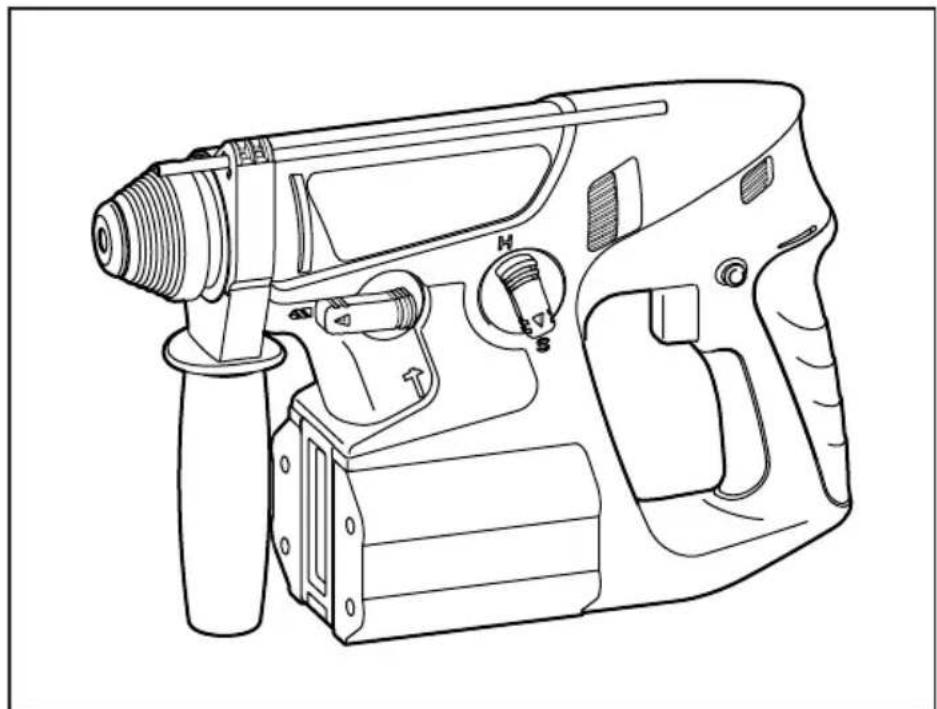
| (A) | ChuckFutterMandrindomandrinoBoorkopPortabrocaBorepatronChuckChuckKiinnitslaite3aximnoi natpon3atncknii natpon | (B) | Depth gaugeBohrtiefenanschlagJauge de profondeurCalibro di profonditàDieptemeterCalibre de profundidadDybdemälerDiupmätureDybdemälerSvyvysmittariГлобиномерГлобиномер |
| (C) | Hammering/drilling switching leverZum Umschalten zwischen normalem Bohren und SchlagbohrenCommutateur martelage/perforationLeva di commutazione martellatura/perforazioneKeuzehendel normala boren/klopborenPalanca de conmutacion de martillo/taladroHamrings/borings omskiftningsgrebOmkopplare mellan slagborr/vanlig borrSlag/bor omskifterVasaran/poran kytkentävipuРыаг песeklnoуеня долбени/cwbepenhyBaxilb песemikanhЯ doxbannя/cwbedniinna | (D) | Speed/Blow Mode selection leverGeschwindigkeit/Blasen-ModuswahlhebelLevier de selection de vitesse/mode de soufflerieLeva di selezione velocità colpoSnelheid/klopfunctie-keuzehendelPalanca del selector de velocidad/modo de solpadorHastighedsvælger/BlaeserfunktionsvælgerValjare für hastiget/slaglajeVelger for hastiget/blösingNopeuden/iskumuondon valintavipuРыаг blybopa skoroctni/ydapaBaxilb bvibopy uzbidkostri/ydapy |
| (E) | Forward/Reverse leverVorwarts/Rückwärts-HebelLevier d' inversion marche avant-marche arriereLeva di avanzamento/inversioneVoorwaarts/achterwaarts-hendelPalanca de avance/inversionGreb til forlaens/bagliens retiningRiktningsomkopplareForover/Revers bryterEteinpain/taaksepainvipuРыаг песeklnoуеня bnepeud/HazadBaxilb песemikanhЯ bnepeud/Hazad | (F) | Variable speed control triggerBetriebsschalterGächette de commande de vitesseGrilletto di controlledo velocità variableStartschakraar variabile nselheidDisparador del control de velocidcd variableKontroludløser for variabel hastighedSteglós varvitalsreglierareHovedbryter, trinlósNopeudensäätoktykinПerekknouateIb terpugnilobovknipere-menhenoi skopoctnIperemikau peryllobanHH 3mHNOI sbvndkosti |
| (G) | Release leverEntriegelungshebelLevier de dégagementLeva di rilascioOntgrendelknopPalanca de liberaciónUdløsergrebLossad hāvarmLønsnespakeVapautetu vipuРыаг освобожденияВaxilb bviibinyhengnay | (H) | Battery packAkkupackBatterieBlocco batteriaAkkuBateria recargable EY9210 (Ni-MH): EY6813 NQKW BatteriERY9116 (Ni-Cd): EY6813 FQW BatteripaketBatteriAkkuBatapeiHb 6 blockBatapeiHb 6 block |
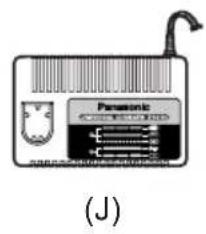
| (I) | Support handleZusatzgriffManche de supportManiglia di sostegnoSteungreePango de soporteHjælpenthandtagStödhandtagStøttehandtukTukikahyaПов徴жваюцая руковда Пidtrpmučuça rykoRTka | (J) | Battery chargerLadegerätChargeurCaricabatterieAkkuladerCargador EY0214: EY6813 NQKW Oplader EY0110: EY6813 FQW LaddareLadeapparatLataaja3apdHoe yctrocbTBO3apdHoe yctrocbTBO3apdHoe yctrocbTBO3apdHoe yctrocbTBO3apdHoe yctrocbTBO3apdHoe yctrocbTBO3apdHoe yctrocbTBO3apdHoe yctrocbTBO3apdHoe yctrocbTBO3apdHoe yctrocbTBO |
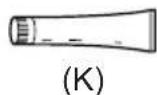
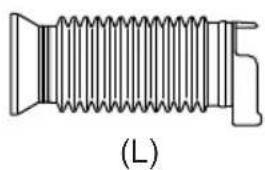
| (K) | GreaseSchmierungGraisseLubricanteVetGrasaSmørefedtFettSmørefettRasvaCmaizaMactnilo | (L) | Dust collection cup (EY9X004)Staubsmammelbehalter (EY9X004)Collecteur de poussière (EY9X004)Coppa di raccoglamento della polvere (EY9X004)Stofzak (EY9X004)Fuelle recollector de polvo (EY9X004)Stavopsamler (EY9X004)Dammuppsamlingskopp (EY9X004)Stovopsamsamlingskopp (EY9X004)Polynkeräyskuppi (EY9X004)Пьлесборник (EY9X004)Пилозбирник (EY9X004) |
Read "Safety Instructions" booklet and the following before using.
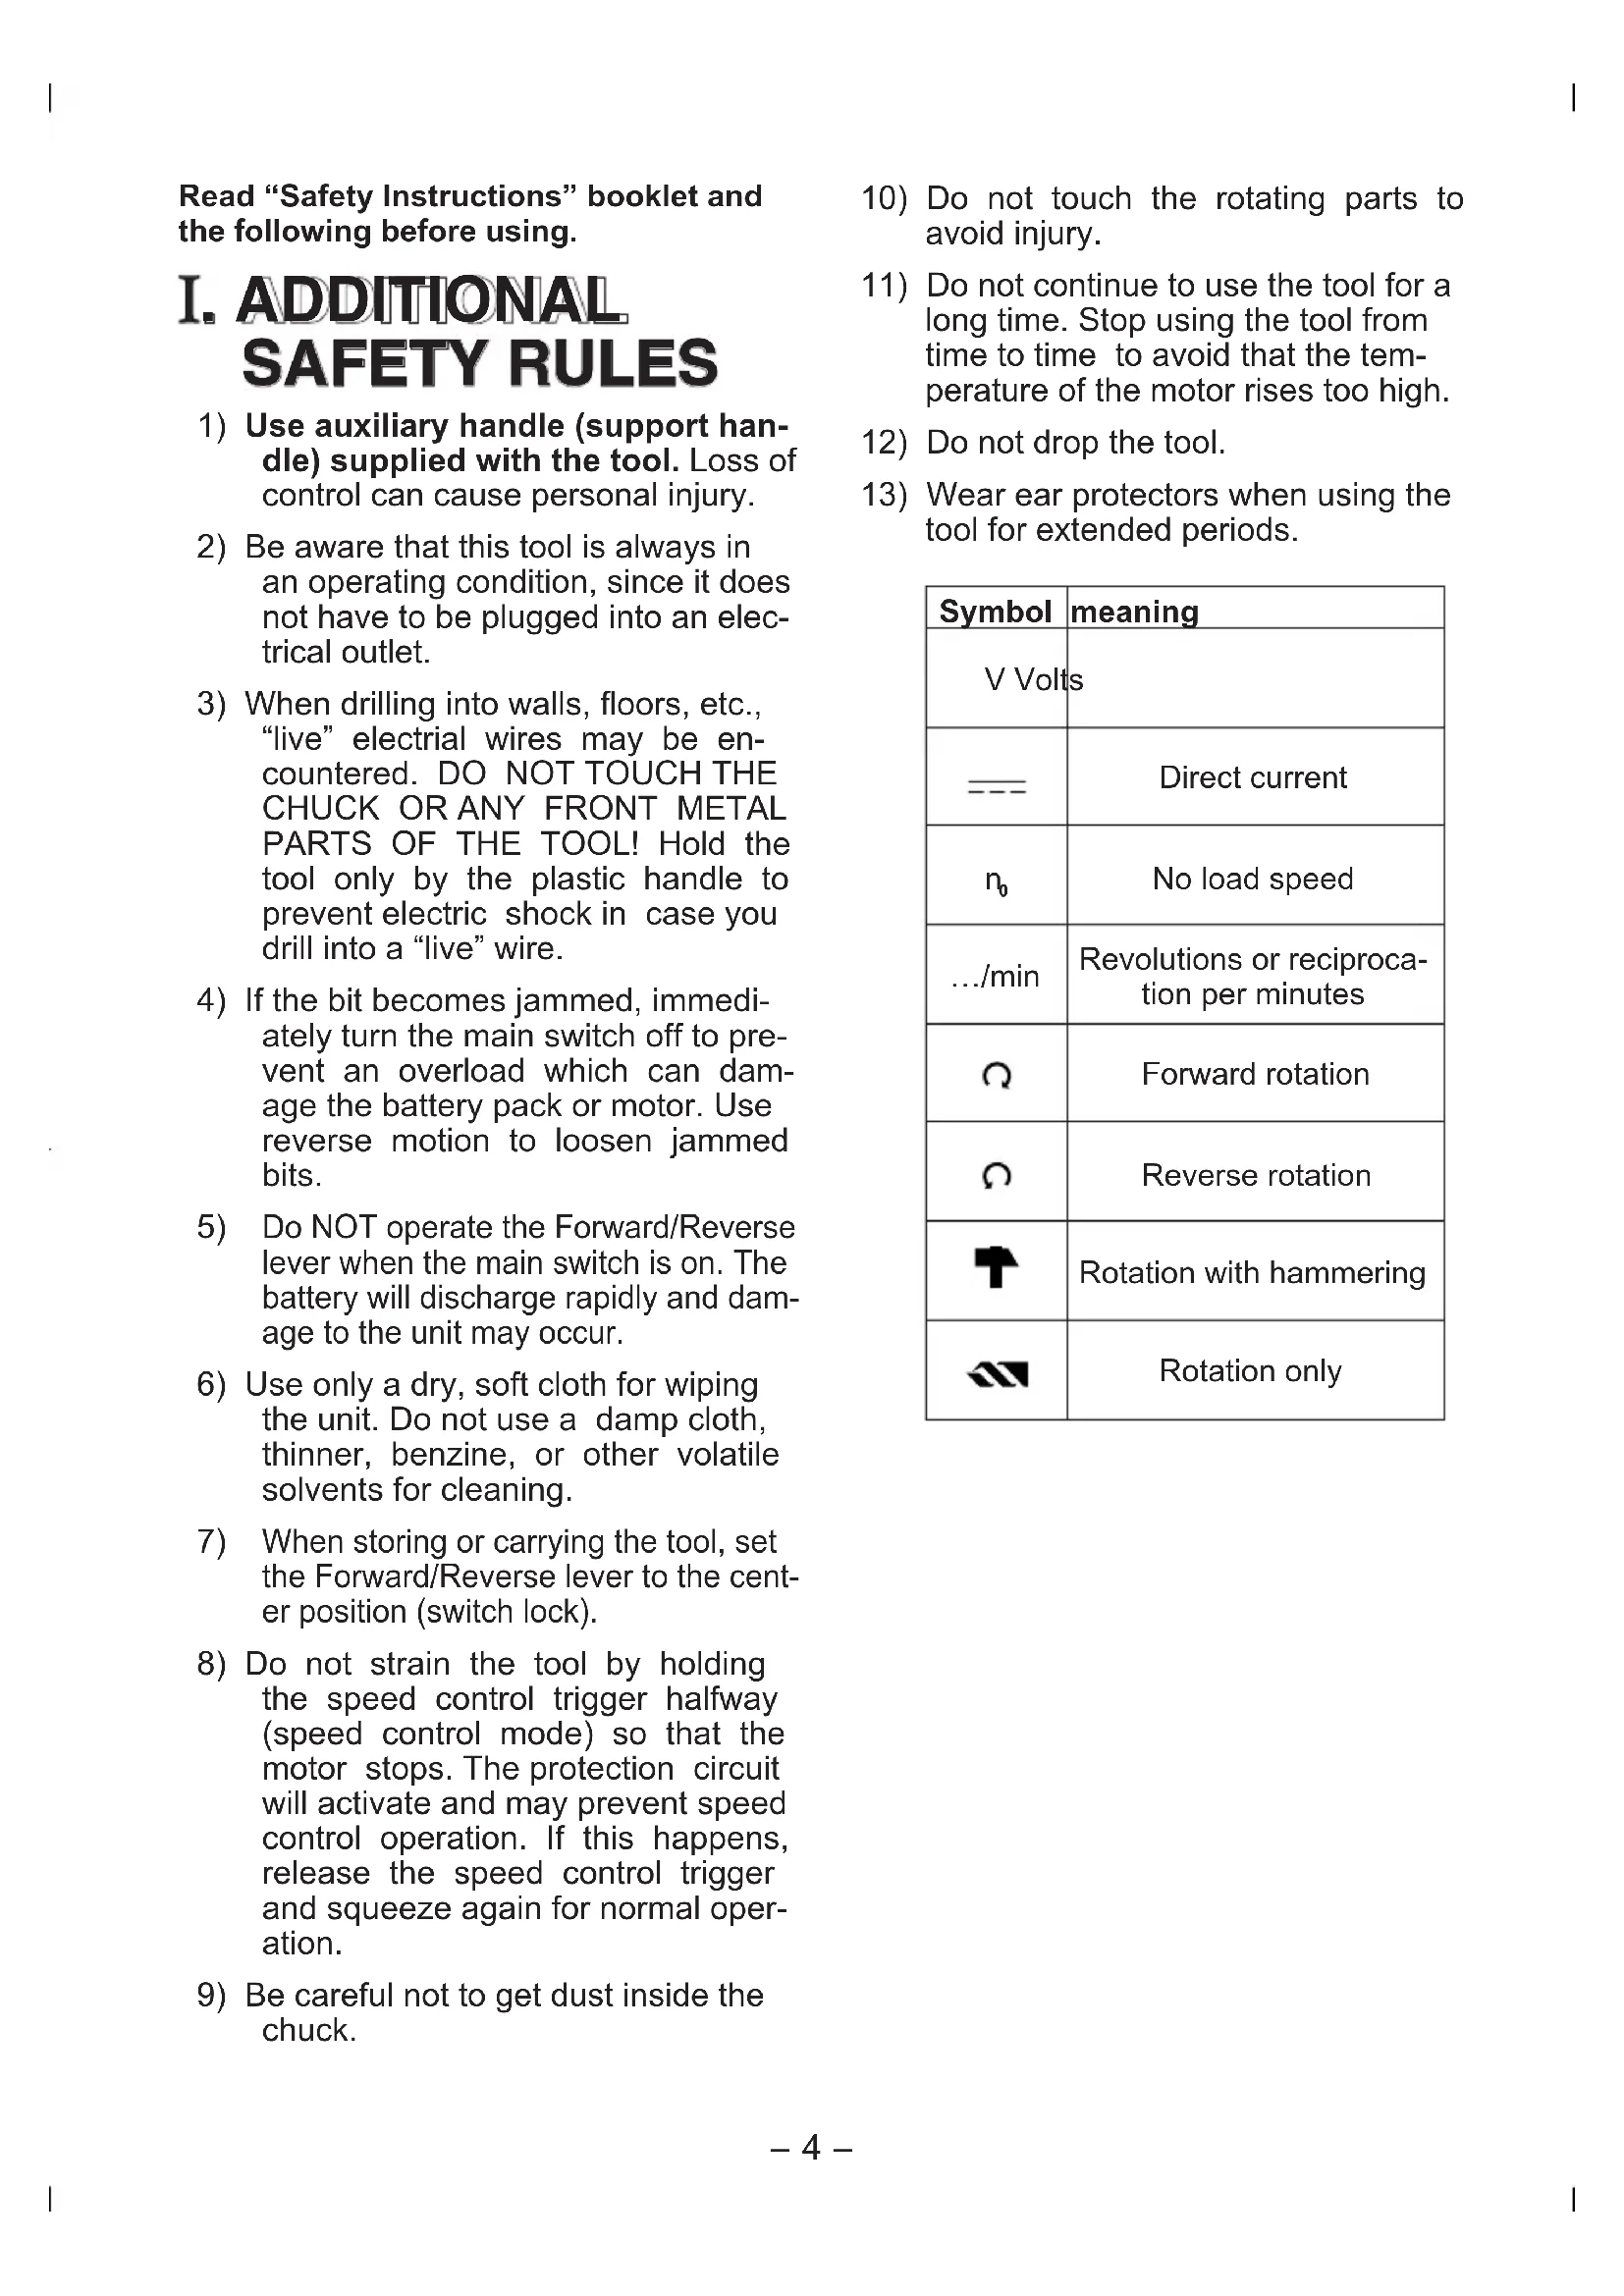
I. ADDITIONAL SAFETY RULES
1) Use auxiliary handle (support handle) supplied with the tool. Loss of control can cause personal injury.
2) Be aware that this tool is always in an operating condition, since it does not have to be plugged into an electrical outlet.
3) When drilling into walls, floors, etc., "live" electrical wires may be encountered. DO NOT TOUCH THE CHUCK OR ANY FRONT METAL PARTS OF THE TOOL! Hold the tool only by the plastic handle to prevent electric shock in case you drill into a "live" wire.
4) If the bit becomes jammed, immediately turn the main switch off to prevent an overload which can damage the battery pack or motor. Use reverse motion to loosen jammed bits.
5) Do NOT operate the Forward/Reverse lever when the main switch is on. The battery will discharge rapidly and damage to the unit may occur.
6) Use only a dry, soft cloth for wiping the unit. Do not use a damp cloth, thinner, benzine, or other volatile solvents for cleaning.
7) When storing or carrying the tool, set the Forward/Reverse lever to the center position (switch lock).
8) Do not strain the tool by holding the speed control trigger halfway (speed control mode) so that the motor stops. The protection circuit will activate and may prevent speed control operation. If this happens, release the speed control trigger and squeeze again for normal operation.
9) Be careful not to get dust inside the chuck.
10) Do not touch the rotating parts to avoid injury.
11) Do not continue to use the tool for a long time. Stop using the tool from time to time to avoid that the temperature of the motor rises too high.
12) Do not drop the tool.
13) Wear ear protectors when using the tool for extended periods.
| Symbol | meaning |
| V Volts | |
| --- | Direct current |
| n0 | No load speed |
| .../min | Revolutions or reciprocation per minutes |
| Ω | Forward rotation |
| ∅ | Reverse rotation |
| T | Rotation with hammering |
| ΔN | Rotation only |
II. OPERATION
Chuck … (A)
NOTE: Grease for bit Grease the oval indentation on the bit with the supplied grease at least once a month.
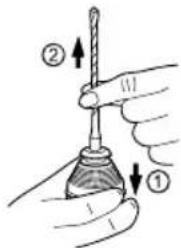
1. To mount the bit
1-1. Insert a bit into the mounting hole, and turn it slightly to locate an engaged position.
1-2. At the engaged position, push the bit as far as it goes. Make sure that the bit is fixed by pulling it.

2. To dismount the bit
2-1. Depress the chuck cover and pull the bit.
Foward/Reverse lever… (E)
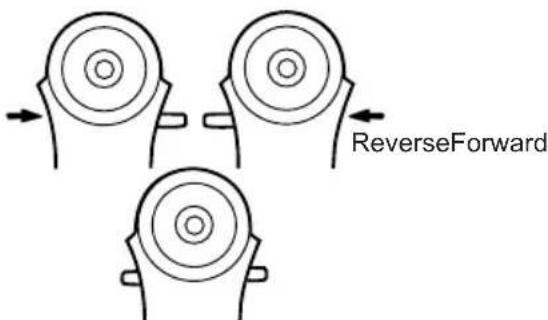
-
Be sure to set the switch in the center to lock it after use.
-
Operate the Forward/Reverse lever after the motor rotation is completely stopped.
Hammering/drilling switching lever ... (C)
Speed/Blow Mode selection lever ... (D)
- There are four modes available with the combination of Hammering/drilling switching lever and Speed/Blow Mode selection lever.
Select the suitable mode for application.
- Operate the mode change after the motor rotation is completely stopped.
| Position of switching lever | Speed/Blow Mode selection lever | Recommended application |
| (Rotation with hammering) | Hard blow hammering mode | This mode has hard blow hammering which is suitable for concrete drilling. •Concrete drill |
| Soft blow hammering mode | This mode is suitable for concrete drilling with smaller diameter drill, or for drilling into soft base material. •Small diameter concrete drill | |
| (Rotation only) | High speed drilling mode | This mode is suitable for metal drilling with high speed rotation. •Metal drill •Metal hole saw |
| Slow speed drilling mode | This mode is suitable for wood drill with high torque. •Wood drill |
Variable speed control trigger ... (F)
To set the center of a hole, pull the trigger slightly to start the drill rotation slowly.
Support handle ... (I)
Place the support handle at your favorite position and tighten the handle securely.
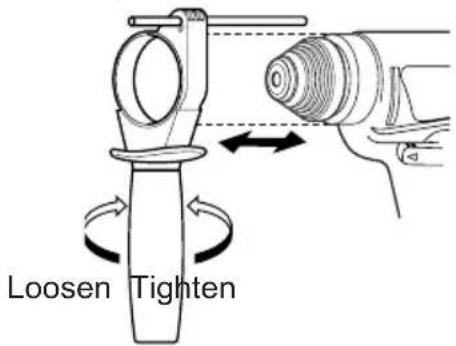
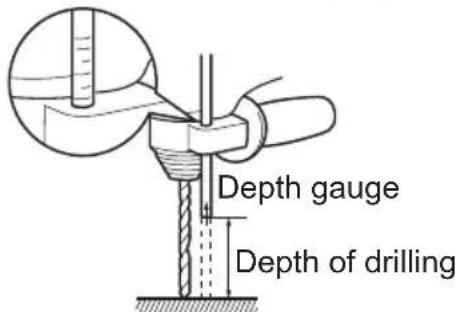
Depth gauge … (B)
Loosen the support handle and adjust the depth gauge at your favorite depth.
After adjusting, tighten the support handle and fix depth gauge.
Battery pack ... (H)
For Appropriate use of Battery Pack Ni-MH Battery pack EY9210
- Charge the battery pack fully before storage in order to ensure a longer service life.
-Ni-Cd Battery pack EY9116
-
Discharge the battery pack empty before storage in order to ensure a longer service life.
-
The ambient temperature range is between 0^ (32^) and 40^ (104^) . If the battery pack is used when the battery temperature is below 0^ (32^) , the tool may fail to function properly. In that case, charge the battery until charging is completed for appropriate functioning of the battery.
Battery pack life
The rechargeable batteries have a limited life. If operation time becomes extremely short after recharging, replace the battery pack with a new one.
NOTE: Use under extremely hot or cold conditions will reduce operating capacity per charge.
Battery Recycling
For environmental protection and recycling of materials, be sure that it is disposed of at an officially assigned location, if there is one in your country.
ATTENTION:
Ni-Cd Battery pack EY9116
This appliance contains Nickel-Cadmium. Battery must be recycled or disposed of properly.
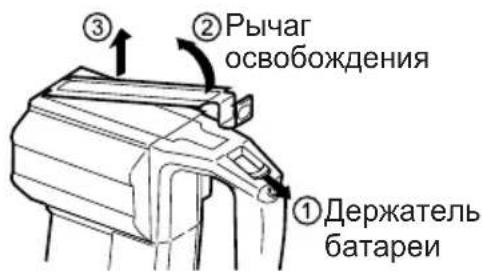
Release lever … (G)
- Battery pack Installation and Removal
-For removal
Pull the release lever to free the battery holder.
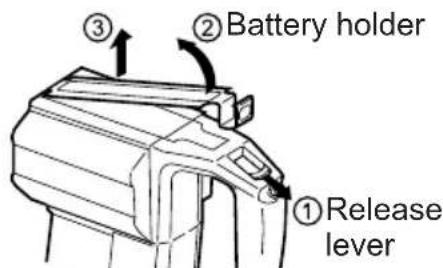
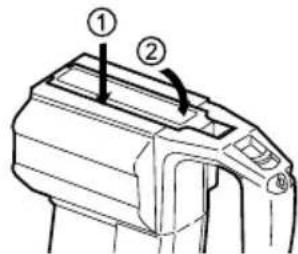
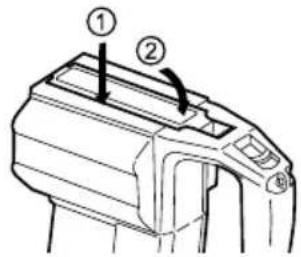
-For installation
Fit the battery holder unit it clicks in position.
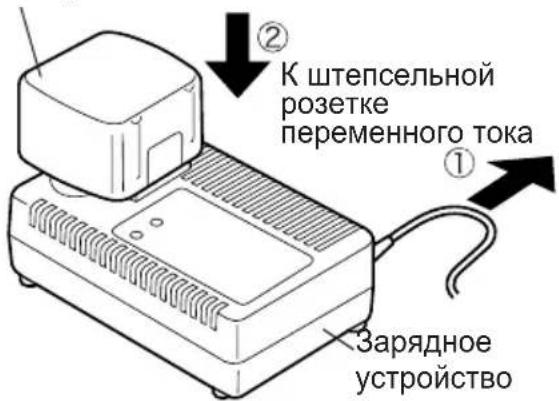
Battery charger… (J)
NOTE: Charge a new battery pack, or a battery pack that has not been used for a prolonged time, for about 24 hours to bring the battery up to full charge.
- Plug the charger into an AC outlet.
- Insert the battery pack firmly into the charger.
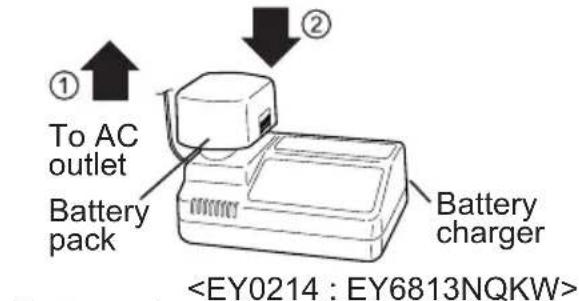
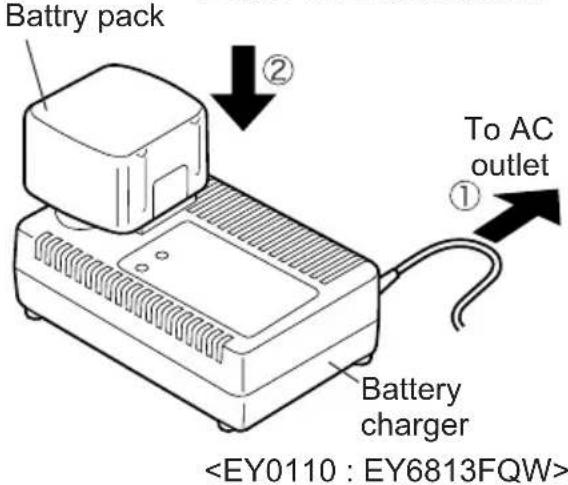
- During charging, the charging lamp will light up.
When the charge is completed, an internal electronic switch will automatically be triggered to prevent overcharging.
-
Charging will not occur if the battery pack is warm (for example, immediately after heavy-duty operation). The orange standby lamp will light up until the battery becomes cool. Charging will then begin automatically.
-
When charging is completed, the charging lamp will start flashing quickly.
-
When the battery pack has not been used for a long time, the charging lamp starts flashing slowly to indicate protective charging. Protective charging takes longer to fully charge the battery pack, than the standard charging time. (Max. charging time is approx. 90 minutes.)
-
If a fully charged battery pack is inserted into the charger again, the charging lamp may light up. After several minutes, the charging lamp may flash quickly to indicate the charging is completed.
-
If the charging lamp does not light immediately after the charger is plugged in, or if after the standard charging time the lamp does not go off, consult an authorized dealer.
NOTE: When a cold battery (of about 5^ (41^) or less) is to be charged in a warm room, leave the battery in the room for at least one hour and charge it when it has warmed up to room temperature. (Failing to do so may result in less than a full charge.)
Cool down the charger when charging more than two batterypacks consecutively.
Do not insert your fingers in- to contact hole, when holding charger or any other occasions.
CAUTION: Do not use power source from an engine generator.
- Do not cover vent holes on the charger and the battery pack.
- Unplug the charger when not in use.
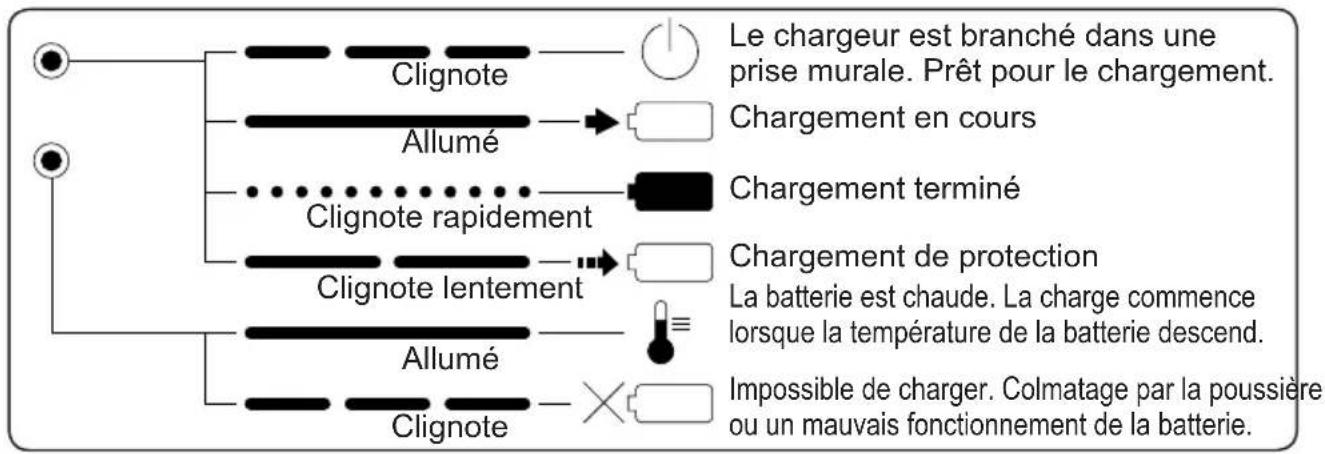
LAMP INDICATIONS
EY0214: EY6813NQKW
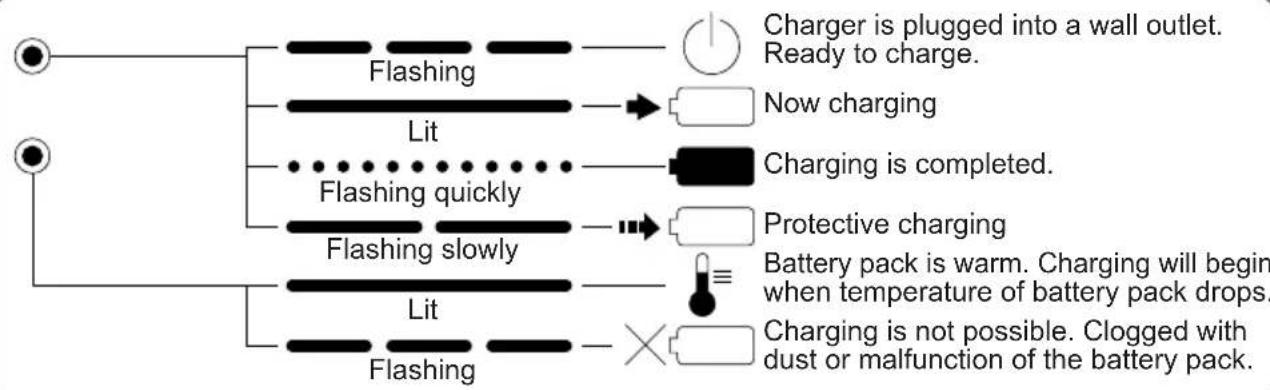
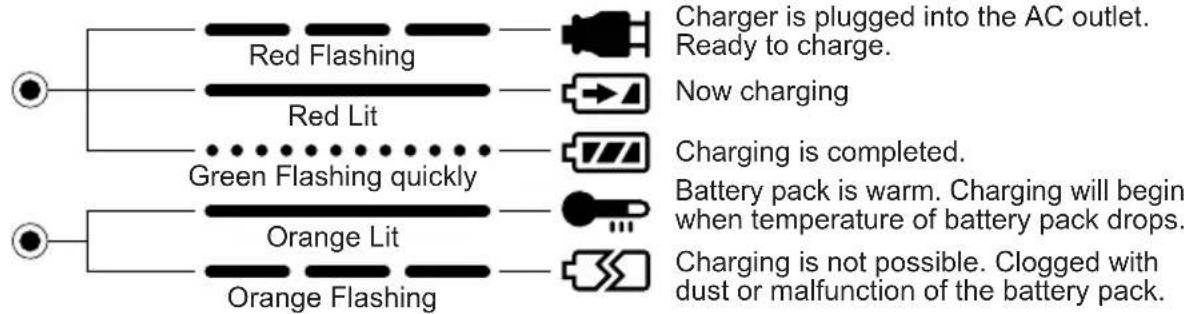
EY0110: EY6813FQW
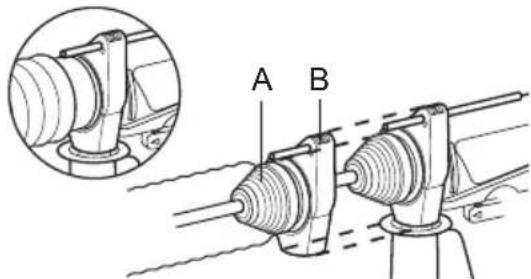
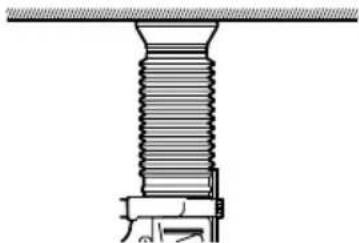
Dust Collection Cup (EY9X004) ... (L)
- Drill bits of which diameter is 20 mm above cannot be inserted through dust collection cup.
-
Do not use the tool for cutting other than concrete, mortar and other ceramic materials. If used for cutting metal materials, the dust collection cup may be damaged by the metal chip heat.
-
Install a drill bit.
- Pass the drill bit through A and fix the cup at B by matching with the shape of the support handle.
Operation
Keep the dust collection cup in close contact with the wall surface during operation.
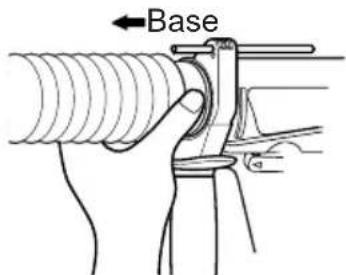
Removal
Hold the base of the dust collection cup for removal.
Please remove after thoroughly getting rid of the dust in the dust collection cup.
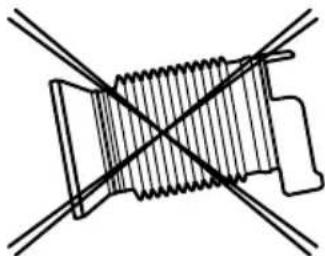
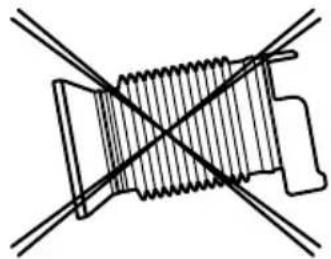
Storage
Do not store the dust collection cup in a compressed position. If kept in a compressed position, it may be impossible to return to the original shape.
III. MAINTENANCE
Use only a dry, soft cloth for wiping the unit. Do not use a damp cloth, thinner, benzine, or other volatile solvents for cleaning.
IV. ACCESSORIES
| Optional attachment | Can be used in: | ||
| Hammer- ing mode | Drilling mode | ||
| Drill chuck EY9HX400E | No Yes | dia.1.5mm 13mm (1/16 ~1/2") Wood drill Metal drill ※Don't in hammering mode. | |
| Hammer chuck EY9HX401E | Yes Yes | dia.2.5mm 13mm (3/32 ~1/2") Masonry drill bit with straight shank (for bricks, mortar, cinder block, Aired Light Concrete drilling only) Wood drill Metalwork drill | |
| Chiseling attachment EY9HX402E | Yes No | Light weight chiseling. •Peeling off tiles •Making ditch for plumbing •Basement trimming | |
V. USAGE SUGGESTION
- If there isn't enough force pushing down on the bit, the hammer may not be able to blow in hammering mode.
This is to prevent the hammering mode from operating with no load. Press down harder on the bit to engage the hammer and cause it to blow.
Always be sure to press down with enough force when working.
- In winter or in other situations where the temperature of the unit is low (5°C or below), the blow of the hammering mode may be weaker than normal at the beginning stage.
This is because the grease becomes stiffer in low temperatures, increasing friction.
If this should happen, operating hammering mode with no load for approximately 30 seconds and repeat this 3 times. This will restore its blowing power.
VI. SPECIFICATIONS
Main Unit (EY6813)
| Maximum Drilling Diameter | Concrete | 20mm (25/32") |
| Steel | 13mm (33/64") | |
| Wood | 27mm (1-1/16") | |
| Motor Voltage DC Motor 24V | ||
| Speed At No Load (RPM) | Slow Mode 0 520 /min (rpm) | |
| High Mode 0 950 /min (rpm) | ||
| Blows Rate Per Minute (BPM) | Soft Mode | 0-3100 /min (bpm) |
| Hard Mode 0 4600 /min (bpm) | ||
| Weight (with battery pack) | 4.35 kg (9.6 lbs) EY6813NQKW / 4.2 kg (9.3 lbs) EY6813FQW | |
| Dimensions (L×W×H) | 316×206×74 mm(12-28/64"×8-7/64"×2-58/64") | |
Battery Pack
| Battery included | EY9210 : (EY6813NQKW) Ni-MH Battery | EY9116 : (EY6813FQW) Ni-Cd Battery |
| Voltage | 24 V DC (1.2 V × 20 cells) | |
Battery Charger
| Model EY0214 : EY6813NQKW | |||||||
| Electrical rating See the rating plate on the bottom of the charger. | |||||||
| Weight 0.97 kg | , (2.14 lbs.) | ||||||
| Charging time | 7.2V 9.6 | V 12V 15.6V | 18V 24V | ||||
| 1.2Ah | EY9065 | EY9080 | EY9001 | ||||
| EY9066 | EY9086 | EY9006 | |||||
| 20min. | |||||||
| 1.7Ah | EY9180 | EY9101 | |||||
| EY9182 | 25min. | ||||||
| 2.0Ah | EY9168 | 30min. 30min. | EY9106 | EY9136 | EY9116 | ||
| 30min. 30min. | 30min. 30min. | EY9107 | EY9117 | ||||
| 3.0Ah | EY9200 | EY9230 | EY9210 | ||||
| 45min. 45min | |||||||
| 3.5Ah | EY9201 | EY9231 | |||||
| 55min. | |||||||
| Model EY0110 : EY6813FQW | |||||||
| Electrical rating See the rating plate on the bottom of the charger. | |||||||
| Weight 0.78 kg | , (1.72 lbs.) | ||||||
| Charging time | 7.2V 9.6 | V 12V 15.6V | 18V 24V | ||||
| 1.2Ah | EY9065 | EY9080 | EY9001 | ||||
| EY9066 | EY9086 | EY 9006 | |||||
| 20min. | |||||||
| 1.7Ah | EY9180 | EY9101 | |||||
| EY9182 | 25min. | ||||||
| 2.0Ah | EY9168 | 30min. 30min. | EY9106 36 | EY9116 | |||
| 30min. 30min. | 30min. 60min. | EY9117 | |||||
| 3.0Ah | EY9200 | EY9230 | EY9210 | ||||
| 45min. 90min | |||||||
| 3.5Ah | EY9201 | EY9231 | EY9251 | ||||
| 55min. 65min | |||||||
NOTE: This chart may include models that are not available in your area.
Please refer to the catalogue.
Charging time: Approximate one full charging time. May be different on battery pack condition.
ONLY FOR U.K.
VII. ELECTRICAL PLUG INFORMATION
FOR YOUR SAFETY PLEASE READ THE FOLLOWING TEXT CAREFULLY
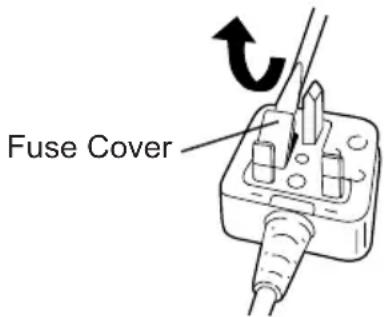
This appliance is supplied with a moulded three pin mains plug for your safety and convenience.
A 3 amp fuse is fitted in this plug.
Should the fuse need to be replaced please ensure that the replacement fuse has a rating of 3 amp and that it is approved by ASTA or BSI to BS1362.
Check for the ASTA mark or the BSI mark on the body of the fuse.
If the plug contains a removable fuse cover you must ensure that it is refitted when the fuse is replaced.
If you lose the fuse cover the plug must not be used until a replacement cover is obtained.
A replacement fuse cover can be purchased from your local Panasonic Dealer.
IF THE FITTED MOULDED PLUG IS UN-SUITABLE FOR THE SOCKET OUTLET IN YOUR HOME THEN THE FUSE SHOULD BE REMOVED AND THE PLUG CUT OFF AND DISPOSED OF SAFELY.
THERE IS A DANGER OF SEVERE ELECTRICAL SHOCK IF THE CUT OFF PLUG IS INSERTED INTO ANY 13 AMP SOCKET.
If a new plug is to be fitted please observe the wiring code as shown below.
If in any doubt please consult a qualified electrician.
IMPORTANT: The wires in this mains lead are coloured in accordance with the following code:
Blue:Neutral
Brown:Live
As the colours of the wire in the mains lead of this appliance may not correspond with the coloured markings identifying the terminals in your plug, proceed as follows.
The wire which is coloured BLUE must be connected to the terminal in the plug which is marked with the letter N or coloured BLACK.
The wire which is coloured BROWN must be connected to the terminal in the plug which is marked with the letter L or coloured RED.
Under no circumstances should either of these wires be connected to the earth terminal of the three pin plug, marked with the letter E or the Earth Symbol 1一
How to replace the fuse: Open the fuse compartment with a screwdriver and replace the fuse and fuse cover if it is removable.
This apparatus was produced to BS800.
—MEMO —
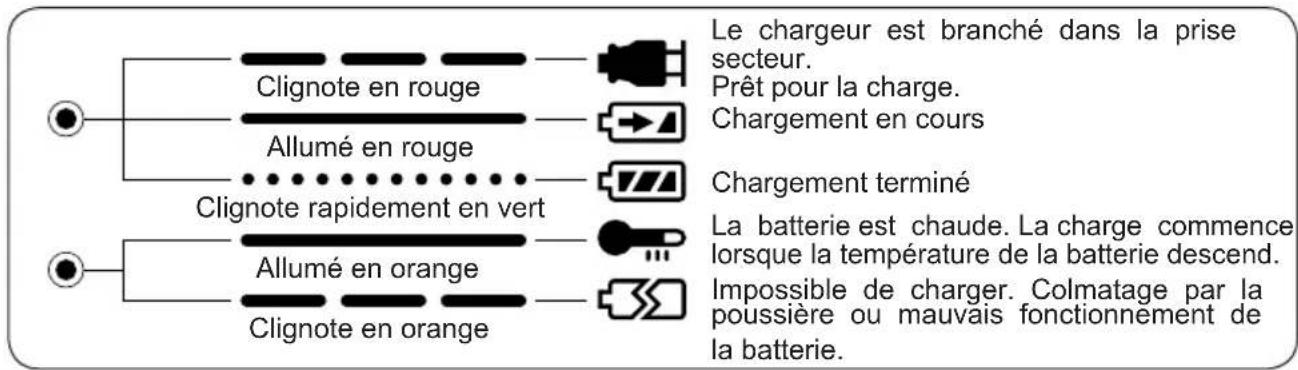
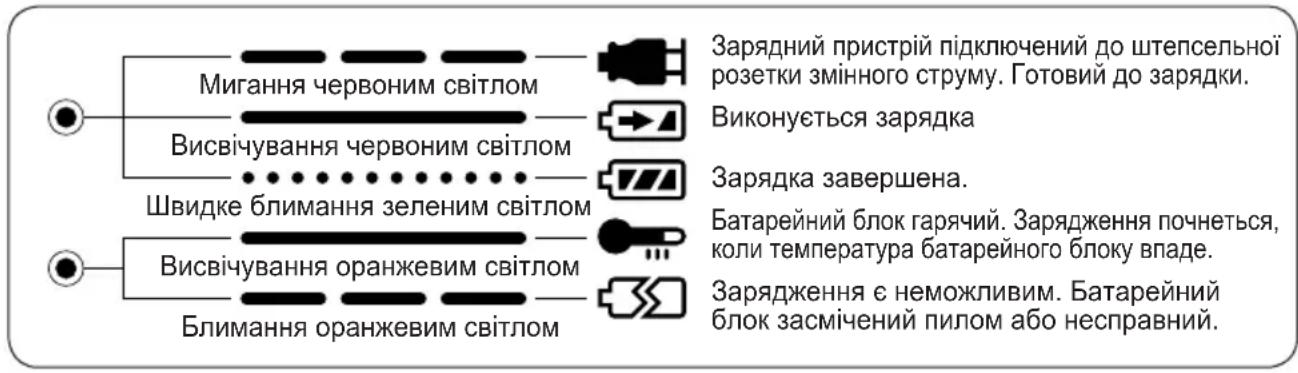
INDICATIONS DU TEMOIN
EY0214: EY6813NQKW
EY0110: EY6813FQW
Pa6oTaIe c pbIyarom nepeKIOUeHnBpePHa3aI NOcJIe TORO, KaB BpaUeHMeMOTopa NOnHOCTbIO OCTaHOBNTcR.
Pbivar nepekIIOUeHnA DOJIeHnA/ CBepJeHnA· (C)
PbIur Bbl6opa ckopoctn/ydapa ... (D)
1.Bo3moXhbl ueTbipe pexnma npin cooyehnn BapnaHTOB nepeKIOueHnepyura nepeKIOueHn DOJ6IeHn/CBepHeHn n pbuara BbIbopa ckopoctn/ydapa.
BbIbepnte COOTBeTCTByIOuI npKIM IINr npIMHeHn.
Cpok cnjx6bl 6aTapeHoro 6Joka
AkkymyIaTOPbIe 6aTapeu IMeOT
OrpaHnueHHbI CpOK CnyX6bl. EcJIi
NoCne NOBTOPOH OAPdKN BpeMg
fYHKUHOHPOBaHNA CTaHOBNTcA Ype3MePHO
KOpOTKIM, 3aMeHInTe 6aTapeHbI 6JIOK Ha HOBbI.
PIMMEUHNE: cNoIb3OBAHne npu OueHb XapKnx NnXoIOndbIX ycNOBnX COKpaUaet BpeMa pa60tHa OdHoi 3apJKe.
Ipepepa6oTka 6aTapei
Для 3auntbl Okpykaiouec cpebln
pepepaotkn MaTeepnaIOB, y6eNTecb, yTO yTnIIN3auny BblONHReTCB OoNuaJIbHO npHrTOM MeCTe, ecNI TaKoe IMeETcB BaWeJ cTpaHe.
BHIMAHNE:
HnkeIb-kaMneBbI 6aTapeHbI 6JOK EY9116
JaHHoe yCTpoIcTBO cOepeXHT HKeJIb n KaAMn. BaTapeJdoJxHa 6bITb nepepa6oTaHa nn yTuIN3nPoBaHa DOJXHbIM o6pa3OM.
Pbivar ocbo6xdeHna… (G)
- YctaHOBka n cHrTne 6aTapeHoro 6noka
-ДЯСЯТЯ
IOTAHHTe pbUar ocBOOxKeHnA, UTObI OCBOOAnTb DePxAteJIb 6aTapeN.
-ДЯ yCTaHOBKN
YctahOBHTe DepxKaTeIb 6aTapeu, YTO6bl OH 3aueJIKNHJyNcHa MeCTe.
3apdHoe yctpoCTBO… (J)
ПРИМЕЧАНЕ:
3apjkaTe HOBbl
6aTapeHbI 6nOK
mN 6aTapeHbI
6nOK, KOTOpbI He
HCNoB3OBaNCB
TEueHne DInTeJbHOrO
BpeMeHN, B TeueHne
24 YacOB, YTO6bl
doBeCTn 6aTapeo Do
PONHO 3apdKn.
- Bкнючite 3apяДhoe yctpoIcTBO B ШтencelьHyIO pO3eTKyпepemeHHoro TOKa.
2.ПNotHO BCTaBbTe 6aTapeHbI 6JOK B 3apArdHoe yCTPOINCTBO.

Батуарейский 6лok
3.BoBpeMa 3apAdkn6ydet ropeTb lamnoUka 3apAdkn.
Iocne 3aBepseHn 3apdKn aBTOMaTnueckn cpa6oTaet BHyTpehnn 3JIeKTPoHHbI nepeKIOuHaTeJb, IpeDoTbpaUaaype3MepHyU 3apdKy.
3apraKa He 6yTeI npOn3BOuNTbcra, ecn6batapeHbI 6nok cInuKOM ropaHn (HaNPmep, HENOCpeDCTBeHHO nocLe cyHKUHOHPOBaHna Pn 6oNbwo Harpy3Ke). OpaHxVeBaJ lamnoUka pexima OxuaHna 6yTe T ropetb Do Tex nop, noka 6batape He octbHeT. 3aTeM 3apraKa HaHETcra ABTOmatueckn.
He xpaHnte nbIeScbOpHNB CxkATOM noIOXeHN. Ecnn DepxKaTb ee B CxkATOM noIOXeHN, MoXeT 6bITb HeBO3MOxHO BepHyTb en nepBOHaaybHyO fOpMy.
III. OBCJIyXINBAHNE
ДляnpotnapaHЯ yctpoiCTBa nCNoJIb3yIte cyxuO MmRkyIO TkaHb. He nCnoJIb3yIte dIЯ OUHCTKN BnaxHyIO TkaHb, pa36aBnteJIb, 6eH3HHnn npOChne JTeTyHne pactBopHTeJI.
IV. ПИHAДПЕХHOCTN
OCHOBHOE YCTPOICTBO (EY6813)
do ynoBHOBaKeHoro cepBicHoro UeHTpy.
PNUMTKA:
-Якwo xoJODHa 6atapea (3 TemnepaTpoI npi6Iu3Ho 5°C (41°F) uM MeHoo) 3apAJaCTbC8 B TeNJI KIMHaTI, 3aIIu7e 6atapeoB KimHaTI npHaHMIHa OOnHy rOdy Hpy i 3apAITb II Nicra TORO, k BOHa HarpieTbC8 Do KimHaTHoi TemnepaTpyn. (JaKuo zuBoro He 3pO6ntn, ue MoKe Ipn3BeCTn Do MeHoo3apAKn, HIX NOBHa 3apAdka.)
- Oxonoditb 3apdHn npucpti npn nocjIOBHi 3apdci 6Inbwe hix dBox 6atapeHnx 6IokIB.
He BCTaBnIte BaSi nalbci B KOHTaKTHi OTbOpN, KOnn Bn TpImaete 3apdHn npucTpi, a TaKoX B iHux BnnaKax.
YBARA:
He BnKOpNCToBvIe B JKOCTi DKepeNa KInBneHnReHepaTop DBNrHa.
He 6IokyIte BeHTnJIaIHi OTBOpH a3apAnHomy npncTpoi Ta Ha 6atapeHOMy 6loci.
BidKlHcyTb 3apAHH npucTpiB iD MepeXi, kUO Bin He BnKOpNCTOByEc.
CBITJIOBI INDINKATOPN
EY0214: EY6813NQKW
EY0110:EY6813FQW
III. OBCJNYTOBYAHHRA
ДляnpOTnupaHн npICtpoB BnKOpNCTOBynte cyxMykTkaHnHy.He BnKOpNCTOBynte nOuIeHHBOJORYTKaHnHy,pO3piKdYBaU, 6eH3nAboIniJIeTyU pO3UnHHNKn.
IV.ПРИДДЯ
Matsushita Electric Works, Ltd.
Osaka, Japan