
EY7430LA2S - Drill PANASONIC - Free user manual and instructions
Find the device manual for free EY7430LA2S PANASONIC in PDF.


| Product type | Cordless drill driver |
| Brand | Panasonic |
| Model | EY7430LA2S |
| Power supply | 14.4 V lithium-ion battery |
| Chuck type | Keyless chuck |
| Drilling capacity (steel) | 10 mm |
| Drilling capacity (wood) | 25 mm |
| No-load speed | 0 - 550 rpm (1st speed) 0 - 1800 rpm (2nd speed) |
| Max torque | 30 Nm |
| Number of speeds | 2 |
| Rotation direction | Reversible right/left |
| Motor brake | Yes |
| Spindle lock | Yes |
| Weight (with battery) | 1.7 kg |
| Dimensions (L x W x H) | 230 x 65 x 210 mm |
| Battery included | Yes (2 batteries) |
| Charger included | Yes |
| LED light | Yes |
| Sound level | 72 dB(A) |
| Maintenance and cleaning | Regularly dust the ventilation slots with a brush or dry cloth. Clean the keyless chuck periodically. |
| Safety | Trigger lock device, overload protection, automatic shutdown in case of jamming. |
| Spare parts and repairability | Batteries, charger, chuck, carbon brushes available. Repairability index: 7.8/10. |
| Warranty | 2 years |
Frequently Asked Questions - EY7430LA2S PANASONIC
User questions about EY7430LA2S PANASONIC
0 question about this device. Answer the ones you know or ask your own.
Ask a new question about this device
Download the instructions for your Drill in PDF format for free! Find your manual EY7430LA2S - PANASONIC and take your electronic device back in hand. On this page are published all the documents necessary for the use of your device. EY7430LA2S by PANASONIC.
USER MANUAL EY7430LA2S PANASONIC
natural_image
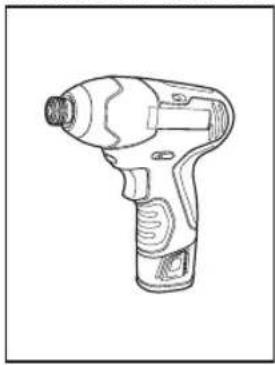
Line drawing of a handheld electric drill (no text or symbols)Cordless Impact Driver Akku-Schlagschrauber Perceuse à impact sans fil Avvitatore ad impulsi senza fili Snoerloze slagschroevendraaier Destornillador de impacto inalámbrico Akku-slagboremaskine Sladdlös slagskruvdragare Trådlös slagbormaskin Langaton iskuruuviavain Kablosuz Darbe Sürücü
Model No: EY7530
natural_image
Line drawing of a handheld electric drill (no text or symbols)LED Flashlight LED-Taschenlampe Lampe-torche DEL Torcia elettrica LED LED-zaklantaarn Linterna eléctrica LED LED-lygte LED-ficklampa LED-lommelykt LED-taskulamppu LED El Feneri
Model No: EY3732

natural_image
Line drawing of a handheld device with a square lens and handle (no text or symbols)Battery charger Ladegerät Chargeur de batterie Caricabatterie Acculader Cargador de batería Batterioplader Batteriladdare Batterilader Akkulaturi Pil şarj cihazı
Model No: EY0L32

natural_image
Line drawing of a mechanical housing component (no text or symbols)Before operating this unit, please read these instructions completely and save this manual for future use. Vor Inbetriebnahme des Gerätes die Betriebsanleitung bitte gründlich durchlesen und diese Broschüre zum späteren Nachschlagen sorgfältig aufbewahren. Lire entièrement les instructions suivantes avant de faire fonctionner l'appareil et conserver ce mode d'emploi à des fins de consultation ultérieure. Prima di usare questa unità, leggere completamente queste istruzioni e conservare il manuale per usi futuri. Lees deze gebruiksaanwijzing aandachtig door voor u het apparaat in gebruik neemt en bewaar de gebruiksaanwijzing voor eventuele naslag. Antes de usar este aparato por primera vez, lea todas las instrucciones de este manual y guarde el manual para poderlo consultar en el futuro. Gennemlæs denne betjeningsvejledning før brugen og gem den til fremtidig brug. Läs igenom hela bruksanvisningen innan verktyget tas i bruk. Spara bruksanvisningen för senare användning. Før enheten tas i bruk, vennligst les disse alle anvisningene og oppbevar deretter bruksanvisningen for senere bruk. Lue ohjeet huolella ennen laitteen käyttöönottoa ja säilytä tämä käyttöohje tallessa tulevaa tarvetta varten. Bu cihazı çalıştırmadan önce lütfen bu talimatları dikkatli bir şekilde okuyun ve bu kılavuzu gelecekte kullanmak üzere saklayın.
Index/Index/Index/Indice/Index/Indice/Indeks/Index/Indeks/Hakemisto/Dizin
English: Page 8
Deutsch: Seite 26
Français: Page 43
Italiano: Pagina 60
Model No: EY7530

Model No: EY3732

Model No: EY0L32

natural_image
Technical line drawing of a mechanical housing component (no text or symbols)Model No: EY7430
| (A) | Keyless drill chuckSchlüsselfreies BohrfutterMandrin porte-foret sans filMandrino autoserranteBoorkop zonder sleutelMandril sin llaveNøglefri borepatronNyckellös borrchuckNøkkelfri drillchuckAvaimeton poran kiinnityslaiteAnahtarsız matkap kovanı | (B) | Clutch handleKupplungsringPoignée de l'embrayageImpugnatura frizioneKoppelingshandgreepMango de embragueKoblinghåndtagKopplingshandtagKoblingshåndtakKytkimen kahvaKavrama kolu |
| (C) | Speed selector switchBereichsschalterInterrupteur de sélection de vitesseRegolatore di velocitàSnelheidskeuzeschakelaarInterruptor selector de velocidadHastighedsvælgerHastighetsomkopplareHastighetskontrollNopeuden valintakytkinHız seçimi anahtarı | (D) | Battery level indicatorAkkustandanzeigeIndicateur de niveau de la batterieIndicatore di livello della batteriaIndicator van batterijniveauIndicador del nivel de la bateríaIndikator for batteriniveauBatterinivåindikatorIndikator för batterinivåAkun lataustason osoitinBatarya düzeyi göstergesi |
| (E) | Forward/Reverse leverRechts/Linkslauf SchalterLevier d'inversion marche avant-marche arrièreLeva di avanzamento/inversioneVoorwaarts/achterwaarts-hendelPalanca de avance/inversiónGreb til forlæns/baglæns retningRiktningsomkopplareForover/Revers bryterEteenpäin/taaksepäin vipuIleri/Geri kolu | (F) | Battery packAkkuBatterie autonomePacco batteriaAccuBateríaBatteripakningBatteriBatteripakkeAkkuPil takımı |
| (G) | Battery pack release buttonAkku-EntriegelungsknopfBouton de libération de batterie autonomeTasto di rilascio pacco batteriaAccu-ontgrendeltoetsBotón de liberación de bateríaUdløserknap til batteripakningFrigöringsknapp för batteriUtløserknapp for batteripakkeAkkupaketin irrotuspainikePil takımı serbest bırakma düğmesi | (H) | Variable speed control triggerBetriebsschalterGâchette de commande de vitesseGrilletto di controllo velocità variableStartschakelaar variabele snelheidDisparador del control de velocided variableKontroludlöser for variabel hastighedSteglös varvtalsreglerareHovedbryter, trinnløsNopeudensäätökytkinDeğişken hızlı kumanda tetikleyici |
| (I) | LED lightLED-LeuchteLumière DELLuce LEDLED-lampjeLuz indicadoraLED-lysLED-ljusLED-lysLED-valoLED ışığı | ||
Model No: EY7530
| (A) | 6.35 mm hex quick connect chuck6,35 mm Sechskant-SchnellaufspannfutterMandrin de connexion rapide hexagonal de 6,35 mmMandrino esagonale di collegamento rapido da 6,35 mm6,35 mm zeskantboorkop met snelkoppelingMandril hexagonal de conexión rápida de 6,35 mm6,35 mm hexagonal borepatron til hurtig tilslutningSnabbchuck med 6,35 mm sexkantshylsa6,35 mm hex hurtigtilkoplingschuck6,35 mm kuusiopikaistukka6,35 mm altigen hızlı bağlantı aynası | (B) | LED lightLED-LeuchteLumière DELLuce LEDLED-lampjeLuz indicadoraLED-lysLED-IjusLED-lysLED-valoLED ışığı |
| (C) | Variable speed control triggerBetriebsschalterGâchette de commande de vitesseGrilletto di controllo velocità variableStartschakelaar variabele snelheidDisparador del control de velocided variableKontroludlöser for variabel hastighedSteglös varvtalsreglerareHovedbryter, trinnløsNopeudensäätökytkinDeğişken hızlı kumanda tetikleyici | (D) | Battery pack release buttonAkku-EntriegelungsknopfBouton de libération de batterie autonomeTasto di rilascio pacco batteriaAccu-ontgrendeltoetsBotón de liberación de bateríaUdløserknap til batteripakningFrigöringsknapp för batteriUtløserknapp for batteripakkeAkkupaketin irrotuspainikePil takımı serbest bırakma düğmesi |
| (E) | Battery packAkkuBatterie autonomePacco batteriaAccuBateríaBatteripakningBatteriBatteripakkeAkkuPil takımı | (F) | Forward/Reverse leverRechts/Linkslauf SchalterLevier d'inversion marche avant-marche arrièreLeva di avanzamento/inversioneVoorwaarts/achterwaarts-hendelPalanca de avance/inversiónGreb til forlæns/baglæns retningRiktningsomkopplareForover/Revers bryterEteenpäin/taaksepäin vipuİleri/Geri kolu |
Model No: EY3732
| (A) | LED lightLED-LeuchteLumière DELLuce LEDLED-lampjeLuz indicadoraLED-lysLED-ljusLED-lysLED-valoLED ışığı | (B) | Torch headLampenkopfTête de torcheTestina della torciaToortskopAntorcha para la cabezaBrænderhovedLyktehodeFicklampshuvudPoltinpääFener başı |
| (C) | SwitchSchalterGâchetteInterruttoreSchakelaarInterruptorKontaktBryterStrömbrytareKytkinAnahtar | ||
Model No: EY0L32
| (A) | Battery pack dockAkku-DockStation de recharge de la batterieDock pacco batteriaAccustationEstación para bateríaDock til batteripakningDokk til batteripakkeBatteridockningsstationAkun liitinPil takımı yuvası |
Model No: EY7430
【Fig.1】
natural_image
Diagram of a mechanical device with a tool and directional arrows indicating motion (no text or symbols)Lock collar
Knebelring
natural_image
Technical line drawing of a mechanical component with rotational arrows indicating motion (no text or symbols)Reverse
Links
Rotation en sens
inverse
Inversione
Links
Marcha atrás
Baglæns
Bakåt
Bakover
Taaksepäin
Geri
【Fig.2】
natural_image
Diagram of a drill bit with arrow indicating clockwise motion (no text or symbols)
【Fig.3】
①
②

【Fig.5】
Increase Torque
Drehmoment erhöhen
Augmenter couple
Aumentare la coppia
Koppel verhogen
Aumentar par
Original instructions: English Translation of the original instructions: Other languages Read the Safety Instructions booklet and the following before using.
I. ADDITIONAL SAFETY RULES
1) Wear ear protectors. Exposure to noise can cause hearing loss.
2) Hold power tools by insulated gripping surfaces when performing an operation where the cutting tool may contact hidden wiring; contact with a "live" wire will make exposed metal parts of the tool "live" and shock the operator.
3) Wear a dust mask, if the work causes dust.
4) Be aware that this tool is always in an operating condition, since it does not have to be plugged into an electrical outlet.
5) When drilling or driving into walls, floors, etc., "live" electrical wires may be encountered. DO NOT TOUCH THE CHUCK OR ANY FRONT METAL PARTS OF THE TOOL! Hold the tool only by the plastic handle to prevent electric shock in case you drill or drive into a "live" wire.
6) If the bit becomes jammed, immediately turn the trigger switch off to prevent an overload, which can damage the battery pack or motor. Use reverse motion to loosen jammed bits.
7) Do NOT operate the Forward/Reverse lever when the trigger switch is on. The battery will discharge rapidly and damage to the unit may occur.
8) During charging, the charger may become slightly warm. This is normal. Do NOT charge the battery for a long period.
9) When storing or carrying the tool, set the Forward/Reverse lever to the center position (switch lock).
10) Do not strain the tool by holding the speed control trigger halfway (speed control mode) so that the motor stops.
11) Do not operate the speed selector switch [1 (LOW)- 2 (HIGH)] while pulling on the speed control trigger. This can cause the rechargeable battery to wear quickly or damage the internal mechanism of the motor.
12) To prevent injury during use, hold the tool steady at all times and avoid waving it around.
13) Make certain that there are no hidden gas or water pipes, or electrical wires in the area where you will be working. Coming into contact with hidden pipes or wires could result in electric shock, or water or gas leaks.
14) Make sure to hold the object you are working on steady.
15) Ensure that the area where you will be working is well-lit.
16) Avoid unexpected starts by keeping your finger off the trigger switch while moving the tool, and making sure the tool is switched off before inserting the battery pack.
17) Be sure to remove adjusting keys and wrenches.
• Make certain that adjusting keys, wrenches, and other tools have been removed before turning the tool on.
18) Always stay focused and exercise caution during operation.
- When operating cordless tools, always remember the proper way to use them, pay attention to your surroundings, and exercise caution.
- Use common sense.
- Do not operate the tool when tired.
19) Check for damaged parts.
- Check thoroughly for damage to the protective cover and other parts before operating.
- Check to make sure the tool and all of its functions are working properly.
- Check the adjustment of all movable parts, and check all fixed parts to make sure they are fitted properly and free of damage. Check all parts of the tool for abnormal function.
20) When attempting to repair the protective cover or other parts, please follow the instructions in the user manual. In cases where there are no instructions in the manual, please take it back to the store to have it repaired.
- If the drill fails to start when the trigger switch is held down or fails to stop when the trigger switch is released, please remove the battery and stop using it.
21) If the tool gets exceptionally hot during use, please take it in for service and repair.
22) It is very important to take the tool back to the store for repairs. Someone without the proper knowledge and experience is not only unprepared to carry out repairs, there is also a risk that he or she will be injured.
23) To avoid potential injury, keep face and
hands away from the drill bit and any shavings.
24) Do not wear gloves when operating the tool, as they may get caught by the drill, leading to injury.
25) Battery terminals, screw shavings, and tool accessories such as drill bits will be very hot immediately after operation. Do not touch them as there is a risk of burning yourself.
| Symbol | Meaning |
| V | Volts |
| --- | Direct current |
| n_o | No load speed |
| ... min ^-1 | Revolutions or reciprocations per minutes |
| Ah | Electrical capacity of battery pack |
| ∪ | Forward rotation |
| ∪ | Reverse rotation |
| Rotation only | |
 | To reduce the risk of injury, user must read and understand instruction manual. |
 | For indoor use only. |
Model No: EY7430 & EY7530
II. ASSEMBLY
Attaching or Removing Bit for EY7430
NOTE:
When attaching or removing a bit, disconnect battery pack from tool or place Forward/Reverse lever in the center position (switch lock).
This tool is equipped with a keyless drill chuck.
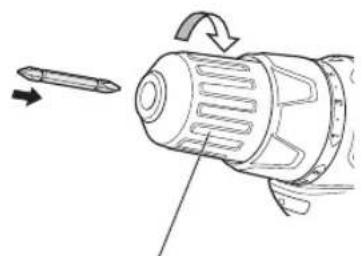
- Attachment 【Fig.1】
Insert the bit and turn the lock collar clockwise (looking from the front) to tighten firmly until it stops clicking.
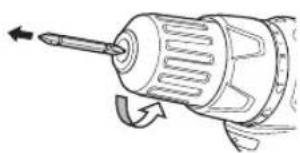
- Removal [Fig.2]
Turn the lock collar counterclockwise (looking from the front), then remove the bit.
NOTE:
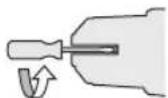
- If excessive play occurs in the chuck, secure the drill in place and ① open the chuck jaws by turning the lock collar and ② tighten the screw (left-handed screw) with a screwdriver by turning it counterclockwise (looking from the front). 【Fig.3】
- To ensure that the bit is held in place securely, fasten the keyless chuck tightly.
• Always keep drill bits sharp and in good condition. Working with dull or damaged drill bits can lead to injury
Attaching or Removing Bit for EY7530
NOTE:
When attaching or removing a bit, disconnect battery pack from tool or place Forward/Reverse lever in the center position (switch lock).
- Hold the collar of quick connect chuck and pull it out from the driver.
- Insert the bit into the chuck. Release the collar.
- The collar will return to its original position when it is released.
- Pull the bit to make sure it does not come out.
- To remove the bit, pull out the collar in the same way.
EN
CAUTION:
If the collar does not return to its original position or the bit comes out when pulled on, the bit has not been properly attached. Make sure the bit is properly attached before use.
Use 6.35 mm hexagonal bits.
To ensure proper securement of the bit, use only hexagonal bits with 9.5 mm detent.

Model No: EY7430 & EY7530
III. OPERATION
[Main Body]
CAUTION:
- When operating the tool by pulling the trigger, there may be a momentary lag before rotation starts. This does not signal a malfunction.
* This lag occurs as the tool's circuitry starts up when the trigger is pulled for the first time after installing a new battery pack or after the tool has not been used for at least 1 minute. Rotation will start without any lag during second and subsequent operations. - To prevent excessive temperature increase of the tool surface, do not operate the tool continuously using two or more battery packs. The tool needs cool-off time before switching to another pack.
- Do not close up vent holes on the sides of the body during operation. Otherwise, the machine function is adversely affected to cause a failure.
- Do NOT strain the tool (motor). This may cause damage to the unit.
- Do not strain the motor.
- Use the tool in such a way as to prevent the air from the body vent holes from blowing directly onto your skin. Otherwise, you may get burned.
• During operation, keep all body
parts away from the chuck and any shavings. There is a risk of injury resulting from being hit by shavings or a broken or detached drill bits. Replace all drill bits regularly.
- Please interrupt the operation when the body heats up, and after let it cool down to the adequate temperature before restarting.
NOTE
- Do not attempt to remove a screw that is rusty or stuck using a box driver (M6 or higher).
NOTE for EY7430
When drilling holes in metal
- Reduce pressure slightly just before drilling through to the other side. When drilling a hole more than 8mm in diameter, start by drilling with smaller bits and expand the hole with larger bits until you reach the desired diameter. If it encounters too much resistance, the tool will lock or the bit will slip inside the chuck.
- If the drill slips, remove and re-insert the drill bit, then fasten the chuck securely. Next, continue drilling, putting only light pressure on the tool. When drilling through metal, pressing hard does not necessarily ensure that the job will be done faster.
- Apply machine oil to the drill point to make the job go more smoothly.
- Do not strain the motor.
- When the tool becomes very hot, stop working temporarily and let it cool down to avoid damaging it.
NOTE for EY7530
- Do not use for drilling holes in metal. Under high torque, drill bits for metal can chip and cause injury.
Switch and Forward/Reverse Lever Operation
【Fig.4】 for EY7430
【Fig.7】for EY7530
CAUTION:
To prevent damage, do not operate Forward/Reverse lever until the bit comes to a complete stop.
Forward Rotation Switch Operation
- Push the lever for forward rotation.
- Depress the trigger switch slightly to start the tool slowly.
- The speed increases with the amount of depression of the trigger for efficient tightening of screws and drilling. The brake operates and the chuck stops immediately when the trigger is released.
- After use, set the lever to its center position (switch lock).
Reverse Rotation Switch Operation
- Push the lever for reverse rotation. Check the direction of rotation before use.
- Depress the trigger switch slightly to start the tool slowly.
- After use, set the lever to its center position (switch lock).
NOTE:
The drill will stop if the Forward/Reverse lever is pushed while the trigger is held down. This will happen even if the Forward/Reverse lever is pushed accidentally.
You will not be able to hold the trigger down again until you release it and return the Forward/Reverse lever to its original position.
Clutch Torque Setting for EY7430
Adjust the torque to one of the 17 clutch settings or " 🔥 " position.
【Fig.5】
CAUTION:
Test the setting before actual operation.
NOTE for EY7430
- The clutch delivers different levels of torque based on the location, material, and type of the screw. Be sure to check these before starting.
- Due to the way the product is constructed, you may sometimes not be able to set it to drill mode after operating the clutch. This does not mean the product is broken. When this happens, set the clutch to (1) and rotate a few times.
- When loosening the screws, adjust the torque position to “.”
Model No: EY7430 & EY7530
Speed Selection for EY7430
Choose 1 (LOW) or 2 (HIGH) speed to suit the use.
【Fig.6】
The more the variable speed control trigger is pulled, the higher the speed becomes.
CAUTION:
- Check the speed selector switch before use.
- Use at low speed when high torque is needed during operation. (Using at high speed when high torque is required may cause a motor breakdown.)
- Do not operate the speed selector switch [1 (LOW)-2 (HIGH)] while pulling on the speed control trigger. This can cause the rechargeable battery to wear quickly or damage the internal mechanism of the motor.
* See specifications for "MAXIMUM RECOMMENDED CAPACITIES".
• Continued operation with the speed control trigger held down can cause electric parts to break and the tool to stop working.
NOTE:
• Always use the low speed [1 (LOW)] when drilling large holes with a wood drill bit or a hole saw.
EN
Bit-locking Function for EY7430
-
With the trigger not depressed and a screwdriver bit locked in place, the tool can be used as a manual screwdriver. There will be a little play in the chuck, but this is not a malfunction.
-
This feature is handy for tightening screws that require more torque than the maximum torque of the driver (position "###" on the clutch), for confirming the tightness of a screw or to loosen an extremely tight screw.
LED light
LED light illuminates when the trigger depressed and turns off when the trigger is released.
- The light illuminates with very low current, and it does not adversely affect the performance of the tool during use or its battery capacity.
CAUTION:
- The built-in LED light is designed to illuminate the small work area temporarily.
- Do not use it as a substitute for a regular flashlight, since it does not have enough brightness.
CAUTION: DO NOT STARE INTO BEAM.
Use of controls or adjustments or performance of procedures other than those specified herein may result in hazardous radiation exposure.
Model No: EY7430 & EY7530
Battery level indicator for EY7430

- This tool is equipped with a Battery level indicator, which indicates the battery pack charge level.
- When the Battery level indicator is green, the battery is fully charged.
- When the Battery level indicator is orange, that the battery has used approximately one half of its charge.
- When the Battery level indicator is red, battery pack is depleted and needs to be charged.
NOTE
- When you start in the state of low battery level, there is the possibility that the Battery level indicator will freeze flashing and stops working. Because the battery level is not sufficient, please use the battery pack after it is charged.
Model No: EY7430 & EY7530
IV. APPENDIX
MAXIMUM RECOMMENDED CAPACITIES
| Model No. EY7430 EY75 | 30 | ||
| Screw driving | Machine screw | M5 | - |
| Wood screw | 4.2 mm 4.2 mm | ||
| Drilling | For Wood 18 mm - | ||
| For Metal 10 mm - | |||
| Bolt fastening - | Standard bolt : M12High tensile bolt : M10 | ||
V. SPECIFICATIONS
MAIN UNIT
| Model No. | EY7430 | |
| Battery voltage DC 10.8 V | ||
| No load speed | 1: Low 110 min | -1 (rpm) ~ 400 min-1 (rpm) |
| 2: High 320 min | -1 (rpm) ~ 1300 min-1 (rpm) | |
| Chuck capacity Φ1.5 mm ~ Φ10 mm | ||
| Overall length | 209 mm | |
| Weight | 1.0 kg | |
| Noise, Vibration | See the included sheet | |
| Model No. | EY7530 |
| Battery voltage DC 10.8 V | |
| No load speed | 0 min ^-1 (rpm) ~ 2200 min ^-1 (rpm) |
| Maximum torque | 90 N·m |
| Impact per minute | 0 min ^-1 (rpm) ~ 2700 min ^-1 (rpm) |
| Overall length | 165 mm |
| Weight | 0.98 kg |
| Noise, Vibration | See the included sheet |
NOTE: Weight indication
Greater than or equal to 1 kg : indicated by 0.05 kg.
Less than 1 kg : indicated by 0.01 kg
VI. ACCESSORIES
Use only bits suitable for size of drill's chuck.
EN
Model No: EY3732
| Symbol | Meaning |
 | To reduce the risk of injury, user must read and understand instruction manual. |
 | For indoor use only. |
WARNING
LED lights create heat whilst in use. Heat may be trapped and cause an accident.
- Do not cover the LED Flashlight with cloth or paper during use.
- Do not touch the LED lights during use or just after the use as they become hot.
- Do not use any other battery pack besides as shown in the Specifications.
CAUTION
-
This LED Flashlight is not waterproof.
-
Do not use it in damp or wet locations.
- Do not expose it to rain or snow.
- Do not wash it in water.
-
Keep it in a safe, dry, and clean area when it is not in use.
-
The LED Flashlight automatically goes off when the battery voltage drops below a specified level.
-
Do not disassemble the LED Flashlight. Servicing should be performed by an authorized service center.
-
Do not throw the battery pack into a fire. This can cause an explosion.
-
Do not look into the LED light and do not allow the lights to contact the eyes directly. If the LED lights contact the eye continuously, it may result in injuries to the eyes.
-
The appliance is not a portable luminaire for children usage.
-
Children shall not play with the appliance.
-
Do not place or use in location with shock or vibration. The unit could fall down and cause an injury.
I. OPERATION
How to use the LED Flashlight:
- Attach the battery pack to the main unit.
- Adjust head angle. 【Fig.8】
NOTE:
The torch head independently pivots 135^ for maximum flexibility. Move the head by manually adjusting to any position within the 135^ pivot range. Do not force the head beyond the 135^ range.
- Press the switch once to turn on the LED Flashlight.
- Press the switch once again to turn off the LED light.
Model No: EY3732
II. MAINTENANCE
• To make any adjustments, changing accessory, or storing the LED Flashlight, remove battery pack from the LED Flashlight.
• To clean the LED Flashlight, wipe with a dry, soft cloth.
WARNING:
The battery pack must be removed from the LED Flashlight before it is scrapped.
III. SPECIFICATIONS
NOTE: Weight is indicated by 0.01 kg.
| Model No. | EY3732 |
| Battery voltage DC 10.8 V | |
| Weight 0.14 kg (main unit only) |
Model No: EY0L32
| Symbol | Meaning |
 | Read the operating instructions before use. |
 | For indoor use only. |
WARNING:
- Do not charge the battery pack in a high-temperature location, such as next to a fire or in direct sunlight.
Otherwise, the battery may overheat, catch fire, or explode. - Never use other than the dedicated charger to charge the battery pack. Otherwise, the battery may leak, overheat, or explode.
I. CHARGING THE BATTERY
Charging
CAUTION:
- The charger is designed to operate on standard domestic electrical power only as stated in the rating plate. Charge only on the voltage indicated on the rating plate of unit. e.g.230 V / 50 Hz.
- Do not attempt to use it on any other voltage or frequency rating.
- The ambient temperature range is between 0 °C (32 °F) and 40 °C (104 °F). If the battery pack is used when the battery temperature is below 0 °C (32 °F), the tool may fail to function properly.
- If the temperature of the battery pack falls approximately below 0 °C (32 °F), charging will automatically stop to prevent degradation of the battery.
- Use the charger at temperatures between 0 °C and 40 °C, and charge the battery at a temperature similar to that of the battery itself. (There should be no more than a 15 °C difference between the temperatures of the battery and the charging location.)
EN
EN
- When charging a cool battery pack (below 0 °C (32 °F) in a warm place, leave the battery pack at the place and wait for more than one hour to warm up the battery to the level of the ambient temperature.
- Cool down the charger when charging more than two battery packs consecutively.
- Do not insert your fingers into contact hole, when holding charger or any other occasions.
• To prevent the risk of fire or damage to the battery charger. - Do not use power source from an engine generator.
- Unplug the charger when not in use.
- Plug in the charger securely all the way. Plugging it in only part way creates a risk of fire resulting from sparks or heat. Do not use a damaged plug or a loose outlet.
- Clear the dust off the plug regularly. Dust on the plug can attract moisture and lead to poor insulation, increasing the risk of fire. Pull the plug out and wipe it with a dry cloth.
- Unplug the charger from the outlet when not in use.
- If not properly maintained, insulation can deteriorate, increasing the risk of electric shock and fire.
NOTE:
Your battery pack is not fully charged at the time of purchase. Be sure to charge the battery before use.
How to charge
- Plug the charger into the AC outlet.
NOTE:
Sparks may be produced when the plug is inserted into the AC power supply, but this is not a problem in terms of safety.
- Insert the battery pack firmly into the charger. 【Fig.10】
- Charging will not start if the battery pack is warm (for example, immediately after heavy-duty operation). The charging lamp (red) will be illuminated until the battery cools down. Charging will then begin automatically.
-
The charging lamp (green) will flash until charging is completed.
-
When charging is completed, the charging lamp (green) will be illuminated. When charging is completed, an internal electronic switch will automatically be triggered to prevent overcharging.
-
If a fully charged battery pack is inserted into the charger again, the charging lamp (green) will be illuminated.
NOTE:
• There are times when the power light stays on for about 10 seconds after unplugging from the power plug, but it is not a breakdown.
LAMP INDICATIOS
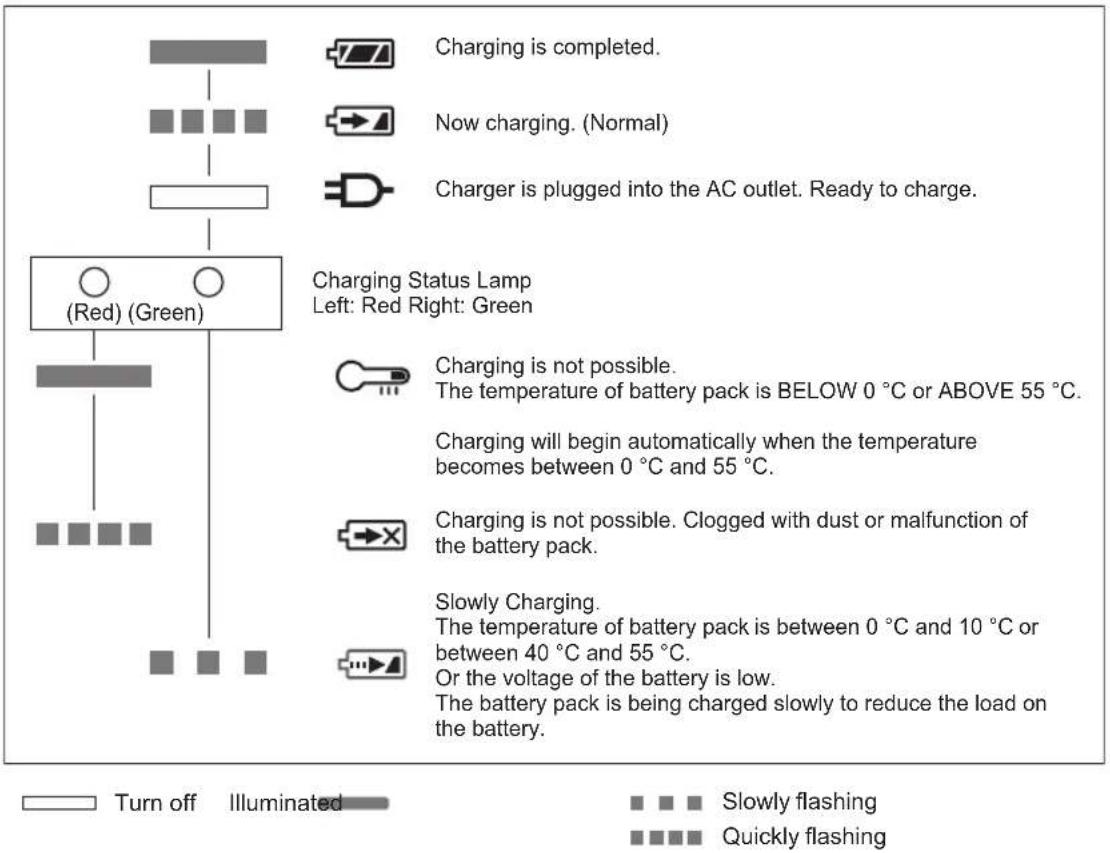
EN
[Charging Status]

flowchart
graph LR
    A["The temperature of battery pack"] --> B["Charging Status"]
    B --> C["Green Lamp"]
    C --> D["Slowly Flashing"]
    D --> E["Slowly Flashing"]
    E --> F["Quickly Flashing"]
    F --> G["Slowly Flashing"]
    G --> H["Slownormal"]
    style A fill:#f9f,stroke:#333
    style B fill:#ccf,stroke:#333
    style C fill:#cfc,stroke:#333
    style D fill:#fcc,stroke:#333
    style E fill:#cff,stroke:#333
    style F fill:#ffc,stroke:#333
    style G fill:#cfc,stroke:#333
    style H fill:#fcc,stroke:#333
II. SPECIFICATIONS
| Model No. | EY0L32 |
| Electrical rating See the rating plate on the bottom of the charger | |
| Weight 0.41 kg | |
| Charging time | Battery pack Model No: EY9L32 |
| 45 min. | |
NOTE: For the dealer name and address, please see the included warranty card.
EN
Model No: EY7430 & EY7530 & EY3732 & EY0L32
Common subject matter of the power tool in this book
I. IMPORTANT SAFETY INSTRUCTIONS
Read All Instructions
1) Before using battery charger, read all instructions and cautionary markings on (1) battery charger, (2) battery pack.
2) CAUTION -To reduce the risk of injury, charge only applicable battery pack as shown in "SPECIFICATIONS". Other types of batteries may burst causing personal injury and damage.
3) Do not expose charger and battery pack to rain or snow or use in damp location.
4) Use of an attachment not recommended may result in a risk of fire, electric shock, or injury to persons.
5) To reduce risk of damaging the electric plug and cord, pull by plug rather than cord when disconnecting charger.
6) An extension cord should not be used.
7) If the supply cord is damaged, it must be replaced by the manufacturer or its service agent, or a similarly qualified person in order to avoid a hazard.
8) Do not operate charger if it has received a sharp blow, been dropped, or otherwise damaged in any way; take it to a qualified service agent.
9) To reduce risk of electric shock, unplug charger from outlet before attempting any maintenance or cleaning.
10) Make sure cord is located so that it will not be stepped on, tripped over, or otherwise subjected to damage or stress.
11) Do not use other than the Panasonic battery packs that are designed for use with this rechargeable tool. Do not use a battery pack that has been modified. This includes battery packs that have been opened and had parts replaced.
12) Panasonic is not responsible for any damage or accident caused by the use of the recycled battery pack and the counterfeit battery pack.
13) Do not attempt to disassemble the battery charger and the battery pack housing.
14) Do not store the tool and battery pack in locations where the temperature may reach or exceed 50 °C (122 °F) (such as a metal tool shed, or a car in the summer), which can lead to deterioration of the storage battery.
15) Do not charge battery pack when the temperature is BELOW 0 °C (32 °F) or ABOVE 40 °C (104 °F).
16) Do not incinerate the battery pack. It can be explode in a fire.
17) The charger is designed to operate on standard household electrical power only. Charge only on the voltage indicated on the nameplate. Do not attempt to use it on any other voltage!
18) Do not abuse cord. Never carry charger by cord or yank it to disconnect from outlet. Keep cord away from heat, oil and sharp edges.
19) Charge the battery pack in a well ventilated place, do not cover the charger and battery pack with a cloth, etc., while charging.
20) Do not short the battery pack. A battery short can cause a large current flow, over-heating and burns.
21) NOTE: If the supply cord of this appliance is damaged, it must only be replaced by a repair shop appointed by the manufacturer, because special purpose tools are required.
22) Do not dispose of the battery pack in a fire, or expose it to excessive heat.
23) Do not allow metal objects to touch the battery pack terminals.
24) Do not carry or store the battery pack in the same container as nails or similar metal objects.
25) After removing the battery pack from the tool or the charger, always reattach the pack cover. Otherwise, the battery contacts could be shorted, leading to a risk of fire.
26) When the battery pack has deteriorated, replace It with a new one.
Continued use of a damaged battery pack may result in heat generation, ignition or battery rupture.
27) These tools are not waterproof.
- Do not use it in damp or wet locations.
- Do not expose it to rain or snow.
- Do not wash it in water.
Keep it in a safe, dry, and clean area when it is not in use.
28) Do not modify, or open in an attempt to repair. This could lead to injury resulting from fire or electric shock.
29) Make sure all set functions are working properly before beginning use.
30) Do not drop or strike.
31) Take care to avoid electric shock. Do not touch the plug with wet hands.
32) Do not use or charge in an area where flammable liquids such as petrol are present.
33) Always keep your workspace clean and tidy. A cluttered workspace can lead to injury.
34) Children should not approach the workspace.
- Only the operator should touch the cordless tool and the charger.
- No one besides the operator should approach the workspace.
35) To avoid accidents, keep the tool out of the reach of children.
36) Use the appropriate cordless tool for the job.
37) Do not use when wearing loose-fitting clothing.
- Do not wear loose-fitting clothing, necklaces, and other accessories, as they can become tangled on the drill bit.
- Footwear with good traction is recommended when working outdoors.
• Cover long hair with a hat or hair net.
38) If using an extension cord, check it regularly for damage, and replace any extension cord that is damaged.
39) Always keep the handle clean and dry. Do not allow oil and grease to get on it.
40) Do not operate in an uncomfortable position. Always keep both feet firmly planted and stay balanced.
41) Do not operate when there is oil or other material on the tool or the battery pack. This increases the risk of dropping the tool. Also, oil or other material inside the tool could cause it to break or heat up.
42) Do not use more than two battery packs in succession. The tool will become hot and there is risk of burns.
43) Do not operate in cramped, tightly sealed places. There is danger from smoke and fire, as well as risk of damage to the tool.
44) When working outside, stop work and unplug the charger at the first sign of thunder and lightning, as there is danger of electrocution resulting from lightning strike.
45) Be careful when using long thin drill bits, as they bend and break easily. Broken drill bits can lead to injury.
46) Perform regular checks. Check regularly for damage and abnormal function. Check the screws for looseness.
47) Avoid inhaling any smoke produced by the tool or the battery pack as it may be harmful to your health.
48) When working in an elevated location make absolutely certain that no one is below you. Falling tools and materials can cause injury.
49) Do not use it in places where there is excessive dust, in water or exposed to rain.
50) There is a possibility that it could cause malfunction such as near high-voltage lines, or a lot of electromagnetic waves. If a malfunction has occurred, please remove and reinstall the battery pack.
51) Before use, make sure that the body, battery pack, charger and tip-tool or other parts are operational normally without damage. Failure to respect requirements leads to a risk of injury due to damage.
52) When storing the product for an extended period, remove the battery pack, and attach the battery pack cover to the battery pack before storing.
EN
II. ASSEMBLY
Attaching or Removing Battery Pack 【Fig.9】
-
To insert the battery pack: Align the battery pack to the bottom of the handle and push the battery pack in to attach it. Ensure it clicks in place.
-
To remove the battery pack: Press the battery pack release button and pull the battery pack from the main body.
NOTE:
Use under extremely hot or cold conditions will reduce operating capacity per charge.
III. ACCESSORIES
Battery Pack
• See the Specification.
NOTE:
Insert the battery pack firmly into the tool. After inserting, check to make sure that it will not come loose.
- Safety Control The battery pack (EY9L32) has individual monitoring sensor of battery cell voltage to ensure optimal charge control, preventing overcharging for safety.
[Battery Pack]
For Appropriate Use of Battery Pack
Li-ion Battery Pack
- For optimum battery life, store the Li-ion battery pack following use without charging it.
- When charging the battery pack, confirm that the terminals on the battery charger are free of foreign substances such as dust and water etc. Clean the terminals before charging the battery pack if any foreign substances are found on the terminals. The life of the battery pack terminals may be affected by foreign substances such as dust and water etc. during operation.
- When battery pack is not in use, keep it away from other metal objects like: paper clips, coins, keys, nails, screws, or other small metal objects that can make a connection from one terminal to another. Shorting the battery terminals
together may cause sparks, burns or a fire.
- When operating the battery pack, make sure the work place is well ventilated.
- When the battery pack is removed from the main body of the tool, replace the battery pack cover immediately in order to prevent dust or dirt from contaminating the battery terminals and causing a short circuit.
- If liquid leaks from the battery, do not touch it with your bare hands. Follow these procedures.
- Battery fluid in the eyes can cause blindness. If the fluid gets on your hands, do not rub your eyes. Wash them immediately in clean water, then consult a doctor.
- Battery fluid can cause inflammation if it gets on your skin or clothing. Wash thoroughly in clean water, then consult a doctor.
- Do not use a battery pack that is leaking fluid. Stop use immediately, keep it away from fire, and contact the retailer as soon as possible.
- Do not use a battery pack that has been modified. This includes battery packs that have been opened and had parts replaced.
- Do not take apart, modify or strike the battery pack. Do not attempt to insert a nail into it.
- The rage of operating temperature for the lithium-ion battery pack (EY9L32) is between -20 °C \~ 70 °C.
- If you use the battery pack as it is to cold below -20 °C without warming it, in a cold area, the body does not operate normally. In that case, leave it for 1 hour or more in a location with more than 10 °C in order to raise the temperature of the battery pack before use, please use after once the temperature of battery pack has raised.
- The battery pack (EY9L32) must only be charged with the Panasonic charger (EY0L32).
- Please check whether there is trash attached to the contact part of the battery pack and body.
- Do not touch the battery terminals just after operation. It could be heated, so there is a risk of burns.
Battery Pack Life
The rechargeable batteries have a limited life. If the operation time becomes extremely short after recharging, replace the battery pack with a new one.
Battery Recycling
ATTENTION:
For environmental protection and recycling of materials, be sure that it is disposed of at an officially assigned location, if there is one in your country.
Recommendations for use
Be sure to use the Pack cover
- When the battery pack is not being used, store the battery in a way that foreign substances such as dust and water etc. do not contaminate the terminals. Be sure to attach the battery pack cover to protect the battery terminals.
- When charging the battery pack, confirm that the terminals on the battery charger are free of foreign substances such as dust and water etc. Clean the terminals before charging the battery pack if any foreign substances are found on the terminals. The life of the battery pack terminals may be affected by foreign substances such as dust and water etc. during operation.
CAUTION:
To protect the battery, be sure to note the following when carrying out operation.
- If the battery becomes hot, the protection function will be activated and the battery will stop operating.
EN
IV. SPECIFICATIONS
Li-ion battery pack
| Model No. | EY9L32 |
| Voltage DC 10.8 V | |
| Battery capacity 1.5 Ah | |
| Charging time (EY0L32) 45 min. | |
Information for Users on Collection and Disposal of Old Equipment and used Batteries

These symbols on the products, packaging, and/or accompanying documents mean that used electrical and electronic products and batteries should not be mixed with general household waste.
For proper treatment, recovery and recycling of old products and used batteries, please take them to applicable collection points, in accordance with your national legislation and the Directives 2012/19/EC and 2006/66/EC.

By disposing of these products and batteries correctly, you will help to save valuable resources and prevent any potential negative effects on human health and the environment which could otherwise arise from inappropriate waste handling.
For more information about collection and recycling of old products and batteries, please contact your local municipality, your waste disposal service or the point of sale where you purchased the items.
Penalties may be applicable for incorrect disposal of this waste, in accordance with national legislation.
For business users in the European Union
If you wish to discard electrical and electronic equipment, please contact your dealer or supplier for further information.
[Information on Disposal in other Countries outside the European Union]
These symbols are only valid in the European Union. If you wish to discard these items, please contact your local authorities or dealer and ask for the correct method of disposal.
V. MAINTENANCE
- Use only a dry, soft cloth for wiping the unit. Do not use a damp cloth, thinner, benzine, or other volatile solvents for cleaning.
- In the event that the inside of the tool or battery pack is exposed to water, drain and allow to dry as soon as possible. Carefully remove any dust or iron filings that collect inside the tool. If you experience any problems operating the tool, consult with a repair shop.
VI. APPENDIX
WARRANTY SUPPLEMENT
- The breakdown and damage caused by usage consistent for a long time (e.g.: factory work on the assembly line, etc.) is out of warranty.
- Only guarantees against damage to the product and materials incurred under normal use. It does not cover modifications, accidents, misuse, liquids or other materials inside the products, carelessness, disregard for the recommended settings, improper adjustments, maintenance, or repairs; or uses of the product not outlined in the operator's manual. Check the warranty to find out the warranty period and what is covered under the warranty.
Troubleshooting
If during the inspection detailed below you find anything wrong with the product, please stop using it immediately and take it back to the retailer.
EN
Model No: EY0L32
| Problem | Cause | Remedy |
| If you attempt to charge a battery pack after it has already finished charging, the charging lamp will flash. | It takes time to detect that the battery has fully charged. | The charging lamp (green) will be illuminated indicating it is fully charged after a short while. |
| Charging causes static which is picked up by radio and television sets. | It is controlled with high frequency which may cause interference. | Use other outlet for charging, or charge the battery pack somewhere away from radio and television sets. |
| The battery pack has been inserted into the charger but the charging lamp still does not come on. | Something is stuck between the battery pack and the charger at the contact points. | Unplug the charger and clear away whatever is between the battery pack and the charger. |
| The battery pack gets hot. | Continue charging as usual. It starts charging automatically after cooling down. |
Model No: EY7430 & EY7530
| Problem | Cause | Remedy |
| Does not turn on or it turns on but suddenly turns off again. | Battery pack is not charged. | Please charge the battery pack. |
| Something is stuck between the unit and the battery pack at the contact points. | Remove the obstruction. | |
| You will hear the stop sound after switching it off. | This is the sound of the brake functioning. | This does not mean the product is broken. |
| You cannot drill many holes, or fasten many bolts or screws even on a full charge. | The drill or the bit is worn down or damaged. | Replace the drill or bit. |
| The battery pack was cooled below -20°C before being charged in a warm place. | Leave it to sit for an hour, and only charge it once it has warmed to room temperature. | |
| The battery pack has reached the end of its service life. | Replace the battery pack. |
EN
Model No: EY7530
Problem
The drill does not generate much torque or revolve quickly even though it is fully charged.
A battery pack that had cooled to below -20°C was used.
RemedyCause
Charge again. Use only after charging is complete.
Model No: EY3732
Problem
The LED lights do not come on when the switch is flipped, or they turn off after a few minutes.
Battery pack is not charged.
Something is stuck between the unit and the battery pack at the contact points.
The battery pack has reached the end of its service life.
An incompatible battery pack is being used.
RemedyCause
Please charge the battery pack.
Remove the obstruction.
Replace the battery pack.
Replace the incompatible battery pack with one that is compatible.
Stop using it immediately and return it to the retailer. The unit is broken.
None of the LED lights come on when the switch is flipped, or alternatively, one or more of the lights turn off after a few minutes.
Stop using the product immediately in the following cases:
Model No: EY0L32
•The charging lamp (green) flickers on and off immediately after charging.
- The battery pack has not finished charging 70 minutes or more after the battery pack was inserted into the charger and the green light came on.
ONLY FOR U.K.
VII. ELECTRICAL PLUG INFORMATION
FOR YOUR SAFETY PLEASE READ THE FOLLOWING TEXT CAREFULLY
This appliance is supplied with a moulded three pin mains plug for your safety and convenience.
A 5 amp fuse is fitted in this plug.
Should the fuse need to be replaced please ensure that the replacement fuse has a rating of 5 amp and that it is approved by ASTA or BSI to BS1362.
Check for the ASTA mark for the BSI mark on the body of the fuse.
If the plug contains a removable fuse cover you must ensure that it is refitted when the fuse is replaced.
If you lose the fuse cover the plug must not be used until a replacement cover is obtained.
A replacement fuse cover can be purchased from your local Panasonic Dealer.
IF THE FITTED MOULDED PLUG IS UNSUITABLE FOR THE SOCKET OUTLET IN YOUR HOME THEN THE FUSE SHOULD BE REMOVED AND THE PLUG CUT OFF AND DISPOSED OF SAFELY.
THERE IS A DANGER OF SEVERE ELECTRICAL SHOCK IF THE CUT OFF PLUG IS INSERTED INTO ANY 13 AMP SOCKET.
If a new plug is to be fitted please observe the wiring code as shown below.
If in any doubt please consult a qualified electrician.
IMPORTANT:
The wires in this mains lead are coloured in accordance with the following code:
Blue: Neutral
Brown: Live
As the colours of the wire in the mains lead of this appliance may not correspond with the coloured markings identifying the terminals in your plug, proceed as follows.
The wire which is coloured BLUE must be connected to the terminal in the plug which is marked with the letter N or coloured BLACK.
The wire which is coloured BROWN must be connected to the terminal in the plug which is marked with the letter L or coloured RED.
Under no circumstances should either of these wires be connected to the earth terminal of the three pin plug, marked with the letter E or the Earth Symbol 12 .
How to replace the fuse: Open the fuse compartment with a screwdriver and replace the fuse and fuse cover if it is removable.

This apparatus was produced to BS800.
Model No: EY7430 & EY7530
Retirez l'obstruction.
Retirez l'obstruction.
III. TEKNISET TIEDOT
Common subject matter of the power tool in this book
I. IMPORTANT SAFETY INSTRUCTIONS : Page 18
II. ASSEMBLY: Page 20
III. ACCESSORIES: Page 20
IV. SPECIFICATIONS: Page 22
V. MAINTENANCE: Page 22
VI. APPENDIX: Page 22
Trouble shooting : Page 23
Deutsch
Seite 26 – 42
EY7430 & EY7530
Panasonic Testing Centre
Panasonic Europe Ltd. - German office,
Winsbergring 15,
22525 Hamburg,
Germany
Panasonic Corporation
1006,Kadoma,Osaka 571-8501,Japan
http://panasonic.net
EN. DE. FR. IT. NL. ES. DA. SV. NO. FI. TR
EY9710373201 2014.08 Printed in China


- Index/Index/Index/Indice/Index/Indice/Indeks/Index/Indeks/Hakemisto/Dizin
- Model No: EY7430
- ADDITIONAL SAFETY RULES
- Model No: EY7430 & EY7530
- ASSEMBLY
- Attaching or Removing Bit for EY7430
- NOTE:
- Attaching or Removing Bit for EY7530
- EN
- CAUTION:
- OPERATION
- [Main Body]
- NOTE
- NOTE for EY7430
- NOTE for EY7530
- Switch and Forward/Reverse Lever Operation
- Forward Rotation Switch Operation
- Reverse Rotation Switch Operation
- Clutch Torque Setting for EY7430
- Speed Selection for EY7430
- Bit-locking Function for EY7430
- LED light
- Battery level indicator for EY7430
- APPENDIX
- SPECIFICATIONS
- ACCESSORIES
- Model No: EY3732
- WARNING
- CAUTION
- OPERATION
- How to use the LED Flashlight:
- MAINTENANCE
- WARNING:
- SPECIFICATIONS
- Model No: EY0L32
- CHARGING THE BATTERY
- Charging
- How to charge
- Model No: EY7430 & EY7530 & EY3732 & EY0L32
- Common subject matter of the power tool in this book
- IMPORTANT SAFETY INSTRUCTIONS
- Read All Instructions
- Attaching or Removing Battery Pack 【Fig.9】
- ACCESSORIES
- Battery Pack
- [Battery Pack]
- For Appropriate Use of Battery Pack
- Li-ion Battery Pack
- Battery Pack Life
- Battery Recycling
- ATTENTION:
- Recommendations for use
- Be sure to use the Pack cover
- SPECIFICATIONS
- Information for Users on Collection and Disposal of Old Equipment and used Batteries
- For business users in the European Union
- [Information on Disposal in other Countries outside the European Union]
- MAINTENANCE
- APPENDIX
- WARRANTY SUPPLEMENT
- Troubleshooting
- Model No: EY7530
- Problem
- RemedyCause
- ELECTRICAL PLUG INFORMATION
- FOR YOUR SAFETY PLEASE READ THE FOLLOWING TEXT CAREFULLY
- IMPORTANT:
- TEKNISET TIEDOT
- Deutsch
- EY7430 & EY7530
Brand : PANASONIC
Model : EY7430LA2S
Category : Drill