EY7201 - Screwdriver PANASONIC - Free user manual and instructions
Find the device manual for free EY7201 PANASONIC in PDF.
User questions about EY7201 PANASONIC
0 question about this device. Answer the ones you know or ask your own.
Ask a new question about this device
Download the instructions for your Screwdriver in PDF format for free! Find your manual EY7201 - PANASONIC and take your electronic device back in hand. On this page are published all the documents necessary for the use of your device. EY7201 by PANASONIC.
USER MANUAL EY7201 PANASONIC
Operating Instructions
Bedienungsanleitung
Cordless Impact Driver
Akku-Schlagschauber
Perceuse a Impact sans fil
Matsushita Electric Works, Ltd.
Osaka, Japan
No.1 EN.GR.FR.IT.ND.ES.DN.SW.NR.FN
EY971072012 H1702
Printed in Japan
Before operating this unit, please read these instructions completely and save this manual for future use.
Read "the Safety Instructions" booklet and the following before using.
I. ADDITIONAL SAFETY RULES
1) Be aware that this tool is always in an operating condition, since it does not have to be plugged into an electrical outlet.
2) When screwing or driving into walls, floors, etc., "live" electrical wires may be encountered. DO NOT TOUCH THE HEX QUICK CHUCK OR ANY FRONT METAL PARTS OF THE TOOL! Hold the tool only by the plastic handle to prevent electric shock in case you screw or drive into a "live" wire.
3)If the screw driver does not rotate anymore, immediately turn the main switch off for a longer period to prevent an overload, which can damage the battery pack or motor. Use reverse motion to loosen jammed bits.
4) Do NOT operate the Forward/Reverse lever when the main switch is on. The battery will discharge rapidly and damage to the unit may occur.
5)During charging, the charger may become slightly warm. This is normal. Do NOT charge the battery for a long period.
6) Use only a dry, soft cloth to wipe the unit. Do NOT use a damp cloth, thinner, benzine, or other volatile solvents for cleaning.
7) When storing or carrying the tool, set the Forward/Reverse lever to the center position (switch lock).
8) Do not strain the tool by holding the speed control trigger halfway (speed control mode) so that the motor stops.
9) Young children should be supervised to ensure that they do not play with the appliance.
10)Wear ear protectors when using the tool for extended periods.
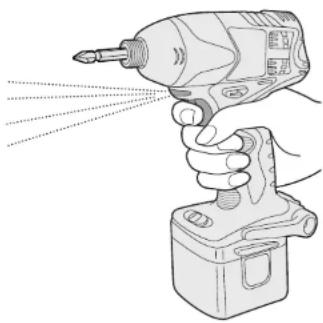
II.ASSEMBLY
Attaching or removing bit
NOTE:
When attaching or removing a bit, disconnect battery pack from tool or place the switch in the center position (switch lock).
- Hold the collar of the quick connect chuck and push it outwards.
- Insert the bit into the chuck.
- The collar will return to its original position when it is released.
- Pull the bit to make sure it does not come out.
- To remove the bit, pull back on the collar in the same way.
CAUTION:
If the collar does not return to its original position or the bit comes out when pulled on, the bit has not been properly attached. Make sure the bit is properly attached before use.
Attaching or removing battery pack
- To connect the battery pack: Insert the battery pack. It snaps into place to indicate proper connection.
- To remove the battery pack: Press the two buttons on the sides of the battery pack. Slide the battery pack out of the tool body.
III.OPERATION
Select the impact mode
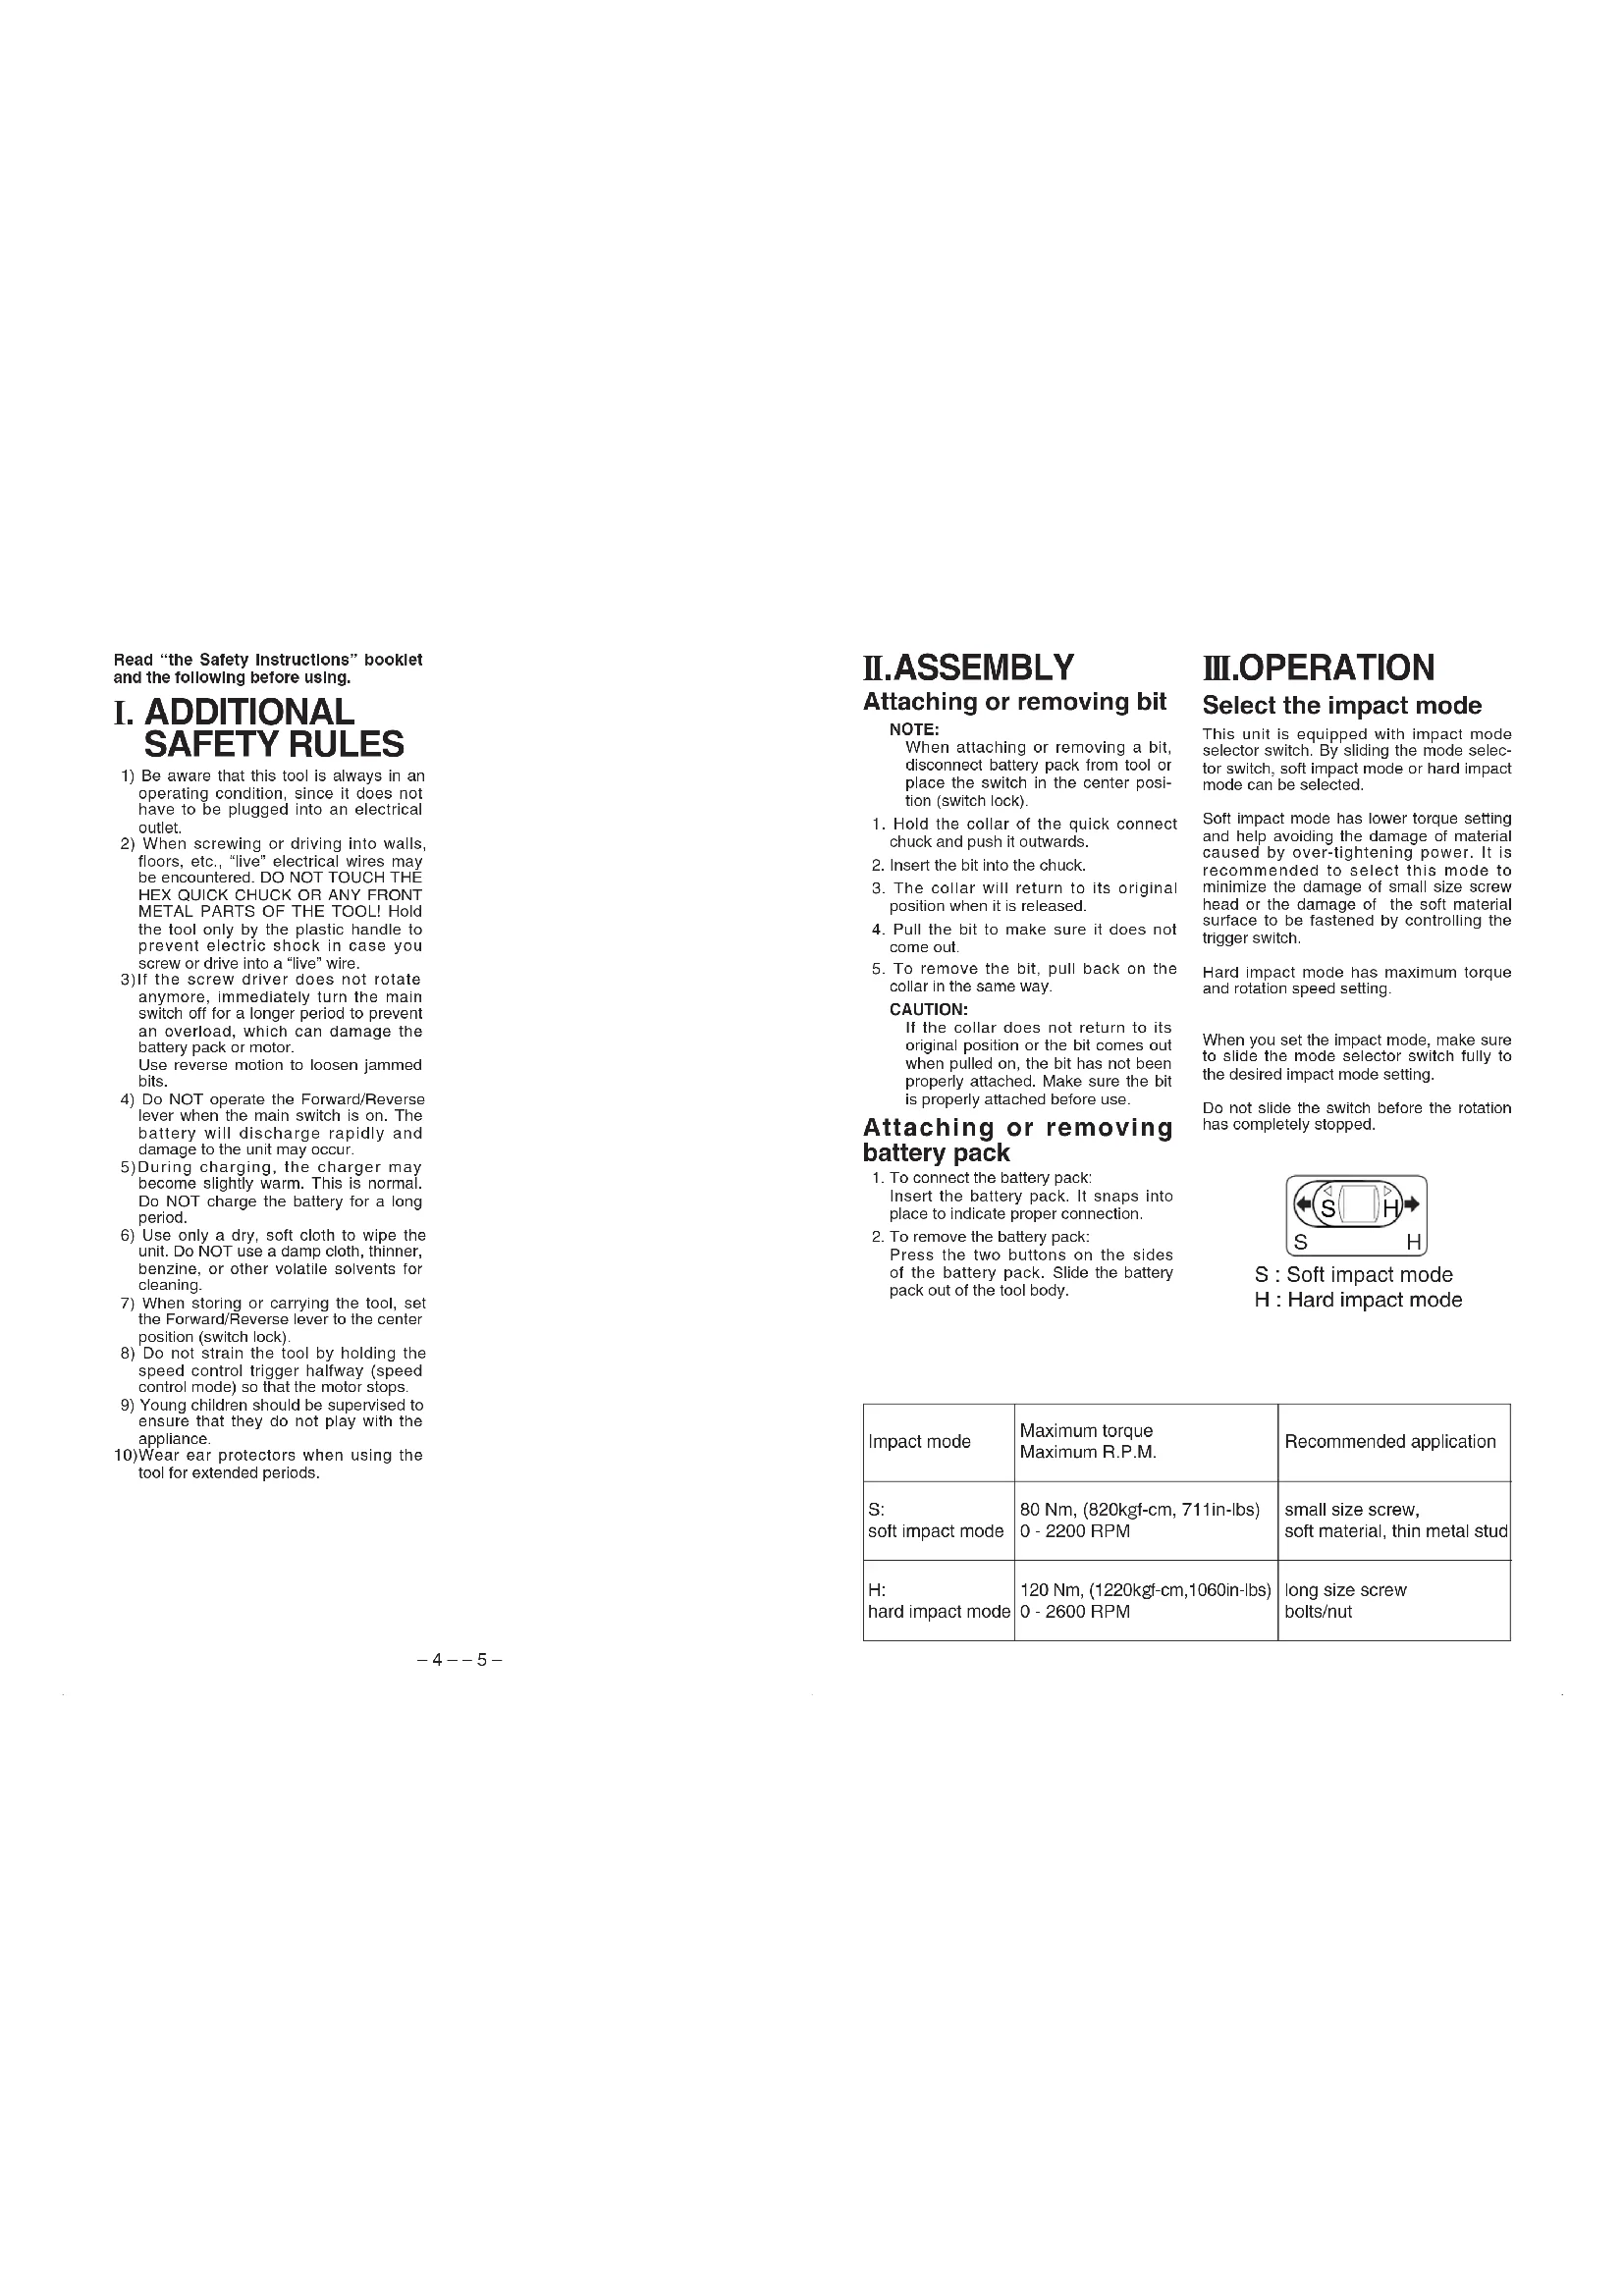
This unit is equipped with impact mode selector switch. By sliding the mode selector switch, soft impact mode or hard impact mode can be selected.
Soft impact mode has lower torque setting and help avoiding the damage of material caused by over-tightening power. It is recommended to select this mode to minimize the damage of small size screw head or the damage of the soft material surface to be fastened by controlling the trigger switch.
Hard impact mode has maximum torque and rotation speed setting.
When you set the impact mode, make sure to slide the mode selector switch fully to the desired impact mode setting.
Do not slide the switch before the rotation has completely stopped.
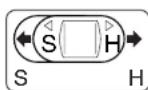
S: Soft impact mode
H:Hardimpactmode
| Impact mode | Maximum torque Maximum R.P.M. | Recommended application |
| S: soft impact mode | 80 Nm, (820kgf-cm, 711in-lbs) 0 - 2200 RPM | small size screw, soft material, thin metal stud |
| H: hard impact mode | 120 Nm, (1220kgf-cm,1060in-lbs) 0 - 2600 RPM | long size screw bolts/nut |
Switch and Forward/Reverse lever Operation
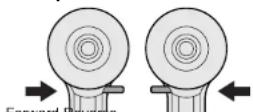
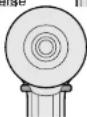
Switch lock
CAUTION:
To prevent damage, do not operate Forward/Reverse lever until the bit comes to a complete stop.
Forward Rotation Switch Operation
- Push the lever for forward rotation.
- Depress the trigger switch slightly to start the tool slowly.
- The speed increases with the amount of depression of the trigger for efficient tightening of screws. The brake operates and the bit stops immediately when the trigger is released.
- After use, set the lever to its center position (switch lock).
Reverse Rotation Switch Operation
- Push the lever for reverse rotation. Check the direction of rotation before use.
- Depress the trigger switch slightly to start the tool slowly.
- After use, set the lever to its center position (switch lock).
CAUTION:
To eliminate excessive temperature increase of the tool surface, do not operate the tool continuously (using two or more battery packs consecutively.) Tool needs cool off time before switching to another pack.
LED light How to use the belt hook
CAUTION:
The built-in LED light is designed to illuminate the small work area temporarily. Do not use it as a substitute for a regular flashlight, since it does not have enough brightness.
Depress the trigger switch, then LED light turns on. When the trigger switch is released, the light turns off automatically.
The light illuminates with very low current, and it does not adversely affect the performance of the driver during use or its battery capacity.
This product has the built-in LED light. This product is classified into "Class 1 LED Product" to EN 60825-1.
CLASS 1 LED PRODUCT
Caution: DO NOT STARE INTO BEAM.
WARNING:
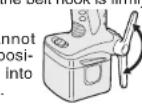
- Be sure to attach the belt hook securely to the main unit with the screw firmly fastened. When the belt hook is not firmly attached to the main unit, the hook may depart and the main unit may fall.
This may result in an accident or injury. - Be sure to attach the belt hook firmly and securely onto a waist belt or other belt. Pay attention to the unit not slipping off from the belt.
This may result in an accident or injury. - When the main unit is held by the belt hook, avoid jumping or running with it. Doing so may cause the hook to slip and the main unit may fall.
This may result in an accident or Injury. - When the belt hook is not used, be sure to return it to the storing position. The belt hook may catch on something. This may result in an accident or Injury.
- When the unit is hooked onto the waist belt by the belt hook, do not attach driver bits to the unit.
A sharp edge object, such as a drill bit, may cause injury or an accident.
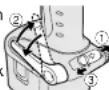
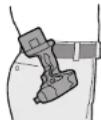
To set the belt hook angle position
- Slide the belt hook lock lever ① and hold it to unlock the belt hook.
- Pull the belt hook from storing position ②and set it as desired angle.
- Release the belt hook lock lever to lock the angle of belt hook.
- Make sure the belt hook is firmly locked ③. Also make sure the belt hook is firmly locked into position.
The belt hook cannot be locked in this position. Firmly lock it into position before use.
To return the belt hook to the storing position, Follow step 1. and 2. above, then lower the belt hook.
To secure the lock, follow 3 and 4 above.
To change the belt hook location side
The belt hook can be attached to either side of the unit.
- Set the belt hook at storing position.
- Loosen the screw turning it counterclockwise, using a coin or a flat blade screw driver.
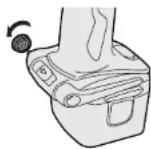
- Take out the belt hook and insert into the other side of the slot on the main unit.
- Fasten the screw firmly, turning it clockwise.
The belt hook can be taken out from the main unit only when it is at storing position.
For Appropriate use of Battery pack
Ni-MH Battery pack (EY9201)
- Charge the Ni-MH battery fully before storage in order to ensure a longer service life.
- The ambient temperature range is between 0^ ( 32^ ) and 40^ ( 104^ ). If the battery pack is used when the battery temperature is below 0^ ( 32^ ), the tool may fail to function properly. In that case, charge the battery until charging is completed for appropriate functioning of the battery.
- When battery pack is not in use, keep it away from other metal objects like: paper clips, coins, keys, nails, screws, or other small metal objects that can make a connection from one terminal to another. Shorting the battery terminals together may cause sparks, burns or a fire.
- When operating with a Ni-MH battery pack, make sure the place is well-ventilated.
Battery Pack Life
The rechargeable batteries have a limited life. If the operation time becomes extremely short after recharging, replace the battery pack with a new one.
Charging
NOTE:
When you charge the battery pack for the first time, or after prolonged storage, charge it for about 24 hours to bring the battery up to full capacity.

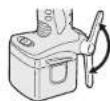
Battery charger (EY0110)
- Plug the charger into the AC outlet.
NOTE:
Sparks may be produced when the plug is inserted into the AC power supply, but this is not a problem in terms of safety.
- Insert the battery pack firmly into the charger.
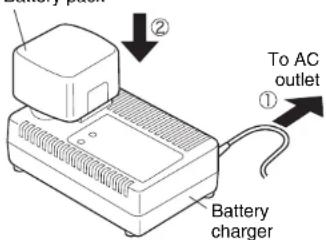
Battery pack
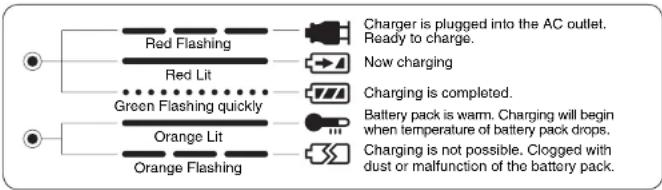
- During charging, the charging lamp will be lit.
When charging is completed, an internal electronic switch will automatically be triggered to prevent overcharging.
-
Charging will not start if the battery pack is warm (for example, immediately after heavy-duty operation). The orange standby lamp will be lit until the battery cools down. Charging will then begin automatically.
-
When charging is completed, the charging lamp will start flashing quickly in green color.
-
When in any of the conditions that battery pack is too cool, or the battery pack has not been used for a long time, the charging lamp is lit. In this case charging takes longer to fully charge the battery pack, than the standard charging time.
-
If a fully charged battery pack is inserted into the charger again, the charging lamp lights up. After several minutes, the charging lamp may flash quickly to indicate the charging is completed.
-
If the charging lamp does not light immediately after the charger is plugged in, or if after the standard charging time the lamp does not go off, consult an authorized dealer.
NOTE:
- When charging a cool battery pack (below 5^ (41^) ) in a warm place, leave the battery pack at the place and wait for more than one hour to warm up the battery to the level of the ambient temperature. Otherwise, battery pack may not be fully charged.
Cool down the charger when charging more than two battery packs consecutively. - Do not insert your fingers into contact hole, when holding charger or any other occasions.
CAUTION:
To prevent the risk of fire or damage to the battery charger.
- Do not use power source from an engine generator.
- Do not cover vent holes on the charger and the battery pack.
IV.LAMP INDICATIONS
V.MAINTENANCE
Use only a dry, soft cloth for wiping the unit. Do not use a damp cloth, thinner, benzine, or other volatile solvents for cleaning.
VI.TIGHTENING TORQUE
The power required for tightening a bolt will vary, according to bolt material and size, as well as the material being bolted. Choose the length of tightening time accordingly.
Reference values are provided below.
They may vary according to tightening conditions.)
Factors Affecting Tightening Torque
The tightening torque is affected by a wide variety of factors including the followings. After tightening, always check the torque with a torque wrench.
1) Voltage
- When the battery pack becomes nearly discharged, the voltage decreases and the tightening torque drops.

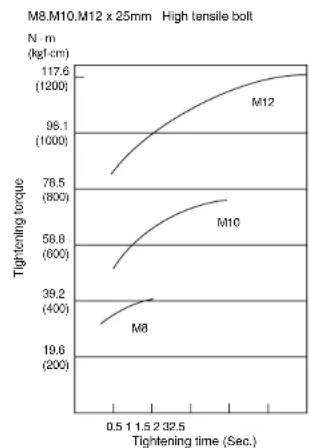
2) Tightening time
Longer tightening time results in increased tightening torque. Excessive tightening, however, adds no value and reduces the life of the tool.
3) Different bolt diameters
The size of the bolt diameter affects the tightening torque. Generally, as the bolt diameter increases, tightening torque rises.
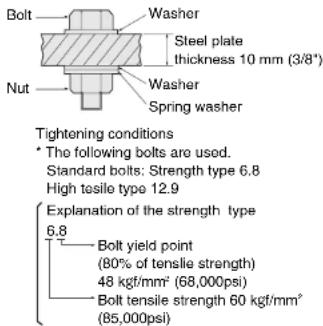
4) Tightening conditions
- Tightening torque will vary, even with the same bolt, according to grade, length, and torque coefficient (the fixed coefficient indicated by the manufacturer upon production).
- Tightening torque will vary, even with the same bolting material (e.g. steel), according to the surface finish.
- Torque is greatly reduced when the bolt and nut start turning together.
5) Socket play
Torque is lowered as the six-sided configuration of the socket of the wrong size is used to tighten a bolt.
6) Switch (Variable speed control trigger) Torque is lowered if the unit is used with the switch not fully pulled out.
7) Effect of Connecting Adapter
The tightening torque will be lowered through the use of a universal joint or a connecting adaptor.
VII.Accessories
Use only bits suitable for size of drill.
MAXMUM RECOMMENDED CAPACITIES
| Model | EY7201 | |
| Screw driving | Wood screw | ø 3.5 ~ ø 9.5 mm (1/8" ~ 3/8") |
| Tech screw | ø 3.5 ~ ø 6 mm (1/8" ~ 1/4") | |
| Bolt fastening | Standard bolt : M6 ~ 12 High tensile bolt : M6 ~ M10 | |
VIII.SPECIFICATIONS
MAIN UNIT
| Model | EY7201 |
| Motor | DC Motor 12 V |
| No load speed | soft impact mode : 0 ~ 2200 /min (rpm) |
| hard impact mode : 0 ~ 2600 /min (rpm) | |
| Maximum torque | soft impact mode : 80 Nm, (820 kgf·cm, 711 in-lbs.) |
| hard impact mode : 120 Nm, (1220 kgf·cm, 1060 in-lbs.) | |
| Impact per minute | soft impact mode : 0 ~ 2100 ipm in Impact Mode |
| hard impact mode : 0 ~ 2800 ipm in Impact Mode | |
| Overall length | 164 mm (6-7/16") |
| Weight (with battery pack) | 1.8 kg (3.9 lbs) |
BATTERY PACK
| Model EY9201 |
| Storage battery Ni-MH Battery |
| Battery voltage 12V DC (1.2V x 10 cells) |
BATTERY CHARGER
| EY0110Model | |||||||
| Electrical rating | See the rating plate on the bottom of the charger. | ||||||
| Weight | 0.78 kg, (1.72 lbs.) | ||||||
| Charging Time | 7.2 V | 9.6 V | 12 V 15 | 5 V 18 V 24 | V | ||
| 1.2 Ah | EY9065 | EY9080 | EY9001 | ||||
| EY9066 | EY9086 | EY9006 | |||||
| 20 min. | |||||||
| 1.7 Ah | EY9180 | EY9101 | |||||
| EY9182 | 25 min. | ||||||
| 2.0 Ah | EY9168 E | 9106 EY9136 | EY9116 | ||||
| 30 min. | 30 min. | EY9117 | |||||
| 30 min. | 60 min. | ||||||
| 3.0 Ah | EY9200 E | 9230 | EY9210 | ||||
| 45 min. | 90 min. | ||||||
| 3.5 Ah | EY9201 E | 9231 | EY9251 | ||||
| 55 min. | 65 min. | ||||||
NOTE: This chart may include models that are not available in your area. Please refer to the catalogue.
CAUTION:
-
This panoramic Impact Driver is designed to use only 12V battery packs.
-
Use with other battery pack type may damage the tool and the battery, and may result in the risk of fire and personal injury.
LED-PRODUKT DER KLASSE 1
KLASSE 1 LED PRODUCT
Waarschuwing: KUK NIET RECHSTREEEKS IN DE LICHSTRAAL.
as
m = 311
10
a
la
nte
de
19
do
46
1a
35
05
1a
1e
in
m = 311
do
86
14
de
58
or
19
yeardrolnreducerer yearktolet
3) Forskellige diametre pa bolte
Storrelsen p boltens diameter pavirker tilspreadingmomentet.
Gonorelt or dot sadan, at nar boltons diameter bliver stre, stiger dreiningsmoment.
4) Tilspandingsbetingelser
KCLASS 1 LED-PRODUKT
Forsiktig: TITTA INTE IN I STRÄLEN.
Sá har anvander du bälteskroken
WARNING:
KLASSE 1 LED PRODUKT
Forsktlg:IKKE SE INN I LYSSTRALEN.
ADVARSEL:
Pass pä feste beltekroken skikkelig til hovedenheten med en godit tilstrammet skru. Dersom beltekroken违法犯罪 hovedenheten, kan kroken ösne, og,enheten kan dermed falnoed. Dette kan fore til en ulykke erlen ekade.
Pass pa a feste beltekroken fast og skikkalig til bukesboltet erer et annet belte.Pass pa at enheten ilke gir av bellet. Dette kan fore til en ulykke eren skade.
Nar hovedenhentens holdes av beitekroken ma du ici hoppe aller springe rundt med maskinen. Dette kan fore til at kroken hektes av og at enheten dermed kan falle av. Dette kan fore til en ulykke eren skade.
Nar beltekrokenIkke benyttes ma du
passe pa a sette den lagringstilling. Hvis ikka ka n de hekto fast beltekroken til andre gjenstander. Dette kan fore til en ulykke eren skade.
- Sā lange anhenten er hoktet pá buksebeltēm med beltekroken ma du likke montere biter pá anhenten. En skarp gjenstand, som en bit kan medrefle uykker erller skader.
Sette beltekroken i en vinklet stilling
- Skyv beltekrokens lasespak (1og hold den for a lseopp beltekroken.
- Trekk beltekroken ut av lagrssstilling (og still den inn i onsket winkel.
- Slipp opp beltekrokens lasespak for a lase boltekroken i onsnet winkel.
-
Kontrolier at beltekroken or skikkeliglast ③. Forsikre deg ogsa om atbeltekroken ogsa erlasti posisjon.
-
Beltekroken kan畸形 Las den forsvarlig i positjion for bruk.
VIII. TEKNISET TIEDOT
PÄALAITE