
CompactPower MFW3612A - Meat Grinder BOSCH - Free user manual and instructions
Find the device manual for free CompactPower MFW3612A BOSCH in PDF.
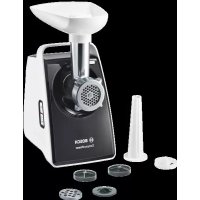


| Product type | Meat grinder |
| Brand | Bosch |
| Model | CompactPower MFW3612A |
| Uses | Grinding, sausages, kebbehs, pasta, shortbread cookies, grater, citrus press |
| Motor power | 600 W (estimated) |
| Speeds | 2 speeds (slow/fast) + reverse |
| Grinding discs | Fine (2.7 mm), medium (4 mm), coarse (8 mm) |
| Included accessories | Worm gear, blade, discs, sausage stuffer, kebbeh mold, pasta maker, shortbread cookie attachment, grater, citrus press (depending on model) |
| Power supply | Mains, 220-240 V, 50/60 Hz |
| Power cord | Adjustable length, integrated storage |
| Material | Plastic body, metal blades and worm gear |
| Safety | Accessory lock, reverse, automatic shut-off, overload protection (shear pin) |
| Cleaning | Removable parts hand-washable, base wiped clean |
| Repairability | Spare parts available through after-sales service (discs, blades, etc.) |
| Warranty | According to the conditions of the country of purchase |
| Weight | Approximately 4.5 kg (estimated) |
Frequently Asked Questions - CompactPower MFW3612A BOSCH
User questions about CompactPower MFW3612A BOSCH
0 question about this device. Answer the ones you know or ask your own.
Ask a new question about this device
Download the instructions for your Meat Grinder in PDF format for free! Find your manual CompactPower MFW3612A - BOSCH and take your electronic device back in hand. On this page are published all the documents necessary for the use of your device. CompactPower MFW3612A by BOSCH.
USER MANUAL CompactPower MFW3612A BOSCH
Read and follow the operating instructions carefully and keep for later reference! Enclose these instructions when you give this appliance to someone else.
If the instructions for correct use of the appliance are not observed, the manufacturer's liability for any resulting damage will be excluded.
This appliance is intended for domestic use only. Use the appliance for processing normal quantities of food for domestic use.
The appliance and accessories (depending on the model) are suitable for the following purposes:
Meat mincer: for cutting and mixing raw and cooked meat, bacon, poultry and fish.
Sausage filler: for making sausages and meat rolls.
Kebbe maker: for making dough and minced meat pockets.
Pasta maker: for making spaghetti or tagliatelle.
Whirl maker: for making whirls.
Shredding attachment: for shredding, grating and cutting up food.
Citrus press: for squeezing juice out of citrus fruits.
Food which is to be processed must not contain any hard components (e.g. bones). The appliance should not be used for processing other substances or objects. Additional applications are possible if the accessories approved by the manufacturer are used. Use the appliance only with genuine parts and accessories.
Never use the attachments or slicing / shredding inserts on other appliances. Only use matching parts for the relevant attachments.
Only use the appliance indoors at room temperature and up to 2000 m above sea level. Do not place the appliance on or near hot surfaces, e.g. hobs.
Your work surface should be easily accessible, resistant to moisture, firm, flat, dry and large enough to prevent any harm from splashing and to let you work unhindered.
This appliance can be used by persons with reduced physical, sensory or mental capabilities or lack of experience and knowledge if they have been given supervision or instruction concerning safe use of the appliance and if they understand the hazards involved. Keep children away from the appliance and connecting cable and do not allow them to use the appliance.
Children must not play with the appliance. Cleaning and user maintenance must not be performed by children.
Safety instructions
Danger of electric shock and fire
The appliance may only be connected to a power supply with alternating current via a correctly installed socket with earthing. Ensure that the protective conductor system of the domestic supply has been correctly installed.
Connect and operate the appliance only according to the type plate specifications. Do not use if the mains cable or appliance show any signs of damage. To avoid potential hazards, repairs such as replacing a damaged cable must only be carried out by our customer service personnel. Never connect the appliance to timer switches or remote-controllable sockets. Never leave the appliance unattended while it is switched on! We recommend that the appliance is never switched on for longer than is necessary to process the ingredients.
The mains cable must not come into contact with hot parts or be pulled across sharp edges. Never immerse the base unit in water or place it in the dishwasher. Do not steam-clean the appliance. Do not use the appliance with damp hands and do not operate at no load. The appliance must always be disconnected from the mains after each use, whenever the appliance is unattended, prior to assembly, disassembly or cleaning and in the event of a fault.
Risk of injury
Immediately after using the appliance wait for it to stop. Before fitting or replacing attachments, the appliance must be switched off and disconnected from the mains.
Do not grasp the sharp blades and edges of the shredding and slicing inserts. Keep hands clear of rotating parts. Never reach into the feed chute or outlet opening. Never put the food to be processed into the feed chute with your hands. Only use the pusher provided! Never clean the sharp blades and edges of the shredding and slicing inserts with your bare hands.
Caution! Risk of damaging the appliance
Check that there are no foreign objects in the feed chute or attachments. Do not poke objects (e.g. knives, spoons) in the feed chute or outlet opening.
Only allow the appliance to run uninterrupted for a maximum of 10 minutes. Then switch off and allow to cool down to room temperature.
Important!
It is essential to clean the appliance as described after each use or after it has not been used for an extended period. → “Care and daily cleaning” see page 25
Congratulations on the purchase of your new Bosch appliance.
On the following pages of these operating instructions you will find useful information for safe use of this appliance.
We request that you read these operating instructions carefully and observe all instructions. This ensures you will be able to enjoy this appliance for a long time, and the results will confirm your choice of this appliance.
Retain these operating instructions for subsequent use or for the next owner. You can find further information about our products on our website.
Content
Intended use 17
Safety instructions 18
Overview. 20
Before using for the first time. 20
Control and display elements. 21
Overload protection. 21
Speed setting. 21
Reversing function 21
Base unit. 22
Base attachment. 22
Shredding attachment 23
Citrus press attachment 24
Care and daily cleaning 25
Recipes 25
Tips 27
Disposal 27
Guarantee 27
Spare parts and accessories 28
Troubleshooting 29
Overview
→Fig.A
1 Base unit
a Drive for attachments b Button I or O/I c Button O or 1·2 | rev d Operation indicator e Release button f Carrying handle g Storage compartment with cover h Mains cable i Cable storage compartment
2 Base attachment
a Housing b Feed chute c Filling tray d Pusher e Worm gear with agitator paddle f Threaded ring
3 Meat mincer insert
a Blade b Perforated disc, fine (2.7 mm)* c Perforated disc, medium (4 mm) d Perforated disc, coarse (8 mm)
4 Sausage filler insert
a Bearing ring b Sausage filler nozzle
5 Kebbe insert*
a Conical ring b Kebbe nozzle
6 Pasta insert*
a Disc for spaghetti b Disc for tagliatelle c Cleaning tool
7 Whirl insert*
a Dough nozzle b Forming disc (rotatable)
→Fig. 3
8 Shredding attachment*
a Housing b Feed chute c Cap d Filling tray e Pusher f Slicing insert g Shredding insert, coarse h Shredding insert, fine i Grating insert
9 Citrus press attachment*
a Collecting tray b Filter insert c Pressing cone d Driving shaft with spring
- depending on the model
The operating instructions refer to different models of the appliance. An overview is provided on the pages that feature the figures. → Fig. M
Spare parts and accessories are
available from Customer Service or at
www.bosch-home.com. → "Spare parts
and accessories" see page 28
Before using for the first time
Before the new appliance can be used, it must be fully unpacked, cleaned and checked.
Caution!
Never operate a damaged appliance!
- Remove the base unit and all accessories from the packaging.
- Remove the packaging material that is present. Dismantle any assembled parts into their individual parts. Do this in reverse order, as described under "Preparation". Check all parts for completeness.
→ Fig. A/B
Inspect all parts for visible damage. Thoroughly clean and dry all parts before using for the first time.
→ "Care and daily cleaning" see page 25
Control and display elements
MFW35...
Button I
Press button I to switch on the appliance.
The drive will start up at once.
Button O
Press button O to switch off the appliance.
The drive stops.
MFW36../MFW38...
Button O/I
Press button O/I to switch on the appliance.
The drive starts running immediately with speed 2 (fast). Press button O/I again to switch off the appliance. The drive stops.
Button 1·2 | rev
Pressing button 1-2 | rev briefly switches the speed of the appliance between 1 (slow) and 2 (fast). → "Speed setting" see page 21
Pressing and holding button 1-2 | rev starts the reversing function. → "Reversing function" see page 21
All models
Operation indicator
The operation indicator lights up when the appliance is switched on. On models with the reversing function, the function indicator flashes for as long as the 1·2 | rev button is pressed.
Release button
Press the release button to unlock an attachment fitted on the appliance. Only when the release button is pressed is it possible to turn the attachment clockwise and remove it from the base unit.
Cable storage compartment
The mains cable can be pulled out of the cable storage compartment or pushed back in again. Only ever pull the cable out as much as is required.
Storage compartment
Unused perforated discs belonging to the meat mincer can be kept in the storage compartment and it closed with the cover.
Overload protection
To prevent serious damage to your appliance if the base attachment is overloaded, the agitator paddle has a notch (predetermined breaking point). If overloading occurs, the agitator paddle will break at this point. A new agitator paddle is available from Customer Service (No. 630701). Spare parts with a predetermined breaking point are not covered by our warranty obligations.
Replace agitator paddle

- Release the screw in the agitator paddle with a screwdriver (PH2) and remove the faulty paddle.
- Fit a new agitator paddle and screw tight again.
Speed setting
ONLY MFW36.../MFW38...
Using the speed setting feature, the speed can be set to 1 (slow) or 2 (fast).
Caution!
For certain applications, it is imperative to use speed 1 (slow). Take note of the recommended speeds! See table → Fig.
- Switch on the appliance with button O/I. The appliance will run at speed 2 (fast). Press button 1-2 | rev briefly. The appliance will switch to speed 1 (slow). Press button 1-2 | rev briefly. The appliance will switch back to speed 2 (fast).
Reversing function
ONLY MFW36.../MFW38...
The reversing function is designed to release food that has got stuck by briefly running the worm gear in reverse. The reversing function switches off automatically after 15 seconds.
Caution!
Never press and hold button 1-2 | rev continuously while the appliance is switched on. Only press and hold button 1-2 | rev continuously once the appliance has come to a complete stop.
- Switch the appliance off with button O/I and wait until the drive has stopped. Press and hold button 1-2 | rev. After approx. 5-10 seconds, release button 1-2 | rev and wait for the drive to come to a standstill.
- Switch the appliance on again with button O/I.
Note:
If food that has got stuck is not released by briefly putting the appliance into reverse, switch the appliance off, unplug and clean it. → "Care and daily cleaning" see page 25
Base unit
Preparation
Risk of injury!
Do not insert the mains plug until all preparations for working with the appliance are complete and the required attachments are assembled correctly and connected to the base unit.
- Place the base unit on a stable and level work surface. Pull the mains cable out of the cable storage compartment to the required length.
The base unit is now prepared.
Base attachment
The base attachment can be used for the following applications:
Meat mincer
For chopping up raw or cooked food. Select the appropriate perforated disc depending on the type and consistency of the food to be processed. → "Tips" see page 27
Sausage filler
For filling artificial and natural casings with sausage meat. For producing meat rolls.
Kebbe maker
For producing tubes of dough or minced meat.
Pasta maker
For producing spaghetti or tagliatelle.
Whirl maker
For producing 3 different dough profiles for whirls.
Note: Other applications are possible using the base attachment and appropriate accessories available from Customer Service.
Caution!
When assembling the different individual parts, make sure that the notched markings on the inserts match up with the relevant one on the housing.
Preparation for meat mincer
Risk of injury!
Do not reach into the sharp knife.
Caution!
Always only use one perforated disc.
See Fig. D
- Insert the worm gear with the agitator paddle at the front in the housing.
- First fit the knife and then the required perforated disc onto the worm gear.
- Fit the threaded ring onto the housing and screw tight in a clockwise direction without using force. The meat mincer is now prepared.
Preparation for sausage filler
→ Fig. 3
- Insert the worm gear with the agitator paddle at the front in the housing.
- First fit the bearing ring onto the worm gear and then the sausage nozzle into the housing.
- Fit the threaded ring onto the housing and screw tight in a clockwise direction without using force.
The sausage filler is now prepared.
Preparation for kebbe maker
→ Fig. 1
- Insert the worm gear with the agitator paddle at the front in the housing.
- First fit the conical ring onto the worm gear and then the kebbe nozzle into the housing.
- Fit the threaded ring onto the housing and screw tight in a clockwise direction without using force.
The kebbe maker is now prepared.
Preparation for pasta maker
→ Fig. 6
- Insert the worm gear with the agitator paddle at the front in the housing.
- Insert the required pasta disc into the housing.
- Fit the threaded ring onto the housing and screw tight in a clockwise direction without using force.
The pasta maker is now prepared.
Preparation for whirl maker
→ Fig. H
- Insert the worm gear with the agitator paddle at the front in the housing.
- First fit the dough nozzle into the housing and then the forming disc.
- Rotate the forming disc until the required profile is at the bottom.
- Fit the threaded ring onto the housing and screw tight in a clockwise direction without using force.
The whirl maker is now prepared.
Use
Note: The food is processed in different ways depending on the application.
"Recipes" see page 25
The following example describes use of the base attachment as a meat mincer:
Risk of injury!
- Do not reach into the feed chute with your hands.
- Only use the pusher when adding more food.
Caution!
- Do not process bones, gristle, sinews or other solid components.
- Do not process frozen meat.
- Do not apply great force with the pusher.
-> Sequence of figures I
- Fit the prepared attachment onto the drive of the base unit, holding it at an angle.
- Turn the attachment anticlockwise until you hear it click into position.
- Fit the filling tray and insert the pusher in the feed chute.
- Prepare your food. Chop up large parts beforehand so they fit into the feed chute without having to press them in.
- Place a suitable container under the attachment. Add the prepared food to the filling tray.
- Connect the mains plug. Switch on the appliance.
Note (MFW36.../MFW38...):
After switching on, the appliance runs at the ideal speed 2 (fast).
- Use the pusher to slide the food down the feed chute, applying light pressure.
- Once you have finished, switch off the appliance and pull out the mains plug.
- Remove the filling tray and pusher.
- Hold down the release button and turn the attachment clockwise until it disengages.
- Remove the attachment, take it apart and clean all parts. → "Care and daily cleaning" see page 25
Shredding attachment
For shredding, grating and slicing items such as cheese, fruit, vegetables, nuts, almonds, dried bread rolls and other hard foodstuffs. Select the appropriate insert depending on the type and consistency of the food to be processed. → "Tips" see page 27
Preparation
Risk of injury!
Do not reach into the sharp blades and edges of the shredding, grating and slicing inserts.
→ Sequence of figures J
- Open the cap. Fit the required insert into the housing.
- Close the cap until you hear it click into position.
The shredding attachment is now prepared.
Use
Risk of injury!
- Do not reach into the feed chute with your hands.
- Only use the pusher when adding more food.
Caution!
- The pusher can only be inserted in one direction.
- Remove hard shells (e.g. on nuts).
- Do not apply great force with the pusher.
Caution! (MFW36.../MFW38...)
- Always use the shredding and cutting inserts at speed 1 (slow).
- Use the grating insert at speed 2 (fast).
-> "Speed setting" see page 21
-> Sequence of figures K
- Fit the prepared attachment onto the drive of the base unit, holding it at an angle.
- Turn the attachment anticlockwise until you hear it click into position.
- Fit the filling tray and insert the pusher in the feed chute.
- Prepare your food. Chop up large parts beforehand so they fit into the feed chute without having to press them in.
- Place a suitable container under the attachment. Add the prepared food to the filling tray.
- Connect the mains plug. Switch on the appliance.
Caution! (MFW36.../MFW38...)
After switching on, the appliance runs at speed 2 (fast). To use the shredding and cutting inserts, you must press button
1·2 | rev once to switch to speed 1 (slow). → "Speed setting" see page 21 7. Use the pusher to slide the food down the feed chute, applying light pressure. The food is now cut up or shredded.
- Once you have finished, switch off the appliance and pull out the mains plug.
- Remove the filling tray and pusher.
- Hold down the release button and turn the attachment clockwise until it disengages.
- Remove the attachment, take it apart and clean all parts. → "Care and daily cleaning" see page 25
Citrus press attachment
For squeezing juice out of citrus fruits, e.g. lemons, oranges, grapefruits.
Preparation
Risk of injury!
The attachment for the citrus press is directly assembled on the base unit. Do not insert the mains plug until all preparations for working with the appliance are complete.
Caution!
The base unit is moved through 90° for preparation and use of the citrus press attachment. Never use other attachments in this position.
→ Sequence of figures
- Hold the base unit by the carrying handle and carefully tip it up so that the drive points upwards. Possibly turn the base unit to make the buttons easily accessible.
- Insert the driving shaft with the spring element pointing down into the drive of the base unit.
Caution!
It should be possible to push the driving shaft down lightly with your finger. It must not become sticky with residue from juice or become blocked with pips or foreign bodies.
- Fit the collecting tray onto the drive at an angle.
- Turn the collecting tray anticlockwise until you hear it click into position.
- Fit the filter insert onto the collecting tray.
- Fit the pressing cone onto the driving shaft.
The citrus press attachment is now fitted to the base unit and prepared.
Use
Sequence of figures M
- Cut the citrus fruits in half.
- Place a suitable container under the attachment.
- Connect the mains plug. Switch on the appliance. The drive is running.
Caution! (MFW36.../MFW38...)
After switching on, the appliance runs at speed 2 (fast). To use the citrus press, you must press button 1· 2 | rev once to switch to speed 1 (slow). → "Speed setting" see page 21
- Position the halved citrus fruits with the cut surface on the pressing cone and press down. As soon as the fruit is pressed onto the pressing cone, the cone will rotate.
- To finish the process, reduce the pressure on the cone.
- Once you have finished, switch off the appliance and pull out the mains plug.
- Hold down the release button and turn the attachment clockwise until it disengages.
- Remove the attachment, take it apart and clean all parts. → "Care and daily cleaning" see page 25
Notes:
- To obtain the largest amount of juice, the pressing procedure should be repeated a few times.
- The filter insert with the pulp and pips should be emptied as necessary.
Care and daily cleaning
The appliance, all attachments and the relevant accessories must be thoroughly cleaned after each use.
Risk of electric shock!
- Disconnect the mains cable from the socket prior to cleaning.
- Never immerse the base unit in liquids and do not clean it in the dishwasher.
Risk of injury!
Do not reach into the sharp blades and edges of the shredding and slicing inserts.
Caution!
- Do not use any cleaning agents containing alcohol or spirits.
- Do not use any sharp, pointed or metal objects.
- Do not use abrasive cloths or cleaning agents.
Fig. N gives an overview of how to clean the individual parts.
Wipe the outside of the base unit with a soft, damp cloth and dry it off. - Dismantle the attachments used in reverse order (see "Preparation" for the relevant attachment). Clean all accessories with a detergent solution and a soft cloth/sponge or with a soft brush. - Allow all parts to dry.
Notes:
- Immediately rub metal parts dry and apply a little cooking oil to protect them from rust.
- Discolouration of plastic parts may occur when processing foods such as carrots. This can be removed with a few drops of cooking oil.
Recipes
Note (MFW36.../MFW38...):
For all operating steps, set the speed to 2 (fast).
Kebbe
Dough pockets:
- 500 g lamb, cut into strips
- 500 g bulgur wheat, washed and drained
- 1 small onion, chopped
Process the lamb and wheat with the meat mincer, alternating between the two (perforated disc, fine). Mix the dough thoroughly and mix in the onion. Process the mixture another two times with the meat mincer.
Filling:
- 400 g lamb, cut into strips
- 2 medium-sized onions, chopped
- 1 tablespoon of oil
- 1 tablespoon of flour
- 2 teaspoons of pimento. Salt and pepper. Process the lamb with the meat mincer (perforated disc, fine). Fry the onions until golden brown.
- Add the lamb and fry until well done.
- Add the remaining ingredients. Fry everything gently for about 1-2 minutes. Pour off the excess fat. Leave the filling to cool down.
Prepare the kebbe:
Use the kebbe maker to process the mixture for dough pockets. Cut off pieces 7.5 cm in length from the hollow strand of dough. Press one end of the dough pocket to seal. Insert a little filling in the opening and also seal the other end of the dough pocket. Heat the oil (approx. 180°C) and deep-fry the dough pockets for about 6 minutes until golden brown.
Bread dumplings
- 300 g fresh white bread - 20 ml milk
- 40 g butter or margarine - 3 eggs
- 1 tbsp finely chopped onions
- Parsley - A little flour Salt and pepper Cut the bread into slices 10 mm thick and halve lengthways. Add 20 ml of milk and soak. Process the moistened bread for approx. 50 secs with the meat mincer (perforated disc, medium).
- Add the finely chopped onions, parsley and melted butter and mix.
- Add the whisked eggs, salt and pepper and mix into the bread dough.
Leave the dough to prove for several minutes. Then knead again. Shape the dumplings with wet hands. Roll the dumplings in flour. Place dumplings in boiling water and leave to simmer for approx. 20 minutes. Do not bring to the boil!
Pasta
Basic recipe for pasta dough with eggs:
- 230 g wheat flour (type 405) or finely ground wheat flour - 2 eggs
Note: You will obtain the best results if you make the dough with the Bosch MUM5 food processor and stirrer (maximum quantity:
1 x basic recipe).
Process all ingredients briefly (10 x about 3 seconds) with the stirrer on setting M. If required, add more flour.
Making pasta:
Prepare the base unit using the pasta maker and required insert. - Add a small amount of the dough to the filling tray. - Switch on the appliance and press the dough into the chute with the pusher. Cut the pasta to the required length directly at the outlet with a knife and place on a piece of cotton or wooden board dusted with flour.
Whirls
Basic recipe for shortcrust pastry:
- 125 g butter (room temperature)
- 100-125 g sugar -1 egg -1 pinch salt -A little lemon peel or vanilla sugar -250gflour Baking powder if required
Note: You will obtain the best results if you make the dough with the Bosch MUM5 food processor and stirrer.
Mix all ingredients with the stirrer for about 1/2 minute at setting 1 (1), and then for about 2-3 minutes at setting 6 (3).
Making the biscuits:
Prepare the base unit using the whirl maker and the required dough profile. - Add part of the dough to the filling tray. - Switch on the appliance and press the dough into the chute with the pusher. - Remove the dough directly at the outlet in the required length and place on a baking tray dusted with flour or covered with greaseproof paper.
Tips
Meat mincer
Using the perforated discs
- Perforated disc, fine (2.7 mm) for: cooked chicken / pork / beef, cooked liver, cooked fish for soups; raw pork and beef for meat loaf; raw liver, meat and bacon for liverwurst; pork for Mettwurst
- Perforated disc, medium (4 mm) for: pork and beef for pâté and Cervelat sausage
- Perforated disc, coarse (8 mm) for: roast pork for goulash soup; leftovers (joint, sausage) for bakes. If you require a finer consistency to your processed food, process it several times or use different perforated discs one after the other (coarse, medium, fine).
- You can add other ingredients (e.g. onions, spices) directly during processing. This ensures all ingredients are mixed together thoroughly.
Sausage filler
Soak natural casing in lukewarm water for about 10 minutes before processing. - Do not stuff casings too full or the sausages may burst during boiling or frying.
Shredding attachment
Caution! (MFW36.../MFW38...)
- Always use the shredding and cutting inserts at speed 1 (slow).
- Use the grating insert at speed 2 (fast). → "Speed setting" see page 21
Using the inserts
- Slicing insert: for carrots, celery, kohlrabi, courgettes
- Shredding insert (coarse): for carrots, nuts, hard cheese (e.g. Emmentaler)
- Shredding insert (fine): for nuts, hard cheese, Parmesan cheese
- Grating insert: for potatoes, Parmesan cheese, nuts
Disposal
Dispose of packaging in an environmentally-friendly manner. This appliance is labelled in accordance with European Directive 2012/19/EU concerning used electrical and electronic appliances (waste electrical and electronic equipment - WEEE). The guideline determines the framework for the return and recycling of used appliances as applicable throughout the EU. Please ask your specialist retailer about current disposal facilities.
Guarantee
The guarantee conditions for this appliance are as defined by our representative in the country in which it is sold. Details regarding these conditions can be obtained from the dealer from whom the appliance was purchased. The bill of sale or receipt must be produced when making any claim under the terms of this guarantee.
Changes reserved.
Spare parts and accessories
| Spare parts and accessories | ||
| 2.7 mm | 638407 | Perforated disc (fine) for meat mincer |
| 4 mm | 637985 | Perforated disc (medium) for meat mincer |
| 8 mm | 637986 | Perforated disc (coarse) for meat mincer |
| 637987 | Sausage filler: for filling artificial and natural casings with sausage meat. For producing meat rolls. | |
| 12000397 | ||
| 638281 | Kebbe maker: for producing tubes of dough or minced meat. | |
| 12001096 | Pasta maker: For producing spaghetti or tagliatelle. Whirl maker: For producing 3 different dough profiles for whirls. | |
| 12011263 | Shredding attachment: for shredding, grating and slicing | |
| 798161 | Slicing insert for the shredding attachment | |
| 798162 | Shredding insert (coarse) for the shredding attachment | |
| 798160 | Shredding insert (fine) for the shredding attachment | |
| 798130 | Grating insert for the shredding attachment | |
| 791603 | Citrus press attachment: for squeezing oranges, lemons and grapefruits. | |
| Spare parts and accessories are available from retailers and Customer Service. | ||
Troubleshooting
| Problem Cause Remedy | ||
| The appliance does not start when switched on. | Appliance has no power supply. | Insert the mains plug in the socket. |
| The appliance is running normally, but the food is not being processed. | The appliance was overloaded, and the agitator paddle has broken at the predetermined breaking point. | Switch the appliance off and wait until it has stopped. Unplug the appliance, remove the attachment, take it apart and clean. Replace the agitator paddle. → “Overload protection” see page 21 |
| The food is not being processed or only very slowly. | The attachment or worm gear is blocked. | Appliance without reversing function: Switch appliance off, wait until it has stopped and unplug. Remove the attachment, take it apart and clean to eliminate the blockage. → “Care and daily cleaning” see page 25 |
| Appliances with reversing function: Switch off the appliance with button O/I and wait for the drive to come to a standstill. Press and hold button 1·2 | rev. After approx. 5-10 seconds, release button 1·2 | rev and wait for the drive to come to a standstill. Switch the appliance on again and continue to use it. → “Reversing function” see page 21 | ||
| The pressure on the pusher is too great or the feed chute is too full. | Reduce the pressure on the pusher and fill the feed chute with less food. | |
| The food to be processed still contains hard components. | Remove hard components. Precook/steam vegetables before processing them. | |
| The reversing function does not start. | Button 1·2 | rev was pressed too briefly. | Press and hold button 1·2 | rev until the reversing function starts. |
| The worm gear is blocked right up. | Switch the appliance off, wait until it has stopped and unplug. Remove the attachment, take it apart and clean to eliminate the blockage. → “Care and daily cleaning” see page 25 | |
| If you are unable to solve the problem, always call the hotline! You will find the telephone numbers at the back of these instructions. | ||
Overload safety 34
Storage compartment
Storage compartment
Overload safety
Overload protection. 62
The pasta maker is prepared.
Warning! MFW36.../MFW38...
Warning! MFW36.../MFW38...
Protective cover for sharp blades
Fig. H
- Place the Koxia on the oven floor and close the oven door.
- Place the first shelf at the lowest position in the oven, as the dish needs space.
- Push the dish in, without letting the desired dish touch the bottom.
- Place the baking tray on the shelf and push it in without using much force towards the oven door. The diffuser for small cakes and pastries with a core is ready.
Use
The accessory is ready.
Use
Risk of injury
-Do not put your hands inside the filling opening. - For the reverse, use only the push button.
Caution!
Information (MFW36..../MFW38....):
www.bosch-home.com/tr
www.bosch-yetkiliservisi.com
Kobacn Wnpu: Iy BnroTOBHeHry KOBacOK Ta pynetIB.
Hacadka Ke66e: Дя пи�otуваньларширobahnx M'Яснх KOTJIeTOK Ke66e.
Macaroni attachment: for forming spaghetti or flat macaroni.
Citrus juicer attachment: for juicing citrus fruits.
The processing products must not contain hard parts (e.g., bones). Do not use the appliance for processing other objects. When using permitted additional parts by the manufacturer, additional instructions for use apply. Always use only with original parts and accessories. Never use attachments or inserts for filling and emptying for other devices. For appropriate attachments, always use reliable parts.
Use the appliance only indoors and at ambient temperatures at altitudes not exceeding 2000 m above sea level. Do not place the appliance on hot surfaces or near them, e.g., on a stove.
9 Citrus juicer attachment
a Collection container with strainer cone Citrus juicer attachment d Drive shaft with spring
- Model-dependent
These instructions for use describe different versions. The illustrations show the appliance. → Figure
Spare parts and accessories can be purchased from the service center or at www.bosch-home.com. → "Spare parts and accessories" see page 210
Discs that are not used can be stored in the container and closed with the lid.
Overload protection
If the overload protection is triggered, the appliance switches off. The overload protection is triggered if the appliance is overloaded. The appliance switches off automatically. The overload protection can be reset in the service center (No. 630701). The warranty does not cover damage caused by overload.
Replacing the overload protection
→Figure
- Unscrew the screw in the overload protection with a suitable screwdriver (PH2) and remove the overload protection.
- Be careful to comply with all laws and regulations.
Only MFW36.../MFW38...
Adjusting the capacity allows you to set the required rotation speed: 1 (full) or 2 (fast).
Attention!
Preparing the sausage attachment
→ Figure
- First insert the worm into the housing.
- Slide the support ring onto the worm shaft, then insert the sausage nozzle into the housing.
- Place the cutting ring on the housing and tighten it clockwise without applying excessive force.
Sausages are ready for operation.
Preparing the kebbe attachment
→ Figure F
- First insert the shaft with the worm into the housing.
- Slide the conical ring onto the worm shaft, then insert the kebbe nozzle into the housing.
- Place the cutting ring on the housing and tighten it clockwise without applying excessive force.
The pasta attachment is ready for use.
Preparing the pasta attachment
→ Attachment
- First insert the auger into the housing.
- Insert the required disc for shaping the pasta into the housing.
- Install the cutting ring on the housing and tighten it clockwise without excessive force.
The pasta attachment is ready for use.
Do not touch the sharp blades and cutting edges of the inserts, especially when cutting.
→ Grater attachment
- Open the hopper. Insert the desired insert into the housing.
- Close the hopper until it clicks into place.
The grater attachment is ready for use.
Application
There is a risk of injury!
- Do not put your hands into the feed tube of the meat grinder. - For detailed instructions, see the operating manual.
Attention!
Do not insert the pusher into this direction. - Insert the pusher (e.g., nuts). - Do not press too hard on the pusher.
Attention! (MFW36.../MFW38...)
The pusher for chopping and slicing can only be used at speed 1 (low). - The pusher for pressing can be used at speed 2 (high).
→ "Adjusting the speed" see page 202
→Operating instructions
- Insert the prepared pusher with slight pressure onto the drive of the main unit.
- Turn the pusher against the direction of the arrow until it is firmly fixed in the groove.
- Place the filling bowl and insert the pusher into the feed tube. 4. Process the food. Pre-cut the ingredients so that they fit into the feed tube without pressing. 5. Add the ingredients for processing. Place the prepared food for processing into the filling bowl. 6. Connect the plug to the socket. Switch on the device.
Attention! (MFW36.../MFW38...)
After switching on, the device starts at speed 2 (high). To use the pusher for chopping and slicing, you must press the button 1-2 | rev 1 time; the device switches to speed 1 (low). → "Adjusting the speed" see page 202
- With light pressure, push the food to be processed into the feed tube. Chopping or slicing of the food occurs. 8. When the work is finished, switch off the device and pull the plug out of the socket.
- Remove the filling bowl and the pusher.
- Press the safety button in the pressed state and turn the pusher in the direction of the arrow until it is unscrewed.
- Remove the pusher, disassemble and clean all parts. → "Cleaning and maintenance" see page 207
Juice extractor attachment
The juice extractor attachment is installed on the main drive unit and is ready for operation.
Usage
→ Instructions M
- Cut the citrus fruits into halves. 2. Place the drive unit under the attachment. 3. Connect the plug to the socket. Switch on the device. The device starts working.
Attention! (MFW36.../MFW38...)
After switching on, the device starts at speed 2 (high). To use the citrus press, you must press the button 1-2 | rev 1 time; the device switches to speed 1 (low). → «Speed setting» see page 202
- Cut the citrus fruits into halves and press them with the cut side down onto the cone of the juice extractor. Press the fruit down. When the fruit is pressed onto the cone, the cone starts rotating.
- To complete the juice extraction process, change the pressing force on the cone of the juice extractor. 6. When the work is finished, switch off the device and remove the plug from the socket.
- Press the release button and hold it in the pressed state, turn the attachment counterclockwise until it unscrews.
- Remove the attachment, disassemble it and clean all parts. → «Cleaning and maintenance» see page 207
Tips:
- To achieve optimal juice yield, the juice extraction process should be repeated several times. - If necessary, empty the strainer with coarse fruit pulp and seeds.
Cleaning and maintenance
The device, all attachments and used accessories must be thoroughly cleaned after each use.
Danger of injury from steam or hot water pipes.
- Before cleaning, the appliance must be disconnected from the socket.
- Never immerse the base unit in water or rinse it under running water.
Danger of injury!
Do not touch the sharp blades and edges of the inserts for chopping and slicing.
Attention!
-Do not use cleaning agents containing alcohol. -Do not use sharp, pointed or metal objects. -Do not use abrasive sponges or cleaning agents.
For the appliance you will find a short description, see individual details.
■Wipe the base unit with a damp cloth and let it dry. ■Disassemble the used attachments in reverse order (see section "Preparing the appropriate attachment"). Rinse all accessories with a mild cleaning agent, using a cloth/sponge, or rinse with soft water. Dry all parts.
Tips:
-Metal parts dry immediately and coat with cooking oil to protect against corrosion. -Stains, e.g., from carrots on plastic parts may form colored spots. They can be removed with a few drops of cooking oil.
Recipe
Tip (MFW36.../MFW38...): For all working operations set speed 2 (speed).
Cable
Stuffing tube:
-500 g of barley, chopped with straw -500 g of large onions, washed and placed in water -1 small bowl, placed
Boil the onions and barley in a meat grinder (with a disk, fried).
Mix the meat grinder, add the onion. Pour the boiled mixture through the meat grinder.
Filling:
-400 g of barley, chopped with straw -2 strong onions, chopped
-1 tablespoon of oil -1 tablespoon of flour -2 tablespoons of tomato paste -salt and pepper to taste. Grind in a meat grinder (with a disk, fried).
Boil until golden-brown color.
-Add the barley and fry. Add the other ingredients. All this simmer for 1-2 minutes. Remove from heat. Cool the filling.
Kebab tubes:
Grease the tubes with the help of a kebab skewer. Place the tubes on a skewer, string them with pieces of 7.5 cm.
Fill one end of the tube. Press the filling into the hole and also fill the other end of the tube. Heat the oil (approx. 180 °C) and fry the tube in the fryer for approx. 6 minutes until golden-brown.
Bread dumplings
-300 g of dry white bread -20 ml of milk -40 g of butter or margarine -3 eggs -1 tsp of finely chopped onion - a little flour -salt and pepper to taste. Cut the bread into cubes of 10 mm and sprinkle with water. Pour 20 ml of milk and let it soak. ■Soak the bread cubes in the meat grinder (with a disk with medium holes) for about 50 seconds. Add the finely chopped onion, melted butter and mix the ingredients. ■Add the egg, salt and pepper to the bread mixture. Knead for a few minutes. Then repeat. For forming the dumplings, the dough should be well kneaded. The dumplings need to be boiled in salted water. Drop the dumplings into boiling water and cook for about 20 minutes. Do not bring to a boil!
Macaroni products
Basic dough recipe
3aTocyBaHHpeiITKOBnxDnCKIB
- PewiTKOBn DnCK, dpi6Hn (2,7 MM): BapeHa KypaTHHa, CBHHa, YIOBnuHa, BapeHa neiHKa, BapeHa p6a dJa cyniB; Cnpa CBHHa i JIOBnuHa dJa pyJeTy 3py6HeHO rCa; Cnpa neiHKa, M'aco i caNo dJa IIBepHOI KO6acn; CBHHa dJa CnpOKOnHeOJ KO6acn
- PeWiTKOBn DnCK, cepeHni (4 MM): CBNHnHa i JIIOBUnHnHa dIy nauTeTy i cepBeNaTy
- PewiTKOBn Dnck, KpyHn (8 MM): CmAgHea CBnHnHa DnI rIyIuOBOrO cyny; peiTKn (HaNP., neyeHi, KOb6acn) dIra 3anikaHKn i3 peiTOK ■KaHIO nOri6Ha 6iNbIbIa Dpi6Ha KOHCnCTeHcIg npOdyKTIb nepepo6Kn, NOBTOPiTb npOce cnoDi6HeHHa I BVKOpuCTOByIte noOeproBO pi3Hi peWitKoBI DNCKN (KpyNHn, cepeHni, dpi6Hn). I OdaJIbIài iInrpeDiEcHTn (HaNP., Cn6yIIO, npraHouzi) MoXHa DoJaBaTn 6e3nocepeHbO NiD Yac NepemelIOBaHHa. TaKIM yHOM Do6pe NepemiUaOTbcra yci InrpeDiEcHTn.
Kob6acnI shnpu
HaTpyaIbHy KOb6achy oboJOnHky nepei nepepo6ko 3amOitb TenPi Bodi Ha npn6n.10 XBnInH. OboJohky KO6acn He 3anOBHIOHTe HADTO《Tyro》,OckIbKnPiJ qac BapHHa6o CmaXeHHa KOB6ackm MoKyTb TpiCHyTN.
Hacadka-Tepka
YBara! (MFW36.../MFW38...)
- HacaKn IJRA WATkyBaHHra Ta Hapi3aHHa MoXHa BnKOpNCTOByBaTn JINHe Ha 1WbNdkOcTi 1 (NoBInbHo). -Hacaiky dIaHaTnpaHnCniD BnKOpNCTOByBaTn Ha WbNdkOcTi 2 (WbNdkO).
→ «HanaammyaHaHa haueudKocmi» duue. cmop. 202
3aTocyBaHHBCTaBOK
- BcTaBkaДЯHapi3aHHa:ДЯ MOpKBn, ceIepi, KOnbpa6i, Ka6auchKIB
- Bctabka IJNA WATkyBaHHa (rpy6a):IJI MOpKBn, ropixiB, TBepdoro cnpy (HapnKnaI, eMeHTaIbcbKO)
- BcTaBkaДЯ WAtKyBaHnR (Dpi6Ha): Дя ropixiB, TBePdOrO cnpy, cnpy napMe3aH
- Insert for: for cartridges, Parmesan cheese, nuts
Disposal
This product is marked in accordance with the European Directive 2012/19/EU on waste electrical and electronic equipment (WEEE). The directive defines the possibilities for returning and recycling used appliances within the European Union. For current disposal options, please contact your local specialized store.
Warranty terms
For this device, the warranty terms issued by our competent representative in the country where you purchased the device apply. You can obtain the warranty terms at any time from the specialized store where you purchased the device, or directly from our representative in your country. The warranty terms and addresses are provided on the last four pages of this brochure. Additionally, the warranty terms are also available on the internet at the specified address. To use warranty services, you must present the purchase receipt in any case.
Possible changes.
Spare parts and accessories
| 3anacnii chactnni ta akcescyapn | ||
| 2.7 mm | 638407 | Peшітковий дисk (дрибни) дlya м'ясорубки |
| 4 mm | 637985 | Peшітковий дисk (середни) дlya м'ясорубки |
| 8 mm | 637986 | Peшітковий дисk (крушини) дlya м'ясорубки |
| 637987 | Ковбасништоц: дlya заловенnya Ковбасю масоюштунói i натуарьни Ковбаси ооблонки. Дlya Формуванни рунетев. | |
| 12000397 | ||
| 638281 | Hадада кеббe: дlya Формуванни фаршированх M'ясних котлесок кеббe. | |
| 12001096 | Мakapонна habадka: дlya Формуванни спагетi або плackих мakapонíв. Hадада дlya φíryрноу почива: дlya Фор说我- Ванни Трbox рizновindíв Вдсадноу φíryрно- пechива. | |
| 12011263 | Hадада.Terрka: дlya Шаткуванни, Терты i Нарizанни | |
| 798161 | Вставka дlya habинни дlya habин-Tерки | |
| 798162 | Вставka дlya Шаткуванни (крушини) дlya Насадни-Tерки | |
| 798160 | Вставka дlya Шаткуванни (дрибни) дlya Насадни-Tерки | |
| 798130 | Вставka дlya Терты дlya habин-Tерки | |
| 791603 | Hадада-cokobintnckay дlya си trypсobи: Длиа Вочаclюванни соку 3 лимони, anelbcsinib ч греифрутов. | |
Spare parts and accessories can be purchased at the store or service center.
Help with malfunctions
Sausage maker: Preparation of sausages and roasts.
Molding attachment for kebbe: Preparation of rolls with meat and bulgur.
Let the appliance cool down intermittently for a maximum of 10 minutes. Then turn off the appliance and let it cool to room temperature.
Important!
Warranty service conditions..224
Spare parts and accessories 225
Troubleshooting guide... 226
Overview
Figure A
1 Main unit
a Drive for attachments b Button I or I/O* c Button O or 1-2 | rev* d Operating status indicator e Unlock button f Handle for carrying g Compartment for storing the lid h Mains cable i Cable compartment
2 Main attachment
a Housing b Feed tube c Feed chute d Pusher e Disc with hook f Blade insert
3 Cutting discs
a Blade b Shredding disc for fine shredding (2.7 mm)* c Shredding disc for medium shredding (4 mm) d Shredding disc for coarse shredding (8 mm)
4 Sausage filler parts
a Support ring b Sausage filler nozzle
5 Kebab attachment*
a Conical ring b Kebab nozzle
6 Pasta attachment*
a Disc for making pasta b Disc for making pasta with cleaning tool
7 Funnel for liquid filling*
and a funnel for the test with a molded disc (rotating)
→Figure
8 Attachment for grinding*
a Housing b Filling pipe c Cover d Filling chute e Pusher f Funnel for fine grinding g Funnel for coarse grinding h Funnel for shredding i Grater attachment
9 Attachment for citrus juicer*
a Collection bowl b Sieve c Filter with cone d Drive for citrus juicer e Spring
- Depending on the model, different versions of the appliance are described in these instructions. The pages with figures show the appliance in assembled condition. →Figure Spare parts and accessories can be obtained through customer service or at www.bosch-home.com. →“Spare parts and accessories” see page 225
Before first
use
Before using the new appliance, it must be unpacked, cleaned, and checked.
Attention!
It is strictly forbidden to put a damaged appliance into operation!
Remove the main unit and all accessories from the packaging. Remove any packaging material.
Disassemble the assembled accessories into individual parts. The sequence of actions should be the reverse of the description in the “Preparation” section.
Check the completeness of all parts.
→Figure A/B
Check all parts of the device for external damage. ■ Before first use, carefully clean and dry all parts. → «Care and daily cleaning» see p. 221
Control elements and indicators
MFW35...
Button I
Press button I to switch on the device. The drive starts rotating immediately.
Button O
Press button O to switch off the device. The drive stops.
MFW36../MFW38...
Button O/I
Press button O/1 to switch on the device. The drive starts working at speed level 2 (fast). Press button O/1 again to switch off the device. The drive stops.
Button 1-2 | rev
Briefly press button 1·2|rev to switch the device speed between level 1 (slow) and level 2 (fast).
→ «Speed setting» see p. 217 Press and hold button 1·2 | rev to activate the reverse function. → «Reverse function» see p. 217
This model
Operating indicator
When the device is switched on, the operating indicator lights up. In models with a reverse gear, the indicator flashes until button 1·2 | rev is released.
Unlocking the button
When the unlock button is pressed, the tool installed on the tool holder is released. Only when the unlock button is pressed can the tool holder be turned clockwise and removed from the main block.
Cable compartment
The mains cable can be pulled out of the cable compartment or inserted back. Always pull the cable only to the required length.
Storage compartment
Unused forming discs or brushes can be placed in the storage compartment and closed with the lid.
Overload protection device
To prevent significant damage to the device in the event of an overload of the main setting, the drive shaft bushing is provided with a notch (predetermined breaking point). In the event of an overload, the catch breaks at that point. A new drive shaft bushing can be purchased from the service department (item no. 630701). The warranty does not cover spare parts with a predetermined breaking point.
Replacing the drive shaft bushing
→Figure
- Loosen the screw in the drive shaft bushing with a suitable screwdriver (PH2) and remove the defective drive shaft bushing.
- Insert the new drive shaft bushing and tighten the screw.
Speed setting
ONLY MFW36.../MFW38...
The speed setting can be set to 1 (slow) or 2 (fast).
Attention!
For certain applications, speed mode 1 (slow) is mandatory. Follow the recommendations for speed setting!
See table → Figure
Switch on the device with the O/I button. The device starts operating in speed mode 2 (fast).
Briefly press the 1·2 | rev button. The device switches to speed mode 1 (slow). Briefly press the 1-2 | rev button again. The device switches back to speed mode 2 (fast).
Do not touch the sharp blade.
Attention!
Always use only one forming disc.
Figure D
- Preliminarily insert the disc with the mandrel into the housing.
- First install the blade on the disc, then the forming disc.
- Install the threaded ring on the housing and tighten it clockwise without applying excessive force.
The meat grinder is ready for operation.
Preparing the sausage nozzle
→Figure
- First insert the auger with the drive pin into the housing.
- First install the support ring on the auger, then insert the sausage nozzle into the housing.
- Install the threaded ring on the housing and tighten it clockwise without applying force.
The sausage nozzle is ready for operation.
Preparing the kebab attachment
Figure F
- First insert the auger with the drive pin into the housing.
- First install the conical ring on the auger, then insert the kebab nozzle into the housing.
- Install the threaded ring on the housing and tighten it clockwise without applying force.
The kebab attachment is ready for operation.
Preparing the pasta attachment
→Figure
- Pre-install the nozzle with the guide bushing into the housing.
- Insert the lower disc for macaroni into the housing.
- Screw the threaded ring onto the housing and tighten it along the arrow, without applying excessive force.
The macaroni forming nozzle is ready for operation.
Preparing the forming nozzle for spaghetti
→ Figure H
- Pre-install the nozzle with the guide bushing into the housing.
- First insert the tube for pasta into the housing, and then the forming disc.
- Turn the forming disc so that its profile is at the bottom.
- Screw the threaded ring onto the housing and tighten it along the arrow, without applying excessive force.
The forming nozzle for spaghetti is ready for operation.
Application
Note. Depending on the intended use, the food products are processed differently. → "Recipes" see p. 222
Here is an example of using the main attachment as a meat grinder:
Danger of injury!
Making sausages
Prepare the main unit with the shaping nozzle for stuffing and the shaping nozzle for the dough. Place part of the dough into the loading tray. Turn on the appliance and push the dough through with the pusher into the feed tube. Cut off the dough directly at the outlet to the desired length and place it on a baking sheet lined with parchment paper.
Tips
Meat grinder
Roasted pork for goulash soup; leftovers (e.g., roast, sausage) for casserole from leftovers
If a finer consistency of processed food is required, repeat the grinding process or use different shaping discs sequentially (with large, medium, small holes). Ingredients (e.g., onions, herbs) can be added directly during processing. This ensures all ingredients are well mixed.
Sausages and pâtés
Soak the natural sausage casing in warm water for about 10 minutes before processing. Do not fill the sausage casing too tightly, otherwise the sausages may burst during cooking or frying.
Attachment for shredding
Attention! MFW36..../MFW38...
- The coarse grater with the cutting insert must be used in speed mode 1 (slow). The fine grater should be used in speed mode 2 (fast).
→ "Speed setting" see page 217
Use of the attachments
- Attachments: graters, graters, graters, graters - Attachments for coarse grating: for carrots, nuts, hard cheese (e.g., Emmental) - Attachments for fine grating: nuts, hard cheese, Parmesan - Grater attachment: for potatoes, Parmesan, nuts
Disposal
Dispose of the packaging in an environmentally friendly manner. This appliance is marked according to the European Directive 2012/19/EU on waste electrical and electronic equipment (WEEE). This directive defines the framework for the return and recycling of used appliances as applicable within the EU. For information on disposal options, please contact the retailer where you purchased the appliance.
Warranty conditions
You can obtain comprehensive information on warranty conditions from your nearest authorized service center, from the manufacturer's service center OOO "BSH Household Appliances", or from the accompanying documentation.
We reserve the right to make changes.
Spare parts and accessories
Telephone numbers are listed on the last pages of the instructions.
Manufacturer information on warranty and service
24-hour hotline*: 8 (800) 200-29-61
Official website: www.bosch-home.ru
Addresses of authorized service centers and all service information are available on the official website: www.bosch-home.ru.
We recommend that you use the services of authorized service centers only.
Original accessories and care products for Bosch household appliances can be purchased from our online store: www.bosch-home.ru/store. You can familiarize yourself with ordering, payment, and delivery terms on the website. You can also purchase original accessories and care products from authorized service centers.
1. Product
Fill in the blanks in case this data is not contained in the purchase documents of the product (cash receipt and/or sales receipt, sales invoice).
3. This information is distributed for Bosch brand household appliances: coffee makers, food processors, blenders, scales, kitchen machines, mixers, rice cookers, slicers, toasters, irons, hair dryers, electric knives, juicers, grinders, blenders, steam irons, vacuum cleaners, floor scales, irons, steam stations, and similar products.

- Dear Ladies and Gentlemen, we inform you that confirmation of conformity of our products with mandatory requirements in accordance with the legislation is carried out by the manufacturer through mandatory certification and declaration of conformity.
Information on mandatory confirmation of conformity of our devices, including data on the certificate number of conformity (declaration of conformity) and its validity period, you can obtain at LLC "BSH Household Appliances".
The manufacturer is BSH Hausgerate GmbH, address: Carl-Wery-Str. 34, 81739 Munich, Germany.
The manufacturer's authorized representative in Russia, authorized by the manufacturer on the basis of an agreement with it, is LLC "BSH Household Appliances", 198515, St. Petersburg, Peterhof, st. Karl Siemens, 1, lit. A, additionally in Moscow: 119071, st. Malaya Kaluzhskaya, 1, phone (495) 737-2777, fax (495) 737-2798.
- Mandatory information on the technical characteristics of the device is given on the nameplate of the device or on its label and/or in the accompanying documentation.
6. Accessories and care products
To ensure the functionality of your appliance and care for it, the manufacturer recommends using only original accessories and care products. Original accessories and care products are developed by the manufacturer, they are ideally suited specifically for your appliance. Original accessories and care products meet the highest quality requirements of the Bosch brand, they undergo factory tests to ensure maximum reliability in operation. For all questions related to accessories and care products for your household appliance, you can contact authorized service centers or by phone of the support service.
7. Manufacturer's warranty
The manufacturer provides a warranty for the household appliance purchased by you in the Russian Federation in accordance with the current legislation for a period of 1 year. For household appliances purchased in the Republic of Belarus, for which a warranty card was issued at the time of purchase, the warranty conditions apply that do not contradict the legislation of the Republic of Belarus.
8. Attention! Important norm for the consumer
This device is intended for use exclusively for personal, family, household and other needs not related to entrepreneurial activity, to meet household needs in the sphere of the enterprise, institution or organization. Use of the device for purposes other than those specified is a violation of the rules of operation of the device.
The rating plate is an integral part of the appliance! Please make sure it is present and keep it on the appliance for the entire service life of the appliance. Removing the rating plate will lead to decommissioning of the appliance and possible violation of its operating rules.
The manufacturer is not liable for defects in the appliance if the service center determines that they arose after the transfer of the appliance to the consumer as a result of violation of the rules of use, transportation, storage, actions of third parties, force majeure (fire, natural disasters, etc.), ingress of household insects and rodents, exposure to external factors, as well as as a result of significant violations of the requirements specified in the operating instructions, including instability of the electrical network parameters established by GOST 32144-2013.
To confirm the date of purchase of the appliance during warranty repair or presentation of other claims provided by law, we kindly ask you to keep the purchase documents (receipt, warranty card, other documents confirming the date and place of purchase).
Serviceable appliances during the warranty period are repaired free of charge or replaced with new ones. The decision on the feasibility of replacement or repair remains with the service centers.
9. Service information
After the warranty period expires, the service center, as well as the workshops of our partners, are always ready to offer you their services. The list of addresses of authorized service centers is available on the official website of the manufacturer: www.bosch-home.ru.
The service life of our household appliances (except for kitchen hoods and vacuum cleaners) is 2 years. The service life of kitchen hoods and vacuum cleaners is 5 years. The service life of the product is calculated from the date of its purchase, or if it is impossible to determine, from the date of manufacture of the product indicated on the rating plate of the product in accordance with the manufacturer's standard. The date of manufacture is marked as YYMM, where YY is the year of manufacture (e.g., 1920) and MM is the month of manufacture. To determine the year of manufacture of the appliance, add 1920 to the number YY.
*Free round-the-clock calls within the territory of the Russian Federation.
B34C065N1-1M00 03/2017
Information about household appliances manufactured under the control of BSH Hausgeräte GmbH, Carl-Wery-Straße 34, 81739 Munich, Germany, in accordance with the requirements of technical regulation legislation and consumer protection legislation of the Russian Federation.
.6
e 1
J 1
p
M
.
121 121 121 121 121 121 121
.
(MFW36.../MFW38...)
() 2rjll jglal
y
Jui 1-2 rev jll bii
b+g>1.() 1
ar-5 a 1
.6 1jgl jgll Jzjj Jzll giiil iic
a
| ar-11 | Δ !A### |
| -#. | |
| MFW36.../MFW38...! I ### | .6 . |
| ar-5 a## ## ## ## ## ## ## ## ## ## ## ## ## ## ## ## ## ## ## ## ## ## ## ## ## ## ## ## ## ## ## ## ## ## ## ## ## ## ## ## ## ## ## ## ## ## ## ## ## ## ## ## ## ## ## ## ## ## ## ## ## ## ## ## ## ## ## ## ## ## ## ## ## ## ## ## ## ## ## ## ## ## ## ## ## ## ## ## ## ## ## ## ## ## ## ## ## ## ## ## ## # # # # # # # # # # # # # # # # # # # # # # # # # # # # # # # # # # # # # # # # # # # # # # # # # # # # # # # # # # # # # # # # # # # # # # # # # # # # # # # # # # # # # # # # # # # # # # # # # # # # # 2 (MFW36.../MFW38...) # ### | .7 b# |
| K ### | .8 c# |
| .9 d | |
| .10 | |
| .11 | |
| .12 | |
| .13 | |
| .14 | |
| .15 | |
| .16 | |
| .17 | |
| .18 | |
| .19 | |
| .20 | |
| .21 | |
| .22 | |
| .23 | |
| .24 | |
| .25 | |
| .26 | |
| .27 | |
| .28 | |
| .29 | |
| .30 | |
| .31 | |
| .32 | |
| .33 | |
| .34 | |
| .35 | |
| .36 | |
| .37 | |
| .38 | |
| .39 | |
| .40 | |
| .41 | |
| .42 | |
| .43 | |
| .44 | |
| .45 | |
| .46 | |
| .47 | |
| .48 | |
| .49 | |
| .50 | |
| .51 | |
| .52 | |
| .53 | |
| .54 | |
| .55 | |
| .56 | |
| .57 | |
| .58 | |
| .59 | |
| .60 | |
| .61 | |
| .62 | |
| .63 | |
| .64 | |
| .65 | |
| .66 | |
| .67 | |
| .68 | |
| .69 | |
| .70 | |
| العربية الحرفية | العربية الحرفية |
| العربية الحرفية | العربية الح註冊ية |
| العربية الح註冊ية | العربية الحرفية |
| العربية الح註冊ية | العربية الح註冊ية |
| العربية الح註冊ية | العربية الح註冊ية |
| العربية الح註冊ية | العربية الح註冊ية |
| العربية الح註冊ية | العربية الح註冊ية |
| العربية الح註冊ية | العربية الح註冊ية |
| العربية الح註冊ية | العربية الح註冊ية |
| العربية الح註冊ية | العربية الح註冊ية |
| MFW36.../MFW38... #p# |
| ###all plabll ### ## ###### ## ###### ## ## ## ## ## ## ## ## ## ## ## ## ## ## ## ## ## ## ## ## ## ## ## ## ## ## ## ## ## ## ## ## ## ## ## ## ## ## ## ## ## ## ## ## ## ## ## ## ## ## ## ## ## ## ## ## ## ## ## ## ## ## ## ## ## ## ## ## ## ## ## ## ## ## ## ## ## ## ## ## ## ## ## ## ## ## ## ## ## ## ## ## ## ## ## ## ## ## ## ## # ## # # # # # # # # # # # # # # # # # # # # # # # # # # # # # # # # # # # # # # # # # # # # # # # # # # # # # # # # # # # # # # # # # # # # # # # # # # # # # # # # # # # # # # # # # # # # # # # # # # # # # 1.2 | rev #j# j# j# j# j# j# j# j# j# j# j# j# j# j# j# j# j# j# j# j# j# j# j# j# j# j# j# j# j# j# j# j# j# j# j# j# j# j# j# j# j# j# j# j# j# j# j# j# j# j# j# jj# j# j# j# j# j# j# j# j# j# j# j# j# j# j# j# j# j# j# j# j# j# j# j# j# j# j# j# j# j# j# j# j# j# j# j# j# j# j# j# j# j# j# j# j# j# j# j# j# j# JJ# J# J# J# J# J# J# J# J# J# J# J# J# J# J# J# J# J# J# J# J# J# J# J# J# J# J# J# J# J# J# J# J# J# J# J# J# J# J# J# J# J# J# J# J# J# J# J# J# J# J# JJ# J# J# J# J# J# J# J# J# J# J# J# J# J# J# J# J# J# J# J# J# J# J# J# J# J# J# J# J# J# J# J# J# J# J# J# J# J# J# J# J# J# J# J# J# J# J# J# J# JJ# JJ# JJ# JJ# JJ# JJ# JJ# JJ# JJ# JJ# JJ# JJ# JJ# JJ# JJ# JJ# JJ# JJ# JJ# JJ# JJ# JJ# JJ# JJ# JJ# JJ# JJ# JJ# JJ# JJ# JJ# JJ# JJ# JJ# JJ# JJ# JJ# JJ# JJ# JJ# JJ# JJ# JJ# JJ# JJ# JJ# JJ# JJ# JJ# JJ#JJ# JJ# JJ# JJ# JJ# JJ# JJ# JJ# JJ# JJ# JJ# JJ# JJ# JJ# JJ# JJ# JJ# JJ# JJ# JJ# JJ# JJ# JJ# JJ# JJ# JJ# JJ# JJ# JJ# JJ# JJ# JJ# JJ# JJ# JJ# JJ# JJ# JJ# JJ# JJ# JJ# JJ# JJ# JJ# JJ# JJ# JJ# JJ# JJ# JJ# J# J# J# J# J# J# J# J# J# J# J# J# J# J# J# J# J# J# J# J# J# J# J# J# J# J# J# J# J# J# J# J# J# J# J# J# J# J# J# J# J# J# J# J# J# J# J# J#J# J# J# J# J# J# J# J# J# J# J# J# J# J# J# J# J# J# J# J# J# J# J# J# J# J# J# J# J# J# J# J# J# J# J# J# J# J# J# J# J# J# J# J# J# J# J# J# J# J#J#J#J#J#J#J#J#J#J#J#J#J#J#J#J#J#J#J#J#J#J#J#J#J#J#J#J#J#J#J#J#J#J#J#J#J#J#J#J#J#J#J#J#J#J#J#J#J#J#J# J#J#J#J#J#J#J#J#J#J#J#J#J#J#J#J#J#J#J#J#J#J#J#J#J#J#J#J#J#J#J#J#J#J#J#J#J#J#J#J#J#J#J#J#J#J#J#J#J# J# |
| J#J# J# J# J# J# J# J# J# J# J# J# J# J# J# J# J# J# J# J# J# J# J# J# J# J# J# J# J# J# J# J# J# J# J# J# J# J# J# J# J# J# J# J# J# J# J# J# J# J# J# J # J# J# J# J# J# J# J# J# J# J# J# J# J# J# J# J# J# J# J# J# J# J# J# J# J# J# J# J# J# J# J# J# J# J# J# J# J# J# J# J# J# J# J# J# J# J# J# J# J# J J# J# J# J# J# J# J# J# J# J# J# J# J# J# J# J# J# J# J# J# J# J# J# J# J# J# J# J# J# J# J# J# J# J# J# J# J# J# J# J# J# J# J# J# J# J# J# J# J# J# |
.0/1 jll bcll ldo n jleal
()2e
jll 1d jn all Jld no jgall
.0/1
1·2 | rev
1·2 | rev jll jlll l
()1jglalae
j(c)2
ar-5
aal lssnsslll j
1.2 rev j
ar-5 a
jbi
J 1
j 1
rev jll la aag
1
aaii iiaai jie aie
aJ 1
i 1
j j 100
B
8*
aclg21
b
C
d i:ill cles
e 1
f 1
2008 2009
0
g 1000 1000
www.bosch-home.com
A/B
Therefore, the area of triangle OBC is equal to the area of triangle BOC plus the area of triangle BOC.
| A | a | b | c | d | e | f | g | h | i | j | k | l | m | n | o | p | q | r | s | t | u | v | w | x | y | z | aa | bb | cc | dd | dd | dd | dd | dd | dd | dd | dd | dd | dd | dd | dd | dd | dd | dd | dd | dd | dd | dd | dd | dd | dd | dd | dd | dd | dd | dd | dd | dd | dd | dd | dd | dd | dd | dd | dd | dd | dd | dd | dd | dd | dd | dd | dd | dd | dd | dd | dd | dd | dd | d | e | f | g | h | i | j | k | l | m | n | o | p | q | r | s | t | u | v | w | x | y | z | a | b | c | d | e | f | g | h | i | j | k | l | m | n | o | p | q | r | s | t | u | v | w | x | y | z | a | b | c | d | e | f | g | h | i | j | k | l | m | n | o | p | q | r | s | t | u | v | w | x | y | z | d | e | f | g | h | i | j | k | l | m | n | o | p | q | r | s | t | u | v | w | x | y | z | d | e | f | g | h | i | j | k | l | m | n | o | p | q | r | s | t | u | v | w | x | y | z | d | e | f | f | g | h | i | j | k | l | m | n | o | p | q | r | s | t | u | v | w | x | y | z | d | e | f | f | g | h | i | j | k | l | m | n | o | p | q | r | s | t | u | v | w | x | y | z | d | e | f | f | f | g | h | i | j | k | l | m | n | o | p | q | r | s | t | u | v | w | x | y | z | d | e | f | f | g | h | i | j | k | l | m | n | o | p | q | r | s | t | u | v | w | x | y | z | d | e | f | g | h | i | j | k | l | m | n | o | p | q | r | s | t | u | v | w | x | y | z | d | e | f | f | g | h | i | j | k | l | m | n | o | p | q | r | s | t | u | v | w | x | y | z | d | e | f | f | g | h | i | j | k | l | m | n | o | p | q | r | s | t | u | v | w | x | y | z | d | e | f | f | g | h | i | l (1) | (2) | (3) | (4) | (5) | (6) | (7) | (8) | (9) | (10) | (11) | (12) | (13) | (14) | (15) | (16) | (17) | (18) | (19) | (20) | (21) | (22) | (23) | (24) | (25) | (26) | (27) | (28) | (29) | (30) | (31) | (32) | (33) | (34) | (35) | (36) | (37) | (38) | (39) | (40) | (41) | (42) | (43) | (44) | (45) | (46) | (47) | (48) | (49) | (50) | (51) | (52) | (53) | (54) | (55) | (56) | (57) | (58) | (59) | (60) | (61) | (62) | (63) | (64) | (65) | (66) | (67) | (68) | (69) | (70) | (71) | (72) | (73) | (74) | (75) | (76) | (77) | (78) | (79) | (80) | (81) | (82) | (83) | (84) | (85) | (86) | (87) | (88) | (89) | (90) | (91) | (92) | (93) | (94) | (95) | (96) | (97) | (98) | (99) | (100) | (101) | (102) | (103) | (104) | (105) | (106) | (107) | (108) | (109) | (110) | (111) | (112) | (113) | (114) | (115) | (116) | (117) | (118) | (119) | (120) | (121) | (122) | (123) | (124) | (125) | (126) | (127) | (128) | (129) | (130) | (131) | (132) | (133) | (134) | (135) | (136) | (137) | (138) | (139) | (140) | (141) | (142) | (143) | (144) | (145) | (146) | (147) | (148) | (149) | (150) | (151) | (152) | (153) | (154) | (155) | (156) | (157) | (158) | (159) | (160) | (161) | (162) | (163) | (164) | (165) | (166) | (167) | (168) | (169) | (170) | (171) | (172) | (173) | (174) | (175) | (176) | (177) | (178) | (179) | (180) | (181) | (182) | (183) | (184) | (185) | (186) | (187) | (188) | (189) | (190) | (191) | (192) | (193) | (194) | (195) | (196) | (197) | (198) | (199) | (200) | (201) | (202) | (203) | (204) | (205) | (206) | (207) | (208) | (209) | (210) | (211) | (212) | (213) | (214) | (215) | (216) | (217) | (218) | (219) | (220) | (221) | (222) | (223) | (224) | (225) | (226) | (227) | (228) | (229) | (230) | (231) | (232) | (233) | (234) | (235) | (236) | (237) | (238) | (239) | (240) | (241) | (242) | (243) | (244) | (245) | (246) | (247) | (248) | (249) | (250) | (251) | (252) | (253) | (254) | (255) | (256) | (257) | (258) | (259) | (260) | (261) | (262) | (263) | (264) | (265) | (266) | (267) | (268) | (269) | (270) | (271) | (272) | (273) | (274) | (275) | (276) | (277) | (278) | (279) | (280) | (281) | (282) | (283) | (284) | (285) | (286) | (287) | (288) | (289) | (290) | (291) | (292) | (293) | (294) | (295) | (296) | (297) | (298) | (299) | (300) | (301) | (302) | (303) | (304) | (305) | (306) | (307) | (308) | (309) | (310) | (311) | (312) | (313) | (314) | (315) | (316) | (317) | (318) | (319) | (320) | (321) | (322) | (323) | (324) | (325) | (326) | (327) | (328) | (329) | (330) | (331) | (332) | (333) | (334) | (335) | (336) | (337) | (338) | (339) | (340) | (341) | (342) | (343) | (344) | (345) | (346) | (347) | (348) | (349) | (350) | (351) | (352) | (353) | (354) | (355) | (356) | (357) | (358) | (359) | (360) | (361) | (362) | (363) | (364) | (365) | (366) | (367) | (368) | (369) | (370) | (371) | (372) | (373) | (374) | (375) | (376) | (377) | (378) | (379) | (380) | (381) | (382) | (383) | (384) | (385) | (386) | (387) | (388) | (389) | (390) | (391) | (392) | (393) | (394) | (395) | (396) | (397) | (398) | (399) | (400) | (401) | (402) | (403) | (404) | (405) | (406) | (407) | (408) | (409) | (410) | (411) | (412) | (413) | (414) | (415) | (416) | (417) | (418) | (419) | (420) | (421) | (422) | (423) | (424) | (425) | (426) | (427) | (428) | (429) | (430) | (431) | (432) | (433) | (434) | (435) | (436) | (437) | (438) | (439) | (440) | (441) | (442) | (443) | (444) | (445) | (446) | (447) | (448) | (449) | (450) | (451) | (452) | (453) | (454) | (455) | (456) | (457) | (458) | (459) | (460) | (461) | (462) | (463) | (464) | (465) | (466) | (467) | (468) | (469) | (470) | (471) | (472) | (473) | (474) | (475) | (476) | (477) | (478) | (479) | (480) | (481) | (482) | (483) | (484) | (485) | (486) | (487) | (488) | (489) | (490) | (491) | (492) | (493) | (494) | (495) | (496) | (497) | (498) | (499) | (500) | (501) | (502) | (503) | (504) | (505) | (506) | (507) | (508) | (509) | (510) | (511) | (512) | (513) | (514) | (515) | (516) | (517) | (518) | (519) | (520) | (521) | (522) | (523) | (524) | (525) | (526) | (527) | (528) | (529) | (530) | (531) | (532) | (533) | (534) | (535) | (536) | (537) | (538) | (539) | (540) | (541) | (542) | (543) | (544) | (545) | (546) | (547) | (548) | (549) | (550) | (551) | (552) | (553) | (554) | (555) | (556) | (557) | (558) | (559) | (560) | (561) | (562) | (563) | (564) | (565) | (566) | (567) | (568) | (569) | (570) | (571) | (572) | (573) | (574) | (575) | (576) | (577) | (578) | (579) | (580) | (581) | (582) | (583) | (584) | (585) | (586) | (587) | (588) | (589) | (590) | (591) | (592) | (593) | (594) | (595) | (596) | (597) | (598) | (599) | (600) | (601) | (602) | (603) | (604) | (605) | (606) | (607) | (608) | (609) | (610) | (611) | (612) | (613) | (614) | (615) | (616) |
Customer Service
AE United Arab Emirates,
BSH Home Appliances FZE Round About 13, Plot Nr MO-0532A
Jebel Ali Free Zone - Dubai Tel.: 04 881 44 01*
mailto:service.uae@bshg.com
www.bosch-home.com/ae
- Sun-Thu 8am to 5pm (exclude public holidays)
AL Republic of Albania Elektro-Service sh.p.k Rruga Kasem Shima, Postal code-1050
Near Mezezi Bridge 1023 Tirana
Tel.: 42278130; -131
mailto:info@elektro-servis.com
EXPERT Service
Rruga e Kavajes
Kulla B Nr 223/1 Kati I
1023 Tirane
Tel.: 44806061; 42274961
Cel: +355 069 60 45555
mailto:info@expert-servis.al
AM Armeniajunuunu ZIGZAGLLC
Charenci str. 25
Yerevan 375025
Tel.: 010 55 60 10
mailto:service@zigzag.am
www.zigzag.am
Gate 1, 1555 Centre Road
Clayton, Victoria 3168
Tel.: 1300 369 744*
mailto:customersupport.au@bshg.com
www.bosch-home.com.au
- Mo-Fr: 24 hours
AZ Azarbaycan Respublikasi, Azerbaijan
Baku Service Company MMC
Azadlig Pr. 116
Baku
Tel.: 125309035
mailto:info@ser-cen.az
www.ser-cen.az
Yurd Service MMC
- Bakikhanoy Str.
Baku, AZ1007
Tel.: 124803301
mailto:info-service@yurd.az
www.yurd.az
Optimal Elektronika MMC
Hasanoghlu 7B
Baku, AZ1072
Tel.: 12954
mailto:xanim.muradova@optimal.az
www.optimal.az
BA Bosnia and Herzegovina
"HIGH" d.o.o
Gradačačka 29b
71000 Sarajevo
Tel./Fax: 033 21 35 13
mailto:centralniservis@yahoo.com
BE Belgium
BSH Home Appliances S.A. - N.V.
Business center FPI, floor 5,
Cherni vrah Blvd. 51B
1407 Sofia
Tel.: 0700 208 17
mailto:informacia.servis-bg@bshg.com
www.bosch-home.bg
BH Bahrain
Khalaifat Est.
BLD 898, R 533, TASHAN 405
Manama
Tel.: 017400553*
mailto:service@khalaifat.com
- Sat-Thu 7am to 5pm (exclude public holidays)
BY Belarus, Benaapycb
OOO“BCX BbITOBaTexHnka"
ten.: 495 737 2961
mailto:mok-kdhl@bshg.com
CA Canada
BSH Home Appliances Ltd.
Tel.: 800 554 9043
www.bosch-home.ca
CH Schweiz, Suisse, Svizzera, Switzerland
BSH Hausgeräte AG
19F, Jinling Asia Pacific Tower,
No.2 Hanzhong Road, Gulou District,
210005 Nanjing, Jiangsu Province
Service Tel.: 400 8855 888*
mailto:careline.china@bshg.com
www.bosch-home.cn
- phone rate depends on the network used
CY Cyprus, KUppos
BSH Ikiakes Syskeves-Service
39, Arh. Makaariou III Str.
2407 Egomi/Nikosia (Lefkosia)
Tel.: 777 78 007
mailto:EGO-CYCustomerService@bshg.com
CYN Turkish Rep. Of North Cyprus
Argas Limited Company
37 Osman Pasa Cad. K. Çiltlik
Lefkosa
Tel.: 02284070
mailto:argas.tenik@yar-group.com
Semson Ticaret Sti, Ltd.
Bedrettin Demirel Cad. no 17
Girne
Tel.: 0816 04 94
mailto:m.defterali@ercantangroup.com
CZ Czech Republic
For more information (e.g. warranty conditions,
extended warranty, etc.) please visit the web-
site www.bosch-home.com/cz/
To arrange an engineer visit, to order spare parts and accessories or for product advice please visit
www.bosch-home.co.uk
or call Tel.: 0344 892 8979*
- Calls are charged at the basic rate, please check with your telephone service provider for exact charges.
GE Georgia,
Elit Service Ltd
Vake-Saburtalo district,
Intersection of Al. Kazbegi ave.
and Kavtaradze Str. 0186
Kavtaradze str. 1
Tbilisi
Tel.: 32 300 020
mailto:info@es.ge
GR Greece, Ελλάς
BSH Ikiakes Siskeves A.B.E.
Central Branch Service
17 km E.O. Athinon-Lamias & Potamou 20
14564 Kifisia
Tel.: 2104277500-701
mailto: nkf-CustomerService@bshg.com
www.bosch-home.gr
HK Hong Kong
BSH Home Appliances Limited
Unit 07, 23/F, CDW Building
388 Castle Peak Road
Tsuen Wan, New Territories,
Hong Kong
Tel.: 2626 9655 (HK)
Toll free 0800 863 (Macao)
mailto:bosch.hk.service@bshg.com
www.bosch-home.com/hr
www.bosch-home.com/hu
IE Republic of Ireland
BSH Home Appliances Ltd.
M50 Business Park
Ballymount Road Upper
Walkinstown
Dublin 12
To arrange an engineer visit, to order spare parts
and accessories or for product advice please call
Tel.: 01450 2655*
www.bosch-home.ie
- Calls are charged at the basic rate, please check with your telephone service provider for exact charges.
IL Israel
C/S/B/ Home Appliance Ltd.
1, Hamasger St
North Industrial Park
Lod, 7129801
Tel.: 089777222
mailto:csb-serv@csb-ltd.co.il
www.bosch-home.co.il
IN India, Bharat.
BSH Household Appliances Mfg. Pvt. Ltd.
Arena House, Main Bldg, 2nd Floor
Plot No. 103, Road No. 12
MIDC, Andheri East
Mumbai 400 093
Toll Free 1800 266 1880*
www.bosch-home.com/in
Mo-Sat 8am to 8pm (exclude public holidays)
IS Iceland
Smith & Norland hf.
Noatuni 4
105 Reykjavik
Tel.: 05203000
www.sminor.is
IT Italia, Italy
www.bosch-home.com/it
KG Kyrgyzstan, Кыргыз Республикасы
ОсОО Alfa Systems
Jibek Jolu str. 40
Bishkek
Tel.: 0702 98 53 53
mailto:alfas-service@mail.ru
KR Republic Korea, Daehan Minguk,
Empel Co.,Ltd
1201 ACE Hightechcity 1-Dong 775
Gyeonglin-ro Yeongdeungpo-gu
Seoul
Tel.: 1899-4636
mailto:hshim@empel.co.kr
Dongsuh Foods Corporation
Dongsuh Bldg., 324, Dongmak-ro, Mapo-gu
Seoul
Tel.: 080-023-9114
mailto:khjo@dongsuh.co.kr
KZ Kazakhstan, Kazakhstan
BSH Home Appliances LLP
Dostyk 117/6,
Business Center "Khan Tengri"
Almaty
Hotline: 5454*
mailto:ALA-Service@bshg.com
- Toll free from mobile only
LB Lebanon
Teheni, Hana & Co.
Boulevard Dora 4043 Beirut
P.O. Box 90449
Jdeideh, 1202 2040
Tel.: 01 255 211
mailto:Info@Teheni-Hana.com
LT Lietuva, Lithuania
Senuku prekybos centras UAB
Jonavos g. 62
44192 Kaunas
Tel.: 037 212 146
www.senukai.lt
UAB "AG Service"
R. Kalantos g. 32
52494 Kaunas
Tel.: 070055655
mailto:servisas@agservice.lt
www.agservice.lt
Baltic Continent Ltd.
Luk\$io q.23
09132 Vilnius
Tel.: 870 055 595
mailto:info@balticcontinent.It
www.balticcontinent.It
UAB Emtoservis
Savanoriu pr.1 (Centrine bustine)
03116 Vilnius
Tel.: 870 044 724
mailto:svc@emtoservis.It
www.emtoservis.it
LU Luxembourg
S.R.L. "Rialto-Studio"
Lintel Investments and
Management Services Pvt. Ltd.
Ma. Maadheli, Majeedhee Magu
Malé
Tel.: 03 010 200
mailto:mohamed.zuhuree@lintel.com.mv
www.lintel.com.mv
NL Nederlande, Netherlands
Level 3, Air NZ Building,
Smales Farm Business Park
74 Taharoto Road, Takapuna
Auckland 0622
Tel.: 0800245700*
mailto: aftersales.nz@bshg.com
www.bosch-home.co.nz
- Mo-Fr 8.30am to 5pm (exclude public holidays)
PK Pakistan,
MEGA Home Appliances
Plaza 46-A, Commercial Sector XX
Phase 3, DHA
Lahore
- Mo-Sat 9am to 6pm (exclude public holidays)
PL Polska, Poland
SA Kingdom Saudi Arabia,
11111111
Abdul Latif Jameel Electronics and
Airconditioning Co. Ltd.
BOSCH Service centre, Kilo 5 Old Makkah Road
(Next to Toyota), Jamiah Dist.,
P.O.Box 7997
Jeddah 21472
Tel.: 800 127 9999*
mailto:ALJECC8@ALJ.COM
www.aljazeera.com.sa
- Sat-Thu 8.00am to 11.00pm (exclude public holidays)
SE Sverige, Sweden
BSH Home Appliances AB
Landsvagen 32
169 29 Solna
Tel.: 0771 19 70 00 local rate
mailto:Bosch-Service-SE@bshg.com
www.bosch-home.se
SG Singapore
BSH Home Appliances Pte. Ltd.
38C Jalan Pemimpin, #01-01
Singapore 577180
Tel.: 6751 5000*
mailto:bshsgp.service@bshg.com
www.bosch-home.com.sg
- Mo-Fr 9am to 6pm, Sat 9am to 1pm
(exclude public holidays)
SI Slovenija, Slovenia
BSH Hišni aparati d.o.o.
Litostrojska 48
1000 Ljubljana
Tel.: 015830700
mailto:informacije.servis-slo@bshg.com
www.bosch-home.com/si
SK Slovensko, Slovakia
Ital Thai Tower, 2034/31-39, 1st floor,
New Petchburi Road
Bangkapi, Huay Kwang
Bangkok, 10310
Tel.: 02 495 2424*
www.bosch-home.com/th
- Mo-Sat 8am to 6pm (exclude public holidays)
TJ Tajikistan, yymxypn
ToUKKCTOH
P.E. Suhrob Muhitdinov
Shamsi street no: 67/A
Dushanbe
Tel.: 0918678043
mailto:sino2003@list.ru
Vostok Co. Ltd.
Yakkacinarskaya street No: 144/4
Dushanbe
Tel.: 446007872
mailto:Lola.Mirzoeva@vostok.tj
www.volna.tj
TM Turkmenistan, Turkmenistan
Bayram Anna Yuryewna
Stariya marka, Atabeyeva str.
Spectrum magaza
Ashgabat
Tel.: 012 26 94 16
mailto:steptm@mail.ru
TR Türkiye, Turkey
BSH Ev Aletleri Sanayi
ve Ticaret A.S.
Fatih Sultan Mehmet Mahallesi
Balkan Caddesi No: 51
34771 Umraniye, Istanbul
Tel.: 02164446333*
mailto:careline.turkey@bshg.com
www.bosch-home.com/tr
- Cagli merkezini sabit hatlardan aramanin bedeli
BSH Home Appliances Private Limited
11F., No.80, Zhouzi St., Neihu Dist.
Taipei City 11493
Tel.: 0800 368 888
mailto:bshtzn-service@bshg.com
Republic of Uzbekistan
Elektronik Magnat
Magnat Electronics
Beruni street No: 5/6
Tashkent
Tel.: 712 156 333
mailto:magnet.service.uzb@gmail.com
KK Kosovo
Service-General SH.P.K.
rr.Magjistralja Ferizaj Prishtine
70000 Ferizaj
Tel.: 00381 (0) 290 330 723
mailto:servicegeneral527@gmail.com
XS Srbija, Serbia
BSH Kucni aparati d.o.o.
Milutina Milankovica br. 9ž
11070 Novi Beograd
Tel.: 011 353 70 08
mailto:informacije.servis-sr@bshg.com
www.bosch-home.rs
For South Africa
BSH Home Appliances (Pty) Ltd.
96 Fifteenth Road, Randjespark
1685 Midrand-Johannesburg
Tel.: 086 002 6724
mailto:bsh@jopen.co.za
mailto:applianceserviceza@bshg.com
www.bosch-home.com/za
bosch-infoteam@bshg.com
Thank you for buying a Bosch Home Appliance!
Register your new device on MyBosch now and profit directly from:
- Expert tips & tricks for your appliance
- Warranty extension options
- Discounts for accessories & spare-parts
- Digital manual and all appliance data at hand
- Easy access to Bosch Home Appliances Service
Free and easy registration - also on mobile phones:
www.bosch-home.com/welcome
BOSCH
HOME APPLIANCES
SERVICE
Looking for help?
You'll find it here.
Expert advice for your Bosch home appliances, need help with problems or a repair from Bosch experts.
Find out everything about the many ways Bosch can support you:
www.bosch-home.com/service
Contact data of all countries are listed in the attached service directory.
| O | |||||||
| 1 | ○ | ✓ | ✓ | ||||
| O/I | 1·2 rev | ✓ | ✓ | ✓ | ✓ | ||
| 2.7 mm | ✓ | ✓ | ✓ | ||||
| 4 mm | ✓ | ✓ | ✓ | ✓ | ✓ | ✓ | |
| 8 mm | ✓ | ✓ | ✓ | ✓ | ✓ | ✓ | |
| ✓ | ✓ | ✓ | ✓ | ✓ | ✓ | ✓ | |
| ✓ | ✓ | ✓ | ✓ | ✓ | ✓ | ||
| ✓ | ✓ | ✓ | ✓ | ✓ | |||
| ✓ | ✓ | ||||||
| ✓ | ✓ | ||||||
| ✓ | ✓ | ✓ | ✓ | ||||
| ✓ | ✓ | ✓ | ✓ | ||||
| ✓ | ✓ | ✓ | ✓ | ||||
| ✓ | ✓ | ✓ | ✓ | ||||
| ✓ | ✓ | ✓ | ✓ | ||||
| ✓ | ✓ | ✓ | ✓ | ||||
| ✓ | ✓ | ✓ | ✓ | ||||
| ✓ | ✓ | ✓ | ✓ | ||||

- SAFETY INSTRUCTIONS
- DANGER OF ELECTRIC SHOCK AND FIRE
- RISK OF INJURY
- CAUTION! RISK OF DAMAGING THE APPLIANCE
- IMPORTANT
- CONGRATULATIONS ON THE PURCHASE OF YOUR NEW BOSCH APPLIANCE
- CONTENT
- OVERVIEW
- →FIG.A
- BASE UNIT
- BASE ATTACHMENT
- MEAT MINCER INSERT
- SAUSAGE FILLER INSERT
- KEBBE INSERT
- PASTA INSERT
- WHIRL INSERT
- →FIG
- SHREDDING ATTACHMENT
- CITRUS PRESS ATTACHMENT
- BEFORE USING FOR THE FIRST TIME
- CAUTION
- CONTROL AND DISPLAY ELEMENTS
- MFW
- MFW36../MFW
- ALL MODELS
- OPERATION INDICATOR
- RELEASE BUTTON
- CABLE STORAGE COMPARTMENT
- STORAGE COMPARTMENT
- OVERLOAD PROTECTION
- REPLACE AGITATOR PADDLE
- SPEED SETTING
- ONLY MFW36.../MFW
- REVERSING FUNCTION
- NOTE
- PREPARATION
- MEAT MINCER
- SAUSAGE FILLER
- KEBBE MAKER
- PASTA MAKER
- WHIRL MAKER
- PREPARATION FOR MEAT MINCER
- SEE FIG. D
- PREPARATION FOR SAUSAGE FILLER
- → FIG
- PREPARATION FOR KEBBE MAKER
- PREPARATION FOR PASTA MAKER
- PREPARATION FOR WHIRL MAKER
- → FIG. H
- USE
- THE FOLLOWING EXAMPLE DESCRIBES USE OF THE BASE ATTACHMENT AS A MEAT MINCER
- SEQUENCE OF FIGURES I
- NOTE (MFW36.../MFW38...)
- → SEQUENCE OF FIGURES J
- CAUTION! (MFW36.../MFW38...)
- SEQUENCE OF FIGURES K
- → SEQUENCE OF FIGURES
- NOTES
- CARE AND DAILY CLEANING
- RISK OF ELECTRIC SHOCK
- RECIPES
- KEBBE
- DOUGH POCKETS
- FILLING
- PREPARE THE KEBBE
- BREAD DUMPLINGS
- PASTA
- BASIC RECIPE FOR PASTA DOUGH WITH EGGS
- MAKING PASTA
- WHIRLS
- BASIC RECIPE FOR SHORTCRUST PASTRY
- MAKING THE BISCUITS
- TIPS
- USING THE PERFORATED DISCS
- USING THE INSERTS
- DISPOSAL
- GUARANTEE
- SPARE PARTS AND ACCESSORIES
- TROUBLESHOOTING
- OVERLOAD SAFETY
- WARNING! MFW36.../MFW
- PROTECTIVE COVER FOR SHARP BLADES
- FIG. H
- INFORMATION (MFW36..../MFW38....)
- CITRUS JUICER ATTACHMENT
- REPLACING THE OVERLOAD PROTECTION
- →FIGURE
- ATTENTION
- PREPARING THE SAUSAGE ATTACHMENT
- → FIGURE
- PREPARING THE KEBBE ATTACHMENT
- → FIGURE F
- PREPARING THE PASTA ATTACHMENT
- → ATTACHMENT
- → GRATER ATTACHMENT
- APPLICATION
- ATTENTION! (MFW36.../MFW38...)
- →OPERATING INSTRUCTIONS
- JUICE EXTRACTOR ATTACHMENT
- USAGE
- → INSTRUCTIONS M
- CLEANING AND MAINTENANCE
- RECIPE
- CABLE
- KEBAB TUBES
- MACARONI PRODUCTS
- BASIC DOUGH RECIPE
- ATOCYBAHHPEIITKOBNXDNCKIB
- KOB6ACNI SHNPU
- HACADKA-TEPKA
- YBARA! (MFW36.../MFW38...)
- ATOCYBAHHBCTABOK
- WARRANTY TERMS
- HELP WITH MALFUNCTIONS
- FIGURE A
- MAIN UNIT
- MAIN ATTACHMENT
- CUTTING DISCS
- SAUSAGE FILLER PARTS
- KEBAB ATTACHMENT
- PASTA ATTACHMENT
- FUNNEL FOR LIQUID FILLING
- ATTACHMENT FOR GRINDING
- ATTACHMENT FOR CITRUS JUICER
- BEFORE FIRST
- CONTROL ELEMENTS AND INDICATORS
- THIS MODEL
- OPERATING INDICATOR
- UNLOCKING THE BUTTON
- CABLE COMPARTMENT
- OVERLOAD PROTECTION DEVICE
- REPLACING THE DRIVE SHAFT BUSHING
- SEE TABLE → FIGURE
- FIGURE D
- PREPARING THE SAUSAGE NOZZLE
- PREPARING THE KEBAB ATTACHMENT
- FIGURE F
- PREPARING THE FORMING NOZZLE FOR SPAGHETTI
- → FIGURE H
- MAKING SAUSAGES
- MEAT GRINDER
- SAUSAGES AND PÂTÉS
- ATTACHMENT FOR SHREDDING
- WARRANTY CONDITIONS
- MANUFACTURER INFORMATION ON WARRANTY AND SERVICE
- HOUR HOTLINE*: 8 (800)
- ACCESSORIES AND CARE PRODUCTS
- MANUFACTURER'S WARRANTY
- ATTENTION! IMPORTANT NORM FOR THE CONSUMER
- SERVICE INFORMATION
- INFORMATION ABOUT HOUSEHOLD APPLIANCES MANUFACTURED UNDER THE CONTROL OF BSH HAUSGERÄTE GMBH, CARL-WERY-STRASSE 34, 81739 MUNICH, GERMANY, IN ACCORDANCE WITH THE REQUIREMENTS OF TECHNICAL REGULATION LEGISLATION AND CONSUMER PROTECTION LEGISLATION OF THE RUSSIAN FEDERATION
- CUSTOMER SERVICE
- NL NEDERLANDE, NETHERLANDS
- PK PAKISTAN
- PL POLSKA, POLAND
- SA KINGDOM SAUDI ARABIA
- SE SVERIGE, SWEDEN
- SG SINGAPORE
- SI SLOVENIJA, SLOVENIA
- SK SLOVENSKO, SLOVAKIA
- TJ TAJIKISTAN, YYMXYPN
- TOUKKCTOH
- TM TURKMENISTAN, TURKMENISTAN
- TR TÜRKIYE, TURKEY
- ELEKTRONIK MAGNAT
- KK KOSOVO
- XS SRBIJA, SERBIA
- FOR SOUTH AFRICA
- THANK YOU FOR BUYING A BOSCH HOME APPLIANCE
Brand : BOSCH
Model : CompactPower MFW3612A
Category : Meat Grinder