Chesterton - Turntable GPO - Free user manual and instructions
Find the device manual for free Chesterton GPO in PDF.
User questions about Chesterton GPO
0 question about this device. Answer the ones you know or ask your own.
Ask a new question about this device
Download the instructions for your Turntable in PDF format for free! Find your manual Chesterton - GPO and take your electronic device back in hand. On this page are published all the documents necessary for the use of your device. Chesterton by GPO.
USER MANUAL Chesterton GPO
Thanks for purchasing the GPO Chesterton Turntable. This all-in-one music player will allow you to enjoy LPs, CDs, FM Radio, MP3s, Bluetooth, and DAB Radio in one stylish, retro-styled entertainment unit. We hope you enjoy adding a touch of retro style to your home.
Safety Information
Before using your GPO Chesterton, please read the following safety information. Please make sure to retain this manual for future reference:
-
Cleaning: Unplug the unit from the wall socket before cleaning gently with a damp cloth. Avoid liquid and aerosol cleaners.
-
Attachments: Please do not use any attachments which have not been recommended by GPO Retro, as they may cause damage to your unit.
-
Water and Moisture: Please keep the unit away from standing water such as a bathtub or kitchen sink. This unit may be damaged by humid or damp environments. Ensure that the unit remains dry, as liquid can damage the unit.
-
Heat: Please keep the unit away from heat sources such as radiators, stoves or other products which produce excess heat.
-
Placement: Please ensure that the unit is placed on a flat, stable surface before use.
-
Transport: Take care when moving the unit to avoid any damage.
-
Ventilation: Make sure that none of the openings or slots in the unit cabinet is covered to ensure proper ventilation. Placing the unit on a covered shelf can block these ventilation openings.
-
Power: Please ensure that the unit is only plugged into an appropriate wall socket or adaptor. Ensure that the cord is not trapped or placed in a way which could cause fraying or damage. Do not overload wall sockets or extension cords.
- For further troubleshooting or technical support advice, please refer to the troubleshooting and product support sections of this manual.
Unpacking
This package contains:
- 1x T298-DAB GPO Chesterton DAB
- 1x Remote Control
- 1x DC Power Cable
- 1x Manual
Carefully remove all of the contents from the packaging. Make sure you retain and store this manual for future reference.
When choosing a location for the unit, avoid inclines, direct sunlight or sources of heat and moisture.
Keep all of the ventilation holes clear, and do not place any equipment on top of the unit as this can lead to damage.
Only remove the stylus guard from the stylus assembly during use.
Leaving the guard in place during storage will protect your stylus from damage.
Location of Controls
Top Panel

- Turntable
- 45 RPM Adaptor Holder
- Tone Arm
-
Arm Clip
-
Raise/Lower Tone Arm Lever
- 33/45/78 RPM Speed Switch
- Autostop Switch
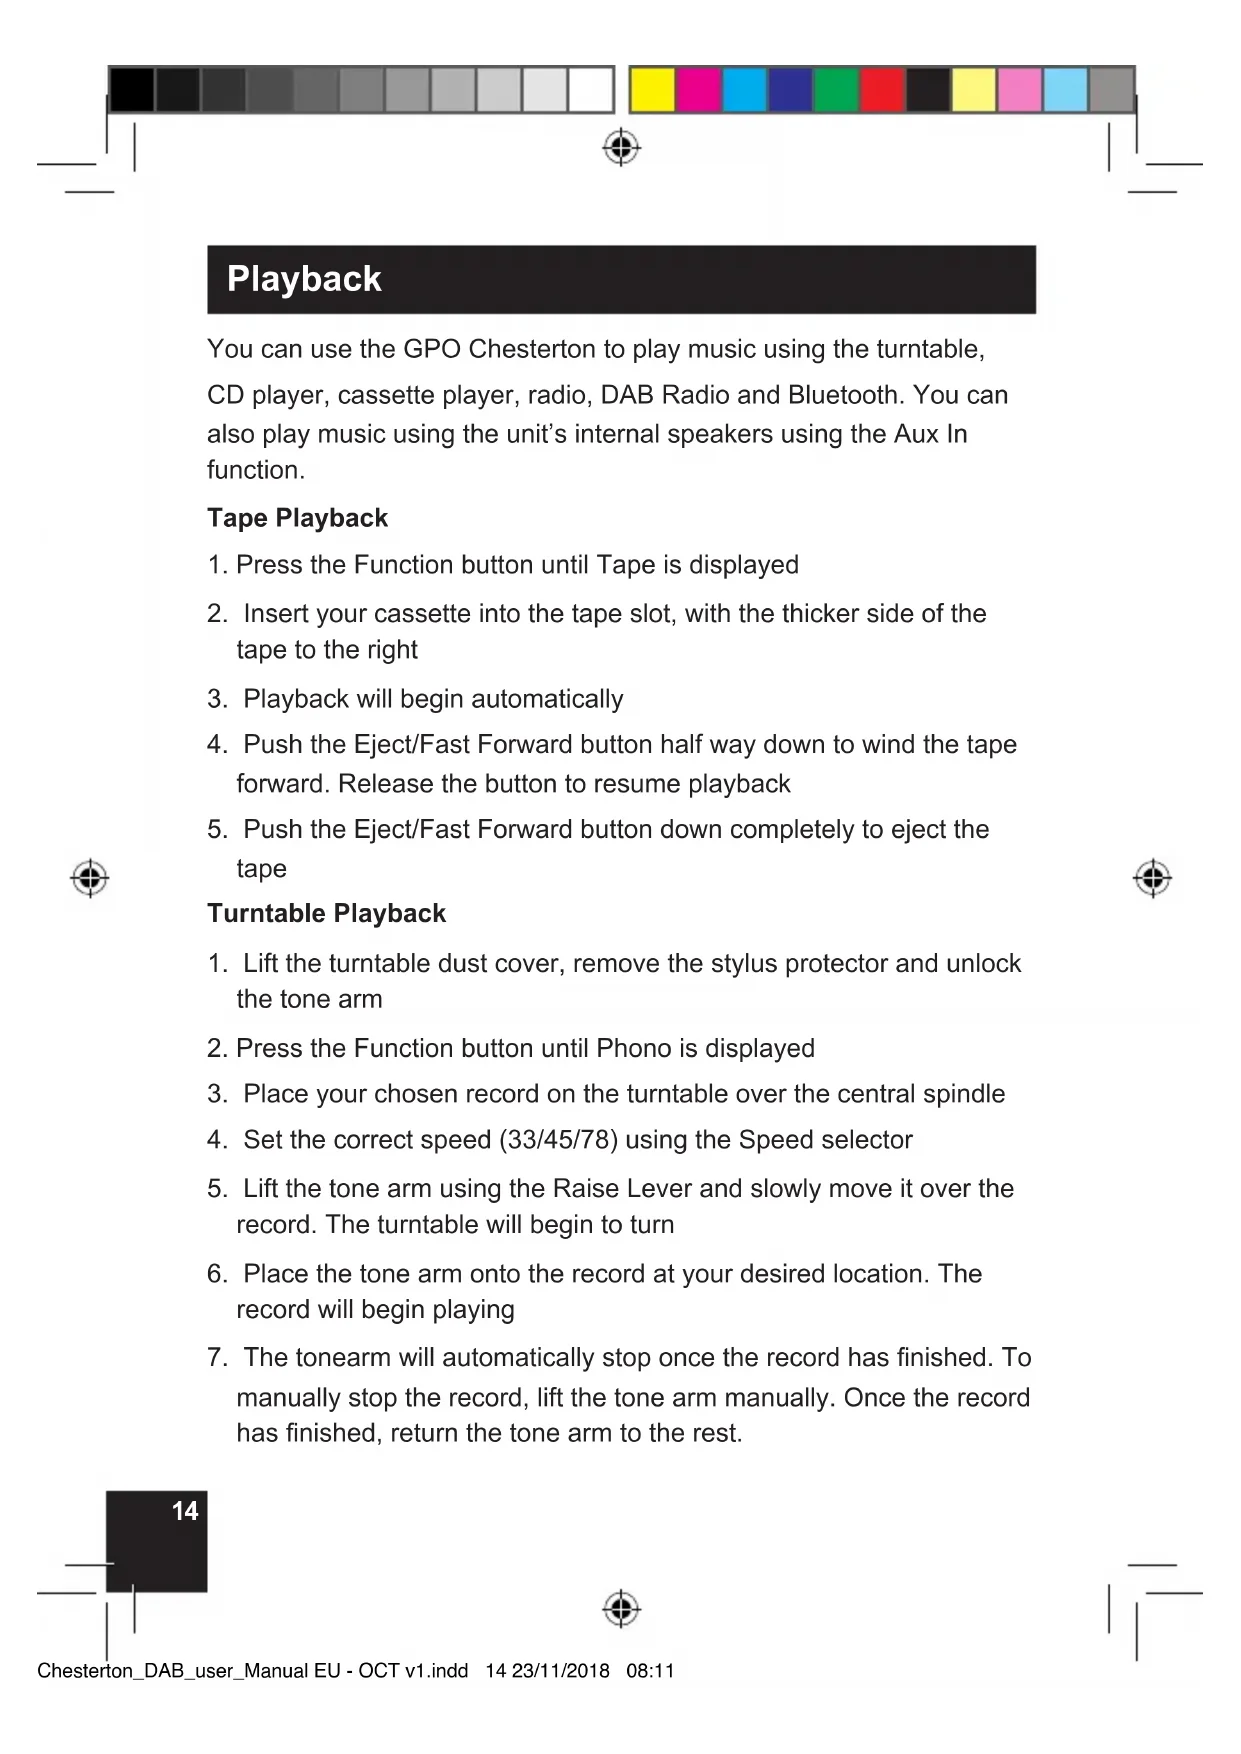
Front Panel

-
Volume Control / Select Button 11. Radio Frequency Selector
-
Program / Preset Button 12. Power Button
-
nfo / Mode Button 13. CD Tray
-
USB Recording Button 14. Open/Close CD Tray
-
Delete Button 15. Function Selector
-
Display 16. Headphone Out Jack
-
Skip Backwards 17. Aux In Jack
-
Skip Forwards 18. USB Port
-
Play/Pause/Pair/Scan 19. Power Indicator LED
-
Stop/Memu 20. Bluetooth Indicator LED
-
IR Receiver LED


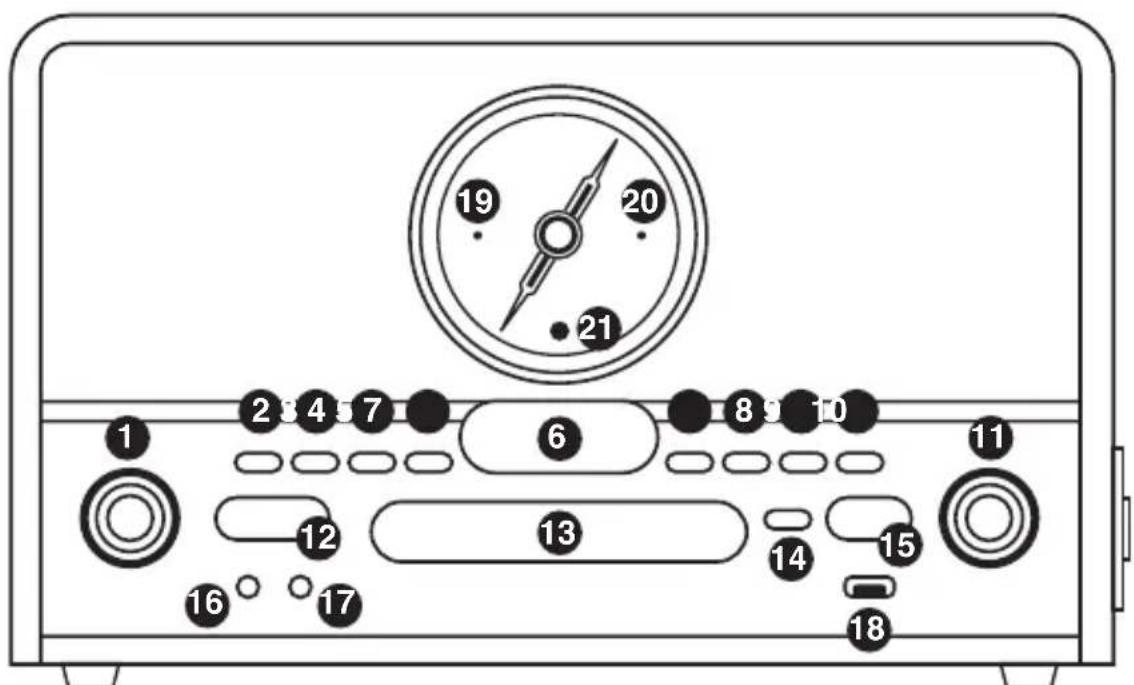
Side Panel
- Cassette Eject/Fast Forward Button
- Cassette Door


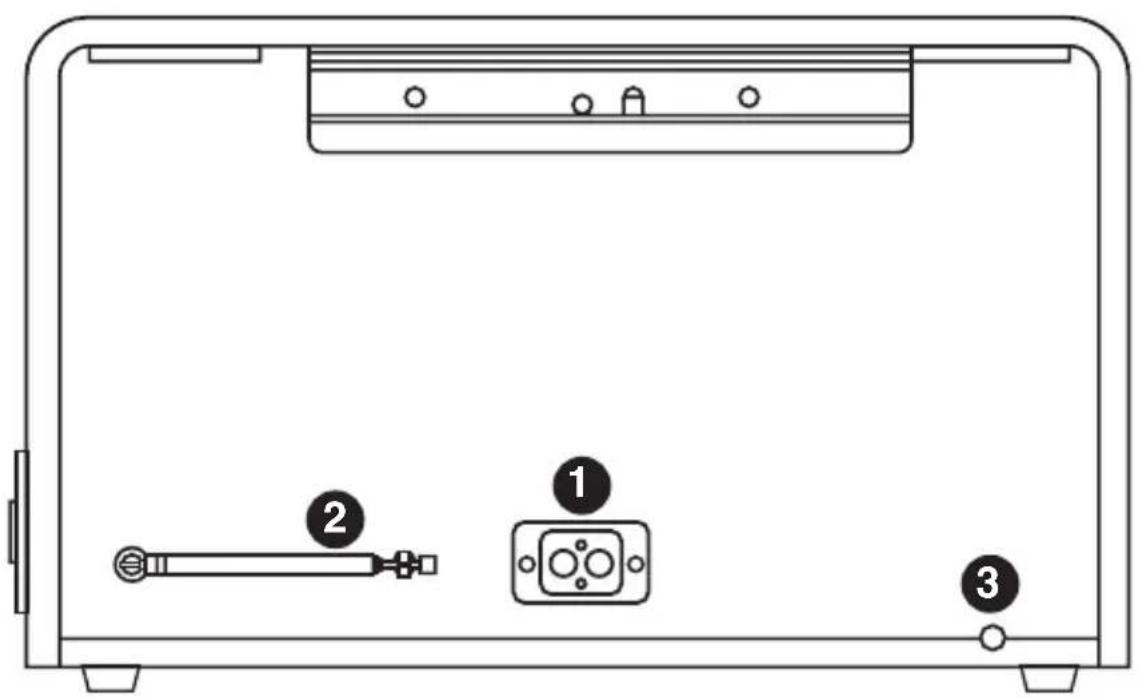
Rear Panel

- Line Output
2.TelescopicAerial - Power Input
Remote Control
Please note: Please install two AAA batteries (not included) before use.
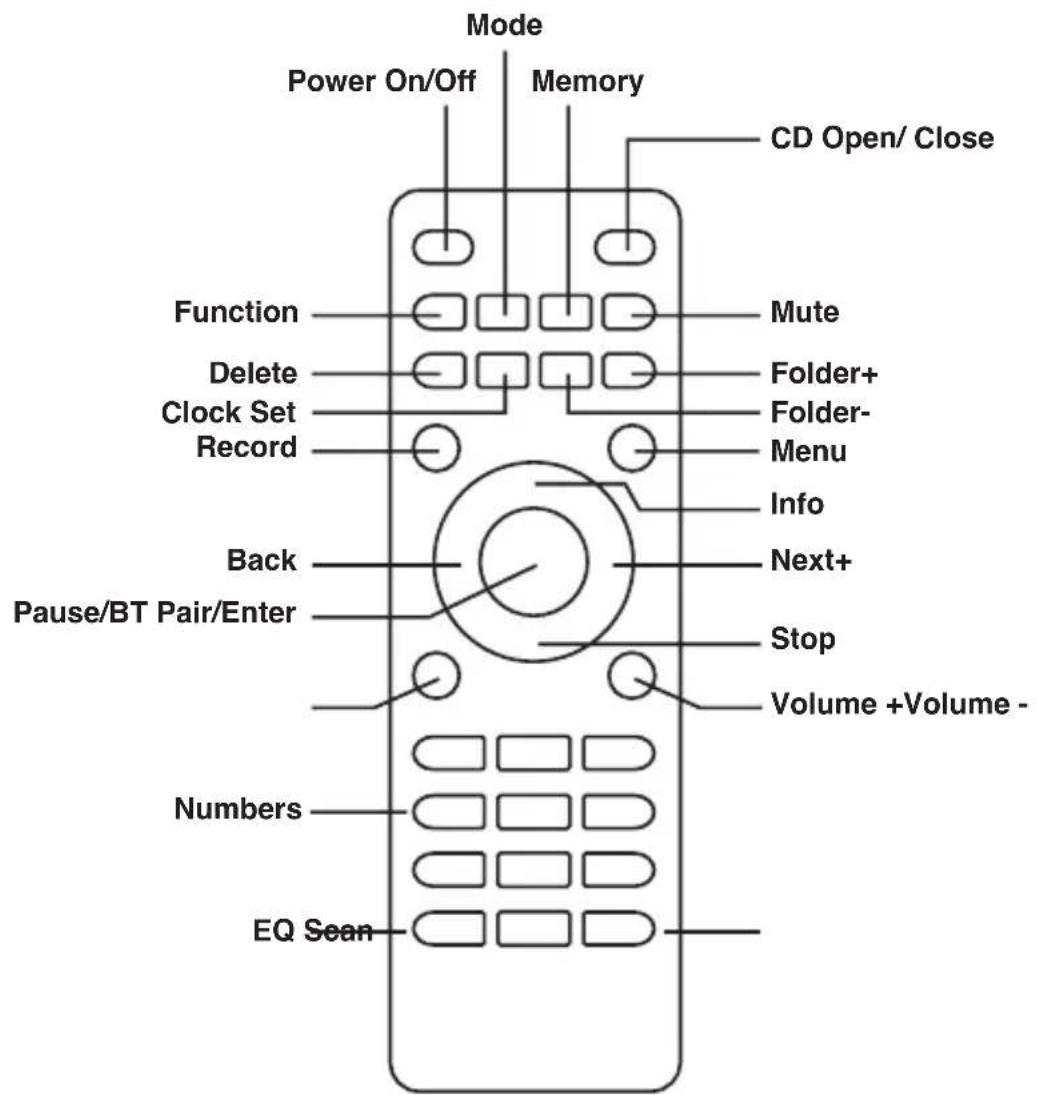
To use the remote control, install two AAA batteries as instructed, point the control at the sensor located on the front panel of the unit and press the button firmly.
Please ensure that there are no obstacles between the control and the sensor, and avoid the sensor being exposed to strong light.
Time Set
21:44:27 4-9-2818
The clock is displayed in standby mode.
- Press the Power button: current time is shown on the display
- Press the Preset button: the hour digit flashes
- Press the Backward / Forward button to adjust the hour digit
- Press the Preset button: the minute digit flashes
- Press the Backward / Forward button to adjust the minute digit
- Press the Preset button: the second digit flashes
- Press the Backward / Forward button to adjust the second digit
- Press the Preset button: the date digit flashes
- Press the Backward / Forward button to adjust the date digit
- Press the Preset button: the month digit flashes
- Press the Backward / Forward button to adjust the month digit
- Press the Preset button: the year digit flashes
- Press the Backward / Forward button to adjust the year digit
- Press the Preset button: the correct time is shown on the display


Playback
You can use the GPO Chesterton to play music using the turntable,
CD player, cassette player, radio, DAB Radio and Bluetooth. You can also play music using the unit's internal speakers using the Aux In function.
Tape Playback
- Press the Function button until Tape is displayed
- Insert your cassette into the tape slot, with the thicker side of the tape to the right
- Playback will begin automatically
- Push the Eject/Fast Forward button half way down to wind the tape forward. Release the button to resume playback
- Push the Eject/Fast Forward button down completely to eject the tape
TurntablePlayback
- Lift the turntable dust cover, remove the stylus protector and unlock the tone arm
- Press the Function button until Phono is displayed
- Place your chosen record on the turntable over the central spindle
- Set the correct speed (33/45/78) using the Speed selector
- Lift the tone arm using the Raise Lever and slowly move it over the record. The turntable will begin to turn
- Place the tone arm onto the record at your desired location. The record will begin playing
- The tonearm will automatically stop once the record has finished. To manually stop the record, lift the tone arm manually. Once the record has finished, return the tone arm to the rest.
Auto-Stop Switch Operation: Please note, some records have an autopost area which causes the record to stop before the last track finishes. If this happens, move the Auto-Stop switch to the off position and manually stop the record once the track has finished.
Aux-InPlayback
- Press the Function button until Aux In is displayed
- Use a 3.5mm audio cable to connect your external device to the unit's AUX IN jack
- Adjust the volume to your desired level
- Begin playback using your external device
CDPlayback
The GPO Chesterton can play standard audio CDs and data CDs which contain MP3, WAV or WMA files. Please note that the Chesterton can only correctly handle data CDs which have folders containing 999 music files or less.
- Press the Function button until CD is displayed
- Open the disc tray by pressing the CD tray Open/Close button
- Place the disc carefully in the disc tray, label size up
- Close the disc tray and the CD will begin to play automatically
- To listen to the same track repeatedly, press the Mode button once. The display will show "Rep ONE"
- To play the entire disc repeatedly, press the Mode button twice. The display will show "Rep ALL"
- To cancel repeat play, press the Stop button
The GPO Chesterton allows you to program the playback order of tracks on your CD:
- Press Stop to stop CD playback
- Press Program
- Press the Backward/Forward button to select the location in which the track should be stored (eg. 1, 2, 3)
- Press Play/Pause to resume playback at the beginning of the first programmed track
- To clear the programmed memory, press Stop twice while the disc is playing
USB Flash Drive Playback
The GPO Chesterton can play the following file types from a USB flash drive: AAC/M4A, AIFF/AIF, MP3, WAV, WMA. Please note that folders on the USB drive must contain 999 files or less, and that the unit can only read FAT32 format USB drives of 32GB or less.
- Press the Function button until USB is displayed
- Connect the USB flash drive to the USB port
- The total number of tracks will be shown on the display and playback will begin automatically
- Press Stop to stop playback
FM mono/FM stereo Radio
- If possible, extend the unit's Telescopic Aerial
- Press the Function button until FM is displayed
- Select the desired station using the Tuner knob
BluetoothPlayback
- Press the Function button until Bluetooth is displayed. The Bluetooth indicator will flash.
- The pairing indicator will flash quickly when pairing. While pairing, remain within 10 meters (33 feet) of GPO MAESTRO.
- Turn on Bluetooth on your phone or tablet to pair select "GPO CHESTERTON DAB" as the Bluetooth device.
- When successfully paired and connected, the Bluetooth indicator will become solid.
- To disconnect from the currently paired Bluetooth device and pair to another Bluetooth device, hold the Play/Pause/Pair button for 3 seconds.
Telescopic aerial
Please make sure that the aerial is fully extended before you attempt to tune to a DAB station (a vertical position is recommended). This will ensure that the maximum signal strength is available when the radio begins to scan. Extending the aerial also ensures the best possible sound quality.
DAB Radio mode
- Check that your Radio is in DAB mode. If you are not already in DAB mode, short press the Mode button until you are in DAB mode (check the display).
- The first time you use the Radio or if the station list is empty, your radio will automatically begin to scan for DAB radio stations. A progress bar will show the progress of the scan and the number of stations found during the scan will also be displayed.
- If you were listening to a DAB station when you switched the radio off, then this station will automatically be selected when you switch the radio back on.
Changing DAB stations
- Short press the Backward or Forward button to scroll through the available stations.
- When the station that you would like to listen to is displayed, short press the Select button. There will be a short delay whilst your radio tunes to your selected station.
Scanning for DAB stations
With DAB radio additional stations and services regularly become avail- able, so it's a good idea to carry out a manual scan every now and then to make sure that you have the most up-to-date station listing stored within the memory of your Radio. If you have moved your Radio to another location, e.g. if you go on holiday, then it's also a good idea to carry out a manual scan.
In DAB mode:
Short press the Scan button to begin a search for stations. The display will change to 'Scanning...'. A progress bar will show the progress of the scan and the number of stations found during the scan will also be displayed.
Prune DAB stations
You can remove the DAB stations in the station list that cannot be received in your area. These are listed with a '?' prefix.
- Press the Menu button to enter the menu options.
- Use the Backward or Forward button to scroll to
. Press the Select button. - Prune? Yes
is displayed. Press the Backward or Forward button to scroll to Yes. press the Select button and prune the station list. Stations with a '?' prefix will now no longer be displayed.
Storing a DAB station preset
Your Radio can store up to 20 DAB radio stations in its preset memories
for instant access to your favourite stations.
- Tune the Radio to the DAB radio station that you wish to preset.
- Long press the Preset button for approximately 2 seconds until Preset Store <1 :(Empty)> is displayed.
- Use the Backward or Forward button to move to the preset location that you would like to store the radio station to (1-20).
Tune to a DAB preset station
- Short press the Preset button. Preset Recall < 1:> is displayed together with the name or frequency of the station stored there, or (Empty) if no previous station has been stored.
- Use the Backward or Forward button to move to the Preset location and station that you would like to listen to (1-20).
- Press the Select button. The radio will instantly tune to that station and begin to play.
Dynamic range control (DRC)
The dynamic range for each radio programme is set by the broadcaster for each radio station and may be different for the types of programme broadcast, such as pop or classical music or a chat show. The dynamic range control signal is transmitted in parallel with the audio signal for each programme and with your radio you can use this control signal to expand or compress the dynamic range (the difference between the loudest and quietest sounds) of the reproduced audio signal. Changing the dynamic range can affect the 'loudness' and/or 'quality of sound'
of the programme that you hear so that it will be more suited to your listening conditions and your own personal listening requirements. e.g. in a noisy environment, where quiet sounds might be swamped, setting the compression to maximum will 'boost' the quiet sounds, whilst keeping the loudest sounds at their original level.
There are 3 levels of compression:
- DRC off - no compression. This is the default setting.
- DRC low - medium compression.
-
DRC high - maximum compression.
-
Press the Menu button to enter the menu options.
- Use the Backward or Forward button to scroll to
. Press the Select button. - Use the Backward or Forward button to scroll through the options and press the Select button.
Line Out
- Connect the Line Out jack to the Aux In jack of your amplifier, taking care to match the socket and jack colours
- Ensure your amplifier is turned on and adjust the volume accordingly
Headphones
To listen to music on your headphones, simply connect them to the earphone jack and play your chosen music as described above.
External Speakers
You can use the external speaker jack on the rear of the unit to connect your chosen speakers to the GPO Chesterton.
If the unit does not receive an audio signal for around 10 minutes, it will automatically enter standby mode. To reactivate the unit, turn the power off and back on again.
Recording
You can use the GPO Chesterton to record to a USB flash drive from a CD, MPS Disc, LP, FM radio, Cassette, DAB Radio, Bluetooth or the unit's Aux Input.
Recording from a CD
- Ensure that your CD is not copy protected and insert into the CD slot
- Press the Function button until CD is displayed
- Insert the USB flash drive into the unit's USB port
- Press the Record button. "Recording." will show on the unit display to indicate that the track is being recorded
- Press the Stop button to stop recording

Recording from an MPS Disc
- Insert your disc into the CD slot
- Press the Function button until CD is displayed
- Insert the USB flash drive into the unit's USB port
- Press the Record button. "Recording." will show on the unit display to indicate that the track is being recorded
- Press the Stop button to stop recording
Recording from an LP
- Place your LP onto the turntable
- Press the Function button until PHONO is displayed
- Insert the USB flash drive into the unit's USB port
- Lower the Tone Arm to the desired location on the record
- Press the Record button. "Recording." will show on the unit display to indicate that the LP is being recorded
- Press the Stop button to stop recording
Recording from the Radio
- Press the Function button until FM is displayed
- Insert the USB flash drive into the unit's USB port
- Select your chosen FM station
- Press the Record button. "Recording will show on the unit display
- Press the Stop button to stop recording
Recording from a Cassette
- Insert your cassette into the tape slot, with the thicker side of the tape to the right
- Insert the USB flash drive into the unit's USB port
- Press the Function button until Tape is displayed - playback will begin immediately
- Press the Record button. "Recording" will show on the unit display to indicate that the cassette is being recorded
- Press the Stop button to stop recording
Recording from DAB Radio
- Press the Function button until DAB is displayed
- Insert the USB flash drive into the unit's USB port
- Select your chosen DAB station
- Press the Record button. "Recording." will show on the unit display to indicate that it is being recorded
- Press the Stop button to stop recording
Recording from Bluetooth
- Press the Function button until Bluetooth is displayed
- Turn on Bluetooth on your phone or tablet for pairing
- Insert the USB flash drive into the unit's USB port
- Press the Record button. "Recording." will show on the unit display to indicate that it is being recorded
- Press the Stop button to stop recording
Recording from the Aux Input
- Connect your external device using the Aux In jack
- Insert the USB flash drive into the unit's USB port
- Press the Function button until AUX is displayed
- Begin playback using the external device
- Press the Record button. "Recording." will show on the unit display to indicate that it is being recorded
- Press the Stop button to stop recording
Troubleshooting
Q) The unit will not turn on
A) Ensure that the unit is correctly connected to the power supply
Q) No sound comes out of the unit's speakers
A) Ensure that the volume has been set correctly and that the Function selector has been set to the correct playback source
Q) The sound quality is poor.
A) Ensure that the unit is not too close to a TV set or other appliance
Q) The unit is not responding.
A) Remove the power supply to the unit and leave for 60 seconds. Plug the unit back into the power supply and try again
Q) The sound quality is poor during LP playback
A) Ensure that your stylus is undamaged, and that it is placed in the correct place on the record


Product Support
For more advice or support please visit www.gporetro.com.
Please note, for your personal safety you SHOULD NOT attempt to open the unit's casing. Opening the casing voids your warranty, and no user-serviceable parts are contained inside
Specifications
Bluetooth:2402-2480MHz
FM : 87.5 - 108 MHz
Frequency : 2.4GHz
Transmit power : CLASS 2 4dBm
Use in Member States: EUROPE, UNITED KINGDOM
Maximum operation Temperature: -5 +45 °C
Input AC 230-240V ~ 50Hz


Einführung
Assistance technique
Dynamic range control (DRC)
Hereby ProtelX, declares that this equipment (GPO Chesterton DAB) is in compliance with the essential requirements and other relevant provisions of Directive, you can access a copy of this certificate on www.gpotre.com/Certificate-of-Conformity
DE
ProTelX Ltd, Unit 6, Park 17 Industrial Estate, Moss Lane,
Whitefield, Manchester, M45 8FJ UK