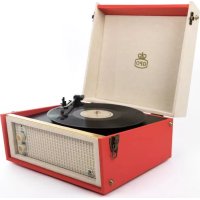
Jam - Turntable GPO - Free user manual and instructions
Find the device manual for free Jam GPO in PDF.
User questions about Jam GPO
0 question about this device. Answer the ones you know or ask your own.
Ask a new question about this device
Download the instructions for your Turntable in PDF format for free! Find your manual Jam - GPO and take your electronic device back in hand. On this page are published all the documents necessary for the use of your device. Jam by GPO.
USER MANUAL Jam GPO
operating temperature range
0^ to 40^
Frequency: FM 87.5-108 MHz,
voltage 230Va.c
DE
Spezifizierung
Betriebstemperatur
When using Electrical equipment please follow instructions and heed all warnings, including:
- Read the instructions. All safety and usage settings must be prior to the use of the product are read.
- Save these instructions. - The safety and operating instructions must be kept for future reference.
3.Warnings - All warnings on the product and in the operating instructions must be observed - Instructions - All operating instructions must be observed.
- Cleaning - remove this product from the wall outlet before cleaning it. Do not use any liquid detergents or aerosol cleaners. For cleaning, use only a damp cloth.
- Attachments - Do not use mounting parts from the manufacturer of the product is not recommended, as this can lead to hazards.
- Water and Moisture - Do not use this product near water, for example by means of a bath, wash basin, sink, or laundry, in a wet basement or near a swimming pool, etc.
- Accessories - Do not place this product on an unstable surface. The product may fall and cause serious injury to a child or adult and serious damage the product. Use only with a recommended by the manufacturer, bracket or table or sold with the product. Each assembly of the product only in accordance with the instructions of the manufacturer and must be a mounting accessory recommended by the manufacturer.
- Transport - This product must be moved carefully to avoid damage or injury.

- The ventilation openings in the device are intended for the device with a ventilation to provide for a reliable operation of the device to ensure and to prevent overheating. These openings must not be blocked or covered. The openings should never be blocked by placing the product on a bed, a sofa, a duvet or a similar user interface. This product should not be used in a built-in installation as a bookshelf or a shelf, unless proper ventilation is provided or the manufacturer's instructions are observed.
- Power Sources - This product may only be used on the basis of the specified on the label power source used. If you are not sure what type of power supply to your house, please contact your product provider or local power company. Observe the operating instructions for products intended to be used from battery power or other sources to work.
- Main connector - the main connector is used as a decoupling device, the decoupling device remains easily accessible.
- Power Protection - Power supply cords should be routed so that they are not in any way captured.
- Lightning - For added protection for this product during an electrical storm or when it is left unattended for long periods of time, unplug the power cord and disconnect the antenna or cable system. This prevents damage to the product by lightning and current.
-
Power supply systems - an outdoor antenna system should not be located in the vicinity of overhead power lines or other electric light or power circuits, or where it is placed in power lines or circuits. During the installation of an external antenna system is important to ensure that these power lines or circuits are not affected because the contact with them could be fatal.
-
Overloading - Do not place any outlets, extension cords, or integral convenience housing on, since this would lead to a risk of electric shock or electrical shock may result.
- Object and liquid feed - Never push objects of this type in this product through openings as they dangerous voltage points or short-circuit parts are allowed to touch the electrical or electrical shock can cause. The device must not be exposed to dripping or splashing water, and on a filled with liquids article as a vase flute is on the device.
- Servicing - Do not attempt to operate this product yourself, as opening or removing covers dangerous voltages or other risks. Please contact qualified personnel.
- Damage Replacement Service - Unplug this product and refer to maintenance
Qualification of personnel under the following conditions:
A. If the power cord or plug is damaged.
As If liquid is spilled or objects have fallen into the product.
C). If the product is exposed to rain or water.
D. If the product does not operate normally, set the operation. Only the control elements which the operation as a wrong adjustment of other controls can lead to damage and require extensive work by a qualified technician to the product back in its normal opera.
E. If the product is in a way or another has fallen or is damaged and the product have a difference in performance, this means that a service is required.
- Replacement Parts - When replacement parts are required, make sure that the service technician has used replacement parts specified by the manufacturer are specified or the same characteristics as the original component. Unauthorized components can fire, electric shock or other hazards.
- Safety check - If you use the service or repair of this product supplement, ask the service technician to perform safety checks to determine that the product is in good condition.
- Heat - The product must be of heat sources such as radiators, heaters, or other products (including amplifiers) that produce heat differ

Precautions
Safety Instructions
- Disconnect the power supply from the electrical outlet. Make sure that you disconnect the device when it is not used for a longer period of time, such as during a holiday
- The use of controls, modifications and implementation of other than the procedures described here can be used for the cause hazardous radiation exposure.
- To help prevent electric shock, plug the connector into a correct and certified wall socket.
- If this product is causing problems, contact qualified service centres and do not use the product in a defective state
Safety Precautions
Warning: To avoid the risk of an electrical shock this device should not be exposed to rain or moisture.
Caution: Use of controls or adjustments or performance of procedures other than those specific can at the time of exposure lead to hazardous radiation
CAUTION
Risk of electric shock - DO NOT OPEN!
To reduce the risk of electric shock, do not remove the cover or the back.
There are no parts of the user in this device to replace. Please contact qualified service personnel

The arrow symbol in a parallel triangle should guide the user to the presence of uninsulated people

"Dangerous Voltage" in the case of a product, which can be of a sufficient size
Risk of electric shock to persons.
(See the instructions on the underside of the unit).
Before Use
- Select the device installation site carefully. Avoid placing it in direct sunlight or near a source of heat. Also avoid vibration and dust, cold or moisture. Keep away from sources that generate a humming noise, such as transformers or motors.
- Do not open the housing, as this will damage the switch or may result in an electrical shock. If a foreign object falls in the set, please contact your dealer.
- Make sure that you do not leave fingerprints on your discs. Never play a disk that has a crack on the surface.
- When unplugging the power cord always pull the plug and never pull the power cable.
- Do not forget to place the white protective needle cap onto the needle to protect the needle after use.
- Do not attempt to clean the device with chemical solvents, as this could damage the device.
Use a clean, dry cloth.
- Pull the mains plug from the wall socket. Make sure that you disconnect the device when it is not in use for a longer period of time, such as a vacation.
- Keep this manual in a safe place for future reference
Replacement of the Stylus (needle)

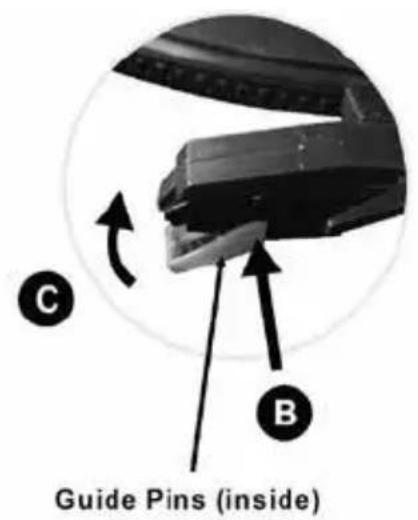
Remove the old stylus
- Insert a screwdriver at the tip of the Stylus
And pressures in the direction of "A" downwards. - Remove the pin by pushing it forward and pull down
Install a new stylus
- Hold the tip of the pin and insert the other edge
By pressing in the direction of "B" prints. - Slide in the direction of "C", until it is locked at the top.
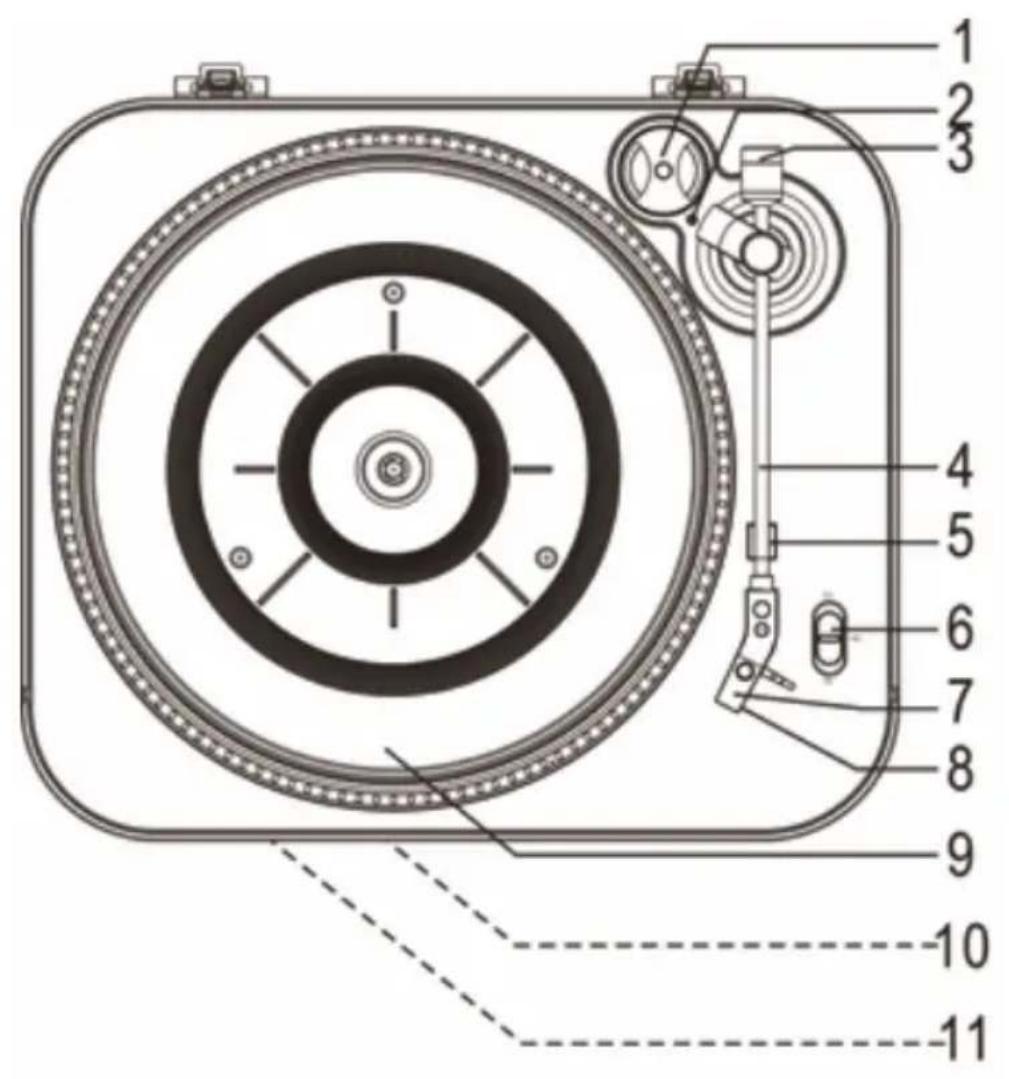
Location of Controls
1.45 RPM ADAPTER
2. TONE ARM CONTROL INDICATOR
3. Decoration (NOT THE BALANCE THE TONE ARM)
4. Tone arm
5. Tone arm support
6. Speed up OF SELECTION
7. STYLUS (needle)
8. Needle cap
9. Rotary Table
10. Power Light
11. Built-in speaker
12. Volume Button
13. RCA line output cable
14. USB port
15. NET SCHNOER
16. Protective Cap


Line output
- Turn the VOLUME knob counterclockwise to decrease the volume of the device to change. Until a "click" sound is heard.
- Connect the RCA cable to your home amplifier. Ensure that you properly connect the colours.
- Connect the power cable from the device to the power supply. You can also switch the amplifier and adjust the volume.
Record Player
- Plug the power cord into the wall outlet. Then the power light as light blue prove
- Rotate the VOLUME button on the back of the device in the clockwise sense, to adjust the volume to the desired level.
- Insert a peeling plate on the record player. Do not forget the 45 RPM adapter in the upper right corner to use if a 45 RPM Disk play.
- The white needle cover. Hold the needle cap in a safe and accessible place for future use.
- Select the correct speed according to the record, you play and move the tonearm on the record player, the tone arm control indicator lights up. Insert the arm on the edge of your disk and your record starts to play.
Note:
You are strongly recommended to use the transparent dust cover to play records. Also, do not place anything on the dust cover when the turntable is in use.
- To stop, move the pick-up arm manually on the armrest support.
- If the album has reached the end, the pitch and the rotation stopped and the tone arm control indication is switched off. Lift the pick-up arm and insert it manually to the armrest.
- Do not forget to place the white plastic needle cover back to protect the needle and disconnect the record player from the wall AC outlet.
| Problem Cause Solution | ||
| The entire evice | ||
| The power indicator is not lit or does not light when the disk player is switched on | Power cable is not plugged. | Plug in the power cord |
| No sound from the speakers | The volume is minimal | Change the volume |
| Not the correct external accessories are connected | Connect the correct external accessories | |
| The sound is not clear | The player is too close to a TV or other device | Turn off the TV or other device and change the location of the player |
| Record player does not work | External factors such as (static electricity) can affect the device | Pull the mains plug and let the device stand for a minute and plug it back in and try again |
| Turntable | ||
| The sound is not clear playing a record | The needle is not placed correctly | Replace the needle |
| The sound is not clear after prolonged usage | The needle should be replaced | Replace the needle |
Warranty and Support
Your ProTelX product has been carefully manufactured with high-quality components and 100% tested. It is for a period of twelve months from the date of purchase against faulty processing and material. In the unlikely event that a fault occurs, the device is repaired or replaced if the refunded postage within the warranty time under the following address has been paid.
The warranty does not include damage or faults caused by abuse or damage during transport. Your statutory rights under the common law are in no way affected by this warranty.
For the service within or outside the warranty period, the part that has been paid to the company from where the product was purchased.
- Repair or replacement is performed at the discretion of the manufacturer.
ProTelX reserves the right product specification without prior notice to change.
ProTelX
Unit 6, Park 17, Moss Lane, White Field,
Manchester, M45 8FJ
Made in China


Unit 6, Park 17, Moss Lane, White Field,
Manchester, M45 8FJ UK
Made in China


Unit 6, Park 17, Moss Lane, White Field,
Manchester, M45 8FJ UK
Made in China


- Hold the tip of the stylus and insert the other edge by pressing in the direction "B".
- Push up in the direction "C" until it locks at the tip
Unit 6, Park 17, Moss Lane, White Field, Manchester, M45 8FJ UK
Made in China


Unit 6, Park 17, Moss Lane, White Field,
Manchester, M45 8FJ UK
Made in China
EN
Hereby ProtelX, declares that this equipment (GPO Jam) is in compliance with the essential requirements and other relevant provisions of Directive, you can access a copy of this certificate on www.gporetro.com/Certificate-of-Conformity
DE
ProTelX Ltd, Unit 6, Park 17 Industrial Estate, Moss Lane,
Whitefield, Manchester, M45 8FJ UK