
KAH647PL - Food Processor KENWOOD - Free user manual and instructions
Find the device manual for free KAH647PL KENWOOD in PDF.
User questions about KAH647PL KENWOOD
0 question about this device. Answer the ones you know or ask your own.
Ask a new question about this device
Download the instructions for your Food Processor in PDF format for free! Find your manual KAH647PL - KENWOOD and take your electronic device back in hand. On this page are published all the documents necessary for the use of your device. KAH647PL by KENWOOD.
USER MANUAL KAH647PL KENWOOD
Copyright 2020 Keraood Limited All rights reserved 12/5/03

English
safety
- Read these instructions carefully and retain for future reference.
- The blades and cutting discs are very sharp, handle with care. Always hold by the finger grip at the top, away from the cutting edge, both when handling and cleaning.
Always remove the knife blade before pouring contents from the bowl. - Keep hands and utensils out of the bowl whilst the kitchen machine is connected to the power supply.
- Never use your fingers to push food down the feed tube. Only use the pushers supplied with the attachment.
- Switch off and unplug:
- before fitting or removing parts
- after use
- before cleaning
- Never remove the lid from the attachment until the blade or cutting disc has completely stopped.
- When using the slicing, grating or julienne disc, don't let the bowl fill up as far as the cutting disc: empty it regularly.
- When using the knife blade do not fill above the Max level marked on the bowl.
- Do not touch moving parts.
-
Do not use excessive force to push food down the feed tube - you could damage the attachment.
-
Don't chop ice cubes or other hard foods, such as spices, they may damage the attachment.
- Don't use the knife blade to mix heavy loads such as bread dough otherwise you may damage your attachment or machine. Use the dough hook in the kitchen machine.
- Never blend hot ingredients in the bowl, allow to cool to room temperature before processing.
- Don't blend liquid ingredients as they may leak from around the lid. A blender is available for this purpose.
- Do not use the lid to operate the food processor, always use the on/off or speed control.
- Misuse of your food processor attachment can result in injury.
- Should excessive vibration occur when using this attachment, either reduce the speed or stop the machine and remove the contents.
- Never use a damaged attachment. Get it checked or repaired. See 'service and customer care'.
Refer to your main kitchen machine instruction book for additional safety warnings.
before using your Kenwood attachment
- Remove all packaging including the plastic blade covers from the knife blade. Take care the blades are very sharp. These covers should be discarded as they are to protect the blade during manufacture and transit only.
- Wash the parts see 'cleaning'
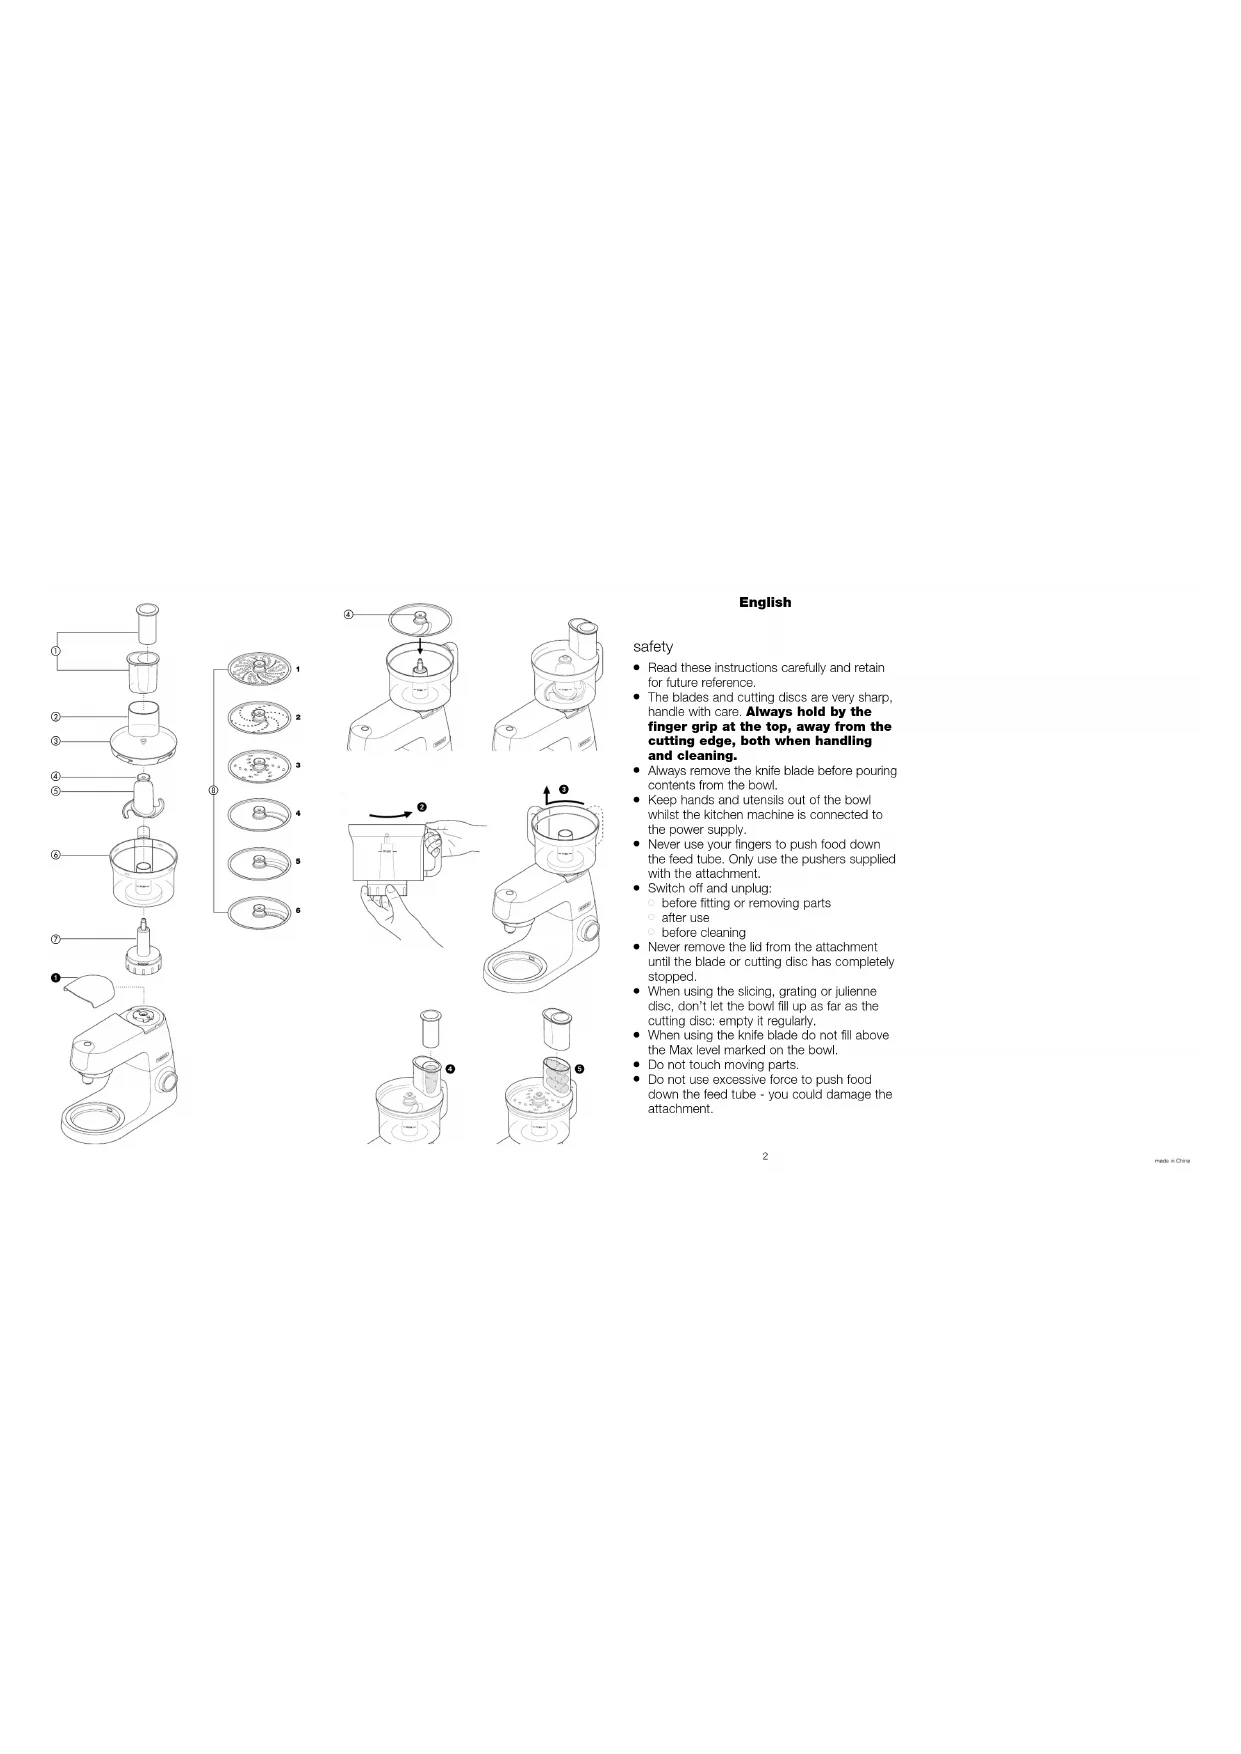
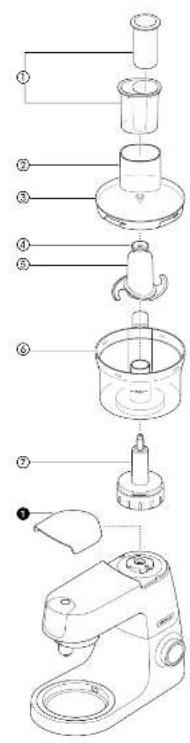
key
① pushers: large and small
② feed tube
(3) attachment lid
④ finger grip
⑤ knife blade
(6) attachment bowl
⑦ connector
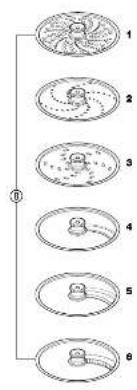
⑧ cutting discs
1 extra fine grating disc
2 fine grating disc
3 coarse grating disc
4 thin slicing disc
5 thick slicing disc
6 julienne disc
knife blade
Use on speed 2 to 5
Use the knife blade to chop raw and cooked meat, cooked eggs, vegetables, nuts, pâtés and dips and to also make crumbs from bread and biscuits. It can also be used to make shortcrust pastry and crumble toppings.
maximum capacities
- pastry (flour weight) 400g
- meat 500g
- Never exceed the 'max' level marked on the bowl.
to use the knife blade
1 Place the kitchen machine on the work surface with the speed control facing the front.
2 Lift off the high speed outlet cover 1.
3 Place the connector onto the outlet and turn clockwise until it locks into position.
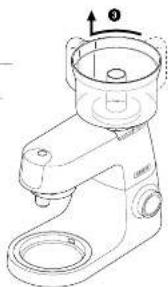
4 Place the bowl onto the connector with the handle at the back of the kitchen machine then turn clockwise to lock in place.
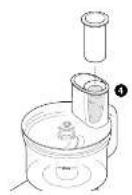
5 Place the knife blade in the attachment bowl. Turn and push down if necessary to locate.
Handle the knife blade with care - the blades are extremely sharp. Hold by the finger grip.
6 Cut the food up and place into the bowl ensuring it is evenly distributed.
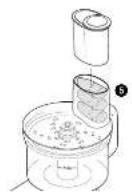
7 Fit the lid onto the bowl by placing the feed tube behind the handle then push down and turn clockwise to lock in place. The lid can be fitted in four different positions.
- If you experience difficulty in fitting the lid, remove the attachment and switch on the kitchen machine briefly. Refit the attachment.
8 Fit the pushers.
9 Switch on and select a suitable speed. Process until the desired result has been achieved.
10 Switch off and unplug.
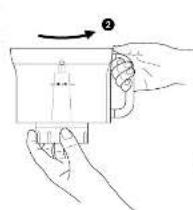
11 Remove the attachment from the outlet by turning anti-clockwise and lifting off. Dismantle the attachment. (To remove the bowl from the connector, hold the base of the connector and turn the bowl anti-clockwise and lift off 2. If you experience difficulty in removing the connector from the bowl, refit the bowl and connector to the outlet. Turn the assembly anticlockwise until it reaches a stop, then turn the bowl further to unlock from the connector 3.)
hints
- Cut food up before placing into the bowl. Meat, bread, vegetables and other foods of a similar texture should be cut into cubes approximately 2cm / % in. Biscuits should be broken into pieces and added down the feed tube whilst the machine is operating.
- If you want to blend soups, drain the ingredients and add the solids to the bowl. Process and then add back to the liquid.
- When making pastry, use firm fat cut into 2cm / % , in cubes from the fridge. Mix with the flour until breadcrumb stage is reached. Gradually add sufficient water down the feed tube to form a dough. Switch off as soon as the ingredients are combined.
- Take care not to over process when using the knife blade.
- Use the K-beater in the mixing bowl to mix cakes - you will get better results.
cutting discs
Use speed 1 to 2 for most operations.
If more power is required increase to speed 3.
Use the slicing/grating discs to slice or grate fruit, vegetables and cheese and the julienne disc to cut vegetables e.g. potatoes and carrots.
important - Don't let the bowl fill up as far as the cutting disc: empty it regularly.
The range of discs listed below are included in pack and can be identified by the numbers marked on each disc as follows:-
Disc No 1 - extra fine grating. For parmesan cheese and potato for German potato dumplings.
Disc No 2 - fine grating. For cheese, chocolate, nuts and firm fruit or vegetables.
Disc No 3 - coarse grating. For cheese and firm fruit or vegetables.
Disc No 4 - thin slice. For cheese and firm fruit or vegetables.
Disc No 5 - thick slice. For cheese and firm fruit or vegetables
Disc No 6 - julienne. Cuts potatoes for French Fries and ingredients for casseroles, salads and dips (e.g. carrot, apple and pear.)
to use the cutting discs
1 Place the kitchen machine on the work surface with the speed control facing the front.
2 Lift off the high speed outlet cover 1.
3 Place the connector onto the outlet and turn clockwise until it locks into position.
4 Place the bowl onto the connector with the handle at the back of the kitchen machine then turn clockwise to lock in place.
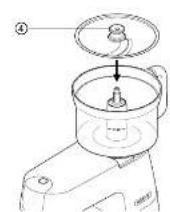
5 Select the desired cutting disc and place onto the connector drive - it will only fit one way. The number marked on the disc should be facing uppermost. Handle the cutting discs with care - they are extremely sharp. Hold the disc by the finger grip.
6 Fit the lid onto the bowl by placing the feed tube behind the handle then push down and turn clockwise to lock in place. The lid can be fitted in four different positions.
- If you experience difficulty in fitting the lid, remove the attachment and switch on the kitchen machine briefly. Refit the attachment.
7 Choose which feed tube you want to use. The pusher contains a smaller feed tube for processing individual items or thin ingredients. to use the small feed tube
- First put the large pusher inside the feed tube ④ . to use the large feed tube
Use both pushers together 5.
8 Put the food into the feed tube.
9 Switch on and push down evenly with the pusher - never put your fingers in the feed tube.
- At the completion of the processing operation, raising and lowering the pusher several times may help to reduce the amount of food left on the cutting disc.
10 Switch off and unplug.
11 Remove the attachment from the outlet by turning anti-clockwise and lifting off. Dismantle the attachment.
(To remove the bowl from the connector, hold the base of the connector and turn the bowl anticlockwise and lift off 2. If you experience difficulty in removing the connector from the bowl, refit the bowl and connector to the outlet. Turn the assembly anticlockwise until it reaches a stop, then turn the bowl further to unlock from the connector 3.)
hints
Use fresh ingredients.
- Don't cut food up too small. Fill the width of the large feed tube fairly full. This prevents the food from slipping sideways during processing. Alternatively, use the small feed tube.
- When using the julienne disc, place thin ingredients horizontally.
- When slicing or grating: food placed upright comes out shorter than food placed horizontally.
After using a cutting disc there will always be a small amount of waste on the disc or in the food.
cleaning
Always switch off and unplug before removing the attachment from the kitchen machine.
- Dismantle the attachment fully before cleaning.
- Never immerse the connector in water, wipe over with a damp cloth.
- Wash remaining parts in hot soapy water, then dry thoroughly. Take care as the blades and cutting discs are sharp. Alternatively wash in the dishwasher (top rack only).
DO NOT DISHWASH THE CONNECTOR.
service and customer care
UK only
If you need help with:
- using your attachment
servicing or repairs (in or out of guarantee)
call Kenwood customer care on 0345 222 0458. Have your model number (e.g. KAH647PL) and date code (e.g. 18B08) ready. They are on the attachment outer carton
spares and attachments
call 0844 557 3653.
other countries
If you experience any problems with the operation of your attachment, before requesting assistance visit www.kenwoodworld.com.
- Please note that your product is covered by a warranty, which complies with all legal provisions concerning any existing warranty and consumer rights in the country where the product was purchased.
If your Kenwood product malfunctions or you find any defects, please send it or bring it to an authorised KENWOOD Service Centre. To find up to date details of your nearest authorised KENWOOD Service centre visit www.kenwoodworld.com or the website specific to your Country.
- Designed and engineered by Kenwood in the UK.
Made in China.
Nederlandsls
for rengjoring
- CobIoJaIe MepbI npEIOCTOpOxHOCTHn
- prI pa6ote c HOKeBbIM 6JOKOM n
- dNCKaMn, T.K. Je3BnA OUeHb OCTpblE.
Ipn pa6oTe n B npocece qnCTkn HOxBeBOrO 6Ioka N3MeIbYnteJЯ 6epNTecb 3a cpeuaJIbHyIO pyuKy, KaK MOxHO daJIbWe OT Ne3Bn.
- Перац Tem КаК onopoxKHTb Yaшу, o6Я3aTeIbHcHmMaIte HOX.
He nomeuTe pykn i KyxOHHyU yTbapb B yaSu, Noka KyxOHHa MaunHa BKIIOueHa B pO3eTKy.
HnkOrda He npoTaJIkBaIte npOdyKtbl BpoJaIOSei Tpy6Ke C NOMOuBIO paIbueB. Bcerda nolb3yITeCb dIa 3TOI cIeIcuaJIbHO pPnlaRaEmbIM TOJkaTeJIeM(AMN).
- BbiklouaTe npnbOp n OTcoeINHnTe eToOT cETN B CNeDyUOxxCnyaX:
O nepei yctaHOBKOI n CHrTHeM KaKnx- IIn6o YacTei
O NOCJIe IcIIOJIb3OBaHnI
O npeed uNCTKoI
He chimaTe KpbIshky C HacaIKN, NOKa HOK IJIH peJyUeN DnCK He OCTaHOBNTcR NOJIHOCTbIO.
Dnck No 3-Kpynhra Tepka.
HnHaTnpaHnCbIpaN TBepdbix
fpyKTOB nnn OBOuSei.
Dnck No 4-TOHkA Hape3ka.
ДЯ Hape3aHЯ CBIPA N TBepDbIX
ФуКТОВ IJI N OBOUeI.
Dnck No5-TOJCTaHape3ka.
ДЯ Hape3aHЯ CBIPA N TBepbIX
ФpyKToB INI OBOUeI.
Dnck No 6-ДЯЖульенOB. Hape3ka KaptopeIЯжари, a TAKKe INHrpeIeNHTOBДЯ 3aNeKaHOK, cAlaTOB I NOdINB (HaNPmEp, MOpKOBn, Ra5NoK rpyu).
NcNoJIb3OBAHne
peKyuX DNCKOB
1 NocTaBbTe KxOHHy MaunHy Ha paobuyIO nobepxHocTb, NOBepHyB ee peryIaTOPOM CKOpOCTn Bnepe.
2 CHIMITE KpbIuKy BbIBOda BblCOKO CKOpOCTN 1.
3 IoDCoeDHHHTe KOHNHeKTOp K BbIXOHDOMy OTBepCTNIO IOBepHnTe No YacOBOn CTpeJIKe DoΦNKCaUN.
4 YcTaHOBInTe yauHa nepexOHNK pyuKoI K 3aHHeN IOBepXHocTn KyxOHHO MaunHbI, a 3aTeM NOBepHInTe No yacOBoi CTpeJIKe, UTo6bl 3aΦNKCuPOBaTb.
5 Bb6epnte Hxhbln Dnck n
nomecnte ero Ha nepexoHnik
PnBODa - yCTaHOBNt bero
MOxHO TOJIbKO OJHOI CTOPHOH.
Homep Na DNcKe DOJXKeH 6blb
NoBepHyT HABepx. O6paauTeCb
OCTOPOXHO C DNCKAMN-OHN
OueHb OCTpbie. DepxNTe Dnck
3a HeocTpbI Bblctyn.
6 HakpoTe yawy KpbIkwOy TaKIM o6pa30m, YTO6bI NOaHouza Tpy6ka 6bIa 7a pyuKo, a 3aTeM PnIXMMTe BHN3 N NOBepHNTe No YacOBoCtpeNke, YTO6bl 3aФИКСИРОВaTb. KpbIwKy MoXHO ycTaHaBnIBaTb B YeTBipex pa3HbIX N03UxJx.
- Ecπn Kpbιшka He 3akpbibaeTcγ, CHIMTe Hacaŋ Ky N Ha MRHOBeHne BKNIOHTe KxOHHyMQaunHy. Nocne 3TORO CHOBA yCTaHOBNTe Hacaŋ Ky.
7 Bb6epnte noaouy Toy6ky, KOTOpB BB6yTe nIb3OBAtbc. B TonkaTeNe HaxoNTcra NoaIoUaT py6ka MeHbWeRo pa3Mepa, KOToPA NcNoJIb3yeTc dJa o6pa6OTKn OTdJIbHbIX npOdyKTOB INI TOHKIN INHRpeDneHTOB.
NcNoIb3OBAHne MaIOIpoJaIoSeI Tpy6Kn
- Chauana BCTaBbTe 60lbwoi TOnkateJIb B NpaUoSyu Tpy6ky 4. HcNoIb3OBAHne 60lbwoi NoaUoSei Tpy6kn
-
IcnojB3yIte o6a ToJIkaTeJRA 5.
8 NomeCTnTe npOdyKtB B NOdaUoUTo Tpy6ky.
9 BkHouHte yctpoiCTBO HauHaTe aKKypaTHO npotaKnBaTb npoDyKtbl C nOMOsbIO TOnKaTeJ. Hb KoeM clyuae He onyckaIte naIbUb I B noDaIoUyIO Tpy6ky. -
Nocne 3aBepueHnO6pa6oTkn NOHMnTe nOnyCTnTe TOnkATEnb HeCKoNbKO pa3, yTo6bl y6paTb OCTaTKn PpOdyKToB C DnCKa.
10 BbIKIouaHTe np6Op n OTKJIouaHTe erO ot ceTu.
11 CHIMITE HACADKY C OCHOBbl.ДЯ 3TOrO NOBEPHNTe ee npOTnB YacOBoi CTpeJIKN, a 3aTeM NODHMITE. Pa36epITe HacaIky. (YTo6bl ChrTb YaIy c IepEXoHNka, BO3bMlTeCb 3a OCHOBAHne IepEXoHNka n NOBEPHNTe yau npOTnB YacOBoi CTpeJIKN, a 3aTeM NODHMITE ee 2.EcNI Bam He ydaetcra OTcoEHNHTb IepEXoHNk OT yaIIN, yCTaHOBITE uX Ha OCHOBY. 3aTeM NOBEPHNTe ux npOTnB YacOBoi CTpeJIKN Do ynpopa, a 3aTeM NOBEPHNTe yau DaJIbIwe, YTO6bl OTDeJIHTb OT IepEXoHNka 3.)
COBETbl
- IcnoJb3yIe ToIbKO CBexKe npOdyKtbl.
HepekBeI npOdyKtbl CnNikOM MeIko.3aONHnTe 6oIbUIO nOdaIOUIO Tpy6ky paBHomepHO no ee IuPnHe.3To npEDoTbpaTIT cDBrI npOdyKTOB B ONDy CTOpOHy BO BpeMnX o6pa6OTKn.
Takke MoXHo NcNoJb3ObaTb MaNyIO NoaIoUyIO Tpy6Ky.
He TopkaItec pyxomnx deTaJeN.
He HamaraTeCnIOIO npoSTOBxHyTn npOdyKtn Kpi3b HappMHy Tpy6Ky-Bm MoKeTe POnKOdNTn HaCaAdKy.
He BnKOpncToBvIe HIX dIy Iopri6HeHnkybIKIB IbOdy a6o iHx TBePdx npOdyKTiB, HApNKJaD, cpei, aJKe BOHN MOKyTb N0XKOdITN HaCAdKy.
He BnKOpNCTOBuYTe HIX DJIa nepemiiuBaHHra ructnx cyMiwei, HanpNKlaI, ticTa dIyXli6a, aJxge ue MoXe NOnKOdHTn HacaKDy abo npJaI. Ira Ticta BnKOpNCTOBuYTe rakonOdi6Hy HacaKDy dJIa BmMiUvBaHHra ticTa, 0o NoCTaayEtbcra 3 npJaIaOM.
He 3miuye rapayi iHrpediEHTN B yawi, octyiditb ix do KIMHaTHoi Tempeatypn neped o6p06koio.
He nepemiyte piki iHrpdiEHTn, aJKe BOHN MOKytb npOTiKaTn Kpi3b KpnuKy. Ira TaKx ciJe BnKOpncTOByTe 6JIeHdep.
He kepyte kombaHOM 3a donomoroKpnk. 3abxdn BnKOpncToByTe dJaIcboRo peyIaTOp wBndkocti a6o KhONKn on/off (yBIMKHyTN/BNMMKHyTN).
-
Викорпстань Кухонноkomбайну He 3a пи3начehняМ може пи3ВODNTNdo TpaBM.
-
Y pa3i BnHKHeHЯ dUxKe CNJbHOI Bi6pauii nID yac BnKOpNCTaHHa HacaDN, 3MeHNITb WbNdkiCtB a6o 3yPiHiTb npIJaT a BnIMiTb 3MiCT.
He BnKOpNCTOBuYTe NOnKoJKeHy hacaIky. IpeBipka a6o peMOHT 3dInCHHOITbCS y CneCiJIaNbHnx ceHTpax: DnVBncb po3diI «CepBicHe o6cnyroByBaHHa}.
IpouHTaIte noci6HnK 3 ekCnIyatauii BaIoI KxOHHoI MaunHn, 06n O3HaioMNTscI i3 DoaTkoBmN 3axoJaMn 6e3neKn.
Ipeed noaTkom BnKOpncTaHHa HacaKn Kenwood
3HIMITb ynaKOBky Ta nlaCTnKOBI 3axnChi nOKpTTra i3 HOxOBoro 6Loky. BydbTe o6epeXhi, ne3a Dyke roctpi. He 36epiraute ci nOKpTTra, OckiNbKn BOHN npn3NaueHi TiNbKn dIg 3axnCTy Ne3 niD qac BnroTOBHeHH Ta TpaHCnOpTyBaAHN npnAdy.
BumnTe Bci deTani, nB. po3dIn 'Dorna Ta YnueHHa
PokaJuk
① ② MAneHbKm
② H nanopMHa Tpy6Ka
③ Kpɪшka Hacaɪkɪ
④ pyUka
(5) HIX
⑥ yuwa Hacaikn
⑦ 3'EDHyBaJIbHm MExaHi3M
⑧ pi3aIbHi DnCK1 DNCK HauDpi6HOro HaTnpaHH2 DNCK Dpi6HOro HaTnpaHH3 DNCK rpy6Oro HaTnpaHH4 DNCK I'JTOHKOro Hapi3aHH5 DNCK I'J KpynHOro Hapi3aHH6 DNCK I'J Hapi3aHH COIOMKIO
Hix
IpaioTe Ha WbndKocTi BiD 2 do 5
HIX BUKOPNCOByeTbCn DnnoDpiBHeHHn Cnporo TarotOBORo M'ra,rotOBnxReCb,OBOyIB,ropixiB,nd
npurotybaHH naHTeTIB Ta coyciB, a TAKOX Teptux cyxapib 3 xJI6a Ta neuBa. BIn TAKOX BnKOpNCTOBycTcA DnI npurotybaHH nicOCHoro TiCTa IIN KOHNTEPCbKNX BnPo6iTB KaIISeHH HAnOBHIOBAiv DnI npNKpacn BnPo6iB.
MaKcMaJIbHl NOKa3NkN 3aBaHTaXeHH
- nicouhe ticTo (Bara 6opouHa) 400 r
M'raCo 500r - HanobHOBaTn yaSy moXHa JIuSe DO nO3HaKn max' - He 6iNbwe.
KopncTyBaTnC HOKOBIM 6JOKOM
1 PocTaBTe KxOHHy MaunHy Ha pObooy NOBepXHIO peryIaTOpOM WbNkocti ypepe.
2 3HimiTb KpNShky 3 aanTepy BucOKoi IWBnKocTi o6epTaHHa 1.
3ЯкwoBpo6oTi npncTroBO BHNKn 6ydb-яki HEnOJaKn, nepei 3BepHeHHaM Do Cnyk6n niTpIMKn 3auiTb Ha caiT WWW. kenwoodworld.com.
4 YctaHOBIb yawy Ha 3'EDHyBaJIbHm MexaHi3M. IOBepHIb yawy TaK, 06n Depkac ONINHBcR No3aDy, a nCJra CbOrO NOBepHIb 3a roHNHHKOBOO CTpiIKoIO dna φikcaui.
5 YctaHOBIb HIX BCEpeHInHi yaWi HacaIK. NOBepHIb Ta HaTnCHITb dIa fikcaii. Ie3a Dyke roCTpi, TOMy 6yDBe o6epeXHi. TpmaTe ix 3a pyky.
6 NopixTe npOdykTu Ta noKnaDiTb ix do yawi. Po3noDinItb iHrpeDiEHTn piBHomipHo BCEpeDInHi yawi.
7 BctaHOBIb KpnuKy Ha qauy po3TaUyBaBun HapmHy Tpy6ky 3a TpImaHem, HATNCHiTb yHn3 Ta NOBepHiTb 3a rOINHHNKOBIO CTpiIKoHO, 06 3a6NOKyBATn. KpnuKy MoXHa BCTaHOBNIOBATn y YoTIPbOx p3HNx NOnOKeHHax.
- RaKuo Bn He MoKeTe BCTaHOBHTN KpnuKy, 3HimItb Hacadky Ta Ha KOpOTKn Yac yBIMKHITb KxOHHy MaunHy. Picna zboro ue pa3 BcTaHOBiTb HacadKy.
8 YctaHObitb wTOBXaHi.
9 YbIMKnHtB npUJa. Bn6epiTb nOTpi6Hy uBnDkictb i BnKoHyTe 6bpo6Ky,doKN He OTPMaTe 6aKaHn pe3yJbTaT.
10 BmKHiTb npnlaTa BiKIOUHTb Ioro BiMpeXeIeKtpoNocTayHn.
11 3Himitb Hacaiky 3 aadantepy, NOBepHyBwI npOTn rOdHHNKOBoi CtpiKTu Ta NiDnBwI ii. Po36epiB Hacaiky. 3HrTn YaWy i3 3'EdHyBaIbHoro MexaHI3My, TpIMaIte NiDCTabKy MexaHI3My Ta NOBepTaIe yawy npOTn rOdHHNKOBoi CtpiKn. PidHimtBuawy 2. RaKuo BN He MoXeTe BiD'EdHaTn yawy BiD 3'EDHyBaIbHoro MexaHI3My, BCTaHOBiTb Yawy Ta 3'EdHyBaIbHm MexaHI3Ma Ha aanTep. NOBepHiB yBeCb By30J npOTn rOdHHNKOBoi CtpiKn Do ynpoy, a NOTIM nobepHiB yawy ue, 5o6 BiDiInnti II BiD 3'EDHyBaIbHoro MexaHI3My 3.)
Kopncn i npaui
- IopixTe npOdykTn nepeTm,ЯK noknactn iX do yawi. M'aco, xni6, oBOci Ta iHwi npOdykTn noDi6HOiT TeKCtypn cnd nopizatn Kybikamn po3mipom np6bn3Ho 3a 2 cm/3/4 IIOIma. PeuNBO cnd pOzIOMTu Ha WMaTOUKN Ta dOdaTn Kpi3b HaprrMHy Tpy6ky niD qac po6oTn npInaLy.
- Raio BV 6aKaTe 3Miatau cyn, BiixmiTb cymiu Ta doaIte TBepdn IHpeiEHTn Do yawa. O6po6tB, a Notim nobepHITb uO cymiu y piinHy.
-Пд чac пиroToyBaHня nicoUHoro TICTa,ВИКОрпсTOBуYe XOLOdHe MacNo (JnP).IopIXTe NOro KByKamN NO 2cM (3/4ДIOHMN).ПicЯцboro nepemiuYte NOrO 3 bOpOuHOM,doKN He OTPIMaTe CymiS,soHaRadye xNl6Hi KpIuKn. IocTuNoBO Kpi3b HAnpMaHy Tpy6kY DoDAaTe DOCTaTHIO KJIbKICtB BOiN,Io6N cyMiW NepeTBOPuInacra Ha TICTO.BmKHiTb PnJaD,soHNO IHrpeDiHTN 6yde 3miuaHO. - 06pobjIte cymiu npotrom 3a3naeHoro yacy, He nepeBnuyTe noka3nKn.
-Дя npiroToyBaHnC ymiWi ДЯ BUNiKaHH TICTeOK BnKOpNCTOByTe K-nOdi6Hy 36nBaIky. Bn OTPmaTe Kpaui pe3yIbTaTn.
pi3aIbHi DnCKn
Дябьшоcti onepaui onupaTe wBndkocti 1 n2.
JaKuo noTpi6Ho 6iNbwe notyXHocTi, o6epiTB WbNdkic3.
BnKOpNCToByTe DnCK DnA HapizanHry/uaTkyBaHHa DnA HapizanHry a6o 7aTkyBaHHa FpykTIB, OBOyIB Ta Cnpy, a DnCK DnA JyIbEHiB - DnA TOHKOrO HapizanHry OBOyIB, HapuKnad, KAPTONIO I MOPKBy.
Ybara: cnikkyte 3a Tm, 06n BMict yawi He nidimacBnupe pi3aIbHoro dNcKa. PerynapHO BInnopoxHnTe yauy.
3a3HaueHi HIXKYe DnCKn BXOJaTb Do KOMPJIeKTy HaCaJKN. IX npu3HaueHHa MOxHa BCTaHOBNTn 3a DOpOMoROIOHOMepiB, P03HaueHnx Ha KOxHOMy DnCKy:
Dnck No 1-HaDipi6He HATnpaHH.ДЯHATnpaHHcny napMe3an i Kaptoni dny nprirotyBaHHKapTOnnHnx ranuok no-Himeczkn (depyhiv).
Dnck No 2 -dp6He HaTnpaHHaBnkOpncTOBycTBcA DnpaHpO6HeHHc npOpi6HeHHc npy, oKoNaNy, ropixiB Ta TBepdx KpykTiB nOBOuiv.
Dnck No 3- rpybe HaTnpaHna. BnkOpncTOByeTBcA dJa Cnpy Ta TBepdIX ppykTiB Yu OBOuiv.
Dnck No 4-TOHKe Hapi3aHHBnKOpNCToByeTbcr IJIa Hapi3aHHcnpy Ta TBepdx cpykTIB nOBOyIB.
Dnck No 5 - KpynHe Hapi3aHHBnKOpncToByeTbcra nna Hapi3aHHnCny Ta TbePdxx cpykTIB nOBOyIB.
Dnck No 6-ДЯЖульецИВ. BnKopncToBvEcTЯн Hapi3aHHa KaptonIДЯ npriroTuBaHHaФpi TaHapi3aHHa IHRpeDiEHTiB DЯ 3aniKaHOK Ta coyciB (MOPKBn, RaJyK Ta rpyu).
KopncTyBaTncr DnCKaMn
1 NocTaBTe KxOHHy MaunHy Ha pObooy NOBepxHIO peyIaTOpOM WbNdkocti ypepe.
2 3HimItb Kpnsky 3 aanTepy BncoKoi WbndKocti o6epTaHHa
3 RaKuo Bpo6oTi npncTroBOBHNKn 6yDb-RAKi HEnOJaKn,pePeD 3BepHeHnM Do CnyXbNiIaTpIMKn 3aJDiTb Ha caiT WWW.kenwoodworld.com.
4 YcTaHOBIb YaIy Ha 3'6dHyBaJIbHm MexaHi3M. NOBepHIb YaIy TaK, 0o6n DePKaK OINHINBCa No3aDy KxOHHO MaunHn, a nicra cboRo NOBepHIb 3a rOHNHHKOBOIO CTPIIKOIO DIA φIKcaqii.
5 O6epiB 6axaHn IuCK Ta BCTaHOBITb NOro Ha 3'EDHyBaIbHN BaN - BiH BCTaHOBHTbcra NlWe ODNHM 6okom. Homep Ha Dncky Mae Bka3yBaTn yropy. Pizalbi DNCKN -Duxi roctpi, TOMy 6yDbTe o6epeXHi. YtpmMyTe DNCKN 3a pyky.
6 BCTaHOBITb KPNUky Ha qauSy po3TaUyBaBUN HAnpymHy Tpy6Ky 3a TpIMaHEm, HATNCHiTb yHN3 Ta NOBepHIb 3a rOINHHNKOBIO CTrpIKKO, 06 3a6NOKyBATn. KPNUky MOxHa BCTaHOBNIOBATn y YoTIPbOx pI3Hnx NONOKeHHAx.
- RaKuo BN He MoKeTe BCTaHOBHTN KpUShky, 3HIMiTb HacAdKy Ta Ha KOpOTKn Yac yBimKHiTb KxOHHy MaunHy. IicIaZbOro ue pa3 BCTaHOBItb HacAdKy.
7 O6epiHnPmHy Tpy6ky nOtpi6Horo po3mipy. UToBxAu MicHTb HnPmHy Tpy6ky HeBeIikKOro po3mipy dIy o6p06Kn OkpeMnx npOdykTIB a60 TohKx iHrpeJeHtIB.
Uo6n cKOpncTaTnCnHa npMaHIO Tpy6koHeBENKOro po3Mipy,
cnoaAtky yctahOBiTB 6ilbwn 3apo3Mipom wToBxAu BCEpeDnHy HanpMaHoi Tpy6Kn
Uo6n cKOpNCtAtncr HAnpMaHIO Tpy6KOIO BeJIHKOrO po3Mipy,
yctaHOBITb 6nDbwa TTOBxaqi 5.
8 NoknaIitb iHrpeiEHTn do HaprrMHOI Tpy6Kn.
9 YbIMKHiTb npuIaI pIBHomipHo HATNCKaIte Ha 1TOBxAu - He onyckaIte naIbci do HanpamHOI Tpy6kn.
- Picna 3akIneHH npoccy 6pbokn, uobn BndaanTn 3aunk npodyktib i3 pi3aIbHoro DnCKa, nDnHIMiTb Ha onyctItb 7TOBxaU deKINbKa pa3iB.
10 Bumkhitb npnada Ta BiKlHoytB Ioro BiMpexi eKeKtpoNocTaaHaHH.
11 3Himitb Hacaiky 3 aadantepy, noBepHyBw npOTn rOHNHHKOBoi CtpiKn Ta nIDHABW II. Po36epitb Hacaiky. (Uo6 3HrTu yI3 3'edHyBaIbHOro MexaHI3My, TpMaIte nIDCTabKy MexaHI3My Ta NOBepTaIe Yaw npOTn rOHNHHKOBI CTPIIKn. IINHIMITb Yaw 2. JkIo Bn He MoKeTe BiD'EDHaTn Yaw BiD 3'EDHyBaIbHOro MexaHI3My, BCTahOBiTb IX Ha aadantep. NoBepHITb YBeCb By30J npOTn rOHNHHKOBI CTpiIKn Do ynpoy, a Notim noBepHITb Yaw Ue, Uo6 BiDIIInTN II BiD 3'EDHyBaIbHOro MexaHI3My 3.)
Kopnchi nopadi
BukopncToByTe TiIbKn CbiKi IHRpeJeHtN.
He KpniwIb npOdykTn. 3anOBHnIe HaprrmHy Tpy6ky BeNkoRo po3mipy pIBHomipHo no Bci WnpHi. Lc denomoxye YHKHTN 3MiueHHn npOdykTib y6ik nId vac o6p6kn.
A60 BnKOpNCTOBuYTe HAnpMHy Tpy6ky HeBEnIKoro po3mipy.
- RaKIO Bn BVNKOpNCTOByTe DnCK DnJa KjYnbChIB, peKOMeHdyETbcR KJnactn iHRpeDiEHTN y Ropu3OHTaJIbHOMy NNoJoxEHHI.
PiJ yac Hapi3aHnTa HaTnpaHn: iHrpeiEHTN, 0o DOaIOTbcy BePTnKaJIbHOMy NIOXeHHi, Hapi3yOITbcra Ha KOpOTwi WMATOckn, HIX Ti, 0o DOaIOTbcy Ropn3OHTaJIbHOMy NIOXeHHi.
-ПисявИКОРИСТАнг рi3aJIbHOrO ДИССКУ HeBeNnKa KINbKICTb БбрблЕнx IHRpeIeHTIb ЗАЛшаeTьсЯ HaДИССКY Ta ВсЕрEDиHITpyБКИ.
YHJ
3aBxDn BmNkaTe IpnJaT a BiKIOuAte Ioro BiMpeXe iEKeKtpoNocTaauHnI nepeI 3HIMaHHM HacaKn i3 KyXOHHOI MaunHn.
- Перед чишиениms nobhicto
po36epitb hacaiky.
He onyckaIte 3'edHyBaIbHm MexaHi3M y BODy, npoTpiTb BOJoroIO raHcipKOIO.
- PpomnTe Bci iHsi DeTani B MInbHi rapuBBoi,Notim peTeIbHo npocuWtB. BydbTe oBepeKHi, OckJIbKn pizalbHi DnCKN -DyKe roCTpi.A6o NOMnTe B nocydomnHi MaunHi (ane TiJbKn Ha BepxHi noNiCi). HE MNITE 3'6DHyBAJIbHm MEXAHl3M Y NOcydOMnHi MAUNHI.
O6cnyroByBaHHaTapeMOHT
- RaKuo Bpo6oTi npncTroH BuHNKnBdy-b-aki HEnOJaKn, nepei 3BepHeHHa Do Cnyk6n NiTpIMKn 3auiTb Ha caiT www.kenwoodworld.com.
- Pam'raTae, 10 Ha npinapnOuHpOeTbCra rapaTia, 10 BiNobiDaE BCIM 3aKOHNM NIOJKeHHM 10oD icHyUOoi rapaHTI Ta npab cnoXnbaua B Tii KpaHi, De npinad 6yB npnd6aHn.
-При винкени HecnpabHocTi Bpo60ti npnaday Kenwood a6o npn BnBJeHHi 6ydjKnx Depektib,6ydI naKa, HadiuItb a6o npnHeciTb npnad BABTO3OBaHIn cepBicHi ceHTp KENWOOD.AkTuAnbHi KOHTaKTHi dani cepBicHx cHTpiB KENWOOD Bu 3HaJTe Ha caTI www.kenwoodworld.com a6o Ha caTI dJaBaWoI kpaIHn.
CnpoeKToBaHo Ta po3po6NeHo KOMnHaHcKenWood, O6'edHaHe KopoJIbCTBO.
3po6neHO B Kntai.
+ ba - b = + dc - d
Jll Jncc Jss Jgall
jie jie jao all j!
alol
aill lololall
aabaaolol,olg jagall
iJb jUa
Jauu Juaa aiaai 1
- | x - 2| = 52 ; | y - 3| = 108
jsslll jn jn jn jn jn jn jn jn jn jn jn jn jn jn jn jn jn jn jn jn jn jn jn jn jn jn jn jn jn jn jn jn jn jn jn jn jn jn
Lleuie ciSas. 1s sla gaii
yall yll 1c) jIbIyIyIe
aJus Jgaglluuiy.
g4b21
yall
aK 1g
JU 1 J
gll gogjL
. www . kenwoodworld . com
Jg
jol jlaal 1a.
Lgolal giglal k
1111111 1
Lgio 1111
Kenwood
a
j!oJluo!gJUw!
.KENWOOD
jdoiaooj5yo
KENWOOD
www.kenwoodworld.com
J 1
Kenwood
.
palell Jia jaoa plaa
8
jiall pablal lue Jg sioi
5 120 s≤11g
pabll Jldj 00 jdo pabll
sallylplabllcogjol
-1
aiaai ygi jdu laloi
s y pabll 1oc 4
Jus Lg aia g aie Sall
aL
eaiiie iie eaeiaaiie
juao jie lauslgljgll Jaa
1
a 1
a clll lccsolj golld
S ACD = S COD + S_ CDA
pablll pall lal lal baa sic
J 1
JkiEgagall
Laiis liia 1
Sbll 2111 03
aill 0
g 41 gall jj j j j
i
i 7
aiee aee
abllgglgag
()
S BCD = S COD + S BDO - S BOC
cboollcbwol
chw sle pablil yasai jies gao
iiee eae
P( x,y) .S( y,z)
aiee
1
aeg 2eall
1
yJogall yllalw
j
a1ai 1ai paliabai jia
ggo s ssu w dclw brc
S OBC = S COD + S BOC - S BOC
S_ OBC = 12 · CO · BC = 12 × CD × 5
j 1
1 1
cbwcoJolalllsljldlglg
1u oJc baii chwi
sulall no baiil taw
chowol
1 1
aal 12 aaii
aai 1
e 1
sall 11
1
goljglal
yjial plabll jia jia jia jia jia
.
. ball plab Jia jia sji 1
plab Jlss iiae plabll Lsc jaiii
Jia jia jia jia jia jia jia jia jia jia jia jia jia jia jia jia jia jia jia jia jia jia jia jia jia jia jia jia jia jia jia jia jia jia jia jia jia jia jia jia jia jia jia jia
jI 1
aaiy gaae aalbal y
aallgssllgssll
aill 1
Jlll
aSgbi gsiuill liqall Jocic
2/1/ps
Jgss
a.
aJx no pLl, lal no a
Jaaal Jaaal pabll Jaa!
Closuljy jgljg
liy
1i 1j sb jol gall
iSall
jll 10g jnall
Jaii jia jia
cbii
04 11 1s yull
Jusill Caiac auie
i 1
r 1
aill /cill 1111 bai chw oio
aIgIgIgIgIgIgIgIgIgIgIgIgIg
cnaa 1gab aai gil
i 1
J 1
pIabll pIj joi joo
e baiiie bueo suiu o jao
pili 15
aolil aJglal baiill oJgao
jai jai g aai jai jai
Jscjgdlpa Jda jao
S OBC = S COD + S_ BOC
gbll cbiill 1
()
jlll jlll llll llll
.
cuiuuiui 1
g 1 g 1 g 1 g 1 g 1 g 1 g
cuiuuiy. 1
aal 1 a
a 1
gA
4.4.1.12
i<11jaiy
1
eess
1
g jol 10 gol 10
Jagall 1e aill
ai = 12,bi = 14,c_i = 18
aagoo jaa aaclll ylae
Jcilllll 1000000000000
jiaai 1i jiaii
aaii i 1110 Jauuie aie
aagoo jaiuyiacllljrc
a 11. 11
.
15
alall jglgallll
aiallalil jai jia
gall sji guci.
paleaie 1000
aal 9
yll lsslal
juaa juaal jkaai
S ACD = S COD + S DCE - S CDE
1 1
aLl aee 0scl alal
aIbll all y). 0alall . 1c.
al pssgall ssc Ieol.
aLl aee 0scl alal
a 1
a
Jusgall jilalll
aalal aagaaal
alai 1
(3)
Kenwood j4g
Jaaaiy aaii 15
Jai jie kuiyall Jaiil aybcjll
Jkll Jd j
i 1
LjI JJLLJALJALJALJGLJ
Jill
#
aessssssssssssssssssssssssssssssssssss
gluljlis
S_ = 12 · CD · CM = 12 × CD × 5
L ④
JSS
jolally jolll 6
J
cibill chwi ⑧
(1)
1
pell (jull) jolll
jll (yll) ylll lal lal
chuaill 1
aaiiie
Jusll
0 11 Y ac yull lc piaa
paalj jssll Jaa
.
L
S uilll jol ool
Lacolj
aigaboll lalwlyg aagll
Sg
()
0 11
gaaal aaii iok jyj
iilll lgl aagall wmaxj
y
1
JIO.
aalil
Jia Jai Jia Jia Jia Jia Jia
1
jg j000000000000000000000000000000
P( 1,0) .Q( -34,34)
aalal
1
.
1
.
y
1
a
11111111111111111
L = 1
1a 1j
J 1
1
aalaae aee
1
pabll jai jai jai jai jai jai jai jai jai jai jai jai jai
a
IMO2019 x^l = 7
i 1
Jiai
jai jia jia jia jia jia jia jia jia jia jia jia jia jia jia jia jia jia jia jia jia jia jia jia jia jia jia jia jia jia jia jia jia jia jia jia jia jia jia jia jia jia jia jia jia
a + b = 1
1
y
J1J1 J1J1 J1J1 J1J1
.
J 1
S = S_1 - S = 45 - 1
1jz1 11j1
puiu 0
a hiiil
aagaaal no gall llae
.45rall lcIolai gbiil jbi
111 111 111
1
1
1
suii
a
2