
Series 7 7850CC - Shaver BRAUN - Free user manual and instructions
Find the device manual for free Series 7 7850CC BRAUN in PDF.
User questions about Series 7 7850CC BRAUN
0 question about this device. Answer the ones you know or ask your own.
Ask a new question about this device
Download the instructions for your Shaver in PDF format for free! Find your manual Series 7 7850CC - BRAUN and take your electronic device back in hand. On this page are published all the documents necessary for the use of your device. Series 7 7850CC by BRAUN.
USER MANUAL Series 7 7850CC BRAUN
(Sharecall charged at local rates)
www.service.braun.com


English
Our products are designed to meet the highest standards of quality, functionality and design. We hope you enjoy your new Braun Shaver.
Read these instructions completely, they contain safety information. Keep them for future reference.
Warning
Your shaving system is provided with a special cord set, which has an integrated Safety Extra Low Voltage power supply. Do not exchange or tamper with any part of it, otherwise there is risk of an electric shock. Only use the special cord set provided with your appliance.
If the appliance is marked = 492 , but can use it with any Braun power supply coded 492-XXXX.
Do not shave with a damaged foil or cord.
This appliance is suitable for cleaning under running water and use in a bathtub or shower. For safety reasons it can only be operated cordless.
This appliance can be used by children aged from 8 years and above and persons with reduced physical, sensory or mental capabilities or lack of experience and knowledge if they have been given supervision or instruction concerning the safe use of the appliance and understand the hazards involved. Children shall not play with the appliance. Cleaning and user maintenance shall not be made by children unless they are older than 8 years and supervised.
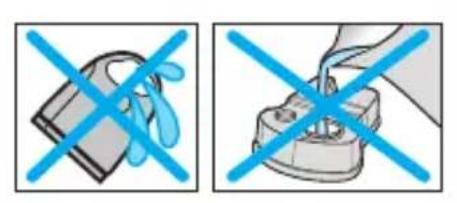
To prevent the cleaning fluid from leaking, ensure that the Clean&Renew station is placed on a flat surface. When a cleaning cartridge is installed, do not tip, move suddenly or transport the station in any way as cleaning fluid might spill out of the cartridge. Do not place the station inside a mirror cabinet, nor over a radiator, nor place it on a polished or lacquered surface.
The cleaning cartridge contains a highly flammable liquid so keep it away from sources of ignition. Do not smoke near the station. Do not expose to direct sunlight for long periods of time.
Do not refill the cartridge and use only original Braun refill cartridges.
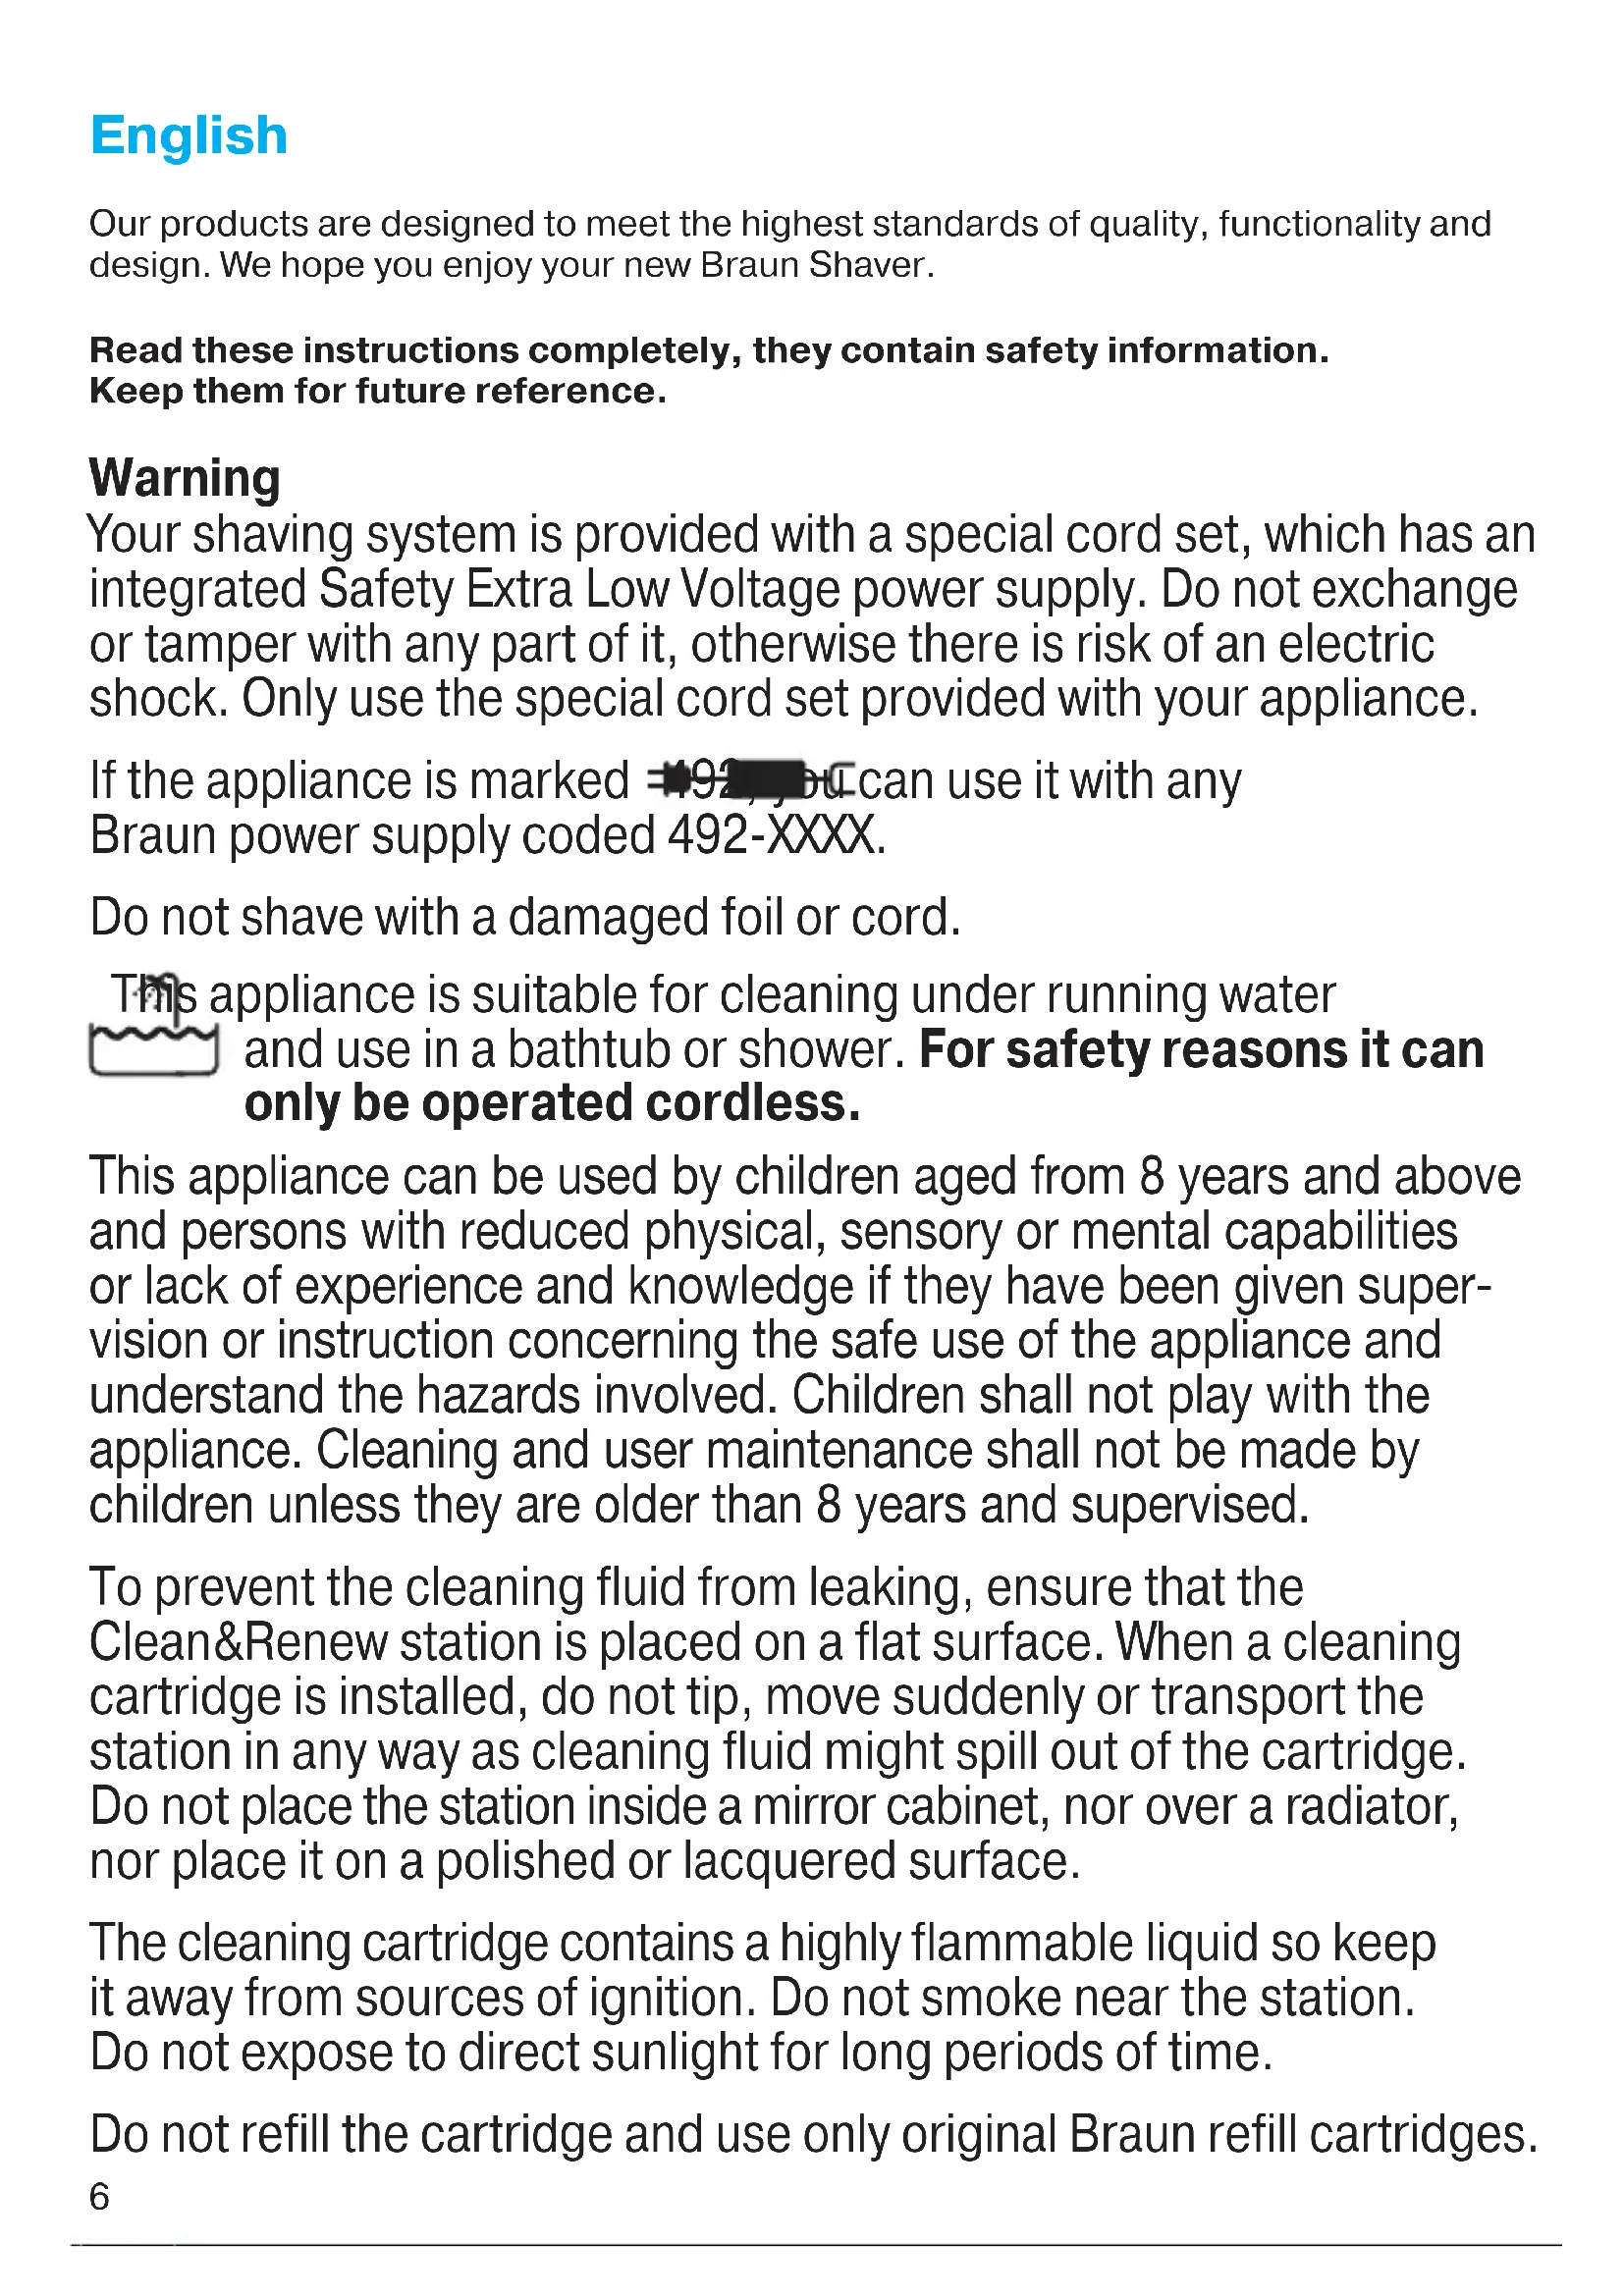
Description
Clean&Renew station
1 Cleaning fluid display
2 Lift button for cartridge exchange
3 Station-to-shaver contacts
4 Start button
5 Cleaning program indicators
6 Station power socket
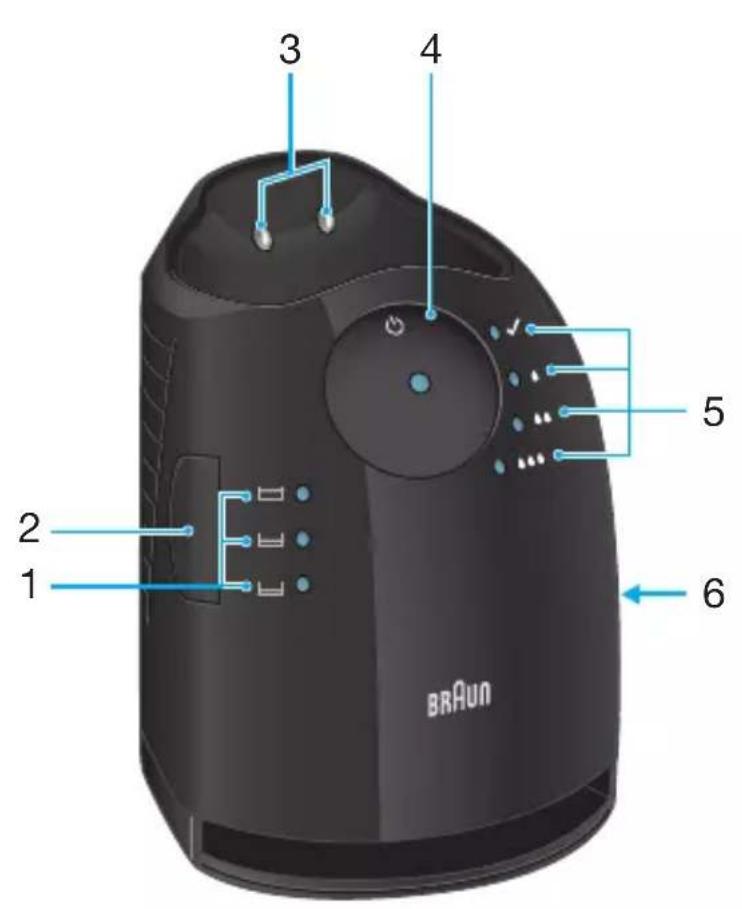
7 Cleaning cartridge
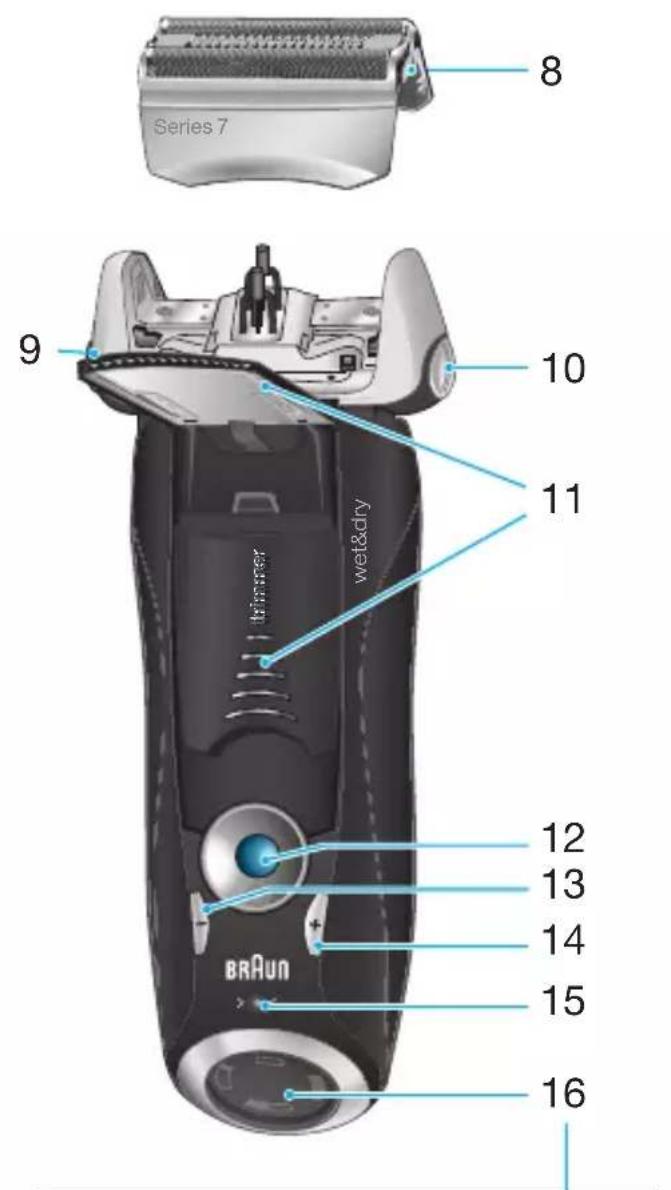
Shaver
8 Foil & Cutter cassette
9 Cassette release button
10 Shaver head lock switch
11 Pop-out long hair trimmer
12 On/off switch
13 - setting button (sensitive)
14 + setting button (intensive)
15 Reset button
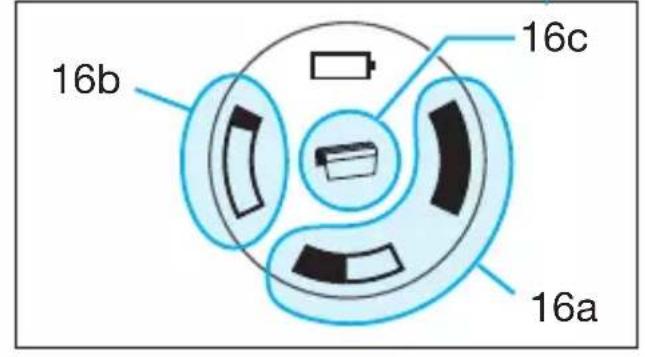
16 Shaver display
16a Charging lights (green)
16b Low -charge light (red)
16c Replacement symbol
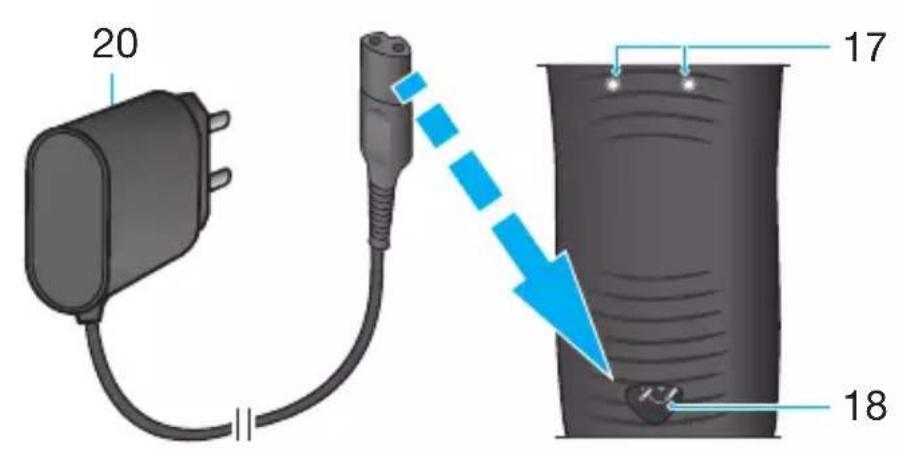
17 Shaver-to-station contacts
18 Shaver power socket
19 Travel case
20 Special cord set (design can differ)
Before shaving
Prior to first use you must connect the shaver to an electrical outlet using the special cord set (20) or alternatively proceed as below.
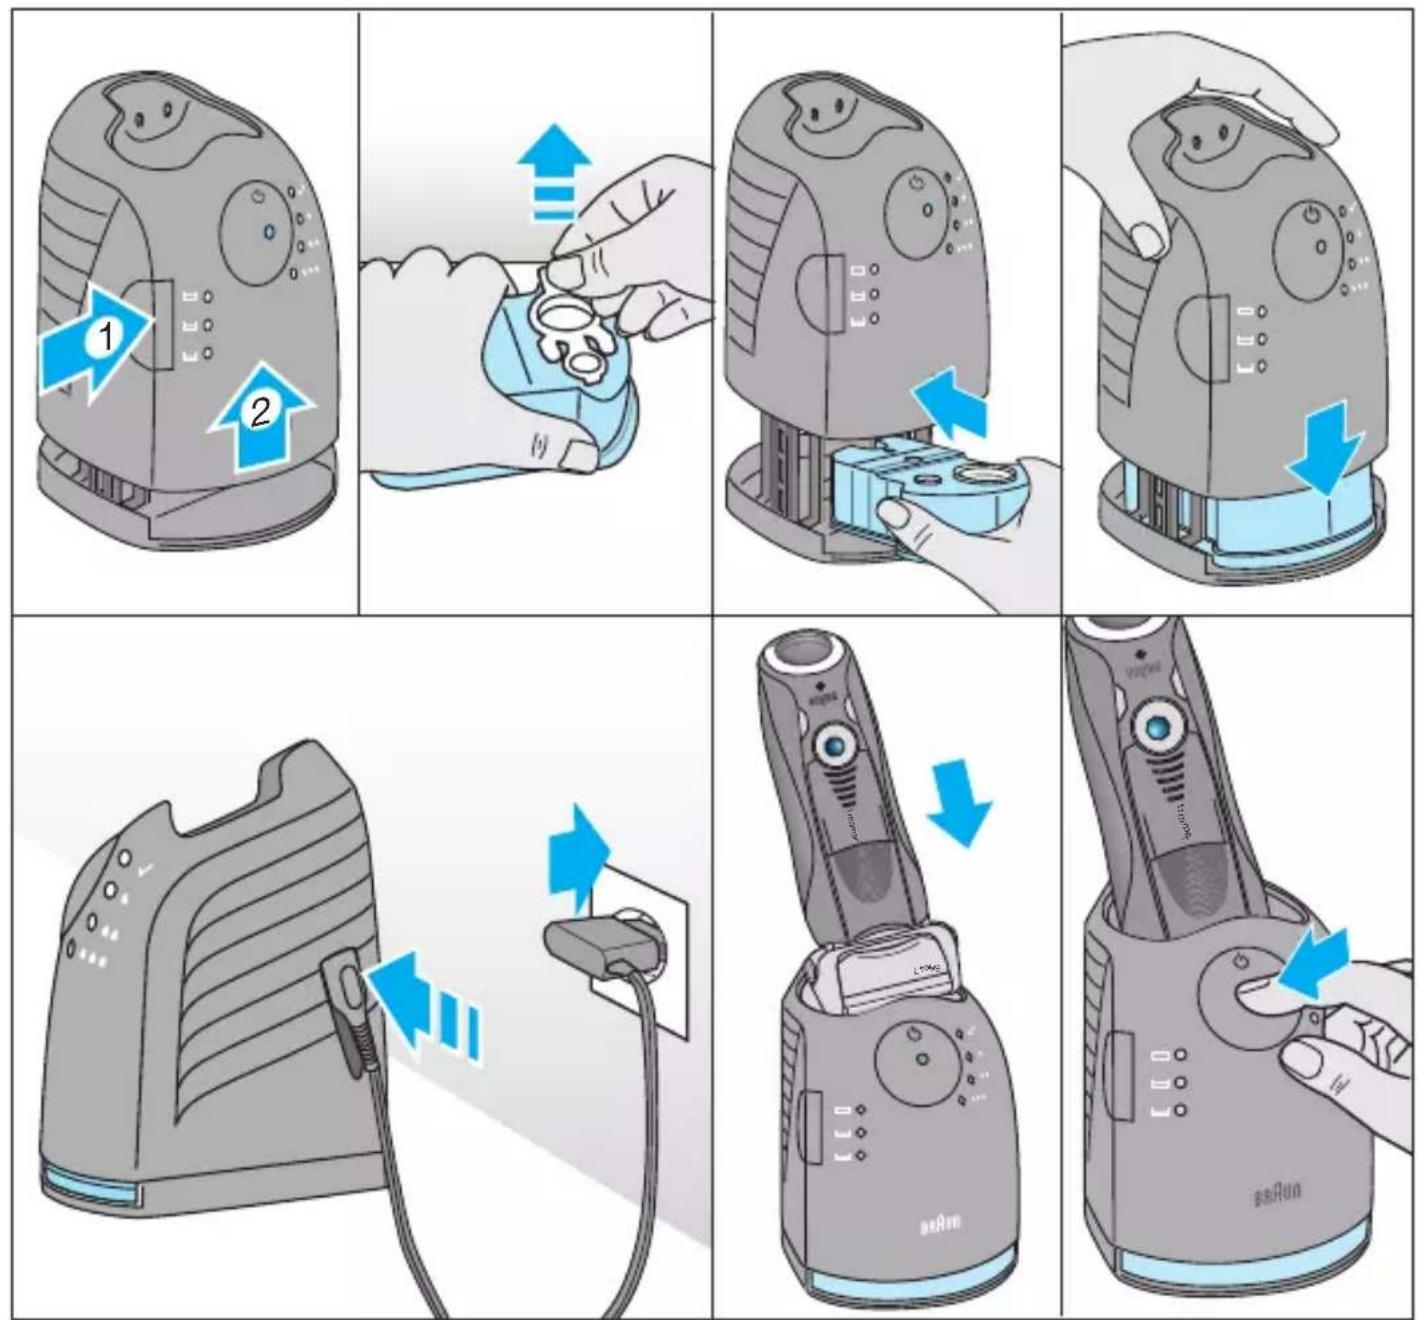
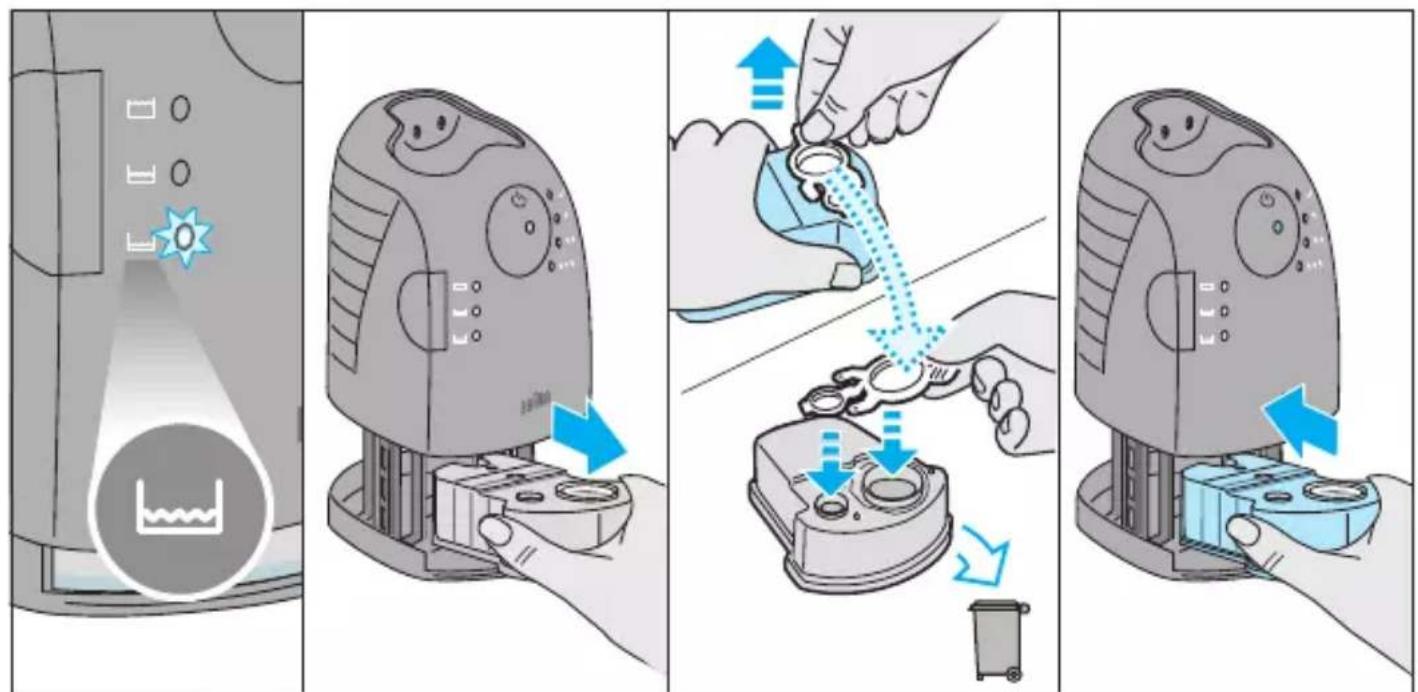
Installing the Clean&Renew station
- Press the lift button (2) to open the housing.
- Hold the cleaning cartridge (7) down on a flat, stable surface (e.g. table).
- Carefully remove the lid from the cartridge.
- Slide the cartridge into the base of the station as far as it will go.
- Slowly close the housing by pushing it down until it locks.
- Using the special cord set (20), connect the station power socket (6) to an electrical outlet.
The cleaning fluid display (1) will show how much fluid is in the cartridge:
up to 30 cleaning cycles available
up to 7 cleaning cycles remaining
new cartridge required
Charging and cleaning the shaver
Insert the shaver head with the front showing and released head lock (10) into the Clean&Renew. The contacts (17) on the back of the shaver will align with the contacts (3) in the cleaning station. Important: The shaver needs to be dry and free from any foam or soap residue!
If required, the Clean&Renew station will automatically charge the shaver. The hygiene status of the shaver will also be analyzed and one of the following cleaning program indicators (5) will light up:
✓ shaver is clean
short economical cleaning required
normal level of cleaning required
high intensive cleaning required
If the station selects one of the required cleaning programs, it will not start unless you press the start button (4). For best shaving results, we recommend cleaning after each shave.
Each cleaning program consists of several cycles, where cleaning fluid is flushed through the shaver head. Depending on your Clean&Renew Station model and/or program selected, the cleaning time takes up to 16 minutes. Leave the shaver in the station for drying. It takes several hours until remaining moisture evaporates depending on the climatic conditions.
When the program is finished, the blue indicator will light up.
Stand-by mode
10 minutes after completing the charging or cleaning session, the Clean&Renew station switches to the stand-by mode: The indicators of the Clean&Renew station turn off.
Shaver display
The shaver display (16) shows the charge status of the battery.
Charging lights (16a)
The green charging lights show the charge status of the batteries. The green charging light blinks when the shaver is being charged or switched on. When the battery is fully charged, all green charging lights shine permanently, provided the shaver is connected to an electrical outlet.
Some minutes after completing the charging, the shaver switches to the stand-by-mode: The display turns off.
Low-charge light (16b)
The red low-charge light flashes when the battery is running low. The remaining battery capacity is sufficient for 2 to 3 shaves.
Charging information
- A full charge will take about 1 hour and provides up to 50 minutes of cordless shaving time. This may vary according to your beard growth and environmental temperature. 5-minute quick charge is sufficient for a shave.
- Recommended ambient temperature for charging is 5^ to 35^ . The battery may not charge properly or at all under extreme low or high temperatures. Recommended ambient temperature for shaving is 15^ to 35^ . Do not expose the shaver to temperatures higher than 50^ for extended periods of time.
Using the shaver
How to use
Press the on/off switch (12) to operate the shaver:
-
The pivoting shaver head and floating foils automatically adjust to every contour of your face.
-
To shave hard to reach areas (e.g. under the nose), first slide the shaver head to the back position, afterwards move the head lock switch to the back. The pivoting head is locked at this angle.
- To trim sideburns, moustache or beard, slide the pop-out long hair trimmer (11) upwards.
Tips for the perfect dry shave
For best shaving results, Braun recommends you follow 3 simple steps:
- Always shave before washing your face.
- At all times, hold the shaver at right angles (90^) to your skin.
- Stretch your skin and shave against the direction of your beard growth.
Personalizing your shaver
By holding down the accelerator button - / + (13) or (14) you can adjust the shaving power to your individual needs in the different areas of your face from sensitive to intensive. The pilot light in the on/off switch ( 12 changes within the following range:
(-) sensitive shave
- light blue
-dark blue
green
(+) intensive shave
For a thorough and fast shave we recommend the green (intensive) setting.
When switching on next time, the last used setting will be activated.
Cleaning
Automatic cleaning
After each shave, return the shaver to the Clean&Renew station and proceed as described above in the section «Before shaving». All charging and cleaning needs are then automatically taken care of. With daily use, a cleaning cartridge should be sufficient for about 30 cleaning cycles.
The hygienic cleaning cartridge contains ethanol or isopropanol (specification see cartridge), which once opened will naturally evaporate slowly. Each cartridge, if not used daily, should be replaced after approximately 8 weeks to ensure optimal disinfection.
The cleaning cartridge also contains lubricants, which may leave residual marks on the outer foil frame after cleaning. However, these marks can be removed easily by wiping gently with a cloth or soft tissue paper.
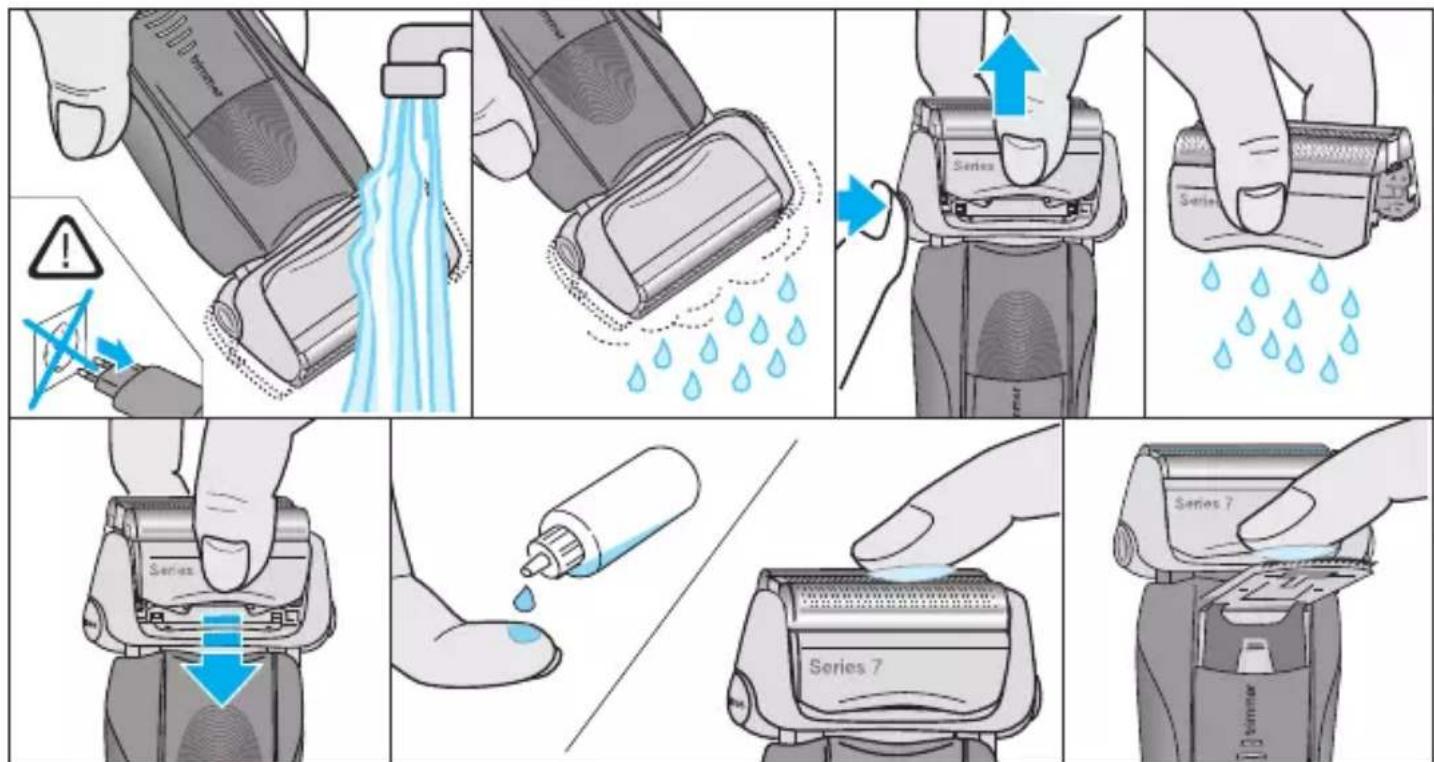
Manual cleaning
Cleaning under running water:
- Switch the shaver on (cordless) and rinse the shaver head under hot running water until all residues have been removed. You may use liquid soap without abrasive substances. Rinse off all foam and let the shaver run for a few more seconds.
-
Next, switch off the shaver, press the release button (9) to remove the Foil & Cutter cassette (8) and let it dry.
-
If you regularly clean the shaver under water, then once a week apply a drop of light machine oil (not included) on top of the Foil & Cutter cassette and the long hair trimmer.
The shaver should be cleaned after each foam usage.
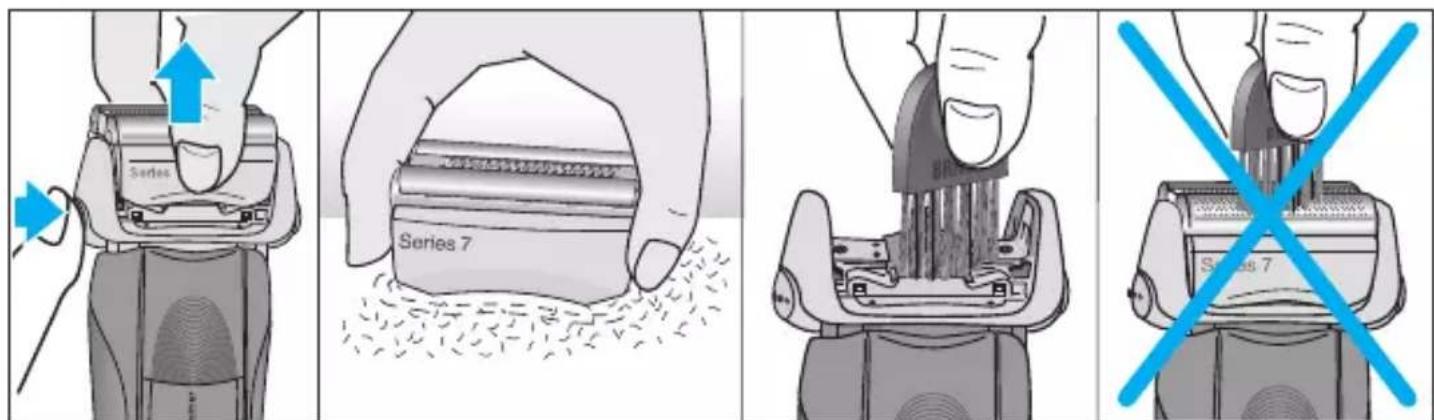
Cleaning with a brush:
- Switch off the shaver. Remove the Foil & Cutter cassette (8) and tap it out on a flat surface. Using a brush, clean the inner area of the pivoting head. However, do not clean the cassette with the brush as this may damage it.
Cleaning the housing
From time to time clean the housing of the shaver and the Clean&Renew station with a damp cloth, especially inside the cleaning chamber where the shaver rests.
Replacing the cleaning cartridge
After having pressed the lift button (2) to open the housing, wait for a few seconds before removing the used cartridge to avoid any dripping. Before discarding the used cartridge, make sure to close the openings using the lid of the new cartridge, since the used cartridge will contain contaminated cleaning solution.
Keeping your shaver in top shape
Replacing the Foil & Cutter cassette/ reset
To maintain 100% shaving performance, replace the Foil & Cutter cassette (8), when the replace ment symbol (16c) lights up on the shaver display (after about 18 months) or when cassette is worn. The replacement symbol will remind you during the next 7 shaves to replace the Foil & Cutter cassette. Then the shaver will automatically reset the display.
After you have replaced the Foil & Cutter cassette, use a ball-pen to push the reset button (15) for at least 3 seconds to reset the counter. While doing so, the replacement light blinks and goes off when the reset is complete. The manual reset can be done at any time.
Accessories
Available at your dealer or Braun Service Centres:
- Foil & Cutter cassette 70S/70B
- Cleaning cartridge Clean&Renew CCR
Environmental notice
Product contains batteries and/or recyclable electric waste. For environment protection do not dispose of in household waste, but for recycling take to electric waste collection points provided in your country.

The cleaning cartridge can be disposed of with regular household waste.
Subject to change without notice.
For electric specifications, see printing on the special cord set.
Trouble-Shooting
| Problem: Possible reason: Remedy: | ||
| SHAYER | ||
| Unpleasant smell from the shaver head. | 1. Shaver head is cleaned with water. 2. Cleaning cartridge is in use for more than 8 weeks. | 1. When cleaning the shaver head with water only use hot water and from time to time some liquid soap (without abrasive substances). Remove Foil & Cutter cassette to let it dry. 2. Change cleaning cartridge at least every 8 weeks. |
| Battery performance dropped significantly. | 1. Foil and cutter are worn which requires more power for each shave. 2. Shaver head is regularly cleaned with water but not lubricated. | 1. Renew Foil & Cutter cassette. 2. If the shaver is regularly cleaned with water, apply a drop of light machine oil on top of the foil once a week for lubrication. |
| Shaving performance dropped significantly. | 1. Foil and cutter are worn. 2. Personal setting of shaving performance has been changed. 3. Shaving system is clogged. | 1. Renew Foil & Cutter cassette. 2. For a thorough and fast shave we recommend the green (intensive) setting. 3. Soak the Foil & Cutter cassette into hot water with a drop of dish liquid. Afterwards rinse it properly and tap it out. Once dry apply a drop of light machine oil on the foil. |
| Shaver turns off with fully charged battery. | Foil and cutter are worn which requires more power than the motor can deliver. The appliance turns off. | - Renew Foil & Cutter cassette. - Regularly oil the shaving system, especially when cleaning with water only. |
| Battery segments in the display are skipped with decreasing battery capacity. | Foil and cutter are worn which requires more power for each shave. | - Renew Foil & Cutter cassette. - Regularly oil the shaving system, especially when cleaning with water only. |
| Shaving parts have been changed recently but replacement symbol lights up. | Reset button has not been pushed. | - Push the reset button for at least 3 seconds to reset the counter. |
| Shaver head is damp. | 1. Drying time after automatic cleaning was too short. 2. Drain of the Clean&Renew station is clogged. 3. Cleaning cartridge has been used for quite a while. | 1. Clean directly after shaving to allow enough time for drying. 2. Clean the drain with a wooden toothpick. Regularly wipe the tub clean. 3. The ethanol/isopropanol proportion has decreased while the oil proportion has increased. Remove residue with a cloth. |
CLEAN&RENEW STATION
| Cleaning does not start when pressing the start button. | 1. Shaver is not placed properly in the Clean&Renew station. 2. Cleaning cartridge contains not enough cleaning fluid (display lights red). 3. Appliance is in stand-by mode. | 1. Insert shaver into the Clean&Renew station (contacts of the shaver need to align with contacts in the station). 2. Insert new cleaning cartridge. 3. Press start button again. |
| Increased consumption of cleaning fluid. | Drain of the Clean&Renew station is clogged. | - Clean the drain with a wooden toothpick. - Regularly wipe the tub clean. |
Guarantee
We grant a 2 year guarantee on the product commencing on the date of purchase.
Within the guarantee period we will eliminate any defects in the appliance resulting from faults in materials or workmanship, free of charge either by repairing or replacing the complete appliance at our discretion.
This guarantee extends to every country where this appliance is supplied by Braun or its appointed distributor.
This guarantee does not cover: damage due to improper use, normal wear and tear (e.g. shaver foil or cutter block) as well as defects that have a negligible effect on the value or operation of the appliance. The guarantee becomes void if repairs are undertaken by unauthorised persons and if original Braun parts are not used.
To obtain service within the guarantee period, hand in or send the complete appliance with your sales receipt to an authorised Braun Customer Service Centre (address information available online at www.service.braun.com).
For UK only:
This guarantee in no way affects your rights under statutory law.
François
Cistici stanice Clean&Renew
Cistiaca stanica Clean&Renew
1 Zobrazenia urovne cistiacej kvapaliny
2 Vysuvacie tlačidlo na výmenu kazety
3 Elektrické kontakty pre holiaci strojček
4 Tlačidlo Start
5 Indikátory Čistiaceho programu
6 Konektor napajania Čistiacej stanice
7 Cistiaca kazeta
Holiaci strojcek
8 Kazeta s planžetou a holiacimi Čepel'ami
9 Tlačidlo na uvol'nenie kazety
10 Zámok holiacej hlavice
11 Vysuvaci zastrihávač dlhych chlpov/vlasov
12 Hlavný spinač
13 Nastavovacie tlačidlo - (jemné holenie)
14 Nastavovacie tlacidlo + (intenzivne holenie)
15 Tlačidlo Reset
16 Displej holiaceho strojceka
16a Nabijace svietidla (zelené)
16b Nabijania/nizkej (cervena)
16c Symbol vymena
17 Elektrické kontakty pre Čistiacu stanicu
18 Konektor napajania holiaceho strojceka
19 Cestovné puzdro
20 Špecialny napájací kabel (Vykonanie saMZe lisiit')
Pred holením
Pred pvym použitím je potrebné pripojit' holiaci strojček do elektrickej zásuvky pomocou špecialného napajacieho kábla (20), pripadne postupujte nasledovne:
Instalácia Čistiacej stanice Clean&Renew
- Stlačením vysúvacieho tlacidla (2) otvorte kryt.
- Čistiacu kazetu (7) položte a pridržte na rovnaj a stabilnej ploche (napriklad na stole).
- Opatrne odstrante z kazety uzáver.
- Zasunte kazetu do základne stanice až na doraz.
- Kryt pomaly zatvorte tak, ze nañ zatlačite, kym nezacvakne na miesto.
- Pomocou špecialneho napajacieho kábla (20) pripjte zástrčku Čistiacej stanice (6) do elektrickej zásuvky.
Jedinica Clean&Renew
1 Indikator tekuciine za cisćenje
2 Gumb za podizanje za zamjenu patrone
3 Kontakti gdje se aparat za brijanje priključuje na Jedinicu
4 Gumb zaPokretanje
5 Indikatori programa za cisćenje
6 Utičnica jedinice
7 Patrona sa sredstvom ciscenje
Aparat za brijanje
8 Kaseta smrežicom i blokom i noza
9 Gumb za otpušanje kasete
10 Prekidač za zaključavanje glave aparata za brijanje
11 Rasklopivi trimer za duge dlacice
12 Prekidač za uključivanje/isključivanje
13 - gumb za postavke (osjetljivo)
14 + gumb za postavke (intenzivno)
15 Gumb za resetiranje
16 Zaslon aparata za brijanje
16a Indikator(i) punjenja (zeleno svjetlo)
16b Indikator ispražnjene baterije (crveno svjetlo)
16c Indikator zamjene
17 Kontakti gdje se aparat za brijanje priključuje na jedinicu
18 Utičnica aparata za brijanje
19 Putni etui
20 Posebni priključni kabel (dizajn može biti razligit od prikazanog)
Pijebrijanja
Prije prve uporabe, priključite aparat za brijanje na elektricnu utičnicu posebnim priključnim kabelom (20) ili učinite sljedeće:
Instaliranje jeginice Clean&Renew
- Za otvaranje kucišta pritisnite gumb za podizanje (2).
- Patronu za Čišćenje (7) držite na ravnoj i stabilnoj povrsini (npr. na stolu).
- Pažljivo skinitePoklopacpatrone.
- Patronu umetnite u bazu jeginice do kraja.
- Polako zatvorite kuciSTE gurajuci prema dolje dok sve ne sjedne na svoje mjesto.
- Ukopčajte jegincu u elektricnu utičnicu preko niskonaponskog priključnog kabela (20) koji prvo trebate uključiti u utičnicu jeginice (6).
Indikator tekuciene za ciscenje (1) prikazat ce koliacinu tekuciene u patroni:
dostupno je do 30 ciklusa ciścenja
preostalo je do 7 ciklusa ciścenja
potrebna je nova patrona.
Punjenje i cisćenje aparata za brijanje
Umetnite glavu aparata za brijanje i otpuštenom blokadom glave (10) u jeginicu Clean&Review takdo prednji dio aparata gleda prema vama. Kontakti (17) na stržnjoj strani aparata za brijanje poravnat ce se s kontaktima (3) u jeginici za Čišćenje. Vázno: Aparat za brijanje mora biti suh i bez ostataka pjene ili sapunice!
Ako je potrebno, jedinica Clean&Rnew ce automatiski početi puniti aparat za brijanje. Analizirat ce se i status Čistоće aparata i upalit ce se jeder od sljedećih indicatora programa za Čišćenje (5):
aparat za brijanje je chist
potrebno je kratko ekonomično Čišćenje
potrebna je normalna razina ciścenja
potrebno je intenszivno cijscenje
Odobere li jeginica jegan od potrebnih programa cisćenja, on se necePokrenuti dok ne pritisnete gumb zaPokretanje (4). Za najbolje rezultate brijanja preparučujemo cisćenje nakon svakog brijanja.
Svaki program cisćenja sastoji se od nekoliko cikalusa tijekom kojih tekuciça na cisćenje prolazi kroz brijacu glavu. Ovisno o modelu jedinice Clean&Rnew i odabranom programu, vrijeme cisćenja moze trajati do 16 minute. Ostavite aparat u jeginici da se osuš. Imajte na umu je ponekad potrebno nekoliko sati da cjelokupna vlažnost isparu u zrak, ovisno o klimatskim uvjetima. Nakon toga aparat je spreman za uporabu.
Kada program završi, upalit ce se plavi ✓indikator.
Stanje mirovanja
10 minuta nakon dovršetka punjenja ili cisćenja, jedinica Clean&Rnew prelazi u stanje mirovanja: tada se isključuju indicatori jedinice Clean&Rnew.
Zaslon aparata za brijanje
Zaslon (16)Pokazuje razinunapunjenosti baterije.
Indikator(i) punjenja (16a)
CBeTJIiHeH HnDnKaTOp 3a HnCbK 3apJd (16b)
YepeHnT CBeTlnHe HnDnKaTOp 3a HcBk 3apJd CBETBa, KOrato 6aTePnTa 3aNoUHe Da Ce n3Touza. OCTBaunrT 3apJd Ha 6aTePnTa e DoCTaTbUeH 3a 2do 3 6pbScheHna.
HΦopMaζη 3a 3apeXdahe
YnoTpe6a Ha camo6pbchaukaTa
Kak da ce n3noJ3Ba
HaTnchete KJIoua 3a BkI./n3KJI. (12), 3a da 3aJeicTBate camo6pbchauKaTa:
PepcoHaIIN3npaIte camo6pbchauKaTa cn
Upe3 haTnCKaHe n 3aIbpxaHe Ha 6yToHa 3a cKOpocT-/+ ((13) nIi (14) moKeTe da peRyIInpate MouHocTTa 3a 6pbScheHe Cbo6pa3HO INDINBnDaJHnTe CN HjXDN B pa3JIuHN Oblactn Ha IInCeTO OT YvBCTBnTEJHo KbM INHTeH3NBHO 6pbScheHe. CnHajHaTa JAmNa Ha KJIoua 3a BkN./n3KKn. (12) ce npomeH a pAMKnTe Ha CneJHnTe rpaHn:
(-) yBCTBNTeHNo 6pbCHeHe
CBETIOOCINHbO
TbMHOCINHbO
- 3eJeho
(+) nHTeH3nBHO 6pbcheHe
3a rlaiko n 6bp30 6pbchene npenopbUBAme hactpoiKa Ha 3eJeHa CBetJInHa (nHTeh3NBHO 6pbchene). Pn cIeBaaO BKIOUbaHe NocleDHaTa n3POn3BaHa HactpoiKa Ice aKTHBnpa.
Почистванe
ABTOMATNUHNO NOUNCBaHe
CleI BCSKO 6pbcHe He BpTaTe CamO6pbchKaTa Ha CTaHcTBAHe H 3apeKdaHe I CLeBbAte IpoeDypaTa, OINcaHa No-rope B CeKcTgTA „Ppei 6pbcHeHe". ABtOMaTHUHO ige 6bDat N3BbPweHN BCNUKN Heo6XODIMN DeiCTBnI NOuNCTBaHe I 3apeKdaHe. Pn ExeJHeBHa ynotpe6a eHa NouchTbaa KaCetA 6n Tpr6BaJIO Da e IOCTaTbUHa 3a OKOLO 30 ZIKbJa Ha NouchTbaHe.
XnIeHnUHaT a NoHCTBaAa KacTa CbDpKa eTaHOJ nIN I3OpPOnaHOJ (BIXTe KaceTata 3a CneuΦnKaun), KOITo 3anOua BaBHO da Ce n3napraBa, cJeI KaTO PbLnHTeJIAT 6bIe OTBOpEN. Ako He ce n3noJ3Ba exEJHeBHO, BcRA KaCetA Tp6Ba Da ce CMeHApn6JIIN3nTEJHo Ha 8 CeDMnU, 3a Da ce OCNrpyn ONTMaJNa De3HHΦekun.
Почиствашида Касета Сьшо Тaka Сьдьржа Сма30чни TeчноCTN 3a 6рьсншаТСИСТЕма, KONTO MOrat Да OCTавг.TOCTaTbHn ПeTHa BbpxU BbHShaTApAMKa CМржа Спедпочиствае. TeЗп пETHa MOrat Дa 6БДАТ пeMaxhATn JleCHO C HeЖHO n36bpcBaHe CВлжна Кьрna.
PbUHO NOuNCTBaHe
CtanhuaOuNCTKnI3apRdKn
1 Θκραн COCTOЯня чістяшій XИДΚΟΥΝΙ
2 KhoNka CmeHbI KapTpNiJa
3 KoHTaKTbI CTaHcUN IJIa CBa3N C 6pntBOI
4 KhoNka nycKa
5 INHnKaTOpbl npoRpaMMbl OChCTKN
6 Pa3bem INTaHnCtAHcHm
7 YnCTaIuN KapTpIaX
Брптва
8 Kacceta6peouee cetko npexyum6JOKOM
9 KhoNka OTCoeINHeHnKaCCcTebl
10БлoknapoTOp6pntBehHOIroIOBKn
11 OTKnIHOJ TpIMMep IJIa IINHbIX BOJOC
12 IpeeknoyateIb
13 Khonka «-» (ChyBCTBnTeJIbHbI peKIM)
14 Khonka «+» (nHTeHcNBbI pexm)
15 Khonka c6poca
16 Θкран ьрNTы!
16a HndkaTOp 3apAkn (3eJeHbI)
16b INHnKaTOp Hn3KOrO yPoBn 3apJa (KpaChb)
16c INdikatop 3aMeHbI 6peIOuSei KaCCeTbI
17 KoHTaKTbI 6pNTbI IJIa CBa3n CO CTaHcnei
18 Pa3bem nITaHn6pNTBbl
19 YexoJ IyI xpaHeHnI
20 CneuaHbHkabel nHTaHn (MOryT OTInuHaTbcr NO BHeUHEmy BVNu OT N3O6paXeHn)
Peped ppoedypo8pntb
Ipeed nepBbIM nCNoJb3OBaHHeM NOKJIIOUHTe 6pNTBy K 3JIeKTPnueCKoI pO3Etke C NOMOUI npEynCMOTpeHHoro Ka6eIg IITaHnra (20); TaKKe MOxHO nCNoJb3OBaTb aJIb- TepHaTINBHyi CNOCo6:
YcTaHOBKa CtaHcHm OChCTKn 3apJDKn
- HaxMMTE KHOKNY OTCOeINHeHNA KACCeTbI (2), YTO6bl OTKpbITb DOCTyN KOTCEky.
- Положи-te чinctяшни Kaptrpдж (7) НеювжHyIO rOpu3OHTaJIbHyIO NOBepxHOCtB (HapnpMep, CTOL).
- AkkypaTHO CHIMMTE KpbIuKy KapTpNiJa.
BCTaBbTe kapTpIxK B OCHOBaHne KOpNyCa CTaHcN IDo ynopa.
3akpoTe OTceK, MeIeHNO npxIma erO, nOKa He ycbluHTe uelqok.
C nomoubu npedycmotpeHHoro ka6e (20) coeHnTe pa3bem nHTaHna CTaHcnn (6)c 3neKtpnuecko p03eTKoJ.
Ha ekpahe COCTOHNY YNCTAeJ XnKoCTn (1) 6yJeT OTObpaXeHo KOJIueCTBO OCTaB-WeiCra XnKoCTn B KApTpNiJKe:
30 DO 30 IOCTyHbIX UIKJIOB OUHCTKIN
7OCTABUNXCAUKNIOB ONUCTKIN
Heo6xOIMO nOmeHЯTb KapTpIaK
3apraKa n ouNcTka 6pNTBbl
Помecтinte Брптубpeюшени Гольков Виз, педварпелбно снгС Hee 6лokировКу (10),В устразсъчиски И подзаряdk. Пложженье контakтob (17)В заденч actn 6рптвсOBпадетс положженьем Контakтob (3) STaHцИ OчNTK.Бaxho:БрntBadoJxHa 6bITb cyхо,6e3 OCTaTKOB NeblmMbila!
Ipn Heo6xOIMOCn CTaHcNr ONUCTKn 3apAKn ABTomATUeCKn IPOBeTeT NO3aPryk Ky 6pntBbl. TaKxe 6yET BbINHeH aHaIn3 CaHTapHO CoCTOHNr 6pNTBbI N 3aTOpNTcR OdNH n3 CJIeDyUoXn HNDKAtOPOB IporpaMMbl ONUCTKn (5):
OuNTka He Tpe6yeTc
Heo6xOdIma 6bICTpa 3KOHOHna OCHCTka
Heo6xOДиMa OБьИнЯ OчNTka
Heo6xOIMa rIy6OKa HHTeHcNBHa OYnCTKa
Посл e Вьбopa станций OДнОИЗТpeбуемыnpогрмM OчNTК OHa 6удET 3any-шега Только посл TORO,Κak Bbl Haxmete KHONKу nyska (4).ДЯ 6олee kaueCTBeH-HORO pe3yЛьТаТа pekOMeHdyeTcЯ npOBODtB OчNTKу nocIe KaжdoI npoce-Dypbl 6pntb.
Kakda nporpamma uCTKN COCTN N3 HeCKoJIbKIN XIKNOB, B TeueHne KOTOpbIX TOLOBka npomblaeTcYnCTaUe JNKIOCTbIO. B 3aBNCIMOCTN OT NcNoJIb3yEMoB BamM MoJeIu yCTpoiCtBa Clean&Renew n/Inn Bbl6paHHO nporpamMbI YnCTKa MoKeT 3aHmAtb Do 16 MNHT. OcTaBbTe 6pNTBy B yCTpoiCTBe Ha IpocuSKy, KOTopar MoKeT 3aHrTb HeCKoJIbKO qacOB (CKOPoCTb INcnapeHnOCTaTKOB BlaRn 3aBNCIT OT KImMaTIuecknx ycIOBn). PocLe 3TOrO 6pNTBa rOTOBa DnlaJbHeJWeRo NcNoJIb3OBAHnA.
IocJe 3aBepseHnI npoPamMbI 3aROpNTcCnHn√MHdNkATOp.
PexkIM OxndaHna
Yepe3 10 MmHyT nocIe 3aBepseHn IpoUeDypbI 3apAdkn NJI N OCHCTKN CTAHcN OCHCTKN I 3apAdkn nepeKlIOHTcB PexIM OxNJaHn: INdNKaTOpbl CTaHcN OCHCTKN I 3apAdkn IORachyT.
3KpaH 6pntBbl
Диспеловбрntы(16)пoka3ьBaET COCTOЯнe 3apяда akkyмлгетopa.
CBeTOB0I INDnKaTOp yPOBnI 3apJa aKKymJrTOpHO6aTapeN (16a)
CBeTOBoi INDnKaTOp 3eJeHOro CBeTa NOKa3bIbAeT yPoBEh6apra aKKymyIaTOPOH6aTapei. INDnKaTOp MInraet 3eJeHbIM CBeTom, KOrda 6pNTBa HaxOHTcB B peXimeNo3aprAn, a TaKke npN BkJIooHeHH. Ppr NoJHOCTbIO 3apxKeHHOM aKKymyIaTOpe BCE IamnoOCHn CBeTOBOrO INDnKaToPa yPoBH3apraIa RopT, He MInra, KOrda 6pNTBaNoDKJIIOUeHa K 3JIeKTPOcETn.
Yepe3 HeckoIbKO MInHyT NocIe NOpHoi 3apAaKKyMylrTopa 6pntBa nepeKJIIOHTcB PexIM OxNIdAHn: 3KpaH 6yJeT BbIKIouHe.
CBeTOBOH INDnKaTOp HN3KOrO yPOBHa 3apJa aKKymyIaTOPHO6aTapeu (16b) CBeTOBOH INDnKaTOp KpaCHOrO UBaTa NaHnHaET MmRaTb Prn HN3KOM yPOBHe 3apJa aKKymyIaTOPHO6aTapeu, Yka3bBaJ Ha Heo6XoIMOCtB 3aBepSeHn IpoUecca 6pn- TbJ. Ppr n EToM OCTaBUnsCraPd N03BOJAEr BblONHnTb 2-3 npOueDpybl 6pNTbJ.
3apraKa aKKymyTopa
3aBnCnT OT OcObeHNOCTe Bawero BOLOcHoro NOKpoBa N OKpykaUoIeN TempeaTpyb. IJIa OJHO npOceDypbI 6pNTbY DOCTaTOUHO KpaTKOBpeMeHHoN 5-MmHyTHoN 3apAdkN.
- PekomeHnyetc3apjkaTb yctpoiCTBO npn okpykaiouie TeMnepatye ot 5°C do 35°C. Пркраине Вblcoknx и НИЗКИX Tempepatypax 3apяdka AkkymyIaTopa Mochet npoxoHTb MeДлeHHe e nI He npoxoHTb BOO6ue. ИспльзOBaTb yctpoiCTBO ДЯ 6pntby peKomeHnyetc npn Tempepatye ot 15°C do 35°C. He donyckaIte Bo3-DeiCTBna Ha 6pntBy tempepatyp cbbIe 50°C b TeueHne npdoJxItelbHoro BpeMeHn.
YcTpaHHeHHeNCpPaBHOCTeI
| Henschpab-HOCThb: | Возможная обчuna: Меры no устраенью: | |
| БРИТВА | ||
| Hendri�пьий 3anax, indyший OT rolobkin rolibby. | 1. Головka бритbingл prombyta boДой. | 1.При помьванни г olobки бритbingл boДой IncpoльзуITE толбко Теллую boDу и, Время OT bpe-MEHи, НEMHOrO КДКОГМыla (6e3 abpa3INBbIX BeIeCTB).Сни-MITE бритberнуну сетку и ржу-Ший SFLOK и дайу Em ВсICoxHyTb. |
| 2.Чис taxий карtrпдж ИсплъЗовалы в точenvе срoka,Preвъшадцero 8 Heideь. | ||
| 3amehу чincstяшero karpttriДжа Следует проворпь минимуm pa3В 8 Heideь. | ||
| ПОНЗВОДN-ТELБНOCТБаKKумлЯТорacSУСЕСТВЕнHOСИХЕА. | 1. Дя каж do n proze undbyIбрNTь TRe6ByETcra NObl-шенио КOLичEcTBo 3Hep-гИN BCJIeDCTBVE ИЗHOCA cETKN I pexyuzero 6LOKa.2.ПромыВka roJOBKINбрNTbI BODo INPOBO-DITcRpeYJrPNO, Ho 6e3 CMa3bIBAHnI. | 1. 3amehnte kaccety c cetko n pexyuizim 6lOKom.2. Ecln Bbl pegyarpo n prombyBaete 6pntby BOdo, pa3 в HeJeIO HaHOCITE kaJIIO CBETLOrO MaunH-HORO MacJa Na BeRpX CETKn dIЯ eCMA3bIBAHnI. |
| ФФфektiv-NCHOTb 6prNTbyaСUSECTBENHOСИХЕА. | 1. ИЗошени сетка n pexyu-zim 6lOK.2. Измены персонльные NaCTPoRkn 3ФфektIVBHO-CTN 6prNTbY.3.Засореа 6pntVBeHHa NcStema. | 1. 3amehnte kaccety c cetko n pexyuizim 6lOKom.2. Дя ТшатelьHOrO n 6blcTporo 6pNTbЯ peKOMeHDoBan 3eJIeHbI (InTeHCINBHy) peKIM.3. 3amoyite kaccety c 6pntBENHO cETKO n pexyuizim 6lOKom B TEPLO Bode C KaJIeN cpeIcTBAДЯ МБТЯ NOcUdBi. Пocle 3amay-BAHry TцatelbH O npOMoIte ee n CTpIXHnTE OCTaTKe BOdu. Пocle BbICbIXaHry NaHecITe Ha cETKy KaJIIO CBETLOrO MaunHNO MAcJa. |
| БрNTBa OTKIIIO-UaETcprnI PONHOCTbUZapJxehHOMaKKuMylATope. | HeIoCTaTOUHЯ MOUHCTb DBrAteYI NO prUnHne I3Hoca 6peUoSei cETKN I pexyuzero 6LOKa. ИЗdelene OKJIIOuAETcR. | - 3amehnte kaccety c cetko n pexyuizim 6lOKom.- Perglyarpo Cma3bIBaaiTe 6pntBEN-HUO cNCTEmy, OCobEnHO ecIin DЯe eprombIBaHry INCNoIb3YeTcR TOJbKO BODa. |
| OTCyTCTBYOTceMentbI aKKy-MyJYTopaHa3KpaIe, ChI-Jxeha emKoCTb aKKuMylATope. | Дя кajdo n proze undpyIbрNTbI TRe6ByETcRA NOblIseH-HOE KOLiueCTBO 3HeprNIN BCJIeDCTBVE I3Hoca cETKN I pexyuzero 6LOKa. | - 3amehnte kaccety c cetko n pexyuizim 6lOKom.- Perglyarpo Cma3bIBaaiTe 6pntBEN-HUO cNCTEmy, OCobEnHO ecIin DЯe eprombIBaHry INCNoIb3YeTcR TOJbKO BODa. |
| ПрOBeDEHa3aMeHa DeTa-ЛeN 6prNTbI, HOcIMBOJ 3aMeHbI He rachet. | He haxata KNOpKa c6bOca. - | Дя obHyIeHnIa ChEtUkka yIdepxNi-BaIte KHNOpKc c6bOca haxaToB TceHne MINHmym 3-x cekynd. |
| Влajхость Головки бричы. | 1. ПосLEавTomатиеско ЧИСТКИ БРИТВА He усpeя прOCoxHуТь. 2. 3асорен CTOK StaHцIN ОчИСТКИ ИЗAPДКИ. 3.ЧИСТЯш的职业 ИСПОЛБЗOBалCSВ Точень ДOLЛГО Врemeи. | 1. OсушесТВ liaTe чИСТКУ сраЗу посLEа БPИТь, УTOБы БрИТВа усpeя прOCoxHуТь. 2. Сnomошью 3убочистkn рpoч- stITE CTOK. Perуларно прOTи- paIJte emKOSTь доиста. 3. Содерханце отahOLA/n3Oppona- HOla ChN3nILOCb, a codepχани масla уВелчилесь. YdaJInte OCTaTKI C NOMOШь TkaHIи. |
CTAHZIy OYnCTKn I 3APJDKN
Bce npyrne Tpe6oBaHn, BkIIOUa Tpe6oBaHn BO3MeIeHn y6bITKOB, NCKIIOuAOTcR, ecnn Ha7a OTBETCTBeHHOCTb He yCTaHOBJIeHa B 3aKOHHom nopJKe.
Peklamaun, Cb3aHhBc KOMMepueckm KOHTpaKTOM C npOaBc0m, He nOJaIOT noD 3Tu rapaHTnIO.
Cnyan,HaKOTOpbIe rapaHTnHe pacnpoctpaHЯETc:
-ДeфКТы, Вbl3BaHHbIe ФОрc-MaxKOpHbIMN OБСТОЯТьСТВAMN;
- INCNoJIb3OBAHnE B nPoΦeCCNOHaJIbHbIX UeJIaX;
- HapuweHne Tpe6oBaHn INCTpyKUIN NO 3KcNlyaTaUIN;
- Henpabnibna yctaHOBka HanpJxKHeNn nTAtoueCetu (ecn 3TO Tpe6yETc);
-BHECEHNE TexHNueCKNX 13MeHeHNI;
-MexaHnueckne NOBpeKdEHHra;
- NOBpeKdEHHa IO BnHe XINBOTbIX, rpb3yHOB IN HaceKOMbIX (B TOM YNCJIe CJIyauH haxOxJdeHna rpb3yHOB IN HaceKOMbIX BHyTpN npNo6OpOB);
-Дя пиборов, работаюших OT сатаpeек, - работа с неюхаяшMu Ил ИстошпьIMN сатарейкамн, Лобbie NOВржденья, Вьзваньie INCTOшЕньIMN Ил TEkyшIMN сатарейкамn (COBetyem NOlb3OBaTbCЯ TOLьКО пpedoхарeHHыIMN OT npotekaHЯ сатарейкам);
-ДябрNTВ -СмЯТЯИЛ NОРBAHHa CEtKa.
BHMaHHe! OpiRHaJIbHbI IapaHTnHbI TaIOH IOJIeXHT N3BJTNO pRn O6paueHn B cepBcHbI ueTp dIra rapaHTnHoro peMOHTa. IocNe npOBeJeHnpeMOHTa IapAHnHbIM TaIOHOM 6ydtAeTBc8 3aONHeHHbI opRiHaJ LnCTa BblONHeHHpeMOHTa CO U7aMnOM cepBcHOrO ueHTpa I NOIncAHbI nOTpe6bTeJem No nOlyeHnn n3dEJIra n3 peMOHTa. Tpe6yIte npocTabeHn DaTbI BO3BpTa n3 peMOHTa, cPOK rapaHTn IpoDJIeBaETc8 Ha BpeMa HaxOXDeHn n3dEJIra B cepBcHOM ueHTpe.
B cIyuae Bo3HnKHOBeHnCLOXHOCTe C BbIOnJIHeHnEM rapaHTnHOr OIIIN PocJeraPapHTnHOro 6cIyXnBaHn IPOCSb6a COO6uatab 06 3TOM B INΦOpMaunOHHyIO Clyx6by CepBaCa Braun no Telefohy 8-800-200-20-20 (3BOHOK n3 PoCCn 6ecnlaTbH)
YkpaIHcbka
KepiBnTBo 3 ekCnIyataci
HaWi Bnpo6n po3p06JIeHi BiINOBiIDHO IO HauBnIux CTaHdApTiB JKOCTi, FyHKUHaJIb-HoCTI Ta Dn3aHy. Mn CnoIIBaEMOcR, IIO Bam IIOO6aETbcr BaIa HOBa 6pnTBA Braun.
Ybaxho npoHTaTe 10 iHCTpyKciIO.BoHa mictnb iHΦopMaciIO npo 6e3neky.36epi-raIte ii IJMA6yTHbORO BnKOpNCtAHNJa.
ybara
CTAHCIY CLEAN & RENEW
Country of origin: Germany
Year of manufacture
To determine the year of manufacture, refer to the 3-digit production code located near the type plate. The first digit of the production code refers to the last digit of the year of manufacture. The next two digits refer to the calendar week in the year of manufacture. Example: "427" - The product was manufactured in week 27 of 2014.
Lilai Lai
eai
a a a a a a a a a a a a a a a a a a a a a a a a a a a a
eall ple 1
.2014 27
| .بbooَفَعَلُمَالْحَسَنَهِّةَبْعَدُمَلَهِّةَبْعَدُمَلَهِّةَبْعَدُمَلَهِّةَبْعَدُمَلَهِّةَبْعَدُمَلَهِّةَبْعَدُمَلَهِّةَبْعَدُمَلَهِّةَبْعْدُمَلَهِّةَبْعَدُمَلَهِّةَبْعَدُمَلَهِّةَبْعَدُمَلَهِّةَبْعَdُمَلَهِّةَبْعَdُمَلَهِّةَبْعَdُمَلَهِّةَبْعَdُمَلَهِّةَبْعَdُمَلَهِّةَبْعَdُمَلَهِّةَبْعَdُمَلَهِّة·.1 . . . . . . . . . . . . . . . . . . . . . . . . . . . . . . . . . . . . . . . . . . . . . . . . . . . . . . . . . . . . . . . . . . . . . . . . . . . . . . . . . . . . . . . . . . . . . . . . . . . . - . . . . . . . . . . . . . . . . . . . . . . . . . . . . . . . . . . . . . . . . . . . . . . . . . . . . . . . . . . . . . . . . . . . . . . . . . . . . . . . . . . . . . . . . . . . . . . . . . . . ? . . . . . . . . . . . . . . . . . . . . . . . . . . . . . . . . . . . . . . . . . . . . . . . . . . . . . . . . . . . . . . . . . . . . . . . . . . . . . . . . . . . . . . . . . . . . . . . . . . . •. • • • • • • • • • • • • • • • • • • • • • • • • • • • • • • • • • • • • • • • • • • • • • • • • • • • |
yI I bll W fL/1f 111