
DMR107 - Radio MAKITA - Free user manual and instructions
Find the device manual for free DMR107 MAKITA in PDF.
| Product Type | Radio |
| Brand | Makita |
| Model | DMR107 |
| Dimensions (L x H x D) | 280 x 302 x 163 mm |
| Weight (without battery) | 4.0 kg |
| Main power supply | 12 V DC 700 mA AC adapter (center positive) or Makita 7.2-18 V battery (sliding or stick type) |
| Backup batteries | 2 UM-3 (AA) batteries |
| Frequency ranges | FM: 87.50-108 MHz (step 0.05 MHz), AM (MW): 522-1629 kHz (step 9 kHz) |
| Output power | Varies with voltage: up to 2 x 3.5 W (at 18 V) |
| Speaker | 3 inches, 8 ohms, stereo |
| Auxiliary inputs | 2 x 3.5 mm jack sockets (AUX IN1 and AUX IN2) |
| FM antenna | Curved flexible rod |
| AM antenna | Built-in bar antenna |
| Display | LCD display with backlight |
| Tuning | Manual, scan, or presets (5 stations per band) |
| Alarm functions | Radio alarm and HWS vibrator alarm (Human Wake-Up System) with snooze |
| Sleep timer | Yes, adjustable (15, 30, 45, 60, 90, 120 minutes) |
| Protection rating | IPX4 (splash-proof) |
| Construction | Rugged design with carrying handle |
| Included accessories | AC adapter |
| Maintenance and cleaning | Clean with a dry cloth only. Do not use solvents. |
| Safety instructions | Read the manual before use. Do not expose to heat. Use only specified accessories. |
Frequently Asked Questions - DMR107 MAKITA
User questions about DMR107 MAKITA
0 question about this device. Answer the ones you know or ask your own.
Ask a new question about this device
Download the instructions for your Radio in PDF format for free! Find your manual DMR107 - MAKITA and take your electronic device back in hand. On this page are published all the documents necessary for the use of your device. DMR107 by MAKITA.
USER MANUAL DMR107 MAKITA
GB Radio Instruction manual
HctpyKuaI NO 3KcnJyaTaauN
BMR102


2
3
4
5
6
7
8
9
10 11
12
Symbols
The following show the symbols used for the equipment. Be sure that you understand their meaning before use.
Symboles
Read instruction manual.
Only for EU countries
Do not dispose of electric equipment or battery pack together with household waste material!
In observance of European Directive 2002/96/EC on waste electric and electronic equipment, 2006/66/EC on batteries and accumulators and waste batteries and accumulators and their implementation in accordance with national laws, electric equipment and battery pack that have reached the end of their life must be collected separately and returned to an environmentally compatible recycling facility.
Gjelder bare for EU-land
Kast aldri elektriskeprodukter aller batterier i husholdningsavfallet!
Móvo yia tics xwpe ts EE
Mny aToppinTe Tov nEeKpiK oEoTIAIO np Tnv mTaTApia paZI e Ta oikiaKa aToppmuata!
ENGLISH (Original instructions)
IMPORTANT SAFETY INSTRUCTIONS
WARNING:
When using electric tools, basic safety precautions should always be followed to reduce the risk of fire, electric shock, and personal injury, including the following:
- Read this instruction manual and the charger instruction manual carefully before use.
- Clean only with dry cloth.
- Do not block any ventilation opening. Install in accordance with the manufacturer's instruction.
- Do not install near any heat sources such as radiators, heat registers, stoves, or other apparatus (including amplifiers) that produce heat.
- Only use attachments/accessories specified by the manufacturer.
- Unplug this apparatus during lighting storms or when unused for long periods of time.
- A battery operated radio with integral batteries or a separate battery pack must be recharged only with the specified charger for the battery. A charger that may be suitable for one type of battery may create a risk of fire when used with another battery.
- Use battery operated radio only with specifically designated battery packs. Use of any other batteries may create a risk of fire.
- When battery pack is not in use, keep it away from other metal objects like: paper clips, coins, keys, nails, screws, or other small metal objects that can make a connection from one terminal to another. Shorting the battery terminals together may cause sparks, burns, or a fire.
- Avoid body contact with grounded surfaces such as pipes, radiators, ranges and refrigerators. There is an increased risk of electric shock if your body is grounded.
- Under abusive conditions, liquid may be ejected from the battery; avoid contact. If contact accidentally occurs, flush with water. If liquid contacts eyes, additionally seek medical help. Liquid ejected from the battery may cause irritation or burns.
SPECIFIC SAFETY RULES
SAVE THESE INSTRUCTIONS.
FOR BATTERY CARTRIDGE
- Before using battery cartridge, read all instructions and cautionary markings on (1) battery charger, (2) battery, and (3) product using battery.
- Do not disassemble battery cartridge.
- If operating time has become excessively shorter, stop operating immediately. It may result in a risk of overheating, possible burns and even an explosion.
-
If electrolyte gets into your eyes, rinse them out with clear water and seek medical attention right away. It may result in loss of your eyesight.
-
Do not short the battery cartridge:
(1) Do not touch the terminals with any conductive material.
(2) Avoid storing battery cartridge in a container with other metal objects such as nails, coins, etc.
(3) Do not expose battery cartridge to water or rain. A battery short can cause a large current flow, overheating, possible burns and even a breakdown.
- Do not store the tool and battery cartridge in locations where the temperature may reach or exceed 50^ (122^)
- Do not incinerate the battery cartridge even if it is severely damaged or is completely worn out. The battery cartridge can explode in a fire.
- Be careful not to drop or strike battery.
- Do not use dropped or struck battery. (Do not use a damaged battery.)
Features:
AM/FM-stereo PLL Synthesized
Large LCD display with illumination
- Manual/Preset/Scan tuning
- Rotary tuning and volume control
- 5 preset stations each band
- Time and 2 alarm timers (radio and HWS buzzer) with Snooze
- Adjustable sleep (auto shut off) timer
- Stereo speaker for rich sound performance
- Ultra rugged design
Water resistant to IPX 4
- Powered by both Makita battery pack and supplied power adaptor
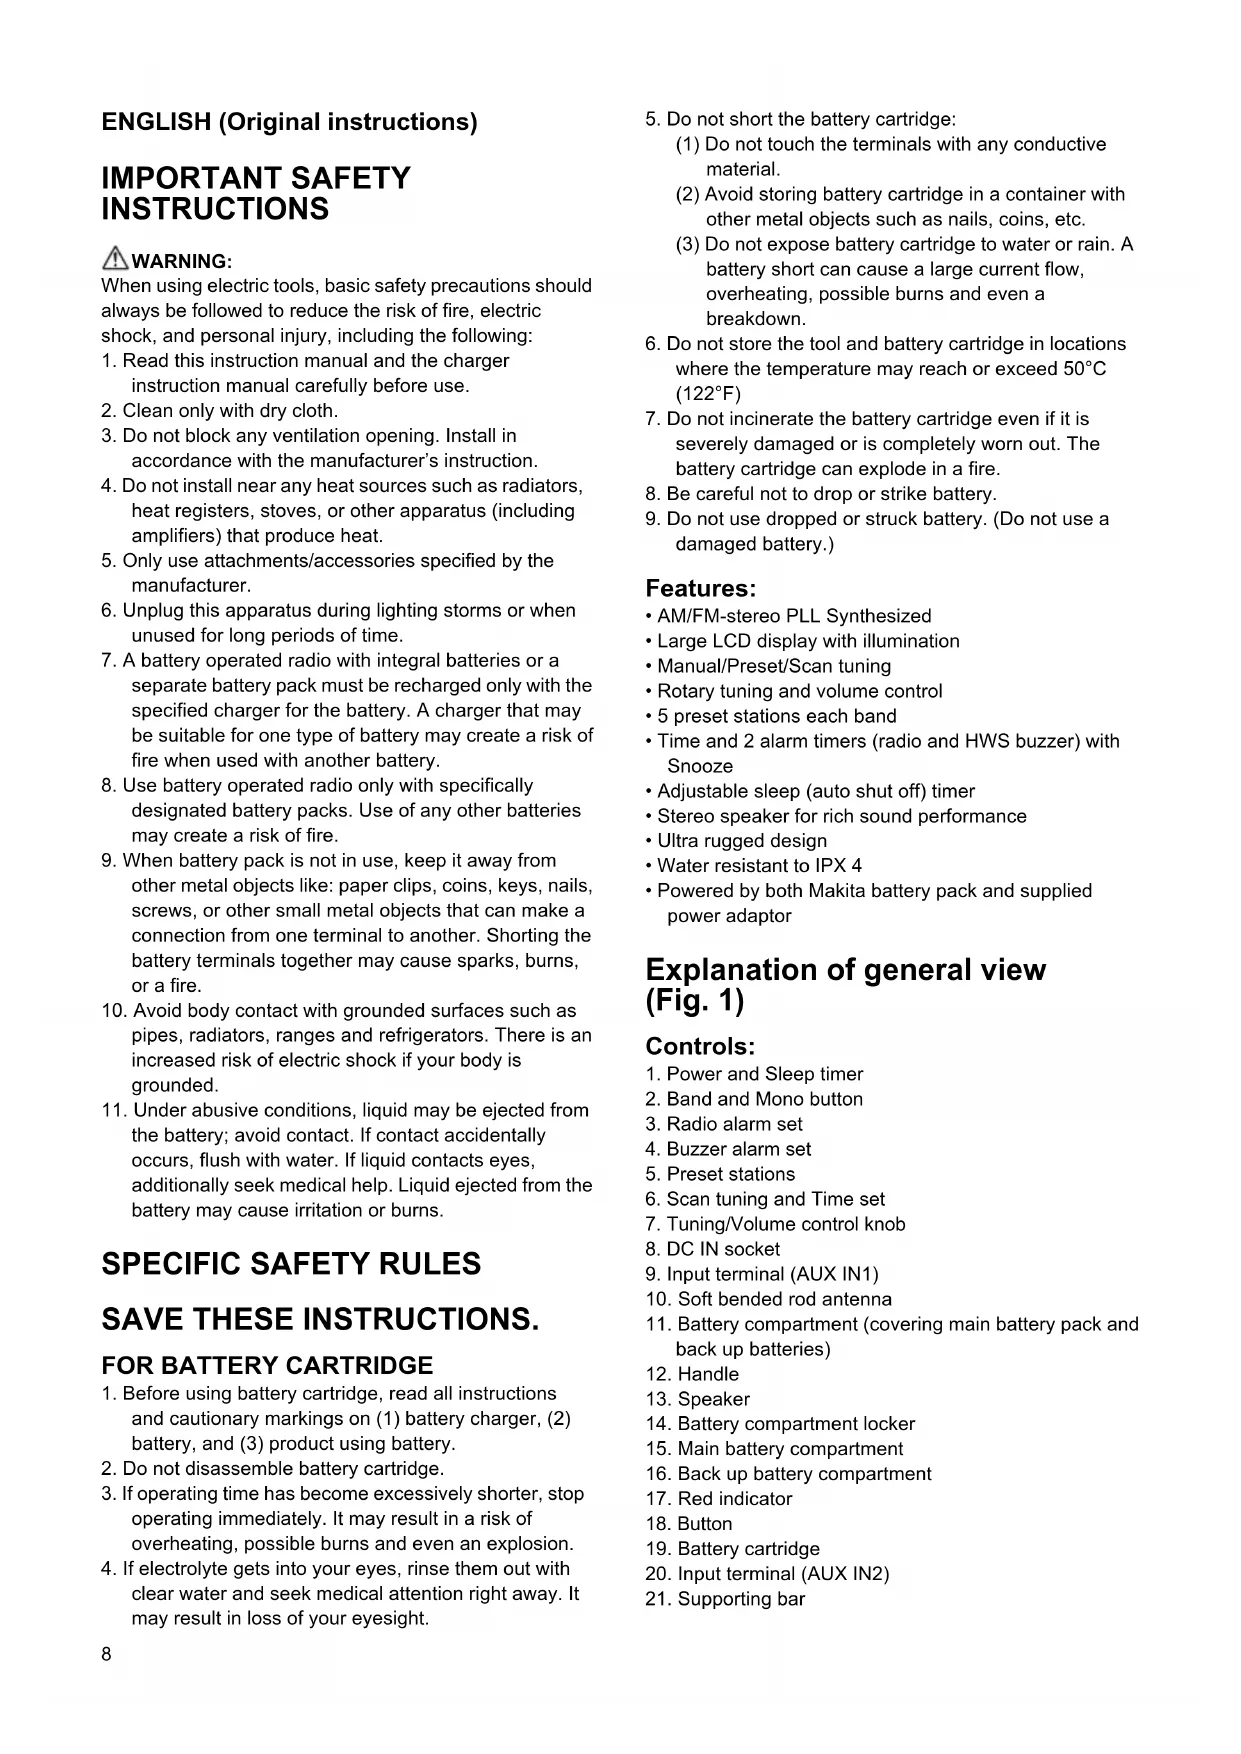
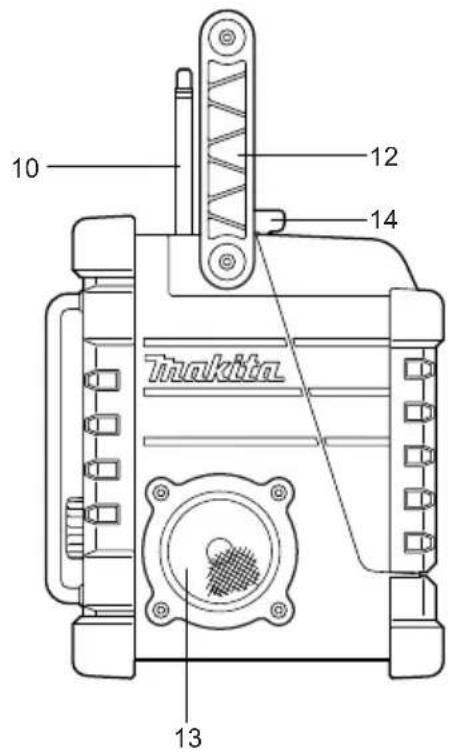
Explanation of general view (Fig. 1)
Controls:
- Power and Sleep timer
- Band and Mono button
- Radio alarm set
- Buzzer alarm set
- Preset stations
- Scan tuning and Time set
- Tuning/Volume control knob
- DC IN socket
- Input terminal (AUX IN1)
- Soft bended rod antenna
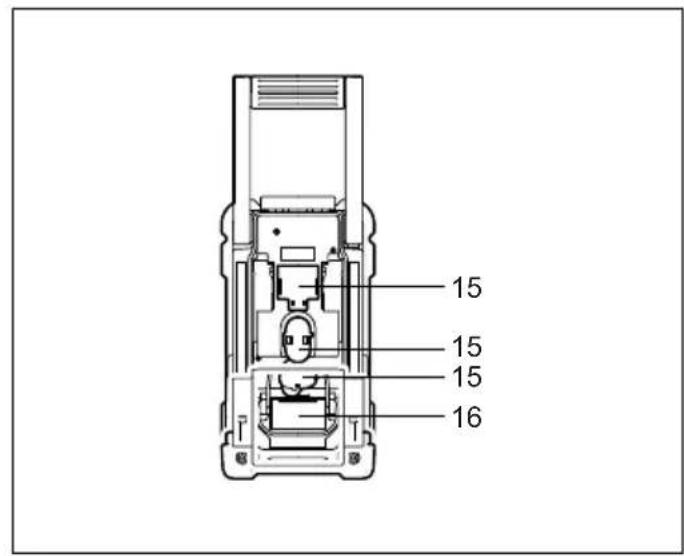
- Battery compartment (covering main battery pack and back up batteries)
- Handle
- Speaker
- Battery compartment locker
- Main battery compartment
- Back up battery compartment
- Red indicator
- Button
- Battery cartridge
- Input terminal (AUX IN2)
- Supporting bar
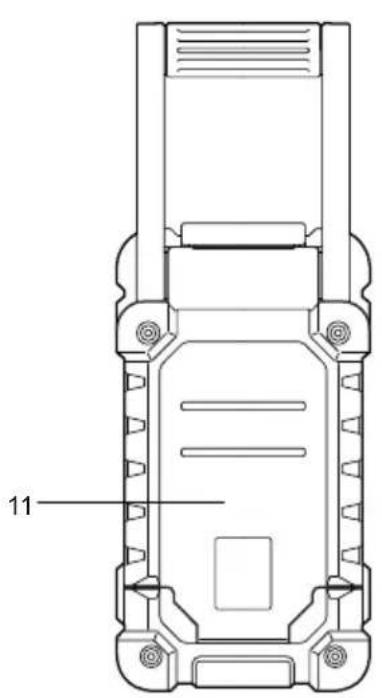
LCD Display:
A. Radio alarm
B. HWS buzzer alarm
C. Scan tuning
D. Band Indicator
E. Low battery indicator
F. Preset stations
G. Sleep and Snooze status
H. Frequency
I. Stereo symbol and Volume
J. Clock
K. Time set
L. PM for clock
Battery Installation
Note:
Keeping back up batteries inside the compartment prevent stored data in preset memories from being lost.
- Pull out the battery compartment locker to release battery compartment. There are main battery pack compartment and back up battery compartment. (Fig. 2 & 3)
- Remove back up battery compartment cover and insert 2 fresh UM-3 (AA sizes). Make sure the batteries are with correct polarity as shown inside the compartment. Replace the battery cover.
- After back up batteries are inserted, insert the main battery pack to power radio. The suitable battery packs for this radio listed as the following table.
The following tables indicate the operating time on a single charge.
| Battery Cartridge Voltage | AT SPEAKER OUTPUT=50 mW + 50 mW unit: Hour | |||||
| 7.2 V 9.6 | V 10.8 V 12 V | 14.4 V 18 V | ||||
| BL7010 Approx. 7.0 | ||||||
| PA09 PA12 | PA14 | PA18 | Approx. 8.0 | |||
| 9050 | 1250 | 1450 | 1850 | |||
| 9100 | 1200 | 1420 | BL1815 | |||
| 9120 | BL1013 | 1220 | BL1415 | |||
| 9100A | 1200A | |||||
| 9102 | 1202 | 1422 | 1822 | Approx. 12.5 | ||
| 9122 | 1222 | BH1420 | ||||
| 9102A | 1202A | |||||
| BH9020 | BH1220 | |||||
| BH9020A | BH1200C | |||||
| 9134 | 1234 | 1434 | 1834 | Approx. 16.5 | ||
| BH1427 | Approx. 17.0 | |||||
| 9135 | 1235 | 1435 | 1835 | Approx. 19.0 | ||
| 1435F | BL1830 | |||||
| 1235F | BL1430 | |||||
| BH9033 | BH1233 | BH1433 | Approx. 21.0 | |||
| BH9033A | BH1233C | |||||
: Cluster Battery
:Slide Battery

WARNING:
Do not use two main batteries at the same time.
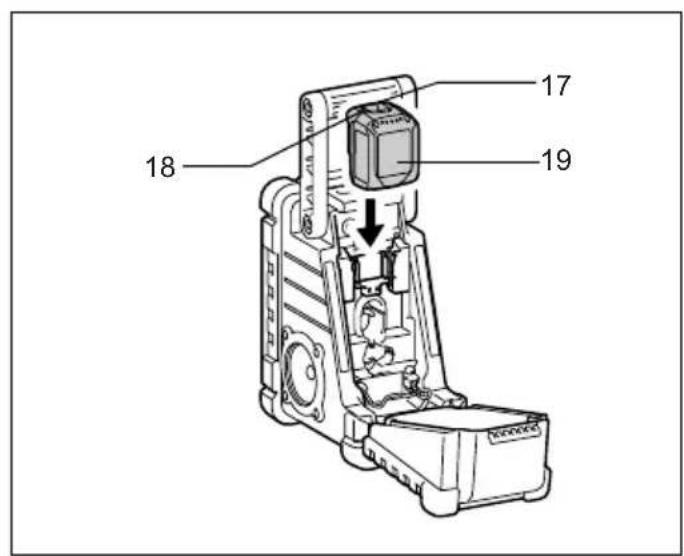
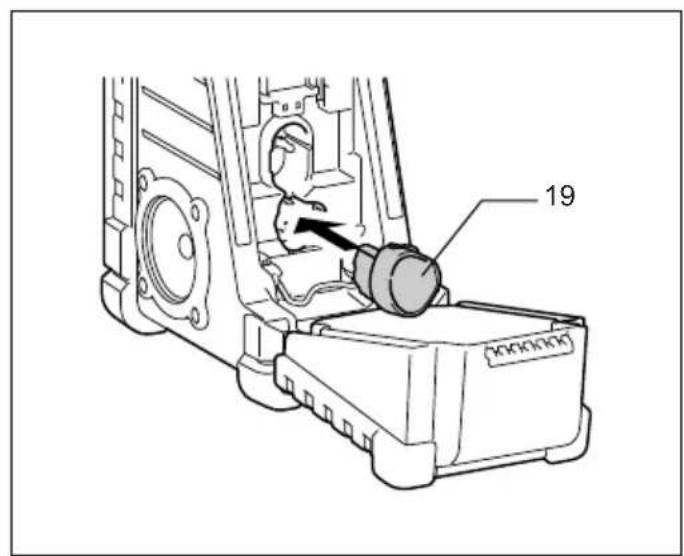
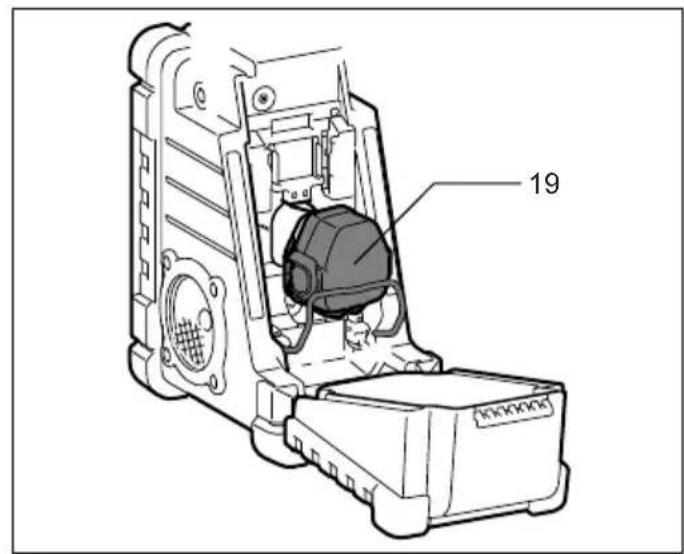
3-1. Installing or removing Slide battery cartridge (Fig. 4)
- To install the battery cartridge, align the tongue on the battery cartridge with the groove in the housing and slip it into place. Always insert it all the way until it locks in place with a little click.
- If you can see the red indicator on the upper side of the button, it is not locked completely. Install it fully until the red indicator cannot be seen. If not, it may accidentally
fall out of the tool, causing injury to you or someone around you.
- Do not use force when installing the battery cartridge. If the cartridge does not slide in easily, it is not being inserted correctly.
- To remove the battery cartridge, slide it from the tool while sliding the button on the front of the cartridge or pressing the buttons on both sides of the cartridge.

WARNING:
Do not use two main batteries at the same time.
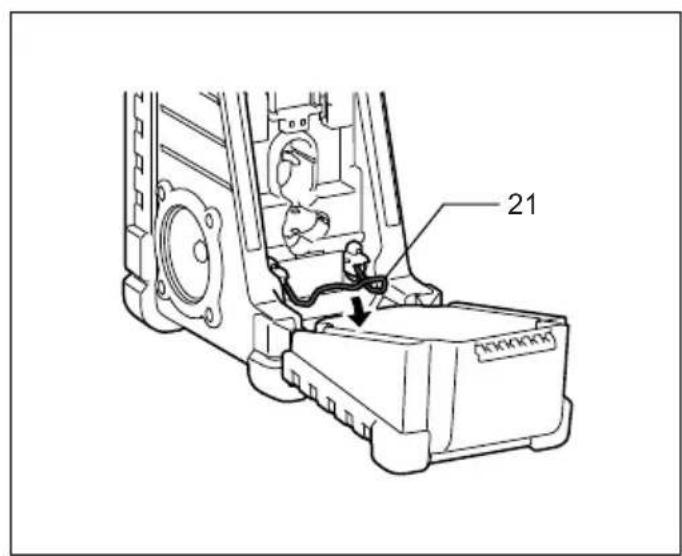
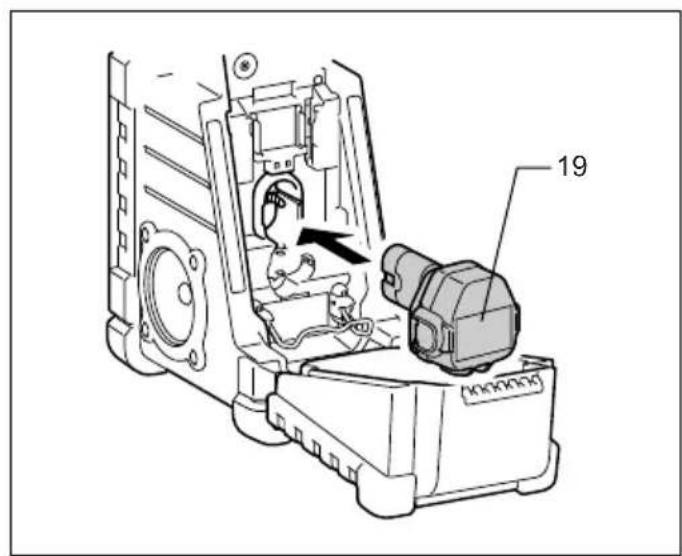
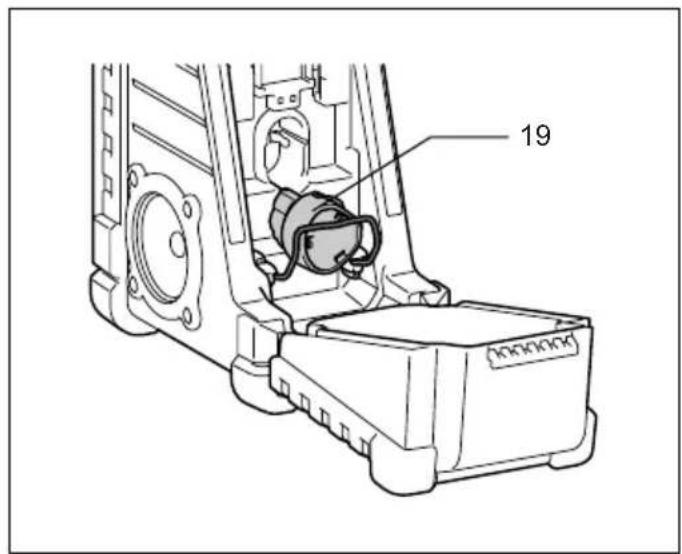
3-2. Installing or removing Cluster battery cartridge (Fig. 5 - 9)
- Pull the supporting bar to allow the battery to insert to the terminal.
- To insert the battery cartridge, align the tongue on the battery cartridge with the groove in the housing and slip it into place.
- Release the supporting bar.
-
To remove the battery cartridge, pull the supporting bar and take the battery out of the terminal.
-
Return the battery compartment locker to the original position.
- Reduced power, distortion and a "stuttering sound" or low battery sign that appears on the display are all the signs that the main battery pack needs to replace.
Note:
The battery pack can't be charged via the supplied AC power adaptor.
6. When low battery sign appears and an "E" keeps on flashing is the time to replace the back up batteries.
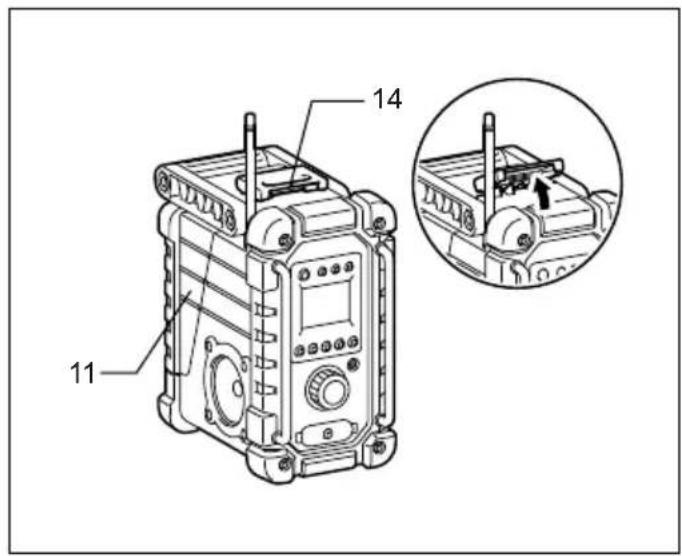
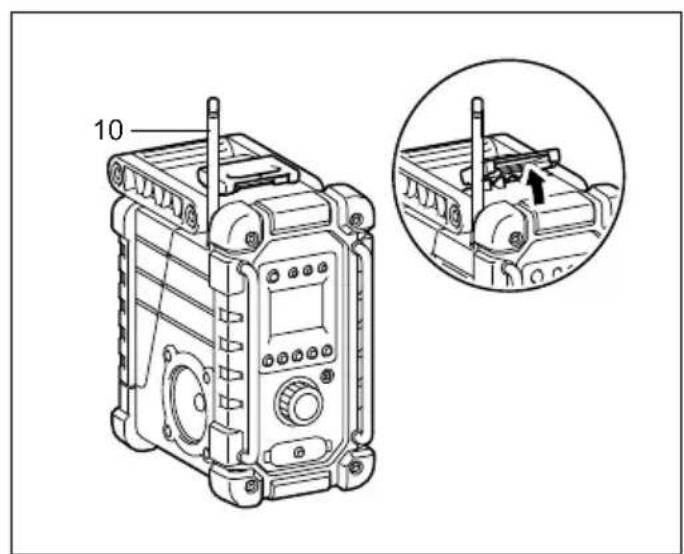
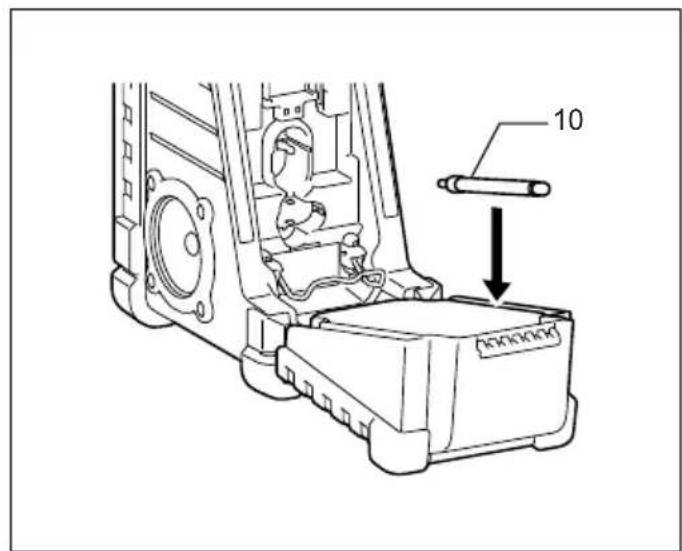
Installing the Soft bended rod antenna (Fig. 10 & 11)
Install the Soft bended rod antenna as shown in the figure.
Note:
There is a click in the battery compartment designed to store the removed antenna.
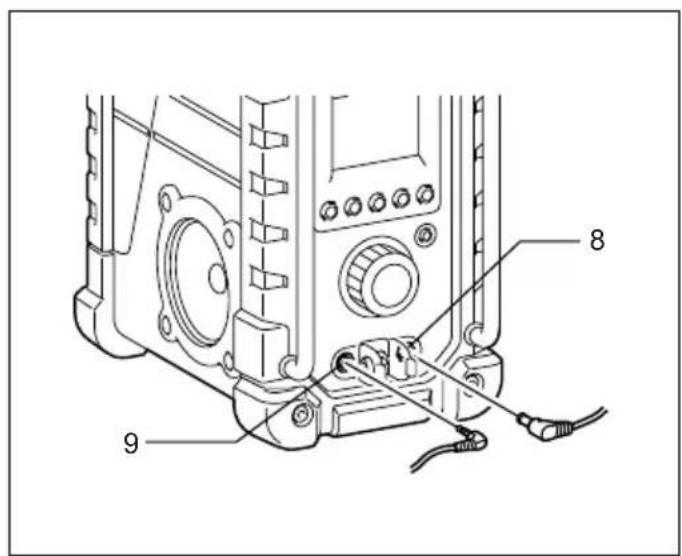
Using Supplied AC power adaptor (Fig. 12)
Remove the rubber protector and insert the adaptor plug into the DC socket on the front side of the radio. Plug the adaptor into a standard mains socket outlet. Whenever the adaptor is used, the battery pack is automatically disconnected. The AC adaptor should be disconnected from the main supply when not in use.
Note:
When your radio has any interference in AM band by its adaptor, please move your radio away from its AC adaptor over 30~cm
Setting the clock
- Clock can be set either when the radio is power on or off.
- Display will show "---" when the back up batteries are installed.
- Long press the time set button for more than 2 seconds, display will flash time set symbol and also the hour digit, followed by a beep.
-
Rotate Tuning/Volume control knob to set the required hour.
-
Press button to confirm hour setting, the minute digit will flash.
- Rotate Tuning/Volume control knob to set the required minute.
- Press the button again to complete clock setting.
Operating the radio
This radio equips with three tuning methods - Scan tuning, Manual tuning and Memory presets recall.
Scan Tuning
- Press the Power button to turn on the radio.
- Select the required waveband by pressing the Band button. Make sure the rubber bended rod antenna has been well placed for best FM reception. For AM (MW) band, rotate the radio to get best signal. Try to avoid to operate the radio next to computer screen and other equipment which will cause interference to the radio.
- Press and release Scan button (long press Scan button more than 2 seconds will activate time setting), LCD display will flash Scan symbol and the radio will search and stop automatically when it finds a radio station. Press the Scan button again to pick up the found station.
Note:
A stereo symbol will appear on the display, if the station found is a stereo station.
Note:
The radio will continue to search next available stations if you do not press Scan button again when it finds a radio station.
- Rotate the Tuning/Volume control knob to get required sound level. LCD display will show sound level changes.
Note:
During operating volume control, you can press in Tuning/Volume control knob to change volume control to tuning control status. - To turn off the radio, press the Power button. Display will show OFF.
Manual Tuning
- Press the Power button to turn on the radio.
- Select the required waveband by pressing the Band button. Adjust the antenna as described above.
- A single rotary to the Tuning/Volume control knob will change the frequency in the following increment:
FM: 50 or 100kHz
AM (MW): 9 or 10kHz
Note:
If the radio is in volume control status, press in the tuning/volume control to become Tuning status.
- Keep on rotating the Tuning/Volume control knob until the required frequency shown on the display.
-
Rotate the Tuning/Volume control knob to get required sound level.
-
To turn off the radio, press the Power button. Display will show OFF.
Storing stations in preset memories
There are 5 memory presets for each waveband.
- Press the Power button to turn on the radio.
- Tune to required station using one of the methods previously described.
- Press and hold down the required preset until radio beeps. The preset number will appear in the display and the station will be stored under chosen preset button.
- Repeat this procedure for the remaining presets.
- Stations stored in preset memories can be overwritten by following above procedures.
Recall stations from preset memories
- Press the Power button to turn on the radio.
- Select the required waveband.
- Momentarily press the required Preset button, the preset number and station frequency will appear in the display.
Setting the radio alarm
When the radio alarm is selected, the radio will turn on and play the chosen radio station at the chosen alarm time. The radio alarm will continue for one hour unless turned off by pressing the Power button. Pressing the Power button whilst the alarm is activated will cancel the alarm for 24 hours.
Note:
When the radio is in low battery status, the radio alarm can't be activated.
a. Setting radio alarm time:
- The radio alarm can be set either when radio is on or off.
- Press and release radio alarm button, the radio alarm symbol will flash.
- During radio alarm symbol flashing, press button for more than 2 seconds followed by a beep.
- Display Hour will flash, rotate Tuning/Volume control knob to select the hour then press button again to confirm hour setting.
- Follow same procedures of setting hour to set required minute. Press button to complete alarm time setting.
b. Setting radio alarmed station
-
During setting radio alarm time and radio alarm symbol is flashing, press Band button to activate the radio to select required wake-up band and station by manual tuning and recall the preset stations. Press 0 - button to complete radio alarm setting. Display will show
-
When above radio alarm time and station are set, press and hold down radio alarm button for 2 seconds followed by a beep to switch alarm on or off. Display will show when radio alarm is set.
Note:
If new radio alarm station is not selected, it will select the last alarm station.
Setting the HWS (Humane Wake System) buzzer alarm
A beep tone will activate when selecting the HWS buzzer alarm.
The alarm beep will become shorter every 15 seconds for one minute followed by one minute silence before repeating the cycle.
The HWS alarm will sound for one hour until turning off by pressing the Power button. Press the Power button whilst the alarm is activated will cancel the alarm for 24 hours.
- The HWS buzzer alarm can be set either radio is on or off.
- Press and release the HWS buzzer alarm button - , the symbol will flash.
- During the symbol flashes, long pressing the _SET button for more than 2 seconds followed by a beep and display Hour digit will flash.
- Rotate Tuning/Volume control knob to select required alarm hour, then press time set button again. The minute digit will then flash.
- Rotate Tuning/Volume control knob to select required alarm minute, the press time set button again to complete HWS buzzer alarm setting.
- Press and hold down buzzer alarm button or more than 2 seconds followed by a beep to switch on or off the HWS buzzer alarm. Display will appear when buzzer alarm has been set.
Snoopze function
- Whilst the alarm is activated, pressing any buttons except the Power button will activate the snooze function. The radio or HWS buzzer alarm will be silenced with interval of 5 minutes.
- The display will flash both the snooze symbol and the alarm symbol. The snooze function can be repeatedly during one hour that the alarms are active.
Sleep function
The sleep timer will automatically switched off the radio after a preset time has elapsed.
- Press and continue to hold down the Power button for more than 2 seconds, followed by a beep tone, the display will cycle through the available sleep times in the order 60-45-30-15-120-90-60.
Release the Power button when the required sleep time appears in the display. The symbol appear in the display and the radio will play the last station selected.
- To cancel the sleep function, press the Power button.
The Symbol will disappear and radio is off.
Display illumination
Press any buttons or rotate Tuning/Volume control knob will illuminate the LCD display for approx. 15 seconds. During scanning stations and alarm activated, will also automatically illuminate the display.
Change Stereo to Mono
When the stereo FM station reception is weak, you can improve it by pressing Mono button for 2 seconds. The sound is no longer in stereo and stereo indicator disappears.
How to play other audios
CAUTION:
Unplug this apparatus before connecting other audios.
- There are 2 AUX in sockets. AUX 1 is located on the front panel, and AUX 2 is located in the battery compartment.
- Connect a stereo or mono source (i.e. iPod, MP3, or CD player) to either AUX 1 or AUX 2 by audio cord.
- Repeatedly press and release the Band button until "AU1" or "AU2" is displayed, then AUX function is activated.
- AUX can't be activated as alarm source.
MAINTENANCE
CAUTION:
- Never use gasoline, benzine, thinner, alcohol or the like. Discoloration, deformation or cracks may result.
Specifications:
Power Requirements
AC power adaptor DC12 V 700 mA, center pin positive
Battery UM-3 (AA size) x 2 for back up
Cluster battery: 7.2 V - 18 V
Slide battery: 9.6 V - 18 V
Frequency coverage FM 87.50 - 108 MHz (0.05 MHz/step) AM (MW) 522 - 1,629 kHz (9 kHz/step)
Circuit feature
Loudspeaker 3 inches 8 ohm
Output Power 7.2 V: 0.5 W × 2, 9.6 V: 1 W × 2
$$ 1 0. 8 \mathrm {V}: 1. 2 \mathrm {W} \times 2, 1 2 \mathrm {V}: 1. 5 \mathrm {W} \times 2 $$
$$ 1 4. 4 \mathrm {V}: 2. 2 \mathrm {W} \times 2, 1 8 \mathrm {V}: 3. 5 \mathrm {W} \times 2 $$
Input terminal 3.5mm dia.AUX IN1/AUX IN2
Antenna system FM: soft bended rod antenna
AM: bar antenna
Dimension (W× H× D) in mm 280× 302× 163 Weight (without battery) 4.0kg
14.4 V: 2.2 W × 2; 18 V: 3.5 W × 2
AM (MW) 522 - 1.629 kHz
(9 kHz/stap)
Circuitfunctie
Luidspreker 3'' 8 ohm
Uitgangsvermögen 7,2 V: 0,5 W x 2, 9,6 V: 1 W x 2
AM (MW) 522 - 1.629 kHz
(9 kHz/paso)
\section*{Characteristicas del circuito}
Altavoz 3 pulgadas 8 ohmios
Potencia de salute 7,2 V: 0,5 W × 2, 9,6 V: 1 W × 2
Peso (sin bateria) 4,0 kg
AM (MW) 522 - 1.629 kHz
(9 kHz/passo)
10,8V:1,2W×2,12V:1,5W×2
14,4V:2,2W×2,18V:3,5W×2
Terminal de entrada 3,5 mm de diametro (Entrada AUX
1/AUX 2)
Sistema de antenna FM: antenna flexivel de haste
regulavel
AM: antenna de barra
AM (MW) 522 - 1.629 kHz
(9 kHz/trin)
Kredslobsfunktion
Hjttaler 3 tommer 8 ohm
Udgangseffekt 7,2 V: 0,5 W x 2, 9,6 V: 1 W x 2 10,8 V: 1,2 W x 2, 12 V: 1,5 W x 2 14,4 V: 2,2 W x 2, 18 V: 3,5 W x 2
Indgangsterminal 3,5 mm diameter (AUX IN1/AUX IN2)
Antennesystem FM: blod bojet stavantenne AM: intern antennae
Mai (B x H x D) i mm 280 x 302 x 163
AM (MW): 522 - 1629 kHz
(9 kHz/steg)
Egenskaper
Högtalare 3 tum 8 ohm
Uttag for extern enhet 3,5 mm dia. (AUX IN1/AUX IN2)
Antennystem FM-böjbar sprötantenn
AM-stavantenn
AM (MW) 522 - 1629 kHz
(9 kHz/trinn)
Kretsløpsfunksjon
Hoyttaler 3 tommer 8 ohm
Utgangseffekt 7,2 V:0,5 W x 2,9,6 V:1 W x 2
10,8V:1,2W×2,12V:1,5W×2
14.4V:2,2W×2,18V:3,5W×2
Inngangsterminal 3,5 mm dia. (AUX IN1 / AUX IN2)
Antennesystem FM: gummiantenne
AM: stangantenne
Dimensjoner (B× H× D) i mm
280× 302× 163
10,8V:1,2W×2,12V:1,5W×2
14,4V:2,2W×2,18V:3,5W×2
AM (MW) 522 - 1.629 kHz
(9 kHz/βnμa)
Xapaktnpiotiko kukawatoc
Meyapwvo 3 IVTow 8 ohm
1oxuc 7,2V:0,5Wx2,9,6V:1Wx2
AM (MW) 522-1 629 kHz
(9 kHz/skok strojenia)
10,8V:1,2W×2,12V:1,5W×2
14,4V:2,2W×2,18V:3,5W×2
YcTaHOBka ⅢTbIpeBOaHTeHHbl (Pnc.10n11)
YcTaHOBtne 1TbIpeByIO aHTeHHy KaK Noka3aHO Ha pncyHke.
Приимechanical:
B 6atapeHOM oTceKe npedymoTeHa 3aueJka nja xpaHeHn CHrToI aHTeHHbl.
IcnoJb3OBAHne npJIaraeMOro aAnTepa nepemehnHoro Toka (Pnc. 12)
CHIMITE pe3HOBBI n3OJIaTOp IN BCTaBbTe pa3beM aadantepa B rHe3do DC Ha nepeJnei naHeJI npaIO. BCTaBbTe aadantep B po3eTKy 3neKTPocETn. Pn iCNOJb3OBAHNn aadantepa akKymJrTOpHbI bNOK ABTomATnueCKn OTCoeDnHReTc. Ecnn aadantep nepemEHoro TOKa He nCNoJIb3yEtc, ero Heo6xOdmo OTCOeDnHrTb OT p03eTKn.
Примочанe:
EcnBBoBpempa6oTbpaNIOBdnaa3OHeAM BO3HnKaIOT NOMEXNOT aanTepe,OTOBnHbTe paNo OT aanTepe nepemehoro ToKa Ha 30 cm.
Hac tropona yacob
- YacbI MoXHO HAcTPOINTb He3aBUNMO OT TORO, BKJIIOUeHO paDIO NJIN Het.
2.Пиустайовке pe3eрВьхаKKуМЛТОРOB haДисплес поВьгETСИнДИКАЦИ“:--”. - Ecnna HaxaB KONky HactpoKn BpemeHn C SET n ydepKnbTb 6onee 2 cekyHd, Ha dncnnee HaHcET MrrA Tb CNMBON yCTaHOBKn BpemeHn C SET n uΦpbl YacOB, Nocne Yero pa3daCTcra 3ByKOBo CNrHaJ.
- Tpe6yemoe 3NaueHne yaca ycTaHaBnBaETCBpaueHmem peryIaTopa HactpoKn/tpomKoCTn.
- Haxmnte KhoNky SET IIN NOITBepKdHnHaCTpoKn Yaca, Nocne 3TORO HAHyT MInrA Tb MNHyTbI.
- Tpe6yemoe 3NaueHne MnHyT yCTaHaBnBaETcBApaueHnem peryIaTopa HAcTpoKn/tpomKoCTn.
- Haxmte KhoNky SET eue pa3. YTO6bI 3aBepuNTb npoueDpy yCTaHOBKn YacOB.
IcnoIb3OBAHne paIIO
Cyuctbyet Tprn BapnaHTa HactpoKn paNo -ckanipobAHne,pyHna HactpoKa N Bbl0B npedyctaHOBOK n3 pAmrTn.
HactpoIka MeToDOM cKaHnpOBaHnIa
- Haxmnte KhoNky NHTaHn, YTO6bI BKJIOHTb paINO.
- Bb6epnte Hxhbl dnaana30H yactot, hxaab KhoNky Bb6opa dnaana30Ha. Y6eintecb, yTO o6pe3nHeHHa 1tBipeBa aHTehHa ycTaHOBHeHa B ONTMaNbHoe noIooKeHne IJn npEma B dnaana30He FM. Jn npEma nepeDaB dnaana30He AM (MW) bpaaate aHTEHy, noka He nOlyuTe HaunUyUns CnHaJ.
CTapaItecB He nCNoJb3OBA Tb paIIO pIaOM C 3KpaHOM KOMNbHOTepa I npYrIM O6OpyIDoBaHHeM, KOtOpoe MOxET BbI3BaTb NOMExn IJIpaIIO.
- Haxmte n otnyctte KhoNky cKaHnpoBaHnna (npn Haxatnn KhoNk cKaHnpoBaHnna C ydepXaHneM 60Jee 2ceKynd akTnBnpyetc yCTaHObKa BpeMeH),HaKKdncJIe e HaHT MraTa b 3HaOc KCaHnpoBaHnna, npaIIO HaHT Nocck B dIina3OHe. IOnCK aBTOMATnueckn PpeKpaAaETcNoCNe TOrO, Ka6ydet o6hApYKeHa paIIOCTaHcIIa. Haxmte KhoNky cKaHnpoBaHnna eIe pa3, YTObI HaAtb npocLyuNbBaTb HaIeHHyO CTaHcIIO.
PpimueaHne:
Ecnn HauDeHHa CtaHcNBAeuaet B CtepeopexMe, Ha DnCnlee NOBNTc3HaQK "CTepeo".
PpimueaHne:
Papno npodjnx nONCK cneDyUOxxCaHcN,ecnHe HaxkMaTb NOBTOpHO KHOKNy cKaHnpOBaHNpyObHapyKeHN paNOCtAHcN.
- BpaaaTe peryIaTOp HAcTpOyKn/rgomKoCTn, YTO6bHaCtPonTb HyxHbI yPoBeHb rpoMkoCTn. Ha KKducnlee oTo6paXaetc n3MeHeHne ypoBn rpoMkoCTn.
Приимейанке:
Bo BpemBaPaueHnpeRyIaTopa rPOMKocTm MOxHo HaaTaB Ha peryIaTOp hAcTpOoN/rrPOMKocTn, TTo6bl nepeKJIIOuHTb peXIM peYIuPoBKn rPOMKocTn Ha peXIM hAcTpOoKN.
5.ДЯВБИКЛIOUeHINpaIHO HAXMNTe KHNKpy NITAHINHaDnCJIeE NOBUTcN INHINKaUIN“OFF”.
Puchna hactpoika
- Haxmnte KhoNky nItaHn, yTo6bI BKnIOHTb paIIO.
- BbI6epnte HxKbI dnaa3oH qactOT, hXkAB KhoNky Bbl6opa dnaana3oHa. OtperynpyTe aHTehHy kak onucaHO Bblwe.
- OdnH obopot peryIaTopa HacTpOu/rgpOMKocTNn3MeHReT YactOTy CO CNeDyUoIM WaROM:FM:50 nnn 100 KfCAM (MW):9 nnn 10 KfC
Приимейсанne:
Ecni paIIO haoiITcB peKIMpeYIpOBKn rpOMKOCTn,HaKMITE Ha peryIaTOp HacTpoIKn/ rpOMKOCTn dIe nepeKIIuOeHnB peKIM HaCTPOIKN.
- BpaaaTe peryTOp HAcTpoKn/rrpOMKoCTn Do Tex nop, noka HyxHna Yactota He OTo6pa3ntc Ha DInCnJIee.
- BpaaaTe perynTOp HAcTpOKn/rrpOMKoCTN, UTo6bl HAcTpOHTb HyxHbI yPoBeHb rPOMKOCTN.
6.ДЯВыкнioуеня paDNo HaxMnte KhoNky nHTaHnHa Ha dinCJIee noBNTc rHdNkaUra "OFF".
CoxpaHeHne cTaHcN B NaMaTn B KaueCTBe IpeDvapHTeIbHO HAcTpoKn
Дя кадуо Диana3oHa Doctynho 5 npedBapnteHbIX HactpoIKN.
- Haxmnte KhoNky NITaHn, YTo6bI BKNIOHTb paIHO.
- HactpoTeCb Ha HyKHyIO CTaHcNIO OdHM n3 ONcaHHbIX Bblwe CnOco6OB.
- Haxmte u ydepKnBaTe HxKHyo KhoNky npedyctaHOBKn Do 3BykoBOrO cnHaJa. Homep npedBapnteJbHOH HAcTpoKN NOBNTcH a 3KpaHe n cTaHcIg 6ydt CoXpAHeHa Nd Bb6paHHo KhoNkoi npedBapnteJbHOH HAcTpoKN.
- NOBTOPnTe npoueDpy dny octabunxcn npedBaPnteJbHbIX HacTpoek.
- CtaHcun, coXpaHeHHbIe B KaueCTBe npEaBapnteJIbHOH HAcTpoKN, MoXHO n3MeHNb, BblONHNB ONCAHHbIe BblIe NpOceJeypbl.
BbI3OB cTaHcNn n3 NaMaTn 0yHKcNn IpeDvapnteJbHOH NaCTpOKn
- Haxmnte KhoNky nIaTHn, YTo6bl BkInOHTb paIIO.
- BbI6epnte HxKhbl dnaana3OH.
- KpaTko HaxMnte Heo6xOuMyo KhoNky npEaBapnteIbHOn HaCTpOuKn - Ha 3KpaHe oTo6pa3aTcra 3aHaHHbH HOpE n Yactota cTaHcNn.
yctaHObKa 6yDnJIbHnKa "paINo"
Ipn yctaHOBKe 6yDInbHnKa "paNIO" npn HAcTyPNeHn 3aDaHHoro BpeMeHN BKNIOuHTcra paNIO n HaChETc BocnpOn3BeDeHne Bbl6paHHo CTaHnN. BocpOn3BeDeHne paNIOCTaHnN 6yJeT npOdoJXaTbcB TteHHe OndHO raca, ecn He HaxaTb KhONKy NITAHnE.Ecnn HaxaTb KhoNk nyNTaHnE npn AKTNbUPOBaHHOM 6yDInbHnKe, BKNIOueHne 6yDInbHnKa 6yJeT OTNoKeHo Ha 24 Yaca.
Приимechanical:
Ecn npaNo pa6otaet npn H3KOM ypOBHe 3apJa aKKyMylTopa,6yDnIbHnK He BkIIOuHTc.
a. YcTaHOBka BpeMeHn cpa6aTbIBaHHa 6yDnJIbHnKa "paINo":
- BydunbHK "paHNO" MOxHO yCTaHOBnTb npn BkJIIOUeHHOM n npn BBKIIIOueHHOM paHNO.
- Haxmnte n OTnycTe KhoNky 6dyHnbHnka "paINo" -, COOTBeTCTByUcHn CnMBOH NaHET MNaTb.
- Noka Muraet Cunboj 6yDnIbHnka "paDIO", HaxMnte KhoNky C SET u yepKuBaIte 6oJee 2 cekyHd do 3ByKOBOrO CnHaJa.
- Hauhet MuraTb INdNkaCuaYacOB; BpaaAperpyIaTOp HAcTPOuKn/rgpOMKocTN, yCTaHOBInTe 3HaHeHne YacOB n HaxMnte KhoNkCy SET eue pa3 dPn IoNTBepXJeHnA HAcTPOuKN YacOB.
- BbINONHnTe Ty Xe npOeDpy DnY yCTaHOBKn MmHyT. HaxMnte KhoNkY CSET, YTO6bl 3aBepuNTb yCTaHOBky BpeMeHn 6yDnIbHnka.
b. YcTaHOBka cTaHcUN dJa 6yDnIbHnKa "paNo"
1.Пи установке Врemeн 6удпьнka "paДио",пoka MИгаET COOTBETCTByUOи CnMBOJ,нжмITE KHONky Bыбopa Диana3OHa,чTOБы BKNHOHTb paДио N Bыбрathу hyЖьдиana3OH И CTaHцИС Cnomoцьpo pyuHOn HAcTpOи N Bbl3OBA npeDbapNTelbHo HacTpOeHHbIX CTaHцИ.НжмITE KHONky - - - - - - - - - - - - - - - - - - - - - - - - - - - - - - - - - - - - - - - - - - - - - - - - - - - - - - - - - - - - - - - - - - - - - - - - - - - - - - - - - - - - - - - - - - - -
2.ПоссеТOro,Кak yka3aHNoe BbIue BpeMЯ nCTaHcNЯ 6ydnlbHnka“paDIO”yCTaHOBNeHbI,HaxMMTe N ydeprKbBaIte KhoNky 6ydnlbHnka“paDIO”O- B TeueHne 2 cekyHddo 3BykoBOrO CnHaHa, YTObI BkIQUHTb INN bIKIIOHTb 6ydnlbHnK.IPocne yctaHOBKn 6ydnlbHnKa“paDIO”Ha DmCnPee NOABITc INHdNKaCnRA
Приимейанne:
EcnHOBaCTaHcNJa 6yDnIbHnKa "paNo" He Bbl6pHa, 6ydtncnoJb3ObaHa cTaHcNja, KOtopa HacTpaBaNacb dJa 6yDnIbHnKa nocJeHne.
YcTaHOBka 6yDnIbHnKa "3ymMep HWS" (CncTeMa npo6yKdEHHa YeNoBeka)
PnBbIbope 6yDnHbNHaKa "3ymMepe HWS" BKnHouaetc npepbIBnCTbI 3ByKOBOcHAn.
3Byokobon ciRHaJI 6yDInbHnka cTaHOBITcK oPoYe KaKdIe 15 cekyHb B TeueHne MHyTbI, 3aTeM cJe dyet OHa MNHyTa TtUnHbI, NocNe Yero UKNI NOBTopReTc. ByuNbHK HWS 6yDet 3ByaTb B TeueHne Ondoro Yaca, ecn He haxKaTb KONKy NtAHnE. Ecn HaxKaTb KONky NITAHnI pN aKTINBupoBaHHom 6yDInbHnke, BKIOUeHne 6yDInbHnka 6yDet OTNoKeHo Ha 24 Yaca.
1.Будиьнк "3ymMep HWS" moKHO yCTaHOBnTb npB KJIIOUeHHOM n npu BBkIIOUeHHOM paINo.
2. Haxmnte n OTncyTne KONky 6yUnJIbHnka "3ymMep HWS" -A, CnMBOJ HAHHeT MmraTb.
3. Noka Muraet CnMBoJ, HaxMMTe KHOJky CSET u ydepXINBaIte 6oJIee 2 cekyHd Do 3ByKOBOrO cnHaJa; HAHT MIRaTb INDnKAuYacOB.
4. Повернite ретуларон HabТрОй/грOMКоCTи,ЧTOБы Вьбразь hyжнычac,Затe меши раз haЖмITE KНОКУ yCTaHOBKNВрemeи CSET.HaCHyT MHRatb MNHyTbl.
5. BpaaTe perynTOp hactpoKn/rpomkoctn, yTo6bl BbIbpaTb HxHoe 3HaueHne MInHyT, 3aTe mEe pa3 HaxMMTE KONky yCTaHOBky BpeMeHN CSET DnA 3aBepSeHHy yCTaHOBKn 6dynNbHnka "3yMMep HWS".
6. Haxmte KhoNky 6dynlbHnka "3ymMep" 0-4 n ydepXnBaIe 6oJee 2 cekyHd do 3BykOBoro CnHaJa, qTO6bl BKNIOUHTb NIN BBIKIOUHTb 6yDNIbHnK "3ymMep HWS". Iocne yCTaHOBKn 6dynlbHnKa "3ymMep" Ha DnCnJee NOABITcNHNikauNg -
BbDnKHOaKKMyTOp: 9,6B-18B
Dnana3OH yactOT
FM 87,50 - 108 MΓu (war 0,05 MΓu)
AM (MW) 522 - 1629 kΓu (ωar 9 kΓu)
NapaMeTpbkoHTypa
HAMK 3IOMa8OM
BbIXoHnA MoHocTb 7,2 B:0,5 BTx2,9,6 B:1 BTx2 10,8 B:1,2 BTx2,12 B:1,5 BTx2 14,4 B:2,2 BTx2,18 B:3,5 BTx2
BxoHno pa3bem dnaMeTp 3,5 MM (AUX IN1/AUX IN
AHTehnha cncTeMa FM: utbipeBa aHTeHHa AM: fpeppuToBa aHTeHHa
Pa3mep (I 山 × B × ) BMM 280 x 302 x 163
Bec (6e3 aKKyMnyTopa) 4,
Makita Corporation
Anjo, Aichi, Japan

- Symbols
- Symboles
- Only for EU countries
- ENGLISH (Original instructions)
- IMPORTANT SAFETY INSTRUCTIONS
- WARNING:
- SPECIFIC SAFETY RULES
- SAVE THESE INSTRUCTIONS.
- FOR BATTERY CARTRIDGE
- Features:
- Explanation of general view (Fig. 1)
- Controls:
- LCD Display:
- Battery Installation
- Note:
- Installing the Soft bended rod antenna (Fig. 10 & 11)
- Using Supplied AC power adaptor (Fig. 12)
- Setting the clock
- Operating the radio
- Scan Tuning
- Manual Tuning
- Storing stations in preset memories
- Recall stations from preset memories
- Setting the radio alarm
- a. Setting radio alarm time:
- b. Setting radio alarmed station
- Setting the HWS (Humane Wake System) buzzer alarm
- Snoopze function
- Sleep function
- Display illumination
- Change Stereo to Mono
- How to play other audios
- CAUTION:
- Unplug this apparatus before connecting other audios.
- MAINTENANCE
- Specifications:
- YcTaHOBka ⅢTbIpeBOaHTeHHbl (Pnc.10n11)
- Приимechanical:
- IcnoJb3OBAHne npJIaraeMOro aAnTepa nepemehnHoro Toka (Pnc. 12)
- Примочанe:
- Hac tropona yacob
- IcnoIb3OBAHne paIIO
- HactpoIka MeToDOM cKaHnpOBaHnIa
- PpimueaHne:
- Приимейанке:
- Puchna hactpoika
- Приимейсанne:
- CoxpaHeHne cTaHcN B NaMaTn B KaueCTBe IpeDvapHTeIbHO HAcTpoKn
- BbI3OB cTaHcNn n3 NaMaTn 0yHKcNn IpeDvapnteJbHOH NaCTpOKn
- yctaHObKa 6yDnJIbHnKa "paINo"
- a. YcTaHOBka BpeMeHn cpa6aTbIBaHHa 6yDnJIbHnKa "paINo":
- b. YcTaHOBka cTaHcUN dJa 6yDnIbHnKa "paNo"
- Приимейанne:
- YcTaHOBka 6yDnIbHnKa "3ymMep HWS" (CncTeMa npo6yKdEHHa YeNoBeka)
- Makita Corporation
Brand : MAKITA
Model : DMR107
Category : Radio