Curtain Driver E1 - Smart Home Aqara - Free user manual and instructions
Find the device manual for free Curtain Driver E1 Aqara in PDF.
| Product type | Smart curtain motor |
| Brand | Aqara |
| Model | Curtain Driver E1 (CM-M01) |
| Dimensions | 140.5 × 96 × 44 mm |
| Power supply | 5 V ⎓ 1.5 A (USB Type-C) |
| Battery | Built-in non-replaceable lithium, charging ≈ 5 h |
| Wireless protocol | Zigbee 3.0 IEEE 802.15.4 |
| Rated torque | 0.2 N·m |
| Rotation speed | 100 rpm |
| Movement speed | 12 cm/s |
| Protection rating | IP20 |
| Operating temperature | 0 °C to 45 °C |
| Operating humidity | 0 to 95% RH non-condensing |
| Main functions | Open/close/stop, light sensor, scheduling, voice control (via hub), group creation for double-sided curtains |
| Installation | On rod Ø 25-32 mm, compatible with grommet and ring curtains |
| Package contents | USB Type-C cable, clips (×8), rubber band, hanger |
| Maintenance and cleaning | Disconnect power before cleaning; do not let children clean it |
| Safety | Minimum distance 20 cm between antenna and body; do not use if worn or damaged |
| Spare parts and repairability | Built-in non-replaceable battery, no detachable parts |
| Manufacturer | Lumi United Technology Co., Ltd., Shenzhen, China |
| Customer service | www.aqara.com/support – support@aqara.com |
Frequently Asked Questions - Curtain Driver E1 Aqara
User questions about Curtain Driver E1 Aqara
0 question about this device. Answer the ones you know or ask your own.
Ask a new question about this device
Download the instructions for your Smart Home in PDF format for free! Find your manual Curtain Driver E1 - Aqara and take your electronic device back in hand. On this page are published all the documents necessary for the use of your device. Curtain Driver E1 by Aqara.
USER MANUAL Curtain Driver E1 Aqara
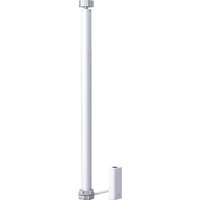
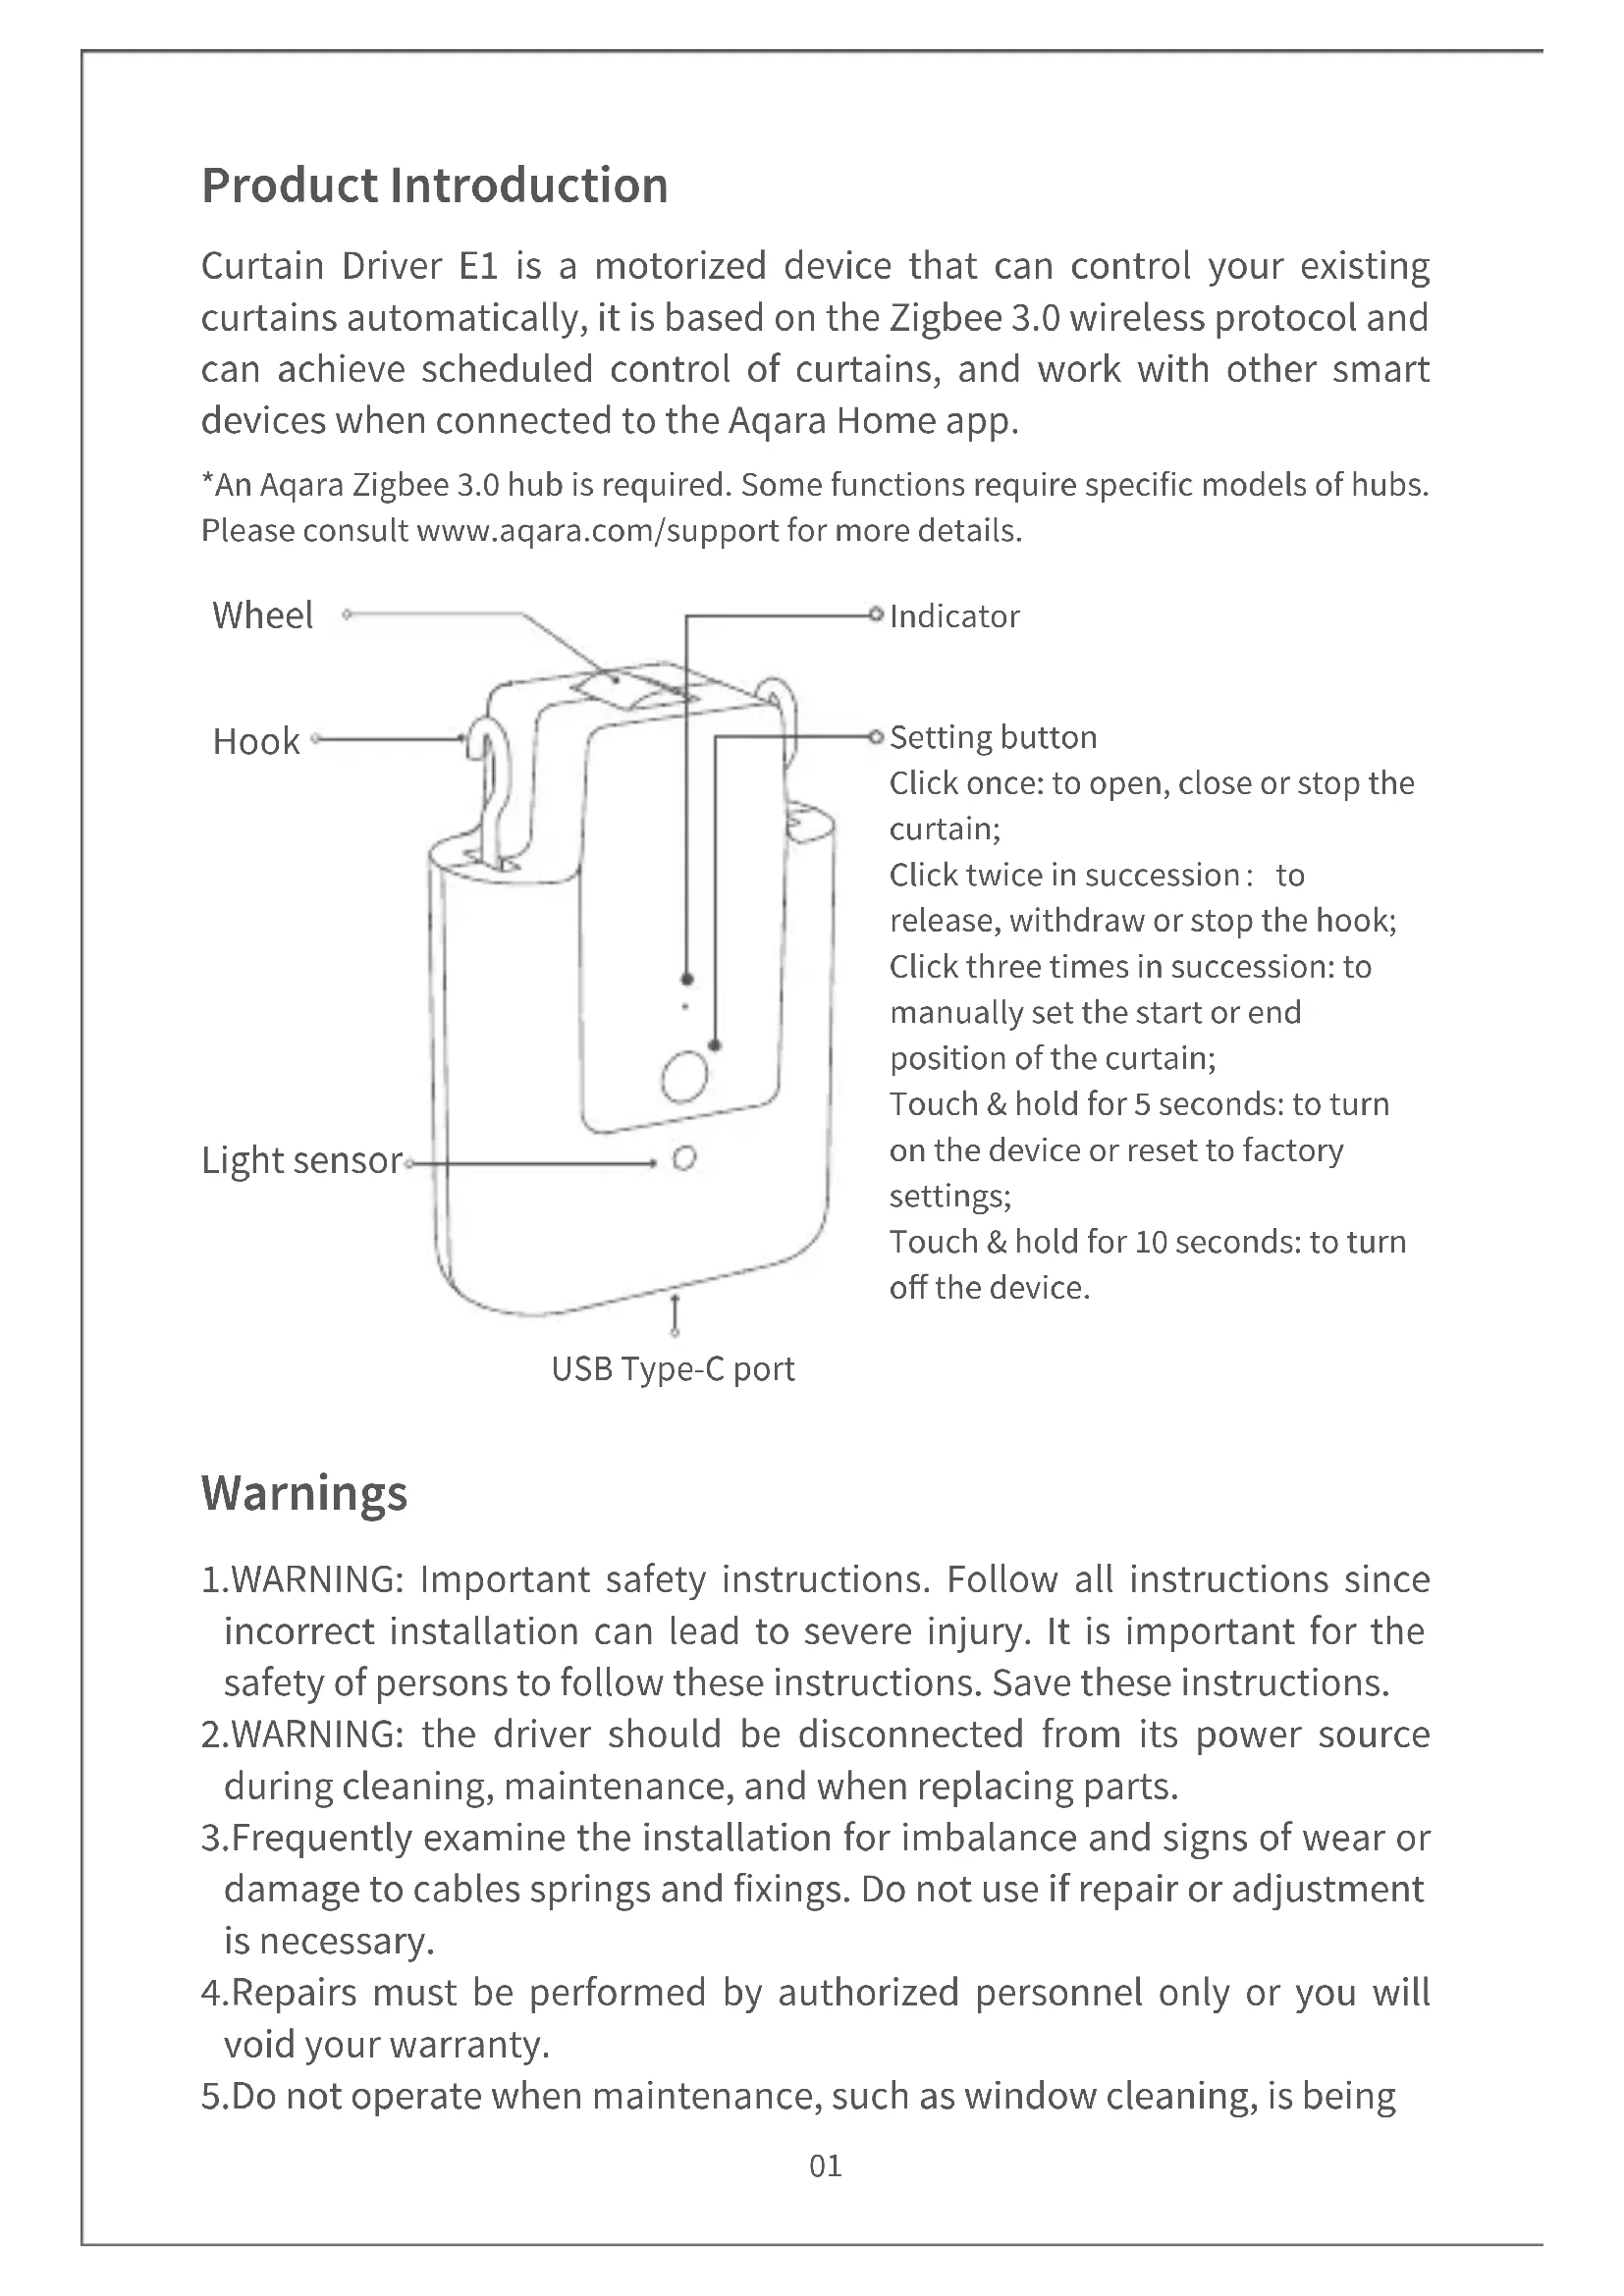
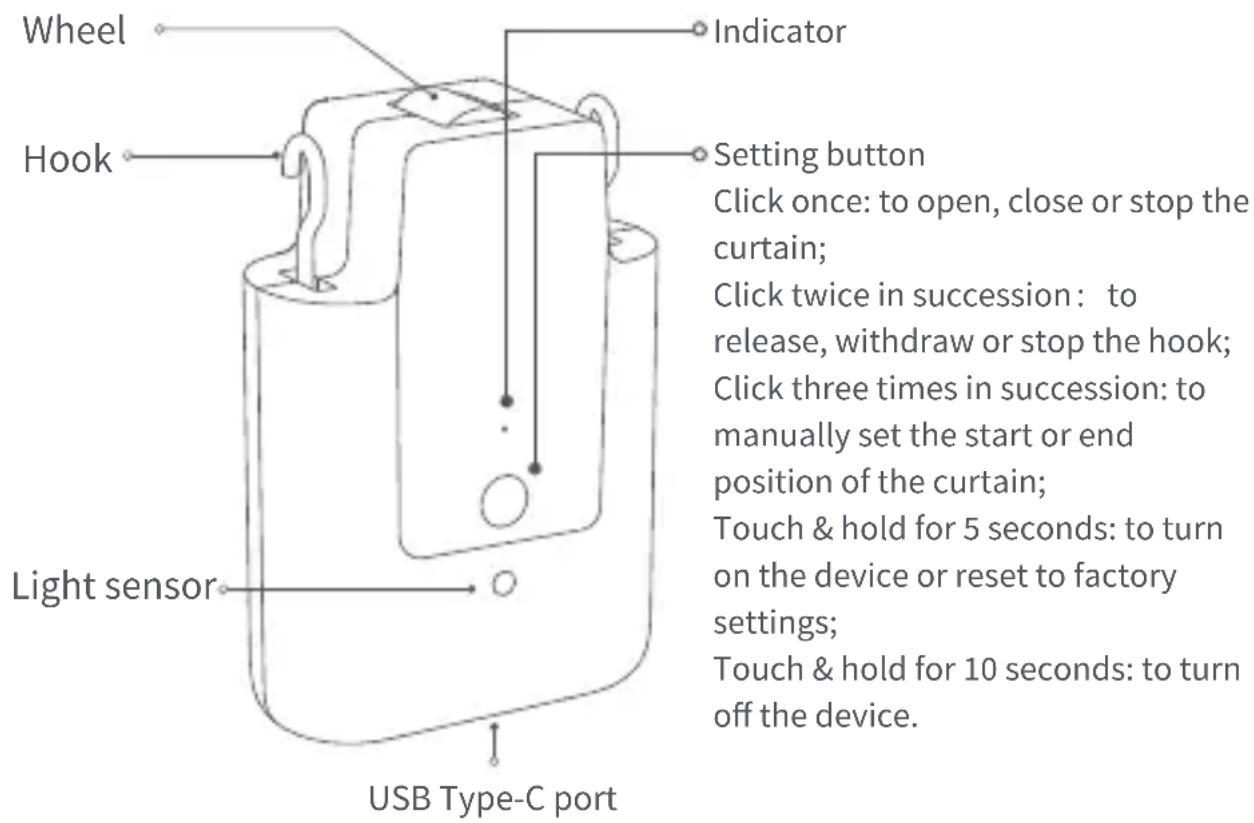
Curtain Driver E1 is a motorized device that can control your existing curtains automatically, it is based on the Zigbee 3.0 wireless protocol and can achieve scheduled control of curtains, and work with other smart devices when connected to the Aqara Home app.
*An Aqara Zigbee 3.0 hub is required. Some functions require specific models of hubs. Please consult www.aqara.com/support for more details.
text_image
Wheel Hook Light sensor Indicator Setting button Click once: to open, close or stop the curtain; Click twice in succession: to release, withdraw or stop the hook; Click three times in succession: to manually set the start or end position of the curtain; Touch & hold for 5 seconds: to turn on the device or reset to factory settings; Touch & hold for 10 seconds: to turn off the device. USB Type-C portWarnings
- WARNING: Important safety instructions. Follow all instructions since incorrect installation can lead to severe injury. It is important for the safety of persons to follow these instructions. Save these instructions.
- WARNING: the driver should be disconnected from its power source during cleaning, maintenance, and when replacing parts.
- Frequently examine the installation for imbalance and signs of wear or damage to cables springs and fixings. Do not use if repair or adjustment is necessary.
- Repairs must be performed by authorized personnel only or you will void your warranty.
- Do not operate when maintenance, such as window cleaning, is being
carried out in the vicinity.
- Fixed controls must be clearly visible after installation.
- Before installing the drive, remove any unnecessary cords or components and disable any equipment not needed for powered operation.
- That the characteristics of the driven part must be compatible with the rated load and rated operating time.
- This appliance contains batteries that are non-replaceable.
- This appliance should not be used by children aged 8 years and under and persons with reduced physical, sensory or mental capabilities.
- Children should not play with the appliance.
- Cleaning and user maintenance should not be done by children.
13.Do not allow children to play with fixed controls.
What's in the Box

USB-C to USB-A Cable × 1

Clip × 8 Rod Accessory × 1Rubber Strip (3m)×1
natural_image
Simple line drawing of a rectangular object with two side handles (no text or symbols)Tutorial Video
Please scan the QR code below to view the installation and operation guide video. If the video is unable to be reached, you can also install the product according to the method described in the manual.

text_image
QR code image containing encoded data, no visible human-readable textInstallation Requirements
Curtain description
Grommet Curtains
Ring Top Curtains
natural_image
Pure mechanical linkage diagram without any text, numbers, or symbols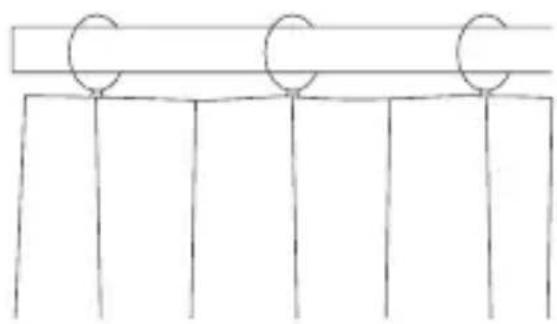
natural_image
Simple line drawing of three vertical bars with circular markers on top and bottom (no text or symbols)If you are using grommet curtains, the minimum spacing between two grommets should be greater than 95mm.
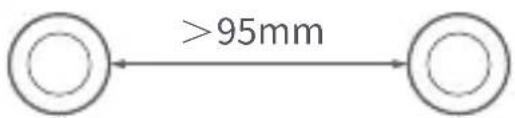
text_image
>95mmGrommet Grommet
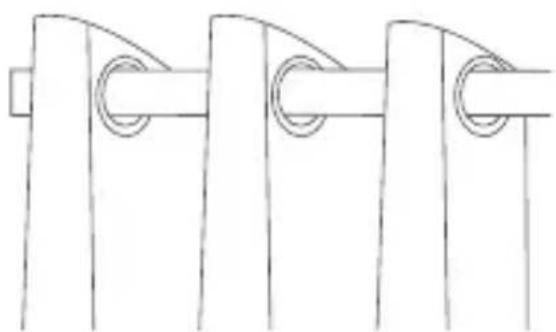
If you are using ring top curtains, the thickness of the rings should be greater than 4mm.
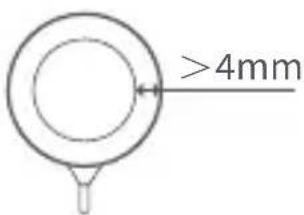
text_image
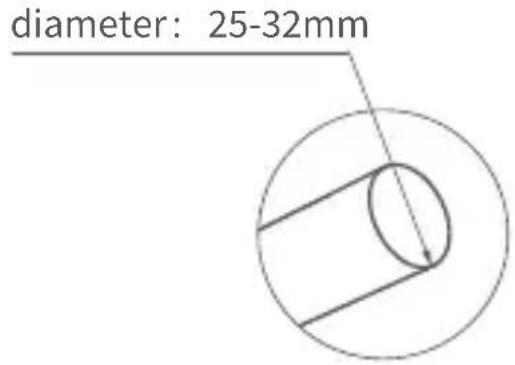
>4mmRod diameter requirement: 25-32mm (corresponding to circumferences of 79-100mm)
text_image
diameter: 25-32mmNote: This product is only applicable to rods with uniform thickness, not to those with different thicknesses at the ends, such as telescopic rods.
The Rods shall be provided with close-fitting decorative caps.
natural_image
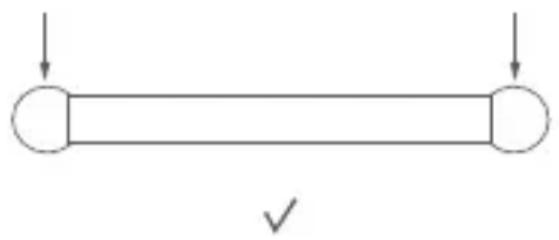
Simple horizontal bar with two ends and a checkmark below (no text or symbols)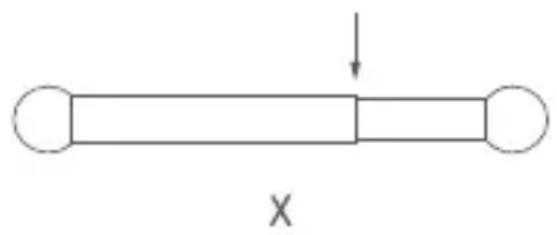
natural_image
Simple diagram of a horizontal bar with two ends and an arrow pointing downward (no text or symbols)Quick Start Guide
Please read the following steps to start using the product.
Preparation before use
- This product needs to be connected with the Aqara Home app before being installed on the curtains.
- Before activating the product, please make sure you have the Aqara Home app and the Aqara Zigbee 3.0 hub installed (Please scan the QR code below to download the app).

text_image
QR code image containing encoded data, no visible human-readable text- Please open the app, tap "Home" and then tap "+" in the top right corner to enter the "Add Device (Accessory)" page. Select "Curtain Driver E1" and the hub to be connected to, and add it according to instructions in the Aqara Home app. Press and hold the Setting button for 5 seconds, and wait for the voice prompt from the Hub.
- If you have purchased two or more Curtain Drivers, please connect all of them to the Aqara Home app before further installation.
- If you use double-sided curtains, it is necessary to connect two Curtain Drivers to the app and then put them in one group for simultaneous control. Enter the main page of the Curtain Driver to be grouped, click "... " in the upper right corner, select "Create a group for Curtains" and follow the instructions.
- It is recommended to fully charge the product before installation.
- The mass and the dimension of the curtain to be driven shall be compatible with the rated torque and rated operating time.
Installation Methods
Installation Methods for Rods
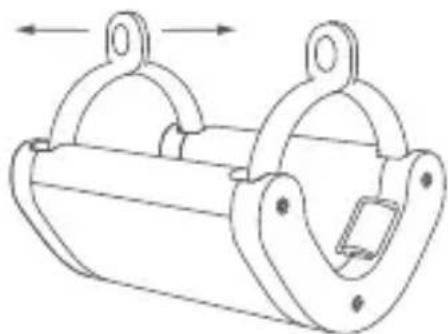
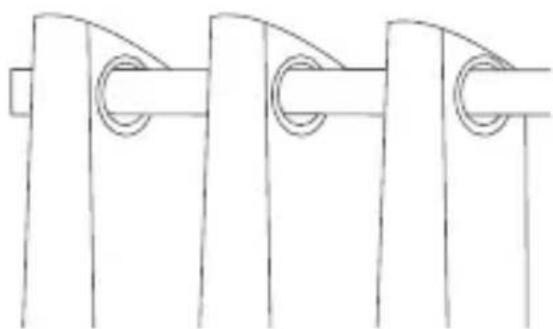
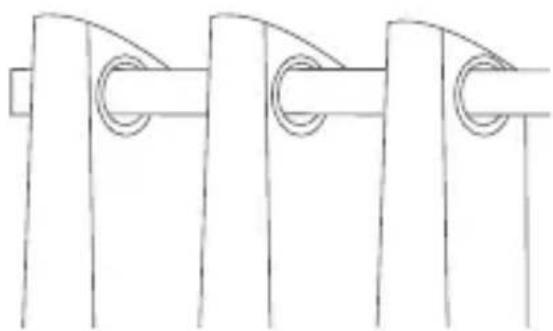
Single-Sided Curtains (only one Curtain Driver is needed)
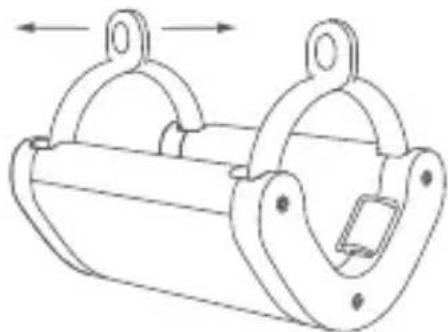
- Force apart the standard Rod hanger, hang it between the first and second rings (or grommets) on the movable side of the curtain, and tighten the four legs of the hanger;
Hold the sides of the hanger to lightly force it apart;
Pinch the ring hole until a "click" is heard;
natural_image
Technical line drawing of a mechanical clamp or bracket assembly (no text or symbols)
natural_image
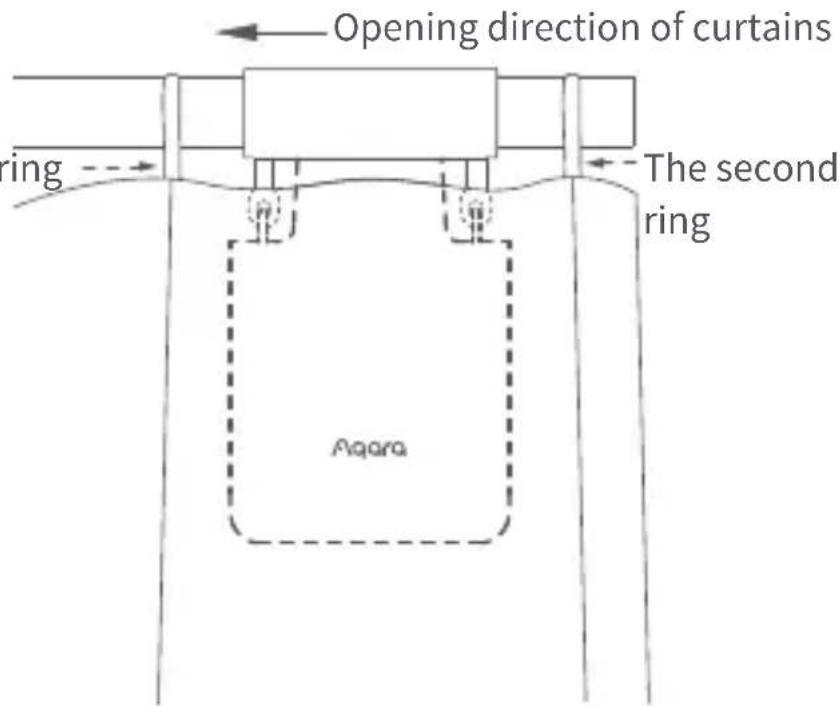
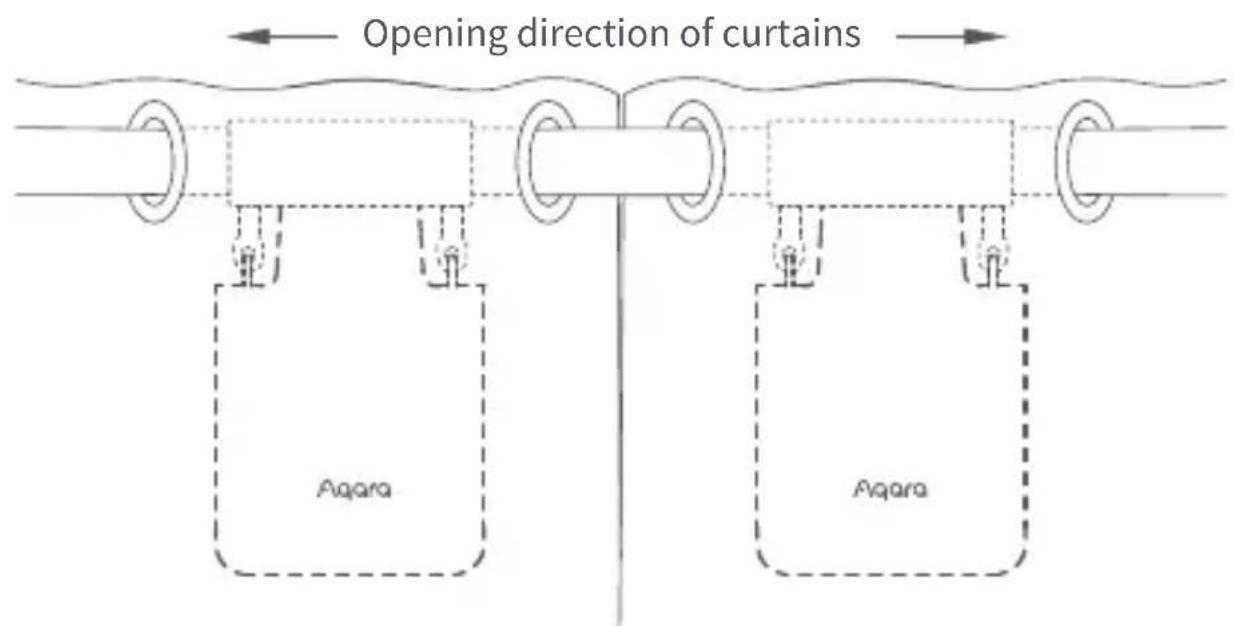
Technical line drawing of a mechanical component with two rings and connecting rods (no text or symbols)- After startup, quickly double tap "Setting button" to release the hook on the curtain driver until it reaches its maximum length, and completely close the curtain;
- Hang the curtain driver on the hanger as shown in the figure below, quickly double tap "Setting button" to hold the curtain driver onto the rod. Then, the indicator will turn green and blink, and 3 short beeps will sound from the buzzer when the product it is held in place.
natural_image
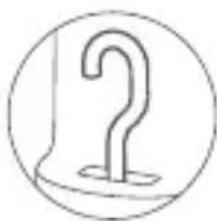
Simple line drawing of a question mark inside a circle (no text or symbols)The first ring
The hook reaches out to the maximum length;
natural_image
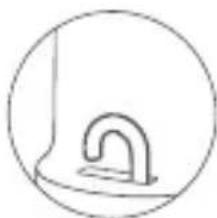
Simple line drawing of a curved mechanical component inside a circle (no text or symbols)The hook is locked to the innermost;
text_image
Opening direction of curtains The second ring AqaraThis product can be configured on the app to open and close the curtains according to the intensity of ambient light. To use the function, the light sensor should face the outside of the window and the Curtain Driver should be installed on the side near the window. If you need to control the opening and closing of curtains according to the light indoor, the light sensor should face the interior and the Curtain Driver should be installed on the side near the interior. To optimize the effect of the light sensor, please ensure that there is no opaque object in front of it.
Install clips and rubber strip (for curtains suitable for Grommets)
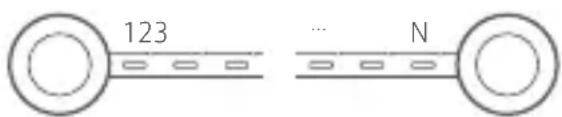
- First, measure the number of holes "N" between the outer edges of two adjacent Grommets with the rubber strip as shown in the figure below (measure the shortest straight-line distance between the outer edges of the Grommets);
text_image
123 ... NGrommets Grommets
- Install the first clip onto the third hole from the left of the rubber strip, and install all the other clips according to the following instructions.
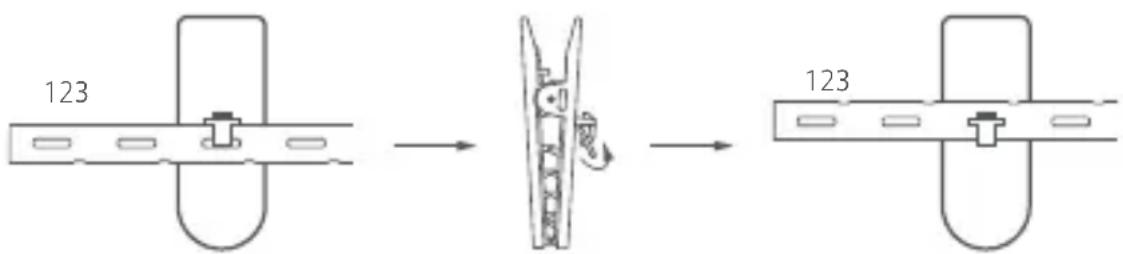
text_image
123 123Turn the rubber strip up to place it in the groove.
Reserve 5 holes between the second and first clips, and the number of holes between the other adjacent clips is "N×2" (including the hole occupied by the clip)

text_image
12341234 Spaced 5 holes apart ... N×Z6 Spaced "N×2" holes apart- Please install the rubber strip together with the clips on the curtain according to your curtain layout as shown below.
Case 1: M-shaped folds on the movable side of the curtain
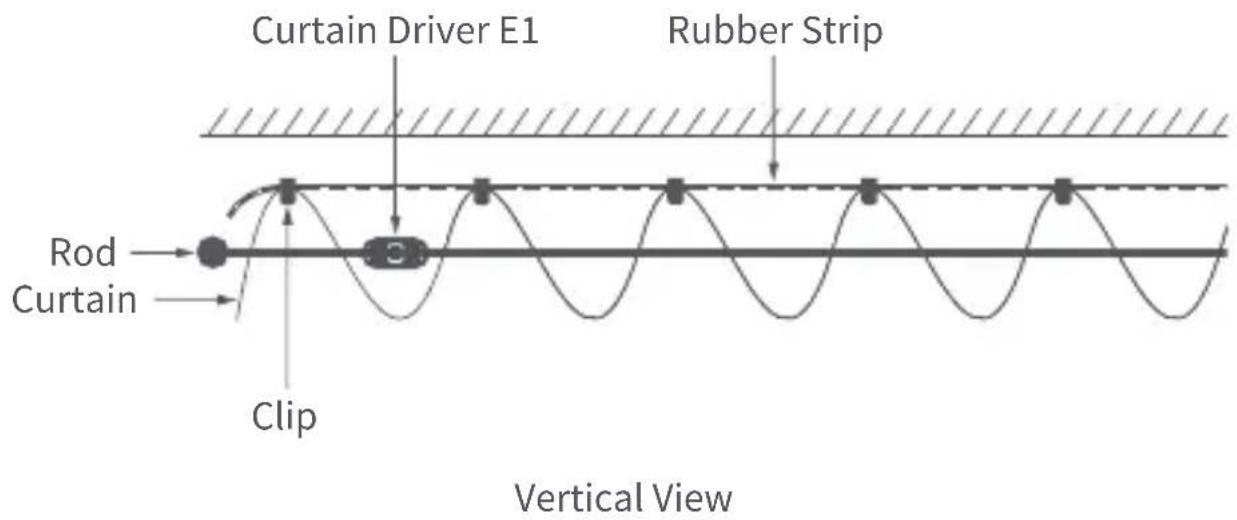
text_image
Curtain Driver E1 Rubber Strip Rod Curtain Clip Vertical ViewCase 2: W-shaped folds on the movable side of the curtain
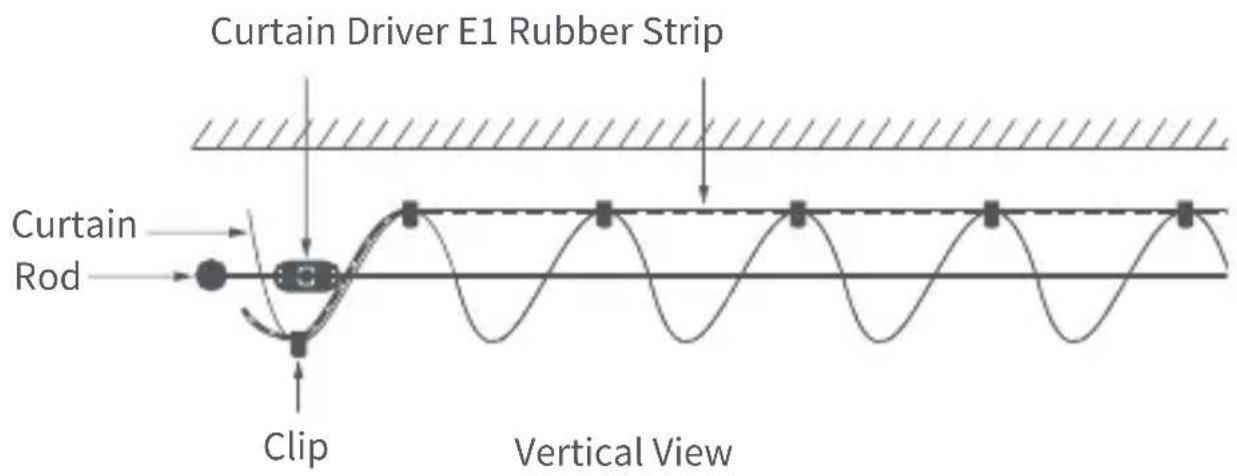
text_image
Curtain Driver E1 Rubber Strip Curtain Rod Clip Vertical ViewDouble-Sided Curtains (two Smart Curtain Drivers are required)
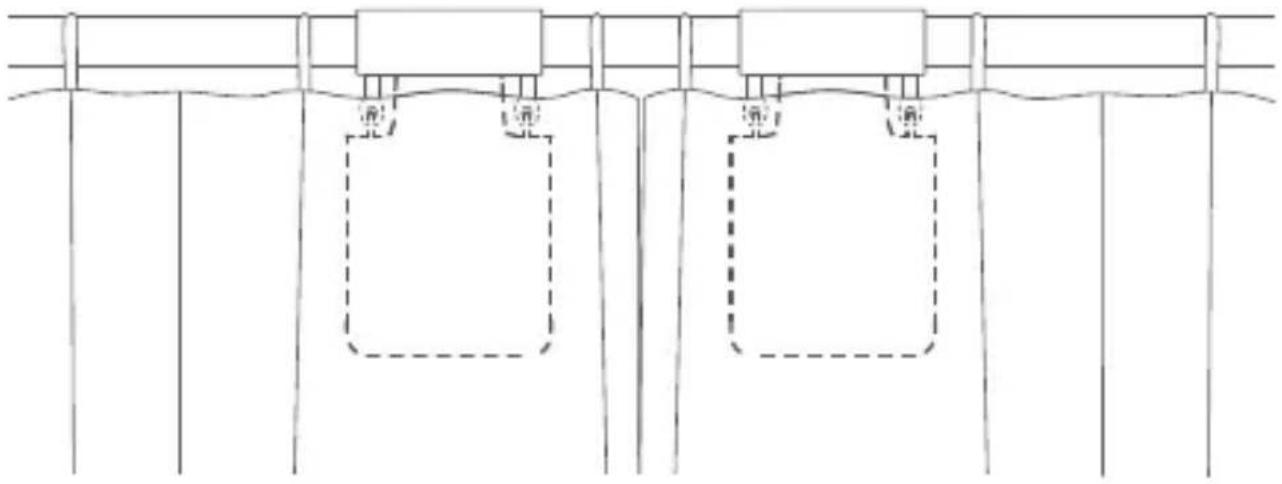
When the curtains on both sides have completely closed, install the two curtain drivers at the positions shown in the figure below and refer to the installation method for single-sided curtains.
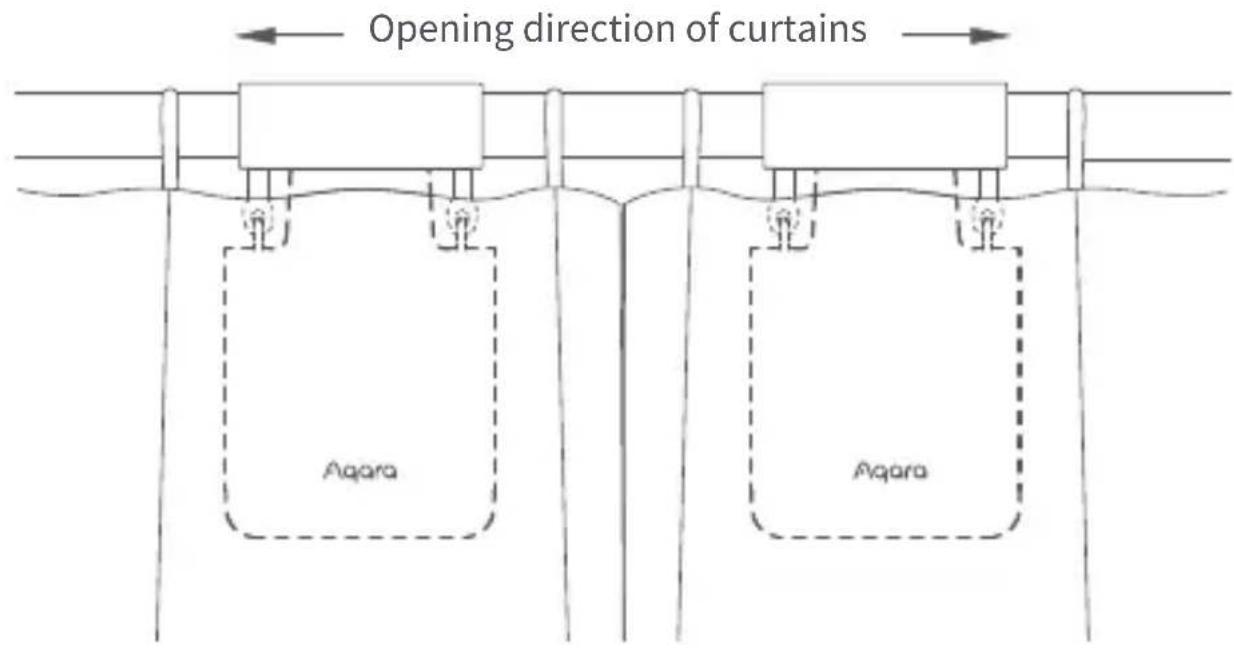
text_image
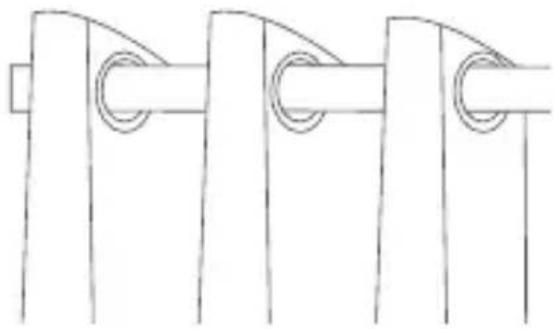
Opening direction of curtains Aqara AqaraRing Top
text_image
Opening direction of curtains Aqara AqaraGrommet
Opening Distance Settings
To ensure proper use of the product, the range should be set for the product after the product is installed.
Single-Sided Curtains
- After the device is connected to the Aqara Home app, the opening distance of the device can be configured on the app. Click the device card on the Home page of the app and set the stroke as instructed on the main page of the device.
- Also, the opening distance of the device can be set by pressing the setting button when the device is not connected to the Aqara Home app. Detailed operations are as follows:
A) Pull the curtain until it is completely closed, and install the Curtain Driver on the rod according to the installation method for the "single-sided curtains".
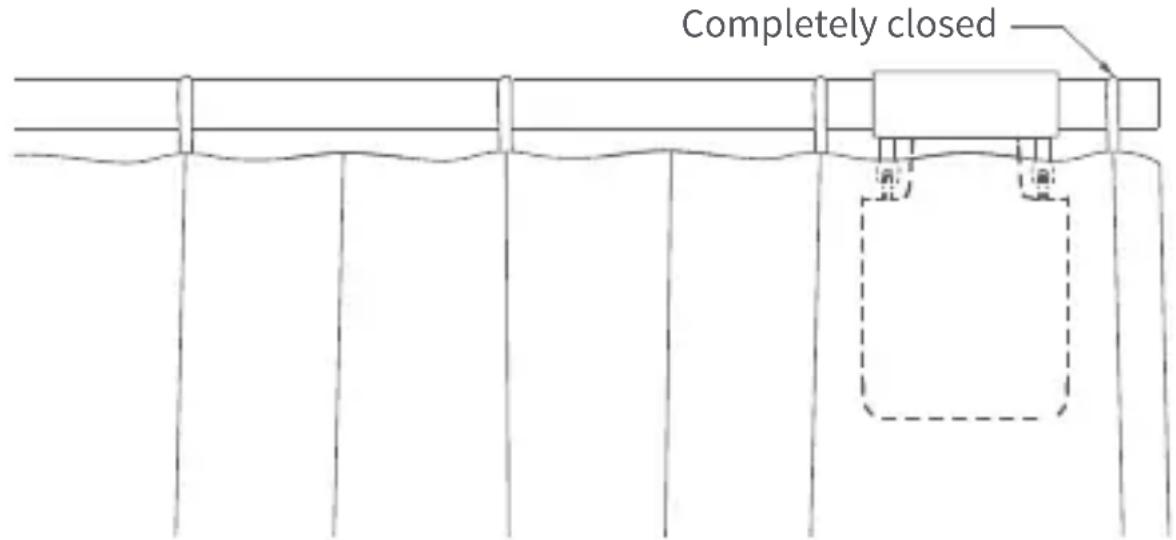
text_image
Completely closedB) Then click the setting button 3 times in succession quickly to set the first limit point of the range. The first limit point is set successfully after the long "beep".
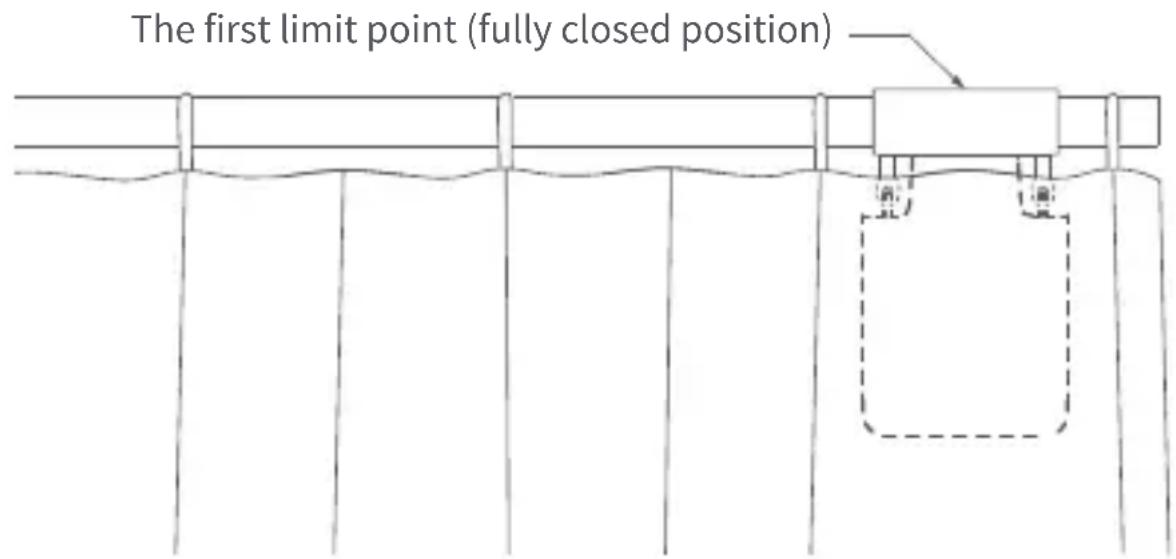
text_image
The first limit point (fully closed position)C) Meanwhile, the Curtain Driver will automatically run to the opening limited point and stop after being pulled in the fully opening direction for about 10 ~cm . After the long "beep", another limit point is automatically and successfully set, which means the opening range of the device is set up.
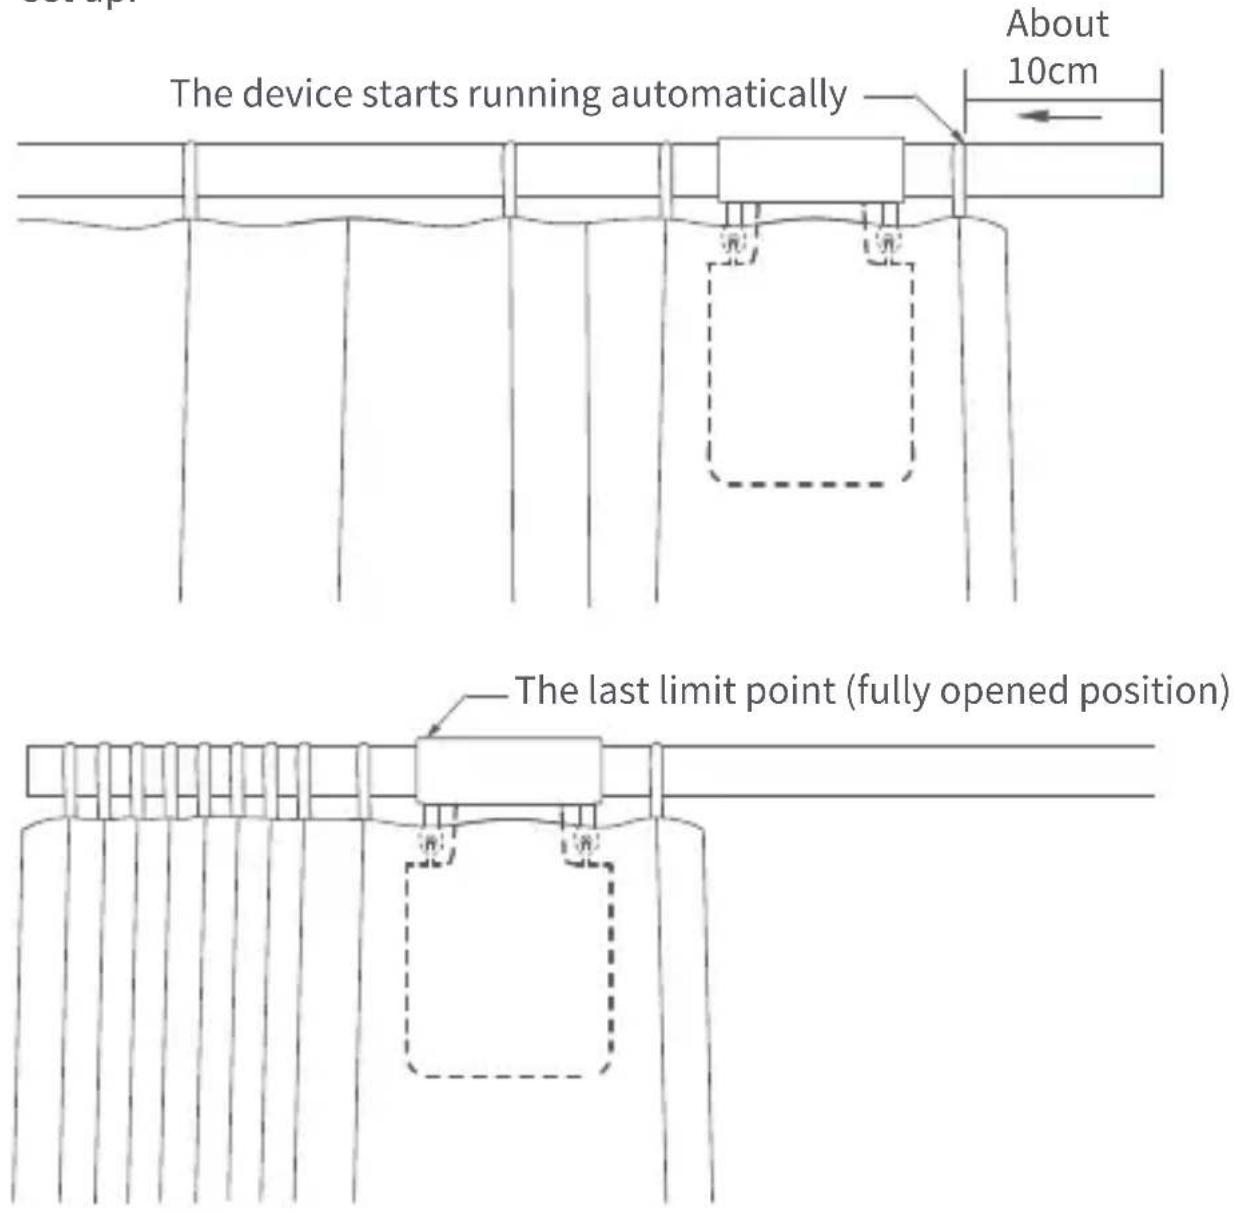
text_image
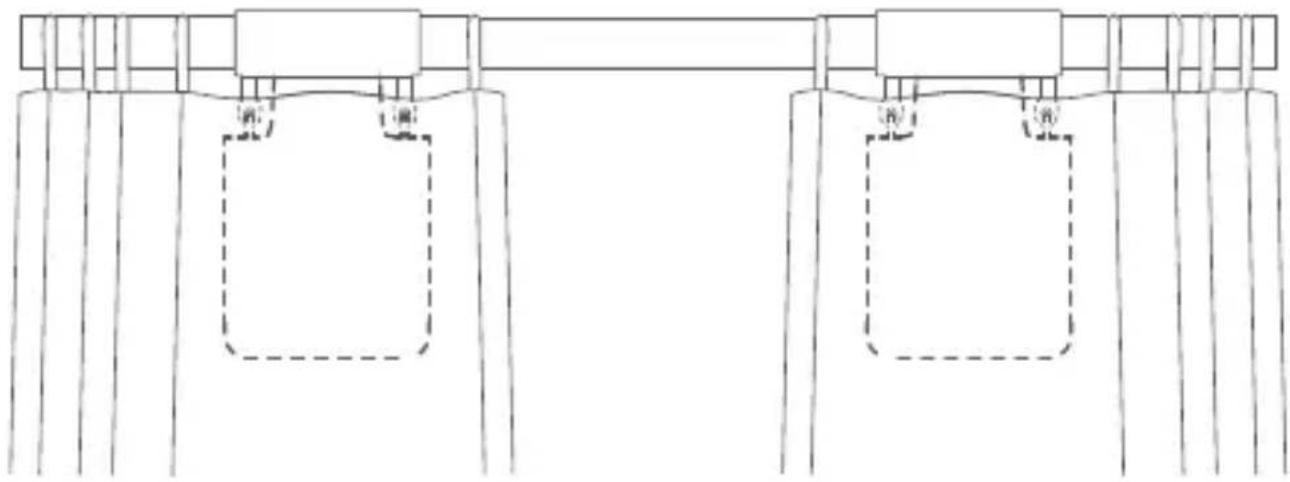
The device starts running automatically About 10cm The last limit point (fully opened position)Double-Sided Curtains
A) Pull the curtains on left and right sides until they are completely closed, and install the two Curtain Drivers at the position on the rod where the curtains are completely closed according to the installation method for the "single-sided curtains".
natural_image
Pure technical line drawing of structural beams and supports without any text, numbers, or symbolsB) Set the opening distance for Curtain Drivers on left and right sides according to Step B and C for that of "single-sided curtains".
natural_image
Pure technical line drawing of two vertical supports with dashed rectangular components, no text or symbols presentButton Operation
| Button Operation Description | |
| Click once | Open, close or stop according to the current state of the Curtain Driver |
| Click twice in succession quickly | Hold, release or stop according to the holding status of the current Curtain Driver |
| Click three times in succession quickly | Set limit point of the range manually |
| Click five times in succession quickly | Delete the current range set for the Curtain Driver |
| Touch & hold for 5 seconds | Restore factory settings or startup (when it is turned off) |
| Touch & hold for 10 seconds | Turn off the device |
Indicator Light Description
| Indicator Light Status | Description |
| Quick blinking of blue light | The Curtain Driver is connecting with the hub (After the device is started for use for the first time or reset). |
| Slow blinking of orange light | Firmware updating is in progress. |
| Quick blinking of green light | Holding to the rail is in progress. |
| Green blinking | Releasing from the rail is in progress. |
| White blinking | The device is being charged. |
| Steady blinking of White light | Charging is complete and the adapter is not removed. |
Buzzer Description
| Buzzer Status | Description |
| 1 Long beep | Device opening range deleted.Factory settings restored.Device searching reaction.Opening and closing directions switched.Range limit point was set successfully. |
| 2 Short beeps | When the range of Curtain Driver is not deleted,set the limit point of stroke manually.When the range of Curtain Driver stroke is deleted, delete the range again. |
| 3 Short beeps | The curtain driver is held in place.The curtain driver is released in place.Warning of low battery. |
Battery Charging
When there is a warning of low battery, please charge the Curtain Driver in a timely fashion. Charging steps are as follows:
- Quickly click the setting button twice in succession or use the app to release the Curtain Driver from the rail, and remove it from the rail;
- Use the USB charging cable, and plug the end of the Type-C plug into the charging port on the Curtain Driver and the other end to the adapter for charging.
- It takes about 5 hours to fully charge the battery.
Specifications
Dimensions: 140.5 × 96 × 44 mm
Rated Current: 1.5 A
Rated Torque: 0.2 N·m
Wireless Protocol: Zigbee 3.0 IEEE 802.15.4
Model: CM-M01(CM-Curtain Motor series products, M01-the first Motorized products)
Battery Type: Lithium battery (not replaceable)
Rated Voltage: 5 V=
Rated Power Input: 7.5 W
Rated Rotor Speed:100 r/min
Moving Speed: 12 cm/s
IP Rating: IP20
Operating Humidity: 0\~95% RH, no condensation
Operating Temperature: 0°C \~ 45°C
Changes or modifications not expressly approved by the party responsible for compliance could void the user's authority to operate the equipment. Note: This equipment has been tested and found to comply with the limits for a Class B digital device, pursuant to part 15 of the FCC Rules. These limits are designed to provide reasonable protection against harmful interference in a residential installation. This equipment generates, uses and can radiate radio frequency energy and, if not installed and used in accordance with the instructions, may cause harmful interference to radio communications. However, there is no guarantee that interference will not occur in a particular installation. If this equipment does cause harmful interference to radio or television reception, which can be determined by turning the equipment off and on, the user is encouraged to try to correct the interference by one or more of the following measures:
—Reorient or relocate the receiving antenna.
—Increase the separation between the equipment and receiver.
—Connect the equipment into an outlet on a circuit different from that to which the receiver is connected.
—Consult the dealer or an experienced radio/TV technician for help."
This equipment complies with IC radiation exposure limits set forth for an
uncontrolled environment. This equipment should be installed and operated with minimum distance of 20 cm between the radiator and your body. This transmitter must not be co-located or operating in conjunction with any other antenna or transmitter.
Zigbee Operation Frequency: 2405-2475 MHz
Zigbee Maximum Output Power: 13 dBm
Under normal use of condition, this device should be kept a separation distance of at least 20cm between the antenna and the body of the user.
EU Declaration of Conformity
Hereby, Lumi United Technology Co., Ltd. declares that the radio equipment type Curtain Driver E1, CM-M01 is in compliance with Directive 2014/53/EU. The full text of the EU declaration of CE
conformity is available at the following internet address: http://www.aqa-ra.com/DoC/
RF Exposure statement
This equipment complies with FCC radiation exposure limits set forth for an uncontrolled environment. This equipment should be installed and operated with minimum distance of 20 cm between the radiator and your body. This transmitter must not be co-located or operating in conjunction with any other antenna or transmitter.
UK Declaration of Conformity
Hereby, Lumi United Technology Co., Ltd. declares that the radio equipment type Curtain Driver E1, CM-M01, is in compliance with Directive 2017 (SI 2017 No. 1206, as amended by SI 2019 No. 696). The full text of the UK declaration of conformity is available at the following internet address: http://www.aqara.com/DoC/.
UK CA
WEEE Disposal and Recycling Information

All products bearing this symbol are waste electrical and electronic equipment (WEEE as in directive 2012/19/EU) which should not be mixed with unsorted household waste. Instead, you should protect human health and the environment by handing over your waste equipment to a
designated collection point for the recycling of waste electrical and electronic equipment, appointed by the government or local authorities. Correct disposal and recycling will help prevent potential negative consequences to the environment and human health. Please contact the installer or local authorities for more information about the location as well as terms and conditions of such collection points.
IC NOTICE TO CANADIAN USERS
This device contains licence-exempt transmitter(s)/receiver(s) that comply with Innovation, Science and Economic Development Canada's licence-exempt RSS(s). Operation is subject to the following two conditions:
(1) This device may not cause interference.
(2) This device must accept any interference, including interference that may cause undesired operation of the device.
This Class B digital apparatus complies with Canadian ICES - 003.
This device complies with RSS - 247 of Industry Canada. Operation is subject to the condition that this device does not cause harmful interference.
Federal Communications Commission (FCC) compliance statement: This device complies with part 15 of the FCC Rules. Operation is subject to the following two conditions:
(1) This device may not cause harmful interference, and
(2) this device must accept any interference received, including interference that may cause undesired operation.
Online Customer Service: www.aqara.com/support
Customer Support Email: support@aqara.com
Website: www.aqara.com
Manufacturer: Lumi United Technology Co., Ltd.
Address: Room 801-804, Building 1, Chongwen Park, Nanshan iPark, No.
3370, Liuxian Avenue, Fuguang Community, Taoyuan Residential District, Nanshan District, Shenzhen, China
natural_image
Simple line drawing of a rectangular object with two vertical posts and circular ends (no text or symbols)круглых карнизов *1
Обучающее видео
text_image
QR code image containing encoded data, no visible human-readable textnatural_image
Simple line drawing of three vertical supports with circular markers at the top (no text or symbols)natural_image
Simple diagram of a horizontal bar with two ends and downward arrows, no text or symbols present
natural_image
Simple diagram of a horizontal bar with two circular ends and an arrow pointing downward (no text or symbols)text_image
QR code image containing encoded data, no visible human-readable textnatural_image
Technical line drawing of a mechanical clamp or bracket assembly (no text or symbols)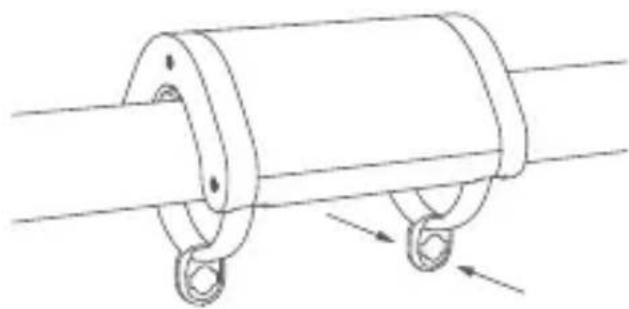
natural_image
Technical line drawing of a mechanical component with two hanging rings and directional arrows indicating motion (no text or symbols)natural_image
Simple line drawing of a question mark inside a circle (no text or symbols)первое кольцо
natural_image
Simple line drawing of a curved mechanical component inside a circle (no text or symbols)text_image
123 ... Nлюверс люверс
natural_image
Pure technical line drawing of a structural support system without any text, numbers, or symbolsnatural_image
Pure technical line drawing of two vertical supports with dashed rectangular components, no text or symbols presentОперации с кнопками
(CM-Curtain Motor series products, M01-the first Motorized products)
www.aqara.com/support
natural_image
Simple line drawing of a rectangular object with two vertical supports at the bottom (no text or symbols)(3m)*1
Tutorial-Video
text_image
QR code image containing encoded data, no visible human-readable textnatural_image
Simple line drawing of a horizontal beam with two circular end points and vertical supports (no text or symbols)Durchmesser: 25-32mm
natural_image
Pure geometric diagram showing a circle with an inner cylinder and an external tangent line (no text or symbols)natural_image
Simple diagram of a horizontal bar with two circular ends and downward arrows at both ends (no text or symbols)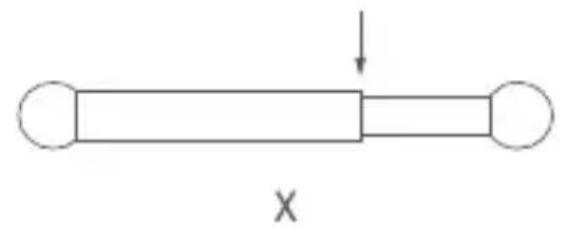
natural_image
Simple diagram of a rectangular object with two circular ends and an arrow pointing downward (no text or symbols)text_image
QR code image containing encoded data, no visible human-readable textnatural_image
Technical line drawing of a mechanical clamp or bracket assembly (no text or symbols)
natural_image
Technical line drawing of a mechanical component with two rings and connecting rods (no text or symbols)natural_image
Simple line drawing of a question mark inside a circle (no text or symbols)der erste klingel
natural_image
Simple line drawing of a U-shaped object inside a circle (no text or symbols)text_image
123 ... NGrommets Grommets
natural_image
Pure technical line drawing of a structural support system without any text, numbers, or symbolsnatural_image
Pure technical line drawing of two vertical supports with horizontal bars, no text or symbols presentTastenbedienung
Modell: CM-M01(CM-Curtain Motor series products, M01-the first Motorized products)
3370, Liuxian Avenue, Fuguang community, Taoyuan Straße, Nanshan
Bezirk, Shenzhen, China
Made in China
natural_image
Simple line drawing of a rectangular object with two vertical supports at the bottom (no text or symbols)(3m)*1
Tutorial-Video
text_image
QR code image containing encoded data, no visible human-readable textnatural_image
Simple line drawing of three vertical supports with circular markers at the top (no text or symbols)text_image
>95mm oeille oeillenatural_image
Simple diagram of a horizontal bar with two ends and downward arrows, no text or symbols present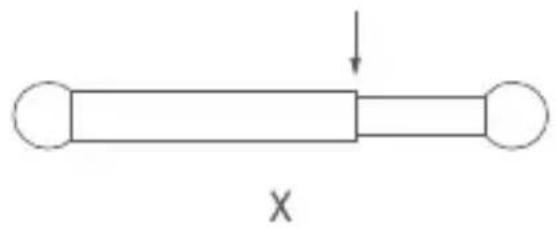
natural_image
Simple line drawing of a rectangular object with two circular ends and an arrow pointing downward (no text or symbols)text_image
QR code image containing encoded data, no visible human-readable textpinch the ring hole until a "click" is heard

natural_image
Technical line drawing of a mechanical clamp or bracket assembly (no text or symbols)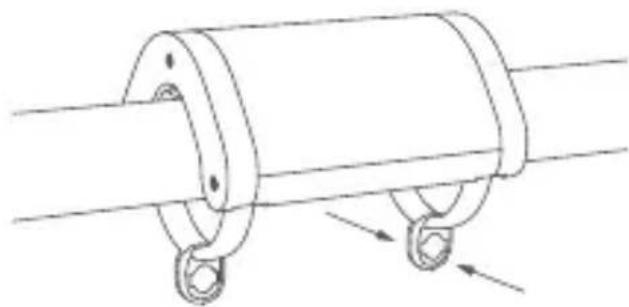
natural_image
Technical line drawing of a mechanical component with two rings and mounting holes (no text or symbols)natural_image
Simple line drawing of a question mark inside a circle (no text or symbols)natural_image
Simple line drawing of a U-shaped object inside a circle (no text or symbols)natural_image
Pure technical line drawing of structural beams and supports without any text, numbers, or symbolsnatural_image
Pure technical line drawing of two vertical supports with horizontal bars, no text or symbols presentModèle : CM-M01(CM-Curtain Motor series products, M01-the first
Motorized products)
natural_image
Simple line drawing of a rectangular object with two vertical supports at the bottom (no text or symbols)(3m)*1
Video Tutorial
text_image
QR code image containing encoded data, no visible human-readable textnatural_image
Pure technical line drawing of mechanical components without any text, numbers, or symbolsnatural_image
Pure geometric diagram showing a circle with an inner cylinder and a diagonal line, no text or symbols present.natural_image
Simple diagram of a horizontal bar with two ends and downward arrows, no text or symbols present.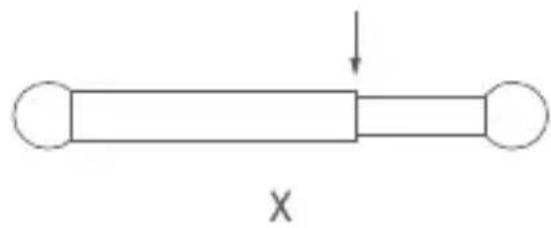
natural_image
Simple diagram of a horizontal bar with two circular ends and an arrow pointing downward (no text or symbols)text_image
QR code image containing encoded data, no visible human-readable textnatural_image
Technical line drawing of a mechanical clamp or bracket assembly (no text or symbols)
natural_image
Technical line drawing of a mechanical component with two rings and mounting holes (no text or symbols)natural_image
Simple line drawing of a question mark inside a circle (no text or symbols)il primo squillo
natural_image
Simple line drawing of a U-shaped object inside a circle (no text or symbols)text_image
123 ... Npasse-fil passe-fil
natural_image
Pure technical line drawing of a structural support system without any text, numbers, or symbolsnatural_image
Pure technical line drawing of two vertical supports with horizontal bars and dashed rectangular components, no text or symbols present.Modello: CM-M01(CM-Curtain Motor series products, M01-the first
Motorized products)
natural_image
Simple circular diagram with concentric rings and a central vertical bar (no text or symbols)
natural_image
Simple line drawing of a rectangular object with two vertical supports and circular ends (no text or symbols)Clip * 8 Tira de goma (3 m) * 1 Percha de varilla * 1
Vídeo tutorial
text_image
QR code image containing encoded data, no visible human-readable textnatural_image
Simple line drawing of three vertical supports with circular markers at the top (no text or symbols)natural_image
Pure geometric diagram showing a circle with an inner cylinder and a diagonal line, no text or symbols present.natural_image
Simple diagram of a horizontal bar with two ends and a checkmark below (no text or symbols)
natural_image
Simple diagram of a horizontal bar with two circular ends and an arrow pointing downward (no text or symbols)text_image
QR code image containing encoded data, no visible human-readable textHold the sides of the hanger to lightly force it apart
pinch the ring hole until a "click" is heard
natural_image
Technical line drawing of a mechanical clamp or bracket assembly (no text or symbols)
natural_image
Technical line drawing of a mechanical component with two hanging rings and a central shaft (no text or symbols)natural_image
Simple line drawing of a hook inside a circle (no text or symbols)el primer anillo
natural_image
Simple line drawing of a U-shaped object inside a circle (no text or symbols)text_image
123 ... Nnatural_image
Pure technical line drawing of a structural beam with supports and a dashed box, no text or symbols presentnatural_image
Pure technical line drawing of a structural support system without any text, numbers, or symbolsnatural_image
Pure technical line drawing of two vertical supports with horizontal bars and dashed outlines, no text or symbols present.Modelo: CM-M01(CM-Curtain Motor series products, M01-the first Motorized products)
natural_image
Simple circular diagram with concentric rings and a central vertical bar (no text or symbols)ロッドハンガー×1

natural_image
Simple line drawing of a rectangular object with two vertical supports at the bottom (no text or symbols)牽引ストリップ(3m) ×1
チュートリアルのビデオ
text_image
QR code image containing encoded data, no visible human-readable textインストール要件
カーテンタイプの説明
グロメットカーテン
リングトップカーテン
natural_image
Pure mechanical linkage diagram without any text, numbers, or symbols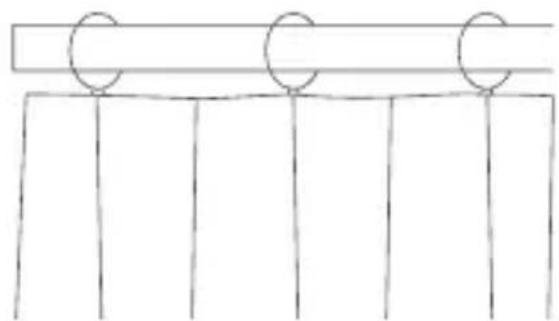
natural_image
Simple line drawing of a beam supported by three vertical supports (no text or symbols)natural_image
Simple diagram of a horizontal bar with two ends and a checkmark below (no text or symbols)
natural_image
Simple diagram of a horizontal bar with two ends and an arrow pointing downward (no text or symbols)クイック・ガイド
text_image
QR code image containing encoded data, no visible human-readable textnatural_image
Technical line drawing of a mechanical component with two hanging rings and a central shaft (no text or symbols)natural_image
Pure structural diagram showing two vertical supports with horizontal beams and dashed rectangular elements, no text or symbols present.natural_image
Pure technical line drawing of two vertical supports with horizontal beams and dashed internal components (no text or symbols)ボタン操作
(CM-Curtain Motor series products, M01-the first Motorized products)
natural_image
Simple line drawing of a rectangular object with two side handles (no text or symbols)설치 영상
text_image
QR code image containing encoded data, no visible human-readable text제품 설치 조건
*설치 가능한 커튼봉 형태*
아일렛형 링 고리형
natural_image
Pure mechanical linkage diagram without any text, numbers, or symbols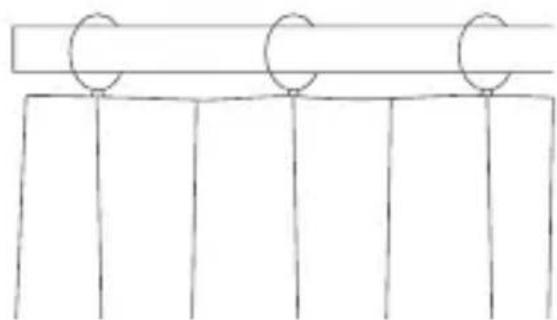
natural_image
Simple line drawing of a beam supported by three vertical supports (no text or symbols)natural_image
Simple line drawing of a horizontal bar with two ends and a checkmark below (no text or symbols)
natural_image
Simple diagram of a horizontal bar with two ends and an arrow indicating downward motion (no text or symbols)제품 사용 가이드
text_image
QR code image containing encoded data, no visible human-readable textnatural_image
Technical line drawing of a mechanical clamp or bracket assembly (no text or symbols)natural_image
Technical line drawing of a mechanical clamp or spring assembly with two hanging rings and directional arrows indicating force or movement (no text or symbols)natural_image
Simple line drawing of a hook inside a circle (no text or symbols)natural_image
Simple line drawing of a U-shaped object inside a circle (no text or symbols)text_image
123 ... N그로밍 그로밍
natural_image
Pure structural diagram showing two vertical supports with horizontal beams and dashed rectangular elements, no text or symbols present.natural_image
Pure technical line drawing of two vertical supports with horizontal beams and dashed internal components (no text or symbols)설정 버튼 사용 방법
(CM-Curtain Motor series products, M01-the first Motorized products)
natural_image
Simple circular diagram with concentric rings and a central vertical bar (no text or symbols)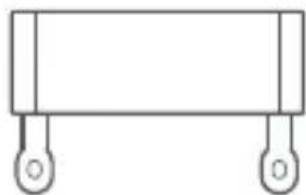
natural_image
Simple line drawing of a rectangular object with two side handles (no text or symbols)教學影片
text_image
QR code image containing encoded data, no visible human-readable text安裝需求
簾布類型說明
穿通式簾布 掛通式簾布
natural_image
Pure mechanical linkage diagram without any text, numbers, or symbols
natural_image
Simple line drawing of three vertical supports with circular markers on top (no text or symbols)natural_image
Simple diagram of a horizontal bar with two ends and a checkmark below (no text or symbols)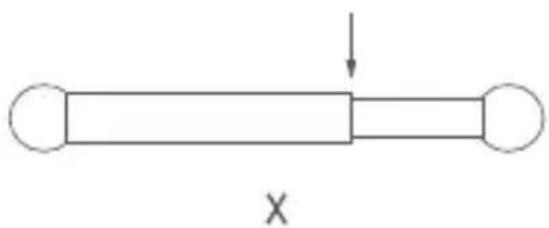
natural_image
Simple diagram of a horizontal bar with two ends and an arrow indicating downward force, labeled 'X' at the bottom (no text or symbols on the bar itself)快速入門指南
請詳閱以下步驟,開始使用本產品。
使用前準備
text_image
QR code image containing encoded data, no visible human-readable textnatural_image
Technical line drawing of a mechanical clamp or bracket assembly (no text or symbols)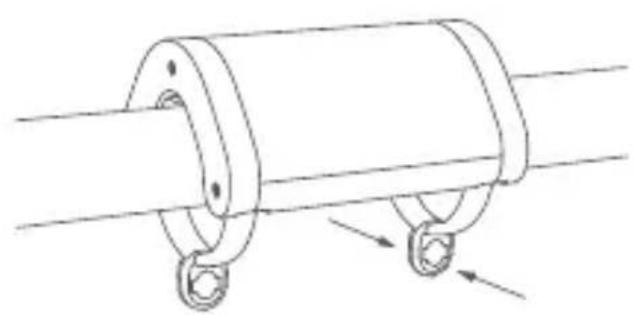
natural_image
Technical line drawing of a mechanical component with two hanging rings and directional arrows indicating motion (no text or symbols)natural_image
Pure structural diagram showing two vertical supports with horizontal beams and dashed rectangular elements, no text or symbols present.natural_image
Pure technical line drawing of two vertical supports with horizontal beams and dashed internal components (no text or symbols)按键操作
型號:CM-M01(CM-Curtain Motor series products, M01-the first Motorized products)
電池類型: 鋰電池(不可替換)
額定電壓:5V
額定輸入功率:7.5 W
旋轉速度:100 轉/分
移動速度:12 公分/秒
IP 等級:IP20
工作濕度:0~95% RH, 無冷凝
工作温度:0℃~45℃