
CAM130 - Video conferencing system AVer - Free user manual and instructions
Find the device manual for free CAM130 AVer in PDF.

| Brand | AVer |
| Model | CAM130 |
| Product Type | Video conferencing system - Content camera |
| Power Supply | 5 V DC power adapter or USB port (USB 2.0/3.0) |
| Power Consumption | Varies with supplemental lighting; requires adapter for lighting on USB 2.0 |
| Connectivity | USB 3.1 Type-C (rear), 5 V DC power jack, Kensington lock |
| Field of View | 90° to 120° (adjustable) |
| Supplemental Lighting | Built-in lamp, color temperature 2700-5700 K, 12 brightness levels |
| Smart Features | Auto-framing (SmartFrame), WDR, presets, AI tracking via PTZApp 2 |
| Microphone | Built-in microphone (disabled by default, activation via PTZApp 2) |
| Control | Physical buttons, remote control, PTZApp 2 (web interface) |
| Mounting | Tripod (1/4" screw), wall/ceiling mount via whiteboard mounting kit |
| Weight | Approximately 500 g (estimated) |
| Security | Kensington lock |
| Package Contents | Camera, lens cover, power adapter, USB 3.1 Type-C to A cable (1.8 m), remote control, whiteboard mounting kit, USB 3.1 extension cable (10 m), tripod screw, QR card |
| System Compatibility | Windows, macOS, MTR (Microsoft Teams Rooms); requires USB 3.0 port for extension cable |
| Operating Temperature | Not specified, indoor use |
| Maintenance | Clean the lens with a soft cloth; avoid solvents |
Frequently Asked Questions - CAM130 AVer
User questions about CAM130 AVer
0 question about this device. Answer the ones you know or ask your own.
Ask a new question about this device
Download the instructions for your Video conferencing system in PDF format for free! Find your manual CAM130 - AVer and take your electronic device back in hand. On this page are published all the documents necessary for the use of your device. CAM130 by AVer.
USER MANUAL CAM130 AVer
| CAM130 Content Camera Unit & Lens Cover | Power Adapter and Plug* | Tripod Screw | USB 3.1 Type-C to Type-A Cable (1.8m) |
| QR Code Card | Whiteboard Mount | USB3.1 Extender 10m** | Remote Control |
- The power adapter will vary depending on the standard power outlet of the country where it is sold.
- Power adapter will be required to support fill light function only when connecting CAM130 Content Camera to PC USB 2.0 port.
** This extender only supports USB3.0 port of PC. Make sure your PC or MTR has USB3.0 port. Otherwise, please purchase USB2.0 extender from the market, such as the Aten UE2120. Please check our compatibility list before purchasing.
https://www.aver.com/Knowledge-Learns/conferencing-collaboration/compatibility-list
Optional Accessories
| USB 3.1 Extender 10m/20m/30m | USB 2.0 Type-C to Type-A Cable (5m)* |
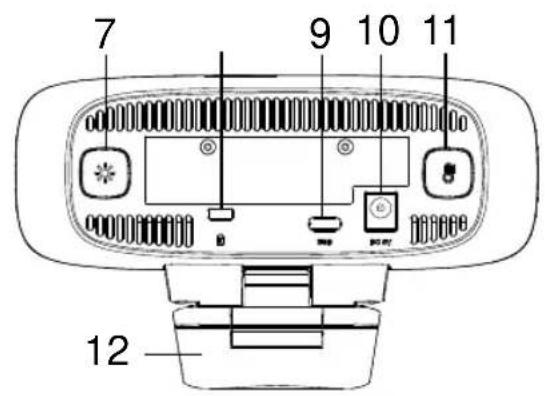
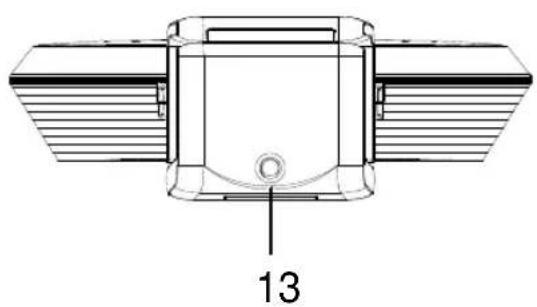
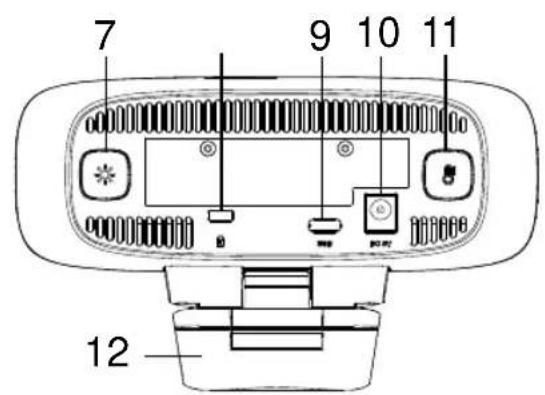
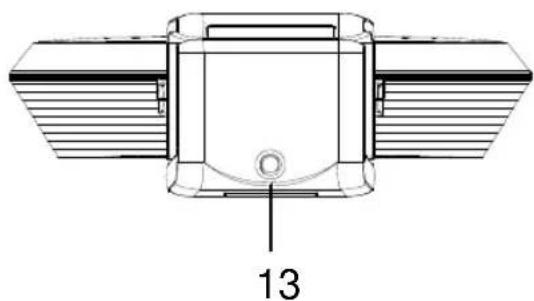
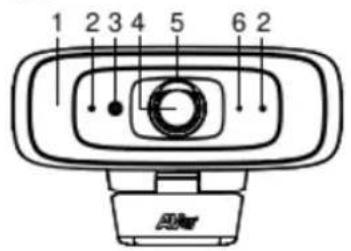
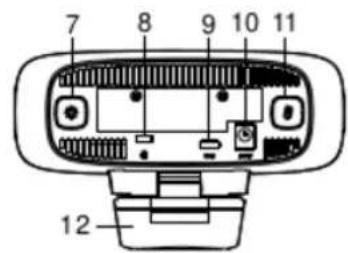
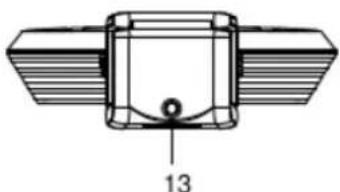
Overview
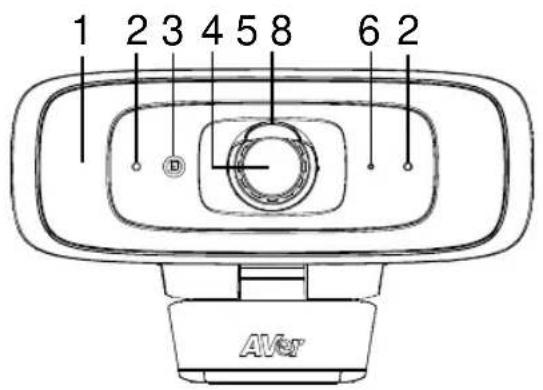
(1) Fill Light
(8) Kensington Lock
(2) Microphones*
(9) USB 3.1 Type-C Port
(3) Color Sensor
(10) DC 5V Power Jack
(4) Lens
(11) Color Temperature Button
(5) Lens Cover
(12) Camera Clip
(6)LED Indicator
(13) Tripod Screw Hole
(7) Light Level Butto
LED Indicator
Power on: Solid red
Start-up: Solid red
Power cable connected but USB cable unplugged: Solid orange
Video mute: Solid white
Video on: Solid blue
Control Fill Light via Device Buttons
Hold either temperature button light level button for 2 sec. to switch on/off fill light function.
Hold both temperature button and light level button together for 2~3 sec. to switch between auto/manual light adjustment. The message below will show on the image screen.
Auto Light Manual Light
- Whether under auto or manual light adjustment mode, user can press the button to slightly adjust color temperature or press the * button to adjust light level.
[Note] The light brightness level in manual mode is much higher than auto mode. There are 12 levels for adjustment.
The camera can memorize the last setting or back to default. Please do advanced settings of the fill light function via PTZApp 2.
The color temperature ranges from 2700k to 5700k.
[Notes]
- By default, fill light function is set as "Manual". You can use PTZApp 2 to change the setting to "Auto" to automatically adjust the lighting level based on actual environment when video streaming is on.
- Users can do advanced lighting behavior setting under manual light adjustment mode via AVer PTZApp 2.
- The fill light brightness level is much higher while connecting the camera to power with power adapter.
- If you want to unplug the power adapter while USB video streaming is on, please turn off fill light first to avoid system shut down.
- Power adapter will be required to support fill light function only when connecting CAM130 Content Camera to PC USB 2.0 port.
Control Fill Light via Remote Control
Long press either button for 1~2 sec. to turn on/off the fill light function.
[Note] When fill light is on, press or button to increase/decrease light level.
Remote Control
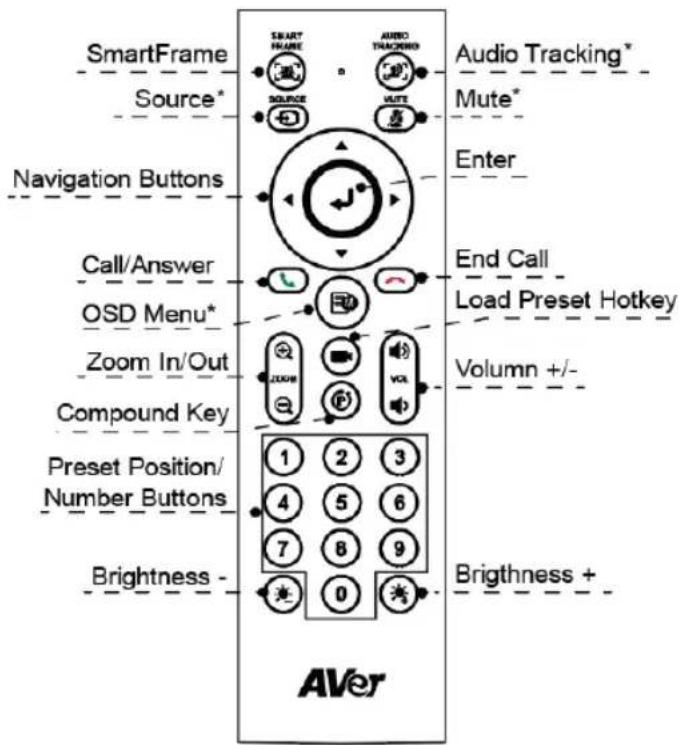
SmartFrame: One-click automatic FOV adjustment to fit all participants in screen. Press and hold the button for 1~2 sec to switch from manually, auto framing and preset framing mode or Off.
Enter () : Press it to show the current AI function on screen such as Auto Framing.
- Load Preset Hotkey (): Press it to move to preset position as user has set in sequence.
Number 0~9: Long press the number button to set preset point. One-click the number key to load preset point.
■ FOV: Press men to change field of view between 90 degree and 120 degree.
WDR: Press to enable/disable the WDR function.
Microphone: Press P then 4 to enable/disable microphone function.
Long press either but for 1~2 sec to turn on/off the fill light function.
When fill light is off, press button to increase/decrease image brightness.
When fill light is on, press button to increase/decrease light level.
Installation
The CAM130 Content Camera can be mounted onto the wall or ceiling using the Whiteboard Mount (refer to Bundle Kit Package).
Wall Mount Mode
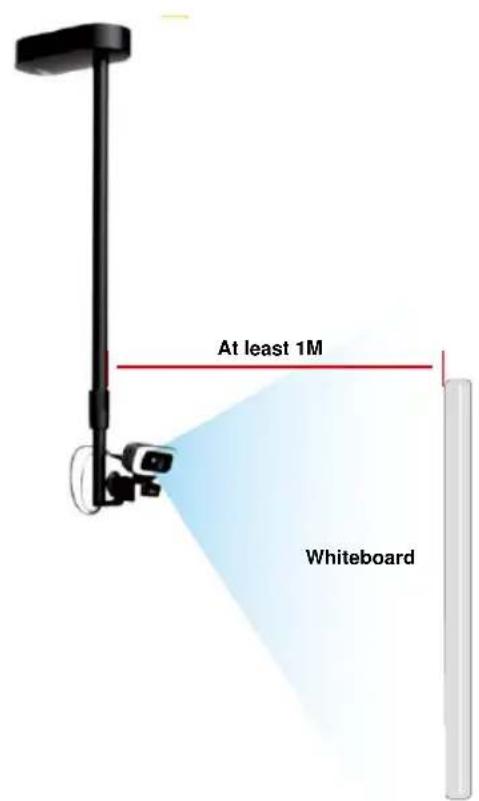
Ceiling Mount Mode
Make sure that the camera has captured the frames of whiteboard completely.
Equipments:
- CAM130 Content Camera.
- USB3.1 Type-C to Type-A cable (1.8m is included in the CAM130 Content Camera package).
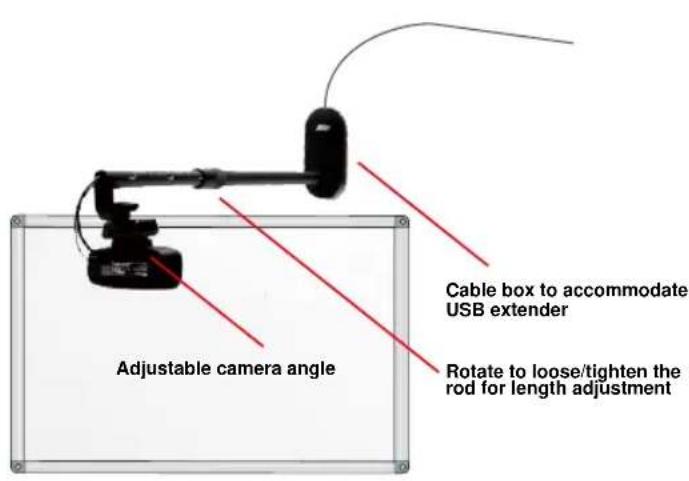
- AVer whiteboard mount kits (Rod, Box and two M4x5mm screws).
- AVer USB3.1 extender (10m is included in CAM130 Content Camera bundle kit. 20m and 30m are optional).
-
MTR system (support USB3.0 USB port).
-
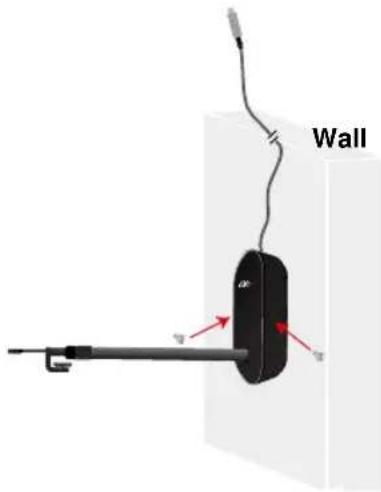
Mount the bottom case of the Box to the wall 3cm above the center line of whiteboard/IFP space (or mount It to the ceiling).
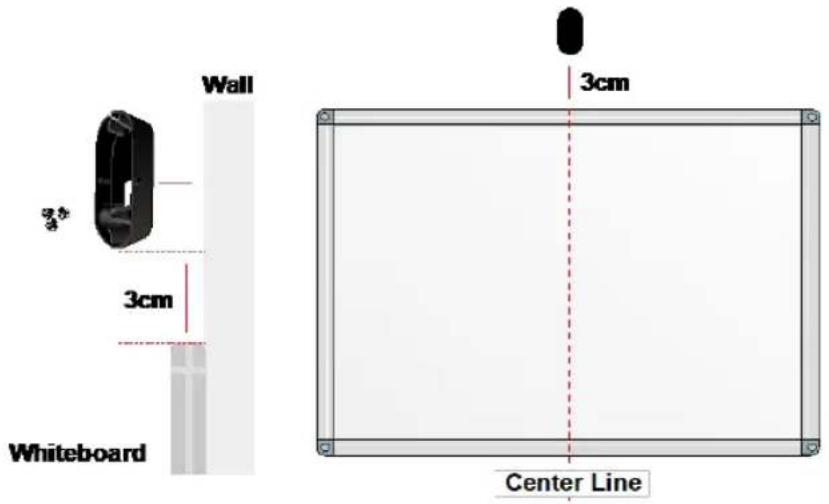
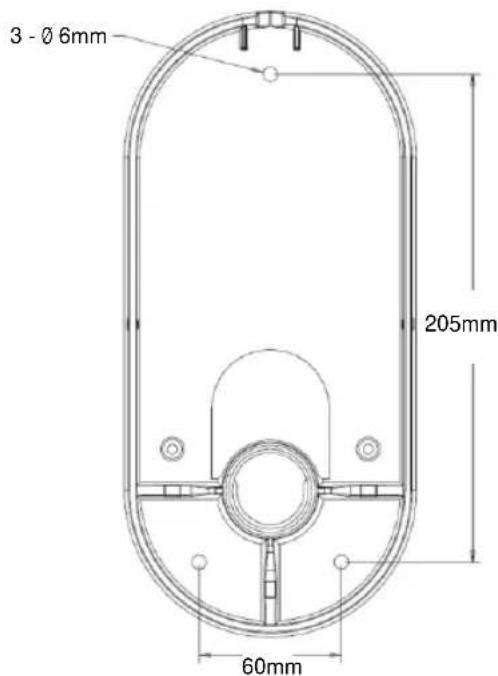
[Note] Please prepare three screws before mounting (not included in the package). The diameter of the three screw holes on the bottom case is 0.6mm
- Insert the cable (Type A side) into the rod hole till the end of the rod. Leave 20cm of the cable for connecting to the camera.
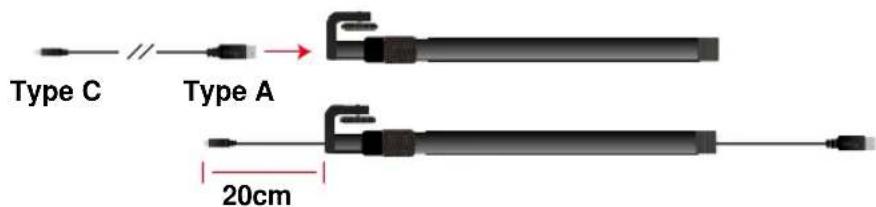
English-6
- Align the top case with the bottom case of the Box, insert the rod into the hole of both cases, and then rotate the rod to get it tightened with the box.

- Connect the USB Type A side to the female connector of USB3.1 Extender Cable and house the joins inside the Box.
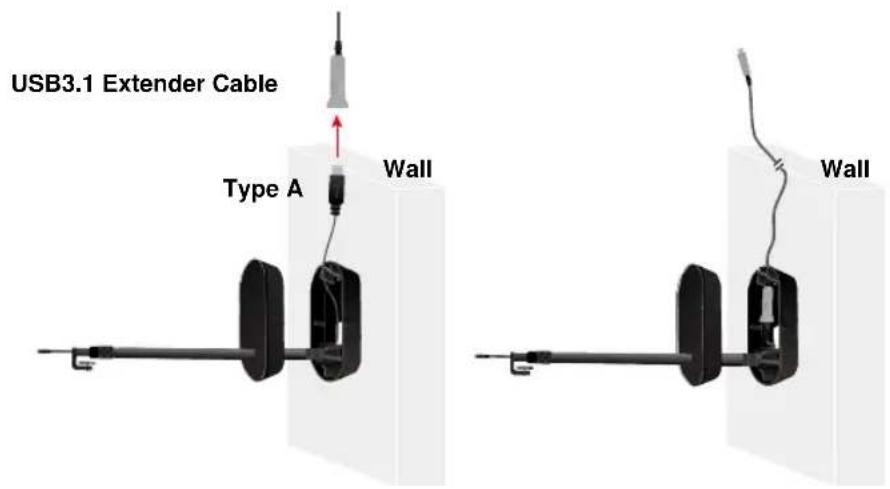
- Secure the top case to the bottom case with the supplied two M4x5mm screws.
English-7
- Install the camera to another end of the rod and turn the wheel to lock it.

- Connect USB Type C to the Type C port located on the back of camera.
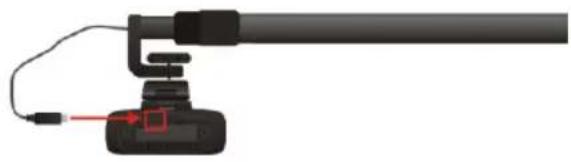
- Rotate the rotating ring on the rod to adjust the rod length and rotate it again in the opposite direction to lock.

- Connect USB3.1 extender to MTR USB3.0 port. USB extender only supports USB3.0 port. Power on MTR and set it up in Teams room. Make sure there is USB3.0 port in MTR since USB extender doesn't support USB2.0 port of PC/MTR. If using USB2.0 USB extender and want to use fill-light function, please connect power adapter to camera.
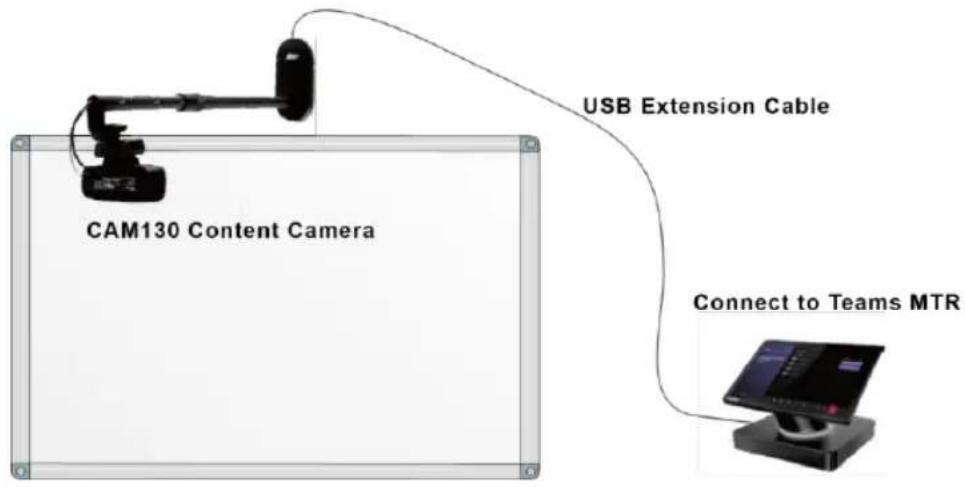
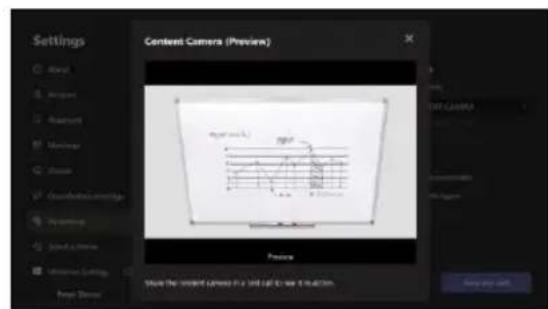
- Connect HDMI out of MTR system to TV monitor and use preview function to see the Content Camera image. Adjust the camera clip to ensure the camera capture the frames of the whiteboard.

- The rod of whiteboard mount can be adjusted in length from 80cm to 120cm as required.
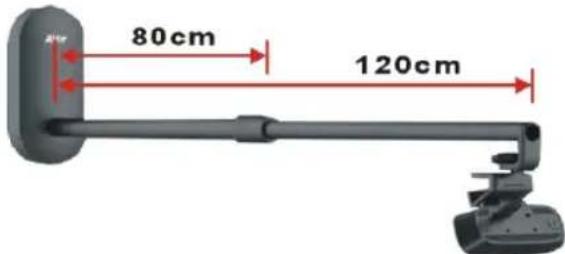
Rod Length vs. whiteboard/IFP size
| Whiteboard Size (L) | Rod Length | Mounting Method |
| <1.2 meters | 80cm | Mount 3cm above the center of the board |
| 1.2~1.7 meters | 100cm | |
| 1.8~2 meters | 120cm | |
| Any Size | 80~120cm | Install the mount on the ceiling and the location is in front of central top of the board. It is suggested to place the camera at least 1m away from the board to ensure complete capturing of the board frames. |
Making a Video Call in MTR
For a fluid meeting room experience, we recommend setting up two cameras. One is the front room camera used to capture all participants (such as VB130 in huddle space or VC520Pro2 in mid to large room). The other is CAM130 Content Camera to capture whiteboard content.
Connect CAM130 Content Camera and AVer conference camera devices to MTR system to start an efficient collaborative meeting. Please refer to user's manual for more details.
[Notes]
The CAM130 Content Camera is a plug-and-play camera. The system requires no special drivers, but we do recommend installing the PTZApp 2 for a better user experience. The following functions are set Off as default. Please use PTZApp 2 to enable them:
-
Whiteboard keystone function
-
Microphone function
Install PTZApp 2
Please go to https://www.aver.com/download-center/ (Global & European Headquarters) or https://www.averusa.com/business/support/ (USA) to download the PTZApp 2. After downloading, double-click on the file and follow the on-screen instructions to complete the installation.
After installing the PTZApp 2, double-click on the PTZApp 2 icon to run the application.
[Note] PTZApp 2 runs on web browser. It doesn't support IE browser. It is suggested to set up your browser to Chrome as default.
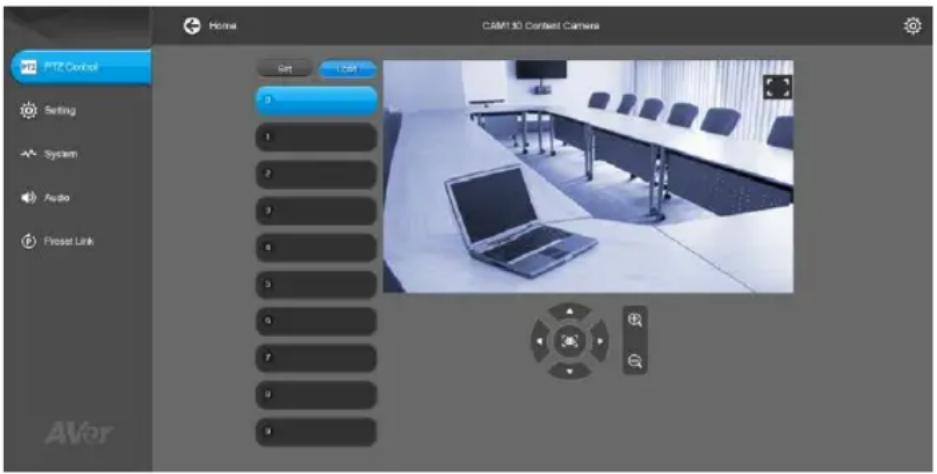
Use PTZApp 2
You can use the PTZApp 2 to pan, tilt and zoom the camera in/out and enable/disable the true WDR, brightness and sharpness features. Please refer to the user's manual for details.
FEDERAL COMMUNICATIONS COMMISSION
NOTE: This equipment has been tested and found to comply with the limits for a Class A digital device, pursuant to part 15 of the FCC Rules. These limits are designed to provide reasonable protection against harmful interference when the equipment is operated in a commercial environment. This equipment generates, uses, and can radiate radiofrequency energy and, if not installed and used in accordance with the instruction manual, may cause harmful interference to radio communications. Operation of this equipment in a residential area is likely to cause harmful interference in which case the user will be required to correct the interference at his own expense. FCC Caution: Any changes or modifications not expressly approved by the party responsible for compliance could void the user's authority to operate this equipment.
This device complies with part 15 of the FCC Rules. Operation is subject to the following two conditions: (1) This device may not cause harmful interference, and (2) this device must accept any interference received, including interference that may cause undesired operation.
Warning:
This is a class A product. In a domestic environment this product may cause radio interference in which case the user may be required to take adequate measures.
Risk of Explosion if Battery is replaced by an Incorrect Type. Dispos of Used Batteries According to the Instructions.
COPYRIGHT
© 2021 AVer Information Inc. All rights reserved.
MORE HELP
For FAQs, technical support, software and user manual download, please visit:
Headquarters
Download Center: https://www.aver.com/download-center
Technical Support: https://www.aver.com/technical-support
USA Branch office
Download Center: https://www.averusa.com/business/support/
Technical Support: https://averusa.force.com/support/s/contactsupport
Europe Branch office
Download Center: https://www.aveurope.com/download-center
Technical Support: https://www.aveurope.com/technical-support
Contact Information
Headquarters
AVer Information Inc.
https://www.aver.com
8F, No.157, Da-An Rd., Tucheng Dist., New Taipei City 23673, Taiwan
Tel: +886 (2) 2269 8535
USA Branch office
AVer Information Inc., Americas
https://www.averusa.com
668 Mission Ct., Fremont, CA 94539, USA
Tel: +1 (408) 263 3828
Toll-free: +1 (877) 528 7824
Technical support: support.usa@aver.com
Europe Branch office
AVer Information Europe B.V.
https://www.aveurope.com
Westblaak 134, 3012 KM, Rotterdam, The Netherlands
Tel: +31 (0) 10 7600 550
Technical support: eu.rma@aver.com
Japan Branch Office
ABAI·INFAMEN株式会社
https://jp.aver.com
Vietnam Branch Office
Cong ty TNHH AVer Information (Vielt Nam)
Tang 5, 596 Nguyen Dinh Chiieu, P.3, Quan 3, Thanh pho Ho Chi Minh 700000, Viet Nam
Tel: +84 (0)28 22 539 211
(內容相機組合包) 包裝內容物
https://www.aver.com/Knowledge-Learns/conferencing-collaboration/compatibility-list
選購配件
https://www.aver.com/download-center
常見問題、技術支援,請到下面網址:
https://www.aver.com/technical-support
連絡資訊
圆展科技股份有限公司
https://www.aver.com
https://www.aver.com/Knowledge-Learns/conferencing-collaboration/compatibility-list
选购配件
https://www.aver.com/download-center
常见问题、技术支持,请到下面网址:
https://www.aver.com/technical-support
连络信息
圆展科技
https://www.aver.com
新北市土城区大安路 157 号 8 楼
电话:(02)2269-8535
https://www.aver.com/Knowledge-Learns/conferencing-collaboration/compatibility-list
才総子販売品
USB3.1 延長ケーハル
10m/20m/30m
USB 2.0 Type-C -
Type-A キープル(5m)


各部名称

©2021 AVer Information Inc. All rights reserved.
その他的さト一卜
https://www.aver.com/Knowledge-Learns/conferencing-collaboration/compatability-list
(1) 型茎芽
(8)图中图(五)
(2) 0013
PTZApp2 1E 1E 1E 1E 1E 1E 1E 1E 1E 1E 1E 1E 1E 1E 1E 1E 1E 1E 1E 1E 1E 1E 1E 1E 1E 1E 1E 1E 1E 1E 1E 1E 1E 1E
PTZApp2
PTZApp2 01iH 03AIOI 04000000000000000000000000000000000000000000000000000
©2022 AVer Information Inc. All rights reserved.
三
T
https://www.aver.com/download-center
#
AVer Information Inc.
https://www.aver.com
8F, No.157, Da-An Rd., Tucheng Dist., New Taipei City 23673, Taiwan
():+886(2)22698535
https://www.aver.com/Knowledge-Learns/conferencing-collaboration/compatibility-list
Accessoires en option
Assistance Technique: https://www.aveurope.com/technical-support
Westblaak 134, 3012 KM, Rotterdam, The Netherlands
Tel: +31 (0) 10 7600 550
Assistance technique: eu.rma@aver.com
https://www.aver.com/Knowledge-Learns/conferencing-collaboration/compatibility-list
Por favor, vaya a https://www.aver.com/download-center/ (Sede Global),
https://www.aveurope.com/download-center/ (Sede Europa) o
Soporte technique: https://www.aveurope.com/technical-support
Westblaak 134, 3012 KM, Rotterdam, The Netherlands
Tel.: +31 (0) 10 7600 550
Soporte专业技术: eu.rma@aver.com
(KomnneKT KomnneKta KaMepbl IJI KONTeHTa) CodepxHmoe ynaKOBKN
https://www.aver.com/Knowledge-Learns/conferencing-collaboration/compatibility-list
LcHTp 3aRpy3ok: https://www.aver.com/download-center
TexnoДерЖа: https://www.aver.com/technical-support
KoHTaKTHaI HhOpMaun
AVer Information Inc.
https://www.aver.com
8F, No.157, Da-An Rd., Tucheng Dist., New Taipei City 23673, Taiwan
Tel.: +886 (2) 2269 8535
- Optional Accessories
- Overview
- LED Indicator
- Control Fill Light via Device Buttons
- Auto Light Manual Light
- [Notes]
- Control Fill Light via Remote Control
- Remote Control
- Installation
- Equipments:
- Making a Video Call in MTR
- Install PTZApp 2
- Use PTZApp 2
- FEDERAL COMMUNICATIONS COMMISSION
- Warning:
- COPYRIGHT
- MORE HELP
- Headquarters
- USA Branch office
- Europe Branch office
- Contact Information
- Japan Branch Office
- Vietnam Branch Office
- (內容相機組合包) 包裝內容物
- 選購配件
- 連絡資訊
- 选购配件
- 连络信息
- 才総子販売品
- 各部名称
- PTZApp2
- 三
- #
- Accessoires en option
- (KomnneKT KomnneKta KaMepbl IJI KONTeHTa) CodepxHmoe ynaKOBKN
- KoHTaKTHaI HhOpMaun
Brand : AVer
Model : CAM130
Category : Video conferencing system