WSWMU2 - Speaker stands SANUS - Free user manual and instructions
Find the device manual for free WSWMU2 SANUS in PDF.

| Product type | Wall mount for speaker |
| Brand | Sanus |
| Model | WSWMU2 |
| Maximum supported weight | 4.53 kg (10 lbs) |
| Material | Steel |
| Compatibility | Speakers with suitable mounting |
| Installation methods | Drywall (min. thickness 12.7 mm), wood studs (38x89 mm min.), solid concrete (min. thickness 203 mm) or concrete block |
| Package contents | Wall plate, speaker brackets, screws, anchors, finishing cap |
| Tools required | Drill, spirit level, screwdriver, adjustable wrench (not included) |
| Care and cleaning | Clean with a dry, soft cloth |
| Safety | Do not exceed the maximum load. The wall must support 5 times the total weight. |
| Spare parts and repairability | No user-repairable parts. Contact customer service. |
| General information | Designed for easy installation. Refer to the full manual. |
Frequently Asked Questions - WSWMU2 SANUS
User questions about WSWMU2 SANUS
0 question about this device. Answer the ones you know or ask your own.
Ask a new question about this device
Download the instructions for your Speaker stands in PDF format for free! Find your manual WSWMU2 - SANUS and take your electronic device back in hand. On this page are published all the documents necessary for the use of your device. WSWMU2 by SANUS.
USER MANUAL WSWMU2 SANUS
We'll Make It Stress-Free
If you have any questions along the way, just give us a call.
P: +31 (0) 495 580 852 • UK: (0) 800 056 2853 • AUS: +61 (0) 7 3299 7000 • US: 1 (800) 359 5520
We're ready to help!

CAUTION: IMPORTANT SAFETY INSTRUCTIONS - PLEASE READ ENTIRE MANUAL PRIOR TO USE - SAVE THESE INSTRUCTIONS
Before getting started, let's make sure this product is perfect for you!
This mount is designed to support most wireless speakers, with similar mounting holes.
CAUTION: Avoid potential personal injuries and property damage!
- Check your speaker owner's manual to see if there are any special requirements for mounting your speaker.
- Please read through these instructions completely to be sure you're comfortable with this easy install process.
- Do not use this product for any purpose not explicitly specified by manufacturer.
- Manufacturer is not responsible for damage or injury caused by incorrect assembly or use.
The wall must be capable of supporting five times the weight of the speaker and mount combined.
If you do not understand these instructions or have doubts about the safety of the installation, assembly or use of this product, contact Customer Service.
Speaker Weight Limit DO NOT EXCEED

Tools Needed
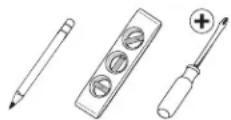
Pencil
Level
Screwdriver
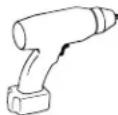
Electric Drill


Stud Finder
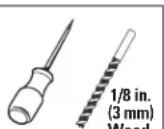
Drill Bit
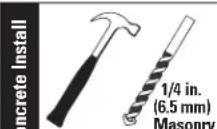
Hammer D

Hammer
Drill Bit
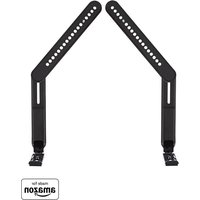
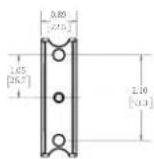
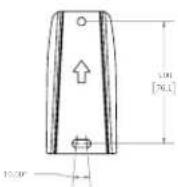
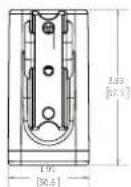
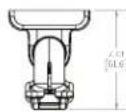
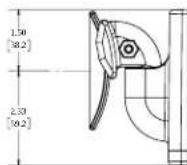
Dimensions
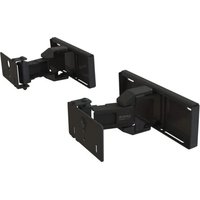
TV INTERFACE
WALLPLATE
TOP VIEW-EXTENDED
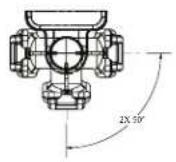
*ATTACHED PRODUCT TO DETERMINE ACTUAL SWVEL
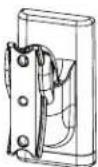
FULLY ASSEMBLED MOUNT
TOP VIEW - RETRACTED
3-D
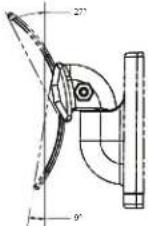
SIDE VIEW-EXTENDED
SIDE VIEW - RETRACTED
Supplied Parts and Hardware
WARNING: This product contains small items that could be a choking hazard if swallowed.
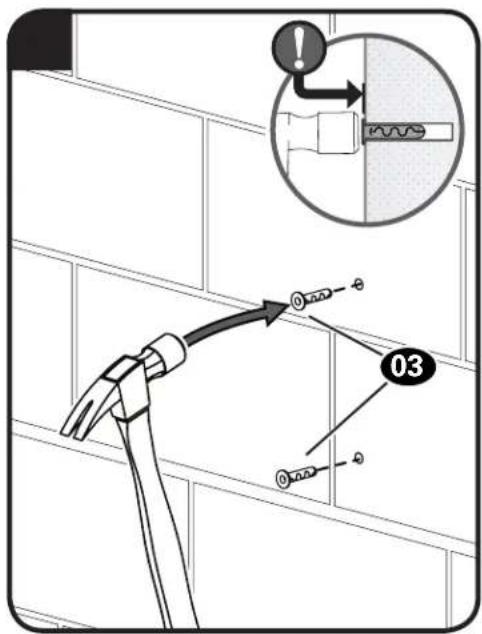
Before starting assembly, verify all parts are included and undamaged. If any parts are missing or damaged, do not return the damaged item to your dealer; contact Customer Service. Never use damaged parts!

NOTE: Not all hardware included will be used.
Quantities shown are for one speaker mount.
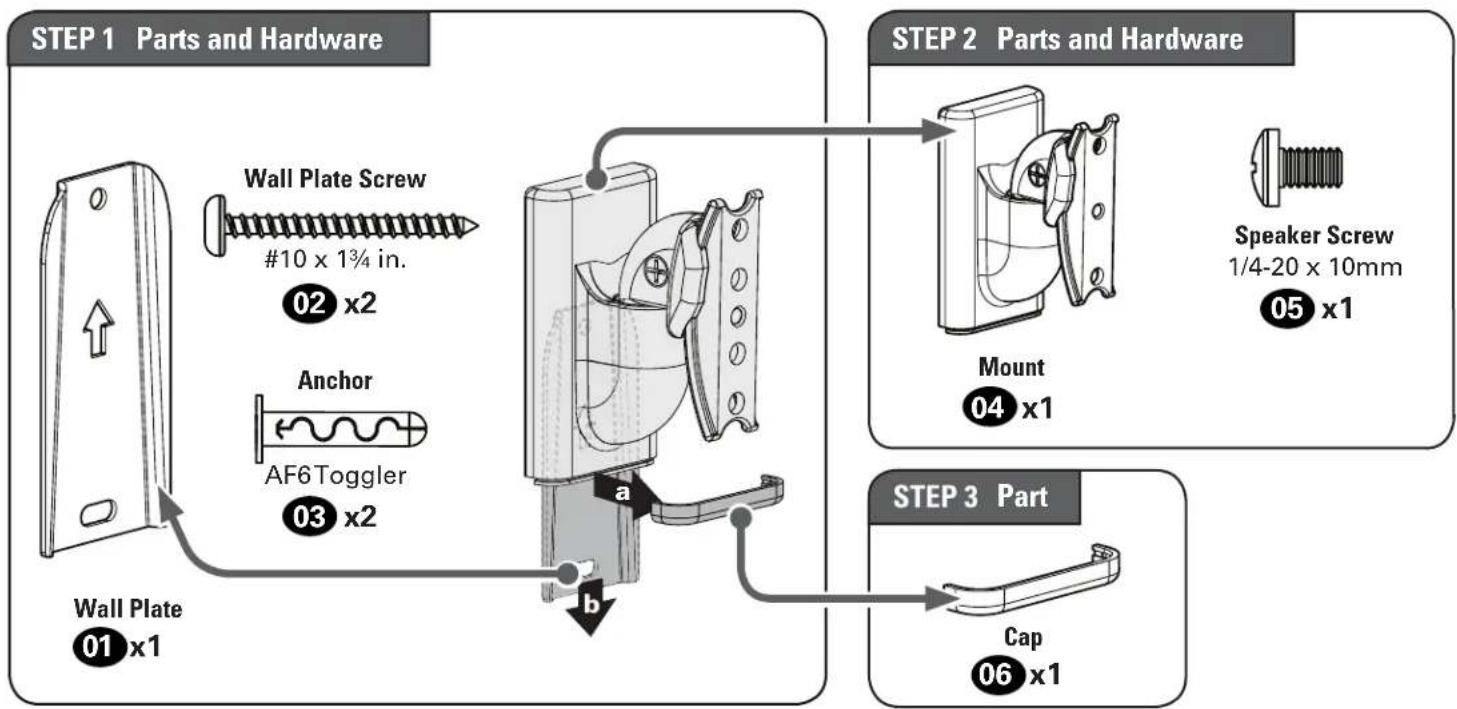
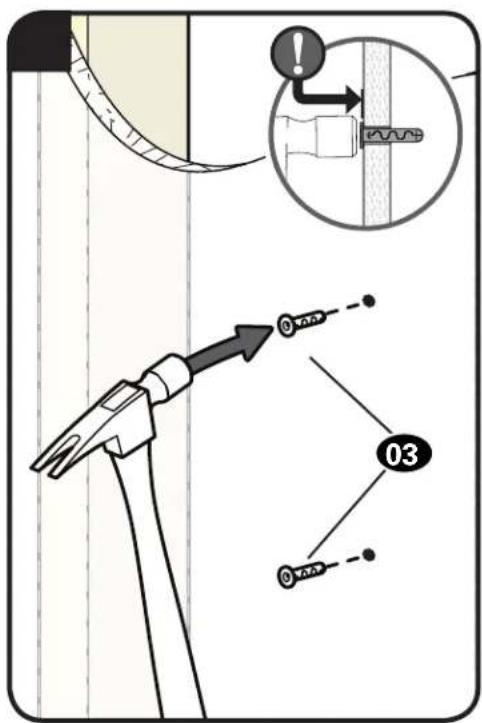
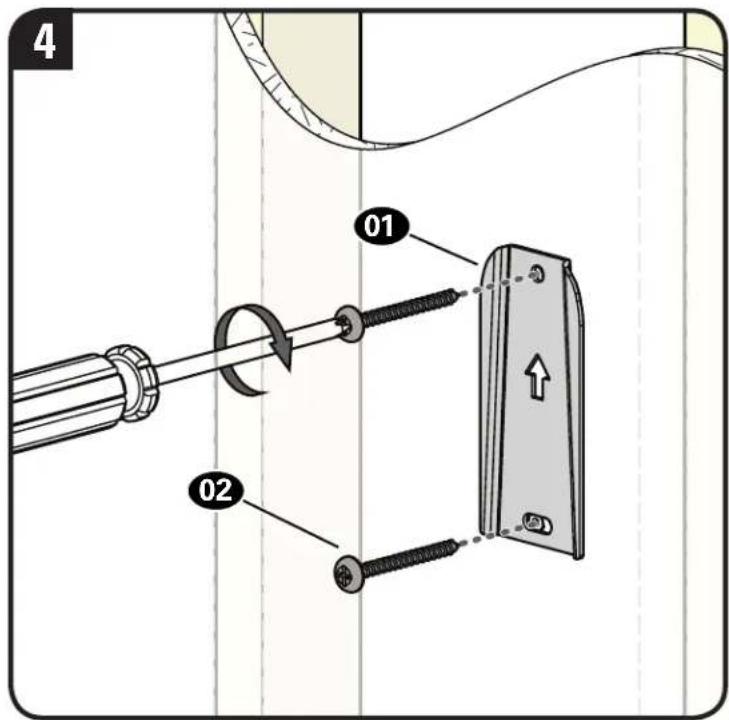
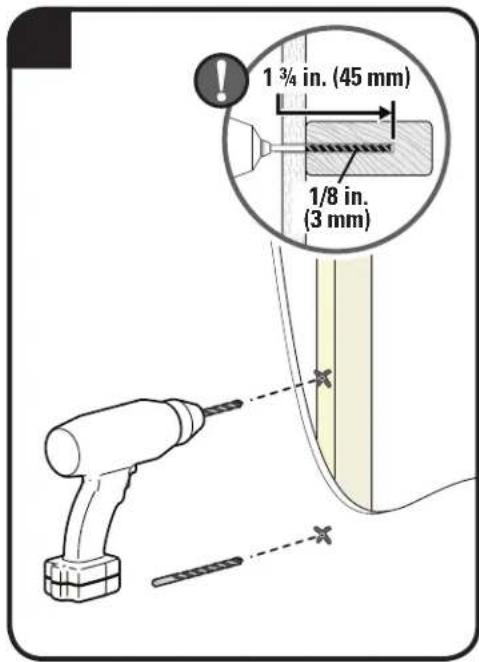
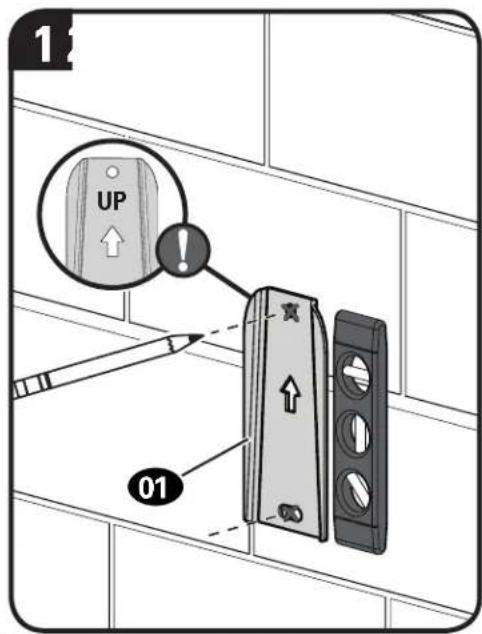
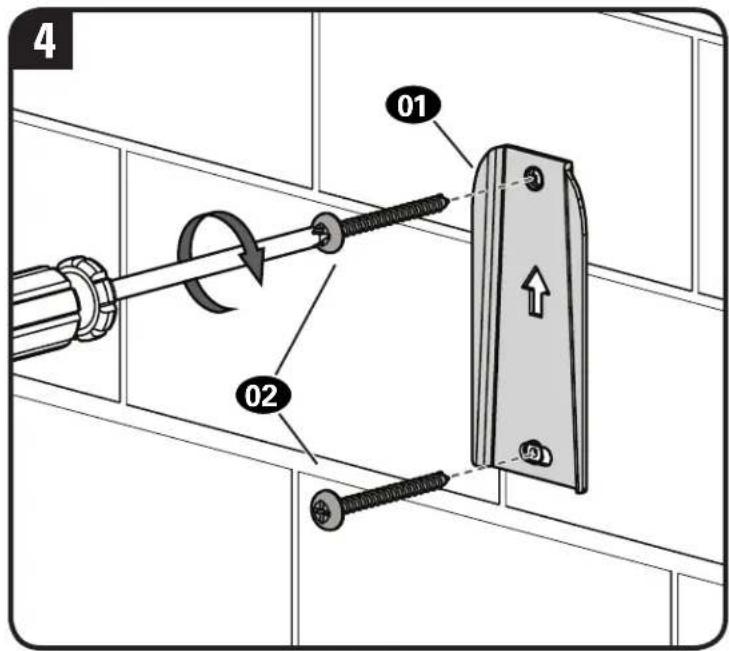
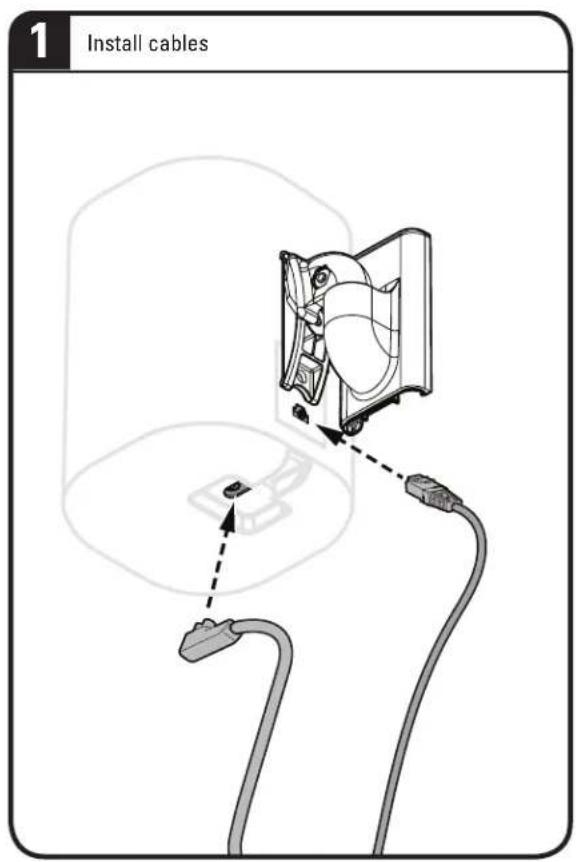
STEP1A
Drywall Only InstallationAttach W;
CAUTION: Avoid potential personal injury or property damage!
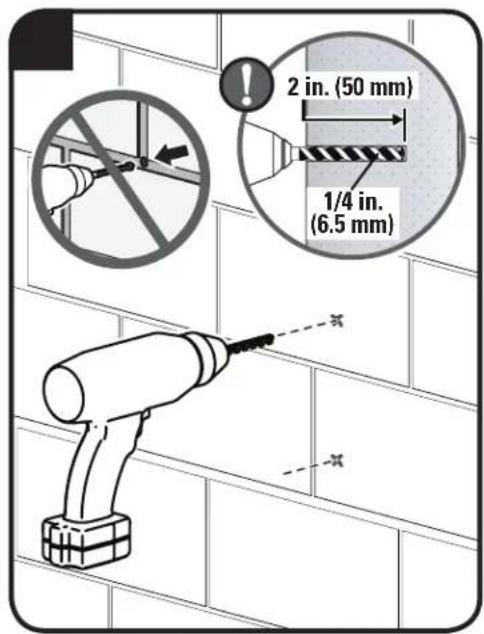
- Drywall covering the wall, must not be less than 1/2 in. (12.7mm)
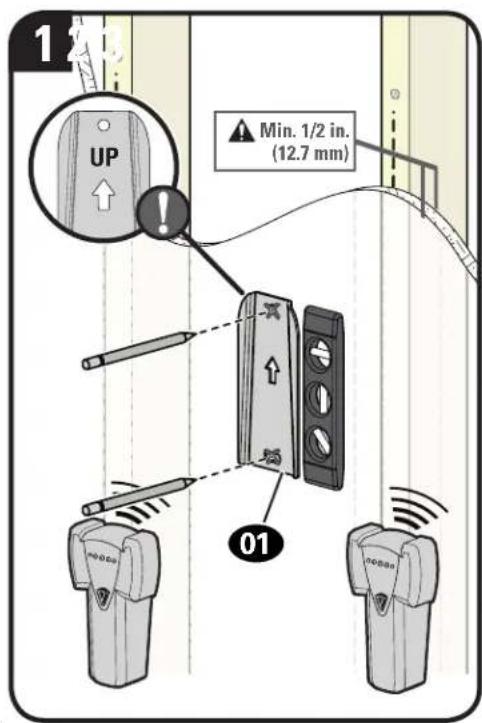


CAUTION: Avoid potential personal injury or property damage!
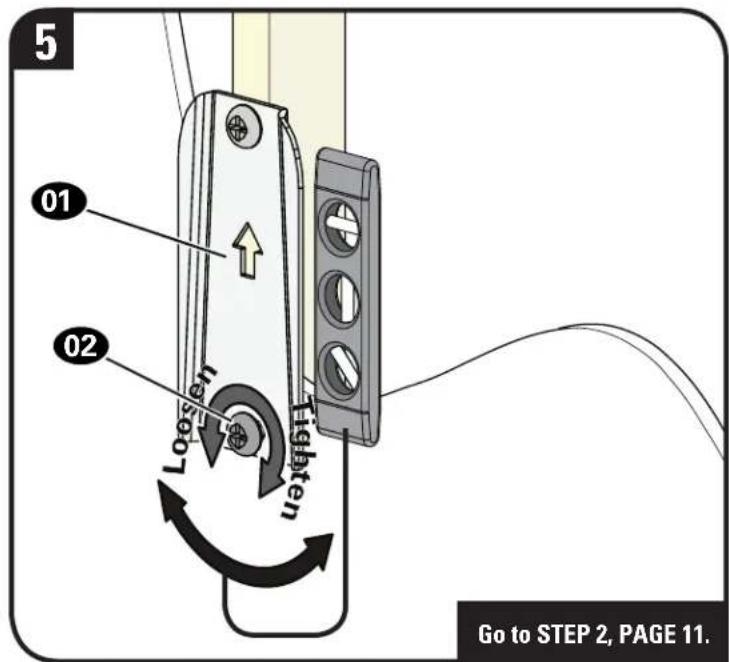
Both screws 02 MUST BE firmly tightened to prevent unwanted movement of the wall plate 01. Ensure the wall plate is securely fastened to the wall before continuing on to the next step.

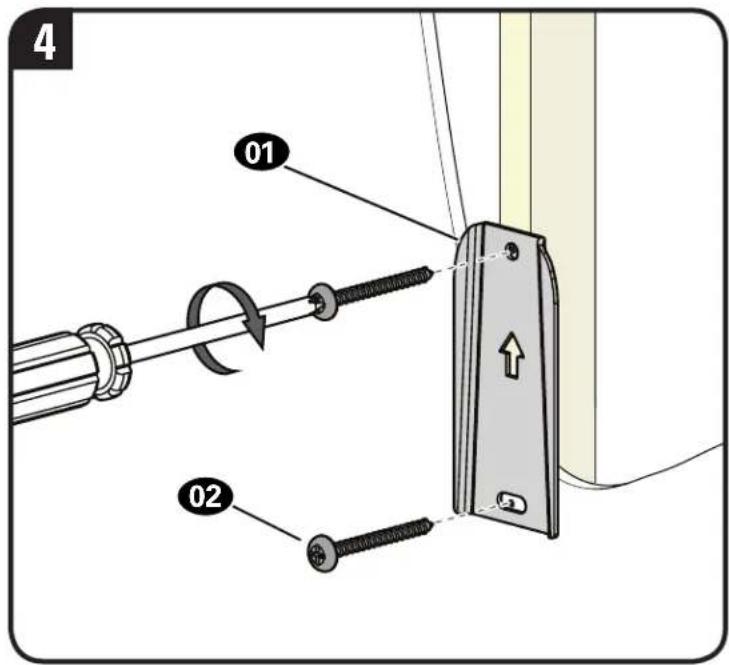
STEP1B
Wood Stud InstallationAttach Wall

CAUTION: Avoid potential personal injury or property damage!
- Drywall covering the wall, must not exceed 5/8 in. (16 mm)
Minimum wood stud size: nominal 2 × 4 in. (51 × 102 ~mm) actual 1 12 × 3 12 in. (38 × 89 ~mm)
Stud center must be verified


CAUTION: Avoid potential personal injury or property damage!
Both screws 02 MUST BE firmly tightened to prevent unwanted movement of the wall plate 01. Ensure the wall plate is securely fastened to the wall before continuing on to the next step.
STEP1C
Attach Wall Plate to Wall
Solid Concrete or Concrete Block Installation
CAUTION: Avoid potential personal injury or property damage!
- Mount the wall plat 01 directly onto the concrete surface (no wall covering)
Minimum solid concrete thickness: 8 in. (203 mm)
Minimum concrete block size: 8 × 8 × 16 in. (203 x 203 x 406 mm)
CAUTION: Avoid potential personal injury or property damage!
Both screws 02 MUST BE firmly tightened to prevent unwanted movement of the wall plate 01. Ensure the wall plate is securely fastened to the wall before continuing on to the next step.
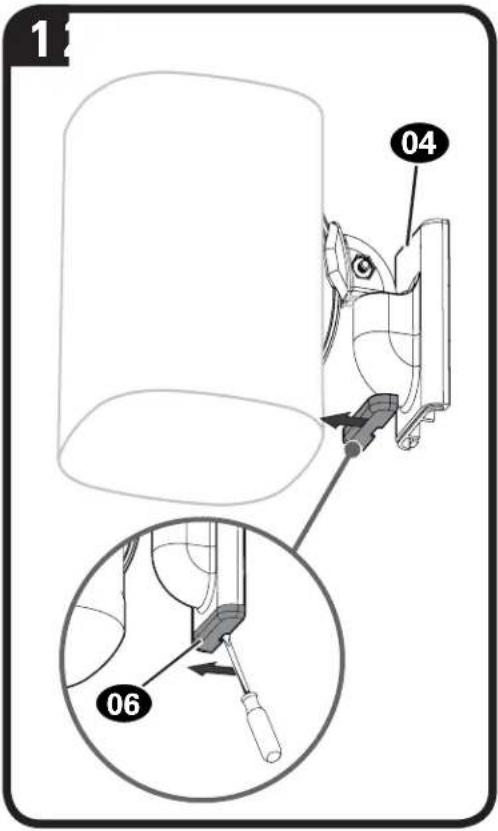
STEP2
Attach Mount to Speaker
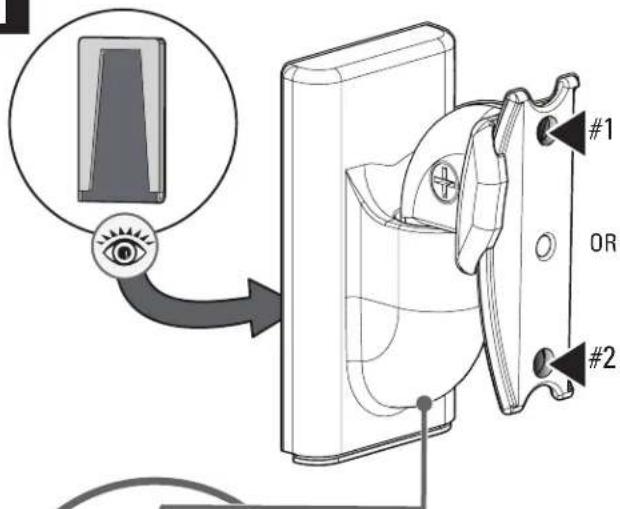
1
Speaker may be installed in either the right-side-up position a or up-side-down position b, depending on height placement.
a
b
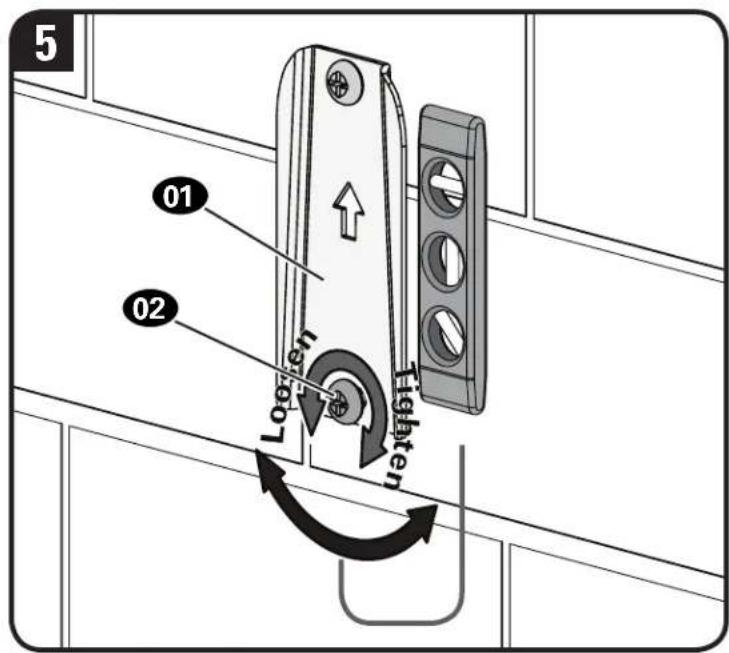
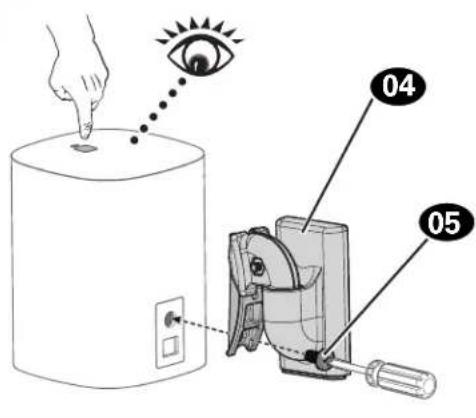
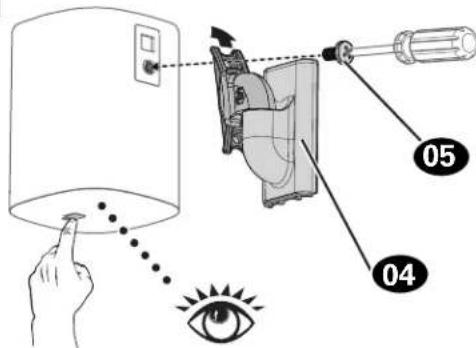
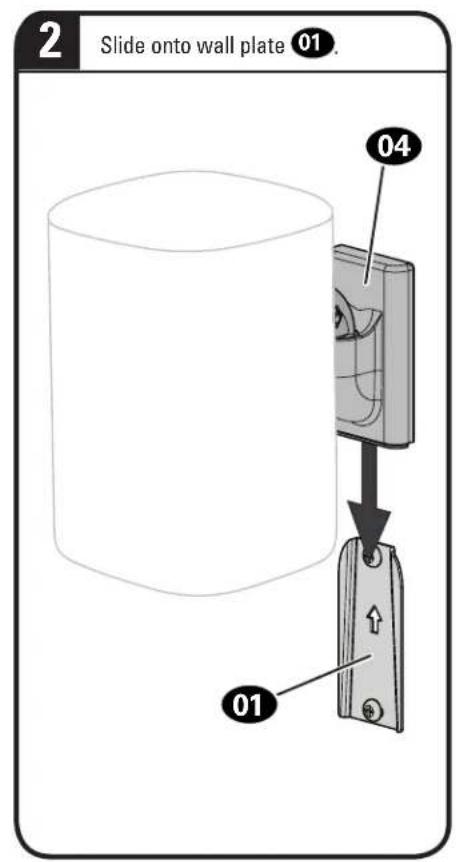
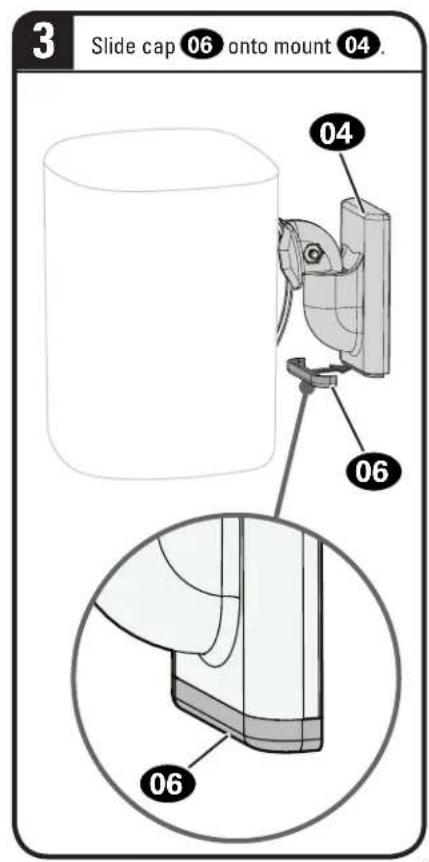
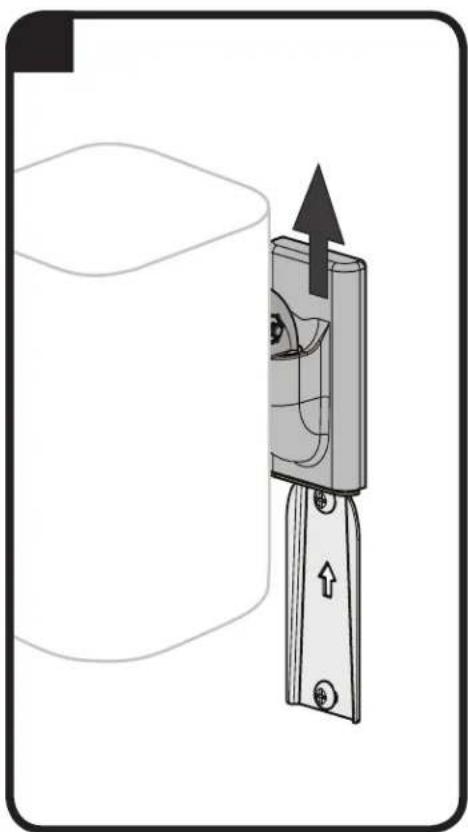
STEP3
Mount Assembly to Wall Plate
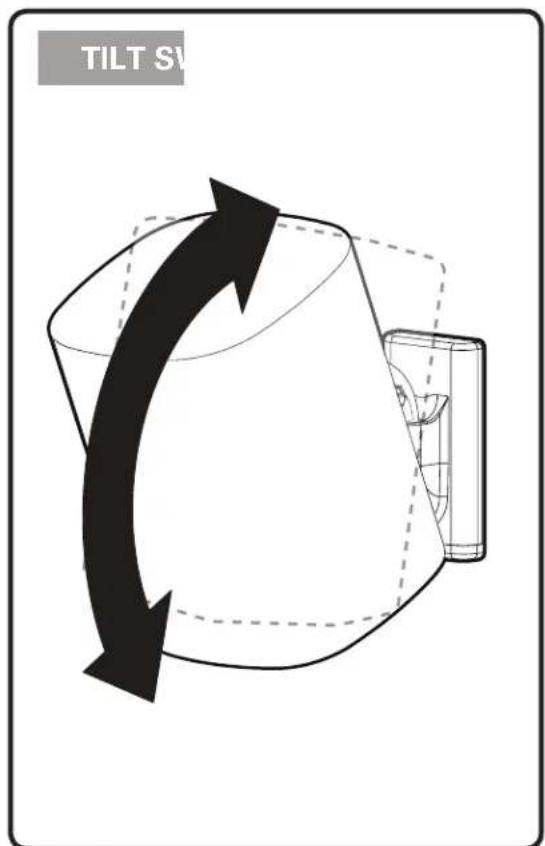
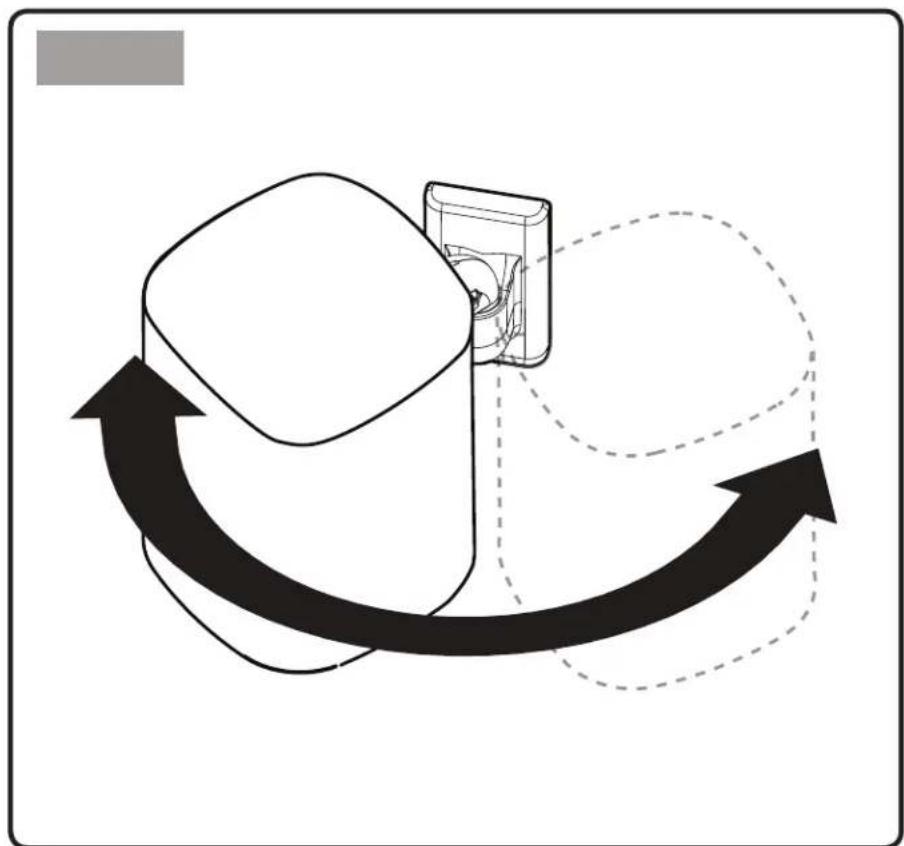
Adjustments
To Remove

ESPANOL
Pour retiree Page 15
DEUTSCH
KpenneHHe NaTeHHo n pIaTnbl K CTeHe
KpeneHne Ha cTeHy n3 6eToHa nn 6eToHHbIX 6nOKOB
BHIMAHHE! Co6nOaIte octopokhoCTb BO n36exhaHne noyehn TpaBM nnn nobpexdeHn mUyecTBA!
YCTAHOBHTHACTEHNYIOIINACTHH01 HENOCPECTBENHO Ha6eTOHHYIO NOBEPXHOCTb
MHHMaJIbHaTToJIuHnHa6eToHHoHcTeHbI:203MM(8JIOHMOB)
MHHMaJIbHbIpa3Mep 6eToHHoro 6noka:203x203x406 MM(8x8x16IOHMOB)
BHMMAHNE! CoHIOaIte OTOPOKHOCTB 0n36eKaHHe NOUYEHNE TpAM HIN NOBpeXeHNE HMyueCTBa!O6a BnHTa 12 HE05XoIMHO HaJEXHO 3aTHyTB, Yo6bI He DOnyCTtB HeKeNaTeBHorO CMeUeHHN HaCTEHNO pAChTHb01. NpeP TeM, KAK PeepTN K CTeDyoUeM yArq, Y6eHNTc8, YTO HAcTeHHa IINACTHHa HAdExHO 3aKpenneHa HA CTHe.
PYCCKM
2
PnpcoeHHeHnHaCTeHHoro KpenHnK KOJOnHKeWAr
cp. 12
PIMUEAHHE. No JeNaHHo KOHNO KMOHO yCTaHOBtB B NIOJOKeHne npBaO CTopoHO BBepx
a Hnnpaboi CTOpohn BHN3 b
WAR3
Thank you for choosing SANUS! Please take a moment to let us know how we did:
Milestone AV Technologies EMEA Headquarters
Franklinstraat 14
6003 DK Weert,
Netherlands
P: +31 (0) 495 580 852
UK: (0) 800 056 2853
SANUS.com
Milestone AV Technologies Australia Office
Unit 20/33 Meakin Road
Meadowbrook QLD 4131,
Australia
P: +61 (0) 732997000
Milestone Global Headquarters 6436 City West Parkway
Eden Prairie, MN 55344 USA
US: +1 (800) 359 5520
SANUS.com
Milestone AV Technologies and its affiliated corporations and subsidiaries (collectively, "Milestone"), intend to make this manual accurate and complete. However, Milestone makes no claim that the information contained herein covers all details, conditions, or variations. Nor does it provide for every possible contingency in connection with the installation or use of this product. The information contained in this document is subject to change without notice or obligation of any kind. Milestone makes no representation of warranty, expressed or implied, regarding the information contained herein. Milestone assumes no responsibility for accuracy, completeness or sufficiency of the information contained in this document.
©2018 Milestone AV Technologies. All Rights Reserved. SANUS is a division of Milestone. SANUS and the SANUS logo are registered trademarks. All other brand names or marks are used for identification purposes and are trademarks of their respective owners.