WSFME12 - Speaker stands SANUS - Free user manual and instructions
Find the device manual for free WSFME12 SANUS in PDF.

User questions about WSFME12 SANUS
0 question about this device. Answer the ones you know or ask your own.
Ask a new question about this device
Download the instructions for your Speaker stands in PDF format for free! Find your manual WSFME12 - SANUS and take your electronic device back in hand. On this page are published all the documents necessary for the use of your device. WSFME12 by SANUS.
USER MANUAL WSFME12 SANUS
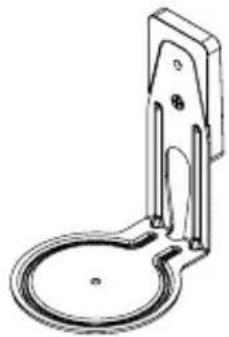
Fixed Speaker Wall Mount
For SONOS® Era 100™
INSTRUCTION MANUAL

We'll Make It Stress-Free
If you have any questions along the way, just give us a call.
US: +1 (800) 359-5520 - EMEA: +31 (0) 495 580 852 - UK: +44 (0) 800 056 2853
We're ready to help!
IMPORTANT SAFETY INSTRUCTIONS
- PLEASE READ ENTIRE MANUAL PRIOR TO USE - SAVE THESE INSTRUCTIONS
Before getting started, let's make sure this product is perfect for you!
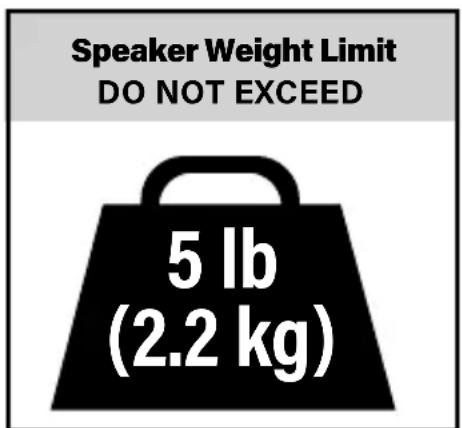
This mount is designed to support only Sonos® Era 100^TM speakers.
CAUTION: Avoid potential personal injuries and property damage!
- Check your speaker owner's manual to see if there are any special requirements for mounting your speaker.
- Please read through these instructions completely to be sure you're comfortable with this easy install process.
- Do not use this product for any purpose not explicitly specified by manufacturer.
- Manufacturer is not responsible for damage or injury caused by incorrect assembly or use.
- The wall must be capable of supporting five times the weight of the speaker and mount combined.
- If you do not understand these instructions or have doubts about the safety of the installation, assembly or use of this product, contact Customer Service at +1 (800) 359-5520 (EMEA: +31 (0) 495 580 852; UK: +44 (0) 800 056 2853).
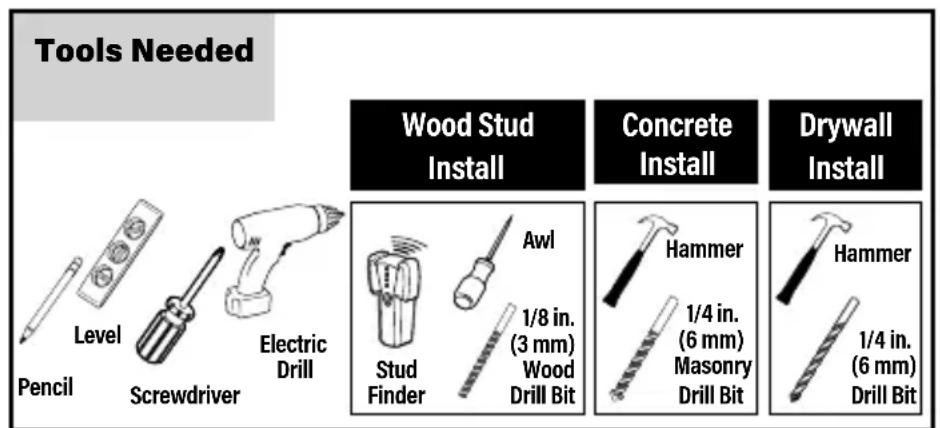
Supplied Parts and Hardware
WARNING: This product contains small items that could be a choking hazard if swallowed.
Before starting assembly, verify all parts are included and undamaged. If any parts are missing or damaged, do not return the damaged item to your dealer; contact Customer Service. Never use damaged parts!

NOTE: Not all hardware included will be used.
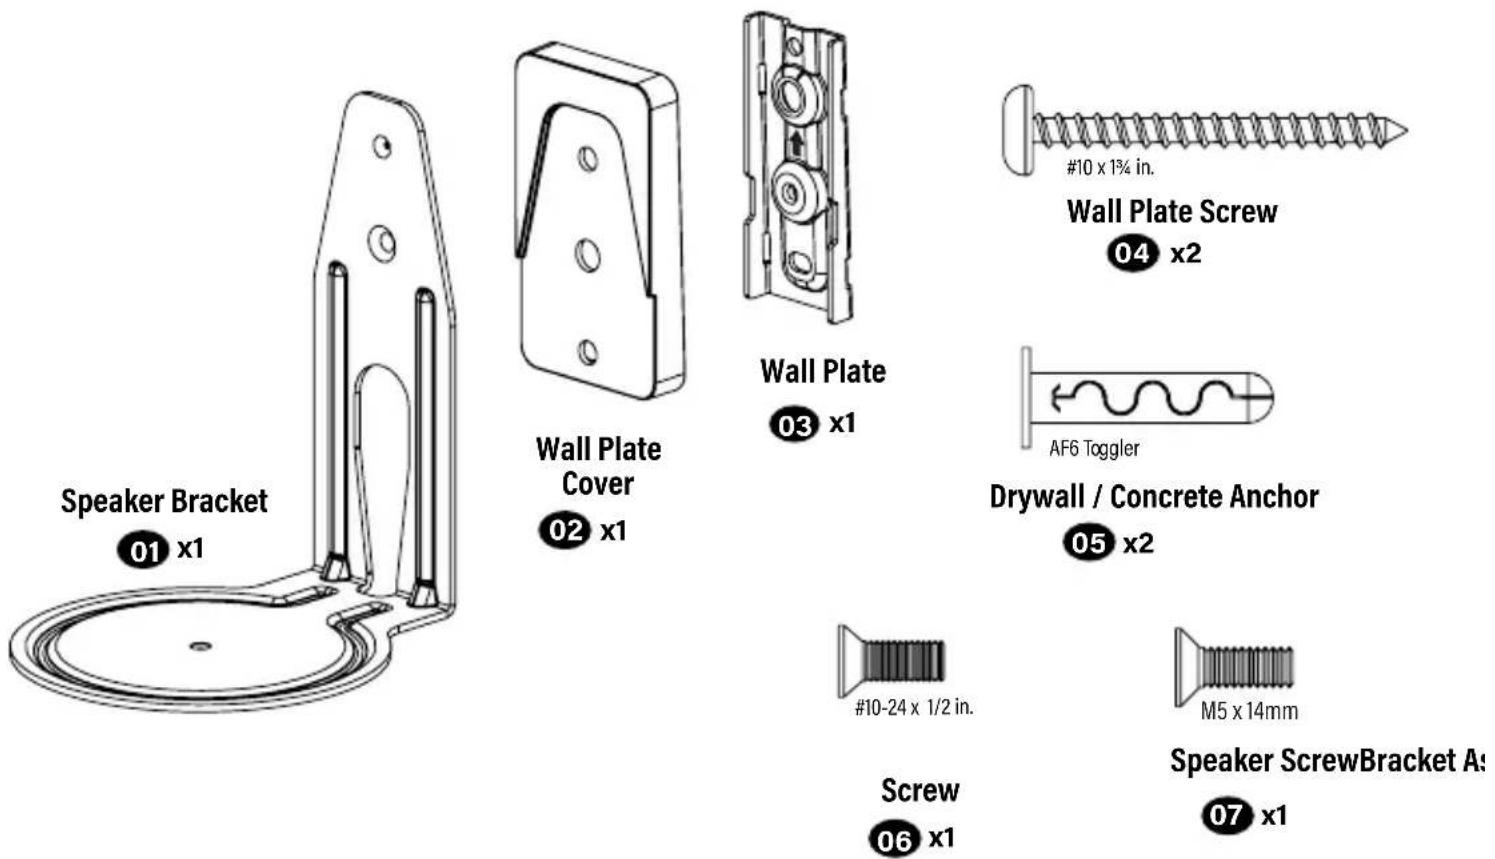
Quantities shown are for one speaker mount.
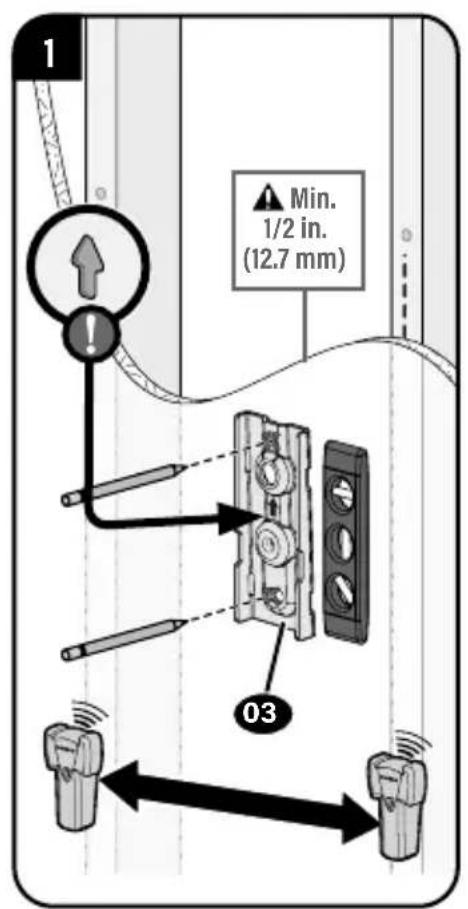
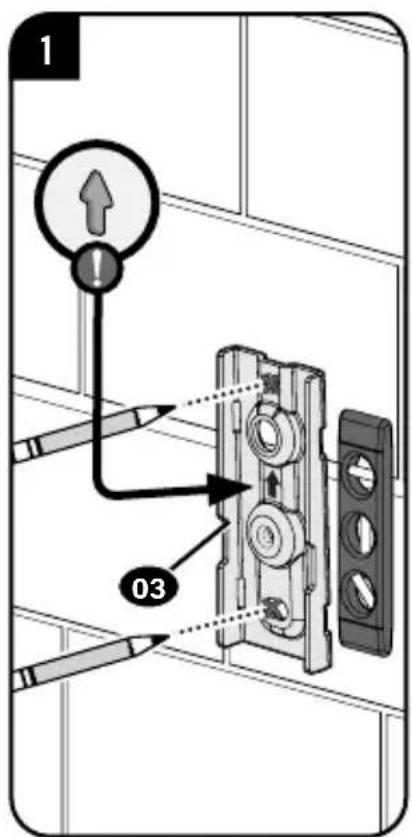
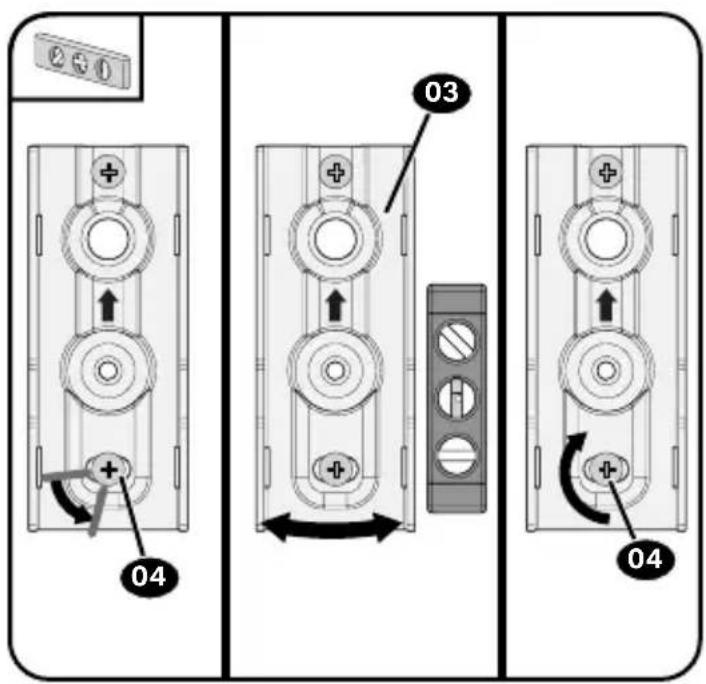
STEP1-A
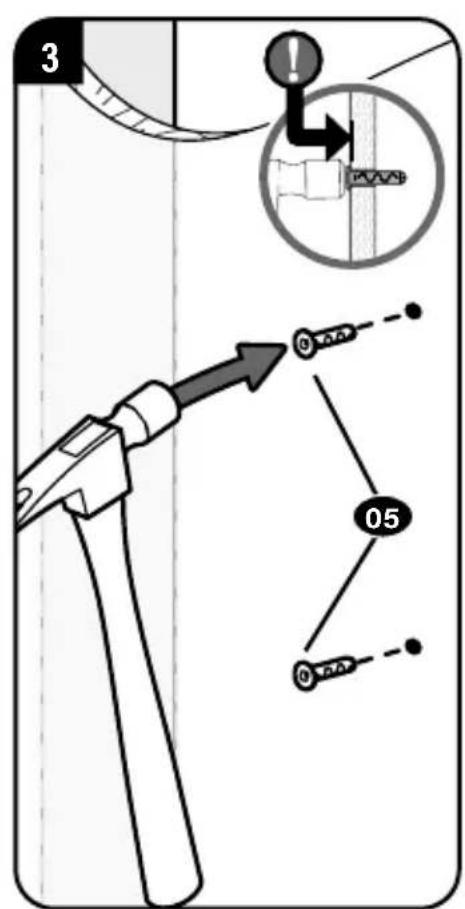
Drywall Only InstallationAttach

CAUTION: Avoid potential personal injury or property damage!
- Drywall covering the wall must not be less than 1/2 in. (12.7mm)
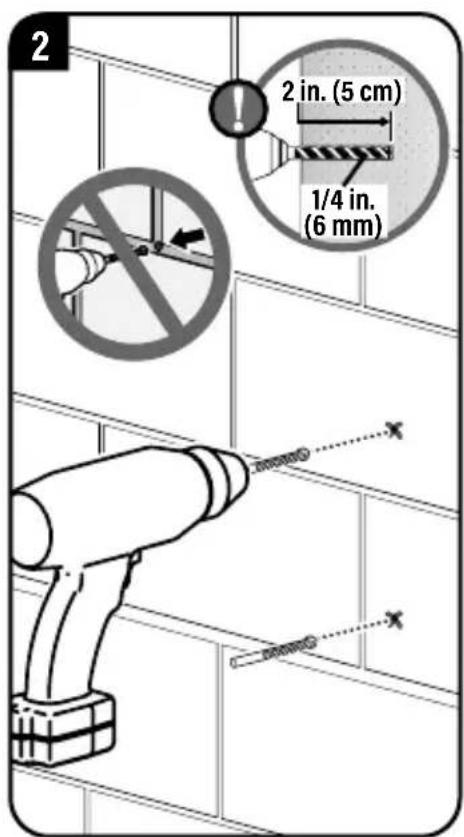
CAUTION: Avoid potential personal injury or property damage!
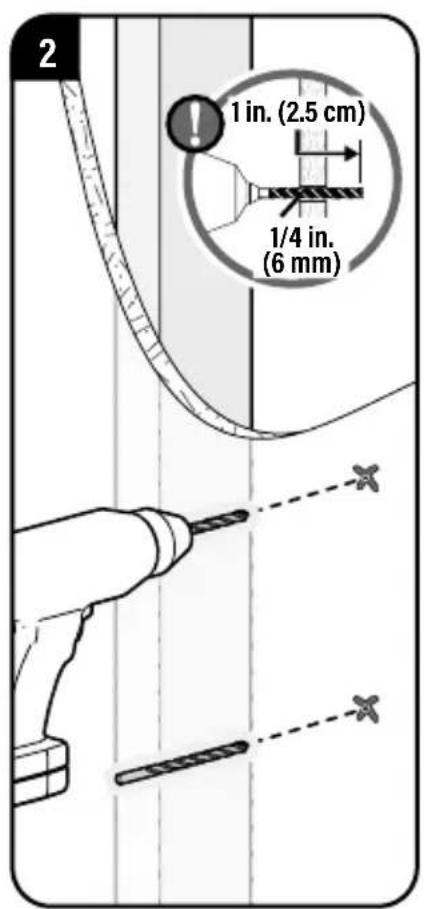
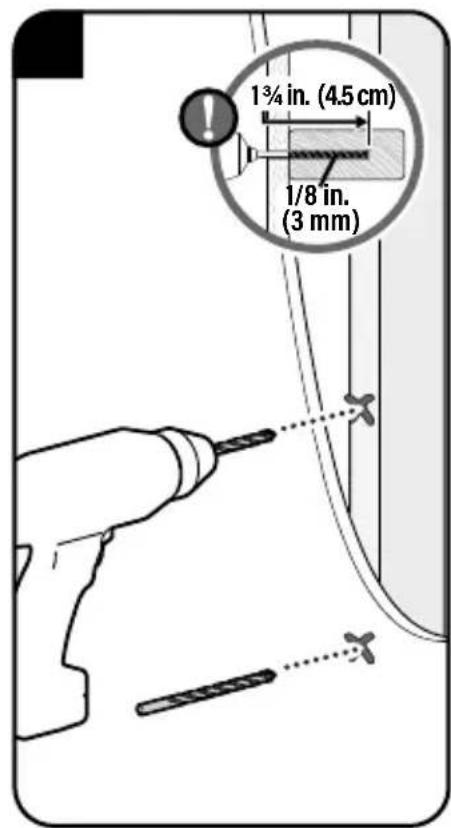
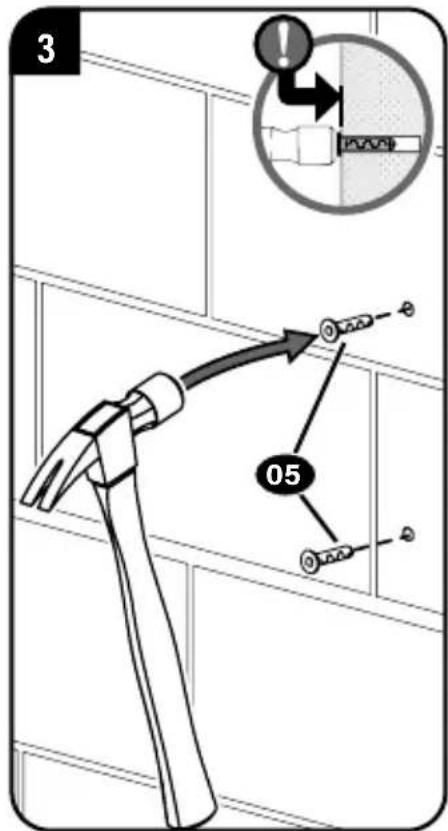
DO NOT use power tools for this step.
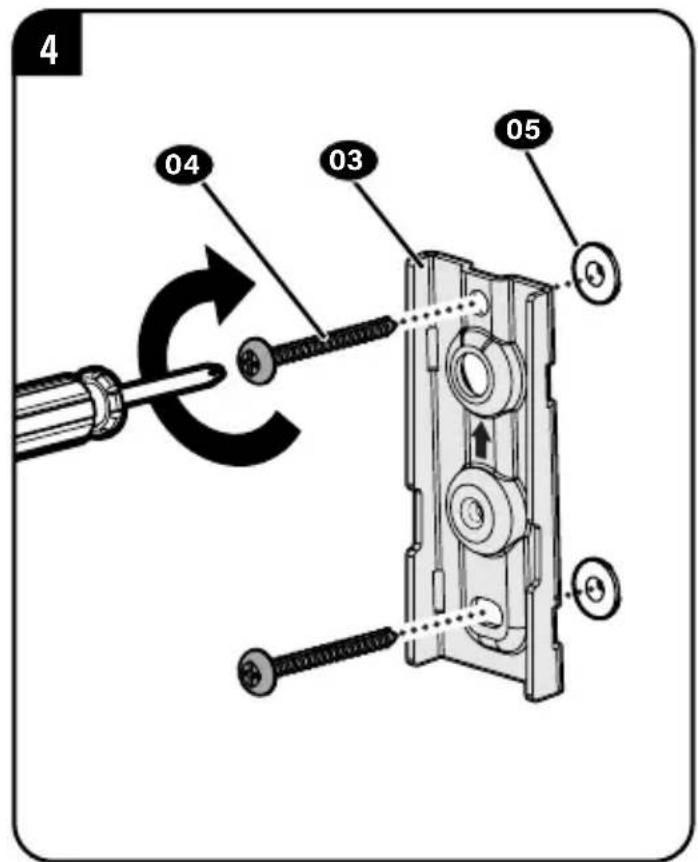
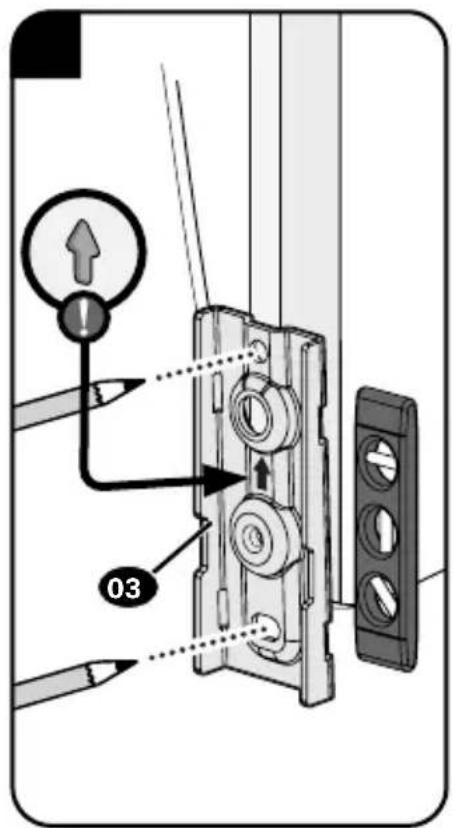
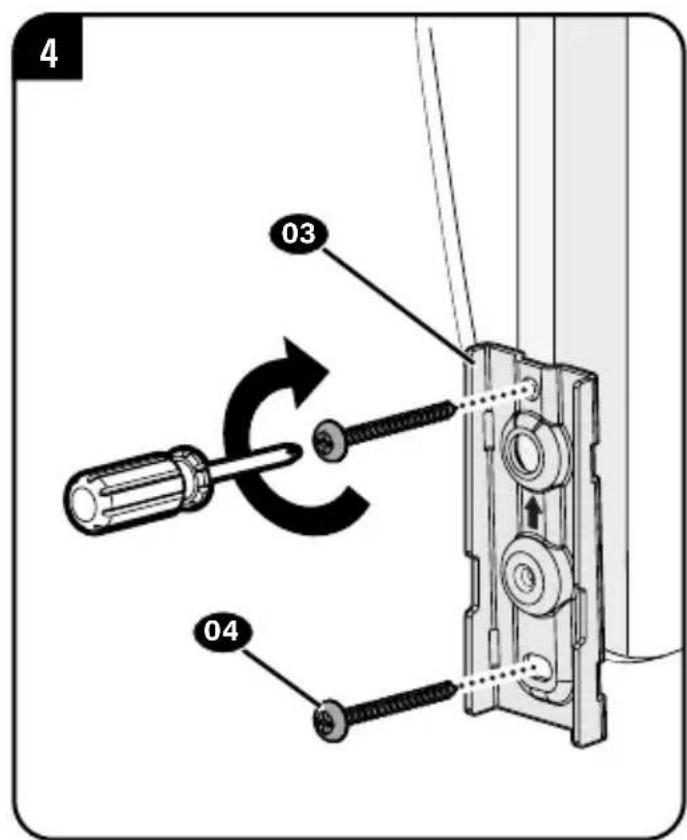
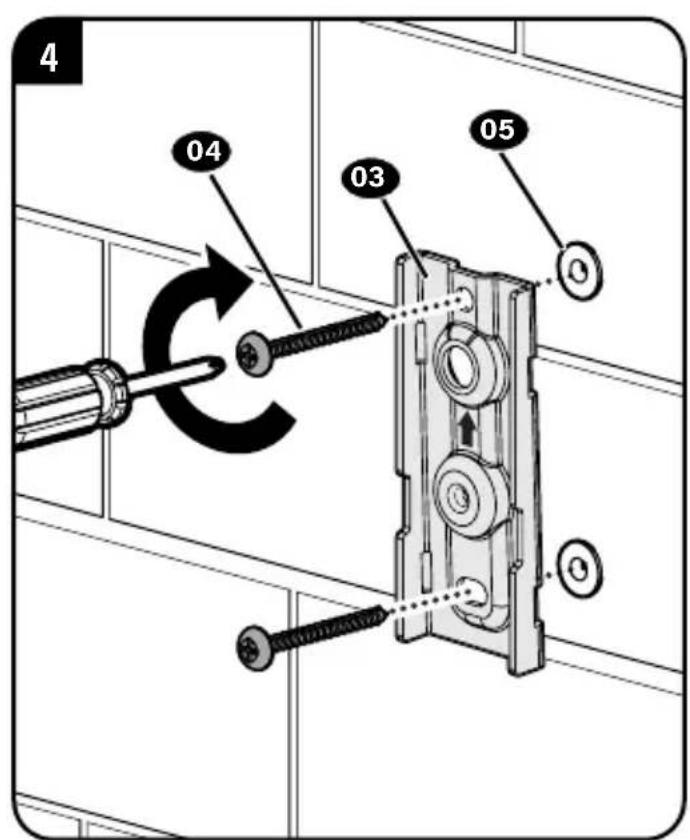
Both screws 04 MUST BE firmly tightened to prevent unwanted movement of the wall plate 03. Ensure the wall plate is securely fastened to the wall before continuing on to the next step, but DO NOT overtighten the screws.
STEP1-B
Attach Wall Plate to Wall
Wood Stud Installation
CAUTION: Avoid potential personal injury or property damage!
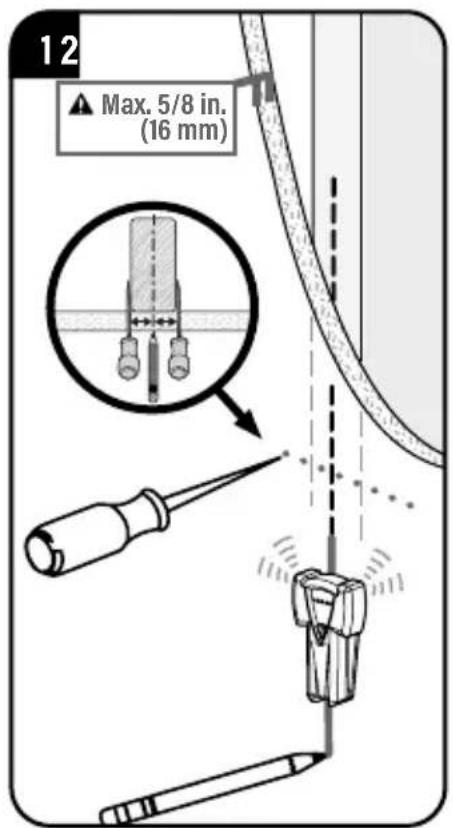
- Drywall covering the wall must not exceed 5/8 in. (16mm)
- Minimum wood stud size: nominal 2 × 4 in. (51 × 102 ~mm) actual 1 12 × 3 12 in. (38 × 89 ~mm)
Stud center must be verified
CAUTION: Avoid potential personal injury or property damage!
DO NOT use power tools for this step.
Both screws 04 MUST BE firmly tightened to prevent unwanted movement of the wall plate 03. Ensure the wall plate is securely fastened to the wall before continuing on to the next step, but DO NOT overtighten the screws.
STEP1-C
Attach Wall Plate to Wall
Solid Concrete or Concrete Block Installation

CAUTION: Avoid potential personal injury or property damage!
- Mount the wall plo3 directly onto the concrete surface (no wall covering)
Minimum solid concrete thickness: 8 in. (203 mm)
Minimum concrete block size: 8 × 8 × 16 in. (203 x 203 x 406 mm)
CAUTION: Avoid potential personal injury or property damage!
DO NOT use power tools for this step.
Both screws 04 MUST BE firmly tightened to prevent unwanted movement of the wall plate 03. Ensure the wall plate is securely fastened to the wall before continuing on to the next step, but DO NOT overtighten the screws.
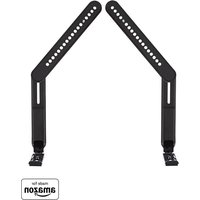
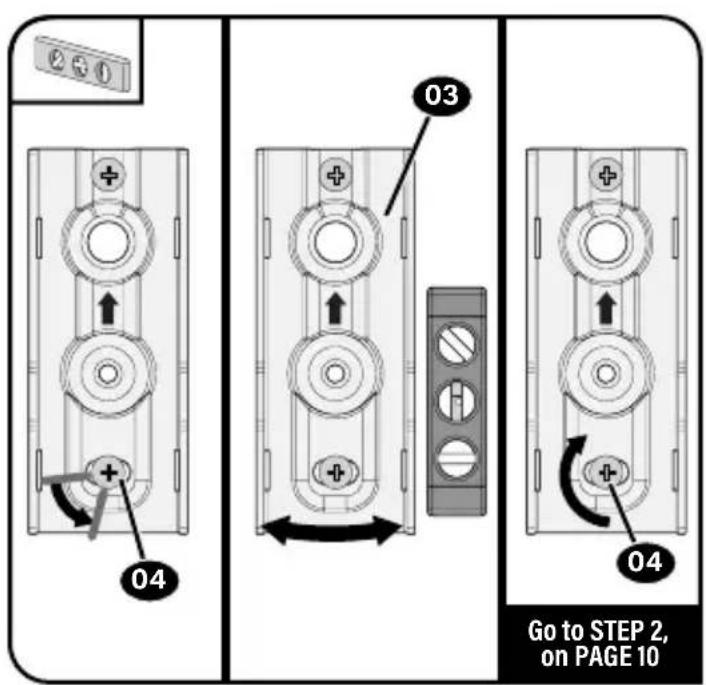
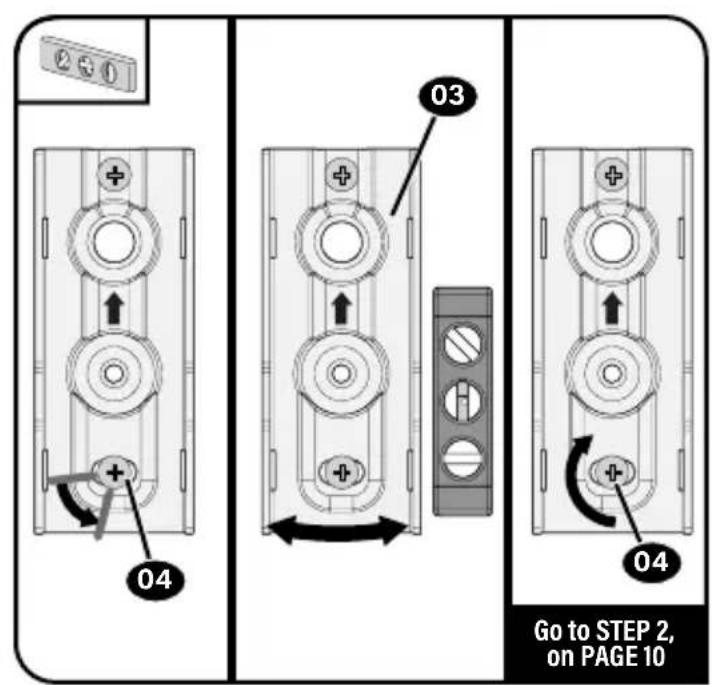
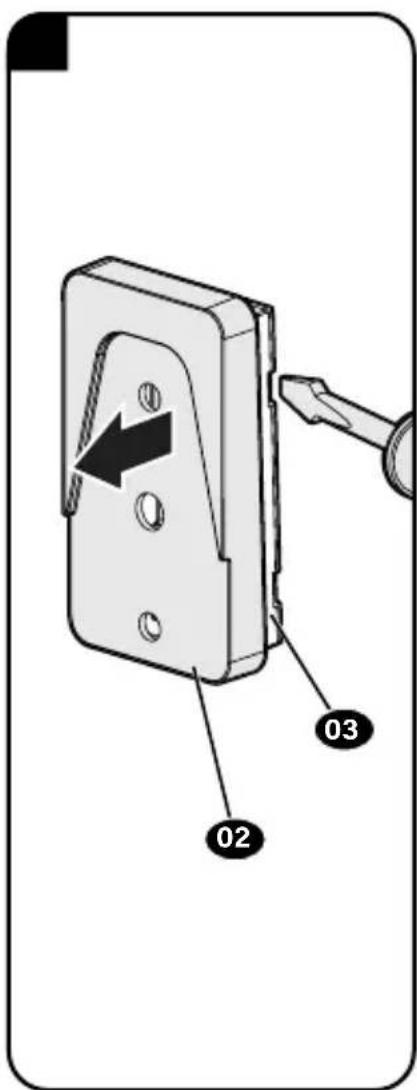
STEP2
Attach Bracket to Wall Plate

1
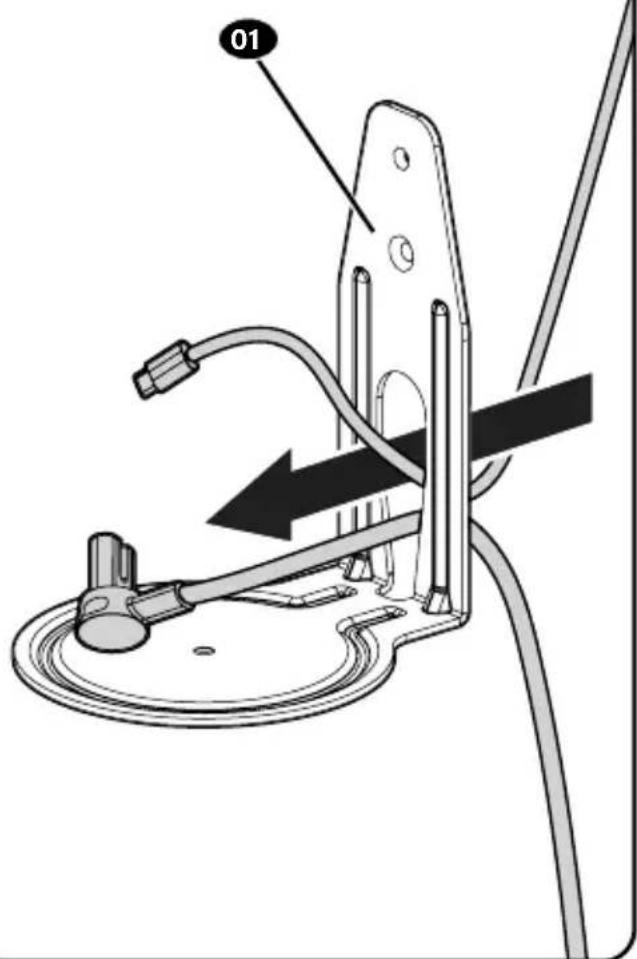
2
3

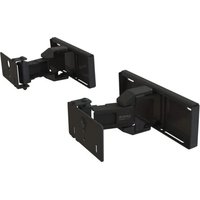
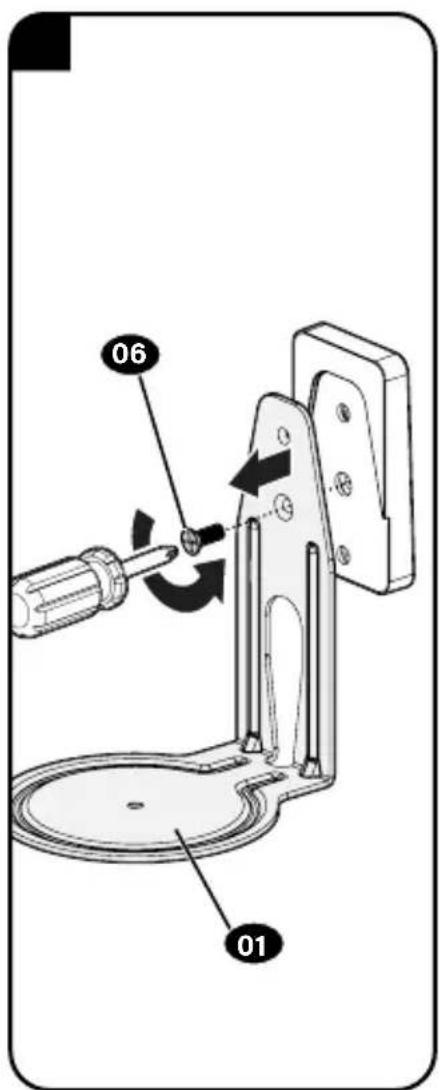
STEP3
Attach Your Speaker
1
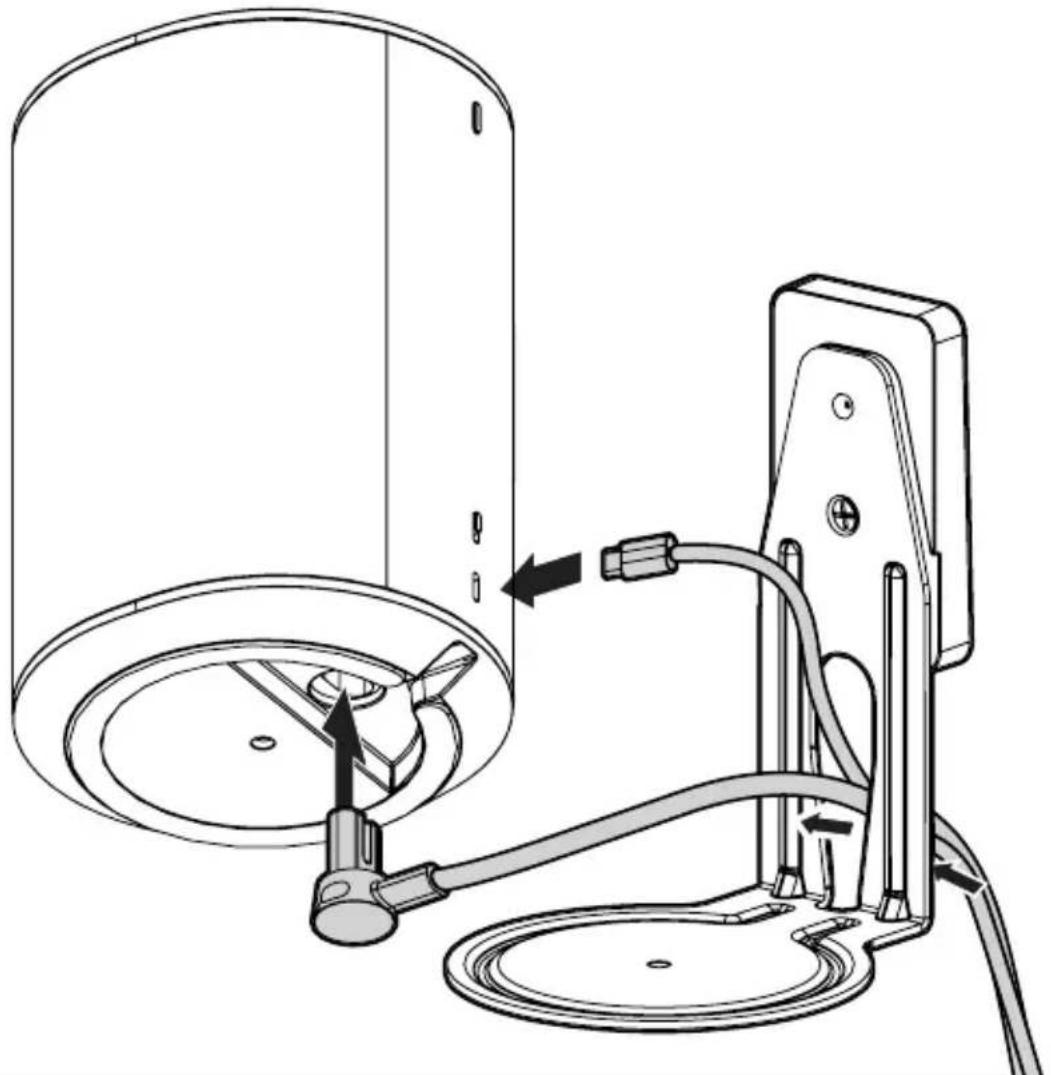

2
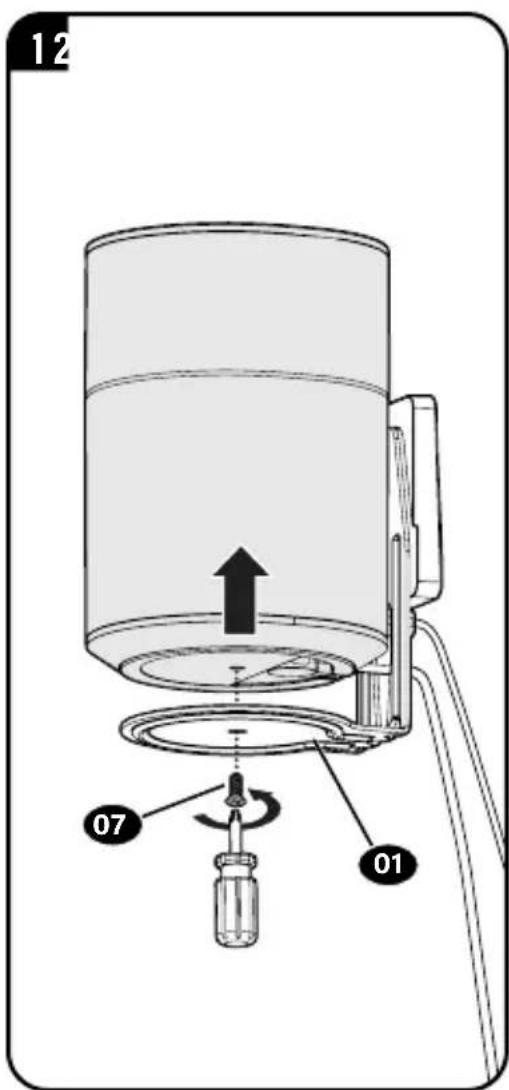
To Remove
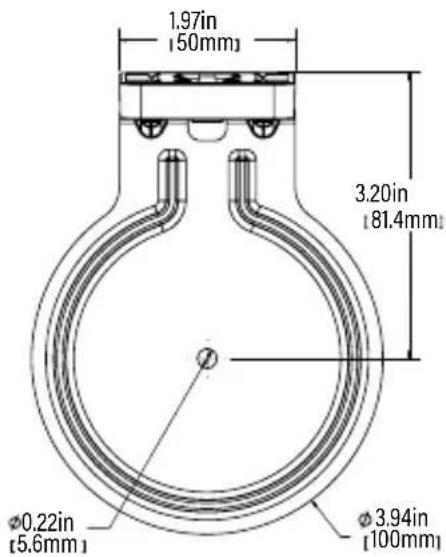
Dimensions
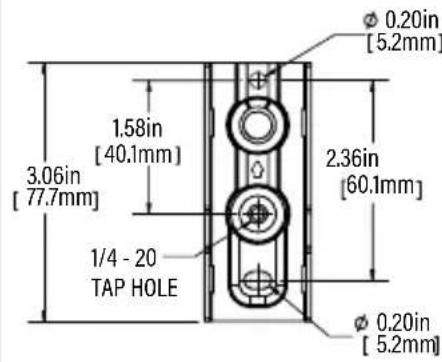
WALLPLATE
TOP VIEW
WALL IS ON TOP
3-D

FRONT VIEW
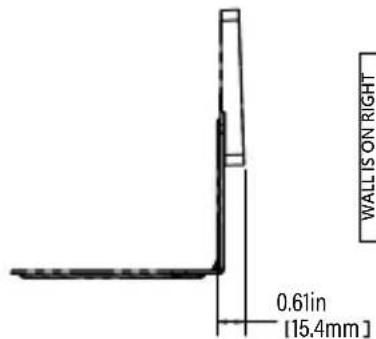
SIDE VIEW
ESPANOL
Fijar la placma mural a la pared
Opinion de tabique
pageina 4
Fijar la placma mural a la pared
Fijar la placma mural a la pared
Alternative for massiv belong ether belongblock
sidan 8
Ipeep c60pKo y6eDnTcB, yTO Bce dTeaH NMeOTcB H aHmUHN H He NobpeKeHb. Ecn KaKaJ-N6o DetAIB oTCyTCTByET Hn NobpeKeHa, He Bo3BaPauaIte H3dennne DnIepy; 6opatntcB BuHTp 6cnykuaHn KInHeTbO. He nONb3yIte NobpeKeHHbIe DetaII!
Yka3aHHbIe KOnuYeCTBa npEHa3HaYeHbI dIra OdHoi cToiKn.
UAT1-A
KpenneHHe HacteHHoN TnactInbI K cTeHe
Kpennnne Ha TmncokapToH
ctp. 4
BHUMAHNE! Co6nOaIte octopoxHcTb BO n36ExHne NOyehn TpaBM Hn NOBpeXeHn HMyueCTBa! ToIuHa rHncokapToHa, nOKpbIaIoero CTey, He doJxHa 6bITb MeHbIe 12,7 mm (1/2 DIOHa).
BHUMAHNE! Co6noJaTe OCTopoXHocTB Bo 36exaHHe NOUYeHn TpaBm HIN NobpeXeHn HMyueCTBa! HE nCNOJIb3yTe 3NeKTPoHNCTpyMeNTbI DAnHHo onepaun.06a BnHTa 0HE05XOIMHO NaEeKHO 3aTaNtB, YTObI He DOyCTnB HeKeNaTeNbHoro CMeUeHn HaCTeHNo PnAChNbI 03. IpepeTem, KAK NpeeyN K CneLyOeM yary, y6eHITcB, YTO NaCTeHn HnAactHa NaEeKHO 3akpenHe HA CTHe. HE 3aTARBAite BNHTbl CnHKOM CnLbNo. PepeJnteK WATY2 Ha CTPAHUE10.
UAT1-B
KpenneHHe HacteHHoN pIaCTnHbI K cTeHc
Kpennene Ha depeBHHbI cToiK
CTp. 6
BHUMAHNE! Co6nOaTe octopoxHocTB BO 36eKaHne nOnyehn TpaBM Hn NobpeXeHn HmUeCTBa! ToIuHa rHncokapToHa, NOKpbBAIOUero CTey, He OJIKHe IpeBbTaTb 16 MM (5/8 dIOHa). MHHMaIbHbPa3Mep DepeBAAHO CToIK:HomHaIbHb 51x 102 MM (2x4dIOHa); fakTHueckn 38x89MM (11/2x312doiMa). Heo6xoIMo npOBepntb pacCTOHN MeKdy CEHTpAM CTOE.
BHUMAHNE! Co6nOaTe octopokHooCT Bo H36eJahne nonyehn TpaBm Hnn NobpeJeHHN MyuocBa! HE nCnoB 3yIte 3NeKtpoHcTpyMeNTbI dAHHo onepaun.06a BnHTa 0HE05XIOHMo HaeKHO 3aTMyb, YTO6bI He donyctnb HeKeNaTeNbHOrO CmeueHNHaCTEHNO INaCTNHbI 03. NpepTeM, KAK NepeTN K cIeNyUoEmy Wary, y6eumTeCb, qTO hAcTeHHa IIaCTHaHa HaeKHO 3aKpeJIHe Ha CTHe.
HE 3aTnBaIte BnHTbCNIuKOM CnIbHo.
IpeiDHTe K IJAFY 2 Ha CTPAHILE 10.
MAT1-C
KpenneHHe HacteHHoN pIaCTnHbI K cTeHe
KpeHHeHa HteHy 36eToHa HnH 6eToHHbX 6NkoB ctp.8
BHUMAHNE! Co6nOaTe octopokHcTb BO m36exHaNe nOnyehn TpaBM Hn NobpeHn HmUeCTBa! yCTaHOHTe HaCTeHHYIO pNactHy 03 HeNoCpeDCTBeHHo Ha 6eToHHyIO nobepxHcTb. MInHMaJIbHa TOnuHa 6eToHHo CTeHb: 203 MM (8dIOIMOB). MInHMaJIbHbI pa3Mep 6eToHHoro 6Ioka: 203 x 203 x 406 MM (8 x 8 x 16 dIOIMOB).
BHUMAHNE! Co6IIOJaTe OeTOPOKHOCTb BO I36EkaHHe NOnyEHn TpaBm HIN NOBpeXeHn IMUeCTBa! HE IcNoJIb 3yIte 3NeKTPoHNCTpyMeNTbI dIaHHo Onepaun.06a BNHTa 0HE05XIOHMo HAdEHXO 3aTMyTB, YTO6bI He DOnyCTNb HHexeNaTeNbHOrO CMeueHn HAcTeHHo PnactHHo 03. IpeP TeM, KAK IpeepTN K CnelyuOeMy Wary, y6eNITcB, yTO HAcTeHHa IIaCTHa HAdEHXo 3aKpeNHe Ha CTHe. HE 3aTARBaTe BnHTb CIINIKOM CNbHO.
WAR2
Thank you for choosing SANUS! Please take a moment to let us know how we did:
Legrand AV Inc.
6436 City West Parkway
Eden Prairie, MN 55344 USA
US: +1 (800) 359-5520
Legrand AV Netherlands B.V.
Franklinstraat 14
6003 DK Weert Netherlands
UK: +44 (0) 800 056 2853
EMEA: +31 (0) 495580852
Authorized Representative for the UK
Starline Holding Technology Ltd.
Unit C Island Road
Reading RG2 ORP UK
Legrand AV Inc. and its affiliated corporations and subsidiaries (collectively, "Legend"), intend to make this manual accurate and complete. However, Legrand AV makes no claim that the information contained herein covers all details, conditions, or variations. Nor does it provide for every possible contingency in connection with the installation or use of this product. The information contained in this document is subject to change without notice or obligation of any kind. Legrand AV makes no representation of warranty, expressed or implied, regarding the information contained herein. Legrand AV assumes no responsibility for accuracy, completeness or sufficiency of the information contained in this document.
©2023 Legrand AV Inc. All rights reserved. SANUS is a brand of Legrand.
All other brand names or marks are used for identification purposes and are trademarks of their respective owners.