NikolaTesla Libra WHA83 - Cooker ELICA - Free user manual and instructions
Find the device manual for free NikolaTesla Libra WHA83 ELICA in PDF.
Download the instructions for your Cooker in PDF format for free! Find your manual NikolaTesla Libra WHA83 - ELICA and take your electronic device back in hand. On this page are published all the documents necessary for the use of your device. NikolaTesla Libra WHA83 by ELICA.
USER MANUAL NikolaTesla Libra WHA83 ELICA
Residual Heat Indicator
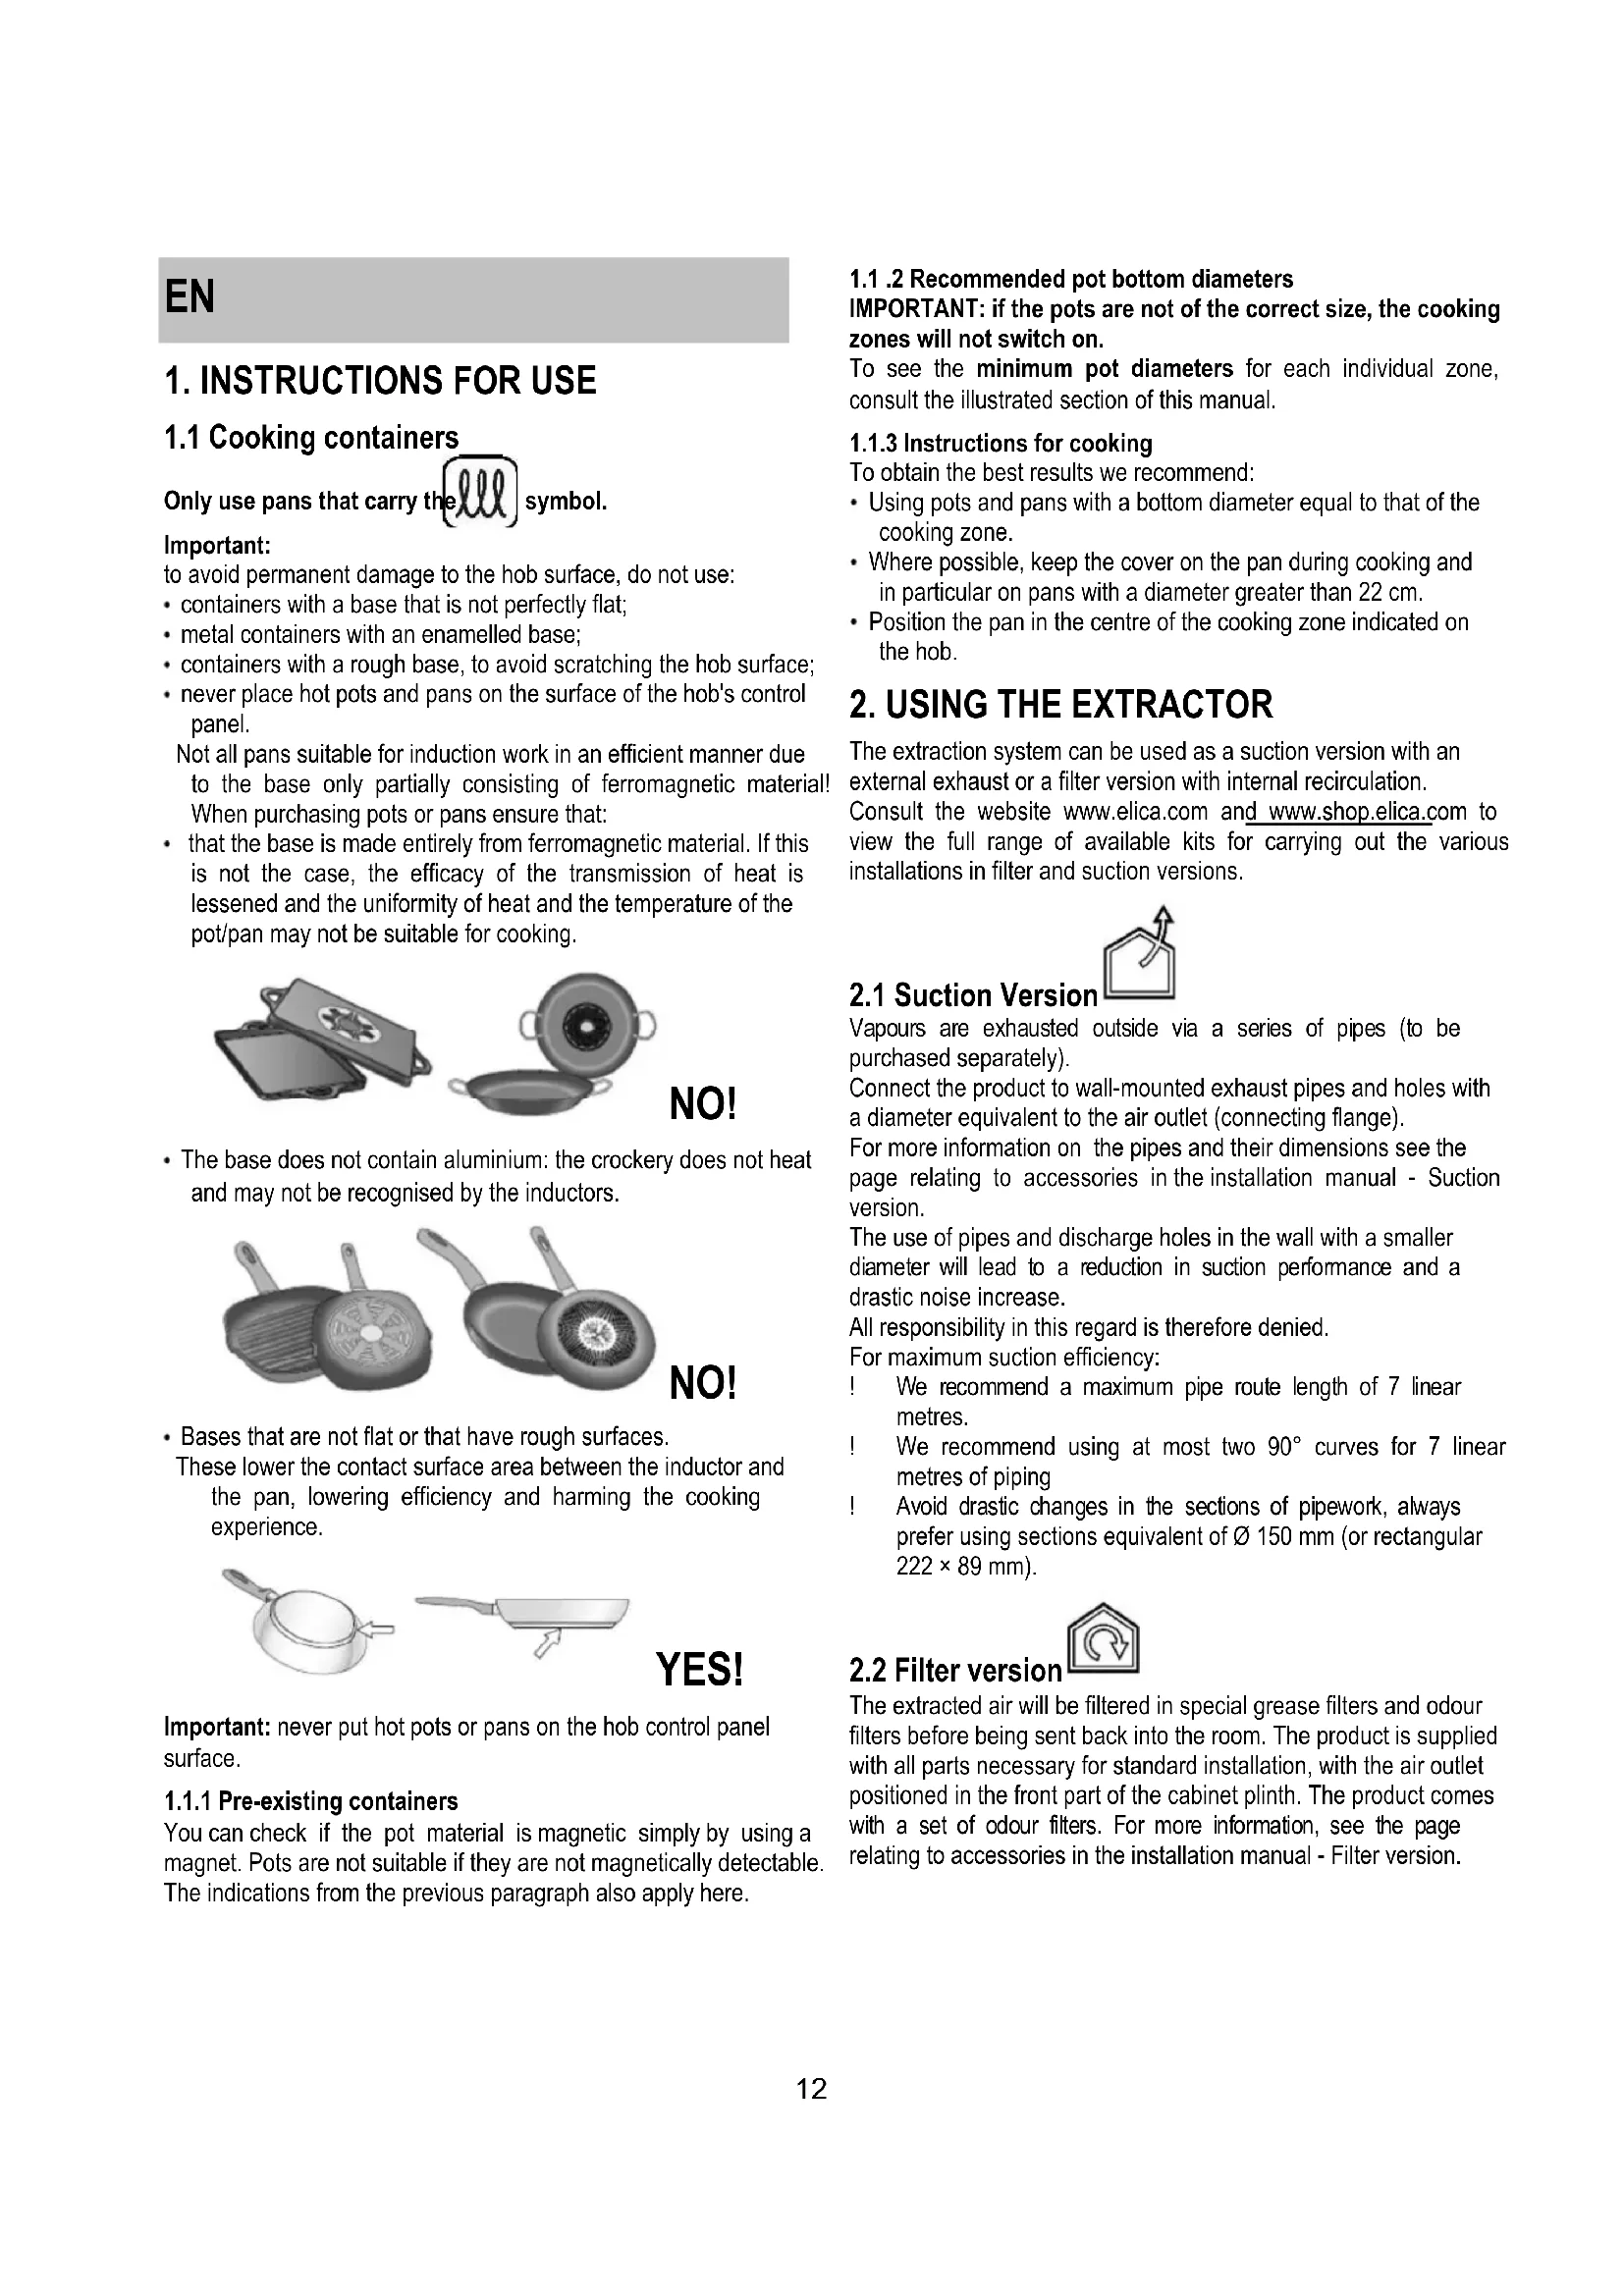
1.1 Cooking containers
Only use pans that carry the symbol. Important: to avoid permanent damage to the hob surface, do not use: containers with a base that is not perfectly flat; metal containers with an enamelled base; containers with a rough base, to avoid scratching the hob surface; never place hot pots and pans on the surface of the hob's control panel. Not all pans suitable for induction work in an efficient manner due to the base only partially consisting of ferromagnetic material! When purchasing pots or pans ensure that: that the base is made entirely from ferromagnetic material. If this is not the case, the efficacy of the transmission of heat is lessened and the uniformity of heat and the temperature of the pot/pan may not be suitable for cooking. NO! The base does not contain aluminium: the crockery does not heat and may not be recognised by the inductors. NO! Bases that are not flat or that have rough surfaces. These lower the contact surface area between the inductor and the pan, lowering efficiency and harming the cooking experience. YES! Important: never put hot pots or pans on the hob control panel surface.
1.1.1 Pre-existing containers
You can check if the pot material is magnetic simply by using a magnet. Pots are not suitable if they are not magnetically detectable. The indications from the previous paragraph also apply here.
1.1 .2 Recommended pot bottom diameters
IMPORTANT: if the pots are not of the correct size, the cooking zones will not switch on. To see the minimum pot diameters for each individual zone, consult the illustrated section of this manual.
1.1.3 Instructions for cooking
To obtain the best results we recommend: Using pots and pans with a bottom diameter equal to that of the cooking zone. Where possible, keep the cover on the pan during cooking and in particular on pans with a diameter greater than 22 cm. Position the pan in the centre of the cooking zone indicated on the hob.
2. USING THE EXTRACTOR
The extraction system can be used as a suction version with an external exhaust or a filter version with internal recirculation. Consult the website www.elica.com and www.shop.elica.com to view the full range of available kits for carrying out the various installations in filter and suction versions.
Vapours are exhausted outside via a series of pipes (to be purchased separately). Connect the product to wall-mounted exhaust pipes and holes with a diameter equivalent to the air outlet (connecting flange). For more information on the pipes and their dimensions see the page relating to accessories in the installation manual - Suction version. The use of pipes and discharge holes in the wall with a smaller diameter will lead to a reduction in suction performance and a drastic noise increase. All responsibility in this regard is therefore denied. For maximum suction efficiency: ! We recommend a maximum pipe route length of 7 linear metres. ! We recommend using at most two 90° curves for 7 linear metres of piping ! Avoid drastic changes in the sections of pipework, always prefer using sections equivalent of Ø 150 mm (or rectangular 222 × 89 mm).
The extracted air will be filtered in special grease filters and odour filters before being sent back into the room. The product is supplied with all parts necessary for standard installation, with the air outlet positioned in the front part of the cabinet plinth. The product comes with a set of odour filters. For more information, see the page relating to accessories in the installation manual - Filter version.13
2. Selection of the cooking zones / Cooking zone display
Increase/decrease cooking power level and extraction speed (power) Display the cooking power level and extraction speed (power)
5. Increase/Decrease
8. Temperature Manager activation (Warming Function)
12. Extractor Selection/Activation
3.2.1 Things to know before starting
This manual describes the main functions. Use the QR code at the front of the manual to access the full instructions online. All the functions of this hob respect the most rigorous safety norms. For this reason: Some functions do not activate, or deactivate automatically, if pans are removed or when they are incorrectly positioned on top of the hob. In other cases functions deactivate automatically after a few seconds when the selected function requires further settings that have not been input. Wait for the display to turn off before approaching the cooking zone.
3.2.2 Cooking zone display
On the displays relating to the cooking areas, the following is indicated: Cooking zone on
Residual Heat Indicator
Bridge Function active
Temperature Manager Function active
Safe Activation: The product is activated only in the presence of pots on the cooking zone: the heating process does not start or is interrupted if there are no pots, or if these are removed. Pot Detector: The product automatically detects the presence of pots on the cooking zones. Safety Shut Down: For safety reasons, each cooking zone has a maximum operating time, which depends on the maximum power level set. Residual Heat Indicator: When switching off one or more cooking zones, the residual heat is indicated with a specific visual signal on the display of the corresponding zone by the " " symbol.
Note: activate the required zone first Switching on: Briefly touch ON/OFF (1) hob/extractor: the symbol will light up; with a long press, all available functions will be visible for a few moments, after which only the main ones will remain active; the others may be used, and are activated subsequently during use of the device. Press ON/OFF (1) again to switch off. Selecting the cooking zones Press (touch) briefly the Selection/Display (2) area corresponding to the desired cooking area. Power Level Touch and slide your fingers along the Selection bar (3): to the right to increase the power level; to the left to decrease the power level. The power level set will be displayed in the Selection/Display area (2) There are 9 power levels available + an intensive power level Power Booster). Power Booster) remains active for 5 minutes, after which the power returns to the previous level. Bridge Zones: The cooking zones FL ( ) and RL Secondary FR ( ) and RR Secondary can work as a pair or in combined mode creating a single zone thanks to the Bridge function (2 in total: 1 on the right and 1 on the left) with the same power level. This function allows evenly distributed cooking with large-sized pots and pans. To activate the Bridge Function: - select both cooking zones to be used simultaneously - on the Display (2) of the symbol appears - using the Selection bar (3), it will be possible to set the Operating power level, which will be shown in the Display (2) of the "Master - to disable the Bridge Function all you have to do is to repeat the activation procedure Power Limitation The Power Limitation function allows the product to be used while limiting its maximum consumption. Note : the setting must be carried out with the machine switched off, without pressing the ON/OFF (1) button, at the moment the hob is connected to the electrical system, or within 2 minutes of reconnecting to the electrical system. To set the Power Limitation: - press (which will flash, usually for the first 2 minutes after powering the product on) - continue to press and hold , press all the areas, one at a time, of the Selection/Display (2) of the Cooking Zones in a clockwise direction starting from the front right zone (FR)
- on each press a brief audible signal will sound - once all of the Display (2) has been pressed, the button can be released: - the Display (2) of the Right Left (RL) zone will display in an C 0 carried out: select the Display (2-RL) then slide on the Selection Bar (3), until the display shows the symbols C 8 on the Display (2-FL) the current setting will by shown 0 = 7.4 KW (default setting) 1 = 4.5 KW 2 = 3.1 KW To change the Power Limitation setting - press the Display (2) on the Front Left (FL) zone - then slide on the Selection Bar (3) to make the new setting - to save the selection made, press the ON/OFF (1) button for 2 seconds; an extended audible signal will be emitted to confirm the setting.15
3.2.5 Use of the scale
Indicator of the unit of measurement in use
The product is equipped with a scale for food incorporated IMPORTANT: when using the scale with pots or containers larger than Ø 20cm, it is advisable to switch off the suction of the hood in order to avoid affecting the measurement of the weight; NOTE = The pot or container must always be centred on the weighing area, avoiding to obstruct the suction area. NOTE = the maximum load of the scale is 10KG; consider a tolerance of +/-2g on the value of each individual weighing. Operation -on To activate the scale tap the weighing area (16) or place the product to be weighed on the area itself; the display (22) activates showing a weight equal to zero or equal to the weight of the product NOTE = if in the weighing area are already present products and these are removed, the scale will activate showing the weight of the product removed with a negative sign; vice versa, if you add other products, the scale will activate showing only the weight of the last product added
The scale switches off automatically: - after 2 minutes, if there are no objects on the weighing area - after 8 minutes, if there are objects on the weighing area
The scale is set by default on the metric measurement system, in grams; press "UNIT" (20) to change the unit of measurement; the unit of measurement in use is displayed below the display of the scale, in the display (24)
The function 'ZERO' (19) allows to bring "to zero" the numeric display of the scale, whether there are products in the weighing area or not (15); NOTE = the indicator ZERO (23) goes off when products are added or removed from the weighing area (and the weight of the products will be shown);
The function "TARE" (18) allows to gradually weigh different foods without having to remove them from the weighing area, and be able to have both the weight of each single food that total weight use: - position the first product in the weighing area, the display (22) displays the weight "1" - press "TARE" (18), the weight in the display (22) is reset - add another product in the weighing area, the display (22) displays the weight "2" - press again "TARE" (18) the display (22) displays the weight "1" + the weight "2" NOTE = it is possible to add products up to the maximum load of the scale NOTE = to exclude the weight of container from the total weight, carry out initially the tare through the "ZERO" (19) function NOTE= to exit from the function "TARE" press "ZERO" (19) function The function "HOLD" (17) allows to store the weight that you are viewing and then recall it to add it or subtract it from the new weight on the scales; the weight will remain stored in memory until the scale is switched off Use: - place the product in the weighing area - keep pressed "HOLD" (17) until the weight in the display starts to flash: the value has been stored16 NOTE = you may proceed by removing the weight from the scale and use it in all its functions NOTE = repeat a new long pressure to store a new weight; only the last weight saved will remain in the memory. By pressing "HOLD" (17) at any time you can view the value stored, it appears and flashes for a few seconds in the display (23); within this time by pressing "HOLD" (17) again the stored weight is added to the weight on the scales; the display (23) displays the total value and the bright feedback "HOLD" (23) remains alight, to inform that the function is still active. By pressing "HOLD" (17) again the weight stored is subtracted from the weight shown in the display; the display (23) displays the value of the difference and it exits automatically from the function. Example: - weight stored: 1KG - weight on the scale when calling the function: 2KG - weight "added", that appears in the display: 3KG (1KG+2KG) - weight "subtracted" before exiting the function: 2KG (3KG - 1KG)+ LOCK function The blocks use of the scale to stop it from being activated when various objects are placed in the weighing area. To activate this function, display turns off; Do the same to deactivate the function: until the scale display turns back on. NB = turns off
3.3 Using the extractor system
Briefly touch ON/OFF (1) hob/extractor: the symbol lights up. Touch again to switch off.
Touch the Selection Zone (12) to activate the extractor The extractor is equipped with 3 levels of extraction speed (power) Touch and slide your fingers along the Selection bar (3): towards the right to increase or to the left to decrease the extraction power. The extraction power will be displayed in the Selection/Display (12) area Power Booster The product has 2 additional power levels (above level 3) Power Booster 1 : timed for 15 min. Power Booster 2 : timed for 5 min. after which the power returns to the previously set level. Touch and slide with the fingers along the Selection bar (3) (over level 3) and activate the Power Booster 1 The Power Booster level 1 is indicated in the Selection / Display area (12) with the number "4" flashing Touch and slide with the fingers along the Selection bar (3) (over level 3) and activate the Power Booster 2 The Power Booster level 2 is indicated in the Selection / Display area (12) with the s17
Power level Cooking type Use (depending on cooking experience and habits) Max power Heat quickly raises the temperature of food in a short space of time to boiling point for water, or to quickly heat cooking liquids 8-9 Fry - boil browning, starting cooking, fry frozen products, boil quickly 7-8 Brown - fry - boil - grill browning, fast rolling boil, cooking and grilling (for brief periods, 5-10 minutes) High power 6-7 Brown - cook - stew - fry - grill browning, slow rolling boil, cooking and grilling (for medium periods, 10- 20 minutes), pre-heat accessories 4-5 Cook - stew - fry - grill stewing, light rolling boil, cooking (for long periods), dressing pasta Medium power 3-4 Cooking - simmering - thickening - creaming longer cooking (rice, sauces, roasts, fish) with accompanying liquids (e.g. water, wine, stock, milk), dressing pasta 2-3 Cooking - simmering - thickening - creaming longer cooking (volumes less than one litre: rice, sauces, roasts, fish) with accompanying liquids (e.g. water, wine, stock, milk) 1-2 Melt - thaw - keep warm - stir melting butter, gently melting chocolate, defrosting small products Low power 1 Melt - thaw - keep warm - stir keeping small portions of just-cooked food warm or maintaining dishes at serving temperature and creaming risottos OFF 0 Support surface Hob in stand-by or off (possible presence of residual heat from the end of cooking, signalled by H-L-O)
Caution! Before any cleaning or maintenance, make sure the cooking zones are switched off and the heat indicator has turned off.
The hob must be cleaned after each use. Important: Do not use abrasive sponges or pads, they may ruin the glass. Do not use irritant chemical detergents such as oven sprays or stain removers. After each use, let the hob cool down completely to remove encrusted on dirt and stains. Use a soft cloth, paper towel or specific products to clean the hob (follow the Manufacturer's instructions). DO NOT USE STEAM JET CLEANERS!!! Important: In the event of the accidental spillage of large quantities of liquid from pans it is possible to drain by using the discharge valve, on the lower section of the product, in order to remove any residues and ensuring maximum hygiene levels are maintained. Fig. 1a For a more thorough and in-depth clean the lower tank can be removed completely. Fig. 1b
4.2 Maintenance of the extractor system
Clean using ONLY a cloth dampened with neutral liquid detergent. DO NOT CLEAN WITH TOOLS OR INSTRUMENTS. Do not use abrasive products. DO NOT USE ALCOHOL!
Fig. 2 Traps cooking grease particles. The grease filter must be cleaned once a month using non aggressive detergents, either by hand or in the dishwasher, which must be set to a low temperature and a short cycle. When washed in a dishwasher, the grease filter may discolor slightly, but this does not affect its filtering capacity.
(For filter version only) Fig. 3a-b-c It absorbs unpleasant odors caused by cooking. The product comes with a set of odour filters. The saturation of the odour filters can occur after somewhat prolonged use depending on the type of cooking and how regularly the grease filter is cleaned. The odour filters can be thermally regenerated every 2/3 months in an oven pre-heated to 200°C for 45 minutes. The correct regeneration of the filter ensures that it can constantly filter efficiently for 5 years.18
Residual Heat Indicator (Indikatorlamp
Residual Heat Indicator (Indikator f
Residual Heat Indicator
Residual Heat Indicator
: FL ( RL FR ( RR Bridge
Residual Heat Indicator (Indicator
- (17) NB = NB = HOLD (17), HOLD
Residual Heat Indicator
- (17) NB = NB = HOLD (17), HOLD
22 (18 TARE «2 1 (19 TARE (19 HOLD (17 HOLD (17 HOLD (17 HOLD
/ 2 (122 (RL (2 0 C (RL-2
(22Residual Pausa :Safe Activation
:Residual Heat Indicator
Bridge Power Limitation