DBX68 - Baby monitors ALECTO - Free user manual and instructions
Find the device manual for free DBX68 ALECTO in PDF.
| Technical Specifications | Video monitor with 2.4-inch LCD screen, range up to 300 meters, infrared night vision, remotely controllable rotating camera. |
|---|---|
| Usage | Easy to install, intuitive use with simple navigation buttons, ability to talk remotely thanks to two-way communication function. |
| Maintenance and Repair | Clean the screen with a soft cloth, regularly check the battery charge, firmware updates via the manufacturer\'s website. |
| Safety | Data encryption to ensure transmission security, compliance with safety standards for electronic devices for children. |
| General Information | Compatible with multiple cameras, parent unit battery life of about 10 hours in eco mode, 2-year warranty. |
Frequently Asked Questions - DBX68 ALECTO
User questions about DBX68 ALECTO
0 question about this device. Answer the ones you know or ask your own.
Ask a new question about this device
Download the instructions for your Baby monitors in PDF format for free! Find your manual DBX68 - ALECTO and take your electronic device back in hand. On this page are published all the documents necessary for the use of your device. DBX68 by ALECTO.
USER MANUAL DBX68 ALECTO
Long range outdoor baby monitor
Index
Dutch 3
French 15
German 27
English 39
Dansk ....51
Sweden 63
Finnish 75
INHOUDSOPGAVE
1 INTRODUCTIE
1.1 BEOOGD GEBRUIK 2
2 INSTALLATIE
2.1 OUDER-UNIT & BABY-UNIT 3
2.2 PLAATSINGSTIPS 3
3 OVERZICHTEN 4
4 WERKING
4.1 BEDIENING VAN HET AANRAAKSCHERM....6
4.2 IN/UITSCHAKELEN 6
4.3 VERBINDINGSCONTROLE 6
4.4 LUISTEREN 6
4.5 NACHTLAMPJE 6
4.6 SLAAPMUZIEKJES 6
4.7 VOEDINGSTIMER 7
4.8 TERUGSPREKEN NAAR DE BABY-UNIT....7
4.9 RIEMCLIP 7
5 INSTELLINGEN
5.1 MICROFOONGEVOELIGHEID....8
5.2 DISPLAYTALEN 8
5.3 HELDERHEID DISPLAYVERLICHTING....8
5.4 TEMPERATUURALARM....9
5.5 ALARMTOON....9
5.6 TRILFUNCTIE 9
5.7 ECO / FULL ECO....10
6 UITBREIDING / NAAM GEVEN
6.1 AANMELDEN & NAAM GEVEN 10
6.2 FUNCTIONEREN MET MEER BABY-UNITS 11
6.3 AFMELDEN....11
7 ALGEMENE INSTRUCTIES EN TIPS
7.1 BATTERIJCONTROLE....12
7.2 BATTERIJGEBRUIKSDUUR....12
7.3 VOEDING....12
7.4 APRS (variabel zendvermogen)....12
7.5 ONDERHOUD....12
7.6 MILIEU 13
8 VERKLARING VAN CONFORMITEIT....13
9 TECHNISCHE SPECIFICATIES....13
10 GARANTIE ....13
1 INTRODUCTIE
1.1 BEOOGD GEBRUIK:
natural_image
Diagram of a mobile phone showing internal components and battery casing (no text or symbols)natural_image
Line drawing of a portable device with a cord and plug, no text or symbols present3 VUES D'ENSEMBLE....16
4 UTILISATION
4.1 FONCTION DE L'ECRAN TACTILE....18
4.2 MISE EN MARCHE/ARRÊT....18
4.3 VÉRIFICATION DE CONNEXION....18
4.4 POUR ECOUTER....18
4.5 ECLAIRAGE DE NUIT 18
4.6 BERCEUSES....18
4.7 MINUTERIE DE NUTRITION....19
8 DÉCLARATION DE CONFORMITÉ....25
9 CARACTÉRISTIQUES TECHNIQUES ......25
10 GARANTIE 25
1 INTRODUCTION
natural_image
Diagram of a mobile phone showing internal components and battery casing (no text or symbols)natural_image
Line drawing of a portable device with a cord and plug, no text or symbols present8 DÉCLARATION DE CONFORMITÉ
MANUFACTURERS NAME AND ADDRESS : SHEN ZHEN HUAJIN ELECTRONICS CO.,
LTD, BLOCK E, XINZHONGQIAO INDUSTRIAL PARK, BAOLONG SIX ROAD, BAOLONG
INDUSTRIAL CITY, LONGGUANG DISTRICT, 518116, SHENZHEN, CHINA. MODEL IDENTIFIER: H.I-0500600-EU
MODEL IDENTIFIER: 116-00000 INPUT VOLTAGE : 100-240VAC
INPUT AC FREQUENCY : 50/60 Hz
OUTPUT VOLTAGE : 5.0V DC
OUTPUT CURRENT : 0.6 A
OUTPUT POWER : 3.0 W
AVERAGE ACTIVE EFFICIENCY : 69.64 %
EFFICIENCY AT LOW 10% LOAD
NO LOAD POWER CONSUMPTION : < 0.1 W
10 GARANTIE
4.6 SCHLAFLIEDER....30
natural_image
Diagram of a mobile phone showing internal components and directional arrows (no text or symbols)natural_image
Line drawing of a portable electric shaver connected to a cord (no text or symbols)5.6 VIBRATIONSFUNKTION:
6 EXPANSION/NAME ASSIGNMENT
6.1 TO REGISTER & ASSIGN A NAME....46
6.2 OPERATION WITH MULTIPLE BABY UNITS 47
6.3 DEREGISTERING 47
7 GENERAL INSTRUCTIONS AND TIPS
7.1 BATTERY CHECK 48
7.2 BATTERY LIFE 48
7.3 POWER SUPPLY 48
7.4 APRS (variable transmission power) 48
7.5 MAINTENANCE....48
7.6 ENVIRONMENT....49
8 DECLARATION OF CONFORMITY 49
9 TECHNICAL SPECIFICATIONS....49
10 WARRANTY....49
1 INTRODUCTION
1.1 INTENDED USE:
The Alecto DBX68GS is a wireless baby intercom to remotely listen to sounds coming from the baby room.
Attention:
Only use the baby intercom as an additional peace of mind, it can never serve as a replacement for an adult or human (baby) sitter.
This baby intercom has a range of 1000 meters in an open field and up to 150 meters indoors; this range depends on local conditions (concrete walls, other baby intercoms, wireless phones, etc.).
Before every use, always check whether the baby intercom is functioning correctly. In addition to checking the baby intercom's range and connection, it's recommended to check its connection by ear while in use.
The DBX68GS may not be used for anything else besides detecting sounds within your own private surroundings; any person located in the room that's being listened to must be informed about the baby intercom being used.
You are not required to have a license for the use of this baby intercom. The system can be freely applied in any domestic situation. However, an interference-free signal transmission cannot always be guaranteed.
You may register up to 4 separate baby units on the parent unit, allowing you to use only one parent unit and listen to a maximum of 4 different baby units. Expansion units are available via the service department of Commaxx. Refer to the rear of this user manual for address information. The order number of an expansion unit for the DBX68GS is: DBX68BU.
2 INSTALLATION
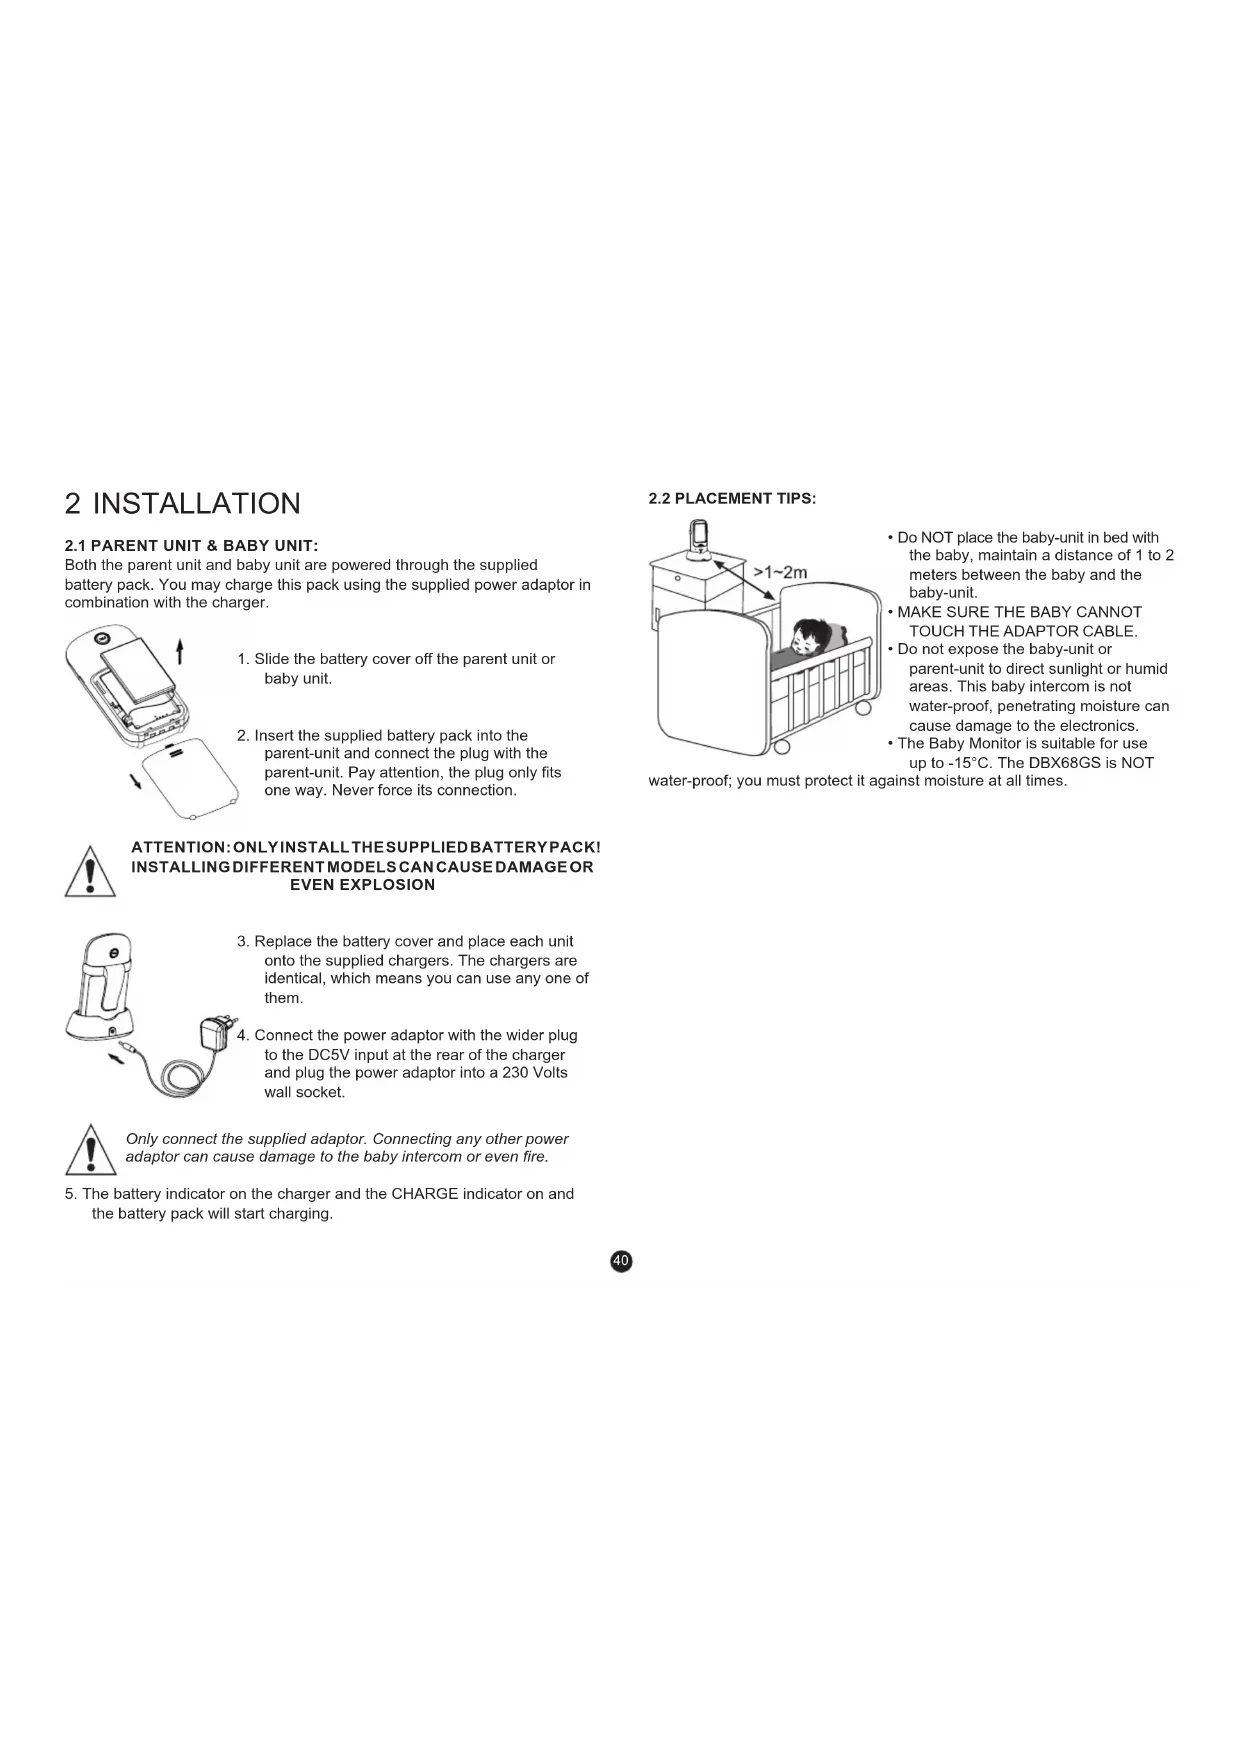
2.1 PARENT UNIT & BABY UNIT:
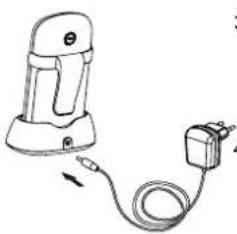
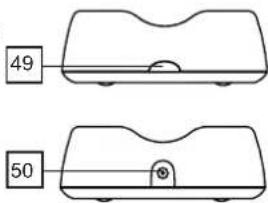
Both the parent unit and baby unit are powered through the supplied battery pack. You may charge this pack using the supplied power adaptor in combination with the charger.
natural_image
Diagram of a mobile phone showing internal components and battery casing (no text or symbols)- Slide the battery cover off the parent unit or baby unit.
- Insert the supplied battery pack into the parent-unit and connect the plug with the parent-unit. Pay attention, the plug only fits one way. Never force its connection.

ATTENTION: ONLY INSTALL THE SUPPLIED BATTERYPACKI INSTALLING DIFFERENT MODELS CAN CAUSE DAMAGE OR EVEN EXPLOSION
natural_image
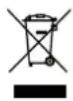
Line drawing of a portable device with a cord and plug, no text or symbols present- Replace the battery cover and place each unit onto the supplied chargers. The chargers are identical, which means you can use any one of them.
- Connect the power adaptor with the wider plug to the DC5V input at the rear of the charger and plug the power adaptor into a 230 Volts wall socket.

Only connect the supplied adaptor. Connecting any other power adaptor can cause damage to the baby intercom or even fire.
- The battery indicator on the charger and the CHARGE indicator on and the battery pack will start charging.
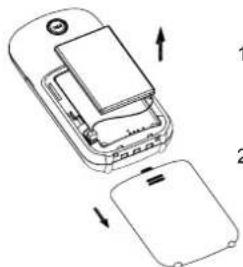
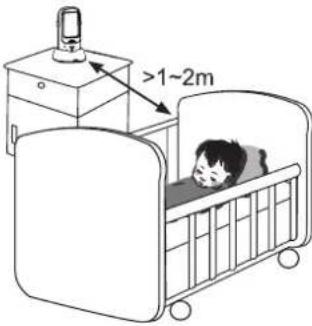
2.2 PLACEMENT TIPS:
text_image
>1~2m- Do NOT place the baby-unit in bed with the baby, maintain a distance of 1 to 2 meters between the baby and the baby-unit.
• MAKE SURE THE BABY CANNOT TOUCH THE ADAPTOR CABLE. - Do not expose the baby-unit or parent-unit to direct sunlight or humid areas. This baby intercom is not water-proof, penetrating moisture can cause damage to the electronics.
• The Baby Monitor is suitable for use up to -15°C. The DBX68GS is NOT
water-proof; you must protect it against moisture at all times.
3 OVERVIEWS
3.1 PARENT UNIT:
- LCD screen, refer to the next page
- power button, press and hold for 3 seconds to switch the parent unit on/off
- built-in microphone for the talk-back function
- built-in speaker
- TALK button (rear), press and hold to talk back to the baby unit, release to listen
- battery compartment (rear)
- Charging contacts
3.2 BABY UNIT:
- LCD screen, refer to the next page
- power button, press and hold for 3 seconds to switch the baby unit on/off
- built-in microphone
- built-in temperature sensor
- nightlight
- speaker (rear)
- battery compartment (rear)
- Charging contacts

text_image
1 2 3 4 5 6 7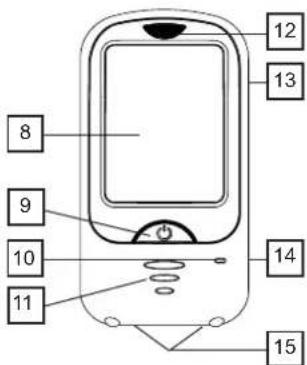
text_image
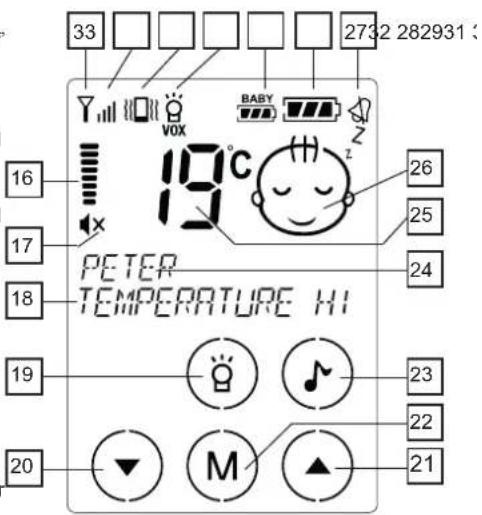
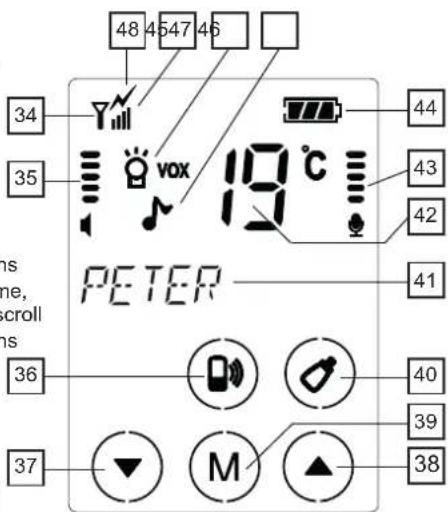
12 13 8 9 10 11 14 153.3 PARENT UNIT DISPLAY
- volume indicator
- 'x' appears for 'sound off'
- Text line
- nightlight on/off
- to reduce the volume, also the ▼button to scroll settings and functions
- to increase the volume, also the ▲button to scroll settings and functions
- menu button
- lullabies on/off
- text line
- temperature display
- visual display indicator whether the baby is crying or silent
- appears when the alert tone is disabled
- battery capacity indicator of the parent unit
- battery capacity indicator of the baby unit
- nightlight on/off/VOX indicator
- vibration on/off indicator
- reception strength indicator of the baby unit's signal
- antenna symbol, flashes when the connection with the baby unit is lost
text_image
33 2732 282931 16 17 18 PETER TEMPERATURE HI 19 20 M 21 22 23 24 25 263.4 BABY UNIT DISPLAY
-
antenna symbol, flashes when the connection with the parent unit is lost
-
volume indicator
-
call button to the parent unit
-
to decrease the volume, also the ▼ button to scroll settings and func
-
to increase the volume, also the ▲button to scroll settings and functions
-
menu button
-
to start the feeding timer
-
name of this baby unit
-
temperature display
-
sensitivity setting of the microphone
-
battery capacity indicator
-
illuminates while playing lullabies
-
illuminates when the nightlight is switched on (VOX illuminates also when the nightlight is set to 'automatic')
-
reception strength indicator of the parent unit's signal during the 'talk-back' function
-
illuminates when the baby unit is transmitting signals to the parent unit
text_image
34 35 vox 19°C PETER 36 37 M 40 39 38 41 42 43 44 45 46 48 49 503.5 CHARGER:
-
'CHARGE' indicator, illuminates when the parent unit or baby unit is placed onto the charger and the adaptor is connected. Attention: the 'CHARGE' indicator on the charger remains lit, even when the battery if full.
-
power adaptor input
text_image
49 504 USE
Don't forget that this baby intercom is merely an extra piece of mind. The device can never replace the physical and monitoring presence of a parent or babysitter.
Both the parent unit and baby unit are operated using the touch-screen.
To activate the required function, please just slightly tap the concerning 'button' on the screen.
4.2 TURNING ON/OFF:

Press and hold the ⬤button for 3 seconds to turn on the baby-unit or parent-unit.
Press and hold the button again for 3 seconds to turn off the baby-unit or parent-unit.
4.3 CONNECTION CHECK:
As soon as you switch on the parent-unit, it will start searching for the baby-unit.
If the parent-unit still hasn't located the baby-unit after 60 seconds (because it's still turned off or out of range), the display lighting will start flashing while the text 'OUT OF RANGE' appears in the display.
4.4 TO LISTEN:
Parent unit reception volume:
- tap button for volume up
- tap button for volume down
- the DBX68GS has 8 volume levels and 'sound off'
- an 'x' will appear behind the speaker symbol when
the volume is switched off
- the set volume level will be shown on the display

Visual sound indicator:
The display indicates whether the baby is crying or not as follows:

baby sleeping

baby crying
4.5 NIGHT LIGHT:
The baby-unit is provided with a built-in night light.
The light has the following possibilities:
- tap repeatedly button 🌿
• appears in the display = night light on
- appears in the display = night light in automatic mode (on when the baby is crying, off when the baby is quiet)
- no light in the display = night light off
4.6 LULLABIES:
The DBX68GS is pre-programmed with 6 different lullabies and sounds that you can set via the parent unit. After selecting your desired sound, it will be played for up to 15 minutes.
- tap button, the playing of the lullaby starts
- you can use the and buttons to select a different song or sound
• after 15 minutes the playing stops or tap button to stop the playing of lullabies earlier - use the and buttons on the baby unit to adjust the volume
- the sound of the lullabies can be heard at the parent unit through the microphone of the baby unit; you can decrease the volume of the parent unit if this bothers you
4.7 FEEDING TIMER:
The DBX68GS parent unit can emit a signal when it's time for your baby to be fed. First you must set how many hours are in between feeding times:
- tap button M to activate the menu
- use the and buttons to select the option FEEDING TIME
- tap button M
- use the and buttons to select the time in between feeding times in increments of half an hour
- briefly press the button to confirm your selection and to leave the menu
- you only have to set this time once, but you'll need to adjust it again when the time in between feeding times changes or when you prefer to turn this function off (by selecting 'off' in the above step 4)
Switching on the timer.
i Attention: when only one baby unit is registered on the parent unit, you may switch on the feeding timer via both the parent unit and the baby unit. When multiple baby units are registered on the parent unit, you can only switch on the feeding timer via the baby unit.
turn on the feeding timer on parent unit: (only possible when just one baby unit is registered on the parent unit)
- tap button M to activate the menu
- use the and buttons to select the option START TIMER
- tap button M to start the timer and to close the menu
- the timer time you have set will now appear in the display directly underneath the name ‘BABY’ (or the name you programmed yourself) and will slowly count down
- at 0.00 the unit will emit beep tones for up to 20 seconds while the text 'FEEDING TIME' appears in the display
turn on the feeding timer on baby unit:
- tap button to activate the alarm for the next feeding time, the unit will emit 2 beep tones.
i Attention: only when the baby unit is in communication with the parent unit you can turn on the alarm for the next feeding time. If you don't hear 2 beep tones after pressing the button, the connection between the baby unit and parent unit is lost. You can now speak into the baby unit and press the button again or you can activate the feeding time alarm via the parent unit.
4.8 TALKING BACK TO THE BABY UNIT:
- Press the TALK button on the parent unit to talk back to the baby unit.
- Press and hold the button while talking and release the button to listen.
- Adjust the volume of the baby unit with the and buttons on the baby unit itself
4.9 BELT CLIP:
The units are provided with a belt clip. Use it to suspend the unit or to carry it on your clothing.
You may remove the belt clip by somewhat bending and opening one of the ends.
5 SETTINGS
5.1 MICROPHONE SENSITIVITY:
You can use the parent unit to set at which volume level the baby unit must start transmitting.
- tap button M to activate the menu
- use the and buttons to select the desired sensitivity as shown on the right in the display by a bar graph
low sensitivity; the baby must cry loudly before the baby unit is activated
hight sensitivity; the baby unit is activated as soon as the baby starts making soft sounds
- briefly press the button to confirm your choice and exit the menu
5.2 DISPLAY LANGUAGES:
The various settings and notifications in the display of the parent unit can be shown in different languages.
In the factory the unit is set to the Dutch language, but you can select another language as follows:
- tap button M to activate the menu
- use the and buttons to select the option LANGUAGE
- tap button M
- use the and buttons to select your desired language
- briefly press the button to confirm you selection and to leave the menu
- you can choose from: Dutch, English, Italian, Spanish, French and German
5.3 DISPLAY LIGHT BRIGHTNESS:
You can adjust the intensity of the display light at the parent unit as follows:
- tap button M to activate the menu
- use the and buttons to select the option BRIGHTNESS
- tap button M
- use the and buttons to select the desired brightness
- briefly press the button to confirm you selection and to leave the menu
To set the display lighting at the baby unit:
- tap button M 2x
- use the and button to select the desired brightness
- briefly press the button to confirm you selection and to leave the menu
- you may choose from 8 brightness levels
- a higher brightness level does often provide a clear readability, but also uses more power.
5.4 TEMPERATURE ALARM:
The display of the parent unit shows the temperature transmitted by the baby unit. You can assign a minimum or maximum temperature to this function and have the unit sound an alarm when these values are exceeded:
- tap button M to activate the menu
- usethe and buttons to select the option TEMP ALARM
- tap button M
- use the and buttons to select whether you want to set or adjust the lower or the upper limit
- tap button M
- use the and buttons to adjust the selected temperature limit and tap button M
- repeat step 5-7 if you want to set the other temperature limit
- briefly press the button to confirm the set temperature limits and to leave the menu
- the upper limit can be set between -3^ and 50^
- the lower limit can be set between -19^ and 3 degrees lower than the upper limit
- select "OF" if you don't want to set an upper or lower limit
- when the set temperature limit is exceeded, the temperature display will start flashing while 'TOO WARM' or 'TOO COLD' is shown
- if the ALARM TONE function is activated, you'll also hear short notification tones
- don't forget that the temperature display is only an indication, you'll have to take a tolerance of +/- 2°C into account
- at temperatures above 50^ and under -19^ , -- will appear in the display
5.5 ALARM TONE:
You can set the unit to emit a clear alarm tone when temperature limits are exceeded, when the battery is low or when the baby unit is out of range.
You can turn this function on or off as follows:
- tap button M to activate the menu
- use the and buttons to select the option ALARM TONE
- tap button M
- use the and buttons to turn this function on (ON) or off (OFF)
- briefly press the button to confirm you selection and to leave the menu
- will appear in the display when the alarm tone is switched off
- this setting only turns the alarm tone on or off; the alarm itself is not changed
- when the alarm tone sounds, you can turn it off by briefly pressing the button
5.6 VIBRATION FUNCTION:
In case of a little more background noise (e.g. noise while vacuum cleaning) while there's a chance that the sounds from the baby monitor cannot be heard clearly, or in case the volume is switched off, you can enable the vibration function:
- tap button M to activate the menu
- use the and buttons to select the option VIBRATION FUNCTION
- tap button M
- use the and buttons to turn this function on (ON) or off (OFF)
- briefly press the button to confirm you selection and to leave the menu
- will appear in the display when the vibration function is switched on
5.7 ECO / FULL ECO;
ECO:
In the ECO mode, the baby-unit is switched off while the baby is sleeping. However, in the background the baby-unit regularly checks the connection between the parent unit and baby unit. You'll be notified if the connection is lost.
FULL ECO:
In the FULL ECO mode, the baby-unit is also switched off while the baby is sleeping and even the connection check is disabled. This means absolutely no radiation when the baby is sleeping.
The baby unit activates as soon as the baby wakes up and starts making noises.

Attention: keep in mind that in the FULL ECO mode, there's no link-check and therefore no alert tone when the connection between the unit and baby unit is lost.
To set the ULL ECO mode on or off:
-
tap 3x button M OF THE BABY-UNIT
-
use the and button to switch between ON (FULL ECO activated) and OFF (FULL ECO disabled)
-
briefly press the button to confirm you selection and to leave the menu
To check the link in between:
In the ECO or FULL-ECO mode you may briefly press the TALK button in the meantime to enable the sound (provided the volume is not set to 0) for about 10 seconds.
6 EXPANSION/NAME ASSIGNMENT
The DBX68GS is capable of registering up to 4 baby units. This way you can monitor 4 babies and because you can assign an individual name to each unit, you can directly determine which child is crying. Additionally, for each baby unit you can set the talk-back function, feeding timer, room temperature, lullabies and night light.
6.1 TO REGISTER & ASSIGN A NAME:

Attention: only during registration a name can be assigned to the baby unit. If the baby unit is already registered and you only need list or set the name, you'll only be able to this this by following the registration process again.
When you're only expanding your setup, ALL baby units must be registered (again), i.e. also the baby units that were previously registered. However, the names of baby units previously registered will remain in the memory.
preparation:
- switch off the parent unit and the/all baby unit(s) by briefly pressing and holding the button until the display is completely empty
parent unit:
-
press and hold the TALK button on the rear of the parent unit
-
now press and hold the button for approximately 3 seconds until the parent unit turns on and P/PAIRING appears in the display with the P flashing. Now release both buttons
first baby unit:
-
press and hold the button until first the baby unit switches on after approx. 3 seconds and then 'P' starts flashing in the display after another 2 seconds or more, now release the button
-
use the and buttons to select the respective baby unit (select 'baby-1' for the first baby unit, 'BABY-2' for the second unit, etc.) and press ⏻
-
use the and buttons to select the first letter of the name and tap the M button
-
repeat this for all of the following letters ('space' is located directly after the 'ABC', followed by the numbers 1 through 9. The name may consist of a maximum of 8 characters)
-
when finished, briefly press the button to store the name and then briefly press the button again to register the baby unit on the parent unit
- now switch off this baby unit (briefly press and hold the button) and put it aside for the moment
additional baby units:
- repeat steps 4 through 9 for all additional baby units
switch off:
- after all baby units are registered according to the procedure above, finally switch off the parent unit by briefly pressing and holding the ⏻ button
- now switch on the parent unit and baby unit(s) in the usual way, as described in paragraph 4.2.
6.2 OPERATION WITH MULTIPLE BABY UNITS:
- When all babies are sleeping and the baby units are all set to sleep mode, the parent unit will first show the status of baby unit 1 (temperature, battery indication, night light or lullabies are switched in, etc.), after 15 seconds the status of baby unit 2, then unit 3 and finally unit 4
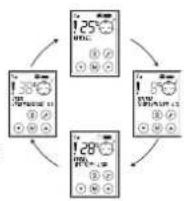
This is repeated continuously for as long as all babies are sleeping (or when quiet)
- Unregistered baby units will be skipped.
- When a baby unit is registered, but not in communication with the parent unit (out of range, empty battery, switched off), the parent unit will emit a warning signal. Only after the cause for this out-of-range notification is cleared, will the parent unit switch over to the next baby unit.
- As soon as one of the babies starts crying, the parent unit will instantly indicate the sound and status of the baby unit where the crying is coming from. Don't forget that baby unit 1 always has the priority; this means that when all babies are crying, the parent unit will indicate the status of baby unit 1. The sequence is: baby-1, baby-2, baby-3, baby-4.
- When several babies are crying, the status of the first crying baby is shown in the display, but the display will indicate that another baby is crying as well.
Brian is crying and his status is shown while the sound is transmitted Angel is crying as well

text_image
Yall !25°C DRAIN ANGELNow briefly press the button to switch priority (in the above situation, the status and sound of Angel are now transmitted).
- For each baby unit, you can turn the night light on or off, turn the lullabies on or off and activate the feeding timer (feeding intervals are the same for all baby units). For turning these functions on or off and talking back to the baby unit, the parent unit must be in communication with the concerned baby unit (the name of this baby unit must be shown in the display).
6.3 DEREGISTERING:
- Defective baby units or units no longer in use must be erased from the parent unit's memory to prevent the parent unit from constantly indicating an out-of-range error for that baby unit. You can do this by re-registering the baby units that are still in use. Only the baby unit you're no longer using should not be re-registered. It is not possible to deregister a specific baby unit at the parent unit.
7 GENERAL INSTRUCTIONS AND TIPS
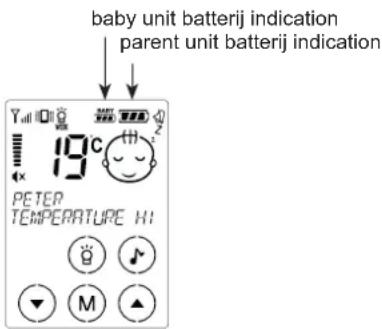
7.1 BATTERY CHECK:
The display indicates the battery capacity.

battery full

battery 2/3 full

battery almost empty
place it onto the charger as soon as possible to recharge the battery

(and flashing): battery is basically exhausted and the unit can switch off any moment
As soon as the battery of the parent unit or baby unit becomes exhausted, the symbol will flash in the display, the warning "WEAK BATTERY" will appear and the unit will emit beep tones. You can turn these beep tones off by briefly pressing the button.
The battery indication will scroll ☐ - while ☐ batteries of the parent unit are being charged.
In addition to its own battery capacity, the parent unit also shows the battery capacity of the baby unit
text_image
baby unit batterij indication parent unit batterij indication 19°C PETER TEMPERATURE HI7.2 BATTERY LIFE:
With a fully charged battery pack, the baby monitor can function for 12 to 20 hours.
The times mentioned are approximates and depend on the settings and use (how high the volume is set, whether the nightlight is enabled, how often and for how long the baby is crying, whether the backlighting is often enabled, what the intensity setting is, the quality of the batteries, etc.)
7.3 POWER SUPPLY:
Adaptors:
When using adaptors, only use the supplied adaptors. Connecting power adaptors other than the supplied adaptors can cause damage to the electronics of the baby intercom.
Batteries:
In the DBX68GS you may only install a RECHARGEABLE battery pack of the type Lithium-Polymer, voltage 3.7V, power 720mAh.
7.4 APRS (variable transmission power):
The DBX68GS is provided with the APRS transmission system. This Automatic Power Reduction System monitors the transmitting power at which the parent unit and baby unit exchange signals, ensuring a minimum in transmission power while maintaining a 100% reliable signal transfer.
This means that the baby unit will never transmit with more power than what is required for a good connection.
7.5 MAINTENANCE:
Only clean the baby monitor with a moist cloth; never use chemical cleaners. Before any cleaning, you must disconnect the adapters. Before cleaning, any connected power adaptors must be disconnected.
7.6 ENVIRONMENT:
The packaging of this baby video monitor can be discarded as waste paper. At the end of its life span, this product may not be discarded as normal domestic waste bit it must be brought to a collection point for the recycling of electric and electronic equipment. You must bring exhausted or defective batteries to your local depot for small chemical waste or to dedicated ba collection points. Never discard batteries as normal domestic w
8 DECLARATION OF CONFORMITY
Hereby, Commaxx declares that the radio equipment type Alecto DBX68GS is in compliance with directive 2014/53/EU. The full text of the EU declaration of conformity is available at the following internet address: https://commaxx-certificates.com/doc/dbx68_doc.pdf
9 TECHNICAL SPECIFICATIONS
Frequency Range : 863.150-869.050 MHz
Maximum Power : < 12 dBm
No. of channels: 53 (set automatically)
Power: power adapter: 5VDC 600mA (incl.)

HJ-0500600-EU
battery pack: LiPo, 3.7V 730mAh rechargeable
(incl)
Recommended ambient temperature: -15°C to +50°C
Storage temperature: -20^ to +60^
INFORMATION POWER ADAPTER:
MANUFACTURERS NAME AND ADDRESS : SHEN ZHEN HUAJIN ELECTRONICS CO., LTD, BLOCK E, XINZHONGQIAO INDUSTRIAL PARK, BAOLONG SIX ROAD, BAOLONG INDUSTRIAL CITY, LONGGUANG DISTRICT, 518116, SHENZHEN, CHINA.
MODEL IDENTIFIER : HJ-0500600-EU
INPUT VOLTAGE : 100-240VAC
INPUT AC FREQUENCY : 50/60 Hz
OUTPUT VOLTAGE : 5.0V DC
OUTPUT CURRENT : 0.6 A
OUTPUT POWER : 3.0 W
AVERAGE ACTIVE EFFICIENCY : 69.64 %
EFFICIENCY AT LOW 10% LOAD :
No LOAD POWER CONSUMPTION : < 0.1 W
10 WARRANTY
For the Alecto DBX68GS you have a warranty of 24 months from the date of purchase. During this period, we guarantee the free repair of defects caused by material and workmanship errors. All this subjected to the final assessment of the importer.
If you notice any defect, first refer to the user's manual. If the manual provides no definite answer, please contact the supplier of this baby video monitor or contact customer service of Alecto via internet www.alecto.nl
THE WARRANTY BECOMES NULL AND VOID:
In case of improper use, incorrect connections, leaking and/or incorrectly installed batteries, use of unoriginal parts or accessories, negligence and in case of defects caused by moisture, fire, flooding, lightning and natural disasters. In case of unauthorised modifications and/or repairs performed by third parties. In case of incorrect transportation of the device without adequate packaging and when the device is not accompanied by this warranty card and proof of purchase. The warranty does not cover connecting cables, plugs and batteries.
All further liability, especially concerning any consequential damages, is excluded.
INDHOLDSFORTEGENELSE:
1 INDLEDNING
1.1 TILSIGTET ANVENDELSE 50
2 INSTALLATION
2.1 FORÆLDREENHED & BABYENHED 51
2.2 TIPS TIL PLACERING 51
3 OVERSIGTER....52
4 BRUG
4.1 BETJENING AF BER∅RINGSSKÆRM 54
4.2 TÆND/SLUK....54
4.3 KONTROL AF FORBINDELSE 54
4.4 AT LYTTE 54
4.5 NATLYS....54
4.6 VUGGEVISER 54
4.7 MAD TIDER....55
4.8 TALE TILBAGE TIL BABYENHEDEN 55
4.9 BÆLTE KLIP 55
5 INDSTILLINGER
5.1 MIKROFONENS F∅LSOMHED....56
5.2 VIS SPROG 56
5.3 VIS LYSSTYRKE 56
5.4 TEMPERATURALARM 57
5.5 ALARM TONE 57
5.6 VIBRATIONSFUNKTION 57
5.7 ECO/ FULL ECO 58
6 TILDELING AF UDVIDELSE/NAVN
6.1 SÅDAN REGISTRERES OG TILDELES ET NAVN 58
6.2 BETJENING MED FLERE BABYENHEDER 59
6.3 AFMELDING 59
7 GENERELLE INSTRUKTIONER OG TIP
7.1 BATTERI CHECK....60
7.2 BATTERILEVETID 60
7.3 STRÖMFORSYNING....60
7.4 APRS (variabel transmissionseffekt)....60
7.5 VEDLIGEHOLDELSE 60
7.6 MILJ∅....61
8 OVERENSSTEMMELSESERKLÆRING 61
9 TEKNISKE SPECIFIKATIONER....61
10 GARANTI....61
1 INTRODUCTION
1.1 TILSIGTET ANVENDELSE:
natural_image
Diagram of a mobile phone showing internal components and battery casing (no text or symbols)natural_image
Line drawing of a handheld device with a cable and plug, no text or symbols present5.6 VIBRATIONSFUNKTION:
INNEHÅLLSFÖRTECKNING
1 INLEDNING
1.1 AVSEDD ANVÄNDNING....2
2 INSTALLATION
4.4 FÖR ATT LYSSNA....6
4.5 NATTBELYSNING....6
4.6 VAGGVISOR....6
4.7 MATNINGSTIMER 7
4.8 TALA TILLBAKS TILL BABYENHETEN 7
4.9 BÄLTESCLIPS 7
5 INSTÄLLNINGAR
5.1 MIKROFONKÄNSLIGHET 8
5.2 DISPLAYSPRÅK 8
5.3 LJUSSTYRKA PÅ DISPLAYEN....8
5.4 TEMPERATURLARM....9
5.5 LARMSIGNAL....9
5.6 VIBRATIONSFUNKTION 9
5.7 EKO / FULL EKO 10
natural_image
Diagram of a mobile phone showing internal components and battery casing (no text or symbols)natural_image
Line drawing of a portable device with a cord and plug, no text or symbols presenttext_image
PETED ①/5 ②/3 ④5.4 TEMPERATURLARM:
text_image
19°C TEMPORATE N ③/5/7 ②/4/6 ①/95.5 LARMSIGNAL:
5.6 VIBRATIONSFUNKTION:
natural_image
Diagram of a mobile phone showing internal components and battery casing (no text or symbols)natural_image
Line drawing of a portable device with a cable and plug, no text or symbols presentAlecto is a brand of Commaxx B.V. Wiebachstraat 37, 6466 NG Kerkrade, The Netherlands

Service / Help ? www.alecto.nl Support.alecto.nl