DVM50 - Baby monitors ALECTO - Free user manual and instructions
Find the device manual for free DVM50 ALECTO in PDF.
Frequently Asked Questions - DVM50 ALECTO
User questions about DVM50 ALECTO
0 question about this device. Answer the ones you know or ask your own.
Ask a new question about this device
Download the instructions for your Baby monitors in PDF format for free! Find your manual DVM50 - ALECTO and take your electronic device back in hand. On this page are published all the documents necessary for the use of your device. DVM50 by ALECTO.
USER MANUAL DVM50 ALECTO
natural_image
Two Alecto medical devices, one displaying a camera and the other a screen showing sleeping photo (no text or symbols visible on devices themselves)camera selecteren....7
6 TIPS EN WAARSCHUWINGEN....8
6.1 ALGEMEEN....8
6.2 INSTALLATIE 8
6.3 ONTVANGST-INDICATIE / BUITEN BEREIK MELDING 8
6.4 VERTRAGING IN BEELD EN GELUID 8
6.5 VOEDING 8
6.6 STORINGSVRIJ 9
6.7 BEREIK....9
6.8 AFLUISTEREN/AFTAPPEN 9
6.9 ONDERHOUD 9
6.10 MILIEU EN AFDANKEN 9
text_image
Technical diagram of a device with numbered parts for identification6.8 AFLUISTEREN/AFTAPPEN:
6.2 INSTALLATION....16
6.3 ANNONCE D'INDICATION DE RECEPTION / HORS DE PORTEE.... 16
6.4 RETARD DE L'IMAGE ET DU SON....16
6.5 ALIMENTATION....16
6.6 SANS INTERFERENCE 17
6.7 PORTEE 17
6.8 L'ECOUTE/L'ENREGISTREMENT CLANDESTIN 17
6.9 ENTRETIEN 17
6.10 ENVIRONNEMENT ET JETER 17
6.11 EN CAS DE PAS D'IMAGE, PAS DE SON.... 17
7 DECLARATION DE CONFORMITE....18
8 SPECIFICATIONS....18
9 GARANTIE 18
1 INTRODUCTION
text_image
Technical diagram of a device with numbered parts for identification6.8 ABHÖREN/ANZAPFEN 25
6.9 PFLEGE 25
text_image
Technical diagram of a device with numbered parts for identification6.5 STROMVERSORGUNG:
- Baby-Einheit:
6.8 ABHÖREN/ANZAPFEN:
6 TIPS AND WRNINGS 32
6.1 GENERAL....32
6.2 INSTALLATION....32
6.3 RECEIVE INDICATOR/OUT OF RANGE REPORT 32
6.4 DELAY IN THE PICTURE AND SOUND 32
6.5 POWER SUPPLY 32
6.6 INTERFERENCE FREE 33
6.7 RANGE 33
6.8 LISTEN IN/TAP IN 33
6.9 MAINTENANCE....33
6.10 ENVIRONMENT AND DISPOSAL 33
6.11 IN CASE OF NO PICTURE, NO SOUND 33
7 DECLARATION OF CONFORMITY 34
8 SPECIFICATIONS 34
9 GUARANTEE 34
1
INTRODUCTION
The Alecto DVM-50 is a wireless video baby monitor, suitable for indoor use.
Optionally, you can continuously watch and listen, or you can leave the baby monitor automatically switched on in case the baby starts to cry.
2 FUNCTION OVERVIEW
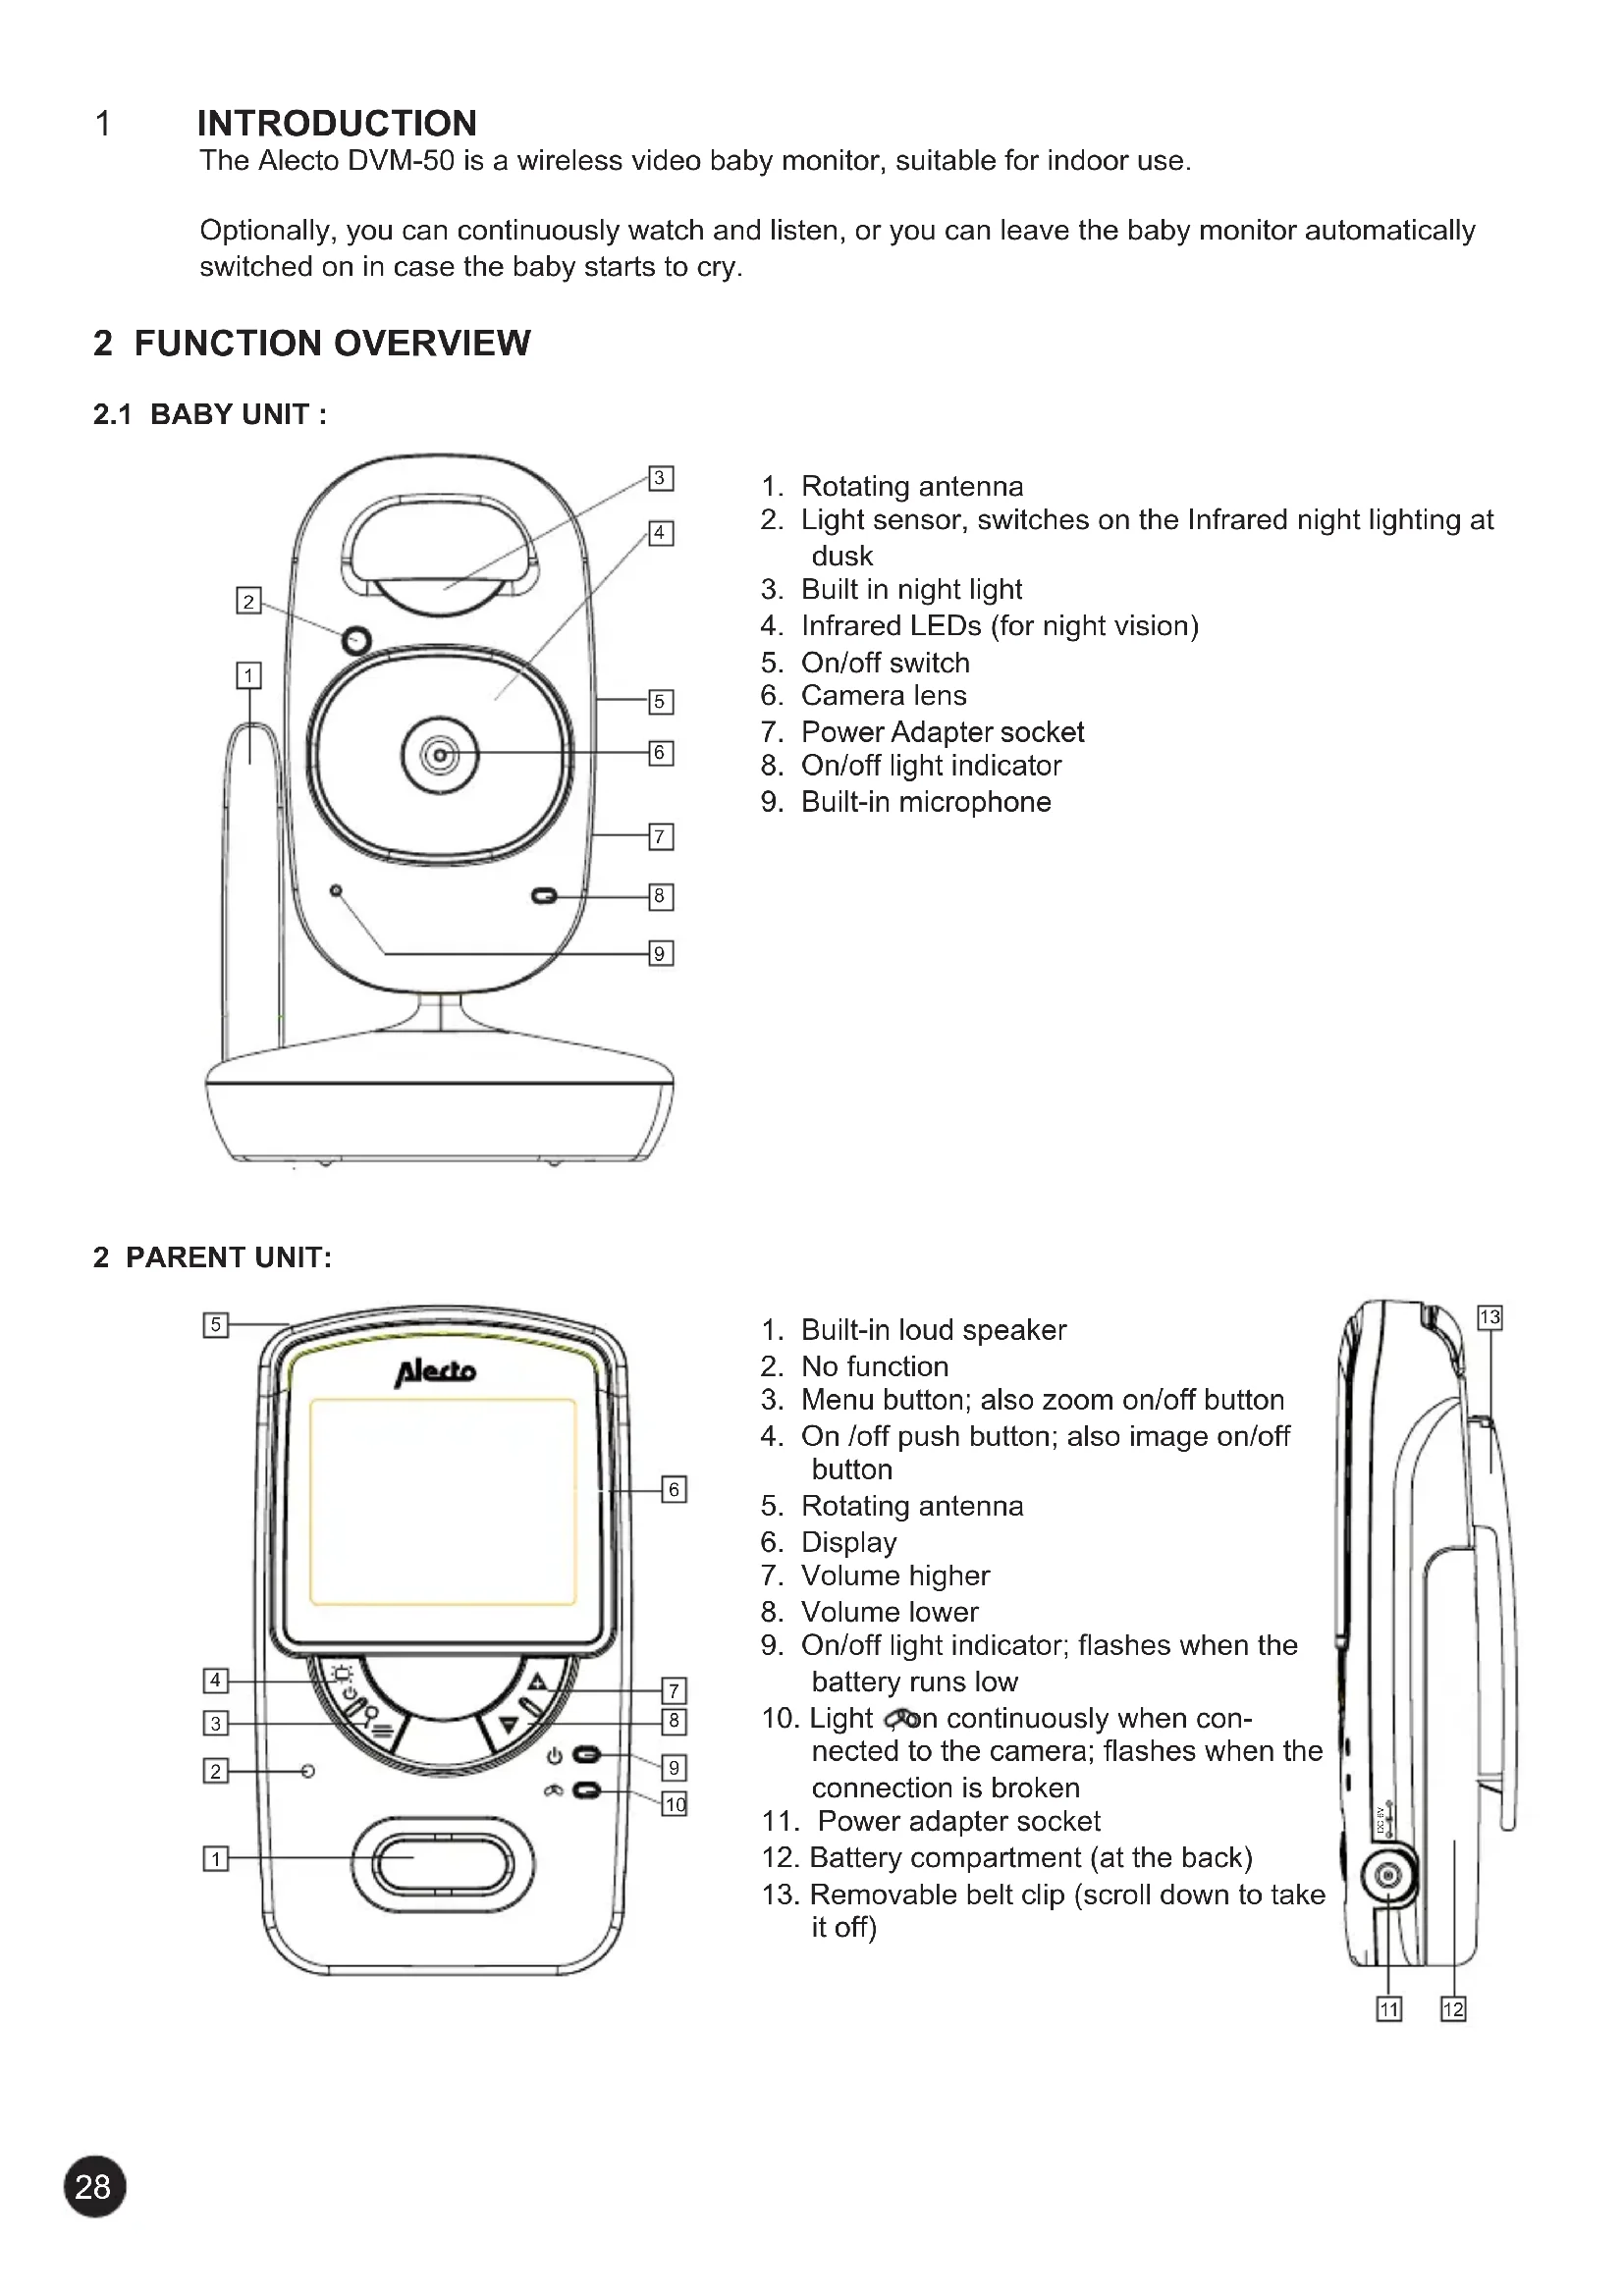
2.1 BABY UNIT :
text_image
Technical diagram of a device with numbered parts for identification- Rotating antenna
- Light sensor, switches on the Infrared night lighting at dusk
- Built in night light
- Infrared LEDs (for night vision)
- On/off switch
- Camera lens
- Power Adapter socket
- On/off light indicator
- Built-in microphone
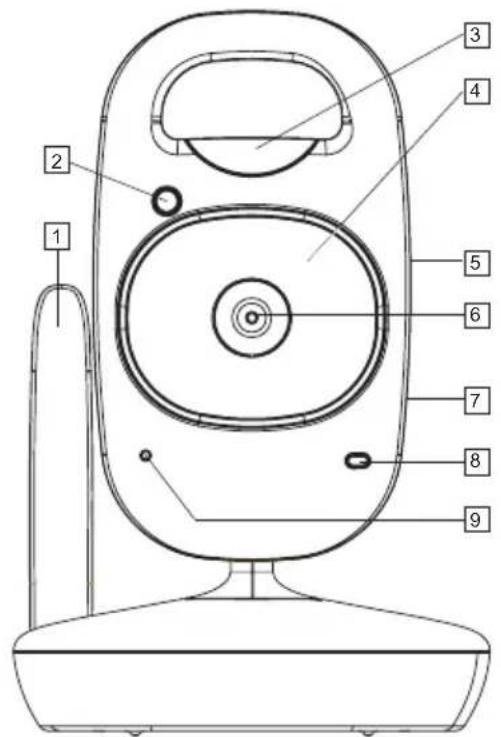
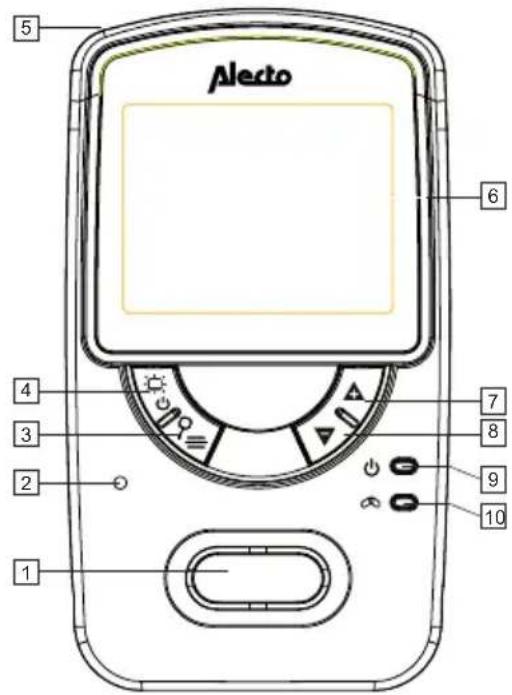
2 PARENT UNIT:
text_image
Alecto 5 6 4 3 2 1 7 8 9 10- Built-in loud speaker
- No function
- Menu button; also zoom on/off button
- On /off push button; also image on/off button
- Rotating antenna
- Display
- Volume higher
- Volume lower
- On/off light indicator; flashes when the battery runs low
- Light ,on continuously when connected to the camera; flashes when the connection is broken
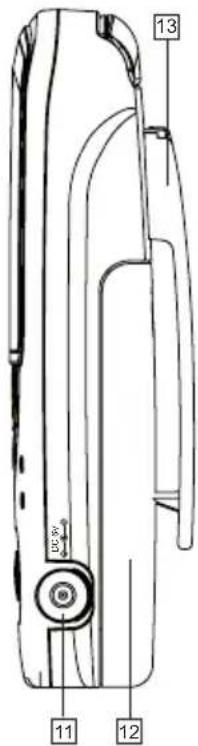
- Power adapter socket
- Battery compartment (at the back)
- Removable belt clip (scroll down to take it off)
text_image
11 12 133 INSTALLATION
3.1 BABY UNIT:
Power:
- Connect one of the included 6V power adapters into the 6V DC socket of the baby unit.
- Plug the power adapter into a 230V electrical outlet.
Only use the supplied power adapter model number 5E-AD060080-E.

When used as a baby monitor: Make sure the baby cannot touch the baby monitor or the cord. Place the baby unit at least 2 meters away from the baby and tape up any additional long wires with tape or special wire ties.
Wall mounting:
Drill two holes next to each other in the wall 6.7 cm apart and insert two screws. Leave the screw head out by a few millimetres.. Hang the baby unit on the wall by sliding the notches on the camera stand down onto the screws. Tie the adapter cord neatly up with special wire ties.
Placement tips:
- When used as a baby monitor, place the baby unit a minimum distance of 2 meter away from your baby and make sure the power adaptor cord is safely tucked away.
- For an optimum connection range, it is preferred to set the baby unit as high as possible and away from large metal surfaces.
3.2 PARENT UNIT:
Power:
The parent unit can be powered directly from the supplied rechargeable battery, or the included power adapter. When you connect the power adapter it will also charge the battery so that the parent unit can be used cordless.
Battery:
- Open the battery compartment by sliding the battery cover on the back off.
- Connect the plug in the battery compartment and insert the battery according to the illustration.
- Slide the battery cover back onto the parent unit.
Connecting the plug and inserting the battery without force.
Only insert the supplied rechargeable Li-ion Polymer battery (3.7V, 1500mAh).
Power adapter:
- Connect the 6V power adapter to the other 6V DC socket located on the side of the parent unit.
- Plug the adapter into a 230V electrical outlet.
Use only the supplied power adapter model number 5E-AD060080-E.
Make sure that the power adapter cord cannot cause any tripping or falling. Tie up any long wires with tape or special purpose wire ties.
Charging:
The battery will begin charging once you have connected the parent unit to the power adapter and then the other end of the adapter into a 230V electrical wall outlet.
- The battery needs to be charged for at least 15 hours before using it the first time, even if the battery indicator shows fully charged.
- The charging circuit of the battery is electronically controlled so there is no danger of overcharging. You can leave the power adapter permanently connected.
- If you are not using the set for long periods of time (> 2 months), it is advisable to take the adapter out from the electrical wall outlet and remove the battery from the parent unit. When you begin using it again, first charge the battery.
4 HOW TO USE
4.1 ON/OFF SWITCH:
Baby unit:
- Slide the ON/OFF switch to ON in order to turn the baby unit on.
- Slide this switch to OFF to turn the baby unit off.
Parent unit:
- Press the button for 2 seconds to turn the parent unit on.
- Press the button again for 2 seconds to turn the parent unit off.
4.2 PARENT UNIT:
Receiving volume:
- Press the + button to increase the receiver volume.
- Press the ▼ button to decrease the receiver volume.
- You have a choice of five levels of volume and volume off.
- The level of volume is shown on the display when adjusting.
The 'volume off' icon will be shown at the top of the display.
Zoom:
- Press the button for 2 seconds to zoom in to the Image (close up). The top of the display will display X2.
- Press the button for an additional 2 seconds for a normal picture.
Picture on/off:
- Press once on the button to turn off the picture.
- Press once on the button to turn the picture off.
4.3 MENU DISPLAY FUNCTIONS & SETTINGS:
Press the button on the parent unit to open the menu. The screen will display the following icons:

Setting the display brightness:
- Press 1x on the button.
- Use the ▲ and ▼ buttons to set the brightness
- Press 1x on the button to save the setting and exit the menu.
Nightlight:
- Press 2x on the button.
- Use the ▲ and ▼ buttons to switch the nightlight on baby unit either (ON) or (OFF).
- Press 1x on the button to save the setting and exit the menu.
VOX Switch image + sound to turn off automatically (when used as a baby monitor, if the baby sleeps):
- Press 3x on the button.
-
Use the + and ▼ keys to set the level of sensitivity:
OFF = the feature is switched off, you will still continue to have picture and sound.
■ = the picture and sound will be switched on when there is a loud noise (= low sensitivity).
■■■■ picture and sound are switched on when there are soft sounds (= high sensitivity). -
Press 1x on the button to save the setting and exit the menu.
When the VOX is switched on, the word VOX will appear at the top of the display.
If the picture and sound have been automatically switched off when the baby is silent, you can press the button to turn the picture and sound temporarily back on again.
-
Press 4x on the button.
-
Press the + and ▼ keys to select the camera.
A '√' behind the camera number will indicate that a camera is logged in.
The 'scan' function allows the parent unit to show every camera for 10 seconds; note, if the camera is switched off or out of range, the out of range picture will be shown and the out of range beep tones will sound.
- Press 1x on the button to save the setting and exit the menu.
See chapter 5 on how to add additional cameras.
4.4 AUTOMATIC NIGHT VISION:
The baby unit has 6 built in infrared LEDs; These LEDs will automatically turn on when the baby unit detects darkness and turn off again when it gets light.
These LEDs can illuminate objects up to a distance of about 2 meters.
Note that when the night vision LEDs are turned on, the image on the parent unit will be displayed in black /white.
Attention: infrared beams cannot be perceived by the human eye; it is not possible to detect that the LEDs have been switched on with the naked eye. However, depending on the type infrared LED there may be a red glow which is visible.
5 EXPANDING MULTIPLE CAMERAS
5.1 GENERAL:
The DVM-50 parent unit can register up to 4 cameras. The parent unit can select the desired camera by scrolling through the menu. Using the menu on the DVM-50 parent unit you can select the desired camera or you can rotate all the connected cameras using the (scan function).
Note: the receiver does NOT automatically switch to the camera where sound is detected.
Expansion Cameras (DVM-51) are available through the Alecto service desk either by phone: 0736411355 (NL), 032385666 (B), 01805030085 (D), or via the website at: www.alecto.info.
5.2 REGISTRATION OF EXTRA CAMERAS:
- Connect the power adapter to the new baby unit, put the other end of the adapter into a 230V electrical outlet and turn on the camera..
- Press the button on the parent unit 4x.
- Use the + and ▼ buttons to select a free 'camera connection'.
A √' behind a camera number will indicate that a camera is already logged on to a specific connection. If you connect a new camera to this number, the connection with the old camera will be lost; preferably chose a camera number without a √ next to it.
- Press the + button for 2 seconds button until the picture ♀appears.
- Press once on the button, the light will flash quickly.
- Within 10 seconds, press once on the PAIRING button located at the back of the new camera. The light indicator on the front of the camera will flash quickly.
- After a few seconds, the parent unit will have found the new camera and the picture will be shown on the display of the parent unit.
6 TIPS AND WARNINGS
6.1 GENERAL:
- Read the user manual carefully and follow all the instructions.
- Do no place or use either the baby unit or the parent unit in a wet or damp area or environment.
- Ensure good ventilation for the heat; never cover the parent unit, the baby unit (s) and /or the power adapter(s) and never place it directly next to a heat source.
- Only use the included power adapter(s), using another type of adapter may damage the electronics.
- Make sure the power cables are not damaged, and ensure the wires will not lead to stumbling or falling over.
- Never take apart the parent unit, the baby unit(s) and/or the power adapter(s); this should only be done by qualified personnel.
6.2 INSTALLATION:
- Only connect or disconnect the power adapter of the baby unit or the parent unit when the power adapter is not connected to an electrical outlet.
- Do not install the DVM-50 during a thunderstorm.
- Do not touch an un-insulated adapter cord unless the adapter is disconnected from the electrical outlet.
6.3 RECEIVE INDICATOR/OUT OF RANGE REPORT:
- The signal strength coming from the baby unit is shown on the top left side of the display on the parent unit:
¶: very good reception
¶: good reception
¶: poor reception
• In every situation, the picture and sound will remain the same quality on the display.
- When the parent unit does not receive any signal from the baby unit (the baby unit is out of range or turned off), the 'Out of Range' connection indicator will show on the display. An alarm tone will also sound every 5 seconds.
- When the out of range problem is solved, the connection indicator will light up continuously again and stop beeping.
6.4 DELAY IN THE PICTURE AND SOUND:
- The baby unit sends an image and sound signal to the parent unit using digital blocks. The parent unit then turns the signal into a recognizable image and an audible sound. A slight delay is possible given the time it takes for the parent unit to correspond the signals into an image and sounds and play it back. The sound and the image on the parent unit will therefore not be exactly in sync with the baby unit.
6.5 POWER SUPPLY:
- Baby unit: The baby unit is powered only from the supplied 6V power adapter. The baby unit does not have a built-in battery for portable use.
- Parent unit:
The parent unit is powered by rechargeable 3.7V Li-ion Polymer batteries; these can supply the parent unit with power for between 8 to 10 hours.
The battery status is displayed on the top right of display:
Battery is full
Battery is 2/3 full
Battery is 1/3 full, charging is required
☐ : Battery is empty and the parent unit will turn off
Battery is charging
- : Battery full/no battery inside
About 15-20 minutes before the battery is empty, the '☐' button will flash on the display. A beep tone will also sound every 60 seconds. Immediately plug in the adapter.
The adapter takes about 5 hours to charge up an empty battery.
6.6 INTERFERENCE FREE:
- This baby monitor is digitally encoded. You will never receive a signal from other equipment and the signal from your baby unit (s) will not be shown on other parent units, for example, your neighbours.
- In the event that the baby unit(s) or the parent unit is in or near the vicinity of electromagnetic fields, the signal (video or audio) may be interfered or hindered. Try a different location for the baby unit(s) or the parent unit, or if possible, remove the source of the problem.
6.7 RANGE:
- The connection range of the baby monitor is up to 250 meters in an open field and 50 meters in a house; the range can differ according to external conditions. Should the units go out of range from each other, the image will first freeze (no movement) for a few seconds, followed by the “out of range” message.
6.8 LISTEN IN/TAP IN:
- Eavesdropping/tapping into the baby monitor's picture is virtually impossible. Not only does one need to be in the range of the baby monitor, one would also need to have very expensive equipment to make it possible.
6.9 MAINTENANCE:
- Only clean the baby monitor only with a damp cloth; never use chemical cleaning agents.
- Disconnect any power adapters before cleaning.
6.10 ENVIRONMENT AND DISPOSAL:
- The packaging of this baby monitor can be recycled as old paper. We recommend however that you keep so that it can be packaged appropriately for transport.
- Old or damaged batteries should be disposed of in an environmentally friendly manner according to your local regulations. Do no throw away used batteries together with your household waste.
- Should the baby monitor need to be replaced, hand it over to your supplier; they will dispose of it in an environmentally friendly manner.

6.11 IN CASE OF NO PICTURE, NO SOUND:
- Are the parent unit and the baby unit turned on? (adapters connected, battery full?)
– Is the parent unit within the range of the baby unit? - Has the baby unit been switched off? (VOX)
- Has the volume on the parent unit been switched to 0 (off)?
- If everything appears in order, take the power adapter out from the electrical wall outlet and remove the rechargeable battery from the parent unit. Wait for a minute then put everything back. Turn the parent unit and the baby unit on again.
- If you still have no picture or no sound, please contact the Alecto service department by phone 073 6411 355 (NL), 03 238 5666 (B), 0180 503 0085 (G) or via the website at: www.alecto.info
7 DECLARATION OF CONFORMITY
The Alecto DVM-50 complies with the essential requirements and provisions as defined in the European Directive 1999/5/EC. The declaration of conformity is available on the website at: www.alecto.info
This product is allowed to be used throughout all EU countries. In France, Italy, Russia and Ukraine only indoor use is allowed.

text_image
www.Alecto.INFO8 SPECIFICATIONS
Range: up to 50m indoors
up to 250 meters outdoors
Power parent unit: 3.7V Li-ion polymer battery (included)
6VDC 800mA power adapter (included)

model: 5E-AD060080-E
Power baby unit: 6VDC 800mA power adapter (included) +
model: 5E-AD060080-E
Frequency: 2.4GHz, digital frequency hopping (FHSS) / 19 Channels
Camera Cmos, 640x480
Display 2.4 "colour LCD display
320*240 pixels
Charging time battery of parent unit: <5 hours *
Battery life of parent unit: 8 \~ 10 hours *
*: Times are approximate and may vary according to usage, settings and the condition of the battery.
9 GUARANTEE
The Alecto DVM-50 has a guarantee of 24 MONTHS after the date of purchase. We guarantee during this period the free repair of defects caused from the material and workmanship. Some things are kept for the assessment of the importer.
WHAT TO DO: If you notice a defect, first consult the manual. If the manual does not give a definite answer, consult the supplier of the baby monitor or the Alecto service department via the website at: www.alecto.info
THE GUARANTEE EXPIRES: For Improper use, faulty connections, leaking and/or incorrect battery, the use of non-original parts or accessories, negligence and damage caused by fire, flood, lightning and natural disasters. If unauthorized modifications and /or repairs are done by third parties. For incorrect transportation without a suitable packaging and if the device is not accompanied by the warranty card and receipt. Cords, plugs and batteries are not covered by the guarantee. Any further liabilities, especially for any consequential damages are excluded.
flowchart
graph TD
    A["Service"] --> B["Help"]
    B --> C["HSC"]
    C --> D["Service@HESDO.DE"]
    D --> E["NL +31 (0) 73 6411 355 FR +32 (0) 3 238 5666 DE +49 (0) 180 503 0085"]
    E --> F["Festnetz 0,14 €/Minute Handy bis zu 0,42/Minute"]
    G["Alecto"] --> H["Hesdo Azielaan 12 5232BA s'-Hertogenbosch The Netherlands"]